

Giocondi
-
Posts
102 -
Joined
-
Last visited
Content Type
Profiles
Forums
Events
Store
Articles
Patch Notes
Posts posted by Giocondi
-
-
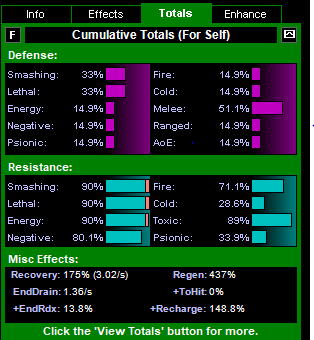
Totals Below:

-
I took a stab at a willpower/stone tank I just got to 50. Hoping someone can overhaul this thing because it feels wildly inefficient with the slotting. I initially wanted cross punch but I just couldn't fit it in with slots. I have no idea if I should be taking hurl boulder and I'm fine losing build up as I just added back after I gave up on having cross punch.
Hero Plan by Mids' Reborn : Hero Designer 2.7.2.10
https://github.com/Crytilis/mids-reborn-hero-designerClick this DataLink to open the build!
Level 50 Magic Tanker
Primary Power Set: Willpower
Secondary Power Set: Stone Melee
Power Pool: Fighting
Power Pool: Speed
Power Pool: Leadership
Power Pool: Leaping
Ancillary Pool: Energy MasteryHero Profile:
Level 1: High Pain Tolerance- (A) Unbreakable Guard - Resistance
- (3) Unbreakable Guard - Resistance/Endurance
- (3) Unbreakable Guard - RechargeTime/Resistance
- (5) Unbreakable Guard - Resistance/Endurance/RechargeTime
- (5) Gladiator's Armor - TP Protection +3% Def (All)
- (7) Steadfast Protection - Resistance/+Def 3%
Level 1: Stone Fist
- (A) Kinetic Combat - Accuracy/Damage
- (48) Kinetic Combat - Damage/Endurance
- (48) Kinetic Combat - Damage/Recharge
- (48) Kinetic Combat - Damage/Endurance/Recharge
- (50) Mako's Bite - Accuracy/Damage
Level 2: Stone Mallet
- (A) Kinetic Combat - Accuracy/Damage
- (37) Kinetic Combat - Damage/Endurance
- (37) Kinetic Combat - Damage/Recharge
- (40) Kinetic Combat - Damage/Endurance/Recharge
- (43) Mako's Bite - Accuracy/Damage
Level 4: Heavy Mallet
- (A) Kinetic Combat - Accuracy/Damage
- (36) Kinetic Combat - Damage/Endurance
- (36) Kinetic Combat - Damage/Recharge
- (37) Kinetic Combat - Damage/Endurance/Recharge
- (45) Mako's Bite - Accuracy/Damage
Level 6: Mind Over Body
- (A) Unbreakable Guard - Resistance
- (7) Unbreakable Guard - Resistance/Endurance
- (9) Unbreakable Guard - RechargeTime/Resistance
- (9) Unbreakable Guard - Resistance/Endurance/RechargeTime
- (11) Impervium Armor - Psionic Resistance
Level 8: Fast Healing
- (A) Doctored Wounds - Heal/Endurance
- (11) Doctored Wounds - Endurance/Recharge
- (13) Doctored Wounds - Heal/Recharge
- (13) Doctored Wounds - Heal/Endurance/Recharge
- (17) Doctored Wounds - Heal
- (21) Doctored Wounds - Recharge
Level 10: Indomitable Will
- (A) Gift of the Ancients - Endurance/Recharge
- (21) Gift of the Ancients - Defense/Endurance
- (23) Gift of the Ancients - Defense/Recharge
- (23) Gift of the Ancients - Defense/Endurance/Recharge
- (25) Gift of the Ancients - Defense
- (25) Gift of the Ancients - Run Speed +7.5%
Level 12: Taunt
- (A) Empty
Level 14: Rise to the Challenge
- (A) Harmonized Healing - Heal/Endurance
- (15) Harmonized Healing - Endurance/Recharge
- (15) Harmonized Healing - Heal/Recharge
- (17) Harmonized Healing - Heal/Endurance/Recharge
- (19) Harmonized Healing - Heal
- (19) Harmonized Healing - Endurance
Level 16: Quick Recovery
- (A) Performance Shifter - EndMod
- (34) Performance Shifter - Chance for +End
Level 18: Heightened Senses
- (A) Reactive Defenses - Defense
- (27) Reactive Defenses - Defense/Endurance
- (27) Reactive Defenses - Defense/RechargeTime
- (29) Reactive Defenses - Defense/Endurance/RechargeTime
- (29) Reactive Defenses - Scaling Resist Damage
- (31) Luck of the Gambler - Defense/Increased Global Recharge Speed
Level 20: Fault
- (A) Rope A Dope - Accuracy/Recharge
- (50) Stagger - Accuracy/Recharge
- (50) Stupefy - Accuracy/Recharge
Level 22: Kick
- (A) Empty
Level 24: Tough
- (A) Unbreakable Guard - Resistance
- (46) Unbreakable Guard - Resistance/Endurance
- (46) Unbreakable Guard - RechargeTime/Resistance
- (46) Unbreakable Guard - Resistance/Endurance/RechargeTime
Level 26: Hasten
- (A) Recharge Reduction IO
Level 28: Tremor
- (A) Superior Gauntleted Fist - Accuracy/Damage
- (34) Superior Gauntleted Fist - Damage/RechargeTime
- (34) Superior Gauntleted Fist - Accuracy/Damage/RechargeTime
- (36) Superior Gauntleted Fist - Damage/Endurance/RechargeTime
- (43) Superior Gauntleted Fist - Accuracy/Damage/Endurance/RechargeTime
Level 30: Weave
- (A) Gift of the Ancients - Defense/Endurance
- (31) Gift of the Ancients - Defense/Recharge
- (31) Gift of the Ancients - Endurance/Recharge
- (33) Gift of the Ancients - Defense/Endurance/Recharge
- (33) Gift of the Ancients - Defense
- (33) Gift of the Ancients - Run Speed +7.5%
Level 32: Build Up
- (A) Recharge Reduction IO
Level 35: Conserve Power
- (A) Recharge Reduction IO
Level 38: Maneuvers
- (A) Gift of the Ancients - Defense/Endurance
- (39) Gift of the Ancients - Defense/Recharge
- (39) Gift of the Ancients - Endurance/Recharge
- (39) Gift of the Ancients - Defense/Endurance/Recharge
- (40) Gift of the Ancients - Defense
- (40) Gift of the Ancients - Run Speed +7.5%
Level 41: Seismic Smash
- (A) Superior Might of the Tanker - Accuracy/Damage
- (42) Superior Might of the Tanker - Accuracy/Damage/Endurance/Recharge
- (42) Superior Might of the Tanker - Accuracy/Damage/Recharge
- (42) Superior Might of the Tanker - Damage/Endurance/Recharge
- (43) Superior Might of the Tanker - Recharge/Chance for +Res(All)
Level 44: Combat Jumping
- (A) Luck of the Gambler - Defense/Increased Global Recharge Speed
- (45) Kismet - Accuracy +6%
- (45) Shield Wall - +Res (Teleportation), +5% Res (All)
Level 47: Super Jump
- (A) Empty
Level 49: Physical Perfection
- (A) Healing IO
Level 1: Brawl
- (A) Empty
Level 1: Gauntlet
Level 1: Prestige Power Dash| Copy & Paste this data into Mids' Reborn : Hero Designer to view the build | |-------------------------------------------------------------------| |MxDz;1423;654;1308;HEX;| |78DA6594CB6F125114C6EF30172814046C29D4BE9077A120A8FBAA6D75515014139| |784B4B774221908345156C6C4D7DA8D4BF72EFC738C8FADEFC4D6B76E0C1EE67C25| |4DE686E13773EEF9EE39E79E3B53BDBDEE7B7EE9EEAAD07C6BED66BFDFB8DE346FA| |A9EB3DA6C195B6234DC7445D9DA58573BCAECABE20DA3DDEE766EA9DEE14455B595| |2AD6F73AA6E27BE1AF753AEDE245A3B5BB67982DAFF554EF2AB51DB06E2BAAB9AD7| |AFD5DA3EB3B7CEE92DFD446D7D82A6E98AAD71A34AACDFE9EEA0DA294408AAEB71E| |FAD346290D9DE2A72E44590AC72FF00F53FE054F335D11122C4891F00A8CA114354| |25C8A5357C16B609D59DE119636E94538D268D024A14942938126074D8A343A343A| |34096812D024A15981E61DD5E5E4BAA41375B950D704EA9A405DDE6572CC48F19E3| |46EEC857B53E3B90AD357052F33835798D335E607D27AA0F5B878BD69C99C71826E| |667402F430D354DF24D727268734C4475ACDAF69D66AFE55F63A760E3CCF0C5E601| |E5F03D7999F481BE04CB4C0638795DDC927CCCF34174296A17DDDF23F71007E63CE| |7F077F3017C3BC6E96B29CE22C1D5303AEBA6CF24928DFE167079DEB302A095B95E| |8648970443D823E14D08702FA50401FE2E43B0BF56C9EFB98A3A873E8FDDC3DC9D5| |DC071F30130F99B9474C49EB2CA0CA05F460113D58446F62E8450CBD88A117198AB| |7841C9690C3534A2F0E5B1CB610C54821460A31D28891468C34626410238318798A| |91C5D9CCBEE0DA975F832FC157CCDC1BE60CC5CBB3C6910FF36EAFFC13D6EEAF6CB| |24F847C8AC8B368EDFE33BF102556895292339F97E3B7967E23AF6539FE060C73B6| |D992CD52B659CED82C676D968ACD5293E36F81D02C8B27387ED3875F465F0AEDE8E| |C81CDB26FB37C3D6AF9CDE7E13F84D7E980| |-------------------------------------------------------------------|
-
Also posted the totals. Note: Particle shielding is on.

-
I am not a great builder but this is what I put together as a rough draft. Please adjust anything you think would improve the build. Also, does anyone know where I can slot might of the tanker ATO to get the most out of the proc? Thanks
Hero Plan by Mids' Reborn : Hero Designer 2.7.2.10
https://github.com/Crytilis/mids-reborn-hero-designerClick this DataLink to open the build!
Level 50 Magic Tanker
Primary Power Set: Radiation Armor
Secondary Power Set: Staff Fighting
Power Pool: Leaping
Power Pool: Fighting
Power Pool: Speed
Power Pool: LeadershipHero Profile:
Level 1: Alpha Barrier -- UnbGrd-ResDam(A), UnbGrd-ResDam/EndRdx(3), UnbGrd-ResDam/EndRdx/Rchg(3), UnbGrd-Rchg/ResDam(5)
Level 1: Mercurial Blow -- TchofDth-Acc/Dmg(A), TchofDth-Dmg/EndRdx(5), TchofDth-Dmg/Rchg(7), TchofDth-Acc/Dmg/EndRdx(7), TchofDth-Dmg/EndRdx/Rchg(13), TchofDth-Dam%(15)
Level 2: Gamma Boost -- PwrTrns-+Heal(A), PrfShf-End%(45)
Level 4: Guarded Spin -- Obl-Dmg(A), Obl-Acc/Rchg(9), Obl-Dmg/Rchg(9), Obl-Acc/Dmg/Rchg(11), Obl-Acc/Dmg/EndRdx/Rchg(11), Obl-%Dam(13)
Level 6: Proton Armor -- UnbGrd-ResDam(A), UnbGrd-ResDam/EndRdx(42), UnbGrd-Max HP%(42), UnbGrd-Rchg/ResDam(42)
Level 8: Radiation Therapy -- ThfofEss-+End%(A), ThfofEss-Heal/Rchg(15), Mrc-Heal/Rchg(21), DctWnd-Heal/Rchg(23)
Level 10: Fallout Shelter -- UnbGrd-ResDam(A), UnbGrd-ResDam/EndRdx(43), UnbGrd-Rchg/ResDam(43), UnbGrd-ResDam/EndRdx/Rchg(43)
Level 12: Taunt -- PrfZng-Taunt(A), PrfZng-Taunt/Rchg/Rng(48), PrfZng-Taunt/Rng(50), PrfZng-Dam%(50)
Level 14: Beta Decay -- AchHee-ResDeb%(A)
Level 16: Eye of the Storm -- Obl-Dmg(A), Obl-Acc/Rchg(17), Obl-Dmg/Rchg(17), Obl-Acc/Dmg/Rchg(19), Obl-Acc/Dmg/EndRdx/Rchg(19), Obl-%Dam(21)
Level 18: Particle Shielding -- Prv-Heal(A), Prv-Heal/EndRdx(23), Prv-EndRdx/Rchg(25), Prv-Heal/Rchg(25), Prv-Heal/Rchg/EndRdx(37), Prv-Absorb%(40)
Level 20: Staff Mastery
Level 22: Super Jump -- Jump-I(A)
Level 24: Kick -- FrcFdb-Rechg%(A)
Level 26: Ground Zero -- TchofLadG-%Dam(A), AchHee-ResDeb%(27), Erd-%Dam(27), PrfZng-Dam%(31), ScrDrv-Acc/Dmg(33)
Level 28: Serpent's Reach -- SprGntFis-Acc/Dmg(A), SprGntFis-Dmg/Rchg(29), SprGntFis-Acc/Dmg/Rchg(29), SprGntFis-Dmg/EndRdx/Rchg(31), SprGntFis-Acc/Dmg/EndRdx/Rchg(31)
Level 30: Tough -- UnbGrd-ResDam(A), UnbGrd-ResDam/EndRdx(33), UnbGrd-Rchg/ResDam(33), UnbGrd-ResDam/EndRdx/Rchg(34)
Level 32: Weave -- Rct-Def(A), Rct-Def/EndRdx(34), Rct-Def/Rchg(34), Rct-Def/EndRdx/Rchg(45)
Level 35: Innocuous Strikes -- Obl-Dmg(A), Obl-Acc/Rchg(36), Obl-Dmg/Rchg(36), Obl-Acc/Dmg/Rchg(36), Obl-Acc/Dmg/EndRdx/Rchg(37), Obl-%Dam(37)
Level 38: Sky Splitter -- TchofDth-Acc/Dmg(A), TchofDth-Dmg/EndRdx(39), TchofDth-Dmg/Rchg(39), TchofDth-Acc/Dmg/EndRdx(39), TchofDth-Dmg/EndRdx/Rchg(40), TchofDth-Dam%(40)
Level 41: Hasten -- RechRdx-I(A), RechRdx-I(46)
Level 44: Maneuvers -- Rct-Def(A), Rct-Def/EndRdx(45), Rct-Def/EndRdx/Rchg(46), Rct-Def/Rchg(46)
Level 47: Combat Jumping -- LucoftheG-Def/Rchg+(A), ShlWal-ResDam/Re TP(48), Rct-ResDam%(48)
Level 49: Meltdown -- RechRdx-I(A)
Level 1: Brawl -- Empty(A)
Level 1: Gauntlet
Level 1: Prestige Power Dash -- Empty(A)
Level 1: Prestige Power Slide -- Empty(A)
Level 1: Prestige Power Quick -- Empty(A)
Level 1: Prestige Power Rush -- Empty(A)
Level 1: Prestige Power Surge -- Empty(A)
Level 1: Sprint -- Empty(A)
Level 2: Rest -- Empty(A)
Level 4: Ninja Run
Level 2: Swift -- Empty(A)
Level 2: Health -- Pnc-Heal/+End(A)
Level 2: Hurdle -- Empty(A)
Level 2: Stamina -- PrfShf-End%(A)
Level 1: Combo Level 1
Level 1: Combo Level 2
Level 1: Combo Level 3
Level 20: Form of the Body
Level 20: Form of the Mind
Level 20: Form of the Soul
------------ -
So I stuck with the Staff primary despite that long taunt animation and I'm struggling reallllly hard on a build for this guy. It looks like Both Rad and Staff can justify picking every darn power. In my opinion, you can either leave out precise strike or serpent's reach but need everything else. Regarding Rad armor, I think everything has value except maybe meltdown if you are already tough enough.
Anyone up for some charity work to showcase a sturdy Rad Armor/Staff build? I think foregoing an epic power pool is the play here so I can still get tough/weave, hasten, combat jumping, and maneuvers.
-
Yes I am (crazy), thank you for coming.
While I've got you here, is the animation time on Staff tanker longer than other sets? I feel like when I taunt with my staff out 😉 that my character swings it behind his back before he starts the normal taunt animation. It is driving me insane!!! I'm trying to get a Rad Armor tank to 50 but I don't think staff is going to make it.
Anyone have and great pairings for Rad armor? I was thinking Dark/Ice/energy/kinetic as I have not run these on a tank AND they sound fun!
-
23 hours ago, Glacier Peak said:
This is a great story! Do you remember what GPU it was? I had a similar experience, albeit with increased memory capacity instead of graphical fidelity lol
I wish I did. I can't even tell you the cost (thanks dad!). My very dark and fuzzy memory wants to say it was some $60-$75 Nvidia card in 2004-2005.
-
I'd have to go with a memory back when the game was live. I was a young man at the time and this was my second MMO ever behind Everquest. My dad took me to best buy to get my first ever dedicated graphics card. I knew nothing about upgrading parts and my dad opened up my rig at the kitchen table and hooked up this probably very mediocre GPU. I remember firing up my PC and logging into my COH account. Behold, before my very own eyes, my character select screen had transformed to a gallery of truly super heroes in the most exquisite, shiny detail. I remember loading into to Talos Island and just running around spamming my abilities with such giddy fascination. This game, even today, just has a special magic about it.
-
 2
2
-
-
Excellent information, thanks!
-
1
-
-
It's rare that I find them, but I absolutely love throwing funds to newbies while I'm leveling. I tend to use an alt account to get my guys to lvl 22-27 so I can slot with basic IO's then level them to 50 through TF's. When I see people ask questions about something that reveals they are new or low on funds like, "I just outleveled my enhancements gotta buy more" I start bombarding them with questions/information/infamy lol. I'll admit this doesn't happen very often as most teams will be quiet or just folks having a good time joking about stuff. It's much more satisfying to deduce that someone is truly new instead of just shouting in broadcast if there are any new players around. Other things to look for are people constantly knocking back mobs and ask if they know about KB to KD enhancements and then trade a couple to them if they are unaware. You can also just check to see if people have set bonuses from their info page but that isn't quite as satisfying as there are people like myself that don't slot sets until 50. You can host a costume contest for the financially challenged or ask how many 50's everyone on your team has or if they have any farming toons.
Anything you do is great though and it's nice of you to share the wealth!
-
I was not able to make it, does anyone have a photo album from the event? I would love to see some of the costumes that showed up!
-
 1
1
-
-
I think you have an excellent build theme and need to see it through. You already have everything you need to be a great energy blaster in this thread.
I just wanted to say, for me, energy blasting is the ranged version of the martial arts melee set. What I mean by that is the sound effects and visuals of energy blast are unparalleled for pure satisfaction. These are the only toons I will have to log on to just get 10-15 minutes of gameplay satisfaction if I've been away from them too long. Hope you made this toon and are enjoying every second of it!
-
 2
2
-
-
@Darkir Another great build, thanks for sharing. I just recently rolled a water/kin corrupter and I spend the vast majority of my time in the PVE group setting. Are there any big changes you would make to the build for this purpose?
-
I feel like when you are brand new, you're better off just playing and browsing the forums until you get a baseline familiarity with the game. Some of these guys and gals on here have a remarkable understanding of game mechanics but you wont necessarily benefit form that without a little precursory knowledge.
I will say that the goal of anyone trying to stay alive is to look at 2 pools of stats, defense and resistance. There are goals you want to hit regarding these stats. Defense you either go type or positional, e.g. Smashing/Lethal damage are types and melee is positional. Your goal is to get these to 45% as there are super diminishing returns after this except some incarnate content but ignore that for now. Resists on a tanker can go up to 90%, so that is what you aim for. Rad/Dark is an extremely survivable combination resist based set with some nifty toys weaved in. You get a bunch of free build do overs in this game (respecs) so don't sweat messing up too much. If you are familiar with set bonuses I would download the mids hero planner form this website and try and reach as many of the defense and resist numbers mentioned above.
Find mids subforum here:
-
1
-
-
For those of you taking eagles claw, is that for slotting purposes or are you using it regularly? I find if a mob runs up to me I storm kick/ki push then blast them as they fly away (feelsgoodman). If you folks ARE using it regularly, when are you using it?
-
Can't remember the name of it but one of the new endurance sets with the chance for heal proc also has an overall recharge set bonus so I'm 6 slotting it for that. If you are wanting to forgo set bonuses I think a mix of health/shield/endurance procs like sakai would be really cool and effective!
-
Check this thread there was a Dark/Elec build posted. I also have a Dark/Elec tank and can check how it holds up when I get home.
-
Great guide as always. I never ran BAF on live but have run it maybe 10 times on HC. However, I was 100% just following the masses and never really understood the mechanics. Much appreciated!
-
Alas, I am mainless. Or maybe my mains are plentiful, while also fleeting. It's impossible for me to play a single character over and over again. I usually will make a character that sounds great and start eagerly playing them. I'll either love the combo and play it to 50, or shelf it somewhere along the way. Even if I love the character immensely, get it to 50, unlock incarnates and get all the enhancements slotted, I still eventually feel the urge to start anew. For what it's worth I don't really have favorites for anything in my life (color, tv show, food). I tend to have cravings, and in that moment only one thing will be truly fulfilling. I guess that's kind of how I view my COH characters as well.
-
@SoveraThank you so much!!!! That was a very informative read and its clear you have a really great understanding of how to build characters! Mu mastery looks great for the ball lightning AOE. Much appreciated and I will get this build up and running shortly.
-
1
-
-
Doing a quick bump. Is there any information someone would find helpful beside what I have provided? I needz halp!
Also if I can work more AOE from epic pool that would be great.
-
Put together a MA/RAD build based on some other forum posts. Any folks out there have ideas on how to improve it? Goal is to be an efficient, yet sturdy killing machine! I don't love Body Mastery as epic pool but I'm not sure what else to use.
Hero Plan by Mids' Reborn : Hero Designer 2.6.0.7
https://github.com/ImaginaryDevelopment/imaginary-hero-designerClick this DataLink to open the build!
Kamae: Level 50 Mutation Scrapper
Primary Power Set: Martial Arts
Secondary Power Set: Radiation Armor
Power Pool: Speed
Power Pool: Leaping
Power Pool: Fighting
Ancillary Pool: Body MasteryHero Profile:
Level 1: Storm Kick -- SprBlsCol-Acc/Dmg(A), SprBlsCol-Dmg/EndRdx(3), SprBlsCol-Acc/Dmg/EndRdx(3), SprBlsCol-Acc/Dmg/Rchg(5), SprBlsCol-Dmg/EndRdx/Acc/Rchg(5), SprBlsCol-Rchg/HoldProc(7)
Level 1: Alpha Barrier -- UnbGrd-ResDam(A), UnbGrd-ResDam/EndRdx(19), UnbGrd-ResDam/EndRdx/Rchg(19), UnbGrd-Rchg/ResDam(25), GldArm-3defTpProc(37)
Level 2: Cobra Strike -- Mk'Bit-Acc/Dmg(A), Mk'Bit-Dmg/EndRdx(7), Mk'Bit-Dmg/Rchg(9), Mk'Bit-Acc/EndRdx/Rchg(9), Mk'Bit-Acc/Dmg/EndRdx/Rchg(11), Mk'Bit-Dam%(11)
Level 4: Hasten -- RechRdx-I(A), RechRdx-I(42)
Level 6: Proton Armor -- UnbGrd-ResDam(A), UnbGrd-ResDam/EndRdx(34), UnbGrd-Rchg/ResDam(36), UnbGrd-ResDam/EndRdx/Rchg(36), UnbGrd-Max HP%(37)
Level 8: Gamma Boost -- PrfShf-End%(A)
Level 10: Super Jump -- Jump-I(A)
Level 12: Focus Chi -- GssSynFr--Build%(A), RechRdx-I(13)
Level 14: Crane Kick -- TchofDth-Acc/Dmg(A), TchofDth-Dmg/EndRdx(15), TchofDth-Dmg/Rchg(15), TchofDth-Acc/Dmg/EndRdx(17), TchofDth-Dmg/EndRdx/Rchg(17), TchofDth-Dam%(43)
Level 16: Fallout Shelter -- StdPrt-ResDam/Def+(A), UnbGrd-ResDam(31), UnbGrd-ResDam/EndRdx(31), UnbGrd-Rchg/ResDam(36), UnbGrd-ResDam/EndRdx/Rchg(37)
Level 18: Radiation Therapy -- TchoftheN-Acc/EndRdx/Heal/HP/Regen(A), TchoftheN-Acc/Heal(39), TchoftheN-Heal/HP/Regen/Rchg(40)
Level 20: Crippling Axe Kick -- Hct-Dmg(A), Hct-Dmg/Rchg(21), Hct-Acc/Dmg/Rchg(21), Hct-Acc/Rchg(23), Hct-Dmg/EndRdx(23), Hct-Dam%(25)
Level 22: Combat Jumping -- LucoftheG-Def/EndRdx(A), LucoftheG-Def(39), LucoftheG-Def/Rchg+(39), ShlWal-ResDam/Re TP(40)
Level 24: Beta Decay -- AchHee-ResDeb%(A), AchHee-DefDeb(48)
Level 26: Dragon's Tail -- SprScrStr-Acc/Dmg(A), SprScrStr-Dmg/Rchg(27), SprScrStr-Acc/Dmg/Rchg(27), SprScrStr-Dmg/EndRdx/Rchg(29), SprScrStr-Acc/Dmg/EndRdx/Rchg(29), SprScrStr-Rchg/+Crit(31)
Level 28: Particle Shielding -- Prv-Heal(A), Prv-Heal/EndRdx(42), Prv-Absorb%(43), Prv-Heal/Rchg(45), Prv-Heal/Rchg/EndRdx(46), Prv-EndRdx/Rchg(46)
Level 30: Kick -- FrcFdb-Rechg%(A)
Level 32: Eagles Claw -- SprCrtStr-Acc/Dmg(A), SprCrtStr-Dmg/Rchg(33), SprCrtStr-Acc/Dmg/Rchg(33), SprCrtStr-Dmg/EndRdx/Rchg(33), SprCrtStr-Acc/Dmg/EndRdx/Rchg(34), SprCrtStr-Rchg/+50% Crit(34)
Level 35: Conserve Power -- RechRdx-I(A)
Level 38: Meltdown -- RechRdx-I(A)
Level 41: Tough -- UnbGrd-ResDam(A), UnbGrd-ResDam/EndRdx(42), UnbGrd-Rchg/ResDam(43), UnbGrd-ResDam/EndRdx/Rchg(45)
Level 44: Ground Zero -- SprAvl-Acc/Dmg(A), SprAvl-Acc/Dmg/Rchg(45), SprAvl-Acc/Dmg/EndRdx/Rchg(46), SprAvl-Rchg/KDProc(50)
Level 47: Weave -- LucoftheG-Def(A), LucoftheG-Def/EndRdx(48), LucoftheG-Def/Rchg+(48), LucoftheG-Def/Rchg(50)
Level 49: Physical Perfection -- Mrc-Rcvry+(A), PrfShf-End%(50)
Level 1: Brawl -- Empty(A)
Level 1: Critical Hit
Level 1: Prestige Power Dash -- Empty(A)
Level 1: Prestige Power Slide -- Empty(A)
Level 1: Prestige Power Quick -- Empty(A)
Level 1: Prestige Power Rush -- Empty(A)
Level 1: Prestige Power Surge -- Empty(A)
Level 1: Sprint -- Empty(A)
Level 2: Rest -- Empty(A)
Level 4: Ninja Run
Level 2: Swift -- Empty(A)
Level 2: Health -- Pnc-Heal/+End(A), NmnCnv-Regen/Rcvry+(13)
Level 2: Hurdle -- Jump-I(A)
Level 2: Stamina -- PrfShf-End%(A), PrfShf-EndMod(40)
Level 50: Cardiac Core Paragon
------------| Copy & Paste this data into Mids' Reborn : Hero Designer to view the build | |-------------------------------------------------------------------| |MxDz;1464;693;1386;HEX;| |78DA6594CB4F135114C6EFED4C2D8FF2A8500AF22EA54F2854DD131535119A109BB| |8F055C7F652460B6DA63591A50BF78A0F3462D48DC68DFF8271EBF3DFF085BA90A8| |AB7AB8DFA1123B69F39BF9CE9C73BE3B67EEA4AFCE7A5F1CBF362364FB91A255A96| |43339C72A9795D394BE52B5AA766945D0E19EB3962DE5A1B3FE9D7836AD8A4A25D3| |9653B5AD62F69053AD8CD463B36A51AD5454F2A495B775118A2F971CD1B2502A159| |399B25279AF3E9D5756D95E29B4E98B637661A94A571D3BA1BC722A4B76D977B46C| |E792874BF9D56CDAAA5495B3DA4B4EC2F4BFBB6D491F35B7B8610A913285EB26730| |D346F316F837BEE80C108A5499D6B8A9F86D6F66E1123C4DFB8EEFD0586F683EB1E| |4EA17E7251A05E016C5A62DA60CB25E6653048B906FA4923012DC60C9117377B71B| |397D12D708C3D8CB1A7D01FF0594C080F728467DDA5B500F568863FD11C45ED7BA4| |B54293ADCF719F97FBDEA7581BAFA7EDB4D06B6F3FC33C0B769E639E07E359709C3| |C77B0E78E009D0C9A6288BD0FFDE73DC4DEC394E3D34FB0E6F2F5183A27EC472CD2| |0D3E204F5DECA92B0CBFDD116614EC8931E3606F82AF29D70F4F86BF53A26737D30| |F46E6B81F790948ED45065E517E9729A65E821B54A78F3DF4BDC6FDFBDE30DF8203| |EF98EF79CD1FC028D5EDE7DCFE8FD0629FC0F82638F1059CFCCAFC0CBAA8EF20CF6| |FF03AD6F490B461AE377C01EFEE88C5BCC8CC81A379A602335436C8F5823CF338F9| |1B676D7C5BA3F51AD423CACF2DCA338CF10CE33CC3099E618CF213C837121BE833F| |1089C7C0CA69EF09EA3BA49AE9BE4394CF15CA6781E291FF8945EC469DE1FD327A4| |7EC752FC5E0F98F57D4E3F3AC4B059DFBDB5784374BA41493528071A94830DCA7C8| |3B260D6BF00426AA5B993F63594DA660B45E5EEE8F77F8A94A3F8BA784F61C5DF76| |DFCDBBF5C7EEFB79F591357086B6458AD7FC17FAECEC3F| |-------------------------------------------------------------------|
-
I hate the cast time on both fire breath and combustion. Great while leveling but I think once you get all the other AOE's I respec out of them.
-
15 hours ago, tafilr said:
I stole the idea, let's say from a recent TV ad, that the top 2% should pay for ATOs. You know, the Billionaires (Boston accent).
I never "played the market" in any previous MMO's I had played over the years. I finally decided to give it a shot with homecoming and it has added a layer of enjoyment to the game for me. I started out fire farming because I thought it was the best way and I was just intimidated by learning the ropes of the market. I started reading several guides and would either not fully comprehend the information in each guide or think it was just too much work and time for me.
It turns out that the most talked about market driven approach to influence is enhancement converting. Once I actually understood how this all worked and figured out how to efficiently go about this, the amount of actual gameplay time it takes to make money is much less than farming. Ironically enough it also yields a lot more money for these efforts than fire farming.
I wholeheartedly encourage you to start poking around the guides on these forums and just trying out he techniques you read about!
-
2
-

Infinitum Build Collection
in Tanker
Posted
Some impressive building prowess going on here. That is one good looking Shield/Fire tanker, might be copycatting that one on mine 🙂