
Muppy
-
Posts
63 -
Joined
-
Last visited
-
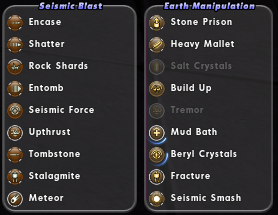
Hello! I've got this blaster up to 46 and haven't really gotten a build off the ground yet cause... well, this is honestly the first blaster I've played past lvl 20 in all the years I've played CoX. Before I try playing with numbers though, I want to know what I should take and what to skip, as well as what kind of numbers I should be trying to hit on a blaster. (Do I want to softcap defenses, etc) Here's a screenie of what I got so far since it'd be easier to look at than a bunch of text: In addition to this, I have Fly (thinking of just going full on Jumping), Combat Jumping, Tough, Weave, and Scorpion Shield. Now, I think I can probably skip Fracture but that's all I can think of really. Would Haste really help, or could I go without it? Stuff and things, stuff and things. Lemme know what you guys think and then I'll cobble something together in mids to the best of my ability, then post it on here for more help. Thank you.

-
Not nearly as much. Most of the time it's my fault since I end up leveling stuff, and I don't do much in Pocket D. Though it can be nice if I'm in a more chill mood, I enjoy field RP more so than RPing in Pocket D.
-
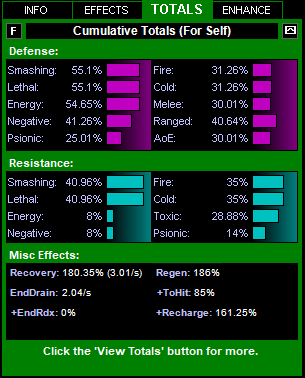
Alrighty. Took a look and messed around with the build a bit more. Let me know if there's anything wrong with it! I'm pretty sure something is wrong. 😛 EDIT: Totals didn't paste in... Here are the totals if you need to look at them. This is with every defense/resist power enabled, etc: This Villain build was built using Mids Reborn 3.0.5.9 https://github.com/Reborn-Team/MidsReborn Click this DataLink to open the build! Chaos Creep Jones: Level 50 Technology Dominator Primary Power Set: Gravity Control Secondary Power Set: Radioactive Assault Power Pool: Flight Power Pool: Speed Power Pool: Concealment Power Pool: Fighting Ancillary Pool: Mace Mastery Villain Profile: Level 1: Lift (A) Thunderstrike - Accuracy/Damage (31) Thunderstrike - Damage/Endurance (40) Thunderstrike - Damage/Recharge (43) Thunderstrike - Accuracy/Damage/Recharge (43) Thunderstrike - Accuracy/Damage/Endurance (43) Thunderstrike - Damage/Endurance/Recharge Level 1: Neutrino Bolt (A) Decimation - Chance of Build Up Level 2: Gravity Distortion (A) Superior Ascendency of the Dominator - Accuracy/Control Duration (3) Superior Ascendency of the Dominator - Control Duration/Recharge (3) Superior Ascendency of the Dominator - Endurance/Recharge (5) Superior Ascendency of the Dominator - Accuracy/Control Duration/Endurance (5) Superior Ascendency of the Dominator - Accuracy/Control Duration/Endurance/Recharge (7) Superior Ascendency of the Dominator - Recharge/Chance for +Damage Level 4: X-Ray Beam (A) Thunderstrike - Accuracy/Damage (19) Thunderstrike - Damage/Endurance (23) Thunderstrike - Damage/Recharge (25) Thunderstrike - Accuracy/Damage/Recharge (25) Thunderstrike - Accuracy/Damage/Endurance (50) Thunderstrike - Damage/Endurance/Recharge Level 6: Propel (A) Apocalypse - Damage (7) Apocalypse - Damage/Recharge (9) Apocalypse - Accuracy/Damage/Recharge (9) Apocalypse - Accuracy/Recharge (11) Apocalypse - Damage/Endurance Level 8: Crushing Field (A) Superior Dominating Grasp - Accuracy/Control Duration (11) Superior Dominating Grasp - Control Duration/RechargeTime (13) Superior Dominating Grasp - Endurance/RechargeTime (13) Superior Dominating Grasp - Accuracy/Control Duration/Endurance (15) Superior Dominating Grasp - Accuracy/Control Duration/Endurance/RechargeTime (15) Superior Dominating Grasp - RechargeTime/Fiery Orb Level 10: Hover (A) Luck of the Gambler - Defense/Increased Global Recharge Speed (17) Shield Wall - +Res (Teleportation), +5% Res (All) (17) Reactive Defenses - Scaling Resist Damage Level 12: Dimension Shift (A) Debilitative Action - Disorient Bonus Level 14: Fly (A) Freebird - +Stealth Level 16: Fusion (A) Gaussian's Synchronized Fire-Control - Chance for Build Up Level 18: Hasten (A) Recharge Reduction IO (19) Recharge Reduction IO Level 20: Radiation Siphon (A) Superior Blistering Cold - Accuracy/Damage (21) Superior Blistering Cold - Damage/Endurance (21) Superior Blistering Cold - Accuracy/Damage/Endurance (23) Superior Blistering Cold - Accuracy/Damage/Recharge (48) Superior Blistering Cold - Damage/Endurance/Accuracy/RechargeTime (50) Superior Blistering Cold - Recharge/Chance for Hold Level 22: Stealth (A) Luck of the Gambler - Defense/Increased Global Recharge Speed Level 24: Grant Invisibility (A) Luck of the Gambler - Defense/Increased Global Recharge Speed Level 26: Wormhole (A) Absolute Amazement - Stun (27) Absolute Amazement - Stun/Recharge (27) Absolute Amazement - Accuracy/Stun/Recharge (29) Absolute Amazement - Accuracy/Recharge (29) Absolute Amazement - Endurance/Stun Level 28: Atom Smasher (A) Armageddon - Damage (31) Armageddon - Damage/Recharge (31) Armageddon - Accuracy/Damage/Recharge (34) Armageddon - Accuracy/Recharge (37) Armageddon - Damage/Endurance Level 30: Boxing (A) Kinetic Combat - Accuracy/Damage (46) Kinetic Combat - Damage/Endurance (48) Kinetic Combat - Damage/Recharge (48) Kinetic Combat - Damage/Endurance/Recharge Level 32: Singularity (A) Call to Arms - Accuracy/Recharge (33) Call to Arms - Accuracy/Damage (33) Call to Arms - Damage/Endurance (33) Call to Arms - Accuracy/Damage/Recharge (34) Call to Arms - Endurance/Damage/Recharge (34) Call to Arms - Defense Bonus Aura for Pets Level 35: Tough (A) Gladiator's Armor - TP Protection +3% Def (All) (36) Steadfast Protection - Resistance/+Def 3% (36) Reactive Armor - Resistance (36) Reactive Armor - Resistance/Endurance (37) Reactive Armor - Resistance/Endurance/Recharge (37) Reactive Armor - Resistance/Recharge Level 38: Devastating Blow (A) Hecatomb - Damage (39) Hecatomb - Damage/Recharge (39) Hecatomb - Accuracy/Damage/Recharge (39) Hecatomb - Accuracy/Recharge (40) Hecatomb - Damage/Endurance (40) Hecatomb - Chance of Damage(Negative) Level 41: Weave (A) Luck of the Gambler - Defense/Increased Global Recharge Speed (42) Luck of the Gambler - Defense (42) Luck of the Gambler - Defense/Endurance (42) Luck of the Gambler - Defense/Endurance/Recharge Level 44: Scorpion Shield (A) Red Fortune - Defense (45) Red Fortune - Defense/Endurance (45) Red Fortune - Defense/Recharge (45) Red Fortune - Defense/Endurance/Recharge (46) Red Fortune - Endurance Level 47: Poisonous Ray (A) Achilles' Heel - Chance for Res Debuff Level 49: Disruptor Blast (A) Sudden Acceleration - Knockback to Knockdown Level 1: Brawl (A) Empty Level 1: Domination Level 1: Sprint (A) Empty Level 2: Rest (A) Empty Level 1: Swift (A) Empty Level 1: Health (A) Panacea - +Hit Points/Endurance (50) Numina's Convalesence - +Regeneration/+Recovery Level 1: Hurdle (A) Empty Level 1: Stamina (A) Performance Shifter - Chance for +End (46) Performance Shifter - EndMod Level 14: Afterburner Level 50: Musculature Radial Paragon Level 50: Ion Radial Final Judgement Level 50: Assault Core Embodiment Level 50: Warworks Core Superior Ally ------------ ------------ Set Bonus Totals: | Copy & Paste this data into Mids Reborn : Hero Designer to view the build | |-------------------------------------------------------------------| |MxDz;1465;696;1392;HEX;| |78DA6D93CB6F125114C6EF3083B5504A91BEDFD052682903D48D8F6A6DA836F6A1D| |81AB7CD4827ED24C834CCD8C8D295BA52ABC68DEF956E5CFB5CF887F8A88D8F8D8F| |C4B5C1C37C87D2A44E80DFE59BF3DDFBCDB977E62F4D353C9FBE3C21247F26AF59D| |6D29479C12868B659F49CD573AB05336FAE9464214420B3AA99567FA6A8EB6BFD33| |6641B7EA480D6D972F65CC825D34F3EA74515B37EC52F57FA456316959DAC5BCAD2| |E68CB86A9E56C635DAF6AC29B35C97B226FACACDA1E67BCB8A6EBCB016778B2B06E| |58C679234FF3FA5058A9330A2B5DC7D78C9C5A5B625ECBE9F463D97AB1D44EF962F| |41DADC477AEB25BDC27A415D1FB008C3E04471E311F339F809B950924C72BC43D42| |5411099A4F82E6965EC84E9DEB25F315A8BC66BE01F7BC05B7683E99B3C89C651F6| |769E52CED9CA59DB3A4398B4A4637BC8A7BD4857913E05E9599043D2930499E3ACE| |5A37AEE0DE11B0E12873026C3CC69C04EB6983EBE175D5B7488ED6348BE768FA03A| |6085EEE8FF73A0D7A14E1259F8F35DF5FF8BED073FB59F33F43B630D505A0498138| |F782F995EA839C3B7803799A6F3237C0D65B60F23698BE03FA68DE16F449B470EE4| |6D2DA586B636D8CB277703F3B6690A97396390776CF334F81DF2857177BBA0E40EB| |3DC83C04860E8383E3A0446BF7C023F76409613A4367C0E4027311DC4F99FAF87CF| |4BD7739FDECFFC0FCC8FC048636999F4199D60973CFC263D89F8136ECC940E5069D| |DD815E7030C4EC03BFD37345D81B1942EEA12833C61C06A323CC38A8D0BA3178E51| |8F776B899D9C40C825729561CB54ABC11DAA887E965FAC0841FBC421E95CF8EFA8E| |D60C2AE21A6929DECFD416F6BD5BD97ECFE94357A5A155A53CB7EB6E56E1579B14C| |9517E7876BCED8EF2ABA64822849EA6CF21D7CF5DD5BF7756DF4577121B60F93F97| |68A537A59A2F4865F0963B9B6BE3A7E1DAF8F40EFD1F86B7F5B4| |-------------------------------------------------------------------|
-
Tried to update an older post about this build, but it didn't take. Hopefully a new post will help. I was suggested to drop the fighting pool and to fit in powers like Propel, Singularity, Dimension Shift, etc. I'm still scratching my head over this build though. I feel like it could use more but I'm not entirely sure. I'm bad at this and need some help! My only real hope is that I can keep fly in there. If hover can be swapped out, that is fine. Not sure if I hit perma dom/hasten. EDIT: Oof had some tech difficulties for a moment. Tried to edit this as much as possible without it looking like a mess. Anyway, would like to know if there are any suggestions on incarnates as well. Level 50: Agility Core Paragon Level 14: Afterburner
-
Every time I open Mids with a "new" (aka an existing build from the last version), it will lag. If I open a build that was previously viewed in Mids, it'll open fine... but then the lag problems return if I open a build using Windows Search, even if I have opened it previously. Is this a common thing or is there something else going on?
-
Interesting changes. Seems odd to drop Distortion Field, but I'll touch up the build in a few and show the results in an edit of this post.
-
Hello. Here's yet another "rajjy doesn't know what she's doing" build! I just got this sucker through a Synapse TF and it gave him a huge boost in levels (almost 22 now) so I wanna start giving him a bit of a build going. As said, I have no idea what I am doing and people will likely call blasphemy for not taking Singularity. I dunno how or where to fit it in. Maybe if I skip Proton Volley? Anyway, any adjustments would be welcome. The only thing is that I'd like to keep my travel powers. I wanted to go with hover/fly cause rocket boots and RP reasons, but I'm sure others would object and CJ is too good. EDIT: Any tips on incarnates would be great too! Villain Plan by Mids' Reborn : Hero Designer 2.7.2.10 https://github.com/Crytilis/mids-reborn-hero-designer Click this DataLink to open the build! Chaos Creep Jones: Level 50 Technology Dominator Primary Power Set: Gravity Control Secondary Power Set: Radioactive Assault Power Pool: Leaping Power Pool: Speed Power Pool: Fighting Power Pool: Leadership Ancillary Pool: Mace Mastery Villain Profile: Level 1: Lift (A) Apocalypse - Chance of Damage(Negative) (11) Apocalypse - Damage (13) Apocalypse - Accuracy/Damage/Recharge (15) Apocalypse - Accuracy/Recharge (15) Apocalypse - Damage/Endurance Level 1: Neutrino Bolt (A) Decimation - Chance of Build Up (3) Decimation - Accuracy/Damage (3) Decimation - Damage/Recharge (5) Decimation - Accuracy/Endurance/Recharge (5) Decimation - Accuracy/Damage/Recharge Level 2: Gravity Distortion (A) Superior Ascendency of the Dominator - Recharge/Chance for +Damage (7) Superior Ascendency of the Dominator - Accuracy/Control Duration (7) Superior Ascendency of the Dominator - Control Duration/Recharge (9) Superior Ascendency of the Dominator - Endurance/Recharge (9) Superior Ascendency of the Dominator - Accuracy/Control Duration/Endurance (11) Superior Ascendency of the Dominator - Accuracy/Control Duration/Endurance/Recharge Level 4: Contaminated Strike (A) Touch of Death - Chance of Damage(Negative) (33) Touch of Death - Accuracy/Damage (34) Touch of Death - Damage/Endurance (34) Touch of Death - Damage/Recharge (34) Touch of Death - Accuracy/Damage/Endurance (37) Touch of Death - Damage/Endurance/Recharge Level 6: X-Ray Beam (A) Decimation - Accuracy/Damage (40) Decimation - Damage/Endurance (42) Decimation - Damage/Recharge (42) Decimation - Accuracy/Endurance/Recharge (42) Decimation - Accuracy/Damage/Recharge Level 8: Crushing Field (A) Positron's Blast - Accuracy/Damage (17) Positron's Blast - Damage/Endurance (17) Positron's Blast - Damage/Recharge (19) Positron's Blast - Damage/Range (19) Positron's Blast - Accuracy/Damage/Endurance Level 10: Combat Jumping (A) Luck of the Gambler - Defense/Increased Global Recharge Speed Level 12: Hasten (A) Recharge Reduction IO (13) Recharge Reduction IO Level 14: Super Jump (A) Blessing of the Zephyr - Knockback Reduction (4 points) Level 16: Fusion (A) Adjusted Targeting - To Hit Buff (43) Adjusted Targeting - To Hit Buff/Recharge (43) Adjusted Targeting - To Hit Buff/Endurance/Recharge (43) Adjusted Targeting - Endurance/Recharge (45) Adjusted Targeting - To Hit Buff/Endurance (45) Adjusted Targeting - Recharge Level 18: Gravity Distortion Field (A) Unbreakable Constraint - Chance for Smashing Damage (21) Unbreakable Constraint - Hold/Recharge (23) Unbreakable Constraint - Accuracy/Hold/Recharge (23) Unbreakable Constraint - Accuracy/Recharge (25) Unbreakable Constraint - Hold Level 20: Radiation Siphon (A) Touch of Death - Chance of Damage(Negative) (45) Touch of Death - Accuracy/Damage (46) Touch of Death - Damage/Endurance (46) Touch of Death - Damage/Recharge (46) Touch of Death - Accuracy/Damage/Endurance (48) Touch of Death - Damage/Endurance/Recharge Level 22: Boxing (A) Empty Level 24: Tough (A) Steadfast Protection - Resistance/+Def 3% (25) Steadfast Protection - Knockback Protection Level 26: Wormhole (A) Absolute Amazement - Stun (27) Absolute Amazement - Stun/Recharge (27) Absolute Amazement - Accuracy/Stun/Recharge (33) Absolute Amazement - Accuracy/Recharge (33) Absolute Amazement - Endurance/Stun Level 28: Atom Smasher (A) Armageddon - Chance for Fire Damage (29) Armageddon - Damage (29) Armageddon - Damage/Recharge (31) Armageddon - Accuracy/Damage/Recharge (31) Armageddon - Accuracy/Recharge (31) Armageddon - Damage/Endurance Level 30: Weave (A) Luck of the Gambler - Defense/Increased Global Recharge Speed (48) Kismet - Accuracy +6% (48) Kismet - Defense/Endurance (50) Kismet - Defense/Recharge (50) Kismet - Endurance/Recharge (50) Kismet - Defense/Endurance/Recharge Level 32: Maneuvers (A) Luck of the Gambler - Defense/Increased Global Recharge Speed Level 35: Proton Volley (A) Calibrated Accuracy - Accuracy/Damage (36) Calibrated Accuracy - Accuracy/Endurance (36) Calibrated Accuracy - Accuracy/Interrupt (36) Calibrated Accuracy - Accuracy/Range (37) Calibrated Accuracy - Accuracy/Recharge (37) Calibrated Accuracy - Accuracy/Damage/Recharge Level 38: Devastating Blow (A) Hecatomb - Damage (39) Hecatomb - Damage/Recharge (39) Hecatomb - Accuracy/Damage/Recharge (39) Hecatomb - Accuracy/Recharge (40) Hecatomb - Damage/Endurance (40) Hecatomb - Chance of Damage(Negative) Level 41: Assault (A) Endurance Reduction IO Level 44: Tactics (A) Gaussian's Synchronized Fire-Control - Chance for Build Up Level 47: Scorpion Shield (A) Luck of the Gambler - Defense/Increased Global Recharge Speed Level 49: Vengeance (A) Luck of the Gambler - Defense/Increased Global Recharge Speed Level 1: Brawl (A) Empty Level 1: Domination Level 1: Quick Form Level 1: Prestige Power Dash
-
Rather than make an entirely new post, I shall dig this up from the grave to post my build. I... think I'm getting better at this? Hero Plan by Mids' Reborn : Hero Designer 2.7.2.10 https://github.com/Crytilis/mids-reborn-hero-designer Click this DataLink to open the build! Rainbow the Rabbit: Level 50 Magic Controller Primary Power Set: Illusion Control Secondary Power Set: Pain Domination Power Pool: Sorcery Power Pool: Speed Power Pool: Fighting Power Pool: Leaping Ancillary Pool: Soul Mastery Hero Profile: Level 1: Blind -- BslGaz-Acc/Hold(A), BslGaz-Rchg/Hold(3), BslGaz-EndRdx/Rchg/Hold(3), BslGaz-Acc/EndRdx/Rchg/Hold(5) Level 1: Nullify Pain -- Pnc-Heal/EndRedux(A), Pnc-EndRdx/Rchg(5), Pnc-Heal/Rchg(7), Pnc-Heal/EndRedux/Rchg(7), Pnc-Heal(9) Level 2: Spectral Wounds -- Dcm-Build%(A), Dcm-Acc/Dmg(9), Dcm-Dmg/EndRdx(11), Dcm-Dmg/Rchg(11), Dcm-Acc/EndRdx/Rchg(13) Level 4: Soothe -- Pnc-Heal/EndRedux(A), Pnc-EndRdx/Rchg(15), Pnc-Heal/Rchg(17), Pnc-Heal/EndRedux/Rchg(17), Pnc-Heal(19) Level 6: Mystic Flight -- Flight-I(A) Level 8: Hasten -- RechRdx-I(A), RechRdx-I(19) Level 10: Superior Invisibility -- LucoftheG-Def/Rchg+(A), RedFrt-Def(42), RedFrt-Def/EndRdx(42), RedFrt-Def/Rchg(42), RedFrt-Def/EndRdx/Rchg(43), RedFrt-EndRdx(43) Level 12: Conduit of Pain -- RechRdx-I(A) Level 14: Group Invisibility -- LucoftheG-Def/Rchg+(A) Level 16: Enforced Morale -- EndRdx-I(A) Level 18: Phantom Army -- ExpRnf-Acc/Dmg(A), ExpRnf-Acc/Dmg/Rchg(21), ExpRnf-EndRdx/Dmg/Rchg(21), ExpRnf-Dmg/EndRdx(23) Level 20: Kick -- FrcFdb-Rechg%(A) Level 22: Tough -- StdPrt-ResDam/Def+(A), GldArm-3defTpProc(23), ImpSki-Status(25) Level 24: Weave -- LucoftheG-Def/Rchg+(A), RedFrt-Def(25), RedFrt-Def/EndRdx(27), RedFrt-Def/Rchg(27), RedFrt-Def/EndRdx/Rchg(29), RedFrt-EndRdx(29) Level 26: Spectral Terror -- GlmoftheA-Dam%(A), GlmoftheA-Acc/Fear/Rchg(31), GlmoftheA-Fear/Rng(31), GlmoftheA-EndRdx/Fear(31), GlmoftheA-Acc/Rchg(33) Level 28: World of Pain -- UnbGrd-ResDam(A), UnbGrd-EndRdx/Rchg(33), UnbGrd-Rchg/ResDam(33), UnbGrd-ResDam/EndRdx/Rchg(34), UnbGrd-ResDam/EndRdx(43), UnbGrd-Max HP%(46) Level 30: Combat Jumping -- LucoftheG-Def/Rchg+(A), Rct-ResDam%(34), Krm-ResKB(34) Level 32: Phantasm -- SvrRgh-Acc/Dmg(A), SvrRgh-Dmg/EndRdx(36), SvrRgh-Acc/EndRdx(36), SvrRgh-Acc/Dmg/EndRdx(36), SvrRgh-Acc(37), SvrRgh-PetResDam(37) Level 35: Anguishing Cry -- AchHee-ResDeb%(A), ExpVln-DefDeb(37), ExpVln-DefDeb/Rchg(39), ExpVln-DefDeb/Rchg/EndRdx(39) Level 38: Painbringer -- DctWnd-Heal(A), DctWnd-Heal/Rchg(39), DctWnd-Heal/EndRdx/Rchg(40), DctWnd-Rchg(40), DctWnd-Heal/EndRdx(40) Level 41: Dark Embrace -- Ags-Psi/Status(A) Level 44: Dark Obliteration -- Ann-ResDeb%(A), Rgn-Dmg(45), Rgn-Dmg/Rchg(45), Rgn-Acc/Dmg/Rchg(45), Rgn-Acc/Rchg(46), Rgn-Dmg/EndRdx(46) Level 47: Soul Drain -- GssSynFr--Build%(A), GssSynFr--ToHit(48), GssSynFr--ToHit/Rchg(48), GssSynFr--ToHit/Rchg/EndRdx(48), GssSynFr--Rchg/EndRdx(50), GssSynFr--ToHit/EndRdx(50) Level 49: Dark Consumption -- PrfShf-End%(A), PrfShf-EndMod(50) Level 1: Brawl -- Empty(A) Level 1: Containment Level 1: Prestige Power Dash -- Empty(A) Level 1: Prestige Power Slide -- Empty(A) Level 1: Prestige Power Quick -- Empty(A) Level 1: Prestige Power Rush -- Empty(A) Level 1: Prestige Power Surge -- Empty(A) Level 1: Sprint -- Run-I(A) Level 2: Rest -- Empty(A) Level 4: Ninja Run Level 2: Swift -- Flight-I(A) Level 2: Health -- NmnCnv-Regen/Rcvry+(A), Mrc-Rcvry+(13) Level 2: Hurdle -- Jump-I(A) Level 2: Stamina -- PrfShf-End%(A), PrfShf-EndMod(15) ------------ | Copy & Paste this data into Mids' Reborn : Hero Designer to view the build | |-------------------------------------------------------------------| |MxDz;1482;686;1372;HEX;| |78DA6594C94F136118C6BFE922525A2845F696B6203B5456AF26821A954A03118FC| |D800526A91DD296A8470F9EDD0EA831D14416BDF817A889FF8351138D7AD38BCAEA| |72AA2FF33C2D4D3A69F3EB3CEFFE7EF91ABD36EE7E71E6C609A579C7927A26131F3| |353D9B4994C26D2CEA8BE60CC29797C53BA919A35AF86B28B89D0943E3B6B64CB44| |6E3BF0CD8745CE2693CB19C34CE5856091CFC9E5F9F9484C52C5C7CD2B464ACF8A9| |F72C74C099B36D37389F475175E961289CB1EEBE7696361316BA416E03591D097E4| |A5F9D4923117610E331D9F369793F1A89EC94A8606E9AB5DBE4F34C52767576F6D4| |A051CCAF68E7C0F3A3E8093DD055F87F2DB951A145B003CD44206C1C321F0B1E4D7| |18A33D12748A6D0574DD271F80EE87604CEAD81963679D4AD6F1B28E97757CAC734| |F86715A8572CAD9A62CAD55965F064D2BEB85E6239F8A5E0E9BB3BC56B3B4EE4AD2| |4556803D1EB20A9C92FE2AD09FAA60BE55317958DFC37CD3E25745BFAA30FCD6C45| |4CD7D576FDA2CEDC836B903D66D8136E9BF86396B6E42B38B560BCD565BAF59E752| |37841D3404F0EE109F7ACE56CF5E1A385B13676BE26C7ECEE6E76CEB8246EEBEF12| |BB4962FE467F21318FA085E94399B11E36CDE452FA1DFE41F30FC17ECD903FBFF81| |75D26B80F304D86B78271FA3AC7936440E327F70137B6CDB22B7C91DF0E82EB907C| |E486FADDC77EB1BD9618DD85E821DAFC8D7E0A56EDC89FDD9DB27D14B4714ECBC40| |C6C8F3E06D69B58B67D4350AED8E68BDECB7F71B66E91BC2F9F50D932360FF28791| |CFCEE562AC2D8C87368C756C935721D1CDC209F81B7A4D48075DB72DAC00A6D7741| |BFA37077E523CFFE62F34AAEA7C43A50A20C9628C325CA48893251ACF4E34C628EC| |27F82D22CAF726FE1C6E77EB8C4CA8D6ABCC9BF0E344D9BC196DDE734EBDFE267B1| |7F17FC378BFDB9894A6EE23F9C9DEB76| |-------------------------------------------------------------------|
-
Got it working. No idea what was up. I'll def have to use this build after I get everything done (ouroboros primarily for merits or something. I'm not rich at all). It looks real good. 🙂 And to be honest, BR is far more fitting for the character. I can live without a travel power.
-
Thank you for the input guys! Though I can't seem to open your build in mids reborn for some reason, Kira.
-
Ready for another round of "I don't know what I'm doing"? I tried my best to make something decent here, but uh... Yeah. I managed 70% S/L resists and about 30% S/L defense, but as always I feel like something is missing. I've never played these sets to their fullest (Headless is only 16 now) so I'm pretty lost on how to properly build 'em... but then again, I'm pretty lost when it comes to builds in general. I hope you guys can give me some good input! I couldn't think of anything to put in at the end of the build other than Energy Mastery, and my power choices are likely bad, so please tell me why I shouldn't/should pick one thing over another. I'm really trying hard to get better at this, but uuuugh! Villain Plan by Mids' Reborn : Hero Designer 2.7.2.10 https://github.com/Crytilis/mids-reborn-hero-designer Click this DataLink to open the build! Headless Pursuer: Level 50 Science Brute Primary Power Set: Savage Melee Secondary Power Set: Radiation Armor Power Pool: Leaping Power Pool: Fighting Power Pool: Leadership Ancillary Pool: Energy Mastery Villain Profile: Level 1: Savage Strike -- SprUnrFur-Acc/Dmg(A), SprUnrFur-Dmg/Rchg(3), SprUnrFur-Acc/Dmg/Rchg(7), SprUnrFur-Dmg/EndRdx/Rchg(7), SprUnrFur-Acc/Dmg/EndRdx/Rchg(9), SprUnrFur-Rchg/+Regen/+End(9) Level 1: Alpha Barrier -- StdPrt-ResDam/Def+(A), GldArm-3defTpProc(3) Level 2: Maiming Slash -- SprBrtFur-Acc/Dmg(A), SprBrtFur-Dmg/Rchg(11), SprBrtFur-Acc/Dmg/Rchg(11), SprBrtFur-Dmg/EndRdx/Rchg(13), SprBrtFur-Acc/Dmg/EndRdx/Rchg(13), SprBrtFur-Rech/Fury(15) Level 4: Gamma Boost -- NmnCnv-Regen/Rcvry+(A), EndMod-I(5), Heal-I(5), Mrc-Rcvry+(15) Level 6: Shred -- AchHee-ResDeb%(A), Arm-Dmg(17), Arm-Dmg/Rchg(17), Arm-Acc/Dmg/Rchg(19), Arm-Dmg/EndRdx(19), Arm-Acc/Rchg(21) Level 8: Combat Jumping -- LucoftheG-Def/Rchg+(A) Level 10: Fallout Shelter -- EndRdx-I(A) Level 12: Proton Armor -- EndRdx-I(A), ImpArm-ResDam/EndRdx(21), ImpArm-ResDam/Rchg(23), ImpArm-EndRdx/Rchg(23), ImpArm-ResDam/EndRdx/Rchg(25), ImpArm-ResDam(25) Level 14: Super Jump -- UnbLea-Stlth(A) Level 16: Vicious Slash -- Mk'Bit-Acc/Dmg(A), Mk'Bit-Dmg/EndRdx(27), Mk'Bit-Dmg/Rchg(27), Mk'Bit-Acc/EndRdx/Rchg(29), Mk'Bit-Acc/Dmg/EndRdx/Rchg(29), Mk'Bit-Dam%(31) Level 18: Radiation Therapy -- Prv-Absorb%(A), Prv-Heal(31), Prv-Heal/EndRdx(31), Prv-EndRdx/Rchg(33), Prv-Heal/Rchg(33), Prv-Heal/Rchg/EndRdx(33) Level 20: Beta Decay -- ShlBrk-%Dam(A), TchofLadG-%Dam(34), AchHee-ResDeb%(34), CldSns-%Dam(34) Level 22: Rending Flurry -- Obl-Dmg(A), Obl-Acc/Rchg(36), Obl-Dmg/Rchg(36), Obl-Acc/Dmg/Rchg(36), Obl-Acc/Dmg/EndRdx/Rchg(37), Obl-%Dam(37) Level 24: Kick -- FrcFdb-Rechg%(A) Level 26: Hemorrhage -- Hct-Dmg(A), Hct-Dmg/Rchg(37), Hct-Acc/Dmg/Rchg(39), Hct-Acc/Rchg(39), Hct-Dmg/EndRdx(39) Level 28: Particle Shielding -- NmnCnv-Heal/EndRdx(A), NmnCnv-EndRdx/Rchg(40), NmnCnv-Heal/Rchg(40), NmnCnv-Heal/EndRdx/Rchg(40), NmnCnv-Heal(42) Level 30: Tough -- UnbGrd-Max HP%(A), UnbGrd-ResDam(42), UnbGrd-ResDam/EndRdx(42), UnbGrd-ResDam/EndRdx/Rchg(43) Level 32: Savage Leap -- FuroftheG-ResDeb%(A), Obl-%Dam(46), Obl-Dmg(46), Obl-Acc/Rchg(46), Obl-Dmg/Rchg(48), Obl-Acc/Dmg/Rchg(48) Level 35: Ground Zero -- SprAvl-Acc/Dmg(A), SprAvl-Dmg/EndRdx(43), SprAvl-Acc/Dmg/EndRdx(43), SprAvl-Acc/Dmg/Rchg(45), SprAvl-Acc/Dmg/EndRdx/Rchg(45), SprAvl-Rchg/KDProc(45) Level 38: Weave -- LucoftheG-Def/Rchg+(A), LucoftheG-Def(48) Level 41: Maneuvers -- LucoftheG-Def/Rchg+(A) Level 44: Superior Conditioning -- EndMod-I(A) Level 47: Physical Perfection -- Heal-I(A) Level 49: Tactics -- GssSynFr--Build%(A), GssSynFr--ToHit(50), GssSynFr--ToHit/Rchg/EndRdx(50), GssSynFr--Rchg/EndRdx(50) Level 1: Brawl -- Empty(A) Level 1: Prestige Power Dash -- Empty(A) Level 1: Prestige Power Slide -- Empty(A) Level 1: Prestige Power Quick -- Empty(A) Level 1: Prestige Power Rush -- Empty(A) Level 1: Prestige Power Surge -- Empty(A) Level 1: Fury Level 1: Sprint -- Empty(A) Level 2: Rest -- Empty(A) Level 4: Ninja Run Level 2: Swift -- Empty(A) Level 2: Health -- RgnTss-Regen+(A) Level 2: Hurdle -- Empty(A) Level 2: Stamina -- PrfShf-End%(A) Level 1: Blood Frenzy Level 50: Cardiac Radial Paragon Level 50: Pyronic Core Final Judgement Level 50: Degenerative Core Flawless Interface Level 50: Barrier Core Epiphany Level 50: Assault Core Embodiment ------------
-

Recommended Zones and Bases
Muppy replied to FoulVileTerror's topic in Roleplay-a-Day's Discussion (OOC)
Sharkhead is a no brainer. We already go there for Monkeys! How about St. Martial's Golden Giza or around the Jackpot? Or, as someone said in the OOC channel, the hotdog stand in Port Oakes? (I really like that one!) -
Thank you for the response. Defenses seem a little low but these sets seem pretty dang hard to get those up. I went with psi cause of concept reasons, but this works better. Thanks again! Edit: And I noticed that power boost makes it better. For all the years I've played this game, I never realized that power boost improved so much stuff on your character. I'm going to love this power.
-
Builds are hard, but I think this might be the hardest one for me to wrangle with. I love this character (who is only about lvl 21) and I want this to work, but I'm falling short on defense while his S/L resists are hard capped. As always, I'm probably doing something wrong here, and I'm assuming that I should probably slap mesmerize in here somewhere for a good attack chain. The reason why I took the pet was mostly for solo purposes (Target it for heals, buffs, etc). I do plan on teaming with him more once he's respec'd at 50, or I can just jump into team only stuff with him asap. I tend to try and go with a build as I level up, but eh. This may be an exception, I guess. ANYWAY! Here's my mess of a build: Hero Plan by Mids' Reborn : Hero Designer 2.7.2.10 https://github.com/Crytilis/mids-reborn-hero-designer Click this DataLink to open the build! Brainfry: Level 50 Mutation Controller Primary Power Set: Mind Control Secondary Power Set: Electrical Affinity Power Pool: Flight Power Pool: Speed Power Pool: Fighting Power Pool: Leadership Ancillary Pool: Psionic Mastery Hero Profile: Level 1: Levitate -- Dcm-Build%(A), Dcm-Acc/Dmg(43), Dcm-Dmg/EndRdx(43), Dcm-Dmg/Rchg(45), Dcm-Acc/Dmg/Rchg(45) Level 1: Shock -- EnrMnp-Stun%(A) Level 2: Dominate -- SprWiloft-Acc/Conf/Hold/Immob/Sleep/Stun/Fear(A), SprWiloft-Conf/Hold/Immob/Sleep/Stun/Fear/Rchg(3), SprWiloft-EndRdx/Rchg(3), SprWiloft-Acc/Conf/Hold/Immob/Sleep/Stun/Fear/EndRdx(5), SprWiloft-Acc/Conf/Hold/Immob/Sleep/Stun/Fear/EndRdx/Rchg(5), SprWiloft-Rchg/Dmg%(7) Level 4: Rejuvenating Circuit -- DctWnd-Heal(A), DctWnd-Heal/EndRdx(7), DctWnd-EndRdx/Rchg(9), DctWnd-Heal/Rchg(9), DctWnd-Heal/EndRdx/Rchg(11) Level 6: Fly -- Frb-Stlth(A) Level 8: Mass Hypnosis -- FrtHyp-Sleep(A), FrtHyp-Sleep/Rchg(11), FrtHyp-Acc/Sleep/Rchg(13), FrtHyp-Acc/Rchg(13), FrtHyp-Sleep/EndRdx(15) Level 10: Energizing Circuit -- PreOptmz-Acc/Rech(A), PreOptmz-EndMod/End(17), PreOptmz-EndMod/Rech(33), PreOptmz-EndMod/Acc/End(33), PreOptmz-EndMod/Acc/Rech(33) Level 12: Galvanic Sentinel -- EnrMnp-Stun%(A), PreOptmz-EndMod/End(40), PreOptmz-EndMod/Rech(42), PreOptmz-EndMod/Acc/End(42), PreOptmz-EndMod/Acc/Rech(42) Level 14: Hasten -- RechRdx-I(A), RechRdx-I(15) Level 16: Faraday Cage -- GldArm-3defTpProc(A), UnbGrd-Max HP%(34), UnbGrd-ResDam(34), UnbGrd-ResDam/EndRdx(34), UnbGrd-Rchg/ResDam(36) Level 18: Total Domination -- SprOvrPrs-Acc/Conf/Hold/Immob/Sleep/Stun/Fear(A), SprOvrPrs-Conf/Hold/Immob/Sleep/Stun/Fear/Rchg(19), SprOvrPrs-EndRdx/Rchg(19), SprOvrPrs-Acc/Conf/Hold/Immob/Sleep/Stun/Fear/EndRdx(21), SprOvrPrs-Acc/Conf/Hold/Immob/Sleep/Stun/Fear/EndRdx/Rchg(21), SprOvrPrs-Rchg/Energy Font(23) Level 20: Hover -- LucoftheG-Def/Rchg+(A), Rct-ResDam%(39), Krm-ResKB(43) Level 22: Empowering Circuit -- GssSynFr--ToHit(A), GssSynFr--ToHit/Rchg(23), GssSynFr--ToHit/Rchg/EndRdx(25), GssSynFr--Rchg/EndRdx(25), GssSynFr--ToHit/EndRdx(27), GssSynFr--Build%(27) Level 24: Boxing -- Empty(A) Level 26: Terrify -- SphIns-%ToHit(A), SphIns-ToHitDeb(29), SphIns-Acc/ToHitDeb(29), SphIns-Acc/Rchg(31), SphIns-ToHitDeb/EndRdx/Rchg(31), Ann-ResDeb%(31) Level 28: Afterburner -- LucoftheG-Def/Rchg+(A) Level 30: Tough -- StdPrt-ResDam/Def+(A) Level 32: Mass Confusion -- CrcPrs-Conf(A), CrcPrs-Conf/Rchg(36), CrcPrs-Acc/Conf/Rchg(36), CrcPrs-Acc/Rchg(37), CrcPrs-Conf/EndRdx(37), CrcPrs-Conf%(37) Level 35: Defibrillate -- LthRps-Acc/Rchg(A), LthRps-EndRdx/Sleep(39), LthRps-Acc/EndRdx(39), LthRps-Sleep/Rng(40), LthRps-Acc/Sleep/Rchg(40) Level 38: Maneuvers -- LucoftheG-Def/Rchg+(A), Srn-Def/EndRdx(45), Srn-Def(46), Srn-Def/Rchg(46), Srn-Def/EndRdx/Rchg(46), Srn-EndRdx(48) Level 41: Amp Up -- RechRdx-I(A) Level 44: Weave -- LucoftheG-Def/Rchg+(A), LucoftheG-Def/EndRdx(48), LucoftheG-Def/Rchg(48), LucoftheG-Def(50), LucoftheG-Def/EndRdx/Rchg(50) Level 47: Indomitable Will -- Empty(A) Level 49: Mind Over Body -- ImpSki-Status(A), ImpSki-ResDam/EndRdx(50) Level 1: Brawl -- Empty(A) Level 1: Containment Level 1: Prestige Power Dash -- Empty(A) Level 1: Prestige Power Slide -- Empty(A) Level 1: Prestige Power Quick -- Empty(A) Level 1: Prestige Power Rush -- Empty(A) Level 1: Prestige Power Surge -- Empty(A) Level 1: Sprint -- Empty(A) Level 2: Rest -- Empty(A) Level 4: Ninja Run Level 2: Swift -- Empty(A) Level 2: Health -- NmnCnv-Regen/Rcvry+(A) Level 2: Hurdle -- Empty(A) Level 2: Stamina -- PrfShf-End%(A), PrfShf-EndMod(17) ------------
-
Hey there! I got an Illu/Pain that I have yet to roll out a build for (one I will likely need help with later, but we'll see. Maybe I'll do a decent job this time!). I was wondering if there are any powers that could be considered skippable. I know the pets are a must, but should I worry about getting deceive? Part of me wants to get that, but if I'm in a group, Deceive seems like something I may not really need... and with pets, even less so if they're just gonna crush, scare, and blast everything in their way. And of course, there are some of the pain skills. Soothing Aura seems kinda eh, but if you guys think otherwise, I'd like to know. Anyway, thanks ahead of time! I'll eventually post a build for you guys to hopefully help me out with. I'd love to get something good going with this little guy. He's mostly conceptish (picked Sorcery up cause of this!), but I want him to be a functional one if possible.