Rustbeltcomics
-
Posts
34 -
Joined
-
Last visited
-
Fire / Kin Controller build advise needed
Rustbeltcomics replied to Rustbeltcomics's topic in Controller
Great discussion. I admit to not previously understanding when to take procs and when not to so this post has been very helpful. I see your points about using Minstrel to save on endurance for Hot Feet. I also have taken procs out of all but one power (Bonfire). I am not sure why endurance is much of an issue on this build though once you get Transference at level 28. I wouldn't have most of the procs built out until much later than level 28 anyway. So here is a revised build idea that is both much cheaper and I think more balanced with still great recharge but also better endurance management. I also like it because the S/L defense is over 43%. Still tweeking the build but I realized I didn't need Hurl Boulder with Arcane Bolt recharging in under 2 seconds. Still wondering how necessary the three Teleportation pool powers are but I admit I like the idea of Fold Space right into a Bonfire and being able to hit them all with Fulcrum Shift.
-
Here is my post and feedback on an earlier build back in 2021.
-
I have had two lvl 50 Earth/Storm Controllers (Stormcloud2 on Excelsior) and can tell you that you will have god-like powers with this build but will not be a God/Goddess. The earth powers like mobs grouped together for all the AOE controls but Storm is known for blowing everything around. I have 29 different builds for this as there are so many different options but let me summarize how you will want to level and what powers I recommend. 1. Early levels will go slow as your single target damage is poor so grab temp powers and use Fossilize and Stone Prison (or I prefer Arcane Bolt). In teams start with Stone Cages and get Freezing Rain at level 16. Soloing with Gale is fine when soloing but get a Knockback to Knockdown into it at level 20. Leveling will be painfully slow if not on a team, I am not a fan of O2 Boost. If you want to be a healer go with another set. 2. You will be squishie no matter what you do but definitely go with Earth Mastery and Earth's Embrace to get 50% more hit points. I do not recommend getting tough and weave in this build as you have more useful control powers that will mitigate damage. Volcanic Gasses as an AOE hold is awesome and will last 60 seconds with a recharge down to about 80 seconds. Look for all the -tohit you can get as that is just as good as having defense once you hit with the specific power. 3. Quicksand, Hurricane, and Snow Storm are skippable but they each have their uses on ocassion. Quicksand provides an -25% to mob defenses and -20% recharge and can have procs to make at have some decent damage. Snow Storm is situational but with a massive -62.5% to recharge and huge slows to running and flying can really mitigate damage. Hurricane keeps everything out of melee range and provides a safe base for range teammates to stand in and be fairly safe. 4. Damage is generally low until you get Lightning Storm at level 30 but you can put damage procs into many of your powers. Focus on damage procs for powers with recharges of 10 seconds or more and don't put more than one recharge IO in any of them since that decreases the proc damage proportional to the recharge time. 5. Lightning storm and Tornado are a truely awesome powers that you can set and forget but adding in Stone Cages, Fold Space, or Volcanic Gasses can help keep the mobs in one place so they don't spend their duration moving around trying to find the next mob to land on. 6. If you like to solo a lot like I do this is likely not the powersets for you. I found this a project that wasn't always enjoyable but I wanted to get to 50 to see what all the powers together could do. I am just too much of a melee player but maybe after this rebuild I may rethink this alt. Focus on letting a teammate take the alpha hit and early on you can put on a Snow Storm to slow all the mobs. Later you can come into melee range after stuff is under control and land a nice Seismic Smash to anything controlled safely and with much satisfaction. My build is an option but I am sure there are plenty of other options. Happy to hear how your experience goes! https://api.midsreborn.com/build/download/FN3PACaSIwHgKLgy
-
Fire / Kin Controller build advise needed
Rustbeltcomics replied to Rustbeltcomics's topic in Controller
Thanks so much for the great video and a really strong build. I have used several of your ideas and want to summarize my thoughts and questions. I tried to not need tough and weave as they use endurance I am not sure I will have but I built them in now. I tried seeing if I could build in enough -tohit but it doesn't work well. I took out Hot Feet to save on endurance but is Hot Feet a great power to keep in my build somehow? I really like having Arcane Bolt, Mystic Flight and Rune of Protection in my build. Arcane Bolt is a great single target attack to put Cupid's Crush into plus a Change for + Recharge. I really like having Rune of Protection for the strong status protections even if it is only up 60 seconds every 180. It gives me a nice boost to my resistance and another place for IOs. I also feel the 50% of additional hit points/Heal in Earth's Embrace provides a much stronger build without too much loss of damage. Why don't you use any Force Feedback: Chance for +Recharges in your build? I have four in my build and so I didn't even take Hasten. I see my recharge hits the 300% cap if just a few of the procs activate. I took out Siphon Speed because I don't love slamming into cave walls with all that speed I can't control. What powers would you suggest I take out and what powers would you recommend adding? https://api.midsreborn.com/build/download/FMPtERQzv5mmXUGU |MBD;23090;1515;2020;BASE64;| |GzFaERWcOgCtDnhq1Jk7MXpwUA1sWPmv605HpejZ8fzyyB8H1Wa2G9FXaS7lp59QJoU| |R9B6N4WTp6msdFpCuejCM1S78qT427fS3ZVuqmxGxXxp0NliA27/f/9qrjVez7sdGxt| |j/3u4EuEQ4WShQCFRcEXV1Tl2NrPCplrNq7yQsaxSwl1/+2hCX92pb3iilxIDp8jAsc| |kZFH08CaxGt9nzZhNPDKDR/gNgudpEF1zBEWkcMS8gFeZ94ogvGeT4XfzjGDKmG9u/O| |kO4V5OM2ZvEJA0GJpzSKGLb1FCu0bRNWb30cwimT4EGyGQUSJngJeccrKsnz6vxGhw7| |XwLwP9ajJuK/rqNVQ2pJ6wfKzTg2PhvhK2pYwIDBedvkONs7ig7fbKi/229J2mJi1cu| |ylfV907Lw8rTvJnsmO4oeVd61JDIcxw2B4Cjd7EYtPnpkoqYBWy8kE9SBDeEtmCzcfr| |O9sPVPajbic/zq88l+iX8aLfZK47vMwSbMkYFWZL9VGOqFN4K9wLH2yuGgnJOQqdM6H| |dJXySK7kHUONnchDOojODZTS32XXPRcLPhaqU+0dRjGhi977M//woWuh0+D03Oo/VAd| |3Q1+0DkXx8oupmvVyDqlpSTWtiPLhRhjtFGW1wzft/pFs8wxp2JeYen+HHW7aOO5dWj| |b9tkgEtf72WN5kfK1kcHObBO2WoH7XH6EebC38+FTqjQeSDyI94YAIrJhQrNDK3uSMg| |xNcoUbwGJbZBzG7dze2cpDHRcPcFAGEmyuAURCJHTguZ1RtQ+dEZwnvS8YVktobD4GE| |5SwLwTMCrLWFtmymexl+qgeiiYHpo9AMaxCZJbpGKhXtyRI7b4Yo9GTotZJAEQS5Vip| |QHHf4NZf3rWpnFyrdOuvE9itLG8eKFpueaVk48CHuNg+g5XGpYKloeIfM5ddur2rY38| |LlCBrYS3yyNbWFXSCXNMSUti/duKrlO/qSC3pqyiUG/DhsZZnJxGLtJEcB/HfpO9j7d| |NEw6C6AYBWRLMtkuPoaLqlRuiFFKLbFi1kNM2a1jwOZVbX/Na+L/zf4iXV/BUtryjuH| |5H1pgOfABDHZg30/Y8r34/SUg0ccW8d3LvQsNDzqNOlsah4PM711TMGKCCbOsfR5SvQ| |HKNoTL3cqNV9lAegLxF9tDp5a4ZbMIVlVEP4907ogIVKz4bp70WJX6SRP702+3+4VcL| |OKnmv/5/cFYnqwH7MTDQ1BqH+DvAP4QHyVUNyK0fkmY8gA8btIRlws2JbLPLfWGt0ow| |AKgAEMUIIBRBP850nu/fKGgOMqz9sCsgxJSf9PaAiDoRkYz9rZpG2RWmIdK0UBkYzYf| |iLkvCtLNReVQLR3Mtp+J7A5GA3v6I/ZdvkksZXz1+eoC6bVwKL52vlOyF7gAqFGSssp| |7Mqn6e4zuQ8DaFAZ8ALgODQV85k8aCBS8rhVNz2NVAo3m6W36IDvFcejWto6r453W6n| |mxe4dxgFlFRuN2quUUQA19OkjW34bO59xrlJY0E7ch3PWr56jQ/+jGQoXx9ehyruXiV| |QoSJVaqGJEx+O+MmMl0dOjJEmymA0YQ5JppMErB6mwSdIUVT1C7PB6srcie5MX43MM1| |c5fOcA9WXl5s6BdzevztSTSRraD0oM7HQn/xjM7JFQv9qixK8X3D0icEFyWyO+9qfOj| |038YhMoBSJPDYNaufbmsBGAJOM/2zXNBz26A53dInTsn7pNegi9r/oAJNyuep33oqxJ| |poMFEBQwRVHIGCEBsalJb/CmkNhMkD8JbNiPe4bk81CXG08V2GyzmMoQhHuLmAuQIUx| |0LIAF+1x5SLHYPpe3TEGvdLOzna5DNymThCRoJcMBNbPnQcn0TfW5s/CKtwdcus86fO| |kI8RkQlg4MfEVRxHP6BihVoN9+gJuQYmikpE/8DOdeNDL8VNgEXH/gdTsaMPzMPvny4| |fkd1FPt/COH69BzFpEFqzT+fLSoqu+XDKWaeEJdUyN03O4jgOmH+gPOjL6jK4T3jece| |BnQS5isawB|
-
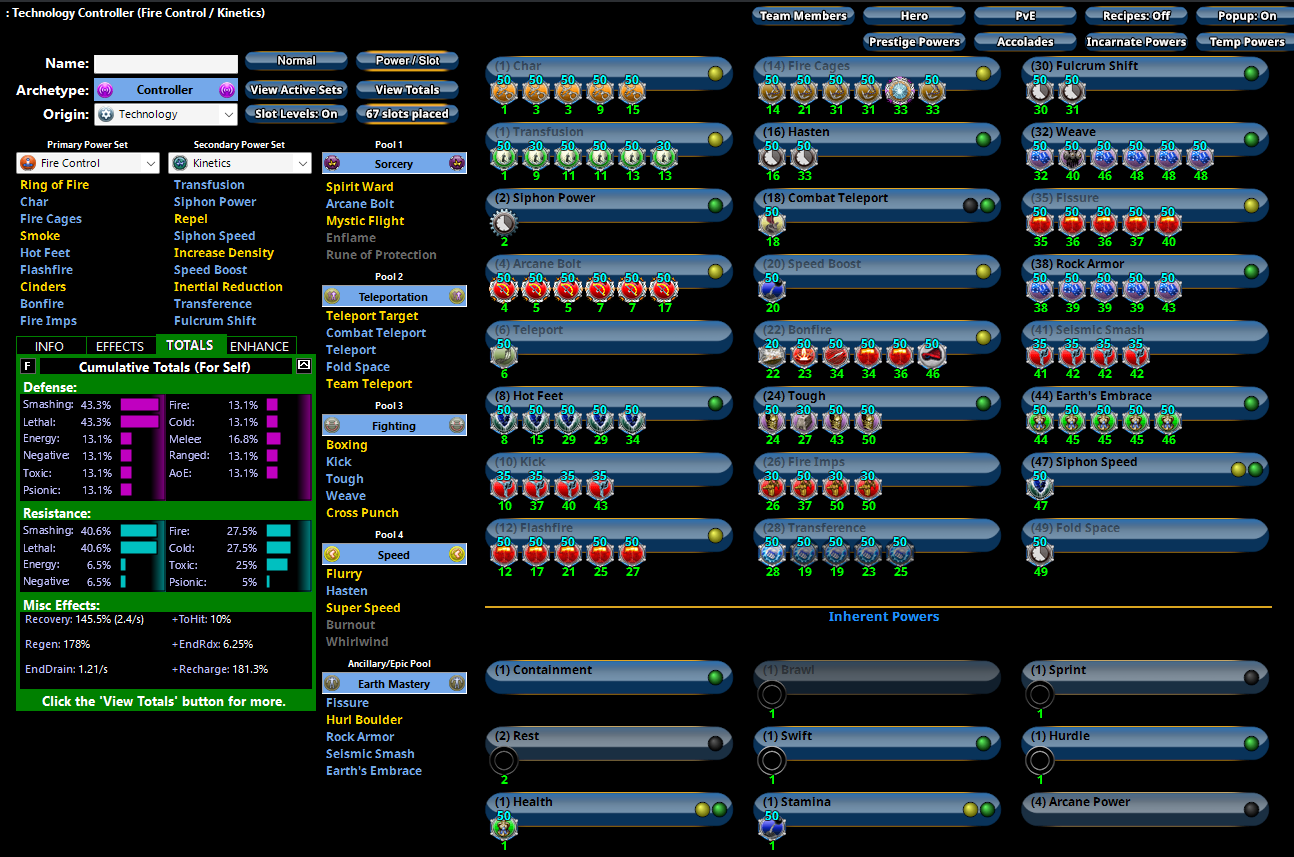
So I have mostly played damage dealing characters and yet I would like to have an alt who is desirable for teaming. I think I may have found both in a Fire/Kin controller. I am finding that I don't enjoy scrappers as much once I get them to 50 as they don't have much variety with mostly damage sets like claws or martial arts. But I also have an 50 Earth/Storm controller and I loved the variety of what I could do with her even though she was so very squishie. So how about this first attempt at a Fire/Kin controller? Any thoughts? Do I really need the 5 force feedback + recharges which I have right now in this first build. Feels like overkill and I am sure others have some ideas on how to better slot this and do I even want Repel as a huge endurance toggle? Seems very situational and likely wouldn't need it in teams but perhaps it would be useful when soloing which I occasionally would like to do. Thanks in advance! https://api.midsreborn.com/build/download/FMxELe3w7peeht4P |MBD;23114;1537;2052;BASE64;| |G0laAKyKx/lXLKSkJLigx4yXS5GuPVUnIj589gNiJ8kaXa2qeNMQWbJ09bUOC0hXnS5| |SvnpZoC3AlH5j350/1cem3f1t2ZbqZkTslwsqBgtw+/f/2y+1cTZG4ozbNTbC7szOC0| |GJ6P0Q/ZTg+MgSySoi57davlF7R+3/RWFTB+xdXFNZk/HbnxG1hzBgpT9mzLDIGBW9e| |vPBWg2mjHxZ4/SwFmh+TIPvnVuXCTBEmt9gWPKpwG9jDzTBOA/kfS0MZkhlbcPvAXL3| |zOZ8CyXxTopoIZ7SGQ2GbUELVmjLJ6xeegeEt1AEN8HxAQPJX2FzyE1eUdn8PDu90OY| |jJTA+qnWvh3Ff1/EXQ0nP1hPmHrWnPDri66rVCxjzcWX5iq6n3/nEvUMs6YfKDRR6af| |1XO5h5WVJXNSyqXfiw3Kr5K90g9mIoDIFLvFoK75qHiiue1YymPG22w/vVrqS2snCzh| |fUFmzjKbgSsXtUr/yXG6lzaJ43zg7txojkFsyufqu7VXOCv/Lt02OeW0cDM8oUIVdsw| |KKx8npQNTPPKN1humFX+Eqv9DvM9ylHG/C23IPs598Kv+QepshYGAYbJzflDsiL9p2b| |BV2HQqTyEyyNpoaYzbuMzC/jUPNOUPFoQ5ac6K6ENl/xbp0eGfyTFPIM71vUtosWvZ+| |xhwSHxsGqi+/d3+UMyKK3J4FZq6nbP2OgKU+eyJMYlextjjqLqsGYKQiin/GXYsT19n| |hzjDmlJTi9MQKOwWOiibZlCD0RnA9G19VBDf4z/2FNFpjbDNMX2kpFksfMm7OMsekNJ| |oBh0TigdKIkxfgzL+pi0kiuJ2wk97Dy/sqRTzFy2qNjulYS0ChT38gxAApMWZA1a65h| |2kWunuE1xt8GleLlUqYlcwVINUdLWXzeukgC60PM9XxQV+2aK076HzZRnepXE0kl2gc| |xXyztIKpMYAt36lVZEdJ+XFUBMp3Kipr+huw4csrIxjp3xMm0i38/tEUmOFKT3gm2AR| |zdtveNSvnDh8d9rPqTExMaCZgpgNijSLtlS46xC8buU9hgwcraWQ3eGNevDxo67tJIf| |umfkZfOHV0aIKAKQnaFVe/6Or3rkjPeGoF1OHomNGow/HryzsvVbVk1KKxrF0jP9OcY| |9u2910JSsYE26PO7pN6a3vubCYH53/UOuMmRukZg/KBJGC30mDs8jwNtAim9Vc58QxP| |QoiTMWhMBnepZGAzhmgY1udgkw6UaGSGt5b0N1x0xmeNaQ3BZVzfUq8DCh4UOVFKI8I| |06qxyfPuTmGeEAlqUrZPt7Fd1IgosRQpLL2gnHE/qhGIbKtFCqvNxXdxY/BWbCZ5N6I| |as5s2AKKybAARaqATuklTGwgrDeAexbGNkPi2QJgDNSkkvzvY2GHm3TSvWv4h/WRSNV| |hpNo8OwMv4l3NTZBQEXdPsqR9/45gDHoVUEcwA/4QRNCFOgIZW8uKQntmQCG5mfbGoE| |RtdLskkFjRBDBtRZUSgLV2Uknmdqt+20+TtqdUuCVROWlW3HWhua8FqULeoCCXaol/Z| |s01Ta5qdIpVsymBsSq9ToiZokkiWGcHMwFj0DnBDGB5z7g718VLHimZu9mAuwjl1mkC| |zLDFkkyfgPBZI0z+RipLr4X7v6y5a6wmmzvoCPbtHWt3gKZCugU66GFVxzfFNJ93Ume| |AtJznqfIG39IdWgCG0K+0JYfe7H8OVzAkp3TS5LwXwIZik1Ct0RoWI6/iV0oy4i2SA0| |oE1ADj8K6GM8tu+TzNfp5XXTryDfBA8ZRfe4pxbrB3VrjzCGoJFcMSHlwguASKoRQqg| |O/co+CxQ4m+dSDmuC8Ug0eFFZmu2Gd5Z/1aufAjueIqPNq0HRfcN0EzG+4wIM/Ir7cU| |T2oGfyitvY/QxN+KfnyTvkJphVgN95mNnAMTxUq4/7dm41HkxaB//T/QX5nGjqGY5L/| |umx/R+0gGfgs8+DnabNzBtPZ/V813/ffxjW8J/et+B12SuaGH7T1D7SxOUT/sPOuYl6| |o5ppLdtyUoLp69Y2Qjv4UbdSG0aUcBoRm5iI3OBg==|
-
I am convinced. I took out Touch of Fear and put in Ground Zero which is a great power. Not sure I should put my Tanker IOs in there but want the 5% defense they give me with 5 slots. Gonna fire up a new character now. Wish me luck!
-
Thanks everyone for the great advice and sharing your experiences. I am not opposed to building out IOs at all. I must admit thought that I usually don't follow through all the way until 50s and only have a few 50s with (mostly) built IOs. Saying that I have influence and plenty of IOS to use by respeccing them out of alts. One is an Elect/Stone tank that hit 50 a few years back that was fun for a while until I lost interest. Probably due to lack of damage procs. Anyway, here is my first attempt at an IO build for a Rad/Dark tank that seems promising. I got melee defense soft capped and have too much in res at over 116% for s/l. I also got some decent recharge at 67.5% plus the FF proc in Kick and could possibly add another to Cross Punch. I went with Taunt over Ground Zero even though I would love to fit Ground Zero into the build. I would love to find ways to boost damage further and know how much def and resistance I can sacrifice and still have a fun, fast moving build. https://api.midsreborn.com/legacy/download?uc=1615&c=708&a=1416&f=HEX&dc=78DA75944B4F135114C7FFB73315698BBCA9082DA5C81B2A98B8F7816E8004817DD3C0080DB543DA92C85E7C051551E3468D2EFD062EFC08B2F5B970EB0B75A13C04A9A773E6C0AD8649A6F7D773EE79DE7B66F8D24060E5E5D049A8C09954229B8D8F27D23356C6376E4D4CA7ED943D358FC253426F9855F101EB8295CE5AB1D1C46432914BDAE9F8A9CC453B1374D5C356CAB2620389CC0C237C23B69D8A8DCD5AD6A4DFC173A9E4D474AE8CB980C9F454F1BFE0D9D9E444EC74662E67C5C7ECB9547C3891CD5999F97A4A2342EF8D76FA519027EF057E1A40BF090F7E31985867F06183E10882641232D18B3596AC9716BB21E908ADD182F57986031815186778D149360A83BBB1153E4AA44F0C017C16F8C210C65781558628B5D4C05E6C65A01B8EE690C04DAAD2ABA5072F8EB3F12DD294A8DDD4F366091A5973102181B0E1BA8B3054A0996183CA2ED5FC9AA57868BA5B1E3154E1B1E936ED09C3513C65B84DB1FD8A3A2489FBB1E27134116419FC545B999E78190A9D360DFCA6B55C3FB872E9789574BC0663026EC7EB50653807578788C771B34439546A6E5425E5E7843E2CB04591AAF548D5B86CBA5B16181A7145E0AA14794DE03AC326B9A9D54BA99522B74913D4FA80209EB1C643E5D72BB567538F05D62C53DE0D7ADE0D72D6CD023BE436A4E71DC22BB93AAF0DB7CF6F04DE1AAEF53B81F70C8B14A94977D32413D28E13CA812E99901E99991E19955E6C3218544A54BF2A5171D322462DE2A645ACBB64BEE85AA2554FA21583AC69739AEA408D408572F3AB16A86498249B0EDD4D079658D3893B02CB0277A5BA7BCAADE53EC38700D0AD37BF1B6D5EE73AF5082CB602313D520C5B7C72C7B02DF0476087A11F79017075162D7D7AA43E78BCEE96E77CCC9D66F1A727DF68427FF28E309FC7D03EF21153B727B962F9AAAFD8B1ECFFB68FFCFBFF7277827EFCA3217CE05E70ACF174D044D26C6B55FC059D6FD916
-
I also would imagine that quicksand and /or snowstorm would make it easy to dance around with stealth on and attack stunned mobs or unstunned mobs that either can’t see you or can’t move fast enough to catch you. My revised defense is still 40% and I can often click unleash potential or earths embrace if I get into any trouble.
-
Hum, You are correct that Thunderclap is much maligned but your play style melds with mine nicely. Would I even need thunderclap given my high recharge and use of three other knockdown powers? I was thinking about using Volcanic Gasses more as it can be powerful but I’m not sure if the best way to a lot it. I had heard somewhere that damage procs work great in it but is that true. I also found some slots by not keeping damage procs in Gale. They just don’t seem to hit more often than the 5% minimum so an extra 40 damage every 3rd or 4th activation doesn’t seem worth it. I’m also of the opinion that with all the control and -acc means the typical build idea of soft capping S/L defenses is overkill. So what is a good level 50 attack chain? I’m thinking Freezing rain, stalagmites, and stone cages followed by Wall of force. Put up a lightning bolt and tornado on myself and Then fossilize anything that was missed and seismic smash them until they are dead. Now that I have some damage procs in earthquake and volcanic gasses perhaps I need to build them into my rotation more often. Fissure feels like it is redundant and thunderclap even more so but I will need to look at my actual in game recharges. I don’t think I will ever have the perfect earth/storm controller build but I’m enjoying the journey and that is all that matters. Thanks again for the feedback.
-
A fun build I started. See what you think. This Hero build was built using Mids Reborn 3.0.2.19 https://github.com/Reborn-Team/MidsReborn Click this DataLink to open the build! Level 50 Magic Blaster Primary Power Set: Dark Blast Secondary Power Set: Ice Manipulation Power Pool: Speed Power Pool: Fighting Power Pool: Leadership Power Pool: Leaping Ancillary Pool: Cold Mastery Hero Profile: Level 1: Gloom -- SphIns-ToHitDeb(A), SphIns-Acc/ToHitDeb(9), SphIns-ToHitDeb/EndRdx/Rchg(23), SphIns-Acc/EndRdx/Rchg(29), SphIns-%ToHit(29), Apc-Dam%(34) Level 1: Chilblain -- EnfOpr-EndRdx/Immob(A), EnfOpr-Acc/EndRdx(21), EnfOpr-Immob/Rng(36), EnfOpr-Acc/Immob(36) Level 2: Umbral Torrent -- SuddAcc--KB/+KD(A), ExpStr-Dam%(3), CldSns-%Dam(3), FrcFdb-Rechg%(5), Bmbdmt-+FireDmg(5), PstBls-Dam%(49) Level 4: Super Speed -- Clr-Stlth(A) Level 6: Aim -- GssSynFr--Build%(A) Level 8: Moonbeam -- SprBlsWrt-Rchg/Dmg%(A), SprBlsWrt-Acc/Dmg/EndRdx/Rchg(9), SprBlsWrt-Dmg/Rchg(11), SprBlsWrt-Acc/Dmg/Rchg(11), SprBlsWrt-Acc/Dmg/EndRdx(13), SprBlsWrt-Acc/Dmg(13) Level 10: Frigid Protection -- Prv-Absorb%(A), Prv-Heal(15), PrfShf-End%(21), PrfShf-EndMod(36) Level 12: Tenebrous Tentacles -- Artl-End/Rech/Rng(A), Artl-Acc/Rech/Rng(15), Artl-Acc/Dam/Rech(17), Artl-Dam/Rech(17), Artl-Dam/End(19), Artl-Acc/Dam(19) Level 14: Boxing -- Empty(A) Level 16: Build Up -- RechRdx-I(A) Level 18: Abyssal Gaze -- SprWntBit-Acc/Dmg(A), Hold-I(23), SprWntBit-Dmg/Rchg(25), SprWntBit-Acc/Dmg/EndRdx(25), SprWntBit-Acc/Dmg/Rchg(27), SprWntBit-Dmg/EndRdx/Acc/Rchg(27) Level 20: Ice Patch -- RechRdx-I(A) Level 22: Tough -- StdPrt-ResDam/Def+(A), GldArm-3defTpProc(31), UnbGrd-ResDam/EndRdx(31), UnbGrd-Max HP%(31), UnbGrd-ResDam(33), UnbGrd-ResDam/EndRdx/Rchg(49) Level 24: Hasten -- RechRdx-I(A), RechRdx-I(33) Level 26: Weave -- LucoftheG-Def/Rchg+(A), LucoftheG-Def(33), ShlWal-ResDam/Re TP(34), ShlWal-Def/EndRdx(34) Level 28: Shiver -- ImpSwf-Dam%(A) Level 30: Life Drain -- Mrc-Rcvry+(A), Mrc-Heal(37), Heal-I(37), Thn-Acc/Dmg(47), Thn-Dmg/EndRdx(47), Thn-Acc/Dmg/Rchg(48) Level 32: Blackstar -- Erd-%Dam(A), Arm-Dam%(39), Arm-Dmg(39), Arm-Dmg/EndRdx(39), Arm-Dmg/Rchg(40), Arm-Acc/Dmg/Rchg(40) Level 35: Snow Storm -- EndRdx-I(A) Level 38: Freezing Touch -- SprBlsCol-Acc/Dmg(A), SprBlsCol-Dmg/EndRdx(40), SprBlsCol-Acc/Dmg/EndRdx(42), SprBlsCol-Acc/Dmg/Rchg(42), SprBlsCol-Dmg/EndRdx/Acc/Rchg(42), Hct-Dam%(43) Level 41: Frozen Armor -- Rct-ResDam%(A), Rct-EndRdx/Rchg(43), Rct-Def/Rchg(43), Rct-Def/EndRdx(45), Rct-Def(45), Rct-Def/EndRdx/Rchg(45) Level 44: Hoarfrost -- NmnCnv-Regen/Rcvry+(A), NmnCnv-Heal(46), NmnCnv-Heal/EndRdx(46), NmnCnv-EndRdx/Rchg(46), NmnCnv-Heal/Rchg(48), NmnCnv-Heal/EndRdx/Rchg(48) Level 47: Maneuvers -- LucoftheG-Def/Rchg+(A), LucoftheG-Def(50) Level 49: Combat Jumping -- LucoftheG-Def/Rchg+(A) Level 1: Defiance Level 1: Brawl -- Empty(A) Level 1: Sprint -- Empty(A) Level 2: Rest -- Empty(A) Level 2: Swift -- Run-I(A) Level 2: Hurdle -- Jump-I(A) Level 2: Health -- Pnc-Heal/+End(A) Level 2: Stamina -- PrfShf-End%(A), PwrTrns-+Heal(7) Level 49: Quick Form Level 50: Musculature Radial Paragon Level 50: Pyronic Core Final Judgement Level 50: Degenerative Core Flawless Interface Level 50: Longbow Radial Superior Ally Level 50: Barrier Core Epiphany Level 50: Melee Radial Embodiment ------------
-
I really like your build ideas and have just made a few minor changes I can share with you and everyone. I will start working my current lvl 23 character towards this build and let you know how it goes. A few changes I made is a took out Tactics and put in Super Speed and moved them around so Super Speed is selected at lvl 4. I also took out the Kismet +acc and moved that slot to the Recovery with Power Transfer: Chance to Heal which may not be really useful as there is plenty of healing in this build already but I couldn't find any better places for that extra slot quickly. Hopefully this build is a little more viable than my low level build has been so far. This Hero build was built using Mids Reborn 3.0.2.19 https://github.com/Reborn-Team/MidsReborn Click this DataLink to open the build! Level 50 Magic Blaster Primary Power Set: Dark Blast Secondary Power Set: Atomic Manipulation Power Pool: Leaping Power Pool: Fighting Power Pool: Speed Power Pool: Leadership Ancillary Pool: Cold Mastery Hero Profile: Level 1: Dark Blast -- Empty(A) Level 1: Electron Shackles -- TraoftheH-Immob/Acc(A) Level 2: Negatron Slam -- Hct-Dmg/EndRdx(A), Hct-Dmg(3), Hct-Dmg/Rchg(3), Hct-Acc/Dmg/Rchg(5), Hct-Acc/Rchg(5), DefDeb-I(49) Level 4: Super Speed -- Clr-Stlth(A) Level 6: Aim -- GssSynFr--Build%(A) Level 8: Moonbeam -- SprBlsWrt-Rchg/Dmg%(A), SprBlsWrt-Acc/Dmg/EndRdx/Rchg(9), SprBlsWrt-Dmg/Rchg(11), SprBlsWrt-Acc/Dmg/Rchg(11), SprBlsWrt-Acc/Dmg/EndRdx(13), SprBlsWrt-Acc/Dmg(13) Level 10: Ionize -- RctRtc-ToHit/Rchg(A), RctRtc-Pcptn(15) Level 12: Tenebrous Tentacles -- Artl-End/Rech/Rng(A), Artl-Acc/Rech/Rng(15), Artl-Acc/Dam/Rech(17), Artl-Dam/Rech(17), Artl-Dam/End(19), Artl-Acc/Dam(19) Level 14: Boxing -- Empty(A) Level 16: Beta Decay -- DefDeb-I(A), ToHitDeb-I(21), ToHitDeb-I(21) Level 18: Abyssal Gaze -- SprWntBit-Acc/Dmg(A), Hold-I(23), SprWntBit-Dmg/Rchg(25), SprWntBit-Acc/Dmg/EndRdx(25), SprWntBit-Acc/Dmg/Rchg(27), SprWntBit-Dmg/EndRdx/Acc/Rchg(27) Level 20: Metabolic Acceleration -- Prv-Absorb%(A), Heal-I(29), EndMod-I(29) Level 22: Tough -- StdPrt-ResDam/Def+(A), GldArm-3defTpProc(31), UnbGrd-ResDam/EndRdx(31), UnbGrd-Max HP%(31), UnbGrd-ResDam(33), UnbGrd-ResDam/EndRdx/Rchg(49) Level 24: Hasten -- RechRdx-I(A), RechRdx-I(33) Level 26: Weave -- LucoftheG-Def/Rchg+(A), LucoftheG-Def(33), ShlWal-ResDam/Re TP(34), ShlWal-Def/EndRdx(34) Level 28: Atom Smasher -- FuroftheG-ResDeb%(A), SprAvl-Rchg/KDProc(34), SprAvl-Dmg/EndRdx(36), SprAvl-Acc/Dmg/EndRdx(36), SprAvl-Acc/Dmg/Rchg(36), SprAvl-Acc/Dmg/EndRdx/Rchg(37) Level 30: Life Drain -- Mrc-Rcvry+(A), Mrc-Heal(37), Heal-I(37), Thn-Acc/Dmg(47), Thn-Dmg/EndRdx(47), Thn-Acc/Dmg/Rchg(48) Level 32: Blackstar -- Erd-%Dam(A), Arm-Dam%(39), Arm-Dmg(39), Arm-Dmg/EndRdx(39), Arm-Dmg/Rchg(40), Arm-Acc/Dmg/Rchg(40) Level 35: Snow Storm -- EndRdx-I(A) Level 38: Positronic Fist -- SprBlsCol-Rchg/HoldProc(A), Hct-Dam%(40), SprBlsCol-Acc/Dmg(42), SprBlsCol-Dmg/EndRdx/Acc/Rchg(42), SprBlsCol-Dmg/EndRdx(42), SprBlsCol-Acc/Dmg/Rchg(43) Level 41: Frozen Armor -- Rct-ResDam%(A), Rct-EndRdx/Rchg(43), Rct-Def/Rchg(43), Rct-Def/EndRdx(45), Rct-Def(45), Rct-Def/EndRdx/Rchg(45) Level 44: Hoarfrost -- NmnCnv-Regen/Rcvry+(A), NmnCnv-Heal(46), NmnCnv-Heal/EndRdx(46), NmnCnv-EndRdx/Rchg(46), NmnCnv-Heal/Rchg(48), NmnCnv-Heal/EndRdx/Rchg(48) Level 47: Maneuvers -- LucoftheG-Def/Rchg+(A), LucoftheG-Def(50) Level 49: Combat Jumping -- LucoftheG-Def/Rchg+(A), LucoftheG-Def(7) Level 1: Defiance Level 1: Brawl -- Empty(A) Level 1: Sprint -- Empty(A) Level 2: Rest -- Empty(A) Level 2: Swift -- Run-I(A) Level 2: Hurdle -- Jump-I(A) Level 2: Health -- Pnc-Heal/+End(A) Level 2: Stamina -- PrfShf-End%(A), PwrTrns-+Heal(7) Level 49: Quick Form Level 50: Musculature Radial Paragon Level 50: Pyronic Core Final Judgement Level 50: Degenerative Core Flawless Interface Level 50: Longbow Radial Superior Ally Level 50: Barrier Core Epiphany Level 50: Melee Radial Embodiment ------------
-
So here is the build I have been running which is working out great. With Hurricane going I still have all the endurance I need. I was running the Cimmera Nictus TF with a team and got some nice compliments that I was running StormCloud2 the way a stormie should be run. We had a good time. I am already thinking about a respec though as I miss getting up close and personal and wonder if I can run with 40% S/L defense. So first my current build which works very well if you like staying at range and running hurricane. This Hero build was built using Mids Reborn 3.0.2.19 https://github.com/Reborn-Team/MidsReborn Click this DataLink to open the build! Level 50 Magic Controller Primary Power Set: Earth Control Secondary Power Set: Storm Summoning Power Pool: Sorcery Power Pool: Speed Power Pool: Leadership Power Pool: Leaping Ancillary Pool: Ice Mastery Hero Profile: Level 1: Fossilize -- BslGaz-Acc/Hold(A), BslGaz-Acc/Rchg(3), BslGaz-Acc/EndRdx/Rchg/Hold(3), BslGaz-EndRdx/Rchg/Hold(5), Apc-Dam%(5), UnbCns-Dam%(7) Level 1: Gale -- SuddAcc--KB/+KD(A), FrcFdb-Rechg%(7), Acc-I(9), JvlVll-Dam%(9), PstBls-Dam%(13), Bmbdmt-+FireDmg(46) Level 2: Stone Cages -- EnfOpr-EndRdx/Immob(A), EnfOpr-Acc/EndRdx(21), EnfOpr-Acc/Immob/Rchg(23), EnfOpr-Acc/Immob(37) Level 4: O2 Boost -- Prv-Heal(A), Prv-Heal/EndRdx(11) Level 6: Spirit Ward -- Prv-Heal(A), Prv-Heal/EndRdx(11) Level 8: Arcane Bolt -- FrcFdb-Rechg%(A), Dcm-Build%(23), GldJvl-Dam%(25), ExpStr-Dam%(25), Apc-Dmg(34), GldJvl-Acc/Dmg(40) Level 10: Steamy Mist -- LucoftheG-Def/Rchg+(A), LucoftheG-Def(13), LucoftheG-Def/EndRdx/Rchg(15), LucoftheG-Def/EndRdx(27), LucoftheG-EndRdx/Rchg(27) Level 12: Stalagmites -- AbsAmz-Acc/Rchg(A), PstBls-Dam%(29), Bmbdmt-+FireDmg(31), Ann-ResDeb%(31), SprWiloft-Rchg/Dmg%(31), SprOvrPrs-Rchg/Energy Font(33) Level 14: Hasten -- RechRdx-I(A), RechRdx-I(33) Level 16: Freezing Rain -- RechRdx-I(A) Level 18: Earthquake -- FrcFdb-Rechg%(A) Level 20: Hurricane -- EndRdx-I(A) Level 22: Super Speed -- Clr-Stlth(A) Level 24: Rune of Protection -- StdPrt-ResDam/Def+(A), GldArm-3defTpProc(34) Level 26: Volcanic Gasses -- BslGaz-Acc/Hold(A), BslGaz-Rchg/Hold(34), BslGaz-Acc/EndRdx/Rchg/Hold(36), BslGaz-EndRdx/Rchg/Hold(36), Lck-%Hold(36) Level 28: Maneuvers -- LucoftheG-Def/Rchg+(A), LucoftheG-Def/EndRdx/Rchg(29), Rct-ResDam%(33), LucoftheG-Def/EndRdx(37), ShlWal-ResDam/Re TP(45), LucoftheG-Def(46) Level 30: Combat Jumping -- LucoftheG-Def/Rchg+(A) Level 32: Animate Stone -- ExpRnf-+Res(Pets)(A), ExpRnf-Acc/Dmg(37), ExpRnf-EndRdx/Dmg/Rchg(39), ExpRnf-Acc/Dmg/Rchg(39), SlbAll-Dmg/EndRdx(39) Level 35: Tornado -- SlbAll-Dmg(A), SlbAll-Dmg/Rchg(40), SlbAll-Acc/Rchg(40), SlbAll-Build%(42), SuddAcc--KB/+KD(42), FrcFdb-Rechg%(42) Level 38: Lightning Storm -- FrcFdb-Rechg%(A), SuddAcc--KB/+KD(43), PrfShf-End%(43), GldJvl-Dam%(43), ExpStr-Dam%(45) Level 41: Hibernate -- RechRdx-I(A) Level 44: Frozen Armor -- LucoftheG-Def/Rchg+(A), LucoftheG-Def/EndRdx(45), LucoftheG-Def/EndRdx/Rchg(46), LucoftheG-Def(50) Level 47: Frost Breath -- Bmbdmt-+FireDmg(A), ImpSwf-Dam%(48), JvlVll-Dam%(48), PstBls-Dam%(48), Rgn-Knock%(50), Rgn-Dmg(50) Level 49: Ice Storm -- RechRdx-I(A) Level 1: Containment Level 1: Brawl -- Empty(A) Level 1: Sprint -- Empty(A) Level 2: Rest -- Empty(A) Level 2: Swift -- Empty(A) Level 2: Hurdle -- Empty(A) Level 2: Health -- Mrc-Rcvry+(A), NmnCnv-Regen/Rcvry+(15), Pnc-Heal/+End(17), Prv-Absorb%(17), Prv-Heal(19), NmnCnv-Heal(21) Level 2: Stamina -- PrfShf-EndMod(A), PrfShf-End%(19) Level 50: Freedom Phalanx Reserve Level 50: Portal Jockey Level 50: Task Force Commander Level 50: The Atlas Medallion Level 50: Vorpal Radial Final Judgement Level 50: Vanguard Core Superior Ally Level 50: Ageless Core Epiphany Level 50: Cardiac Core Paragon Level 50: Support Core Embodiment ------------ And now my new potential build where I will be relying on powers that slow and hold and getting into melee range as my finishing move. I like that I was able to get Stone Mastery back in as my Epic pool and still have plenty of powers that with procs now do decent damage. So if I can get by with a little less defense which seems likely since most of my attacks have -5% To Hit debuffs I should be able to do more damage while having more HP and a great occasional large heal from Hoarfrost. Any thoughts? This Hero build was built using Mids Reborn 3.0.2.19 https://github.com/Reborn-Team/MidsReborn Click this DataLink to open the build! Level 50 Magic Controller Primary Power Set: Earth Control Secondary Power Set: Storm Summoning Power Pool: Force of Will Power Pool: Leadership Ancillary Pool: Stone Mastery Hero Profile: Level 1: Fossilize -- Apc-Dmg/Rchg(A), Apc-Dmg/EndRdx(3), Apc-Acc/Dmg/Rchg(3), Apc-Dam%(5), SprEnt-Rchg/AbsorbProc(5), EntChs-Heal%(7) Level 1: Gale -- SuddAcc--KB/+KD(A), FrcFdb-Rechg%(7), Acc-I(9) Level 2: Stone Cages -- Acc-I(A) Level 4: Mighty Leap -- UnbLea-Stlth(A) Level 6: Project Will -- FrcFdb-Rechg%(A), EntChs-Heal%(23), ExpStr-Dam%(25), Dcm-Build%(25), Apc-Dmg(34), Dmg-I(40) Level 8: Weaken Resolve -- TchofLadG-%Dam(A), AchHee-ResDeb%(9), ShlBrk-%Dam(11), CldSns-%Dam(11) Level 10: Steamy Mist -- LucoftheG-Def/Rchg+(A), LucoftheG-Def(13), LucoftheG-EndRdx/Rchg(13), LucoftheG-Def/EndRdx/Rchg(15), LucoftheG-Def/EndRdx(27) Level 12: Stalagmites -- AbsAmz-Acc/Rchg(A), PstBls-Dam%(29), Bmbdmt-+FireDmg(31), Ann-ResDeb%(31), SprWiloft-Rchg/Dmg%(31), SprOvrPrs-Rchg/Energy Font(33) Level 14: Wall of Force -- Rgn-Dmg(A), PstBls-Dam%(19), Bmbdmt-+FireDmg(21), FrcFdb-Rechg%(21), ExpStr-Dam%(23), Rgn-Dmg/EndRdx(27) Level 16: Freezing Rain -- RechRdx-I(A) Level 18: Earthquake -- FrcFdb-Rechg%(A), ExpStr-Dam%(33), TchofLadG-%Dam(34) Level 20: Hurricane -- EndRdx-I(A) Level 22: Unleash Potential -- LucoftheG-Def/Rchg+(A) Level 24: Quicksand -- ImpSwf-Dam%(A) Level 26: Volcanic Gasses -- UnbCns-Acc/Hold/Rchg(A), UnbCns-Hold(34), GldNet-Dam%(36), UnbCns-Acc/Rchg(36), UnbCns-Dam%(36), UnbCns-Hold/Rchg(37) Level 28: Maneuvers -- LucoftheG-Def/Rchg+(A), LucoftheG-Def/EndRdx/Rchg(29), Rct-ResDam%(33), LucoftheG-Def/EndRdx(37), LucoftheG-Def(46) Level 30: Snow Storm -- ImpSwf-Dam%(A) Level 32: Animate Stone -- ExpRnf-+Res(Pets)(A), ExpRnf-Acc/Dmg(37), ExpRnf-EndRdx/Dmg/Rchg(39), ExpRnf-Acc/Dmg/Rchg(39), SlbAll-Dmg/Rchg(39) Level 35: Tornado -- SlbAll-Build%(A), SlbAll-Dmg(40), SlbAll-Acc/Dmg/Rchg(40), SlbAll-Dmg/EndRdx(42), SuddAcc--KB/+KD(42), FrcFdb-Rechg%(42) Level 38: Fissure -- AbsAmz-ToHitDeb%(A), Bmbdmt-+FireDmg(43), PstBls-Dam%(45), ExpStr-Dam%(46) Level 41: Seismic Smash -- SprBlsCol-Dmg/EndRdx(A), SprBlsCol-Rchg/HoldProc(43), SprBlsCol-Acc/Dmg/Rchg(43), SprBlsCol-Dmg/EndRdx/Acc/Rchg(46), SprBlsCol-Acc/Dmg(48), Hct-Dam%(50) Level 44: Rock Armor -- LucoftheG-Def(A), LucoftheG-Def/Rchg+(45), LucoftheG-Def/Rchg(45), LucoftheG-Def/EndRdx(50) Level 47: Earth's Embrace -- Heal-I(A), GldArm-3defTpProc(48), Heal-I(48) Level 49: Lightning Storm -- FrcFdb-Rechg%(A), PrfShf-End%(50) Level 1: Containment Level 1: Brawl -- Empty(A) Level 1: Sprint -- Empty(A) Level 2: Rest -- Empty(A) Level 2: Swift -- Empty(A) Level 2: Hurdle -- Empty(A) Level 2: Health -- Mrc-Rcvry+(A), NmnCnv-Regen/Rcvry+(15), Pnc-Heal/+End(17), Prv-Absorb%(17) Level 2: Stamina -- PrfShf-EndMod(A), PrfShf-End%(19) Level 50: Freedom Phalanx Reserve Level 50: Portal Jockey Level 50: Task Force Commander Level 50: The Atlas Medallion Level 50: Vorpal Radial Final Judgement Level 50: Vanguard Core Superior Ally Level 50: Ageless Core Epiphany Level 50: Cardiac Core Paragon Level 50: Support Core Embodiment Level 50: Diamagnetic Core Flawless Interface ------------
-
So I saw this post and decided a dark/atomic blaster looks like a lot of fun so I started one. I made my first build idea and would like some feedback. The biggest question I have it does it make sense to put a lot of damage procs into the build like I have seen others do? If so which powers to proc? I also know I need to focus on a defense type and wonder if 35-40% defense would be enough given all the -accuracy powers in the dark set. This Hero build was built using Mids Reborn 3.0.2.19 https://github.com/Reborn-Team/MidsReborn Click this DataLink to open the build! Level 50 Magic Blaster Primary Power Set: Dark Blast Secondary Power Set: Atomic Manipulation Power Pool: Speed Power Pool: Fighting Power Pool: Leaping Power Pool: Concealment Ancillary Pool: Mace Mastery Hero Profile: Level 1: Gloom -- Thn-Acc/Dmg(A), Thn-Acc/Dmg/EndRdx(3), Thn-Dmg/EndRdx(3), GldJvl-Dam%(5), CldSns-%Dam(5), Apc-Dam%(7) Level 1: Electron Shackles -- SprDfnBrr-Rchg/+Status Protect(A), SprDfnBrr-Acc/Dmg/EndRdx/Rchg(40), SprDfnBrr-Acc/Dmg/EndRdx(42), SprDfnBrr-Acc/Dmg/Rchg(42), SprDfnBrr-Dmg/Rchg(42), SprDfnBrr-Acc/Dmg(43) Level 2: Negatron Slam -- KntCmb-Acc/Dmg(A), KntCmb-Dmg/EndRdx(7), KntCmb-Dmg/Rchg(13), KntCmb-Dmg/EndRdx/Rchg(15), FrcFdb-Rechg%(15), SprBlsCol-Rchg/HoldProc(17) Level 4: Positron Cell -- Thn-Acc/Dmg(A), Thn-Dmg/EndRdx(17), Thn-Dmg/Rchg(23), Thn-Acc/Dmg/Rchg(25), Thn-Acc/Dmg/EndRdx(29), Thn-Dmg/EndRdx/Rchg(29) Level 6: Aim -- GssSynFr--Build%(A) Level 8: Moonbeam -- ExcCnt-Acc/Dmg(A), ExcCnt-Dmg/EndRdx(9), ExcCnt-Dmg/Rng(9), ExcCnt-Dmg/ActRdx(11), ExcCnt-Dmg/Rchg(11), ExcCnt-Stun%(13) Level 10: Ionize -- RctRtc-ToHit/Rchg(A), RctRtc-Pcptn(46) Level 12: Tenebrous Tentacles -- Artl-End/Rech/Rng(A), Artl-Acc/Rech/Rng(37), Artl-Acc/Dam/Rech(37), Artl-Dam/Rech(39), Artl-Dam/End(39), Artl-Acc/Dam(39) Level 14: Super Speed -- BlsoftheZ-ResKB(A), BlsoftheZ-Travel(46) Level 16: Beta Decay -- SphIns-ToHitDeb(A), SphIns-Acc/ToHitDeb(43), SphIns-ToHitDeb/EndRdx/Rchg(43), SphIns-%ToHit(45), SphIns-Acc/EndRdx/Rchg(45) Level 18: Abyssal Gaze -- Thn-Acc/Dmg(A), Thn-Dmg/EndRdx(19), Thn-Dmg/Rchg(19), Thn-Acc/Dmg/Rchg(21), Thn-Acc/Dmg/EndRdx(21), Thn-Dmg/EndRdx/Rchg(23) Level 20: Metabolic Acceleration -- PrfShf-End%(A), PwrTrns-+Heal(31) Level 22: Boxing -- Empty(A) Level 24: Tough -- StdPrt-ResDam/Def+(A), GldArm-3defTpProc(25), UnbGrd-Max HP%(45), UnbGrd-ResDam(48) Level 26: Weave -- LucoftheG-Def/Rchg+(A), LucoftheG-Def(27), LucoftheG-Def/EndRdx(27), LucoftheG-Def/Rchg(50), LucoftheG-Def/EndRdx/Rchg(50) Level 28: Atom Smasher -- Arm-Dam%(A), Arm-Dmg/EndRdx(36), Arm-Acc/Rchg(36), Arm-Acc/Dmg/Rchg(36), Arm-Dmg(37) Level 30: Hasten -- RechRdx-I(A), RechRdx-I(31) Level 32: Blackstar -- SprBlsWrt-Rchg/Dmg%(A), SprBlsWrt-Acc/Dmg/EndRdx/Rchg(33), SprBlsWrt-Acc/Dmg/EndRdx(33), SprBlsWrt-Dmg/Rchg(33), SprBlsWrt-Acc/Dmg/Rchg(34), SprBlsWrt-Acc/Dmg(34) Level 35: Scorpion Shield -- LucoftheG-Def/Rchg+(A), LucoftheG-Def(40), LucoftheG-Def/EndRdx(40), LucoftheG-Def/Rchg(46), LucoftheG-Def/EndRdx/Rchg(50) Level 38: Combat Jumping -- LucoftheG-Def/Rchg+(A) Level 41: Stealth -- ShlWal-ResDam/Re TP(A), LucoftheG-Def/Rchg+(48) Level 44: Summon Spiderlings -- SlbAll-Acc/Dmg/Rchg(A) Level 47: Umbral Torrent -- SuddAcc--KB/+KD(A) Level 49: Burnout -- RechRdx-I(A) Level 1: Brawl -- Empty(A) Level 1: Defiance Level 1: Sprint -- Clr-Stlth(A) Level 2: Rest -- Empty(A) Level 2: Swift -- Run-I(A) Level 2: Health -- Pnc-Heal/+End(A), Mrc-Rcvry+(34), Prv-Absorb%(48) Level 2: Hurdle -- Jump-I(A) Level 2: Stamina -- PrfShf-End%(A), PwrTrns-+Heal(31) Level 49: Quick Form ------------
-
Great advice about slotting the chance to heal proc as many times as possible. I think two of those will keep me upright better than putting three power slots into the healing pool. I just lost too much trying to fit them in and a 4 second activation is like missing three attacks so DPS would really suffer. I had Elude and didn’t use it much. When I did I would be on a time because I would have to finish off a group before it crashed. The crash makes me not want it again. I guess I’m more into consistently knowing what I can do versus being Uber for a few minutes and then sucking air and possibly dying during the crash. Still some helpful advice so I appreciate it.
-
Good reason. Here is one more build without the Presence Power Pool. E/N resistance is only 29% versus your 47% but S/L resistance is one hit away from the 90% cap. I also really like the Soul Mastery Epic pool both for the excellent Gloom ranged attack and Darkest Night toggle that gives -30% damage and -15% to hit along with a nice AOE of negative energy. This may be my final build, but I should never say never. This Hero build was built using Mids Reborn 3.0.2.19 https://github.com/Reborn-Team/MidsReborn Click this DataLink to open the build! Level 50 Science Tanker Primary Power Set: Super Reflexes Secondary Power Set: Martial Arts Power Pool: Speed Power Pool: Fighting Power Pool: Leaping Ancillary Pool: Soul Mastery Hero Profile: Level 1: Focused Fighting -- LucoftheG-Def/EndRdx(A), LucoftheG-Def/Rchg(3), LucoftheG-Def/EndRdx/Rchg(3), LucoftheG-Def(5), LucoftheG-Def/Rchg+(5), LucoftheG-EndRdx/Rchg(31) Level 1: Thunder Kick -- SprMghoft-Acc/Dmg(A), SprMghoft-Dmg/Rchg(36), SprMghoft-Acc/Dmg/Rchg(43), SprMghoft-Dmg/EndRdx/Rchg(43), SprMghoft-Acc/Dmg/EndRdx/Rchg(43), SprMghoft-Rchg/Res%(46) Level 2: Focused Senses -- LucoftheG-Def/EndRdx(A), LucoftheG-Def/Rchg(7), LucoftheG-Def/EndRdx/Rchg(7), LucoftheG-Def(9), LucoftheG-Def/Rchg+(9), Rct-ResDam%(40) Level 4: Super Speed -- Clr-EndRdx(A), Clr-Stlth(13) Level 6: Storm Kick -- Mk'Bit-Dmg/EndRdx(A), Mk'Bit-Acc/EndRdx/Rchg(11), Mk'Bit-Dam%(31), Mk'Bit-Acc/Dmg(34), Mk'Bit-Dmg/Rchg(34), TchofDth-Dam%(36) Level 8: Hasten -- RechRdx-I(A), RechRdx-I(11) Level 10: Warrior's Provocation -- MckBrt-Taunt/Rchg/Rng(A), MckBrt-Taunt/Rng(23), MckBrt-Rchg(23), PrfZng-Dam%(31) Level 12: Boxing -- Empty(A) Level 14: Tough -- StdPrt-ResDam/Def+(A), UnbGrd-Max HP%(33), UnbGrd-ResDam(13), UnbGrd-ResDam/EndRdx(15), GldArm-End/Res(15), GldArm-3defTpProc(17) Level 16: Crane Kick -- SuddAcc--KB/+KD(A), Mk'Bit-Acc/Dmg(42), Mk'Bit-Dmg/EndRdx(33), Mk'Bit-Dmg/Rchg(33), Mk'Bit-Acc/Dmg/EndRdx/Rchg(34), Mk'Bit-Dam%(37) Level 18: Evasion -- LucoftheG-Def/EndRdx(A), LucoftheG-Def/Rchg(19), LucoftheG-Def/EndRdx/Rchg(19), LucoftheG-Def(21), LucoftheG-Def/Rchg+(21), LucoftheG-EndRdx/Rchg(42) Level 20: Agile -- LucoftheG-Def/Rchg+(A) Level 22: Dodge -- LucoftheG-Def(A) Level 24: Dragon's Tail -- Obl-Dmg(A), Obl-Acc/Rchg(25), Obl-Dmg/Rchg(25), Obl-Acc/Dmg/EndRdx/Rchg(27), Obl-%Dam(27), FuroftheG-ResDeb%(29) Level 26: Quickness -- Run-I(A) Level 28: Focus Chi -- RechRdx-I(A), RechRdx-I(29) Level 30: Combat Jumping -- LucoftheG-Def/Rchg+(A) Level 32: Lucky -- ShlWal-ResDam/Re TP(A) Level 35: Gloom -- Dcm-Acc/Dmg(A), Dcm-Dmg/EndRdx(37), Dcm-Dmg/Rchg(39), Dcm-Build%(39), Dcm-Acc/Dmg/Rchg(39), EntChs-Heal%(42) Level 38: Eagles Claw -- SprGntFis-Acc/Dmg(A), SprGntFis-Dmg/Rchg(45), SprGntFis-Acc/Dmg/Rchg(45), SprGntFis-Dmg/EndRdx/Rchg(45), SprGntFis-Acc/Dmg/EndRdx/Rchg(46), SprGntFis-Rchg/+Absorb(46) Level 41: Darkest Night -- DarWtcDsp-ToHitDeb/EndRdx(A), DarWtcDsp-ToHitDeb(48) Level 44: Dark Obliteration -- Bmbdmt-Dam(A), Bmbdmt-Acc/Rech/End(48), Bmbdmt-Dam/Rech(48), Bmbdmt-Acc/Dam/Rech(50), Bmbdmt-Acc/Dam/Rech/End(50), Bmbdmt-+FireDmg(50) Level 47: Summon Widow -- RechRdx-I(A) Level 49: Practiced Brawler -- RechRdx-I(A) Level 1: Brawl -- Empty(A) Level 1: Gauntlet Level 1: Sprint -- Empty(A) Level 2: Rest -- Empty(A) Level 2: Swift -- Empty(A) Level 2: Health -- DctWnd-Heal(A), DctWnd-Heal/Rchg(17), Prv-Absorb%(36), Prv-Heal(37), Pnc-Heal/+End(40), Mrc-Rcvry+(40) Level 2: Hurdle -- Empty(A) Level 2: Stamina -- PrfShf-End%(A) ------------