The Beta Account Center is temporarily unavailable
×


Story Archer
-
Posts
523 -
Joined
-
Last visited
Content Type
Profiles
Forums
Events
Store
Articles
Patch Notes
Everything posted by Story Archer
-
For some reason MIDS isn't showing any of the damage from procs for me. Is anyone else having this problem? I can find anywhere in the settings where I might have that disabled...
-
Very, very true. I put together a completely unkillable MA/Dark tanker that pretty much capped Defenses, Resistances, had that huge Heal up every 15 seconds or so AND could either stack fear or stun AoE. Just insane.
-
Just interjecting that this is one of the reasons why Bio-Armor is so popular with some, particularly on Scrappers (and Stalkers, I suppose, I don't play them) - it contributes to 'defeat mitigation' in a big way and provides some sneaky defensive benefits that can help you get past traditional caps, like the damage debuff caused by Genetic Contamination.
-
Also throwing out there that Defense is generally considered better than Res because it protects you from stacking debuffs, BUT there are also a lot of stacking Defensive debuffs out there which can crash you hard (often referred to as 'cascading defensive failure'), so you need to keep DDR in mind and try to layer your defenses as much as possible with Defense, Resistance, Absorb Shields, Heals, damage debuffs, etc. That's one of the reasons why I've come to love Bio-Armor so much, those Absorb shields are golden. I'm actually a huge fan of Rad Armor (my favorite Tanker and most prolific farmer is a SS/Rad). The main reasons why some people tend to love Rad so much are as follows: Highly resistant to Energy drain/Recovery debuffs which are a PAIN when you have to deal with them, especially solo. Highly resistant to Energy damage which can be a difficult thing to achieve in many other builds. Big absorb shield to compliment its Resistances. Meltdown is a great T9 power with no downside, which usually isn't the case. Beta Decay is a really nice power that does a lot for you that's easy to overlook. Ground Zero is easily proc-able into a potent fast-recharging mini-nuke, and if you're creative, you can do the same thing with Radiation Therapy as well. Until recently I'd say that the last reason is the biggest one by far, but with the recent patch I haven't checked to see how much those proc bombs have been affected yet, so that might have diminished its allure a little.
-
It's a very good power, your most damaging one from a burst standpoint, with a higher than normal chance to Crit. However, it also has a longer activation time than anything else in your arsenal and roots you while it goes off, which diametrically opposes the playstyle encouraged by Claws as a whole. Claws has fast recharging, fast activating powers which can be very efficient when fully taken advantage of. I used Eviscerate for a long time and promoted it, but when I finally dropped it in favor of Shockwave, my entire approach (and my entire appreciation) of the Claws set really elevated. Against large groups, a Claws character is much more effective using Follow-Up and Spin, jumping/moving back a step and using Shockwave to knock everyone down before jumping back in. Your survivability goes through the roof with this approach - just make sure you have a KB to KD IO slotted into Shockwave. Against solo foes, Shockwave and Focus usually give you enough cycling KD to keep a guy on his back for most of the fight. Eviscerate can admittedly hit hard, but every time you use it to deal 500 damage when you only needed 150 damage to finish off a guy, it's a waste of time and energy. Chaining together Claws' faster, lighter attacks is usually much more efficient. As far as armors go, I play mine with Bio - like you, I initially had no interest in it, but eventually I got turned around and now it's my favorite Scrapper armor. Generally speaking though, I suggest Resistance-based armors for Brutes & Tankers and Defense-based armors for Scrappers and Stalkers, so of the two you mentioned, I'd recommend going with EA. There are some nice IO slotting tricks that you can use to boost your defenses with that set even further. Ninjitsu is also a good choice because of its useful toolbox and the fact that it uses positional defense instead of typed defense.
-
My favorite character - Ladyshrike, a Claws/Bio Scrapper - is a deadly solo farmer even though that's not what she's designed for, strictly speaking. Bio-Armor benefits from having lots of mobs to target with its various abilities and the combination of fast-recharging Spin and Shockwave can be utilized (along with Genetic Contamination) to the point that you really don't need any additional AoE's. Follow-Up -> Spin -> (step back) -> Shockwave -> (step up) is a seamless attack chain that becomes second nature after a little while. I usually keep Pyronic Radial Final (Incarnate) as a reserve nuke to use in case I draw too many mobs at once - it's ultra-fast cast time makes it perfect in that regard. Moving in and out of melee range while repeatedly knocking down mobs with Shockwave actually ends up being better damage mitigation than any armor set I've seen. I've also found that it is easy to overlook the level of protection that absorb shields give you until you've actually played with them, and a lot of people forget that Genetic Contamination comes with a hefty -11.25% damage debuff as well. Not only is that like a free 11% damage resistance, it applies even when you've reached the DR hard cap. If needed, dropping the occasional Shadow Meld (Soul Mastery EPP) or Barrier Core Epiphany (Incarnate) will help keep you up and running in even the toughest of farms. Here's my current build, if you're interested - again not optimized for farming, but I've found that it doesn't need to be. [Ladyshrike] alt.mbd
-
Plus it will eventually take the Coercive Persuasion set with its ridiculous Contagious Confusion proc, +5% Ranged defense and +10% Recharge...
-
Hopefully this helps - she's my current badger and 1A main. I farm +4/x8 solo with no problem. She's my second strongest Scrapper. [Veil of Blades] new.mbd The Heal and Recovery clicks come back up fast (18 seconds & 24 seconds respectively) and Rune of Protection goes a long way in shoring up the defenses in those -Def fights. Melee Core Embodiment (when you get to Incarnates) also does wonders for your damage resistance and you'll have one of the two of them up 75% of the time. Blinding Powder is decent mitigation on its own and offers a wonderful enhancement set in Coercive Persuasion. Shadow Meld and Kuji-In Retsu are more for muleing LotG but they have their place in the rotation from time to time as well. I can't speak to what Street Justice brings to the table, but I'm not using any defensive mitigation from my offense, so this is purely Ninjitsu. I will ask this - do you need all those power selections from Street Justice? I've never played the set (I think it's animations look cool, though), but I've found that one of the keys to building a strong scrapper is to get as efficient as possible with your attack chain(s), not just when it comes to rotation, but also when it comes to slotting. Gaining an extra power slot or two and another half dozen or more enhancements free can go a long way towards optimizing your build.

-
My Snipe from the Epic pool crits all the time...
-
Patch Notes for June 17th, 2025 - Issue 28, Page 2
Story Archer replied to The Curator's topic in Patch Notes Discussion
Is this the best place to track the status of the badge tracker? It's actually my favorite addition to the game, but I've only seen it work once (on Excelsior). -
Does Spring Attack need to be slotted for Accuracy?
Story Archer replied to Story Archer's topic in General Discussion
This is what I was looking for - thanks! -
Does Spring Attack need to be slotted for Accuracy?
Story Archer replied to Story Archer's topic in General Discussion
I'm not sure why, I thought it was a bit wider than this. If you are going to proc-bomb it, does it check for the procs at the wider range only, or does it let you double-dip by checking for them twice, once at each range? -
Does Spring Attack need to be slotted for Accuracy?
Story Archer replied to Story Archer's topic in General Discussion
Thanks for the response - just out of curiosity, for us lay-people, what does the 1.0 accuracy mean? I assume it references how enhancements affect it, but what does the base accuracy work out to, percentage-wise? -
And if so, how much? It doesn't come up with an accuracy percentage on Mids. It doesn't have a radius for it either, now that I look at it. I tried to search the forums but either I'm never able to come up with anything when I do that (or I get everything, it's always one or the other).
-
Are these still being run?
-
Indom was my first server - I'll definitely have to sign up for some of your badge runs if you are still running them.
-
How much does Offensive Adaptation (Bio-Armor) hurt your defenses?
Story Archer replied to Story Archer's topic in Scrapper
Scrapper, not Brute. I'll have to check my version of Mids, but I've had problems updating in the past - thanks for the responses! -
Good afternoon, all. I'm a long-time player who has never so much as dipped their toe into PvP, but a renewed interest in finishing my badger has me eyeballing this one part of the game I've yet to explore. Had my first impromptu fight in RV where somebody just came at me while I was working on pillboxes and heavies... we went at it for like 15 minutes with neither of us gaining any real advantage and got to chatting while we did it. Eventually we just parted ways but not before they strongly encouraged me to get into the PvP side of things. So now I'm looking at my badger, aware that they probably aren't an optimal PvP set, but she's my badger so she's stuck with the job. I thought I might present her build on her so you more experienced guys can tell me what changes I need to make if I'm going to be diving primarily into PvP for a while. Any advice would be appreciated (including suggestions regarding tactics with this particular power set). [Veil of Blades] new.mbd I'm assuming I need to work Hasten back in, probably dropping the TP pool to make room. Maybe start replacing some of those LotG sets with Shield Wall sets? It seems like slotting in particular can get really convoluted, given how certain enhancement sets function differently. Do the PvP enhancement sets provide both sets of benefits in PvP or only the latter? It's a little confusing...
-
How much does Offensive Adaptation (Bio-Armor) hurt your defenses?
Story Archer replied to Story Archer's topic in Scrapper
When I toggle Offensive Adaptation on and off in Mids, I see no changes in my Resistances. The damage buff from Offensive adaptation seems way off too. With no adaptations on, my damage buff is 141.5%, when I toggle Offensive Adaptation on, it goes up to 172.75% (or +31.5%). That's well and good, but when I look at the actual damage caused by attacks according to Mids, the jumps are way higher than I would expect. Slotted as I have everything, Focus, for example, has a base damage of 144.4 and an enhanced damage of 456.6. When I toggle on Offensive Adaptation, it jumps to 546.5, or 90 points which is more of a 62% increase than a 31% increase. That jump is more or less reflected across all my attacks but inconsistently so. Do you get similar results? -
This is my first time posting regarding Mids and I want to take the opportunity to say thanks for providing such a wonderful service that has been incredibly useful to me and countless others through the years. I know that Mids is imperfect and by necessity a constant work in progress... but am I wrong in thinking that it has an unusual number of problems when it comes to Bio Armor? A Claws/Bio Armor scrapper has become far and away my favorite character to play, but there seem to be so many inconsistencies with Bio Armor in Mids that I honestly don't know if anything I'm looking at is accurate. Is it just the unusual nature and awkward complexity of the set, is it something else or am I misjudging what I'm seeing completely? Also, is there another option if I want to be able to lock down the numbers for a character using Bio Armor?
-
How much does Offensive Adaptation (Bio-Armor) hurt your defenses?
Story Archer replied to Story Archer's topic in Scrapper
That's incredibly confusing, but thanks for the response. I know that MID's is an imperfect tool, and that's fine, but it seems to be really off in a number of ways where Bio Armor is concerned. -
Always looking for someone to run with and love to discuss builds. One thing I've learned over the years is that no matter how perfectly you think you've gotten a build, there is always something new to learn. Feel free to hit me up @Story Archer any time.
-
Since the nature of your defensive bonuses don't grant any real DDR to speak of, you're going to want a way to get your non S/L resistances up when you hit that cascading failure. Rune of Protection via the Sorcery pool is one way to do it (and will get you a ranged attack that you can mine for F/C Resistance) and Melee Core Embodiment is another. In the build above, between the two, I can pretty much run capped resistances to everything except E/N 75% of the time. Melee Core Embodiment will give your already strong regen another bump as well.
-
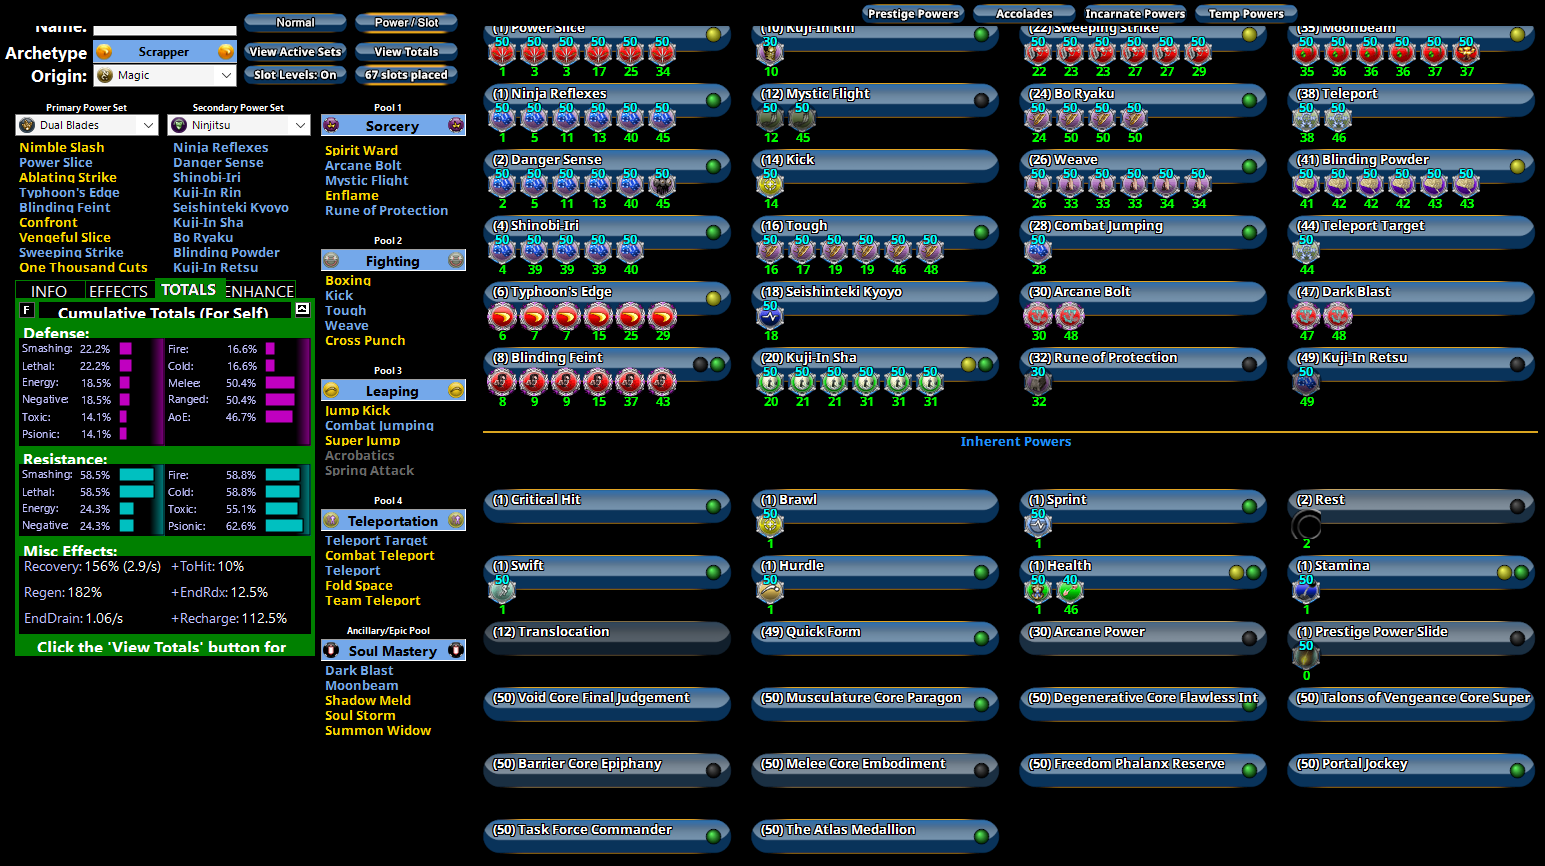
I can offer a little bit of insight, though I prefer my Dual Blades to be Ninjitsu-flavored... I'll post the build of my main first and then talk to you about some things you might want to consider. [Veil of Blades] new.mbd As far as attack combos, for most of the build's life, I incorporated into my single-target and AoE attack chains what I consider to be the two most effective and easy to get off combos: Single Target attack chain: Empower Combo [Nimble Slash -> Ablating Strike -> Blinding Feint] ->Sweeping Strike AoE attack chain: Blinding Feint ->Sweeping Strike -> Weaken Combo [Nimble Slash -> Ablating Strike -> Typhoon's Edge] This worked superbly well for me. I only respec'ed out of it once I had gotten my girl all sorted out with IO's, Patron Pool Powers and Incarnates. I personally like the Power Slice animation better and I get a very smooth attack chain with the four attack powers that I have (especially once I toss in Moonbeam from time to time). I also don't think that you need Hasten either. I respec'ed out of it and haven't missed it once. I feel like leaning so heavily on Kinetic Combat IO's ultimately gimps the effectiveness and efficiency of all of your melee attacks. The S/L defensive buffs are great but you're losing a lot there and, as a Scrapper, the best defense you have is dead enemies. Also keep in mind that the Weaken combo results in a significant 10% ToHit DeBuff to everyone within melee range (this will stack with your Rise to the Challenge debuff), so definitely some potential overkill if you're using that. I'd also like to suggest that you consider splitting Superior Scrapper's Strike into two different AoE attacks, putting three into each along with three from eradication. That'll net you +10% S/L defense as well as +6.25% E/N defense. The only reason I don't do that here is because I'm not chasing positional defenses (which I generally try to avoid anyway). Additionally, you can get a LOT out of temporary defensive buffs from Rune of Protection and Shadow Meld (Soul Mastery EPP) and eventually the Barrier Core Incarnate - between them WAY more than enough to handle any defensive concerns you might have, so keep that in mind when it comes to how you're slotting your attacks. If those are damage procs you're putting in there with Mako's Bite, I suggest subbing in Touch of Death procs instead, just because Negative damage is less heavily resisted. Don't neglect ranged attacks whenever you can find them - not to use, necessarily, but because you can mule an extra 6% F/C res from each of them with minimal investment. If any specific questions come to mind, feel free to hit me up here or DM.
-
Bio Armor says that there is a penalty to both Defense and Damage Resistance when Offensive Adaptation is toggled on, but I can't find hard numbers anywhere. For some reason MIDs seems to be getting increasingly difficult to use.

.png.0402e1f7a4ade2bcb6f6254fe52eb425.png)