

Darkir
-
Posts
1044 -
Joined
-
Last visited
Content Type
Profiles
Forums
Events
Store
Articles
Patch Notes
Posts posted by Darkir
-
-
14 minutes ago, Clave Dark 5 said:
If that's true about a Dom, then one could practically do nothing else, although that might be boring to play. Maybe drop Soul Extraction between, maybe a Dom group hold or something. I'll have to look into that.
It might seem boring....but you still have call hawk and vicious slash. I find it to be super fun. I absolutely love feral charge and between those three attacks you can have the FF proc the majority of the time.
My ice/savage Dom pretty much scraps all the time and just relies on ice slick and artic air toggle to keep me safe. The chaos confuse brings is also very fun, but really it's all the feral charges I get to do (proc'd out of course).
-
 2
2
-
-
7 hours ago, Swoo said:
Did you push forward with your experimentation on this one? 🙂
Yes, I only started playing again a little while ago. Still getting accolades and testing in all the different TFs.
This is what I am currently using (I don't find tesla cage to be all that great. Its range to jump is small and it needs to jump 5 times before its damage goes higher than ball lightning).
SpoilerThis Villain build was built using Mids Reborn 3.4.7
https://github.com/LoadedCamel/MidsRebornClick this DataLink to open the build!
Level 50 Mutation Corruptor
Primary Power Set: Electrical Blast
Secondary Power Set: Kinetics
Power Pool: Leadership
Power Pool: Fighting
Power Pool: Speed
Power Pool: Leaping
Ancillary Pool: Dark MasteryVillain Profile:
Level 1: Lightning Bolt- (A) Superior Malice of the Corruptor - Accuracy/Damage
- (29) Superior Malice of the Corruptor - Damage/Recharge
- (29) Superior Malice of the Corruptor - Accuracy/Damage/Recharge
- (31) Superior Malice of the Corruptor - Damage/Endurance/Recharge
- (31) Superior Malice of the Corruptor - Accuracy/Damage/Endurance/Recharge
- (31) Superior Malice of the Corruptor - Recharge/Chance for Negative Energy Damage
Level 1: Transfusion
- (A) Numina's Convalesence - Heal/Endurance
- (21) Numina's Convalesence - Endurance/Recharge
- (25) Numina's Convalesence - Heal/Recharge
- (25) Numina's Convalesence - Heal/Endurance/Recharge
- (27) Numina's Convalesence - Heal
- (27) Numina's Convalesence - +Regeneration/+Recovery
Level 2: Ball Lightning
- (A) Artillery - Accuracy/Damage
- (3) Artillery - Damage/Endurance
- (3) Artillery - Damage/Recharge
- (5) Artillery - Accuracy/Damage/Recharge
- (11) Artillery - Accuracy/Recharge/Range
- (33) Artillery - Endurance/Recharge/Range
Level 4: Maneuvers
- (A) Luck of the Gambler - Defense
- (5) Luck of the Gambler - Defense/Increased Global Recharge Speed
- (48) Shield Wall - +Res (Teleportation), +5% Res (All)
- (48) Reactive Defenses - Scaling Resist Damage
Level 6: Short Circuit
- (A) Obliteration - Damage
- (7) Obliteration - Accuracy/Recharge
- (7) Obliteration - Damage/Recharge
- (9) Obliteration - Accuracy/Damage/Recharge
- (9) Obliteration - Accuracy/Damage/Endurance/Recharge
- (11) Obliteration - Chance for Smashing Damage
Level 8: Boxing
- (A) Empty
Level 10: Siphon Speed
- (A) Accuracy IO
Level 12: Zapp
- (A) Sting of the Manticore - Accuracy/Damage
- (13) Sting of the Manticore - Damage/Endurance
- (13) Sting of the Manticore - Damage/Interrupt/Recharge
- (15) Sting of the Manticore - Damage/Endurance/Recharge
- (15) Sting of the Manticore - Chance of Damage(Toxic)
Level 14: Tactics
- (A) Gaussian's Synchronized Fire-Control - To Hit Buff
- (40) Gaussian's Synchronized Fire-Control - To Hit Buff/Recharge
- (42) Gaussian's Synchronized Fire-Control - To Hit Buff/Recharge/Endurance
- (42) Gaussian's Synchronized Fire-Control - Recharge/Endurance
- (42) Gaussian's Synchronized Fire-Control - To Hit Buff/Endurance
- (43) Gaussian's Synchronized Fire-Control - Chance for Build Up
Level 16: Tough
- (A) Unbreakable Guard - Resistance
- (17) Unbreakable Guard - Resistance/Endurance
- (17) Unbreakable Guard - Endurance/RechargeTime
- (19) Unbreakable Guard - Resistance/Endurance/RechargeTime
- (19) Gladiator's Armor - TP Protection +3% Def (All)
Level 18: Weave
- (A) Luck of the Gambler - Defense
- (21) Luck of the Gambler - Defense/Increased Global Recharge Speed
Level 20: Speed Boost
- (A) Blessing of the Zephyr - Run Speed, Jump, Flight Speed, Range/Endurance
- (46) Blessing of the Zephyr - Knockback Reduction (4 points)
Level 22: Voltaic Sentinel
- (A) Superior Scourging Blast - Accuracy/Damage
- (23) Superior Scourging Blast - Damage/RechargeTime
- (23) Superior Scourging Blast - Damage/Endurance/RechargeTime
Level 24: Hasten
- (A) Recharge Reduction IO
Level 26: Thunderous Blast
- (A) Artillery - Accuracy/Damage
- (34) Artillery - Damage/Endurance
- (34) Artillery - Damage/Recharge
- (34) Artillery - Accuracy/Damage/Recharge
- (37) Artillery - Accuracy/Recharge/Range
- (40) Artillery - Endurance/Recharge/Range
Level 28: Transference
-
D-Sync Origin:D-Sync Drain
Level 30: Fulcrum Shift
- (A) Accuracy IO
Level 32: Repel
- (A) Endurance Reduction IO
- (33) Sudden Acceleration - Knockback to Knockdown
- (33) Force Feedback - Chance for +Recharge
Level 35: Dark Consumption
- (A) Superior Avalanche - Accuracy/Damage
- (36) Superior Avalanche - Damage/Endurance
- (36) Superior Avalanche - Accuracy/Damage/Endurance
- (36) Superior Avalanche - Accuracy/Damage/Recharge
- (37) Superior Avalanche - Recharge/Chance for Knockdown
Level 38: Dark Embrace
- (A) Unbreakable Guard - Resistance
- (39) Unbreakable Guard - Resistance/Endurance
- (39) Unbreakable Guard - Endurance/RechargeTime
- (39) Unbreakable Guard - Resistance/Endurance/RechargeTime
- (40) Steadfast Protection - Resistance/+Def 3%
Level 41: Combat Jumping
- (A) Luck of the Gambler - Defense/Increased Global Recharge Speed
- (46) Blessing of the Zephyr - Run Speed, Jump, Flight Speed, Range/Endurance
- (49) Blessing of the Zephyr - Knockback Reduction (4 points)
Level 44: Soul Drain
- (A) Obliteration - Damage
- (45) Obliteration - Accuracy/Recharge
- (45) Obliteration - Damage/Recharge
- (45) Obliteration - Accuracy/Damage/Recharge
- (46) Obliteration - Accuracy/Damage/Endurance/Recharge
- (49) Obliteration - Chance for Smashing Damage
Level 47: Increase Density
- (A) Unbreakable Guard - Resistance/Endurance/RechargeTime
- (47) Unbreakable Guard - Resistance/Endurance
- (47) Unbreakable Guard - Endurance/RechargeTime
- (48) Unbreakable Guard - +Max HP
Level 49: Vengeance
- (A) Luck of the Gambler - Defense/Increased Global Recharge Speed
Level 1: Scourge
Level 1: Brawl| Copy & Paste this data into Mids Reborn : Hero Designer to view the build | |-------------------------------------------------------------------| |MxDz;1767;755;1510;HEX;| |78DA7594D94F136110C0672F4A0B586B5B5A048422506861A9FE0586C3448184C32| |BBE344DBBC0C6A66DB64BA26F6AE23FE08B0F2A86C433F1FC3F505078D3379E3D12| |8F78AFE34E073E96B049BBBF6FBEF966E69B63272F8E36BE5C9938065270A498AB5| |6B32365CB5AACD865AB7E72D1CED966B9A4003E3EFC25B6F6B233B9D2BC51D0C78A| |46DEB6CC7CAE981DC6D3766C5B6378716E4E1F374B866DE6AB109C2A978BFA84912| |B185675C1AC34B9EBE3E6FC826D96E603EE6AB66218854656ACA03C345631F3FA68| |CEBA909D44EB8675298E61F4E32F2AE39F04FC381AC0638CF3880A6DF084E129C12| |178C6F09CE105C18AB4CBCCB4E4EE446086200EB30CA7080EC269863304CD188D24| |9A9140D1DC1D1954068D40853A8200F8083AA19E2084495604338A0291FF0EFC782| |84A3004E314F9107C2688A16F4DF4ADC12FD9DDA983DF0C7F08EAE12F8323D78200| |3223F9A8C66C06170E3EB08AA6FDD2568E1CF0E3B5DD505AD04283E0586D8055706| |D35C21AC31B827DB0CEB0411046674DDB3973B426B84B2125E11E413FDC6778C0F0| |9020058F08143413148308C217BAD07EF8CAF08DE0007C67384AA0E2E990705A0A7| |1C2239CF0D7F80A8B2A61784BAE07E11D412BBEA2828A1C856E95FA027A1892045D| |E83126E8420CD294CE36B4D222D6B1857B28C13D94E01E4A700F75730F25B987D6D| |144ABE8A01532B8E3536003A5ED6225DBB992AF50D621D442EE400FEE4E276CAAB5| |1EBD4697BD8C99EB12ACA85D708B540EC36D8625863B6A2DCC65822B78BA472C570| |F97AB97CBD5CBE5EAE57225DD8CB5FBA11993D72726BA8FAB34C845C97051AEE2D9| |B410A796E6B118E0B118E0B118E0B118E4B1C8F058ACA1015D1C499DA3D239609D0| |31E821F04118C3323CE5286E254E184EA7E6F0ABCE3B4A9203E8E2BC4B19BD8433E| |A58ADF2B944B247F1FD8F92163FD0F7BC83F7AE48809A5365A277181EDFA69B7CA7| |5D9CD760A6E509AE269CF75C6533B6FEEFC6C4645C188733EE0119CF30ACE7A05D3| |5EC1CDF8CEE4384B5EC1B257F00FF160EEEE| |-------------------------------------------------------------------|
- (A) Empty
Level 1: Sprint- (A) Empty
Level 2: Rest- (A) Empty
Level 1: Swift- (A) Empty
Level 1: Hurdle- (A) Empty
Level 1: Health- (A) Panacea - +Hit Points/Endurance
- (43) Miracle - +Recovery
Level 1: Stamina- (A) Performance Shifter - EndMod
- (43) Performance Shifter - Chance for +End
Level 1: Shocked
Level 49: Quick Form
Level 50: Agility Core Paragon
Level 50: Marshal
Level 50: Invader
Level 50: High Pain Threshold
Level 50: Born In Battle
Level 1: Defense Amplifier (1 hour)
Level 1: Offense Amplifier (1 hour)
Level 1: Survival Amplifier (1 hour)
-------------
1
-
28 minutes ago, Uun said:
Range is disallowed on all melee PBAoEs, regardless of AT.
The website does not say that range is disallowed on burn, but I assume it is from your description. If range is 0 it doesn't matter if it is being given a multiplier or not.
31 minutes ago, Uun said:Powers not affected by the gauntlet radius buff will have radius disallowed. In the case of Rending Flurry, radius is not disallowed and it should benefit from the radius buff.
Ok, great. Thank you for all your help.
-
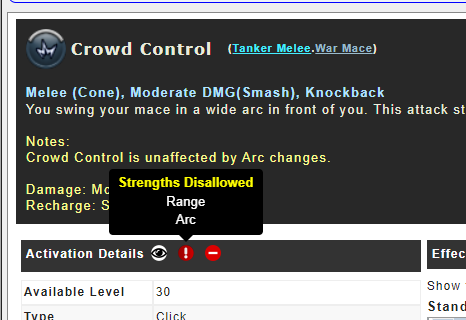
3 hours ago, Uun said:
If you open the power in CoD, look next to activation details. It will tell you if the range or arc buff is disallowed. (Crowd Control is both, but other powers can be just one or the other.)

Ok, that is very useful thank you.
But, wait, when a pbaoe has only range disallowed that still means the radius is not increased right? Even though some pbaoes have only radius disallowed. I'm assuming that if radius or ranged is disallowed then the effective area of the pbaoe is not increased.
Or am I wrong in that assumption.
Does rending flurring on a tanker have increased radius?
-
Does burn from fiery arua on a tanker get increased radius?
-
How can I tell which which powers are affected by the gauntlet buff and which are not? The game seems to tell me in info if the target cap has been raised, but how do I do tell about the radius?
-
4 hours ago, Nostromo21 said:
Yep, my Ill/Dark troller just sits (well, hovers) back & does her nails, while her pets annihilate everything in their path! Most fights she only has time for one nail...;)
*checks timestamps*
Holy necropost batman!
-
1
-
-
In terms of just straight teleporting the most, a dominator will actually be the best. Feral charge can be up for use again in about 3 seconds.....it feels so so great and fun to play.
-
1
-
-
1 hour ago, TheZag said:
Primaries are more powerful than secondaries. Just storm summoning happens to have a fair amount of damage in it for a buff set.
Shouldn't the endurance drain in electric blast or the -tohit in dark blast be better on a corruptor then?
But defenders get better modifiers right? And corruptors get better damage...but not if its a secondary apparently? Do you see why I am confused when it comes to storm summoning?
-
Does anyone know the reasoning as to why storm summoning does more damage on a defender compared to a corruptor? Is it a bug like sleet doing the same -res on a defender and corruptor?
-
1 hour ago, BurtHutt said:
WTF is kings day?! The idea of kings and queens in this day in age is rather sickening.
Ummmm its the day when Christians remember the day that the three kings visited Jesus.
-
 1
1
-
 1
1
-
-
@Xandyrso SR or ICE for the primary and then DB or Claw or Kinetic Melee seem to be what most people think is weakest and is least popular. Whatcha think?
-
2
-
-
Can....can I make the build with whatever 'bad' powersets you choose? This seems like a fun challenge.
-
2
-
-
On 10/11/2022 at 9:02 AM, WitchofDread said:
Ok i have reworked the water/dark/dark build. There isnt a great deal of change in all honesty but i think this might be better:
- Only 38.43% R def but my hope is the - to hit will make up for it.
- Capped S/L res
- Hasten isnt perma, but i have slotted 2 Force feedback + rech, one in Hydro Blast and the other in Water Burst. Both powers will be used enough to hopefully make up for hasten
- For Destiny i'm thinking either Ageless or Clarion, depends on my end usage.
This Villain build was built using Mids Reborn 3.4.6
https://github.com/LoadedCamel/MidsRebornLevel 50 Magic Corruptor
Primary Power Set: Water Blast
Secondary Power Set: Dark Miasma
Power Pool: Flight
Power Pool: Speed
Power Pool: Fighting
Ancillary Pool: Dark MasteryVillain Profile:
------------
Level 1: Hydro Blast
(A) Thunderstrike - Accuracy/Damage/Endurance
(3) Thunderstrike - Accuracy/Damage/Recharge
(3) Thunderstrike - Accuracy/Damage
(5) Force Feedback - Chance for +Recharge
Level 1: Twilight Grasp
(A) Accuracy IO
(5) Panacea - +Hit Points/Endurance
(7) Panacea - Heal
(7) Panacea - Heal/Endurance
(9) Panacea - Heal/Recharge
(9) Panacea - Heal/Endurance/Recharge
Level 2: Water Burst
(A) Bombardment - Accuracy/Damage/Recharge
(11) Bombardment - Accuracy/Damage/Recharge/Endurance
(11) Javelin Volley - Chance of Damage(Lethal)
(13) Force Feedback - Chance for +Recharge
(13) Positron's Blast - Chance of Damage(Energy)
(15) Bombardment - Chance for Fire Damage
Level 4: Tar Patch
(A) Recharge Reduction IO
Level 6: Whirlpool
(A) Artillery - Accuracy/Damage
(15) Artillery - Damage/Endurance
(17) Artillery - Damage/Recharge
(17) Artillery - Accuracy/Damage/Recharge
(19) Artillery - Accuracy/Recharge/Range
(46) Artillery - Endurance/Recharge/Range
Level 8: Tidal Forces
(A) Gaussian's Synchronized Fire-Control - Chance for Build Up
Level 10: Darkest Night
D-Sync Origin:D-Sync Marginalization
Level 12: Dehydrate
(A) Superior Scourging Blast - RechargeTime/PBAoE +End
(19) Superior Scourging Blast - Damage/Endurance/RechargeTime
(21) Superior Scourging Blast - Accuracy/Damage/RechargeTime
(21) Thunderstrike - Accuracy/Damage/Endurance
(23) Thunderstrike - Accuracy/Damage/Recharge
(23) Thunderstrike - Accuracy/Damage
Level 14: Howling Twilight
(A) Annihilation - Chance for Res Debuff
Level 16: Shadow Fall
(A) Luck of the Gambler - Defense/Increased Global Recharge Speed
(25) Reactive Defenses - Scaling Resist Damage
(25) Reactive Defenses - Defense/Endurance
(27) Shield Wall - +Res (Teleportation), +5% Res (All)
Level 18: Water Jet
(A) Apocalypse - Chance of Damage(Negative)
(27) Apocalypse - Damage/Endurance
(29) Apocalypse - Damage/Recharge
(29) Apocalypse - Damage/Recharge/Accuracy
(31) Apocalypse - Recharge/Accuracy
Level 20: Fearsome Stare
(A) Glimpse of the Abyss - Chance of Damage(Psionic)
(31) Cloud Senses - Chance for Negative Energy Damage
(31) Cloud Senses - Accuracy/Endurance/Recharge
(33) Cloud Senses - Accuracy/Recharge
(33) Cloud Senses - Accuracy/ToHitDebuff
Level 22: Hover
(A) Luck of the Gambler - Defense/Increased Global Recharge Speed
(33) Kismet - Accuracy +6%
Level 24: Fly
(A) Blessing of the Zephyr - Run Speed, Jump, Flight Speed, Range/Endurance
(34) Blessing of the Zephyr - Knockback Reduction (4 points)
Level 26: Hasten
(A) Recharge Reduction IO
(34) Recharge Reduction IO
Level 28: Petrifying Gaze
(A) Neuronic Shutdown - Accuracy/Endurance
(34) Neuronic Shutdown - Chance of Damage(Psionic)
(36) Ghost Widow's Embrace - Chance of Damage(Psionic)
(36) Unbreakable Constraint - Chance for Smashing Damage
(36) Gladiator's Net - Chance of Damage(Lethal)
(37) Lockdown - Chance for +2 Mag Hold
Level 30: Kick
(A) Empty
Level 32: Geyser
(A) Superior Malice of the Corruptor - Accuracy/Damage
(37) Superior Malice of the Corruptor - Damage/Recharge
(37) Superior Malice of the Corruptor - Accuracy/Damage/Recharge
(39) Superior Malice of the Corruptor - Damage/Endurance/Recharge
(39) Superior Malice of the Corruptor - Accuracy/Damage/Endurance/Recharge
(39) Superior Malice of the Corruptor - Recharge/Chance for Negative Energy Damage
Level 35: Tough
(A) Gladiator's Armor - TP Protection +3% Def (All)
(40) Steadfast Protection - Resistance/+Def 3%
(40) Titanium Coating - Resistance
(40) Titanium Coating - Resistance/Endurance
(42) Titanium Coating - Resistance/Recharge
(42) Titanium Coating - Resistance/Endurance/Recharge
Level 38: Dark Servant
(A) Cloud Senses - ToHit Debuff
(42) Cloud Senses - Accuracy/ToHitDebuff
(43) Cloud Senses - Accuracy/Recharge
(43) Cloud Senses - ToHit Debuff/Endurance/Recharge
(43) Cloud Senses - Accuracy/Endurance/Recharge
(45) Cloud Senses - Chance for Negative Energy Damage
Level 41: Dark Consumption
(A) Obliteration - Accuracy/Damage/Recharge
(45) Obliteration - Accuracy/Damage/Endurance/Recharge
Level 44: Dark Embrace
(A) Aegis - Psionic/Status Resistance
(45) Aegis - Resistance
(46) Aegis - Resistance/Endurance
(46) Aegis - Resistance/Endurance/Recharge
Level 47: Soul Drain
(A) Obliteration - Chance for Smashing Damage
(48) Obliteration - Accuracy/Damage/Recharge
(48) Eradication - Chance for Energy Damage
(48) Eradication - Accuracy/Damage/Recharge
(50) Eradication - Accuracy/Damage/Endurance/Recharge
Level 49: Weave
(A) Luck of the Gambler - Defense/Increased Global Recharge Speed
(50) Red Fortune - Defense
(50) Red Fortune - Defense/Endurance
Level 1: Scourge
Level 1: Brawl
(A) Empty
Level 1: Sprint
(A) Empty
Level 2: Rest
(A) Empty
Level 1: Swift
(A) Empty
Level 1: Hurdle
(A) Empty
Level 1: Health
(A) Numina's Convalesence - +Regeneration/+Recovery
Level 1: Stamina
(A) Performance Shifter - Chance for +End
Level 1: Combo Level 1
Level 1: Combo Level 2
Level 1: Combo Level 3
Level 24: Afterburner
Level 50: Intuition Radial Paragon
------------| Copy & Paste this data into Mids Reborn : Hero Designer to view the build |
|-------------------------------------------------------------------|
|MxDz;1676;741;1482;HEX;|
|78DA7594594F135114C7FFB733A5B4052AB243D9CA4EE9E6F26E584C8890104DF4C|
|D66424B692CB4B625D13735F133F844A28F26AE6FBEBB47FD04FA60E202260226BE|
|99E8787ACF5C7A0B6192E9FCE6EC3DE7CC5DBC36DBF0E1FDC21988C04CCE2A95923|
|3F96271A350CE17DD8B5626BB6C802E0FDDC17D45F2BCB59E49A7A297AC72BA989C|
|26AF72775539BDB1B2129DB58A57928B59ABB466C1BF94CFE7A26773D9CC6AD927F|
|942219D4E35B2B822CDAE6702F26D216DA5D2C5D26AB6D03C57C82E3B61287EBA78|
|BD936A18A63B37443F02EAB2A9C07BF44C78E1C25D059B0C266EBB243CAF3A48273|
|7D0AD4C060D097518501064A8479F827E8635CA2D84A88621A45009133E08052143|
|4203E7AEC0334868828B6D5E909BA1FD051808B3C93A25706B1AB71B86DB7136198|
|EC1ADA08EE1383C0C11D433E4298C474FE0C17D2EE62549BDBAC68B51F2F1182890|
|8F5F6F911F1326F97828FE98299D5B31CA92566EB907EDDCF20A6C32BCA2E08D7A8|
|2466C1952F39AA4017D7001B409A9E9C46FC3813D866E9C63B84A55356B5599CD48|
|B81C93384310110551863EC418DE50FC16DDBB059F8563B24D26BD15D86218C0370|
|55F19BCB4F66D5AC1A24D153C80BF90267E32E9D012880E7CE4D483F8C41022932E|
|3D4A170FBB62E2C05B52F7E853EFC1657AEDA5DD84C53084352167308479970373B|
|C68C3F8C3121765EAD58AA1179B2E94A887FD7AF87E3CE0EE0EE3A182470CA378AC|
|E08982A70C06850FE9614238C19A317408D98E3144852399649840584184E11D3D4|
|6F43023F8C2FD9E508D9F54A398C47705CE94A6D4DC6E50EAF1EA41608B71FCE386|
|4FC166B84926617DE1C2382D1C93530C11C4159C64B8454EF427EAF657264ADFAAD|
|4C454821876B986187E3224B0C360528FE25A4A575CAD4C024D0A7C0CF3A63CC852|
|CAD60E9AB5879414D2FC168E902F99FA414872C1F21D5FED09A9EC778F90EF1D965|
|FE465FB75587387776DABBDB6267BFBA0E0C741019D1135DF8A6DD25B428B6EFF07|
|4FA6D986|
|-------------------------------------------------------------------|Why are you doing a hover build on a toon that is designed to use soul drain? Isn't it better to build to stay in melee?
Some variation of something like this for example:
This Villain build was built using Mids Reborn 3.4.7
https://github.com/LoadedCamel/MidsRebornClick this DataLink to open the build!
Level 49 Magic Corruptor
Primary Power Set: Water Blast
Secondary Power Set: Dark Miasma
Power Pool: Speed
Power Pool: Fighting
Power Pool: Leadership
Power Pool: Leaping
Ancillary Pool: Dark MasteryVillain Profile:
Level 1: Aqua Bolt- (A) Superior Scourging Blast - Accuracy/Damage/RechargeTime
- (48) Superior Scourging Blast - Accuracy/Damage/Endurance/RechargeTime
- (48) Superior Scourging Blast - Accuracy/Damage
Level 1: Twilight Grasp
- (A) Numina's Convalesence - Heal/Endurance
- (3) Numina's Convalesence - Endurance/Recharge
- (3) Numina's Convalesence - Heal/Recharge
- (5) Numina's Convalesence - Heal/Endurance/Recharge
- (5) Numina's Convalesence - Heal
- (7) Numina's Convalesence - +Regeneration/+Recovery
Level 2: Tar Patch
- (A) Recharge Reduction IO
Level 4: Water Burst
- (A) Superior Scourging Blast - RechargeTime/PBAoE +End
- (42) Superior Scourging Blast - Damage/RechargeTime
- (43) Superior Scourging Blast - Damage/Endurance/RechargeTime
- (43) Force Feedback - Chance for +Recharge
Level 6: Whirlpool
- (A) Artillery - Accuracy/Damage
- (15) Artillery - Damage/Endurance
- (15) Artillery - Damage/Recharge
- (36) Artillery - Accuracy/Damage/Recharge
- (36) Artillery - Accuracy/Recharge/Range
- (37) Artillery - Endurance/Recharge/Range
Level 8: Tidal Forces
- (A) Gaussian's Synchronized Fire-Control - To Hit Buff
- (9) Gaussian's Synchronized Fire-Control - To Hit Buff/Recharge
- (9) Gaussian's Synchronized Fire-Control - To Hit Buff/Recharge/Endurance
- (11) Gaussian's Synchronized Fire-Control - Recharge/Endurance
- (11) Gaussian's Synchronized Fire-Control - To Hit Buff/Endurance
- (13) Gaussian's Synchronized Fire-Control - Chance for Build Up
Level 10: Howling Twilight
- (A) Recharge Reduction IO
Level 12: Dehydrate
- (A) Thunderstrike - Accuracy/Damage
- (42) Thunderstrike - Damage/Endurance
- (46) Thunderstrike - Damage/Recharge
- (47) Thunderstrike - Accuracy/Damage/Recharge
- (47) Thunderstrike - Accuracy/Damage/Endurance
- (48) Thunderstrike - Damage/Endurance/Recharge
Level 14: Hasten
- (A) Recharge Reduction IO
- (49) Recharge Reduction IO
Level 16: Shadow Fall
- (A) Unbreakable Guard - Resistance
- (17) Unbreakable Guard - Resistance/Endurance
- (17) Unbreakable Guard - Endurance/RechargeTime
- (19) Unbreakable Guard - Resistance/Endurance/RechargeTime
- (19) Luck of the Gambler - Defense
- (21) Luck of the Gambler - Defense/Increased Global Recharge Speed
Level 18: Water Jet
- (A) Superior Malice of the Corruptor - Accuracy/Damage
- (21) Superior Malice of the Corruptor - Damage/Recharge
- (27) Superior Malice of the Corruptor - Accuracy/Damage/Recharge
- (29) Superior Malice of the Corruptor - Damage/Endurance/Recharge
- (33) Superior Malice of the Corruptor - Accuracy/Damage/Endurance/Recharge
- (33) Superior Malice of the Corruptor - Recharge/Chance for Negative Energy Damage
Level 20: Boxing
- (A) Empty
Level 22: Tough
- (A) Unbreakable Guard - Resistance
- (23) Unbreakable Guard - Resistance/Endurance
- (23) Unbreakable Guard - Endurance/RechargeTime
- (25) Unbreakable Guard - Resistance/Endurance/RechargeTime
- (25) Gladiator's Armor - TP Protection +3% Def (All)
Level 24: Weave
- (A) Luck of the Gambler - Defense
- (27) Luck of the Gambler - Defense/Increased Global Recharge Speed
Level 26: Geyser
- (A) Ragnarok - Damage
- (33) Ragnarok - Damage/Recharge
- (34) Ragnarok - Damage/Recharge/Accuracy
- (34) Ragnarok - Recharge/Accuracy
- (34) Ragnarok - Damage/Endurance
- (36) Force Feedback - Chance for +Recharge
Level 28: Maneuvers
- (A) Luck of the Gambler - Defense
- (29) Luck of the Gambler - Defense/Increased Global Recharge Speed
Level 30: Dark Servant
- (A) Basilisk's Gaze - Accuracy/Hold
- (31) Basilisk's Gaze - Recharge/Hold
- (31) Basilisk's Gaze - Endurance/Recharge/Hold
- (31) Basilisk's Gaze - Accuracy/Endurance/Recharge/Hold
Level 32: Combat Jumping
- (A) Luck of the Gambler - Defense/Increased Global Recharge Speed
Level 35: Dark Consumption
- (A) Obliteration - Damage
- (37) Obliteration - Accuracy/Recharge
- (37) Obliteration - Damage/Recharge
- (40) Obliteration - Accuracy/Damage/Recharge
- (40) Obliteration - Accuracy/Damage/Endurance/Recharge
- (43) Obliteration - Chance for Smashing Damage
Level 38: Dark Embrace
- (A) Unbreakable Guard - Resistance
- (39) Unbreakable Guard - Resistance/Endurance
- (39) Unbreakable Guard - Resistance/Endurance/RechargeTime
- (39) Unbreakable Guard - +Max HP
- (40) Steadfast Protection - Resistance/+Def 3%
Level 41: Super Speed
- (A) Blessing of the Zephyr - Run Speed, Jump, Flight Speed, Range/Endurance
- (42) Blessing of the Zephyr - Knockback Reduction (4 points)
Level 44: Soul Drain
- (A) Superior Avalanche - Accuracy/Damage
- (45) Superior Avalanche - Damage/Endurance
- (45) Superior Avalanche - Accuracy/Damage/Recharge
- (45) Superior Avalanche - Accuracy/Damage/Endurance/Recharge
- (46) Superior Avalanche - Recharge/Chance for Knockdown
- (46) Fury of the Gladiator - Chance for Res Debuff
Level 47: Tactics
-
Hamidon Origin:Cytoskeleton Exposure
Level 49: Vengeance
- (A) Luck of the Gambler - Defense/Increased Global Recharge Speed
Level 1: Brawl
- (A) Empty
Level 1: Scourge
Level 1: Sprint| Copy & Paste this data into Mids Reborn : Hero Designer to view the build | |-------------------------------------------------------------------| |MxDz;1760;751;1502;HEX;| |78DA7594494F535114C7FFAFEF95A180B552CA58190A65D20A286E3580269A9230A| |818374D434B69185ADB92E84E4DFC026EDC8880714C1C3F834617EACEA889EED585| |C3428DC6E179FA4E0FDC3EC34D5EDFAFE7DC7BCEFF9E77EE1D3D3552F9FC59783F3| |4F7F07C349B8D0CA73299A5742E95718E4613C9691D344AE9695A774426A28B8978| |2C3415CDC53391215A956BD8700E2DCDCC8446A299B9C868329A5D88C235964ACD8| |726D3F178ACCAC283C9C46C2EB998705BFFC2F1682C9EC9CE26D395F23F4D4ECF81| |7472BA108712C433A7EB48442F3D7301FAD120C374004103E837B00B5D02ED0C0FB| |5E2B94E605CB33C0E4C084C321838227094A104C7181ED14B53C250C8BC92FE722C| |90187DC365EA3ABA3975373A187AD02970DE61C1222D72AAAA9CD09D96670B0C012| |743002502A50CED28634805F8CBAC8729C5554E50866B02D7195CB8217093A112B7| |181E9392727573E5B2B93425A8507556601985CD5D66D8891586105605D650F8085| |718DA4864951246AB92047D024FC8ED5633B9F155B7166FC53781EF0CDBF043C0AB| |59ABBDA8613849823D6A180F6EF35C2FEE3034E02E4313EE31B4E0BEC003068D045| |72B85A53F260DE864AF51C21B35A2D2272A7DA2B24E54D66180C1A0D5B56A196A45| |7F83E8CF92FE7AA59B9CF51870589E16EC6668C51E814181BD0C01E92F0F656A543| |3354AA626C9F4945E7E658AEEC70B5AEC37B01D2F055E09BC66F051DC66B5539A25| |DC19DA629BB67ED24C671B7E390ADDFA5BE00F4327FE0A988EC2C10097E82CBD3AD| |4027748818352E0A0D435889F7A214CBEAA7EDA3FC9EB523E9BD685378E42BBBE65| |38474B7A559DBDB8C487730796055604568D428FAF09ECE394D59429A4162284C1F| |C35A9C34B9E3EB575FAB844D46F06D461E69F7C531D32AC2B2A267633BCC9C43143| |BDCAAC4BC8B27F7415DF7132FFB3CD4ED84AF23BF347FFB066C1A74D967EF97FE90| |5EEB1125CE44ABEF315AB34DFDB0D1FEC86873DC5DFC73EC274E6FA95ACE60997CD| |70DC6E98B21BC6ED867FAB7FF76A| |-------------------------------------------------------------------|
-
On 11/23/2022 at 7:00 AM, Player2 said:
I get having it done early, especially if you're getting someone else to do it and there's a queue... but even if the lights are up early, there's no need to turn them on until after Thanksgiving. And definitely stop leaving them on after January 1st.
Isn't it traditional to leave them on until January 6th (kings day)?
-
-
1 hour ago, twozerofoxtrot said:
This hits a lot harder since the Sonic rework, and still stacks -Res debuffs (albeit differently). Cold/Sonic feels great to solo with. I'd say it's competitive with Cold/Water now, though it's not a 1-1 comparison.
The problem with cold/sonic for solo is that it lacks a way to heal yourself. So when you are running solo missions at +4x8 with bosses and you take damage (and YOU WILL take damage) you have no good way to recover.
Compare this to water and you get a decent way to heal yourself that is part of your attack rotation anyway with dehydrate. You can also slot it for better heals or damage via procs as you wish, including a -res proc.
Water also has some very light mitigation with two knockdowns that you can also use for FF recharge procs. Shockwave doesn't work as well in sonic.
Yes, sonic is better soloing after the change, but it's not as good at soloing as water.
If I had to have only one defender to bring to every TF, I would definitely choose cold/water over cold/sonic. There will be times that I find myself alone in a pack of mobs and when that happens I want to be able to live and heal myself.
I know that soloing at +4x8 with bosses+elite bosses is a ridiculous standard for a build that 95% of the player base dont care about, but being able to solo cimorrea missions like this is what I want out of any of my toons. Even at +2 or +3 x8 you are still going to have situations where you want to heal in order to comfortably continue and I appreciate having a heal at those times.
-
I believe it should be similar to how feral charge works. Which works like:
On 1/10/2022 at 2:36 PM, Bopper said:Ok, so quick test seems to show the following:
The main target will not proc twice. Since it's an execute power effect, there seems to be code/logic that knows not to repeat proc rolls on a target that's already been checked. However, the main target will use ST formulas while the "splash" targets will use AoE formulas.
The main target will use a ST formula with 10s base recharge and 1.167s cast time. Assuming no slotted recharge, the main target will have a 65.14% chance with a 3.5 ppm proc, and the hecatomb will have a 83.75% chance to proc.The targets hit by the AoE will use a AoE formula with 10s base recharge, 0s cast time, and 20 foot radius. Assuming no slotted recharge, the "splash" targets will have a 17.95% chance with a 3.5 ppm proc, and the hecatomb will have a 23.08% chance.
The Force Feedback proc will have a 18.6% chance to proc on the main target and 6.5% chance to proc on each of the "splash" targets. If you want to know your chance to proc, it would be:
1 - (1 - 0.186)*(1 - 0.065)^(n-1),
where n is the number of targets hit. For 5 targets (the max), it would be 37.8%
-
 1
1
-
-
Also on corruptors in mids you can turn off the Scourge button. It is a power located in the bottom close to health and stamina.
-
1
-
-
7 hours ago, Snarky said:
Lets start with a Basic statement. Blasters have a ranged damage scalar of 1.125. Corruptors .75, Defenders .65. Simple.
Remember that this is a guideline and not true for every single power.
-
1
-
-
59 minutes ago, StriderIV said:
Time seems SO good on Defenders… and is just overall a cool set. Do you know how it holds up in the new HM content?
I just started playing again a few days ago, I have not tried the new HM content. I am working on my ice/savage/psionic dominator first to get a really tight build for him first and that is the first character I will try the HM content with I think (or I'll get impatient beforehand and just use my kintank ^_^). I'd imagine time works very well on the HM content for the reasons I mentioned in the post here.
-
59 minutes ago, StriderIV said:
For the Dark/Fire combo, why would you suggest that on a Defender over a Corruptor?
With the changes to tar patch on a corruptor vs a defender the combo works a bit better on the defender because you get more slots after reaching softcapped def that you can use to focus on procs and recharge. Scourging rain of fire is always fun though.
59 minutes ago, StriderIV said:I’ve also looked at Kinetics, but on a Corruptor. What blast sets would you pair with it?
On a corruptor, I really don't think there is a better pairing than fire/kin. My Fire/Kin corruptor is hands down my favorite character. Walk up to a mob fulcrum shift--->inferno is death god level destruction. Almost all of fire blasts damage is frontloaded and that is very important on a kin. Electrical and water blasts pairings are tied for second I would say and then either radiation blast or pistols coming next.
-
1
-
-
2 hours ago, Snarky said:
I never liked Corruptors on live. I played villains. Why do villains want to be healers? Still have issues with this.
But.... In trying to find the best Dark Dark Dark Soul Dark Darkity BLACK Darkness I am slowly settling into a Dark^3 Corruptor.
I am used to healing myself as I play a lot of Dark. So using the team heal is not a big stretch, and I try not to be the "team medic" If you are near me, fine. If not, sucks to be you. The -regen on the target is sweet. Very vampire. Give me your life.
The to hit debuffs, and style (for me Disorienting so I can Soul Drain for power!) are just better on the Corruptor. It seems to me.
But generally speaking (from a quick glance) It seems like when the fight is hard a Corruptors damage is better than a Blasters. They have the power to debuff regen, or res, or to hit, and the Scourge mechanic to finish the job. Am I missing something?
Of course I have a Fire Blaster. With no defenses. No nothing. Except Fire. Roasting everything works 95% time.
For a triple dark character min/max wise a defender is likely best, but I'm glad you are enjoying the corruptor. Triple dark defenders and corruptors are fun because you can do a lot of interesting things with the powers in those sets:
dark pit+oppressive gloom+stun proc'd dark consumption, tar patch+soul drain+blackstar, dark servant (Fluffy!)+petrifying gaze, lots of fun proc interactions, etc.
Those three powersets are great on their own, but work really well together mechanically and thematically.
-
1
-
-
On 11/18/2022 at 11:48 AM, MoonSheep said:
good point on the solo front, not sure what i’d pick for a mighty all rounder then. maybe my kin/sonic in a moustache and tall hat?
My recommendation for an all around solo and TFs defender would be:
Cold/water - better on a corruptor, but so much easier soloing and exemplaring on a defender
Time/pistols - with time you can power boost+radial clarion incarnate+farsight your and your team's defense and +tohit into the stratosphere. You also get a good -resist power. A pistols build will give a lot of recharge/proc damage/mixture of both and is thematically fun.
Dark/fire - this is a tried and true powerhouse. With the dark miasma Tar Patch change the defender version is better and Tar patch+rain of fire is a thing of beauty.
X/Sonic - sonic is very good on a defender, but I can't recommend it for this because it just doesn't solo well compared to the others. If I had to, I'd go nature/sonic I think for this.
Kin/X - no, be a corruptor and become a death god.
-
1
-
/Kin question
in Corruptor
Posted
You are the dps on your team. When you are capped you do more damage than a blaster. Your buffs just happen to apply to others.
Apply sb and increased density between mobs if you can, but don't worry about it too much. As others have said, the important thing is to follow the tank in and get a good fulcrum shift off and then inferno/fireball. If your defense and resists are good enough you don't need the tank.