Naturallymorbid
-
Posts
28 -
Joined
-
Last visited
Content Type
Profiles
Forums
Events
Store
Articles
Patch Notes
Everything posted by Naturallymorbid
-
Wasnt dead set on sonic, just wondering what to pair with the Psionic set, ive got a elect and a storm sentinels that im pretty happy with and want something fresh - Fire is a bit boring IMO, that's why i was considering sonic
-
So i looked at the new patch notes for the beta build, the new Psionic armor looks pretty cool, a little defence, a little res and some nice utility sprinkled in. Overall i think its a set that suit my playstyle, mid-range mostly. So i was wondering what would work with it, and Sonic actually caught my eye but i cant seem to remember the last time i saw a sonic sentinal and i was wondering is there a reason why... the set look solid 2 cones, 1PBaoe and the -res is very nice for both solo and team play, im just wondering if there is an flaw that im missing ( such as lacking damage compared to other sets)
-
With that im fairly used to but i feel im lacking in tools in certain situations particurally with tougher enemies, a blaster's main tool is their damage while other ATs have other tools, doms and trollers have thier CC, defenders and corrupters have buffs/debuffs, MM have thier minions. what my issue was that it felt lacking, while you can knock out 90% of a mob with your alpha dealing with bosses or other hard to kill enemies can be a real issue, especially when i started going into melee range. ill give you an example: my Arsenal/Savage dom is fairly squishy but even with +4 mobs, in the first 2 seconds of a fight the whole mob is already blinded, confused and under an ice patch, then followed by stun grande and tear gas - the versatility of CC feel more well rounded, while its way slower than blowing everything up, there is particularly no outgoing damage.
-
As a blaster 😄 with tanks im very comfy
-
Alright, maybe i gotta try out devices first to get the hang of things at range, then after i get the "blaster mindset" move on to other secondaries. Right now when i move to melee range i feel way to expost having real issues even in group setting to deal with alphas
-
Like most folks that try out blaster, i like big boom and big numbers, right now im playing a Fire/Atomic blaster which has great damage but the lack of defensive options is a sticking point for me, so maybe im missing something or a certain way of thinking. Aside from dominators and blasters, every AT has defensive powers, but dominators make up for that lack of defensive options with their CC, so nothing actually manages to attack them. Sentinels might be a bit iffy, since the lack of damage compared to blasters makes some prolong fight a bit of an issue but iv'e been spoiled since i use a Storm/Bio sentinel - Storm is amazing on sentinels and the knockdown provides me with that CC i need to solo (in groups it is slow but if a group clears a mob that quickly than your damage doesnt really matter IMO) With blasters i feel like the approach is "blow everything up before it can hurt you", which is fine for group play and some solo play, but i dont think that works with harder content like 8/+3 or +4.
-
Fair enough. though i found the Cardiac alpha gave me that res i needed + the end reduction is really nice, strangely enough i dont feel like assault is needed on this build the damage is pretty damn decent already. i did move some of the slotting around to be a little more defensive but the build works great able to solo pretty much anything so far (except for carnies, illusion masters are a pain)
-
So i recently dusted off my "old" Arse/Sav Dom after seeing your build, gonna give a shot when i have the time Would you mind explaining the incarnate powers choice? for example, the melee got me a little confused, regen is nice but wount the others fit better?
-
Beam Rifle / Rad - advice and guidence
Naturallymorbid replied to Naturallymorbid's topic in Sentinel
its a 40k Themed... Killing filthy xeons is the core of it's lore 🙂 But why Rikti in particural? how are they different from any other faction -
Storm/Bio - WAY better than i thought (feedback needed)
Naturallymorbid replied to Naturallymorbid's topic in Sentinel
would chain lighting be a better proc? -
So iv'e been having a blast on my Elect/bio and i though i though i'd give Storm a try for the first time. So after hitting level 30 and putting some basic IOs in it, for solo its amazing! with group less so because of the set up time, but the damage and overall control it gives is amazing, even at these levels i can solo 5/+1 pretty easily. So i'd love some advice on slotting and addition powers, mainly focusing on solo content. Defensively its a little lack since im planning on using offensive adaptation. As far as epic i went with Cold for CC |MBD;23766;1461;1948;BASE64;| |G9VcYCwKbGNL6BfTZ3QwaEoj80M9BKWuCvHCs1Fstz+ET4dQzDZR+em5TZj/TwL0oOM| |IXY2cWbJ09bUOC0hXm1pVlJ58X+YovFc5ou2aabQ0WIBnf/9pLU3cORkhI9RugJw8mg| |nBXoCp+DcApO7cyQJ6AmHqzFW7zqh5XwWEqmxdG3VeVrYy8Mh+2uugN3+7CRQCaojec| |B5WRf7fKMSHPbBWw5CZP7eQwsYWAn+h4XX65HEDVkh1DQkJZgG9gTzK74nzdp1tY9gg| |Jfa/FxTtUHPmlZSwEoO2+FeKcPALpXDC9qztglWE4xDeouJ9ANtfZHzZr+t0F1fokIR| |2Hk8KyT3/Udn8EUEhmVTdOnuWx0XM6h2tm8XmRXZSnJyf3UGIy6P1nA2u3WuTvBgwzZ| |JHaZwlPzo6eB2Hfcno8XS0AXLCdPtrOzpnidvZeEouHIn5PoreNSLNC01Jf68sWpCrs| |+X2ZPvI4vJt5TS+9bpm+LhO1NoSrN0Cjvs+7H40OxGw+q9eaWcW+Dgr9yFi3T/uQ2Wm| |0Ve1fJ7cqIQTsOBr9bWPS2aDgm+FSVg+WF9XgtBgoffahtMNLZo/dZf2w4pPXHcP/oC| |1MKMTEX7jJ0JlLcyI/bqu+pOo9gWPBEXYlzwaKMERa0LAWrSEjEK/d3kLeqNqa7Ea9g| |Z1rxwThkni4MUDSuwVRXkKl0emTqEist1XYlYdGGKxO5f19vyl87dKZXPMejh/76HjQ| |JEzymS4jkUux2t4Q1vVNp03EP4GS5s6HQkjWmp2DRRni7cW/hc7+AEVo6+r4pVC3PEw| |k1N06lhvnYw7p6dUuGVR0NFXzM3wcvLOkkN7GLjCYt0oOfclxklye7AiYQMtirgQJqj| |ucIstrpyOO3kGL4NWwOMyk5RFBwbYFSwaMAIgWzQl1NWLmhUs5fZ6xB0sntDCDGydlQ| |Mpp366CGSILp0BAXfD0pXfwHjeNhO7T8TlkCcAW9g2C7nXyLRXJI2RVqg1Nq1TwLoDY| |5i2sC5QyHlzAwwNAF2AF95DX7UksFjqacBxEcAhRVk/DWnREe288/OBK2xxhXg+2XiA| |KWrd4gWFETYFhwaMY1MywqmqgH+fUuqcUh0APGz7NGjUG5HodgOlhjAykwHjGNnwb8A| |IIxf+CT/oa7ntGdelORh4DnlFlnoJv9/73D8Q/W70P0GFr0NhRnEOYoXmFWjO+iO0YN| |8qKwUrOTc5RqnveezIqoTAzrLNiAuulPRnSqKUWaYRJjZHhizUzj4tvcX2KF2eJHFhg| |K3BmEFt26TBio6sKZyFYQzhZL+g54DFUu/Euq79LYp01Kp0mV56oWGIAYJbwa0DExhQ| |MGK9Ojk6LZpCHvgALpY6t+PQ4rtx+JOaWzZJWSQwwq5m0UB29D+6prfA/LqY6xOfKjD| |gweKJIQs8b5xFA44XriPM85ynI0Af2CtnIVsvblwyGVd187GrRCxJJgenPHhQB8ZZII| |CdbfKFiij42i4JCkNsCg4FhwaYqwL3aP/ITn9Zup06UsSgyFcmImXClinJ0dv3/Twq3| |IewOn4g4C6L6z1aDjH5A+wZimuLiBv8GHoGbIFZWzR7DlRw60JzBv7W8hTopJtVJ4Xd| |Xndu6fLr4KLVsrnbZ2QN90RXnVv63QK9GL2sR3jWIaXagBuL2+26vog2GEqhhs2EkRp| |FnIe8cEY8u2RVw7a6rY46kzlQST1yS7AmbY+7XVyKkRdSMQcv0k/ghedFSl3az7mMFw| |Mrc1XZmdJiZY5m8LPKqfA0tEl2nD/N11C5QqzC7gWjOIW/TXXEf8bzrzCf5Va+zJb/8| |5qp7piKfXDD7DTI/A3Zkx8SPBSNl8mBzM0/6yy+xDhQ18aFtD5ypWaQGOBCo6MrQx0b| |xGvsYBo+0X4s+YLB3O0L2AA5mNBjSnJXX691PJ+FvyQ66icHVv4feeywTj0Dynci0kX| |8GRUN| Toxic Typhoon - Sentinel (Storm Blast - Bio Armor).mbd
-
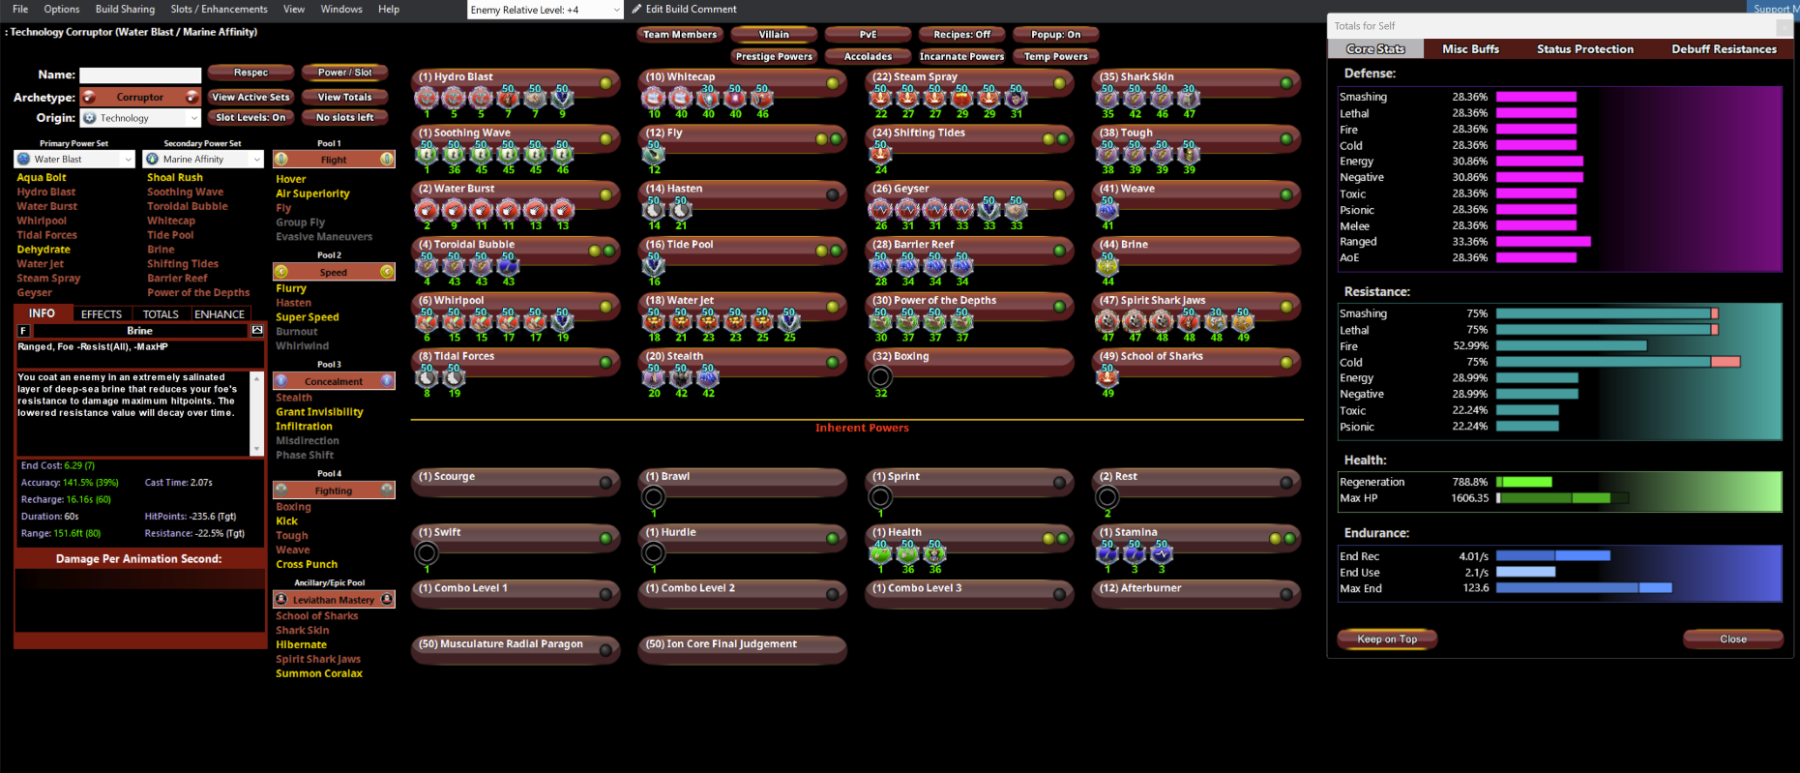
Anyone got a good water/marine affinity build yet?
Naturallymorbid replied to TyrantLlama's topic in Corruptor
Thanks, i was considering it, but i couldn't mange to squeeze it in (since if im going mystic i would like Rune of protection). The problem is Since i dont take dehydrate, i felt a little lacking in single target damage so that's why i opted for the Jaws at lvl 47, Making you one power short, you could also drop stealth but i think the recharge is more would be more vital -
Anyone got a good water/marine affinity build yet?
Naturallymorbid replied to TyrantLlama's topic in Corruptor
Mine is work in progress, its mostly theoretical (i only got mine to lvl 27) and there some thematic choice (like the leviathan pick ) but i think should be solid enough i know most folks like dehydrate but i just hate the animation and never feel like i need the self heal. Corruptor (Water Blast - Marine Affinity).mbd
-
Tank primary set for a full time 5 person only SG team
Naturallymorbid replied to Dirtball's topic in Tanker
I second the Rad Armour suggestion, iv'e got a Rad/Axe, he is tanky as hell and does great damage - easly solo running 54X8 content without breaking sweat. Axe is also a great feeling set in general both with big numbers and the overall "impact" of the set (it just feels chonky 😄 ) -
So i went through a lot of the builds in the forums and saw that most, if not all, use One with the shield - now i've never been a fan of the "drop" of the T-9 panic buttons. it forces you to stop/slow down considerably , the added resist is quite nice but even without it i can hit 40%ish resist on most damage types (smashing and lethal are at 80%) doesnt seem worth it to me, am i missing something?
-
So this is my first sentinel, 40K themed (Death Korps of Krieg ). Just hit lvl 35 and fairly enjoying my time, so far. Would love to hear any feedback/advice Hero Sentinel Build plan made with Mids' Reborn v3.7.4 rev. 9 ────────────────────────────── Primary powerset: Beam Rifle Secondary powerset: Radiation Armor Pool powerset (#1): Speed Pool powerset (#2): Flight Pool powerset (#3): Fighting Pool powerset (#4): Concealment Epic powerset: Weapon Mastery ────────────────────────────── Powers taken: Level 1: Charged Shot A: Apocalypse: Damage 3: Apocalypse: Damage/Recharge 3: Apocalypse: Damage/Recharge/Accuracy 5: Apocalypse: Recharge/Accuracy 5: Apocalypse: Damage/Endurance 7: Apocalypse: Chance of Damage(Negative) Level 1: Alpha Barrier A: Aegis: Resistance/Endurance 50: Aegis: Resistance/Endurance/Recharge 50: Aegis: Resistance 50: Aegis: Psionic/Status Resistance Level 2: Gamma Boost A: Performance Shifter: Chance for +End 37: Preventive Medicine: Chance for +Absorb 39: Power Transfer: Chance to Heal Self Level 4: Proton Armor A: Titanium Coating: Resistance/Endurance 37: Titanium Coating: Resistance/Endurance/Recharge 37: Titanium Coating: Resistance 39: Titanium Coating: Endurance Level 6: Disintegrate A: Superior Sentinel's Ward: Accuracy/Damage 7: Superior Sentinel's Ward: Damage/RechargeTime 9: Superior Sentinel's Ward: Accuracy/Damage/RechargeTime 9: Superior Sentinel's Ward: Accuracy/Damage/Endurance 11: Superior Sentinel's Ward: Accuracy/Damage/Endurance/RechargeTime 11: Superior Sentinel's Ward: RechargeTime/Chance for +Absorb Level 8: Aim A: Gaussian's Synchronized Fire-Control: Chance for Build Up 13: Gaussian's Synchronized Fire-Control: To Hit Buff/Recharge Level 10: Fallout Shelter A: Impervium Armor: Resistance/Endurance 43: Impervium Armor: Resistance/Endurance/Recharge 43: Impervium Armor: Resistance 43: Impervium Armor: Psionic Resistance Level 12: Lancer Shot A: Superior Winter's Bite: Accuracy/Damage 13: Superior Winter's Bite: Damage/RechargeTime 15: Superior Winter's Bite: Accuracy/Damage/Endurance 15: Superior Winter's Bite: Accuracy/Damage/Recharge 17: Superior Winter's Bite: Damage/Endurance/Accuracy/RechargeTime 17: Superior Winter's Bite: Recharge/Chance for -Speed & -Recharge Level 14: Hasten A: Invention: Recharge Reduction 19: Invention: Recharge Reduction Level 16: Proton Therapy A: Numina's Convalesence: Heal/Endurance 40: Numina's Convalesence: Heal/Endurance/Recharge 40: Numina's Convalesence: Heal 40: Numina's Convalesence: +Regeneration/+Recovery Level 18: Refractor Beam A: Superior Frozen Blast: Accuracy/Damage 19: Superior Frozen Blast: Damage/Endurance 21: Superior Frozen Blast: Accuracy/Damage/Recharge 21: Superior Frozen Blast: Accuracy/Damage/Endurance 23: Superior Frozen Blast: Damage/Endurance/Accuracy/RechargeTime 23: Superior Frozen Blast: Recharge/Chance for Immobilize Level 20: Particle Acceleration A: Invention: Run Speed Level 22: Piercing Beam A: Ragnarok: Damage 25: Ragnarok: Damage/Recharge 25: Ragnarok: Damage/Recharge/Accuracy 27: Ragnarok: Recharge/Accuracy 27: Ragnarok: Damage/Endurance 29: Artillery: Accuracy/Recharge/Range Level 24: Particle Shielding A: Panacea: Heal/Endurance 46: Panacea: Heal/Recharge 46: Panacea: Heal/Endurance/Recharge 46: Panacea: Heal 48: Panacea: Endurance/Recharge 48: Panacea: +Hit Points/Endurance Level 26: Overcharge A: Superior Opportunity Strikes: Accuracy/Damage 29: Superior Opportunity Strikes: Damage/RechargeTime 31: Superior Opportunity Strikes: Accuracy/Damage/RechargeTime 31: Superior Opportunity Strikes: Accuracy/Damage/Endurance 31: Superior Opportunity Strikes: Accuracy/Damage/Endurance/RechargeTime 33: Superior Opportunity Strikes: RechargeTime/Chance for Opportunity Level 28: Ground Zero A: Superior Avalanche: Accuracy/Damage 33: Superior Avalanche: Accuracy/Damage/Recharge 33: Superior Avalanche: Accuracy/Damage/Endurance/Recharge 34: Superior Avalanche: Recharge/Chance for Knockdown Level 30: Meltdown A: Gladiator's Armor: End/Resist 36: Gladiator's Armor: Resistance/Rech/End 36: Gladiator's Armor: Resistance 36: Gladiator's Armor: TP Protection +3% Def (All) Level 32: Fly A: Hypersonic: Flying / Increased Fly Protection Level 35: Tashibishi A: Pacing of the Turtle: Accuracy/Slow 39: Pacing of the Turtle: Endurance/Recharge/Slow Level 38: Boxing (Empty) Level 41: Tough A: Unbreakable Guard: Resistance 42: Unbreakable Guard: Resistance/Endurance 42: Unbreakable Guard: Resistance/Endurance/RechargeTime 42: Unbreakable Guard: +Max HP Level 44: Weave A: Luck of the Gambler: Defense/Endurance 45: Luck of the Gambler: Defense/Endurance/Recharge 45: Luck of the Gambler: Defense 45: Luck of the Gambler: Defense/Increased Global Recharge Speed Level 47: Stealth A: Reactive Defenses: Scaling Resist Damage 48: Reactive Defenses: Defense/Endurance Level 49: Infiltration A: Shield Wall: +Res (Teleportation), +5% Res (All) ────────────────────────────── Inherents: Level 1: Brawl (Empty) Level 1: Opportunity Level 1: Sprint (Empty) Level 2: Rest (Empty) Level 1: Swift (Empty) Level 1: Health A: Miracle: +Recovery Level 1: Hurdle (Empty) Level 1: Stamina A: Invention: Endurance Modification 34: Invention: Endurance Modification 34: Invention: Endurance Modification Level 1: Disintegrating Level 32: Afterburner |MBD;23262;1396;1864;BASE64;| |G91aERWUFgCtjreFYcVCSkqCJpvy11aHZWHGyhFNjvyAqmXWInoT51J+ek8kL9R14+T| |ZGE6Wrr7WYQHp6g02b1DhT7Wvqvdcnbtm1CN+8pKwi8ECnLn9/9ZehY0EtokwkRFqJi| |h8VIRfmh8gdoTFF9gCbVwB5ZeN66lnYetUXK2dKc19aiNT9+sqt+57GWELIcPZTXjTa| |uggVEKmfWFY5N6oEJ8XmLPRyZ5vc0RyokXm9zc285973gI7pNFGVPyJQNuR/lxXnJfv| |/HenYqyQnNC6HZCXuPubv/dSwEoM+u47U3qkEbGxFhO02QGrEW9AeEv+W6IoaQ+/gZc| |8rnlHZXOG3UbGVF+xdwIPcjkUrQ6CyxWZskK7ghDDozXMMddug6Ua+J6bVFA2Wer5WL| |Zkdl2LTtn62Db1Yv+YXDCt+Wqn/ddzaFdhtqXgYUQx7tLQj+1RI9TRfcTtoLi82tTe2| |qUoLtdWfY1rvcUxfGscZNpOxm6e377Pq1K2CwGrd/VKMzPv9UmxHmKOPp1RuakEgzkH| |lRpb4APMP82+NC6yNzj4KOyE6Rvr10wQGjfQRTm920D2oS/uqWTEFzS+ht6wFiu6YJy| |n/MNU5sQ+blfVDf2RVl68eCRQGHnLo4CiyHu7jdaeqdYKp2XbuvFuB7mcNLbyyhyckn| |rroexIyp/AnmKefFWWeIxX3LOepPDhY3aCSZcS2si0P2MQZOXtA/4QeE7NkVuZ/Wskt| |+B6p2Mn1V0wT7JeHMOrAXnHdUkh2P9RnKXYZA1i5xI7CUk6vNCsCjCK5GqSBcMvWz4i| |kv4NquAegk7V5FtDqFr2nWqo4p04STeOPTPa9nFAIWwrnDMoQtyAwLliEt35CGSoTNz| |wgFMwvTvxyhS2pPiyc/e96hs7mQRWheszYxs/KBrc0Mzu6Y1VfRXFBa21IsATHvCEK/| |OYiFvWiN/Ry1mbxEO2ZOZU4FQRYDpo7da2/zvGRhRghqhYWPrnJZKlkkgKBJV98yWHI| |axY+GVgBCsedhXd5lfpluzX94qzYIoO2NzolWn9DmMNbVIAQEXVaK1qcPaKNEEAH4Jv| |bb+GGOd3NrKbFQnbCr04eARnV+BWMckag+OOW7Jh1INa0AwpJfIRVQq9C4+Ff8OIlLP| |eY4FKjkLEgoBfAYaxQrCrGGgrb2Coeht54qMmDBqvAhPN34cvK2jeahTEJnYezzA5dU| |Uzefg0Dv9ftDwsrrAsEjCMrGdRgFEEt1JcwdOgxioZcuMSt7YIfQE2gp1EIxtv4AXUi| |E5WDhkOBRhFUhgkTLIk73pZ9tf5UUUFfNx8eynqeLuDLjKDRrNfVjYmKEQsBfhn+Bdg| |FAuFiao2eJV7G9MT4cDRsbKSlXCzsm1XfcfoJTazAowi3ebJi7MdtOqPk5ezq+FBawV| |dX9KYFXqkRgkk6hOaVYJToF0GpC4GXu2mX9kMmAhmf/XlniKzZCOZmkd2vfDmzqwVPn| |MSAy+Ct2/kFfoXptdB/wt0XlE6M2FDBUfUvKbuTIHHyT/XLtZUVPT0eG+Aor5uUqzTz| |77OqzIlMMIDRui7mP8cV5xzRWlV43roptS8Erwq0KZg0m/gG9kN2Ai2e1aASm2XJh4P| |oPi0YOXmVmBW0TLb7Xe+dVKPAmuVc8CP4O93eHJTi+PnJsl2kUdqdEoQ+xvQVAFcxDb| |YFP7X0Y1Vs5oSuKv/k07BH2q0qvHMc5Q4ho/2vnXmL79Dua6StWHFbgv3kd9QJ9Wjjo| |w1MLGVBI/C5z9ifMjh//Hmv/kXic5A+/AaPQk6Cd4UlWFDTdAmW7ErjJ6E/q2jeIhxU| |GeAboZtW+YXVfdZK2pZlNQkeKzjKL/Dyu2dM/0JjxWG2Haho8i9DQ==|
-
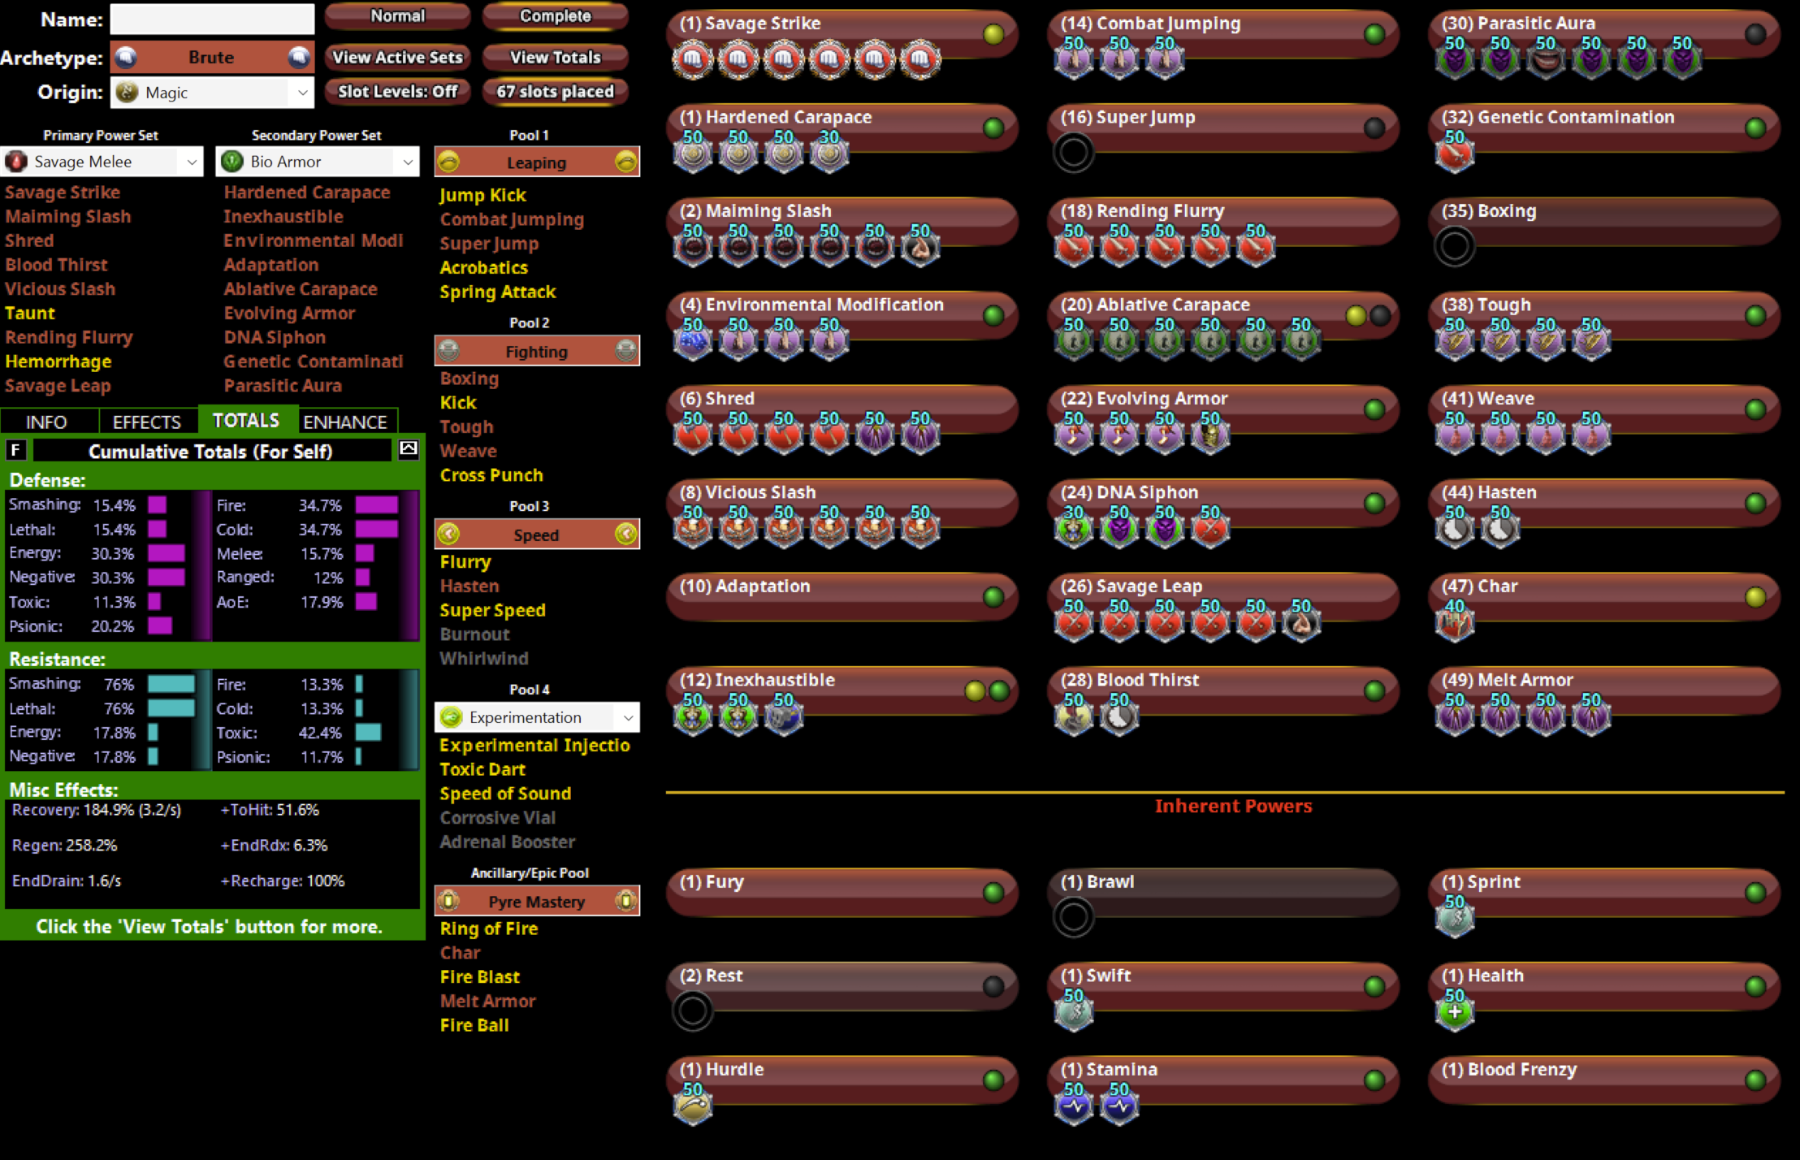
I recently came back to the game after a long while, hopped around between a few toons but landed on, and have been very much enjoying a Savage melee / Bio brute, since i havent played in a long time i'd love to hear any advice P.S i know some folks drop Savage strike and Shred but i enjoy working them into my rotation even if it not optimal
-
"The Buddy" Troller - First time Controller advice needed
Naturallymorbid replied to Naturallymorbid's topic in Controller
Cool, thanks for the help iv'e actually havent played a Corr since the OG release of CoV, might give it another try 🙂 -
So im just jumping into controllers and i wanted to make a "Buddy" troller while not great at soloing can provide a lot of utility and is a bit more easier to place. Right now Ice/Time to me seems fun, a bit end heavy, but fun. But im open to suggestion
-
I'm a brute player at heart, and to me, SS/Bio has been one of the most enjoyable sets for a number of reasons - some actually that matter some that are personal preference. In general SS/Bio Is a brute that dives in, and stays in up close and personal. Super Strength Solid Damage - While it isn't the hardest hitting powerset is snappy and has a good rhythm to keep your fury up and to produce solid damage overall, in most fights I never dip below 70% fury. Animations - Aside from Hurl (which I advise against taking since you want to be up close and personal as much as possible for multiple reasons), all the animations are rather short and to the point. On a personal note they also "feel" impactful and have a solid feel to them. Rage - Like I said Super Strength's damage is solid even without using rage but when you do use Rage you basically turn it up to 11 making you single target damage great and for a fairly long duration. At later levels when you also get a decent amount of AOE damage, when you get enough cooldown on your foot stop (I also too the Mighty incarnate power just because it fit so perfectly with it) , ya the "rage drop" is a bit annoying but you can still keep attack and keep your fury going and you learn how to just get used to it. Personally, when you finally get slotted up at level 50 I don't feel the need to use it all the time but it a nice ace in the hole when you need it for a tough fight - and unlike most damage buffs this will last you 2-3 mobs even when soloing. Hand Clap - I take hand Clap at a very late level but use it only as an "Oh shit im swarmed and I need a second to reposition" (this mainly happens with very certain mobs that Bio has a weakness to). Overall it's a great powerset that is always great regardless of your secondary. Bio Armor Overall great - Good Regen, solid resists and bit of defense to sweeten the deal - only being primarily weak to Psi damage. While might feel a tad bit squishy at first but it will pass once you'll hit later levels. Debuffs - Solid debuffs for damage (which just adds to the damage mitigation) and the regen Good "Panic" Buttons" - Personally I love powerset with good power that allows you to survive in sticky situations. While they all have a slight delay to them they are based on the number of enemies around you (but are still effective on 1v1 of AVs) - so if you jump in a mob and pop: ablative carapace + DNA syphon + Parasitic aura" you will outlive a stuff that a lot of other power sets wouldn't, and with fairly low cooldowns Adaptation - A great modular power that you can set however you like/need, Running low on endurance? Go for the efficient adaptation, the same goes for offensive and defensive. In most cases, I use defensive mostly but that's because I like the extra survivability Also a great all-rounder with good healing and resists.
-
Hi so I'm kinda new both to shield and Dark melee and I'd love some input on the build. Now keep in mind as far as enhancement goes i went for the "cheap" option (hoping to spend around 50-60 mil for the whole build) for now since im currently in the processes of maxing out another hero. Villain Plan by Mids' Villain Designer 1.962 http://www.cohplanner.com/ Click this DataLink to open the build! Level 50 Magic Brute Primary Power Set: Dark Melee Secondary Power Set: Shield Defense Power Pool: Fighting Power Pool: Speed Power Pool: Flight Ancillary Pool: Soul Mastery Villain Profile: Level 1: Shadow Punch -- CrsImp-Acc/Dmg(A), CrsImp-Dmg/EndRdx/Rchg(3), CrsImp-Dmg/Rchg(3), CrsImp-Acc/Dmg/Rchg(5), CrsImp-Acc/Dmg/EndRdx(5) Level 1: Deflection -- RedFrt-Def/EndRdx(A), RedFrt-Def(7), RedFrt-EndRdx(7), RedFrt-Def/EndRdx/Rchg(9) Level 2: Smite -- CrsImp-Acc/Dmg/Rchg(A), CrsImp-Dmg/Rchg(11), CrsImp-Acc/Dmg(11), CrsImp-Dmg/EndRdx/Rchg(13), CrsImp-Acc/Dmg/EndRdx(13) Level 4: Shadow Maul -- ClvBlo-Acc/Rchg(A), Mlt-Acc/Dmg(15), Mlt-Dmg/Rchg(17), Mlt-Acc/EndRdx(17), Mlt-Acc/Dmg/EndRdx(19), Mlt-Dmg/EndRdx/Rchg(19) Level 6: Battle Agility -- RedFrt-Def(A), RedFrt-EndRdx(9), RedFrt-Def/EndRdx/Rchg(21), RedFrt-Def/EndRdx(21) Level 8: Siphon Life -- TchoftheN-Heal(A), TchoftheN-Heal/HP/Regen/Rchg(23), TchoftheN-Acc/Heal(25), TchoftheN-Acc/EndRdx/Heal/HP/Regen(25), TchoftheN-Acc/EndRdx/Rchg(27), SphIns-Acc/Rchg(27) Level 10: Active Defense -- RechRdx-I(A), RechRdx-I(29) Level 12: True Grit -- ResDam-I(A), ResDam-I(15), Heal-I(29), Heal-I(31) Level 14: Boxing -- Empty(A) Level 16: Against All Odds -- EndRdx-I(A) Level 18: Dark Consumption -- ClvBlo-Acc/Rchg(A), Mlt-Acc/Dmg(23), Mlt-Dmg/Rchg(31), Mlt-Acc/EndRdx(33), Mlt-Acc/Dmg/EndRdx(33), Mlt-Dmg/EndRdx/Rchg(33) Level 20: Phalanx Fighting -- DefBuff-I(A), DefBuff-I(34) Level 22: Tough -- TtnCtn-ResDam(A), TtnCtn-EndRdx(34), TtnCtn-ResDam/EndRdx(36), TtnCtn-ResDam/EndRdx/Rchg(36) Level 24: Touch of Fear -- Ngh-Acc/Rchg(A), Ngh-Acc/Fear/Rchg(36), Ngh-Acc/Fear(37), Ngh-Acc/EndRdx(37) Level 26: Soul Drain -- ClvBlo-Acc/Rchg(A), Mlt-Acc/Dmg(37), Mlt-Dmg/Rchg(39), Mlt-Acc/EndRdx(39), Mlt-Acc/Dmg/EndRdx(39), Mlt-Dmg/EndRdx/Rchg(40) Level 28: Weave -- RedFrt-Def/EndRdx(A), RedFrt-Def(40), RedFrt-EndRdx(40), RedFrt-Def/EndRdx/Rchg(42) Level 30: Hasten -- RechRdx-I(A), RechRdx-I(31) Level 32: Midnight Grasp -- OvrFrc-Acc/Dmg(A), OvrFrc-End/Rech(34), OvrFrc-Acc/Dmg/End(42), OvrFrc-Dmg/End/Rech(43), OvrFrc-Acc/Dmg/End/Rech(43), CrsImp-Acc/Dmg/Rchg(43) Level 35: Shield Charge -- ClvBlo-Acc/Rchg(A), Mlt-Acc/Dmg(42), Mlt-Dmg/Rchg(45), Mlt-Acc/EndRdx(45), Mlt-Acc/Dmg/EndRdx(46), ClvBlo-Dmg/Rchg(46) Level 38: One with the Shield -- Empty(A) Level 41: Grant Cover -- RedFrt-Def/EndRdx(A) Level 44: Soul Tentacles -- EnfOpr-Acc/Rchg(A), EnfOpr-Acc/Immob/Rchg(46), EnfOpr-Acc/Immob(50), EnfOpr-Immob/Rng(50) Level 47: Dark Obliteration -- DarWtcDsp-ToHitDeb/Rchg(A), DarWtcDsp-ToHitdeb/Rchg/EndRdx(48), DarWtcDsp-ToHitDeb/EndRdx(48), DarWtcDsp-Rchg/EndRdx(48) Level 49: Fly -- Empty(A) Level 1: Brawl -- Empty(A) Level 1: Prestige Power Dash -- Empty(A) Level 1: Prestige Power Slide -- Empty(A) Level 1: Prestige Power Quick -- Empty(A) Level 1: Prestige Power Rush -- Empty(A) Level 1: Prestige Power Surge -- Empty(A) Level 1: Fury Level 1: Sprint -- Empty(A) Level 2: Rest -- Empty(A) Level 4: Ninja Run Level 2: Swift -- Empty(A) Level 2: Health -- Empty(A) Level 2: Hurdle -- Empty(A) Level 2: Stamina -- EndMod-I(A), EndMod-I(45), EndMod-I(50) ------------
-
As far as the AOE i was referring the Street justice's AOE not rad, both PBaoe attack has horrible range. To me Rad felt a little "squishy" i though maybe im not combining the right sets either I'm not fully using Rad potential with STJ or there are other sets that shorten the time to kill, so they feel less squishy.
-
So I've trying out Street justice / Rad (lvl 26 )and so far I'm a fan of Street justice.. the AOE is pretty terrible but the damage is good and most importantly i like the animations so far (except for shin breaker. But I'm not sure about the pairing with Rad, any other suggestions of secondaries that might work with Street justice?
-
who does more damg - Brute at 50% Fury or a scrapper?
Naturallymorbid replied to Naturallymorbid's topic in Brute
Is there anything that increases the crit chance? I'm trying to figure out the average damage output -
So I'm a brute kinda a player but ive been thinking of trying out a scrapper (Fire/Bio) - so i was wondering who does more damage on average a brute at 50-60% fury (on average) or a scrapper?