The Beta Account Center is temporarily unavailable
×


Nemu
-
Posts
1418 -
Joined
-
Last visited
-
Days Won
3
Content Type
Profiles
Forums
Events
Store
Articles
Patch Notes
Everything posted by Nemu
-
High dps DB scrapper builds skip the combos and rotate Blinding Feint, Ablating strike and Sweeping Strike + snipe. It requires a lot of recharge but Ice armor provides the LOTG mules to make that goal more obtainable. You will take most attacks but a good deal of them are just purple/scrapper ATO mules for the recharge. Defensive armor sets that also offer some +rech really help such builds and Ice doesn't have such a recharge boosting power (but it does have an end recovery power to sustain then endurance requirements of a high recharge buzzsaw build). so this means you'll need to slot more recharge reduction in the 3 staple powers instead of procs. The flashy AOE powers are a bit clunky, once you are able to get your chain down to those 3 core powers + snipe you will feel a difference in playstyle, from posing and pausing to a true buzzsaw of doom. You can use the combos and the flashy powers if you choose to since you need them as recharge bonus mules, but when it's time for serious business you can also forgo those powers go into dps mode.
-
-
I'll see myself out....
-
My observation is that people that build blasters the way you do end up not enjoying blasters because they still die too much even though they bought into this fallacy that skipping all your melee attacks and keeping at range by hover blasting is "safe" If survival is your goal I recommend a sentinel. You still get to blast, with the comfort of armor that prevents you from getting mezzed and contributes significantly towards your survival. And from what I hear you get a Psy epic for role play purposes as well. Blaster build threads generally start with learning how to play a blaster first. I see them as an "advanced" AT if this game had tiers of difficulty. To really succeed as a blaster you need a fair bit of knowledge on game mechanics/mob factions and problem targets. If you don't have any of those then you are in for a rough time with a blaster.
-
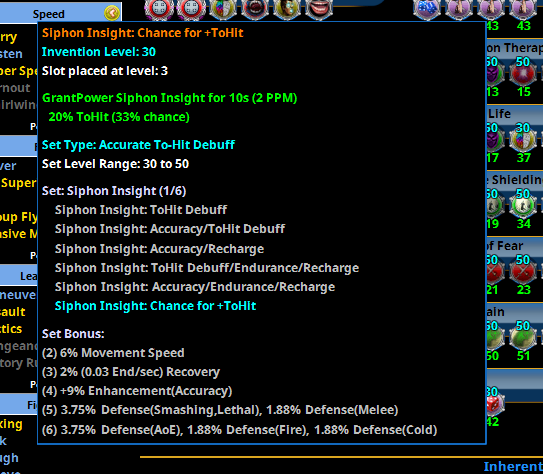
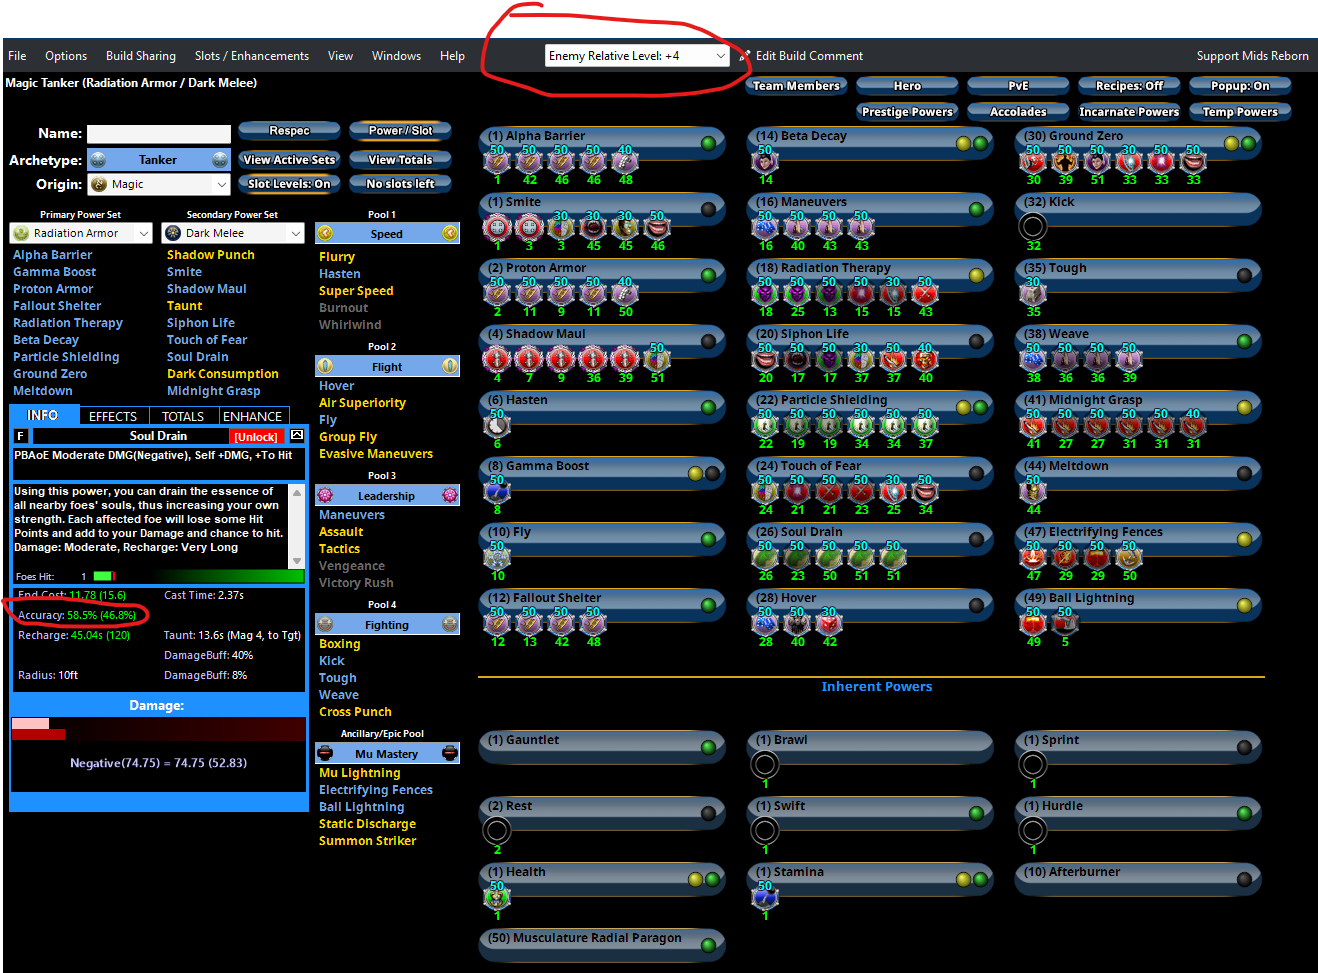
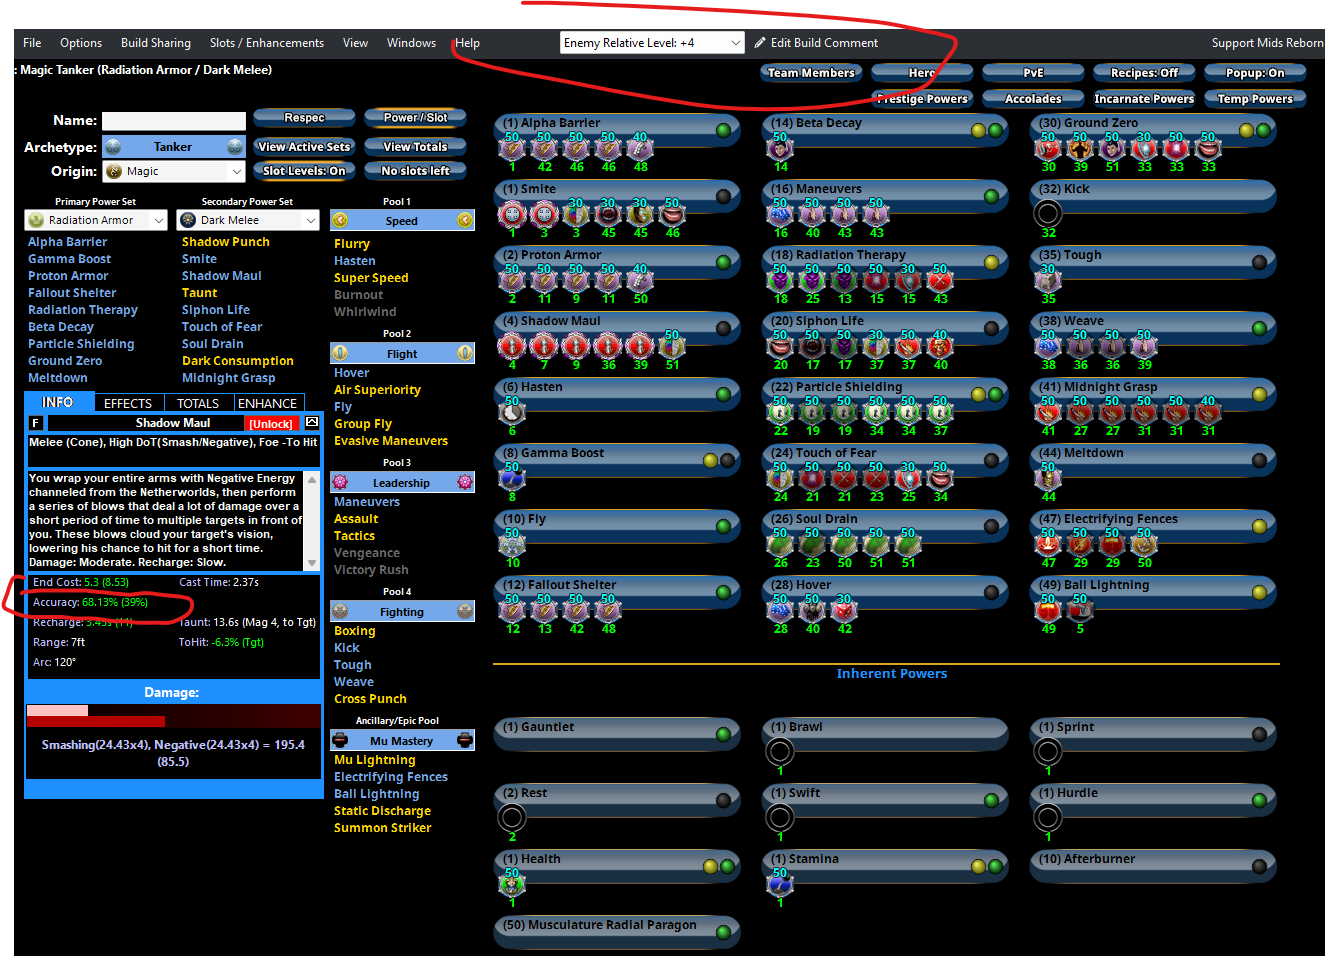
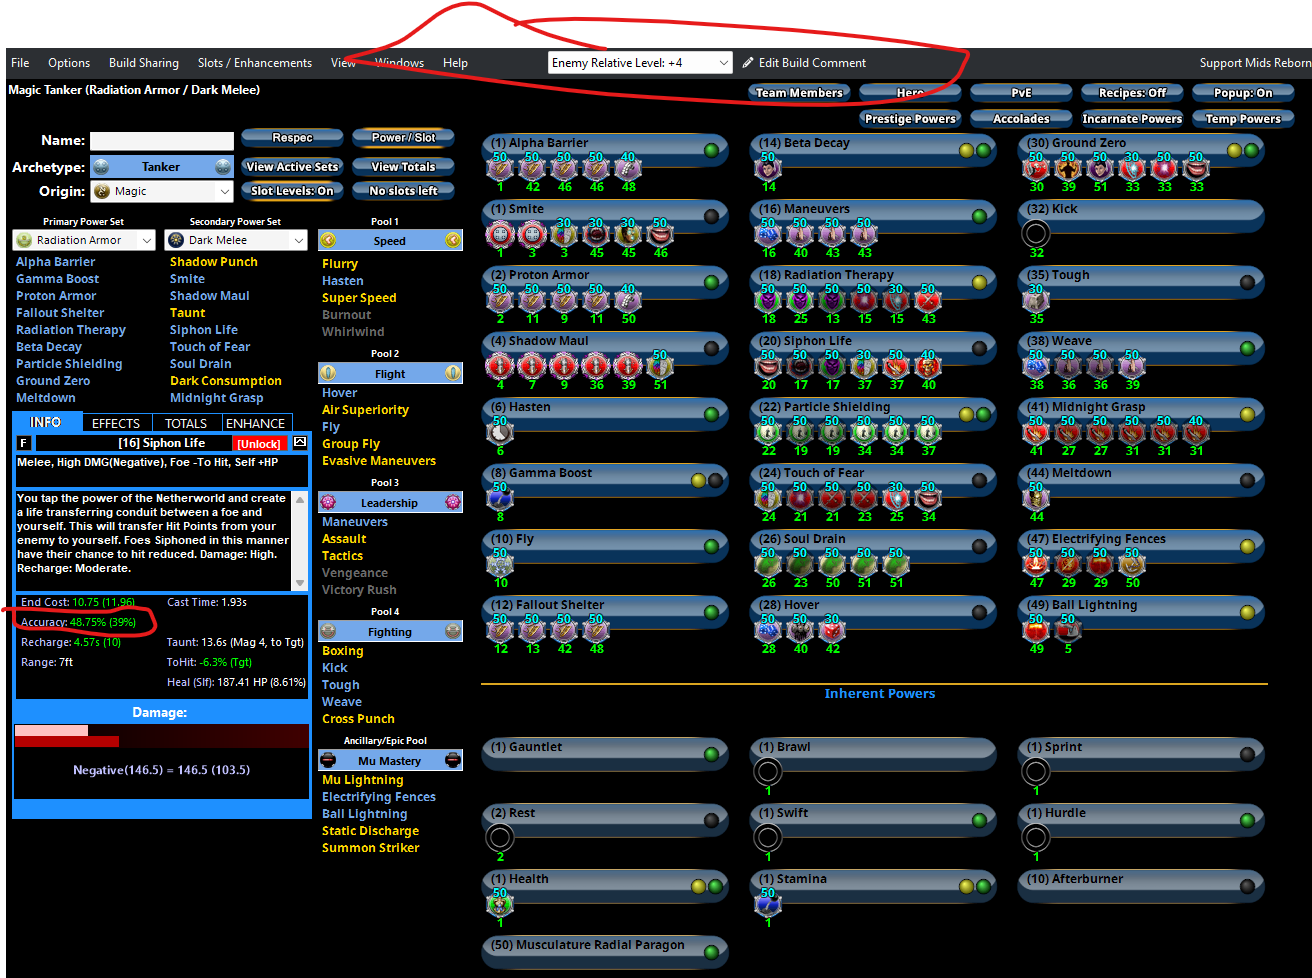
This is not a substitute for skippping on accuracy enhancements or accuracy set bonuses if you plan to proc bomb every single one of your attacks. Your chances to hit +4 mobs without those procs for soul drain sits at less than 60% which is quite low. Your chances to hit for shadow maul which is you most "conventionally slotted" attack Siphon life I get it. Everyone talks about procs but no one gives any insight to what makes proc builds work and what holes you need to address for proc builds to function. So let me break it down for you: Proc builds sacrifice ACC/DAM/END/RECH slotting in attacks and replaces them with procs. So you need to make up for those enhancement values elsewhere, either by set bonuses or powersets that supplements those areas. Rad/Dark has your endurance covered so there's synergy there. But you still need to make up for ACC/Rech from set bonuses. Also, not every power is worth investing in procs, especially the t1-t2 attacks that have low recharge. Those are better served as set bonus mules. Here's some reading material on procs and how they work Your resists are not overkill, you have meltdown toggled on. This is what your resists look like without: You can get by with those numbers but it takes experience with the game (not tanking in general) and leveraging build synergy to make up for hard stats. I can't speak to your experience, but I can tell you the build doesn't have enough synergy to mitigate the loss of hard stats. Here are a few ways from a build perspective to shore up survival: More recharge - clicks come up sooner Using soft controls such as knockdowns - Avalanche KD proc in one of the PBAOEs and other similar kD procs can go a long way More damage (that have enough accuracy to hit stuff) - you got on the proc train, now you need to not whiff.

-
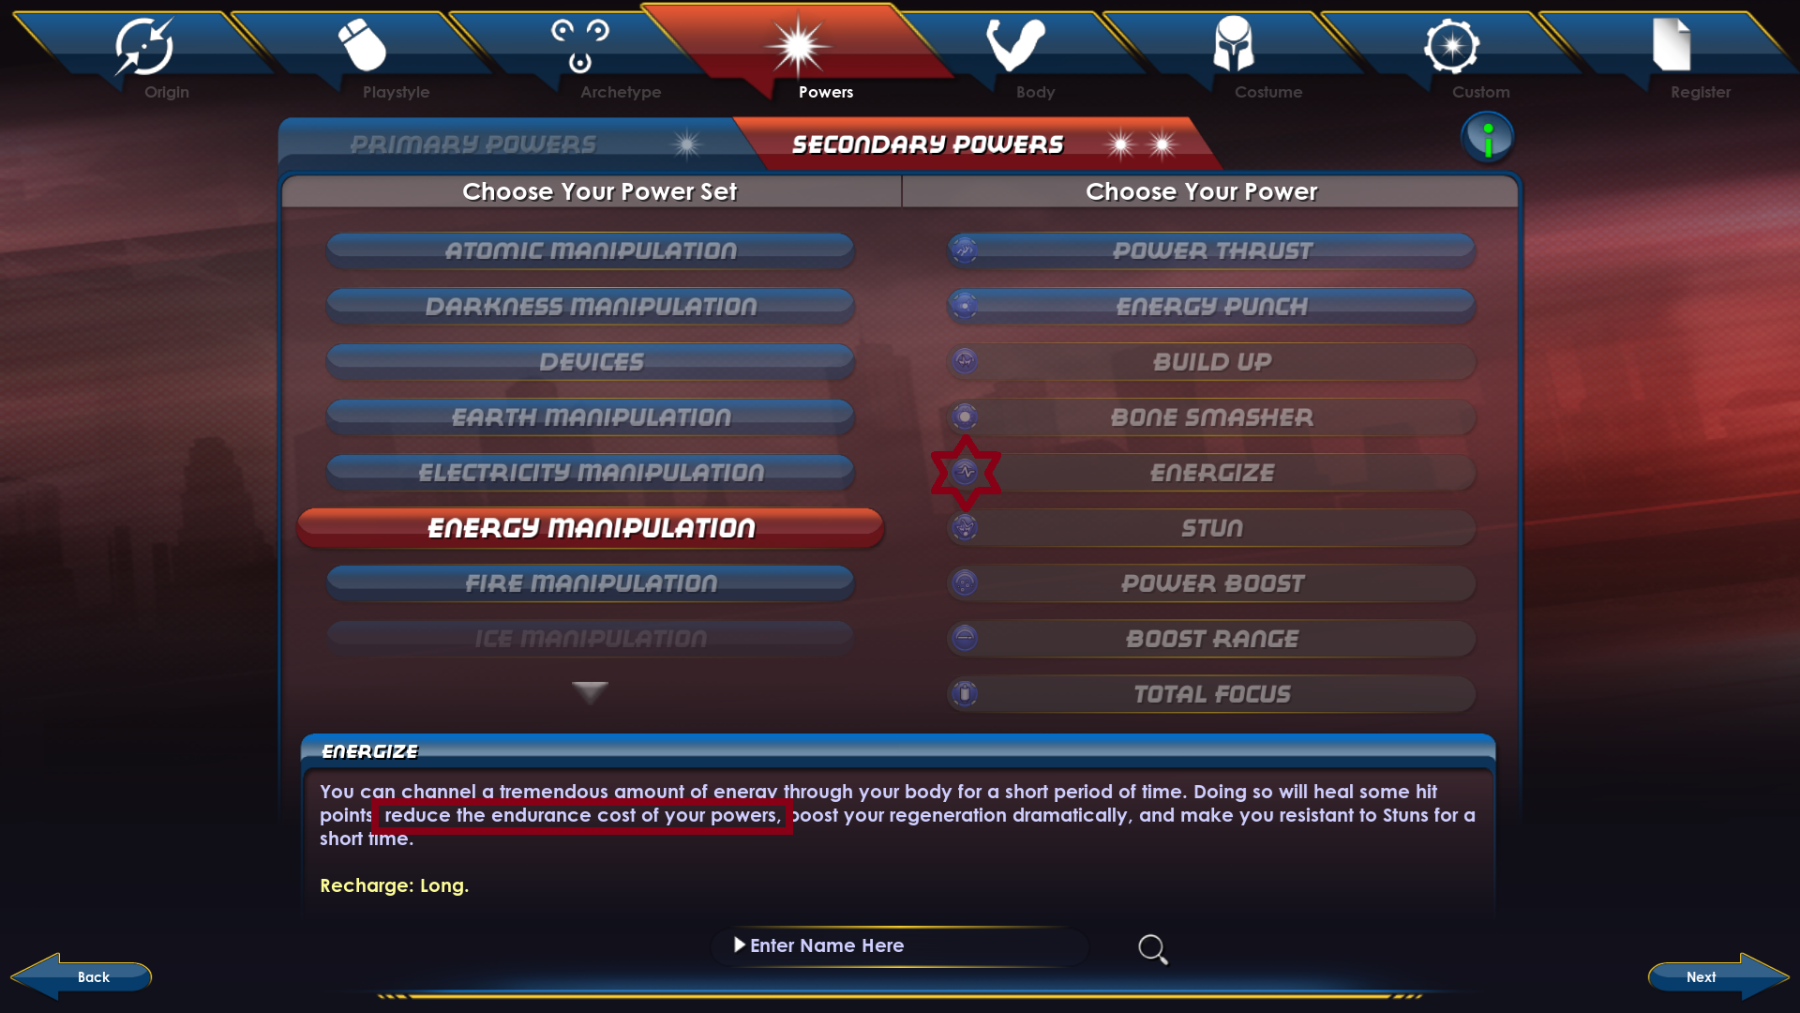
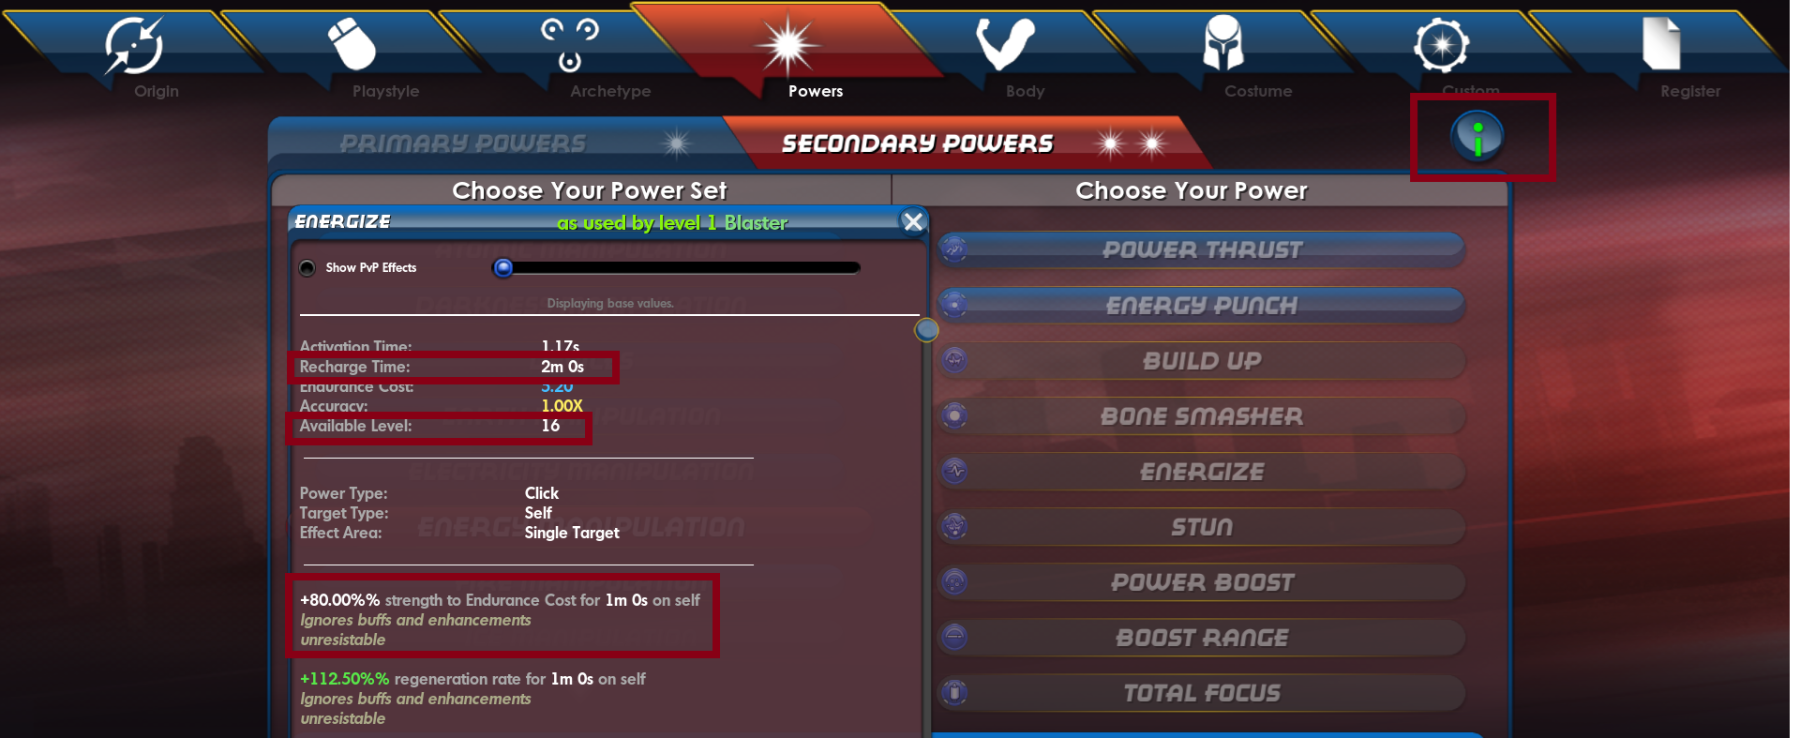
Reading the power description gives you hints on what powers do. It may not be super intuitive to look at the real numbers but that functionality was implemented as well, you can click the green "i" and hover over each power at character creation to see what the effects are, when they are available, how long their native recharge/damage/endurance cost/range etc.... are. In this case you can get energize at level 16 and it has a 2 minute recharge, but it discounts your endurance usage by 80% at level (this actually scales up as you level up, at level 16 it goes up to 92%. So if you are using single origin enhancements I would slot energize with 3 recharge reducers to make it as close to perma as you can and put that on as your autopower. You can also access real numbers in game through enhancement management screen - "show detailed info here" at the top
-
While not spines/regen. There are fundamental build philosophies for regen that are discussed in that thread that will apply to any regen build. 1 - don't build for passive regen 2 - recharge is key, as your survival depends on your clicks and all of them have relatively long recharge. 3 - so is slow resist, if your recharge is neutered you die. 4 - splash in defense accordingly A side note on copying builds from here or discord or anywhere else: As a rule of thumb you can consistently identify builds that are not highly optimized by the prevalence of too many 6 slotted sets. Those kinds of builds generally lack focus and waste slots on unnecessary bonuses that don't provide a lot of return on investment. Remember - just because someone shares their build for free doesn't mean their build is good or good for you. I gave a power by power, slot by slot breakdown of a street justice/regen build in that link. It might help you,
-
I imagine that most people that ask what build to run goldside with have the inclination to experience as many contacts/content possible. I typically run goldside content at -1/1 and doing so gets me through all the contacts organically, no street hunting or repeatable missions for those last scraps of xp to get me to the next set of contacts. In that context, goldside content isn't all that much harder. People that say stalkers are ill equipped to handle goldside content can't be more wrong. 1 - sneaking past stuff and getting to objectives is still faster than fighting your way through mobs and stalkers don't have to wait until level 12 to get total invis. If you want to experience as many arcs as possible this is the xp conscious way to run missions. 2 - ambushes and mobs are dumb as fuck and you CAN just run past them for the 2-3 missions that spawn mass ambushes that home in on you or for escort missions. For escorts you can turn hide, travel and sprint off and saunter past mobs naked from one end of the map to another and still make it to the door with the hostage. I have yet to experience an escort mission where I had non-ambush mobs chasing me relentlessly after I casually walked out of their aggro radius with my escort. 3 - build up + assassin's strike means you kill objectives faster, making those ambush missions a lot less dangerous because you are not fighting a war of attrition against overwhelming odds. The ONLY dicey mission with overwhelming ambushes is the eliminate shen mission from bobcat, and guess what? DPS wins and stalkers have that. I just ran through goldside 1-20 with my db/stone stalker. At no point did I think "man this is hard for a stalker." The one mission that I did find to be a slog is the kill 100 weakened destroyers mission from Tammy Baker, but I imagine that to be the case for most ATs simply because of the lack of endurance sustain at that level. I would not pick an AT with low damage to solo goldside or not. At those levels killing stuff fast is really the best way to carry you through.
-
I went electric manip for more knockdowns to support the seismic mechanic.
-
If we alternate between farming and KB posts we can keep all the shitposters occupied for the rest of eternity.
-
Slot freeze ray and bitter freeze ray for damage first and foremost, not hold duration. The blaster mantra is "kill things before they kill you" Blasters have no protection from any debuffs or status effects and this is going to be pretty important especially if you decide to dance in melee with melee attacks. I would try to address some of the low hanging fruits that require very little investment: 1 - immobilize: Combat jumping give you protection from it, it's also a LoTG 7.5 and kismet mule. It has no pre-requisites that you need to take from the jump pool, needs no further slotting and gives you defense, superior movement and jump control, and protection from immobilize. If need be you can also add a slot for the karma KB protection IO. 2 - blind: I hate being blinded, I don't know about you. Therefore for those blasters that don't have +perception I will try to fit in tactics to combat that. The benefit is that you also get to pick up maneuvers for a defense oriented build, and that tactics +to hit buffs quick snipe damage for those blasters with a snipe. I'm going to quote myself on /elec from this thread I don't like fly for melee heavy blasters. I'm too enfranchised with the mobile play style with combat jumping, jousting and hopping around the battlefield and I can never imagine doing what I do with hover. If you really need to fly there's the P2W jetpacks. Speaking of jousting: Finally from a survival perspective, in addition to rotating knockdowns and in your case rotating your arsenal of 3 holds, there's also the hard stats on defense. I had another post where I talk about the importance of range defense above S/L even for melee heavy blaster builds: This is my Fire/elec template: Defensively I shot for close to softcap range defense and around 40% S/L Def. You have more options around procs in your holds at the expense of defense with Ice/Elec, and if you chose to go that route and hover around 32.5% S/L and Range defense you should also be ok as long as you are comfortable popping lucks for the appropriate encounters.
-
The majority of builds I see on the blaster forums are hover blasters that avoid melee at all costs, and that sentiment correlates to the majority of blaster players I see in game. No I think range is pretty well represented, overrated even. I know I'm misinterpreting the original intent of the topic. Don't mind me.
-
You focus a lot on hard stats and I believe you underestimate the benefit of building for synergy. Survival is a combination of hard stats (def res regen, etc...), active mitigation, build synergy, inspiration usage, play style (exploiting mob AI and game mechanics), and last but not least - kill speed. Most people on the forums/discord/in game only focus on hard stats across all ATs. And the idea that "you only need as much survival as you need to kill things quickly" apparently only applies to blasters while players aspire to be statues that compromise a lot of damage for more survival than they need with every other AT. Here's an example: I ran into a softcapped ice tank on a MJ AV mission with Resistance mobs and he said he can't tank those because they chew through his defenses. He only looked at his hard stats and when met with debuffs or elements that counter his hard stats, that's where his ability to survive stopped. I told him to herd those resistance mobs that are all happy to shoot at him from range and debuff his defense around a corner so he can break LOS and force those range happy resistance to fight on his terms (one of the few scenarios where herding is actually useful nowadays). Guess what? The whole team started not dying, he and the team started killing them faster with their AoEs. FYI I have no qualms jumping into +5 mobs while exemped down with either my Rad/SS tank or my SS/Rad Brute (with even less hard stat numbers), between double stacked rage and killing stuff fast even during rage crash, rotating my arsenal of knockdowns (hand clap also stuns minions), force feedback feeding my recharge to keep rotating that suite of active mitigation, micro movements to keep mobs chasing me instead of standing still and giving them free hits, team support and the occasional inspiration usage(it's not as often as you think), I rarely have issues with accuracy or survival while fulfilling my role as a tank that takes the alpha for the team and hold mob attention. And if I'm 50 I have cheatyface Barrier whenever I am in trouble. I will admit that when I do go down it happens fast, but each time I go down I could have done something to prevent it, because I got complacent.
-
That's the plan. The build is all about synergy. Recharge is important but there are 4 powers in my regular rotation that have force feedback procs, and the build itself focuses on global recharge at the cost of survival. AoEs like ground zero and rad therapy have long recharge time yes, but they are front loaded with damage to kill things the first time around, anything that survives gets mopped up by footstomp and psi nado. The lack of damage enhancements in these powers is made up by double stacking rage, which also addresses accuracy. Endurance management is addressed by 1: Particle shielding, 2 rad therapy, 3 endurance passives. Without damage procs, you do almost no damage during rage crash. With procs you can still crank out triple digit damage numbers even if you are at -9999% dmg debuff. Does that make sense?
-
It's a glass cannon. what kills me more than most is getting stuck in post damage animation lock for ground zero and unable to use a life saving click/inspiration. Having said that I've taken it to fire farms and such, proactive inspiration management and usage helps overcome the squishiness, as always. Play like you would play a blaster and you'll be fine. When you get complacent and think you are a tank, that's when you get in trouble. I know arctic breath is great but I really think Dominate + Psi nado + Harmonic mind puts Psi mastery over leviathan. You can't fully proc spirit shark like you can dominate and breath is a cone which can be awkward to use for some players. Harmonic mind is just icing on the cake, as the build guzzles endurance and rad therapy can't sustain that consumption indefinitely.
-
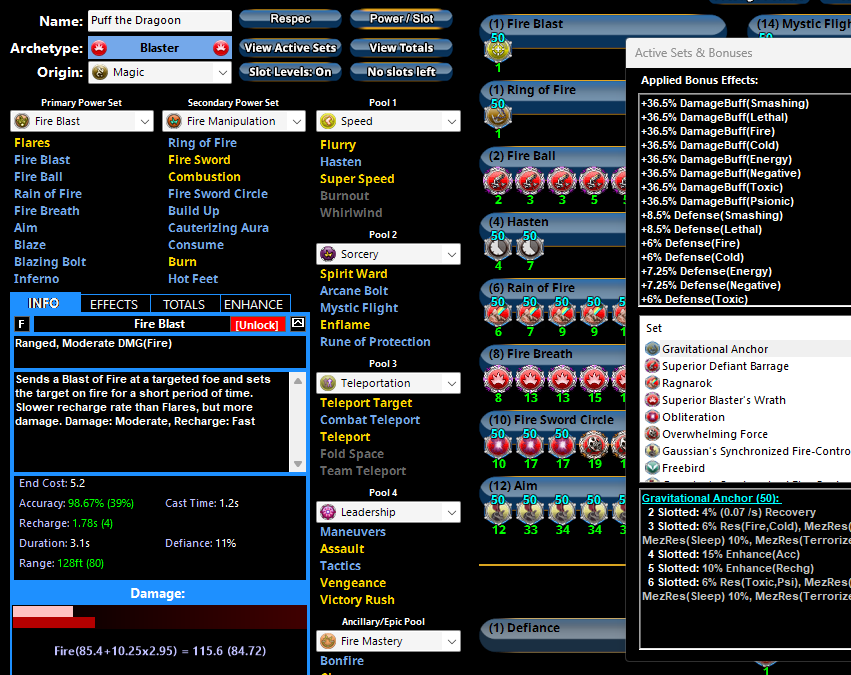
A while ago I veered off the conventional path of gloom + dark oblit for my rad/ss and went with leviathan for a fully procced arctic breath. The game has changed, and now with the introduction of psionic mastery, there's no contest that this pool has the most synergy with a fully procced Rad/SS tank or brute. Nuka Panda - Hero Tanker Build plan made with Mids' Reborn v3.7.4 rev. 9 ────────────────────────────── Primary powerset: Radiation ArmorSecondary powerset: Super StrengthPool powerset (#1): LeapingPool powerset (#2): SpeedPool powerset (#3): ConcealmentPool powerset (#4): LeadershipEpic powerset: Psionic Mastery ────────────────────────────── Powers taken: Level 1: Alpha Barrier A: Gladiator's Armor: End/Resist42: Gladiator's Armor: TP Protection +3% Def (All)48: Gladiator's Armor: Resistance Level 1: Punch A: Hecatomb: Damage11: Hecatomb: Damage/Recharge11: Hecatomb: Damage/Recharge/Accuracy13: Hecatomb: Recharge/Accuracy15: Hecatomb: Damage/Endurance Level 2: Proton Armor A: Unbreakable Guard: Resistance15: Unbreakable Guard: Resistance/Endurance17: Unbreakable Guard: +Max HP Level 4: Haymaker A: Superior Might of the Tanker: Accuracy/Damage7: Superior Might of the Tanker: Damage/Endurance/Recharge7: Superior Might of the Tanker: Accuracy/Damage/Endurance/Recharge9: Superior Might of the Tanker: Recharge/Chance for +Res(All) Level 6: Combat Jumping A: Luck of the Gambler: Defense/Increased Global Recharge Speed17: Kismet: Accuracy +6%29: Shield Wall: +Res (Teleportation), +5% Res (All)33: Reactive Defenses: Scaling Resist Damage Level 8: Radiation Therapy A: Superior Gauntleted Fist: RechargeTime/+Absorb34: Obliteration: Chance for Smashing Damage34: Eradication: Chance for Energy Damage34: Perfect Zinger: Chance for Psi Damage37: Touch of the Nictus: Chance for Negative Energy Damage40: Theft of Essence: Chance for +Endurance Level 10: Fallout Shelter A: Steadfast Protection: Resistance/+Def 3% Level 12: Hasten A: Invention: Recharge Reduction13: Invention: Recharge Reduction Level 14: Infiltration A: Luck of the Gambler: Defense/Increased Global Recharge Speed29: Winter's Gift: Slow Resistance (20%) Level 16: Hand Clap A: Explosive Strike: Chance for Smashing Damage40: Perfect Zinger: Chance for Psi Damage43: Sudden Acceleration: Knockback to Knockdown45: Force Feedback: Chance for +Recharge Level 18: Particle Shielding A: Preventive Medicine: Heal19: Preventive Medicine: Heal/Endurance19: Preventive Medicine: Endurance/RechargeTime25: Preventive Medicine: Heal/RechargeTime27: Preventive Medicine: Heal/RechargeTime/Endurance27: Preventive Medicine: Chance for +Absorb Level 20: Knockout Blow A: Ghost Widow's Embrace: Chance of Damage(Psionic)21: Touch of Death: Chance of Damage(Negative)21: Perfect Zinger: Chance for Psi Damage23: Hecatomb: Chance of Damage(Negative)23: Mako's Bite: Chance of Damage(Lethal)25: Force Feedback: Chance for +Recharge Level 22: Ground Zero A: Superior Avalanche: Recharge/Chance for Knockdown45: Perfect Zinger: Chance for Psi Damage45: Touch of Lady Grey: Chance for Negative Damage46: Eradication: Chance for Energy Damage46: Scirocco's Dervish: Chance of Damage(Lethal)46: Obliteration: Chance for Smashing Damage Level 24: Rage A: Adjusted Targeting: To Hit Buff39: Adjusted Targeting: To Hit Buff/Recharge42: Adjusted Targeting: To Hit Buff/Endurance/Recharge42: Adjusted Targeting: Endurance/Recharge43: Adjusted Targeting: Recharge Level 26: Beta Decay A: Achilles' Heel: Chance for Res Debuff Level 28: Gamma Boost A: Synapse's Shock: EndMod43: Synapse's Shock: EndMod/Recharge49: Synapse's Shock: Damage/Rechage50: Synapse's Shock: Damage/Accuracy/Endurance50: Synapse's Shock: EndMod/Increased Run Speed Level 30: Foot Stomp A: Scirocco's Dervish: Chance of Damage(Lethal)31: Eradication: Chance for Energy Damage31: Perfect Zinger: Chance for Psi Damage31: Armageddon: Chance for Fire Damage33: Fury of the Gladiator: Chance for Res Debuff33: Force Feedback: Chance for +Recharge Level 32: Taunt A: Perfect Zinger: Chance for Psi Damage Level 35: Dominate A: Gladiator's Net: Chance of Damage(Lethal)36: Ghost Widow's Embrace: Chance of Damage(Psionic)36: Neuronic Shutdown: Chance of Damage(Psionic)36: Unbreakable Constraint: Chance for Smashing Damage37: Gladiator's Javelin: Chance of Damage(Toxic)37: Apocalypse: Chance of Damage(Negative) Level 38: Meltdown A: Synapse's Shock: EndMod39: Synapse's Shock: Damage/Rechage39: Synapse's Shock: EndMod/Recharge40: Synapse's Shock: Damage/Recharge/Accuracy47: Synapse's Shock: Damage/Accuracy/Endurance Level 41: Harmonic Mind A: Power Transfer: Chance to Heal Self Level 44: Psionic Tornado A: Explosive Strike: Chance for Smashing Damage47: Bombardment: Chance for Fire Damage48: Javelin Volley: Chance of Damage(Lethal)48: Positron's Blast: Chance of Damage(Energy)49: Annihilation: Chance for Res Debuff50: Force Feedback: Chance for +Recharge Level 47: Maneuvers A: Luck of the Gambler: Defense/Increased Global Recharge Speed Level 49: Tactics A: Invention: Endurance Reduction ────────────────────────────── Inherents: Level 1: Gauntlet Level 1: Brawl (Empty) Level 1: Sprint A: Unbounded Leap: +Stealth Level 2: Rest (Empty) Level 1: Swift (Empty) Level 1: Hurdle (Empty) Level 1: Health A: Panacea: +Hit Points/Endurance Level 1: Stamina A: Performance Shifter: Chance for +End Psi mastery has all the synergy: Another fully procced ST attack not subject to rage crash and can stack holds with KO blow, an endurance helper, and another wide area AoE that feeds FF proc and provides KU mitigation. It's also available for brutes, so this can work on either AT. That's my PSA. Nuka Panda i27 p5 - Tanker (Radiation Armor).mbd
-
I play a lot of blasters. my dislike of empaths is not because I die a lot before they can react. but because most emps disappoint me. When player mastery/builds reach a certain maturity level, there are fewer benefits empaths bring to the table. The biggest skill for empaths is discerning who is most deserving of their buffs and most empath players fail at that. Out of 100 empaths, maybe I get 5 that actually understands the value of clear mind and fortitude on well piloted squishies. More often than not I get the healer type that think CM/fort always needs to go on tanks/melee and their primary job is whack a mole on the HP bar. They don't have the skills nor the understanding of the game to either use buffs period, or use buffs on those most deserving. CM is the most important buff to squishies without mez protection and I challenge you to find any emps that understands that and proactively puts CM on other support ATs with debuff toggles/pbaoe auras or aggressive blasters that don't hang in the back. For that matter I have a great deal of apathy for buff based support because so many people suck at it. It's too much to ask to even keep up a team wide shield you can re-apply every 4 minutes, let alone something like fort or CM. Bring a debuff set, at least I know their selfish play will also benefit the team/myself in some capacity.
-
Join the bad breath brigade! We are also accepting applications to the church of SPIN. Apply now while there are seats left!
-
I'd appreciate some thoughts/critiques on this Rad/SS Tanker...
Nemu replied to Story Archer's topic in Tanker
My approach is that since the build is going to have a lot of recharge that also means there will be a lot more rage crashes. So I made a conscious decision to lean only on powers that can take all the procs and mule others. Real statistics and math can prove me wrong on how much conventionally slotted attacks like haymaker/cross punch (they would be hecatomb/armageddon mules in my build) contributes to my overall damage over time, but I get a real sadface seeing those pop up for 1 damage during rage crash when I can still pump out double and sometime even triple digit damage from my fully procced attacks. Between KO, stomp, hand clap, breath and particle shielding I have enough to do every 30 seconds to not worry about a seamless attack chain. Maybe I’ll use a haymaker here and there for the +res proc but a lot of times that’s just me going out of my way to do something I don’t really need. i’ll have to check my build but I believe I got those aforementioned attack powers down to sub 10 second cooldowns to be able to reasonably string them without huge unbearable gaps. -
Single target stuns is rookie league. No one wants to be a rookie scrub. I know you don’t. you can port that combo to scrappers and be the most epic stunner to ever stun.
-
I'd appreciate some thoughts/critiques on this Rad/SS Tanker...
Nemu replied to Story Archer's topic in Tanker
Cross punch and gloom are cool and all but they have a 33 1/3 chance of beating throw sharks, and if you add arctic breath to the mix their chances drastic go down! you should try arctic breath. It’ll wreck your end bar and the enemies’ HP bar. Mutually assured destruction is the best kind of struction. I need you betty, on my side, to promote bad breath and the gospel of SPIN. Together we can make a difference! -
I'd appreciate some thoughts/critiques on this Rad/SS Tanker...
Nemu replied to Story Archer's topic in Tanker
hAnDcLaP dOeS nO dAMaGe! 1 - it takes FF proc. Proc builds want all that recharge 2 - it helps with crowd control especially during rage crash. 3 - it even takes two damage procs you need more recharge. Ditch the teleport pool and get the stealth pool for more lotg mules. Armageddon proc replaces the ACC io in footstomp. Fit theft of essence +end instead if you want a wee bit of insurance for sustain against single target fights KO blow needs ALL the procs, not a single slot should be a conventional IO. This way during rage crash you have at least 1 ST power that can still hurt stuff. Take haymaker, mule it with 5 piece hecatomb without the proc for the recharge. Add the tanker +res ATO Speaking of res, trying to hit 90% S/L res and slotting for melee defense only dilutes the build. Mine only runs around 70ish S/L resist even with tough. If you really want to embrace the way of the proc, take leviathan pool for arctic breath, fill it with ALL the procs. You will need global acc bonuses in addition to rage to hit buff to make sure this hits. People sleep on this power for banes, they sleep on this power for proc monster tanks/brutes. As a bonus you get to throw sharkz with the ST prerequisite. I don’t invest too much in a ST chain. If you invest more in rechage as a proc build demands, Footstomp and KO blow is enough and teammates can pick up the slack. -
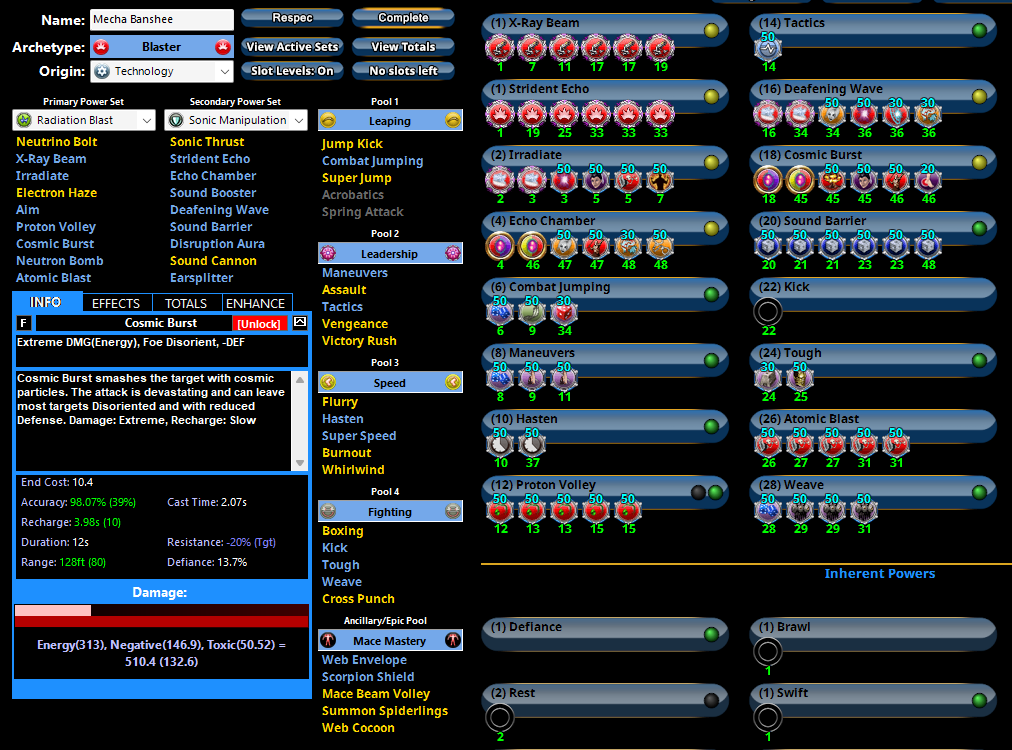
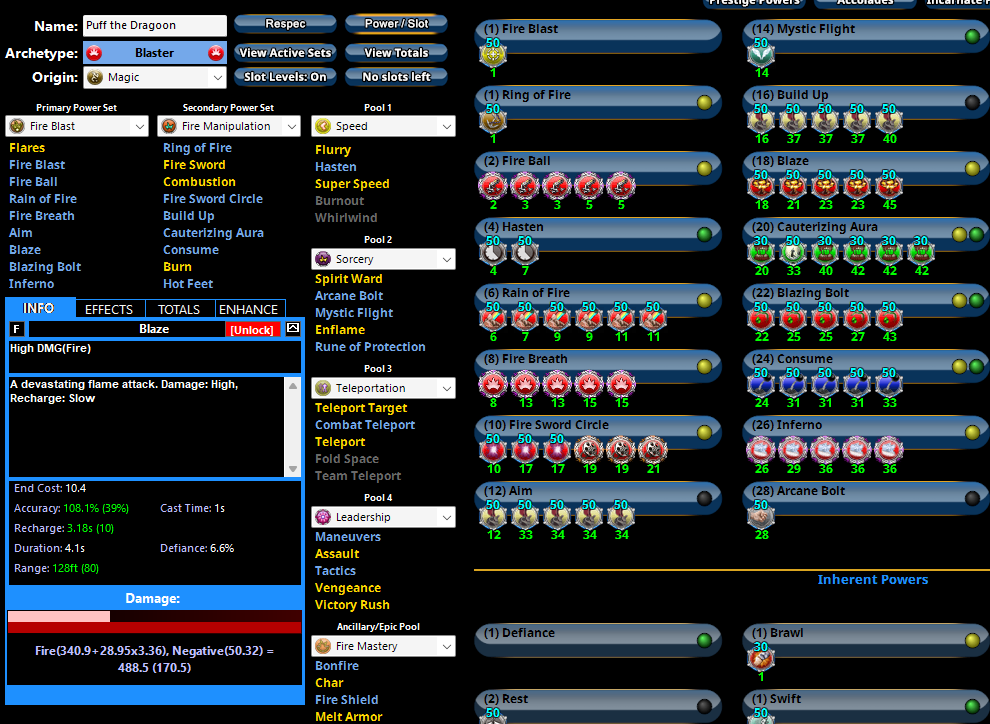
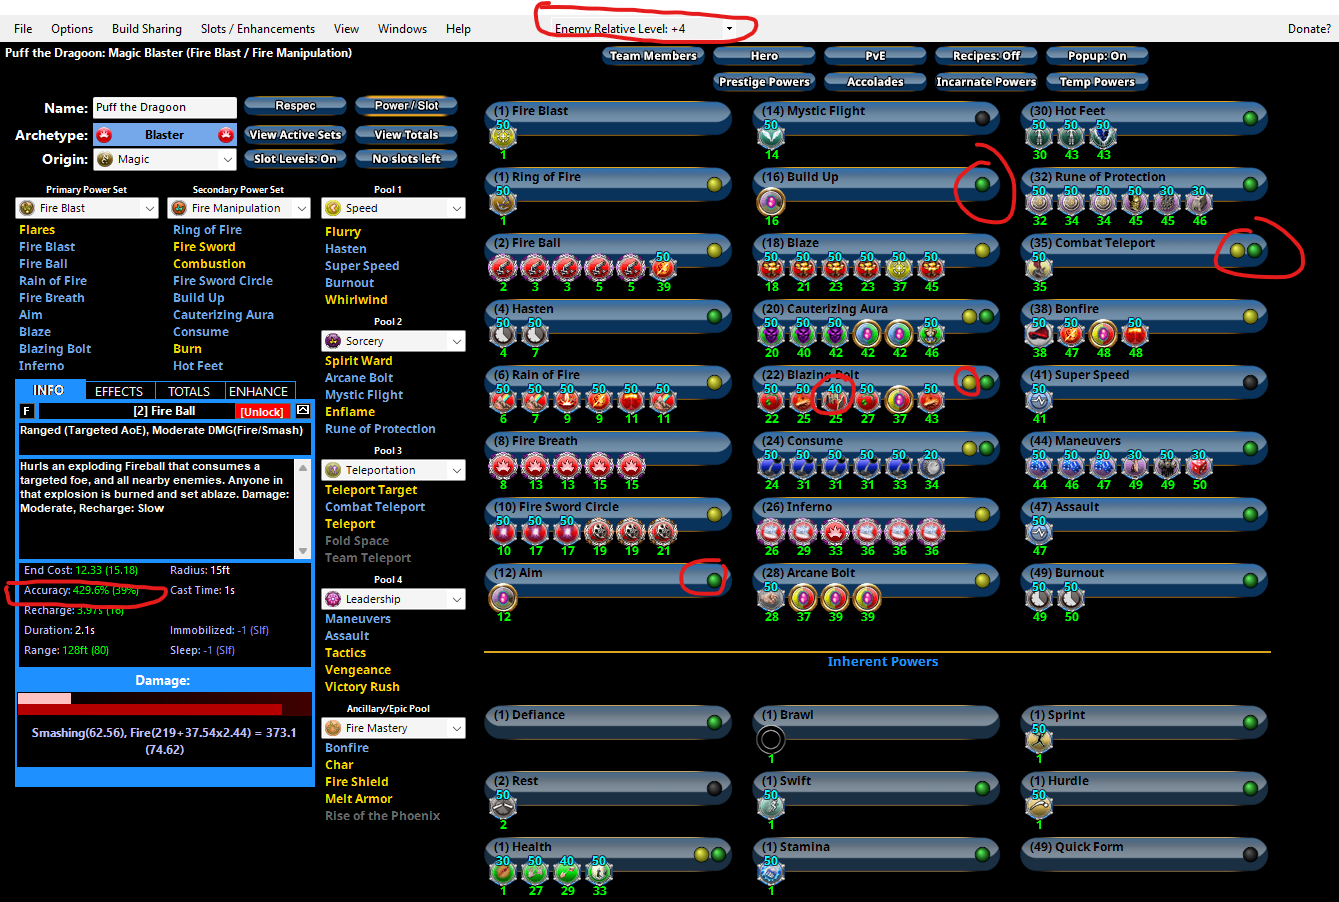
High damage in this game doesn't come from stacking +damage IO bonuses. 2.5% damage at the expense of 4 additional slots is poor ROI when those slots can be allocated to helping your global recharge, which synergizes with procs since proc chances are not negatively impacted by global recharge bonuses (but they are negatively impacted by recharge reduction you slot in the power you want to proc) Here's your original build, let's use Fire blast as an example You have an SO's worth of +damage from set bonuses. Fire blast does 115 damage I removed the +dam bonuses from guassians, sudden acceleration and performance shifter, theft of essance and overwhelming force, your +dam went down to 18%. but I put a single damage proc in fire blast without slotting it for anything else Now it does 121 average damage, the caveat is that the proc won't fire all the time and hence "average damage", your average damage without the proc falls down to 99. Fire/fire doesn't lend itself well to extravagant proccing of powers compared to something like this: Mecha Banshee - Blaster (Radiation Blast).mxd Back to your original build - Note your unbuffed damage on blaze in your build, it tops off at 488 with muscalature alpha. Look at the damage potential for echo chamber in my build, this is a tier 3 hold that happens to do some damage under normal slotting, Cosmic burst Moral of the story is that procs can elevate certain, but not all powers from utility tools to heavy hitters (usually holds or powers with secondary debuffs like slow or -defense because they can take a huge variety of procs). The other way to think about procs is that if you are at the damage cap, procs and -resist powers is the only way you can deal more damage to your target. The typical approach to high damage builds prioritizes recharge and procs. The two goals have synergy because most recharge bonuses also offer ACC bonuses along the way and heavily procced powers do not have a lot of room for stuff like ACC/Recharge/endurance reduction slotting. Inferno will contribute the bulk of the damage you do in your career, so recharge helps there too. For Fire/Fire though, I'd worry less about procs. On Accuracy, a few things: Your accuracy is represented by the "accuracy" field on the left tab showing the power. It's impacted by buffs and enemy level. You can set the enemy level at the very top. +3 or +4 is where most builds check against. 95% is the cap, any overflow helps buffer against debuffs. All the stuff I circled on your actual power selection area are non-persistent to-hit buffs. Uncheck those radial dials so you can see your real chances to hit. As for your comment about fire blast, it's more conducive to think about how powers work together than to look at each piece in a vacuum. Yes Blaze and Blazing bolt do more damage. but they animate fast and you have a gap between the recharge of those two powers, even if you use fire ball as a filler blazing bolt still takes 5 seconds to recharge so you still have that gap. Fire blast can fill that gap. The fact that you can use fire blast while you are held/stunned/slept/mezzed means that you still have the opportunity to kill stuff before they can get close to you. One typical recommendation is to slot the full defiant barrage set into either your T1 or T2 blast so that when you are mezzed you can use it and hope to proc the +mez protection proc to break free. The other school of thought is to put the +mez protection proc in an opener like fireball and hope to pre-emptively trigger it, I don't have experience with the latter. I prefer the former for build/set bonus efficiency/ROI reasons. The build has a distinct lack of status protection. There are some low hanging fruits that you can address even with the blaster AT. Knockback is the most obvious one. there are many IOs that offer 4 points of KB protection, blessing of zephy 4pt kb is a easy one to slot into a travel power. Immobilize is the other, combat jumping gives you protection against that. It also offers superior (in my opinion) mobility compared to combat teleport or hover. Some people play blasters without it, I can't imagine my life as a mobile blaster without it. My advice to you is to learn movement if you are committed to doing high damage at the expense of survival. The following tips might help you on that journey. Some people will go as far as to grab acrobatics as well. That's your call. Most optimized builds are tight and you'll have to make some decisions on what powers you drop in favor of other powers. There are other comments I have about your build but I need coffee. Stay tuned.
-
I think it really depends on your definition of blapper. I hate the term by the way. It's a construction of yesteryear when people didn't figure the blaster AT out and relegated it to a "pure" range AT, and "blappers" became an anomaly. While that may have been true 15 years ago, it doesn't hold up now. Can you think of any other AT where it's OK or even encouraged by the masses to skip pretty much all of its secondary? We did away with taunt only 1 attack tanks, 1 attack pure healers with the medicine pool, etc... Blasters is the last hold out where this idea that somehow using all your tools from both your primary and secondary is not normal and deserves a name. "Blappers" are just regular ass blasters, they use both their primary and secondary, the same way every other AT is played. There is also a difference in the mindset that "if you use melee you stay in melee" vs leveraging melee attacks as another tool to be used at the appropriate time and place. The former is the the mindset of a melee player resigned to the fact that they need to operate in melee range, and the latter is how smart blasters operate. More often than not I see the former applied to the tons of blaster builds I've gave feedback on. If nothing else melee attacks are great mules for mako's bite which shores up range defense, or a set of hecatomb/armageddon for 10% global recharge, and by using those as mules you open up your build to other set bonuses instead of dumping/limiting all your slot investment/build goals into your primary attacks. I'm resigned to the fact that a lot of people will never move past their bias that blasters should always operate at PURE range because it's "safer", but I feel a strong need to correct this notion that you should skip all your melee attacks just by virtue of the IO bonuses they accord a build. (not that you skip your melee attacks, but I do see a lot of builds over the years that do.)