Nemu
-
Posts
1424 -
Joined
-
Last visited
-
Days Won
3
Content Type
Profiles
Forums
Events
Store
Articles
Patch Notes
Everything posted by Nemu
-
Again, how are you picking and slotting your powers as you are leveling your tank? You mentioned that you slotted your attacks for acc and end but did not mention damage. Doesn't that correlate to what I said about kill speed making things easier? You said the scrapper is more survivable and that you don't slot scrapper attacks for endurance reduction. Scrappers do more damage than tanks out of the gate, this further bolsters my comment about killing things faster = things seem easier. You kill things in two hits, mobs has less time to hit back, you use less overall endurance - Scrapper You kill things in 5 hits, mobs has more time to hit back, you use more overall endurance, fights drag out longer and you have to spend more time recovering HP and End - Tanks that choose to invest heavily in defense early game instead of go all in on offense, I've experienced this myself as a newbie with 1-2 attack tanks that focused all in on armor into their late teens.
-
I have not tested it. I had contemplated that while planning the build but I didn't have slots to spare. I need recharge, so my options were 5 piece coercive with the proc, 5 piece absolute amazement with the proc, or 5 piece Fortunata hypnosis. I was leaning towards the stun or sleep set due to the acc bonus since I completely procced my attacks with no acc slotting, but I ultimately settled on the stun set because of the proc. If I had a 6th slot to spare I'd have tried the coercive proc for sure.
-
I'd focus on this statement instead: IH is better auto insurance when you do get into an accident. Or put it another way: RR covers standard wear and tear, and I firmly believe any well built regen can cover that regardless of RR IH covers when your bumper falls off and when your engine explodes, and even well built regen need help with that.
-
This is the main context that I'm evaluating IH vs RR. I feel that RR provides little to no value if things are going ok, especially if you supplement the build with heals/ROP/etc... Regen playstyle doesn't really change because of RR, you are still leaning heavily on secondary mitigation and heals to survive. But when you need that big burst of survival, IH delivers.
-
Probably too squishy for the way you play and build Ultimo, but if you are willing to invest in IOs, you can make a pretty offensive oriented Psi/SS tank that can survive tough situations and deal excellent damage.
-
You are learning an important lesson here. When things die faster content feels easier. When things are locked down you can take your time and cruise to victory. Early game tank experience sucks. You have too few attacks and the natural instinct when building a defensive AT is to take all armor picks and slot up your defenses. But even if you slot up your defenses early on you have nowhere near a complete toolkit to help you actually tank, which exacerbates the leveling situation where you don't have enough defenses nor do you have adequate offense to level at a good pace. Nowadays I don't even bother adding slots to my armors before 5-6 slotting 3 attacks (for acc and damage, and then endurance reduction/recharge) on tanks (as a general rule, but there are exceptions, especially endurance granting powers). The base slot on armor toggles is just an endurance reduction. I start slotting my defenses more during my 20s and certainly go all in once I reach my 30s and have slots to spare. During the early leveling process your increased bag of HP is your primary defense and the mantra during those levels is to kill the enemy before they kill you. Also if you are solo I run at -1/0, you get more xp via mission completion and story arc completion bonuses than killing higher con/tougher foes and wasting more time doing so.
-
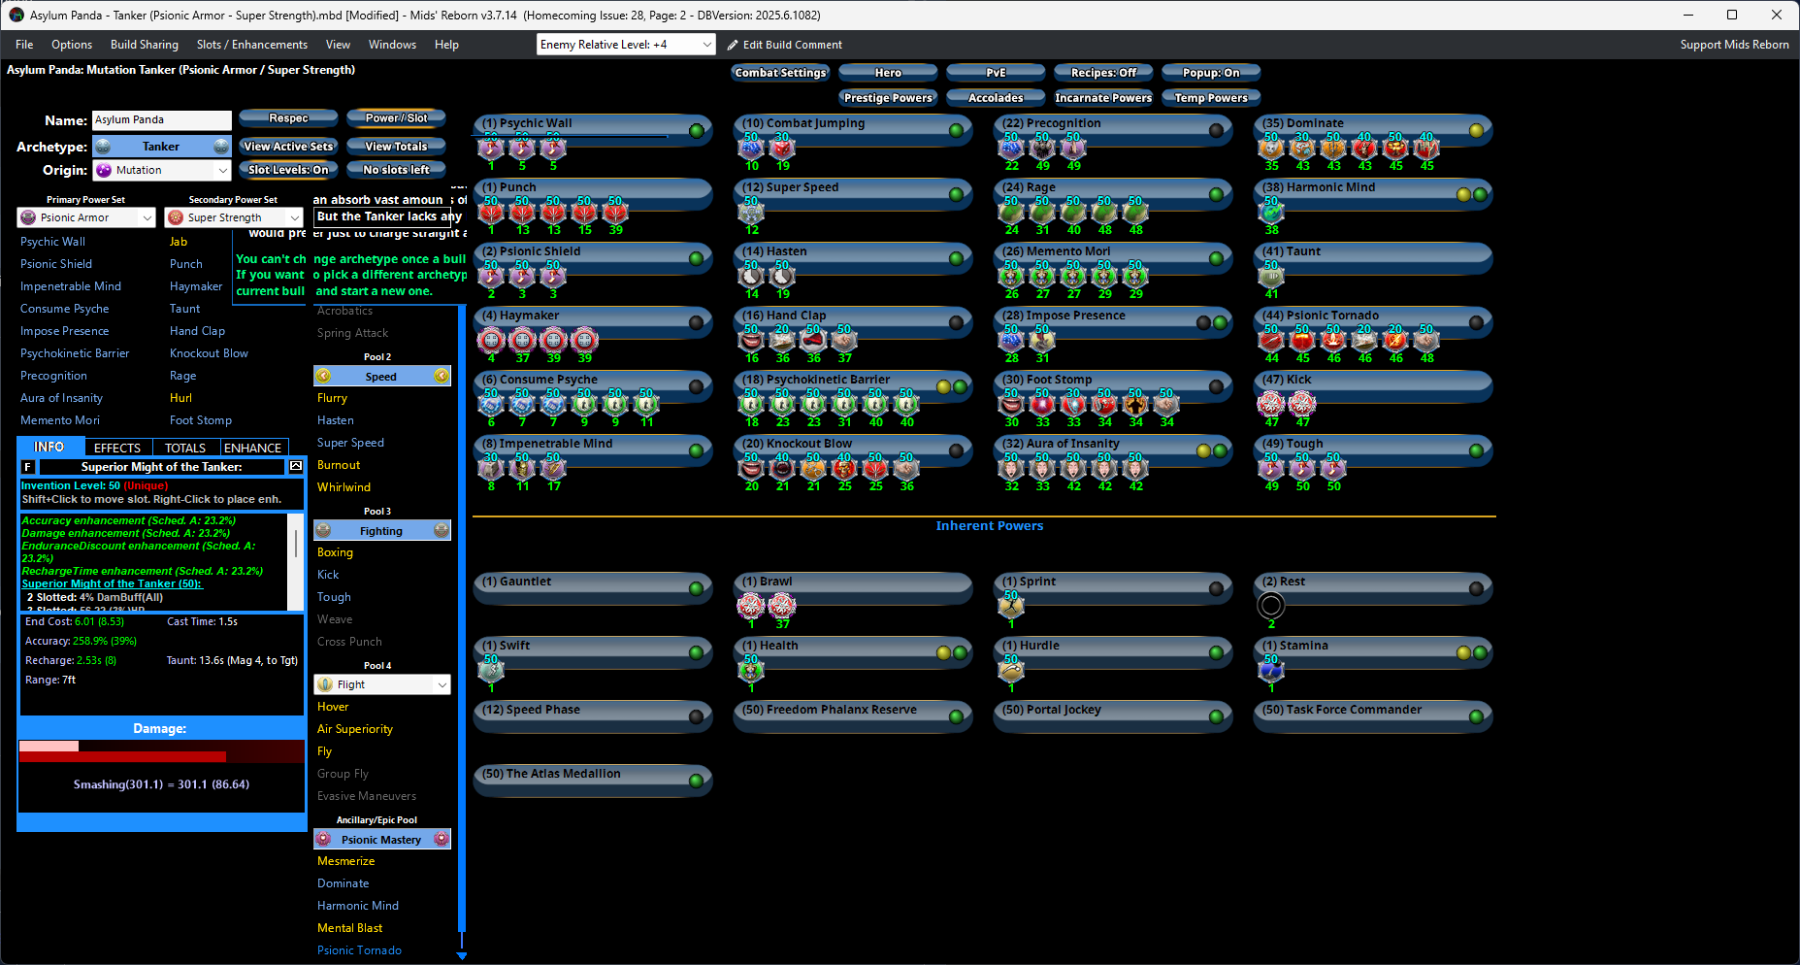
How I built mine. I treat psy armor as no different than rad/fire/regen armor which depend heavily on clicks for survival. Recharge focus, proc out SS attacks, get enough slow resist. Aura gets stun set to couple with handclap, the 5 pieces contribute a bonus to acc and recharge because those are build goals and the stun proc also debuff to hit which is an added bonus. Secondary goal +max HP where I can fit it in. Guassian proc goes in impose presence, it works just like invincibility in invuln. Asylum Panda - Tanker (Psionic Armor - Super Strength).mbd

-
I see 2 paths. One that ignores passive regen other than instant healing and one that leans into it and takes reactive regen instead of instant healing. The former saves you a power pick (I wouldn't bother with fast healing), the latter will take everything in regen, and most likely supplement the passive regen by adding physical perfection (I'm going to guess that you can probably get around 100+hp/sec passive regen with this setup if you build for max HP and cram a few of those regen uniques/bonuses in). The optimal builds will still supplement either path with hasten and Rune of Protection + soft controls from attacks/pools/epics, but you need to make some sacrifices in power picks if you want to fit all those in now. I'd ignore passive regen, aside from the debuff resistance auto, which reduces some taxes on IOs that I need to invest in slow resistance, and 1 less skippable power in revive, nothing else has really changed. +rech/+slow resist/mitigation, those are still the build priorities
-
It's easier for your fingers to reach down to hit the bottom row of keys than it is for them to extend up to hit the number row. I also need to curl my hands up more so my thumb can hit the space key with the RDFG config. I don't even bother using keys for turning, that's what mouselook is for.
-
Also, use ERTF as your movement keys. it gives you more keyboard estate for your pinky and ring finger. I just bind keys directly to trays nowadays and I keep it consistent across all characters in how powers are assigned to trays. For example, build up type powers are always at the same tray location for each char, same for nukes, pets, etc... The only powers I click with my mouse are toggles, as those are set and forget and I don't mind the "extra work" using my mouse on those. I also put my toggles on a separate tray so they are all together. With the additional 2 columns of keys on your pinky side, you should be able to map all your click powers via direct key presses and shift+key presses without also needing to dip into alt and ctrl + key presses.
-
Have you tried chaining thunder strike and force of thunder? The latter with a KD IO? I recommend you read through the entire thread. The build went through some updates but more importantly I discuss some of the reasons for why I did what I did.
-
What do you feel underwhelming about the combo? Damage? Style? Cool factor? Survival? What would you like this combo to do? What's the barrier that makes it feel underwhelming?
-
When you can get comfortable using your melee attacks, that's when you know you made it as a bona-fide blaster badass.
-
I would recommend you learn to embrace melee as a blaster. That's when you become damage incarnate. You can both do long range blasting AND at the very least, make sure that those get in your face regret their decision to do so.
-
The build has a lot of full sets. I see a mix of range defense, AoE defense, recharge, and a smattering of resistance bonuses. What's your goal/game plan? How are you going to deal with mez of any type?
-
Deciding between Fire or Force ancillary, for my Siesmic/Fire blaster
Nemu replied to normalperson's topic in Blaster
You can post builds by dragging the Mids file onto the post. Both pools are fine but people generally favor bonfire over personal force field for protection because the former lets you attack while providing area mitigation. On survival, consider adjusting your playstyle as well. Inspirations, especially lucks and breakfrees are crucial to blaster survival. Proactive inspiration management is the key to blaster success - pop 3 lucks and a breakfree before you dive into spawns, combine other inspirations into lucks and breakfrees during downtime. You can also seek mitigation through your toolkit, you mentioned knockdowns/ups through attacks and that is the way. Bonfire and fire shield will add another layer to what you are doing already. You can also use invention sets to augment your defense so you get hit less, and there are tanky blaster builds that use those sets to achieve softcap (~45% defense) against one or more damage vectors. That route takes more financial investment but can be well worth it in the end. Take a look at the videos below. Read my first post on defense and the reasoning behind why range defense is paramount on even those blasters that wade into melee range. -
Here is an example of how to apply some emotional intelligence to a response to the original post: Yeah recharge debuffs can suck, especially if you don’t have a lot of powers to cycle through. (Not invalidating the fact that recharge debuffs exist and they can be debilitating) The -recharge cap is 4x the base recharge value of the power, for example a power that recharges in 6 seconds would take 24 seconds if you are at the -recharge cap all the time. If you are experiencing more than 4x then it maybe a bug. (Based on the poster’s history he cares more about theme and has never expressed a penchant for deep math and data centric deep dives of powers. This keeps the explanation at a high level to get the message across. You are meeting him where he is) There are a few ways to combat this debuff: Through IOs, the winter universal travel unique is fairly cheap. It provides 20% -recharge resistance and can be slotted early. There are other sets but those can be much more costly. Base buff - you can craft another 15% there Accolade - Time lord offers another 20% but it may take a bit of time to get that accolade. Avoid getting hit - use your lucks. (offer some solutions, give him tools deal with the problem. Whether he leans into those is up to him) This one response could have ended the thread instead of 2 pages of toxic replies mocking/gaslighting the poster before this “valiant” effort to determine whether the experience is a bug.
-
So you are going to call out this one specific detail about a person not naming powers correctly when the bigger picture can be "yeah it happened, here's how you can solve for it" Look I get it, details matter, but past a certain point there's no value arguing semantics when you can do something more productive like help the person overcome the core problem once it's already identified. I mean raise of hands, who prefers to hear a solution to the problem rather than someone belittling you for getting a detail wrong in your ask when they full well understand the problem exists, just not in the magnitude you may have painted it. And that last quote calling out the other user yall love to pile on to just shows the malevolence @Camel pointed out. I bet the lot of you just light up seeing that person post so you can swarm all over that post.
-
Someone long time ago did the math and blaster nukes accounted for over 60% of a blasters lifetime damage contribution. The blaster mantra is "kill them before they kill you." And the nukes are the epitome of that mantra. Use it on big spawns whenever it charges up, euphoria ensues.
-
The only good thing to come out of this thread is that now you have a list of the rude and emotionally deaf forum regulars that should go on your ignore list.
-
Marvel Heroes has a functioning private server setup with steam
Nemu replied to Nemu's topic in Video Games
Been a while since I visited this forum. Yes but it has to be the latest version. Here's the link on setup instructions for the server emulator: https://github.com/Crypto137/MHServerEmu/blob/master/docs/Setup/InitialSetup.md Get a copy of version 1.52.0.1700 of the game client. This is the final released version of Marvel Heroes, so if you still have the game in your Steam library, you can download it from there. If you do not have the game in your Steam library, you may be able to find an archived copy of it on websites like Archive.org. If you just want to play and not fuss around with setting up you own sandbox there is the project tahiti subreddit. They host a private server and things are mostly functional https://www.reddit.com/r/ProjectTahiti/ -
Key powers - bonfire with kd proc, hotfeet Playstyle - drop bonfire first, hot feet to slow mobs and keep them flopping, hope incoming damage < kill speed Very little defenses by the way the build is taking damage, and taking fire sword circle and/or some of the other attacks in the secondary can greatly increase kill speed. There's untapped potential left on the table.
-
That's what Kyoyo is for. It's one of the cornerstones of what makes /Nin on scrapper better than /Nin on stalkers. At 5 slots with no set bonuses (2 end mod SOs, 3 recharge SOs) you can get back 50% endurance every 30 seconds, which ignores recovery debuffs. There's absolutely no need for the additional slots you dumped into health and stamina in a final build, especially if you are also taking body mastery with physical perfection. Why did you get cross punch so early? Is it for theme? If not you could have saved 3 power picks and fit in your mez protection at level 10, kyoyo at 16. If you need another early level attack you can always take crane kick and use it as a finisher or put a kb-kd proc in it, and respec out of it for your final build. If you hate waiting for your attacks to recharge at early levels you can always swap out storm kick for thunder kick, and respec out of it for the final build once you get enough global recharge bonuses. If you do take tough early I'd just use it as a mule for the 3% defense IOs and never toggle it on. I'd slot your heal as an actual heal rather than mule that for the defense uniques. I consider getting 40% of your hp back every 30 seconds with just SOs (2 heal 3 recharge) a lot more useful than 17% resist to S/L only and additional endurance drain. Here's how I would progress my power picks on a natural martial/nin leveling build. Assuming you have the +def uniques, a luck can near-softcap you before you even get weave.
-
Enemies below your level will cause normal KD attacks to turn into knockback. Even level enemies, unless they are clockwork robots, will be knocked down/up by axe attacks, and against those or lower level mobs, jump up and attack at the peak of your jump. Inex is not worth 6 slots. You are better off investing that slotting into ablative carapace, which is a cornerstone of bio survival. You also have DNA siphon at 2 slots. DNA siphon is another cornerstone of bio survival and endurance sustain, and you would want that to be available more with more slots enhancing recharge at the very least. Survival for bio comes from layering all these clicks, DNA siphon, Ablative, Parasitic aura. These click powers with decent slot investment will do far more for your build than 6 slotting a passive power. In general there are very few passive powers that warrant 6 slots. Set mule or not, consider slotting efficiency and how your investment contributes to overall build effectiveness/synergy. That last part requires some knowledge of how a build should operate and which powers are cornerstones of the build. Here is a post where I broke down what makes a bio build work
-
Sure certain combinations can keep henchmen alive better than others but play style will go a long way towards you being a better mastermind in spite of the support that may or may not be available from your toolkit. I find the following playstyle changes help keep my henchmen alive: 1 - take the alpha strike yourself (this means building for some level of self mitigation). get the drop on your enemies and land some debuffs and soak the retaliation so your henchmen can get to work. 2 - focus fire with all henchmen so they don't aggro everything, the quicker something dies, the less incoming damage that pets will suffer. Pets that do their own thing means they are all going to attack different targets which means those targets all live longer which means they all have more time to kill your henchmen. The poorest MMs are the ones that don't take the time to control their pets, but I also find those fancy MM binds needlessly convoluted. Petcomall attack/stay/follow defensive/goto are the only ones I ever use. No need to segment them based on tier/name and have some sit back in BG mode. In this day and age when it's relatively easy to make sturdy builds, the value of separating your henchmen for BG mode is greatly diminished. And like I wrote above, I find absolutely no value in separating your henchmen offensively.