
r0y
-
Posts
335 -
Joined
-
Last visited
Content Type
Profiles
Forums
Events
Store
Articles
Patch Notes
Posts posted by r0y
-
-
On 8/20/2020 at 1:19 PM, MitchEvans said:
Is there any way to see how many and/or who is queued in the LFG system? Seems like it would save time and reduce chat spam if someone with a team of 7 could see if they'll "pick up the spare" by launching the queue instead of spamming the LFG channel for the last member. It would also cut the constant "any TFs starting" spam as well. Don't want to organize a TF? Jump in the queue and you can get scooped up.
The LFG queue has always been a bit wonky, even when it works. To my knowledge there is no way to see who is in queue. It would be a great addition one day, but I think there are so many things to fix before adding new
bugsfeatures.-
 1
1
-
-
Sorry for such a late reply / bump, but I don't play the game much anymore. Anyway, I posted the command-line to get full sets of superiors here:
-
1
-
-
Where's the vote option: RANDOM (which seems fitting for many of these "costumes")
-
First of all, welcome back!
Next, if you are only 1-slotting Aim (or Buildup), I like to throw in the Gaussian proc. It fires off almost every time due to the lack of recharge (it's a 1 ppm proc), so I usually put it in Aim. This way, I can alternate Aim and BU (Ionize, in Atomic's case) for consistent +dam; with the rare Aim+BU for a nuke or something. I like options.
Since this thread and my original build post (which had more melee), I've since learned the "real power" behind /atomic for blasters: abusing the AoE Hold, Radioactive Cloud.
Atomic is the best secondary for mez, IMO. As such, I've re-tooled the toon and made it fairly cheap (as I don't really play it as much). Positron Cell (single target hold) hits for more damage than other secondary sets' hold power, and is fast casting (which is not so good for proc'ing, but great for stacking holds).
I was thinking to make an ice/atomic hold machine, but that just seemed boring, outside of maybe a hami raid.
Anyway, newer build here (dropped melee, more mez-minded):
SpoilerHero Plan by Mids' Reborn : Hero Designer 2.7.2.10
https://github.com/Crytilis/mids-reborn-hero-designerClick this DataLink to open the build!
Adam Fyre-HC-v2_mez: Level 50 Natural Blaster
Primary Power Set: Fire Blast
Secondary Power Set: Atomic Manipulation
Power Pool: Leaping
Power Pool: Fighting
Power Pool: Leadership
Power Pool: Concealment
Ancillary Pool: Mace MasteryHero Profile:
Level 1: Flares -- Thn-Acc/Dmg(A), Thn-Acc/Dmg/Rchg(15), Thn-Acc/Dmg/EndRdx(40), Thn-Dmg/EndRdx/Rchg(42), SprDfnBrr-Acc/Dmg/EndRdx(46), SprDfnBrr-Rchg/+Status Protect(48)
Level 1: Electron Shackles -- EnfOpr-Acc/Rchg(A), EnfOpr-EndRdx/Immob(40), EnfOpr-Acc/EndRdx(42), EnfOpr-Immob/Rng(42), EnfOpr-Acc/Immob/Rchg(45), EnfOpr-Acc/Immob(46)
Level 2: Fire Ball -- OvrFrc-Acc/Dmg(A), OvrFrc-End/Rech(9), OvrFrc-Acc/Dmg/End(9), OvrFrc-Dmg/End/Rech(11), OvrFrc-Acc/Dmg/End/Rech(13), OvrFrc-Dam/KB(15)
Level 4: Positron Cell -- BslGaz-Acc/Hold(A), BslGaz-Acc/Rchg(5), BslGaz-EndRdx/Rchg/Hold(5), BslGaz-Acc/EndRdx/Rchg/Hold(7), SprDfnBrr-Acc/Dmg(46), SprDfnBrr-Acc/Dmg/Rchg(48)
Level 6: Combat Jumping -- Ksm-ToHit+(A), Krm-ResKB(7)
Level 8: Boxing -- KntCmb-Acc/Dmg(A), KntCmb-Dmg/EndRdx(21), KntCmb-Dmg/Rchg(43), KntCmb-Dmg/EndRdx/Rchg(45)
Level 10: Ionize -- AdjTrg-Rchg(A), AdjTrg-ToHit/Rchg(11)
Level 12: Aim -- GssSynFr--ToHit(A), GssSynFr--ToHit/Rchg(13), GssSynFr--ToHit/Rchg/EndRdx(23), GssSynFr--Rchg/EndRdx(31), GssSynFr--ToHit/EndRdx(31), GssSynFr--Build%(31)
Level 14: Super Jump -- BlsoftheZ-ResKB(A)
Level 16: Beta Decay -- CldSns-ToHitDeb(A), CldSns-Acc/Rchg(17), CldSns-ToHitDeb/EndRdx/Rchg(17), CldSns-Acc/EndRdx/Rchg(40), UndDfn-DefDeb/Rchg/EndRdx(43), UndDfn-DefDeb/EndRdx(50)
Level 18: Blaze -- Thn-Acc/Dmg(A), Thn-Dmg/EndRdx(19), Thn-Dmg/Rchg(19), Thn-Acc/Dmg/Rchg(37), Thn-Acc/Dmg/EndRdx(37), Thn-Dmg/EndRdx/Rchg(37)
Level 20: Metabolic Acceleration -- PrfShf-End%(A), PrfShf-EndMod(21)
Level 22: Tough -- UnbGrd-Max HP%(A), StdPrt-ResDam/Def+(23), GldArm-3defTpProc(43)
Level 24: Weave -- LucoftheG-Def/EndRdx(A), LucoftheG-Def/EndRdx/Rchg(25), LucoftheG-Def/Rchg+(25)
Level 26: Blazing Bolt -- StnoftheM-Acc/Dmg(A), StnoftheM-Dmg/EndRdx(27), StnoftheM-Acc/ActRdx/Rng(27), StnoftheM-Dam%(34), StnoftheM-Dmg/EndRdx/Rchg(36)
Level 28: Maneuvers -- LucoftheG-Def/EndRdx(A), LucoftheG-Def/EndRdx/Rchg(29), LucoftheG-Def/Rchg+(29)
Level 30: Assault -- EndRdx-I(A)
Level 32: Inferno -- Obl-Dmg(A), Obl-Acc/Rchg(33), Obl-Dmg/Rchg(33), Obl-Acc/Dmg/Rchg(33), Obl-Acc/Dmg/EndRdx/Rchg(34), Obl-%Dam(34)
Level 35: Scorpion Shield -- LucoftheG-Def/EndRdx(A), LucoftheG-Def/EndRdx/Rchg(36), LucoftheG-Def/Rchg+(36), LucoftheG-Def(48)
Level 38: Radioactive Cloud -- BslGaz-Acc/Rchg(A), BslGaz-Rchg/Hold(39), BslGaz-EndRdx/Rchg/Hold(39), BslGaz-Acc/EndRdx/Rchg/Hold(39), Lck-EndRdx/Rchg/Hold(50), Lck-Rchg/Hold(50)
Level 41: Tactics -- AdjTrg-ToHit/EndRdx(A), AdjTrg-ToHit/EndRdx/Rchg(45)
Level 44: Stealth -- EndRdx-I(A)
Level 47: Vengeance -- LucoftheG-Def/Rchg+(A)
Level 49: Grant Invisibility -- LucoftheG-Def/Rchg+(A)
Level 1: Brawl -- Empty(A)
Level 1: Sprint -- UnbLea-Stlth(A)
Level 2: Rest -- Empty(A)
Level 4: Ninja Run
Level 2: Swift -- Run-I(A)
Level 2: Health -- Prv-Absorb%(A), NmnCnv-Regen/Rcvry+(3)
Level 2: Hurdle -- Jump-I(A)
Level 2: Stamina -- PrfShf-EndMod(A), PrfShf-End%(3)
------------ -
Did you also know that if you let your mouse HOVER over the name of the event (e.g. Time's Arrow [Imperious] ) that it will pop up an information window, detailing various aspects of the event?
Did you also know that you can get the Midnighter badge via the Mansion in Night Ward? And that mansion does NOT go to Cimeroa...
Did you know that King's Row is the closest base-portal-drop-off to a tram (blue side)? Founders Falls is the closest ouro-portal-drop-off to a tram (blue side).
-
 2
2
-
 1
1
-
-
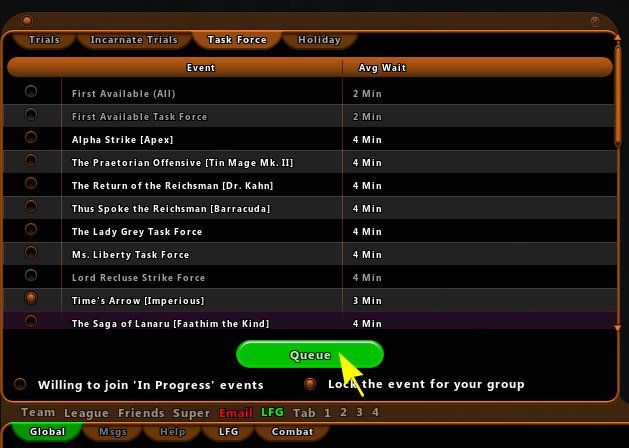
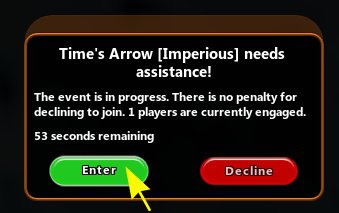
Many times while I'm playing and forming a Task Force or other group event, there sometimes is a new (or newly-returned) player that may not know about the LFG tool, nor that tool's ability to move character across zones. For many veterans, we all know and love the LFG-TP "trick" - and it's only called a "trick" because not everyone knows about it.
So, while walking through a very new player on how to get to Cimeroa (yes, they needed the badge, too); I remembered that I was going to write up a graphical guide and create a tiny url ( tinyurl.com/LFGtp ) so it might be easier to explain.
Step 0: Make sure you are SOLO, and not teamed. If you are teamed, everyone has to be in the same zone, and they all better want to go wherever you're trying to get to. So if you got invited to an ITF (as an example) and you don't know how to best get to Cimeroa, please: Let the team know you're going to temporarily drop team so you can LFG-TP there. They will understand.
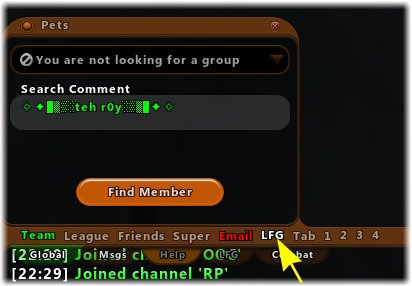
Step 1: Click the LFG along the top of the chat window:

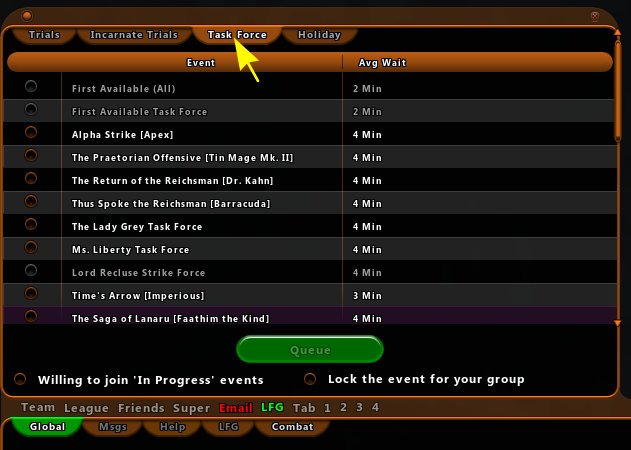
Step 2: Click the appropriate tab along the top of the LFG window:
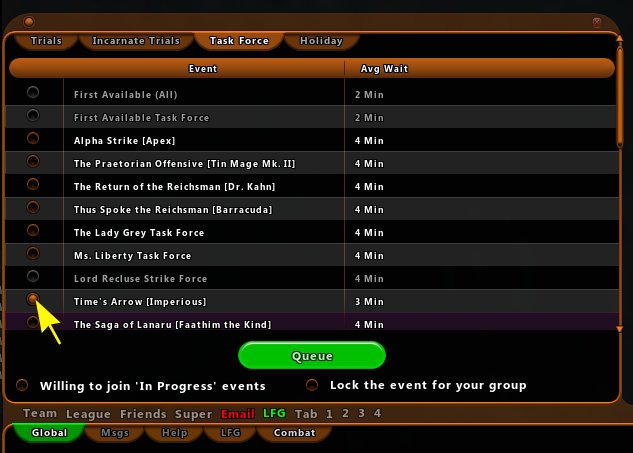
Step 3: Click the Task Force (or event) that you want to go to:
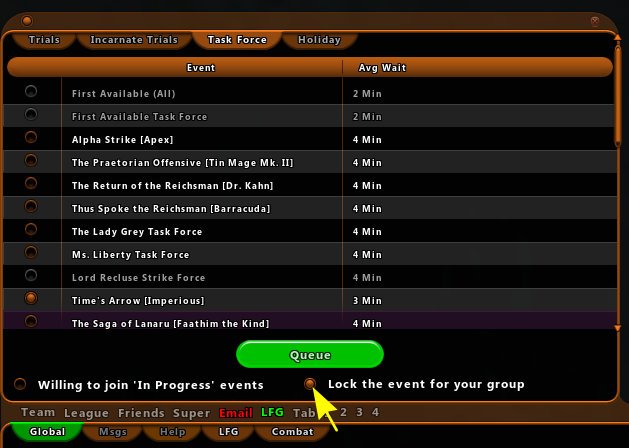
Step 4: Click the "Lock the event for your group" button (this is the step that often gets over-looked):
Step 5: Click the Queue button:
Step 6: Click the Enter button on the pop-up window:
You will then be transported to the event's contact (in the ITF's case, that's Imperious all the way back in Ancient Rome!).
Congratulations, you saved your team some wait time!
Just remember while SOLO: Task Force→Lock→Queue (it soon becomes second-nature)
And if you want to direct someone to this guide while in-game: tinyurl.com/LFGtp
NOTE: a "Guide" to people over 40: Written. a "Guide" to people under 40: Video.
Therefore, assuming you want the written guide, I'll assume your eyesight isn't the best, so I'll use big fonts!
-
6
-
-
22 hours ago, josh1622 said:
Nice build as always r0y. You should test out moonbeam in your build if you haven't. It's really great with procs, it seems to be right up your alley. Not sure how you could fit it in though. But the -res is a huge mulitplier on those procs so following up envenom with a proc'd out snipe is a huge hitter. I love it on my poison/rad.
If I was going more for solo or small team play, I would totally have Moonbeam instead of the stun. Even if one doesn't proc it much, the 5-set bonus from Manticore is nice. I'll usually 5-manticore (including proc) and another proc, for a mix of POW and set bonus. I've also proc'd it out completely for massive damage. You are correct about it, of course!
The poison/dark I have above is really my league toon, and I don't solo much at all with her. I'm still surprised how effective Torrent is. So undervalued by many, I think. It's a MASSIVE range (80' I believe) and it is up about as soon as the mobs are getting up, so if one wanted to, one could "perma-knockdown" whole groups of mobs. It's a great opener prior to debuffing and jumping in with the debuff toggle, poison trap and blackstar.
-
Looks like I am (so far) the lone Poison/Dark advocate! While I agree with @Hjarki about DP, Dark is also very good and here's why:
Dark Blast is very proc'able, has a lot of CC powers to help keep you (and your team) alive. It is end-heavy (cones ain't cheap).
POISON (what I take and why):
Envenom and Weaken are your bread and butter for Poison; you'll spam them often.
Alkaloid is a joke as a heal since it's single target, but I use it as a 6-set mule for Preventive Medicine. The 20% toxic resist is cute.
Antidote is nice, a few slotting options (I usually just 1 slot, end reducer); but the resists (toxic and cold) are ok.
Poison Trap is your proc-nuke (6 damage procs) - this is amazing damage for an otherwise shit power.
Venomous Gas - very powerful toggle debuff that requires you to be in contact with the enemy. Tough sell on Sonic or Dark (hence the DP suggestion). However, it's not a lot to hop in, drop a poison trap, hop out... they get the debuff on them for the poison trap's proc-nuke (and your blast set nuke).
DARK BLAST (what I take and why):
Dark Blast (can't avoid, otherwise I'd take Gloom) - it's a nice filler
Dark Pit (most skip this, but it's great soft-cc, mag 2 stun); also a purple set mule for +rech (5 Absolute Amazements)
Tenebrous Tentacles (locks 'em down for debuff & nuke); adds DoT/debuff
Night Fall (main spamming attack) - really decent damage, but in DoT form, so it's not all upfront.
Torrent (a lot skip this, but it's really decent when proc'd) - this is the main spamming soft CC when you add a KB-KD proc, a +Rech proc, and 3-4 damage procs (I went with 3, as I use a Posi A/D/E to help with end costs).
Life Drain (not the greatest heal, but your only one) - I throw this in the attack chain, it's decent ST damage, and keeps you topped off.
Blackstar - probably the best nuke defenders have, you can 6-slot it with damage procs, though I go with 5 and an A/D/R purple set (more recov).
POOL SETS (what I take and why):
Leaping - because you literally need to hop in and out, move around a lot. Combat Jumping is the best toggle ever! 😃
Fighting - because everyone always takes fighting on everything (generally)
Leadership - because you're a defender, this pool is almost mandatory with defender AT scaling!
Flight - because you don't really need Hasten, so Hover is a nice level 49 1-slot pick and LotG mule.
Mace Mastery - because you want to try and get S/L/E softcap defenses, and Scorpion Shield is the way to do it! (well, the best way, not the only way)
It's not as fun as Nature/Dark, but I play my Poison/Dark a lot, and love the toon. She tanks quite a bit, too. Gotta love seeing the Brutes and Tanks waiting to see what group I attack before jumping in!
Ursyla (Poison/Dark/Mace):
SpoilerHero Plan by Mids' Reborn : Hero Designer 2.7.2.10
https://github.com/Crytilis/mids-reborn-hero-designerClick this DataLink to open the build!
Ursyla-v2_jump: Level 50 Natural Defender
Primary Power Set: Poison
Secondary Power Set: Dark Blast
Power Pool: Leaping
Power Pool: Fighting
Power Pool: Leadership
Power Pool: Flight
Ancillary Pool: Mace MasteryHero Profile:
Level 1: Envenom -- ShlBrk-Acc/Rchg(A), ShlBrk-Acc/EndRdx/Rchg(3), AchHee-ResDeb%(3)
Level 1: Dark Blast -- SprVglAss-Acc/Dmg(A), SprVglAss-Dmg/Rchg(5), SprVglAss-Rchg/+Absorb(5), Thn-Acc/Dmg/Rchg(7), Thn-Acc/Dmg/EndRdx(11), Thn-Dmg/EndRdx/Rchg(42)
Level 2: Weaken -- CldSns-Acc/ToHitDeb(A), CldSns-Acc/Rchg(7), CldSns-ToHitDeb/EndRdx/Rchg(9), CldSns-Acc/EndRdx/Rchg(9)
Level 4: Alkaloid -- Prv-Heal(A), Prv-Heal/EndRdx(11), Prv-EndRdx/Rchg(13), Prv-Heal/Rchg(13), Prv-Heal/Rchg/EndRdx(15), Prv-Absorb%(43)
Level 6: Combat Jumping -- Ksm-ToHit+(A), LucoftheG-Def/Rchg+(15)
Level 8: Kick -- Empty(A)
Level 10: Dark Pit -- AbsAmz-Stun(A), AbsAmz-Stun/Rchg(45), AbsAmz-Acc/Stun/Rchg(46), AbsAmz-Acc/Rchg(46), AbsAmz-EndRdx/Stun(46)
Level 12: Antidote -- EndRdx-I(A)
Level 14: Super Jump -- BlsoftheZ-ResKB(A)
Level 16: Tenebrous Tentacles -- SprDfnBst-Acc/Dmg(A), SprDfnBst-Dmg/Rchg(17), SprDfnBst-Dmg/EndRdx/Rchg(17), SprDfnBst-Acc/Dmg/EndRdx(43), SprDfnBst-Acc/Dmg/EndRdx/Rchg(43), SprDfnBst-Rchg/Heal%(45)
Level 18: Tough -- StdPrt-ResDam/Def+(A), GldArm-3defTpProc(19), UnbGrd-Max HP%(19)
Level 20: Night Fall -- SprVglAss-Dmg/EndRdx/Rchg(A), SprVglAss-Acc/Dmg/EndRdx(21), SprVglAss-Acc/Dmg/EndRdx/Rchg(21), PstBls-Dmg/Rng(25), PstBls-Dam%(25), Bmbdmt-+FireDmg(40)
Level 22: Weave -- LucoftheG-Def/EndRdx(A), LucoftheG-Def/EndRdx/Rchg(23), LucoftheG-Def/Rchg+(23)
Level 24: Assault -- EndRdx-I(A)
Level 26: Poison Trap -- Erd-%Dam(A), ScrDrv-Dam%(27), Obl-%Dam(27), NrnSht-Dam%(34), GhsWdwEmb-Dam%(37), UnbCns-Dam%(40)
Level 28: Torrent -- PstBls-Acc/Dmg/EndRdx(A), PstBls-Dam%(29), Bmbdmt-+FireDmg(29), CldSns-%Dam(31), SuddAcc--KB/+KD(34), FrcFdb-Rechg%(34)
Level 30: Maneuvers -- LucoftheG-Def/EndRdx(A), LucoftheG-Def/Rchg+(31), LucoftheG-Def/EndRdx/Rchg(31)
Level 32: Venomous Gas -- UndDfn-DefDeb/EndRdx(A), UndDfn-DefDeb/Rchg/EndRdx(33), UndDfn-DefDeb(33), DmpSpr-ToHitDeb/Rchg/EndRdx(33), DmpSpr-ToHitDeb/EndRdx(39), DmpSpr-ToHitDeb(40)
Level 35: Life Drain -- Dvs-Acc/Dmg(A), Dvs-Dmg/EndRdx(36), Dvs-Acc/Dmg/Rchg(36), Dvs-Acc/Dmg/EndRdx/Rchg(36), Mrc-Heal/EndRdx(37), Mrc-Heal(37)
Level 38: Scorpion Shield -- LucoftheG-Def/EndRdx(A), LucoftheG-Def/EndRdx/Rchg(39), LucoftheG-Def/Rchg+(39)
Level 41: Blackstar -- Erd-%Dam(A), ScrDrv-Dam%(42), Obl-%Dam(42), CldSns-%Dam(48), Arm-Acc/Dmg/Rchg(50), Arm-Dam%(50)
Level 44: Tactics -- AdjTrg-ToHit/EndRdx(A), AdjTrg-EndRdx/Rchg(45)
Level 47: Vengeance -- LucoftheG-Def/Rchg+(A)
Level 49: Hover -- Flight-I(A)
Level 1: Brawl -- Empty(A)
Level 1: Sprint -- Clr-Stlth(A)
Level 2: Swift -- Run-I(A)
Level 2: Health -- Mrc-Rcvry+(A), NmnCnv-Regen/Rcvry+(48), Pnc-Heal/+End(50)
Level 2: Hurdle -- Jump-I(A)
Level 2: Stamina -- PrfShf-EndMod(A), PrfShf-End%(48)
------------ -
I have enjoyed my Time/DP defender. I made many similar picks as you, except I do NOT use Suppressive Fire, instead I went with Executioner's Shot as my proc'd heavy hitter.
I do not quite have perma Hasten (2.6s off) or Chrono (5.02s off), but I usually have them on when in combat... If not, I'll survive for 5s (I hope). I also have no endurance issues, as I've slotted for it.
Also, I only have used Intuition Radial for Alpha; and I went Degen for Interface. (Clarion Core, Void Radial, Support Core). I also do 99% of the time Incendiary the other 1% is when I rez and forget to toggle it on... Is the -dam from Chemical *that* noticeable? The DoT from incendiary is very noticeable.
I also seem to be taking Hover at 49 on a lot of "non-flying toons" - just to have that option (e.g. Hami raids, Shard, etc). Plus, LotG mule...
Cowboy Roy (Time/DP):
SpoilerHero Plan by Mids' Reborn : Hero Designer 2.7.2.10
https://github.com/Crytilis/mids-reborn-hero-designerClick this DataLink to open the build!
Cowboy Roy_v1: Level 50 Technology Defender
Primary Power Set: Time Manipulation
Secondary Power Set: Dual Pistols
Power Pool: Leaping
Power Pool: Fighting
Power Pool: Speed
Power Pool: Flight
Ancillary Pool: Soul MasteryHero Profile:
Level 1: Temporal Mending -- Prv-Heal(A), Prv-Heal/EndRdx(5), Prv-EndRdx/Rchg(11), Prv-Heal/Rchg(31), Prv-Heal/Rchg/EndRdx(33), Prv-Absorb%(33)
Level 1: Pistols -- SprVglAss-Acc/Dmg(A), SprVglAss-Dmg/EndRdx/Rchg(5), SprVglAss-Acc/Dmg/EndRdx/Rchg(11), SprWntBit-Acc/Dmg(15), SprWntBit-Acc/Dmg/EndRdx(31), SprWntBit-Dmg/EndRdx/Acc/Rchg(31)
Level 2: Time's Juncture -- DarWtcDsp-ToHitDeb(A), DarWtcDsp-ToHitdeb/Rchg/EndRdx(7), DarWtcDsp-Rchg/EndRdx(34), DarWtcDsp-ToHitDeb/EndRdx(34)
Level 4: Empty Clips -- SprVglAss-Dmg/Rchg(A), SprVglAss-Acc/Dmg/EndRdx(7), SprVglAss-Rchg/+Absorb(13), SprFrzBls-Acc/Dmg(34), SprFrzBls-Dmg/EndRdx(36), SprFrzBls-Acc/Dmg/EndRdx(36)
Level 6: Combat Jumping -- Ksm-ToHit+(A), LucoftheG-Def/Rchg+(9), ShlWal-ResDam/Re TP(50), Rct-ResDam%(50)
Level 8: Distortion Field -- NrnSht-Dam%(A), GhsWdwEmb-Dam%(9), GldNet-Dam%(13), ImpSwf-Dam%(15), UnbCns-EndRdx/Hold(37), UnbCns-Dam%(37)
Level 10: Swap Ammo
Level 12: Kick -- Empty(A)
Level 14: Super Jump -- BlsoftheZ-ResKB(A)
Level 16: Bullet Rain -- PstBls-Acc/Dmg/EndRdx(A), PstBls-Dam%(17), JvlVll-Dam%(17), Bmbdmt-+FireDmg(25), ImpSwf-Dam%(27), ExpStr-Dam%(29)
Level 18: Farsight -- LucoftheG-Def/Rchg(A), LucoftheG-Def(19), LucoftheG-Def/Rchg+(19)
Level 20: Tough -- UnbGrd-ResDam/EndRdx(A), UnbGrd-EndRdx/Rchg(21), StdPrt-ResDam/Def+(21), GldArm-3defTpProc(37)
Level 22: Weave -- LucoftheG-Def/EndRdx(A), LucoftheG-Def/EndRdx/Rchg(23), LucoftheG-Def/Rchg+(23)
Level 24: Hasten -- RechRdx-I(A), RechRdx-I(25)
Level 26: Slowed Response -- AchHee-ResDeb%(A), TchofLadG-%Dam(27), ShlBrk-%Dam(40), ShlBrk-Acc/DefDeb(42)
Level 28: Executioner's Shot -- GldJvl-Acc/Dmg(A), GldJvl-Dam%(29), ImpSwf-Dam%(39), TchofLadG-%Dam(39), ExpStr-Dam%(40), ShlBrk-%Dam(40)
Level 30: Temporal Selection -- NmnCnv-Regen/Rcvry+(A)
Level 32: Chrono Shift -- EffAdp-EndMod/Rchg(A), PrfShf-EndMod/Rchg(33), PreOptmz-EndMod/Rech(42), PreOptmz-EndMod/End/Rech(43)
Level 35: Dark Embrace -- UnbGrd-ResDam(A), UnbGrd-ResDam/EndRdx(36), UnbGrd-EndRdx/Rchg(43), UnbGrd-Rchg/ResDam(43), UnbGrd-ResDam/EndRdx/Rchg(48), UnbGrd-Max HP%(50)
Level 38: Hail of Bullets -- ImpSwf-Dam%(A), Erd-%Dam(39), Obl-%Dam(42), FuroftheG-ResDeb%(46), Arm-Acc/Dmg/Rchg(46), Arm-Dam%(46)
Level 41: Power Boost -- RechRdx-I(A)
Level 44: Soul Storm -- GldJvl-Acc/End/Rech(A), GldJvl-Dam%(45), Apc-Dam%(48), NrnSht-Dam%(48), GhsWdwEmb-Dam%(45), GldNet-Dam%(45)
Level 47: Super Speed -- WntGif-ResSlow(A)
Level 49: Hover -- LucoftheG-Def/Rchg+(A)
Level 1: Brawl -- Empty(A)
Level 1: Quick Form
Level 1: Prestige Power Dash -- Empty(A)
Level 1: Prestige Power Slide -- Empty(A)
Level 1: Prestige Power Quick -- Empty(A)
Level 1: Prestige Power Rush -- Empty(A)
Level 1: Prestige Power Surge -- Empty(A)
Level 1: Sprint -- UnbLea-Stlth(A)
Level 1: Vigilance
Level 2: Rest -- Empty(A)
Level 4: Ninja Run
Level 2: Swift -- Run-I(A)
Level 2: Health -- Mrc-Rcvry+(A), Pnc-Heal/+End(3)
Level 2: Hurdle -- Jump-I(A)
Level 2: Stamina -- PrfShf-EndMod(A), PrfShf-End%(3)
Level 10: Chemical Ammunition
Level 10: Cryo Ammunition
Level 10: Incendiary Ammunition
Level 50: Intuition Radial Paragon
Level 50: Degenerative Radial Flawless Interface
Level 50: Void Radial Final Judgement
Level 50: Longbow Core Superior Ally
Level 50: Clarion Core Epiphany
Level 50: Support Core Embodiment
-------------
1
-
-
I'll put anything from a single level-50 IO recharge... to 4 slots (1 achille's + 3 undermined defenses for max end for recovery). I generally don't put a lot of rech., and often like to put the achilles' heel proc.
-
On 7/21/2020 at 12:34 PM, Scientist said:
One other thing to consider, Storm gets its signature debuffs significantly earlier than Time, if you are going to exemp for low level content a lot I'd consider Storm. Storm also has more of a learning curve to use effectively, whereas you can usually fire any Time power in any situation and not be TOO wrong.
How do you figure? I mean, apart from Freezing Rain (8) and Steamy mist (10), one can put off Hurricane until later; the "signature" powers are Tornado (26) and Lightning Storm (32).
Time gets Distortion Field (8) but has Time's Juncture (2) and Temporal Mending (1). I put off Temporal Selection (6) until late, similar with Hurricane. That's FOUR (4) solid powers. Granted, signature moves are often last, like storm, Farsight (18), Slowed Response (26), and Chrono Shift (32). Not to mention, if you need a hold, Time Stop is available at level 12!
I would NEVER say that Time is a late bloomer. Not by a LONG shot. The defining power is at level 18. Storm's is 8 (if we think Freezing Rain is the defining power). Level 18 is not a late bloomer.
-
I play both. A lot. I have to say, Time/DP is one of my most damaging toons. Feels like a blaster with armor, etc. Can solo the hell out of many things. Has so many buffs/debuffs, it's not funny. No worry for health or end, but recharge is paramount (come as close as possible to perma Chrono Shift). A lot of damage-proc potential in Time, but I skip the hold (3 procs possible) since my blast set is better. Definitely proc out Distortion Field and Slowed Response.
Time/DP is more everything: damage, buff, debuff, cc, heal...
SpoilerHero Plan by Mids' Reborn : Hero Designer 2.7.2.10
https://github.com/Crytilis/mids-reborn-hero-designerClick this DataLink to open the build!
Cowboy Roy_v1: Level 50 Technology Defender
Primary Power Set: Time Manipulation
Secondary Power Set: Dual Pistols
Power Pool: Leaping
Power Pool: Fighting
Power Pool: Speed
Power Pool: Flight
Ancillary Pool: Soul MasteryHero Profile:
Level 1: Temporal Mending -- Prv-Heal(A), Prv-Heal/EndRdx(5), Prv-EndRdx/Rchg(11), Prv-Heal/Rchg(31), Prv-Heal/Rchg/EndRdx(33), Prv-Absorb%(33)
Level 1: Pistols -- SprVglAss-Acc/Dmg(A), SprVglAss-Dmg/EndRdx/Rchg(5), SprVglAss-Acc/Dmg/EndRdx/Rchg(11), SprWntBit-Acc/Dmg(15), SprWntBit-Acc/Dmg/EndRdx(31), SprWntBit-Dmg/EndRdx/Acc/Rchg(31)
Level 2: Time's Juncture -- DarWtcDsp-ToHitDeb(A), DarWtcDsp-ToHitdeb/Rchg/EndRdx(7), DarWtcDsp-Rchg/EndRdx(34), DarWtcDsp-ToHitDeb/EndRdx(34)
Level 4: Empty Clips -- SprVglAss-Dmg/Rchg(A), SprVglAss-Acc/Dmg/EndRdx(7), SprVglAss-Rchg/+Absorb(13), SprFrzBls-Acc/Dmg(34), SprFrzBls-Dmg/EndRdx(36), SprFrzBls-Acc/Dmg/EndRdx(36)
Level 6: Combat Jumping -- Ksm-ToHit+(A), LucoftheG-Def/Rchg+(9), ShlWal-ResDam/Re TP(50), Rct-ResDam%(50)
Level 8: Distortion Field -- NrnSht-Dam%(A), GhsWdwEmb-Dam%(9), GldNet-Dam%(13), ImpSwf-Dam%(15), UnbCns-EndRdx/Hold(37), UnbCns-Dam%(37)
Level 10: Swap Ammo
Level 12: Kick -- Empty(A)
Level 14: Super Jump -- BlsoftheZ-ResKB(A)
Level 16: Bullet Rain -- PstBls-Acc/Dmg/EndRdx(A), PstBls-Dam%(17), JvlVll-Dam%(17), Bmbdmt-+FireDmg(25), ImpSwf-Dam%(27), ExpStr-Dam%(29)
Level 18: Farsight -- LucoftheG-Def/Rchg(A), LucoftheG-Def(19), LucoftheG-Def/Rchg+(19)
Level 20: Tough -- UnbGrd-ResDam/EndRdx(A), UnbGrd-EndRdx/Rchg(21), StdPrt-ResDam/Def+(21), GldArm-3defTpProc(37)
Level 22: Weave -- LucoftheG-Def/EndRdx(A), LucoftheG-Def/EndRdx/Rchg(23), LucoftheG-Def/Rchg+(23)
Level 24: Hasten -- RechRdx-I(A), RechRdx-I(25)
Level 26: Slowed Response -- AchHee-ResDeb%(A), TchofLadG-%Dam(27), ShlBrk-%Dam(40), ShlBrk-Acc/DefDeb(42)
Level 28: Executioner's Shot -- GldJvl-Acc/Dmg(A), GldJvl-Dam%(29), ImpSwf-Dam%(39), TchofLadG-%Dam(39), ExpStr-Dam%(40), ShlBrk-%Dam(40)
Level 30: Temporal Selection -- NmnCnv-Regen/Rcvry+(A)
Level 32: Chrono Shift -- EffAdp-EndMod/Rchg(A), PrfShf-EndMod/Rchg(33), PreOptmz-EndMod/Rech(42), PreOptmz-EndMod/End/Rech(43)
Level 35: Dark Embrace -- UnbGrd-ResDam(A), UnbGrd-ResDam/EndRdx(36), UnbGrd-EndRdx/Rchg(43), UnbGrd-Rchg/ResDam(43), UnbGrd-ResDam/EndRdx/Rchg(48), UnbGrd-Max HP%(50)
Level 38: Hail of Bullets -- ImpSwf-Dam%(A), Erd-%Dam(39), Obl-%Dam(42), FuroftheG-ResDeb%(46), Arm-Acc/Dmg/Rchg(46), Arm-Dam%(46)
Level 41: Power Boost -- RechRdx-I(A)
Level 44: Soul Storm -- GldJvl-Acc/End/Rech(A), GldJvl-Dam%(45), Apc-Dam%(48), NrnSht-Dam%(48), GhsWdwEmb-Dam%(45), GldNet-Dam%(45)
Level 47: Super Speed -- WntGif-ResSlow(A)
Level 49: Hover -- LucoftheG-Def/Rchg+(A)
Level 1: Brawl -- Empty(A)
Level 1: Sprint -- UnbLea-Stlth(A)
Level 2: Swift -- Run-I(A)
Level 2: Health -- Mrc-Rcvry+(A), Pnc-Heal/+End(3)
Level 2: Hurdle -- Jump-I(A)
Level 2: Stamina -- PrfShf-EndMod(A), PrfShf-End%(3)
------------My Storm/Dark Blast is very survivable, can solo almost as much, but when on a large team... it REALLY ups the damage and survival. Storm requires a couple of procs to maximize (some KB-KD, a couple +rech, etc). You really need to focus on endurance management, not so much recharge focus. I also have a Storm/Sonic which is TEAM-only, really... it will provide FAR more damage via -Res for teams; not so great solo.
Storm/Dark is more CC and Debuff than Damage:
SpoilerHero Plan by Mids' Reborn : Hero Designer 2.7.2.10
https://github.com/Crytilis/mids-reborn-hero-designerClick this DataLink to open the build!
Lord Reckless: Level 50 Natural Defender
Primary Power Set: Storm Summoning
Secondary Power Set: Dark Blast
Power Pool: Leaping
Power Pool: Fighting
Power Pool: Speed
Power Pool: Leadership
Ancillary Pool: Mace MasteryHero Profile:
Level 1: O2 Boost -- Prv-Heal(A), Prv-Heal/EndRdx(5), Prv-EndRdx/Rchg(5), Prv-Heal/Rchg(7), Prv-Heal/Rchg/EndRdx(7), Prv-Absorb%(9)
Level 1: Dark Blast -- SprDfnBst-Acc/Dmg(A), SprDfnBst-Dmg/Rchg(9), SprDfnBst-Dmg/EndRdx/Rchg(25), SprDfnBst-Acc/Dmg/EndRdx(31), SprDfnBst-Acc/Dmg/EndRdx/Rchg(45), SprDfnBst-Rchg/Heal%(45)
Level 2: Gale -- Acc-I(A)
Level 4: Moonbeam -- GldJvl-Acc/Dmg(A), GldJvl-Dam%(13), StnoftheM-Dam%(15), CldSns-%Dam(15), Apc-Dam%(31)
Level 6: Combat Jumping -- Ksm-ToHit+(A), LucoftheG-Def/Rchg+(11)
Level 8: Freezing Rain -- RechRdx-I(A)
Level 10: Steamy Mist -- Rct-Def(A), Rct-Def/EndRdx(11), Rct-EndRdx/Rchg(13), Rct-Def/Rchg(48), Rct-Def/EndRdx/Rchg(48), Rct-ResDam%(50)
Level 12: Kick -- Acc-I(A)
Level 14: Super Jump -- WntGif-ResSlow(A)
Level 16: Tenebrous Tentacles -- SprVglAss-Acc/Dmg(A), SprVglAss-Dmg/EndRdx/Rchg(17), SprVglAss-Rchg/+Absorb(17), PstBls-Dam%(19), Bmbdmt-+FireDmg(19), CldSns-%Dam(45)
Level 18: Hasten -- RechRdx-I(A), RechRdx-I(23)
Level 20: Night Fall -- SprVglAss-Dmg/Rchg(A), SprVglAss-Acc/Dmg/EndRdx(21), SprVglAss-Acc/Dmg/EndRdx/Rchg(21), PstBls-Dam%(43), Bmbdmt-+FireDmg(43), CldSns-%Dam(43)
Level 22: Tough -- UnbGrd-ResDam/EndRdx(A), UnbGrd-ResDam/EndRdx/Rchg(23), UnbGrd-EndRdx/Rchg(48), GldArm-3defTpProc(50), StdPrt-ResDam/Def+(50)
Level 24: Weave -- LucoftheG-Def/EndRdx(A), LucoftheG-Def/EndRdx/Rchg(25), LucoftheG-Def/Rchg+(42)
Level 26: Tornado -- ExpRnf-Acc/Rchg(A), ExpRnf-Dmg/EndRdx(27), ExpRnf-Acc/Dmg/Rchg(27), ExpRnf-EndRdx/Dmg/Rchg(37), SuddAcc--KB/+KD(40), FrcFdb-Rechg%(42)
Level 28: Torrent -- PstBls-Acc/Dmg/EndRdx(A), PstBls-Dam%(29), Bmbdmt-+FireDmg(29), CldSns-%Dam(31), SuddAcc--KB/+KD(34)
Level 30: Assault -- EndRdx-I(A)
Level 32: Lightning Storm -- Dvs-Dmg/EndRdx(A), Dvs-Dmg/Rchg(33), Dvs-Acc/Dmg/Rchg(33), Dvs-Acc/Dmg/EndRdx/Rchg(33), FrcFdb-Rechg%(34), SuddAcc--KB/+KD(34)
Level 35: Life Drain -- Thn-Acc/Dmg(A), Thn-Dmg/EndRdx(36), TchoftheN-Acc/Heal(36), TchoftheN-%Dam(36), Mrc-Heal/Rchg(37), Mrc-Heal/EndRdx/Rchg(37)
Level 38: Blackstar -- Erd-%Dam(A), ScrDrv-Dam%(39), Obl-%Dam(39), CldSns-%Dam(39), Arm-Acc/Dmg/Rchg(40), Arm-Dam%(40)
Level 41: Scorpion Shield -- LucoftheG-Def/EndRdx(A), LucoftheG-Def/Rchg+(42), LucoftheG-Def/EndRdx/Rchg(46)
Level 44: Maneuvers -- LucoftheG-Def/EndRdx(A), LucoftheG-Def/EndRdx/Rchg(46), LucoftheG-Def/Rchg+(46)
Level 47: Hurricane -- HO:Enzym(A)
Level 49: Vengeance -- LucoftheG-Def/Rchg+(A)
Level 1: Brawl -- Empty(A)
Level 1: Sprint -- Empty(A)
Level 2: Swift -- Run-I(A)
Level 2: Health -- Mrc-Rcvry+(A), Pnc-Heal/+End(3)
Level 2: Hurdle -- Jump-I(A)
Level 2: Stamina -- PrfShf-EndMod(A), PrfShf-End%(3)
------------Storm/Sonic is more for team damage buff (via -Res) - I basically spam Howl and the Storm powers, lots of O2 Boost, very "support" oriented:
SpoilerHero Plan by Mids' Reborn : Hero Designer 2.7.2.10
https://github.com/Crytilis/mids-reborn-hero-designerClick this DataLink to open the build!
Galinda-HC: Level 50 Mutation Defender
Primary Power Set: Storm Summoning
Secondary Power Set: Sonic Attack
Power Pool: Flight
Power Pool: Leadership
Power Pool: Fighting
Power Pool: Speed
Ancillary Pool: Mace MasteryHero Profile:
Level 1: O2 Boost -- Prv-Heal(A), Prv-Absorb%(17), Prv-Heal/EndRdx(45), Prv-EndRdx/Rchg(46), Prv-Heal/Rchg(46), Prv-Heal/Rchg/EndRdx(46)
Level 1: Shriek -- Thn-Acc/Dmg(A), Thn-Dmg/EndRdx(43), Thn-Dmg/Rchg(45), Thn-Acc/Dmg/Rchg(45), Thn-Acc/Dmg/EndRdx(48)
Level 2: Gale -- SuddAcc--KB/+KD(A), SuddAcc-KB/Acc(40)
Level 4: Howl -- PstBls-Acc/Dmg(A), PstBls-Dmg/EndRdx(5), PstBls-Dmg/Rchg(5), PstBls-Dmg/Rng(19), PstBls-Acc/Dmg/EndRdx(19), Dtn-Dmg/EndRdx/Rng(50)
Level 6: Hover -- Ksm-ToHit+(A), LucoftheG-Def/Rchg+(7), ShlWal-ResDam/Re TP(7), Srn-EndRdx/Fly(15), Srn-Fly(31)
Level 8: Steamy Mist -- Rct-Def(A), Rct-Def/EndRdx(9), Rct-EndRdx/Rchg(9), Rct-Def/Rchg(13), Rct-Def/EndRdx/Rchg(13), Rct-ResDam%(15)
Level 10: Freezing Rain -- UndDfn-Rchg(A), UndDfn-DefDeb/Rchg/EndRdx(11), UndDfn-DefDeb/Rchg(11), AchHee-ResDeb%(50)
Level 12: Fly -- WntGif-ResSlow(A)
Level 14: Afterburner -- Flight-I(A)
Level 16: Maneuvers -- LucoftheG-Def/EndRdx(A), LucoftheG-Def/EndRdx/Rchg(40), LucoftheG-Def/Rchg+(43)
Level 18: Boxing -- Empty(A)
Level 20: Amplify -- AdjTrg-Rchg(A), AdjTrg-ToHit/Rchg(21), GssSynFr--Build%(21)
Level 22: Tough -- UnbGrd-ResDam/EndRdx(A), UnbGrd-ResDam/EndRdx/Rchg(23), UnbGrd-Max HP%(23), StdPrt-ResDam/Def+(37), GldArm-3defTpProc(37)
Level 24: Weave -- LucoftheG-Def/EndRdx(A), LucoftheG-Def/EndRdx/Rchg(25), LucoftheG-Def/Rchg+(25)
Level 26: Tornado -- CaltoArm-Acc/Rchg(A), CaltoArm-Dmg/EndRdx(27), CaltoArm-Acc/Dmg/Rchg(27), CaltoArm-EndRdx/Dmg/Rchg(34), SuddAcc-KB/Dmg/Rech(36), SuddAcc--KB/+KD(37)
Level 28: Hurricane -- DarWtcDsp-ToHitdeb/Rchg/EndRdx(A), DarWtcDsp-Rchg/EndRdx(29), DarWtcDsp-ToHitDeb/EndRdx(29), DarWtcDsp-ToHitDeb(31)
Level 30: Tactics -- AdjTrg-ToHit/EndRdx(A), AdjTrg-ToHit/EndRdx/Rchg(31), AdjTrg-EndRdx/Rchg(50)
Level 32: Lightning Storm -- Thn-Dmg/EndRdx(A), Thn-Dmg/Rchg(33), Thn-Acc/Dmg/Rchg(33), Thn-Dmg/EndRdx/Rchg(33), SuddAcc-KB/Dmg/End(34), SuddAcc--KB/+KD(34)
Level 35: Scorpion Shield -- LucoftheG-Def/EndRdx(A), LucoftheG-Def/EndRdx/Rchg(36), LucoftheG-Def/Rchg+(36)
Level 38: Dreadful Wail -- OvrFrc-Acc/Dmg(A), OvrFrc-End/Rech(39), OvrFrc-Acc/Dmg/End(39), OvrFrc-Dmg/End/Rech(39), OvrFrc-Acc/Dmg/End/Rech(40), OvrFrc-Dam/KB(48)
Level 41: Screech -- Stp-Acc/Rchg(A), Stp-EndRdx/Stun(42), Stp-Acc/EndRdx(42), Stp-Stun/Rng(42), Stp-Acc/Stun/Rchg(43)
Level 44: Assault -- EndRdx-I(A)
Level 47: Hasten -- RechRdx-I(A), RechRdx-I(48)
Level 49: Vengeance -- LucoftheG-Def/Rchg+(A)
Level 1: Brawl -- Empty(A)
Level 1: Sprint -- Clr-Stlth(A)
Level 2: Swift -- Flight-I(A)
Level 2: Health -- Mrc-Rcvry+(A), Pnc-Heal/+End(3)
Level 2: Hurdle -- Jump-I(A)
Level 2: Stamina -- PrfShf-EndMod(A), PrfShf-End%(3), PrfShf-EndMod/Acc(17)
------------All in all, I prefer the Time/DP. I have more Storm toons than Time, and I have more Dark Blast toons than DP. Still, something about Time/DP that just makes it MASSIVE.
-
1
-
1
-
-
I recently had an issue where zoning into Brickstown would crash. Then I had toons "stuck" in there, as when I tried logging in to them, it'd immediately crash.
I went into the Tequila launcher and under Options, did a re-validate. I saw it download stage2d, stage3d, and some tex-filething. After that, no more crashing for Brickstown.
Maybe re-validate your files and see if that helps any?
-
22 hours ago, AboveTheChemist said:
it is midnight in-game on the hour and half hour, and noon in-game at XX:15 and XX:45
HOLY CRAP! Do you know how OLD that makes my dudes? They're going to have to retire far earlier than expected... 😉
Also, we should use in-game time for TF ads... "Starting a Dr. Q TF (about 4 days)" or "Numina TF forming (about 2 days)" that'd be fun!
"ApeMage speed run (approx. 12hrs+) forming in RWZ..."
-
1
-
-
Make that five (5) toons, five crashes. My fifth tried to go into Bricks via the gate from IP.
I now have 5 characters I cannot log into.
-
Four different toons, four crashes.
I go into my base, take the portal to bricks and the game crashes to desktop. I've filled out the crash-log thing that pops up. Others in game did not have the issue. I now have four characters "stuck" in Bricks (if I log into them, it crashes).
At first, it would put me in a falling loop, only rendering NPCs, doors, cars, etc. No walls, ground, buildings, etc. I can fly/hover, but if I went too far, it snaped me back. That happened on the first two characters (both now stuck); the next two, I just crashed when trying to portal in to Bricks.
-
I also have a question for @Redlynne - wouldn't it be better to use /targetcustom_near instead of _next? I understand they cycle the same, etc. but with near, it's less likely that the fallen teammate is out of range for vengeance. It is picking at nits, of course, but I found it to be good practice when dealing with buffs, etc.
-
On 6/25/2020 at 3:03 PM, Dungeoness said:
/bind w "+forward$$powexecauto hasten"
Every time you press w, or whichever key you hit a lot, it will try to both toggle and detoggle Hasten.
The way around this is to have a "filler" autoexec in there like this:
/bind w "+forward$$powexecauto Brawl$$powexecauto Hasten"
That way, a slight tap will lock the auto on hasten (nothing happens with Brawl). I prefer this on my Melee toons who often find themselves standing and fighting, not a lot of moving around, and with the original macro (just 1 powexecauto) you have to be moving a bit for it to trigger, whereas with the above example, a very quick tap (w/o even moving) will lock in the auto. Much nicer, IMHO.
-
1
-
-
2 hours ago, Zer0 Hour said:
@r0y would you happen to have an ice/bio build you would be willing to share?
I have played it on the test server, and made one on the regular server, but it's only level 10 or so... but here is the build I made and will follow for Ice/Bio:
SpoilerVillain Plan by Mids' Reborn : Hero Designer 2.7.2.10
https://github.com/Crytilis/mids-reborn-hero-designerClick this DataLink to open the build!
Fridgita: Level 50 Natural Stalker
Primary Power Set: Ice Melee
Secondary Power Set: Bio Armor
Power Pool: Leaping
Power Pool: Fighting
Power Pool: Speed
Power Pool: Leadership
Ancillary Pool: Soul MasteryVillain Profile:
Level 1: Ice Sword -- SprAssMar-Acc/Dmg(A), SprAssMar-Dmg/Rchg(43), SprAssMar-Acc/Dmg/Rchg(45), SprAssMar-Dmg/EndRdx/Rchg(45), SprAssMar-Acc/Dmg/EndRdx/Rchg(46), SprAssMar-Rchg/Rchg Build Up(46)
Level 1: Hide -- LucoftheG-Def/Rchg+(A), ShlWal-ResDam/Re TP(5), Ksm-ToHit+(40)
Level 2: Frost -- SprStlGl-Acc/Dmg(A), SprStlGl-Dmg/Rchg(5), SprStlGl-Acc/Dmg/Rchg(40), AirBrs-Dmg/Rng(42), PstBls-Dmg/EndRdx(43), PstBls-Dmg/Rng(43)
Level 4: Boundless Energy -- EffAdp-EndMod(A), EffAdp-EndMod/Rchg(17), NmnCnv-Heal(19), NmnCnv-Regen/Rcvry+(19)
Level 6: Assassin's Ice Sword -- Hct-Acc/Dmg/Rchg(A), Hct-Acc/Rchg(7), Hct-Dmg/Rchg(7), SprStlGl-Dmg/EndRdx/Rchg(9), SprStlGl-Acc/Dmg/EndRdx/Rchg(15), SprStlGl-Rchg/Hide%(17)
Level 8: Combat Jumping -- LucoftheG-Def/Rchg+(A), DefBuff-I(9)
Level 10: Environmental Modification -- Rct-Def(A), Rct-Def/EndRdx(11), Rct-EndRdx/Rchg(11), Rct-Def/Rchg(13), Rct-Def/EndRdx/Rchg(13), Rct-ResDam%(15)
Level 12: Build Up -- GssSynFr--Build%(A)
Level 14: Super Jump -- WntGif-ResSlow(A)
Level 16: Adaptation
Level 18: Ice Patch -- RechRdx-I(A)
Level 20: Hardened Carapace -- UnbGrd-ResDam(A), UnbGrd-ResDam/EndRdx(21), UnbGrd-ResDam/EndRdx/Rchg(21), UnbGrd-Rchg/ResDam(25)
Level 22: Ablative Carapace -- DctWnd-Rchg(A), DctWnd-EndRdx/Rchg(23), DctWnd-Heal/Rchg(23), DctWnd-Heal/EndRdx/Rchg(25), DctWnd-Heal(46)
Level 24: Kick -- KntCmb-Acc/Dmg(A), KntCmb-Dmg/EndRdx(48), KntCmb-Dmg/Rchg(50), KntCmb-Dmg/EndRdx/Rchg(50)
Level 26: Freezing Touch -- Hct-Dmg(A), Hct-Dmg/EndRdx(27), Hct-Dam%(27), NrnSht-Dam%(37), GhsWdwEmb-Dam%(37), UnbCns-Dam%(37)
Level 28: DNA Siphon -- ThfofEss-Heal/Rchg(A), ThfofEss-+End%(29), Erd-%Dam(29), ScrDrv-Dam%(34), Obl-%Dam(36), Arm-Dam%(36)
Level 30: Tough -- UnbGrd-ResDam/EndRdx(A), UnbGrd-Max HP%(31), UnbGrd-ResDam/EndRdx/Rchg(31), StdPrt-ResDam/Def+(31), GldArm-3defTpProc(50)
Level 32: Frozen Aura -- ScrDrv-Acc/Dmg(A), ScrDrv-Acc/Dmg/EndRdx(33), ScrDrv-Dam%(33), Erd-%Dam(33), Obl-%Dam(34), FuroftheG-ResDeb%(34)
Level 35: Moonbeam -- SprWntBit-Acc/Dmg(A), SprWntBit-Dmg/Rchg(36), SprWntBit-Acc/Dmg/EndRdx(39), SprWntBit-Acc/Dmg/Rchg(39), SprWntBit-Dmg/EndRdx/Acc/Rchg(40), SprWntBit-Rchg/SlowProc(48)
Level 38: Weave -- LucoftheG-Def/EndRdx(A), LucoftheG-Def/EndRdx/Rchg(39), LucoftheG-Def/Rchg+(42)
Level 41: Hasten -- RechRdx-I(A), RechRdx-I(42)
Level 44: Maneuvers -- LucoftheG-Def/EndRdx(A), LucoftheG-Def/EndRdx/Rchg(45), LucoftheG-Def/Rchg+(48)
Level 47: Genetic Corruption -- FrtHyp-Plct%(A)
Level 49: Shadow Meld -- LucoftheG-Def/Rchg+(A)
Level 1: Assassination
Level 1: Brawl -- Empty(A)
Level 1: Sprint -- Empty(A)
Level 2: Rest -- Empty(A)
Level 2: Swift -- Run-I(A)
Level 2: Health -- Mrc-Rcvry+(A), Pnc-Heal/+End(3)
Level 2: Hurdle -- Jump-I(A)
Level 2: Stamina -- PrfShf-EndMod(A), PrfShf-End%(3)
Level 16: Defensive Adaptation
Level 16: Efficient Adaptation
Level 16: Offensive Adaptation
------------ -
Waht tpyos? I haevn't saw a signal one anywere!
-
Mine is Plant/Storm/Mace because I don't like getting hit, and I often tank (Scorpion Shield). Things usually die so fast, I don't know if I'd have time to set up a frostbreath, though I am a fan of proc-monster powers, and frost breath is one.
You proc out carrion creepers and build for recharge. I never felt a need to dip in to more damage sources via epic or patron pools with my Plant/Storm. It's already a very active and busy build, I usually have 2-3 tornadoes and lightning storms going, not to mention dropping Freezing rain every 15-20 seconds, in between seeds (damage proc'd), roots, and strangler (5 damage procs). Any "free time" I may have from locking things down and destroying them, usually involve throwing out an O2 boost to a team mate, or chuckling as Gale (slot w/ KB-KD) is such an effective soft-control.
By far, Plant/Storm is my favorite control combo. It's nasty-silly, and I don't know if I'd give up my softcap S/L/E for some extra damage. I probably would if I was more timid and did not rush in to attack before the rest of the team 9 times out of 10.
-
Here's how I would slot Dark Servant, based on number of slots dedicated to the power:
1 = Endoplasm Exposure (Endo, a Hami-O for Acc/Mez) OR Cloud Senses Proc
2 = Endo + Cloud Senses Proc
3 = 2 Endo + Cloud Senses Proc
4 = 4 Cloud Senses (always incl. proc)
5 = 4 Cloud Senses + Endo
6 = 4 Cloud Senses + 2 Touch of Nictus (Acc/Heal + Acc/End/Heal)
Unless you want a specific 5- or 6-pc set bonus, the above is a solid choice for the slots allocated. As others have undoubtedly said, the Cloud Senses proc will get a lot of usage, as most of Fluffy's powers have a -ToHit component, and thus a chance to fire it off. For 1-slot configurations, I think it's a toss-up between acc/mez and the cloud senses proc.
-
1
-
1
-
-
3 hours ago, Oginth said:
Will I be able to select name from chat channel, and perform info_tab?
No, you will not be able to use it via selecting a name from the chat channel because you have to have the other player targeted.
That was one of the reasons I originally was asking for a "/info $target" - because if we can replace the $target with a typed name of a toon currently logged in, that would accomplish what you're asking. Although I imagine there's more than a couple hurdles, code-wise, to overcome.
-
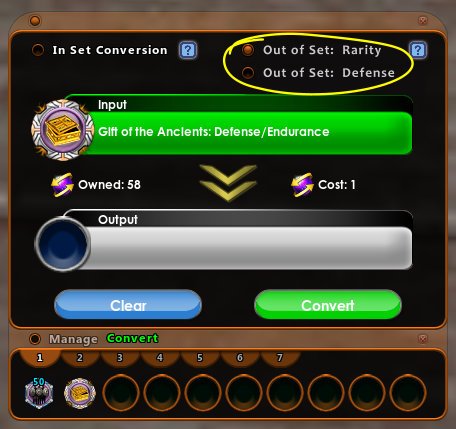
I really love converting, it's a great enhancement to the game (slight pun intended).
However, I have lost more than a few recipes to the dreaded drop-down for Out of Set. For instance, I'm converting a cheapish™ defense enhancement, trying to get a LotG or something better, so I drop down, select out of set: defense, and hit the convert button. Repeat. Repeat. etc. Well, occasionally on those repeats, if I forget to change the drop-down's default "out of set: rarity" to the "out of set: defense" I just lost a lot of converters.
Why can't the drop-down remember what it was last set on?
Why can't we have the Convert Window look something like this:
(yeah, I graphically edited this)
The only issue with the above graphic hack is the length of the term in the second Out of Set: option. Still, they could be slid over, closer to the left's "In Set Conversion" while remaining aligned, etc.
It really is frustrating (even when I don't lose a conversion from defense to sleep) to have to keep picking the "out of set: family" option. Every. Time.
-
4
-
2
-
Homecoming Launcher Public Beta
in Homecoming Launcher
Posted
Out of the blue; haven't been on in a while. Downloaded the new installer (I'm on windows 10), installed to a different directory (E:\Games\...) and ran it.
It found my installed copy of CoH and copied it all. Awesome.
Downloaded the Beta and it was fast, so maybe it also found or re-used stuff? It was a fast download.
Everything went smoothly, and no problems encountered whatsoever. Additional PLUS: clicked links open default browser, not MS Edge (as Tequilla did for me). That's a nice change!
Overall, very good job!