
r0y
-
Posts
336 -
Joined
-
Last visited
Content Type
Profiles
Forums
Events
Store
Articles
Patch Notes
Posts posted by r0y
-
-
1 hour ago, Generator said:
I only just saw the bit about Boggle. @Heraclea, I'm like >< that close to speccing out of it on Scarlet. If it was longer range, or shorter animation, maybe. But as it is the most I can say for it is that it takes the Malaise's set for decent bonuses. Some time soon I'll respec, at which time sayonara Boggle, bonjour Laser Beam Eyes.
Yes, it is ironic, as I am boggled why they made it the way they did. Such a missed opportunity. Not sure if HC/SCORE can re-do it to a nice, heavy single-target attack with a confuse component. It would be unique and fun ("man, I hit him so hard, he got all confused!"), not to mention unique proc opportunities. It's just so bad in every way, it really drags a mediocre set down to "probably best to avoid" status.
Also, at least for tanks, they should re-break Greater Psi Blade. The insight spread was awesome and made the whole set's mechanic useful.
-
20 minutes ago, Sovera said:
I played my Tanker as a little beast with 45% melee/ranged/AoE + 90% resists
Do you have this build? I'm curious how positional soft-cap was achieved via sets. I'm guessing you went with Martial Arts (yay, Storm Kick!)
This is what I had (still have it, slots were emptied, thus it's on my "retired" page in the character selection screen):
SpoilerHero Plan by Mids' Reborn : Hero Designer 2.6.0.7
https://github.com/Crytilis/mids-reborn-hero-designerClick this DataLink to open the build!
Klunker-HC: Level 50 Natural Tanker
Primary Power Set: Radiation Armor
Secondary Power Set: Psionic Melee
Power Pool: Leaping
Power Pool: Fighting
Power Pool: Leadership
Power Pool: Flight
Ancillary Pool: Soul MasteryHero Profile:
Level 1: Alpha Barrier -- UnbGrd-ResDam(A), UnbGrd-ResDam/EndRdx(3), UnbGrd-EndRdx/Rchg(11), UnbGrd-Rchg/ResDam(42), UnbGrd-ResDam/EndRdx/Rchg(42), UnbGrd-Max HP%(42)
Level 1: Mental Strike -- Mk'Bit-Acc/Dmg(A), Mk'Bit-Dmg/EndRdx(7), Mk'Bit-Dmg/Rchg(7), Mk'Bit-Acc/EndRdx/Rchg(9), Mk'Bit-Acc/Dmg/EndRdx/Rchg(21), Mk'Bit-Dam%(25)
Level 2: Proton Armor -- Ags-ResDam/EndRdx(A), Ags-ResDam/EndRdx/Rchg(3), Ags-ResDam(15), Ags-ResDam/Rchg(25), Ags-Psi/Status(43)
Level 4: Telekinetic Blow -- Mk'Bit-Acc/Dmg(A), Mk'Bit-Dmg/EndRdx(5), Mk'Bit-Dmg/Rchg(5), Mk'Bit-Acc/EndRdx/Rchg(19), Mk'Bit-Acc/Dmg/EndRdx/Rchg(37), Mk'Bit-Dam%(48)
Level 6: Fallout Shelter -- Ags-ResDam/EndRdx(A), Ags-ResDam(34), Ags-ResDam/EndRdx/Rchg(34), ImpArm-ResPsi(43)
Level 8: Combat Jumping -- Ksm-ToHit+(A), LucoftheG-Def/Rchg+(34), ShlWal-ResDam/Re TP(48), Rct-ResDam%(50)
Level 10: Taunt -- PrfZng-Taunt/Rng(A), PrfZng-Taunt/Rchg/Rng(11), PrfZng-Taunt/Rchg(50), PrfZng-Acc/Rchg(50)
Level 12: Radiation Therapy -- DctWnd-Heal/EndRdx(A), DctWnd-EndRdx/Rchg(13), DctWnd-Heal/Rchg(13), DctWnd-Heal/EndRdx/Rchg(15), DctWnd-Rchg(43)
Level 14: Super Jump -- WntGif-ResSlow(A)
Level 16: Psi Blade Sweep -- Obl-Dmg(A), Obl-Acc/Rchg(17), Obl-Dmg/Rchg(17), Obl-Acc/Dmg/Rchg(19), Obl-Acc/Dmg/EndRdx/Rchg(37), Obl-%Dam(40)
Level 18: Boxing -- Empty(A)
Level 20: Concentration -- AdjTrg-Rchg(A), AdjTrg-ToHit/Rchg(21)
Level 22: Particle Shielding -- NmnCnv-Heal(A), NmnCnv-Heal/EndRdx/Rchg(23), NmnCnv-Heal/Rchg(23)
Level 24: Gamma Boost -- PrfShf-End%(A)
Level 26: Beta Decay -- CldSns-Acc/ToHitDeb(A), CldSns-Acc/EndRdx/Rchg(27), CldSns-Acc/Rchg(27), CldSns-ToHitDeb/EndRdx/Rchg(48)
Level 28: Tough -- GldArm-End/Res(A), StdPrt-ResDam/Def+(29), GldArm-3defTpProc(29)
Level 30: Weave -- LucoftheG-Def/EndRdx(A), LucoftheG-Def/EndRdx/Rchg(31), LucoftheG-Def(31), LucoftheG-Def/Rchg+(31)
Level 32: Maneuvers -- LucoftheG-Def/EndRdx(A), LucoftheG-Def/EndRdx/Rchg(33), LucoftheG-Def(33), LucoftheG-Def/Rchg+(33)
Level 35: Greater Psi Blade -- Mk'Bit-Acc/Dmg(A), Mk'Bit-Dmg/EndRdx(36), Mk'Bit-Dmg/Rchg(36), Mk'Bit-Acc/EndRdx/Rchg(36), Mk'Bit-Acc/Dmg/EndRdx/Rchg(37), Mk'Bit-Dam%(46)
Level 38: Mass Levitate -- Obl-Dmg(A), Obl-Acc/Rchg(39), Obl-Dmg/Rchg(39), Obl-Acc/Dmg/Rchg(39), Obl-Acc/Dmg/EndRdx/Rchg(40), Obl-%Dam(40)
Level 41: Assault -- EndRdx-I(A)
Level 44: Gloom -- Thn-Acc/Dmg(A), Thn-Dmg/EndRdx(45), Thn-Dmg/Rchg(45), Thn-Acc/Dmg/Rchg(45), Thn-Acc/Dmg/EndRdx(46), Thn-Dmg/EndRdx/Rchg(46)
Level 47: Hover -- LucoftheG-Def/Rchg+(A)
Level 49: Vengeance -- LucoftheG-Def/Rchg+(A)
Level 1: Brawl -- Empty(A)
Level 2: Swift -- Run-I(A)
Level 2: Health -- NmnCnv-Regen/Rcvry+(A)
Level 2: Hurdle -- Jump-I(A)
Level 2: Stamina -- PrfShf-EndMod(A), PrfShf-End%(9)
------------ -
6 hours ago, Sovera said:
Nah, kidding, but man, you're hard to please when the current best meta armor is something you feel as mediocre 😄 What turned you off from it?
Likely it was psi melee that turned me off of the set; that and it seemed the "layers" of regen/absorb were on very long recharges (Rad Therapy & Particle Shielding), Ground Zero heals allies (not a fan of this mechanic) and also a lengthy cooldown.
Resistance-based sets are best when one layers in near-soft-capped defense, as the debuffs are not a guarantee hit, as it is with resistance only. ZERO defense in the set, so it makes power pools and slotting mandatory to achieve a modicum of defense, and even then, it's not nearly enough, so you are heavily-dependent on the other layers. Regen and Absorb are not the best, unless you really get regen (e.g. Regen or WP) and absorb (120s) needs a shorter cooldown (e.g. Bio's @90s).
For me, it seemed I was waiting for "help" while getting pummeled. Sure, capping S/L/Toxic is fun (toxic!), not much is doing cold (the set's "hole"), I was only able to achieve about 26-30% typed, 35% ranged defenses. Regen was not awesome, and there was no reliable +HP (rad therapy didn't add much, it felt... like 350? can't remember...)
I mean, compared to the other resistance-based sets (apart from Stone) Rad is excellent! Unfortunately, there are better options for tanks, and lots more for brutes/stalkers (e.g. Energy Aura). I wish tanks got Energy Aura...
But I'll wager Psi Melee had a lot to do with it. It is an OK set, was made tolerable when Greater Psi Blade was "broken" and spread insight strike. They "fixed" it, and now it's a very lack-luster set, which is too bad, I love the mitigation of Mass Levitate (oh, please give that to Mind Control! Maybe replace TK). Then you PUNCH (tk blow, mental strike), or do you have a psi blade (sweep, psi blade) - set feels confused, thematically. I get they wanted to avoid a pure-psi damage, so let's throw in the two most resisted things (smashing and lethal) and split the few attacks up. Then there's Boggle. That's only there for a set mule or (usually) avoided altogether. What a waste of an attack! Especially when it could have been a massive single-target PUNCH that confused the mob (instead of disorient)! That would have been epic and funny.
I do like Rad Armor on Sentinels, however, it's one of the most survivable sets I've played. Just wasn't thrilled with it on a tank.
-
9 hours ago, Sovera said:
o_o;
"Terrible" might have been an over-statement. How about "not as good as" (Bio, Dark, Invuln, SR, Energy Aura). Rad Armor is better than Fiery Aura, Shield, Electric Armor, Ninjitsu... Stone (though Stone is way more survivable, it's annoying to play for me).
So Rad Armor is more likely in the middle of the sets. In my view, obviously. YMMV.
-
I was bored tonight and was thinking: sure wish we had account-wide bank and salvage/inf storage (beyond a personal SG with bins, etc).
So I thought, well, why not have a macro that will move cash to one's @<global> and I came up with this:
/macro $ "emailsendattachment @r0y Cash-Dump 20000000 0 0 "Cash from $name."
Now, emailsendattachment takes SIX (6) arguments: <string> <string> <integer> <integer> <integer> <string>
I've heard the other two integers are the placement of the attachment (not sure what or why). I leave them both 0 (zero). The above macro will then place (assuming I have it) 20,000,000 (twenty-million) inf in my in-game e-mail box to my global name. Handy.
So just before logging out, or whenever, spam the macro a few times. I copy macros across my characters (via popmenu) so once each alt has it, I can then start storing my influence/infamy/information in my global mail, at least until I hit the limit - but with the frequency and amount of alts I start, that likely won't happen.
Just thought I'd share it, and this sub-forum seemed the likely spot.
-
 4
4
-
 3
3
-
-
20 hours ago, marcussmythe said:
Relying HEAVILY on Roy's very clever work above, I've fiddled with something to get a bit more damage out and variety in the attack chain, at the cost of a chunk of the survival he offers. My expectation is will still be tough enough for most things, but able to solo better (I dont get to team as much as I would like).
Likely a very valid assumption. SR isn't enough resists, IMO, as it would truly make the set godlike. The scaling is fine when the incoming damage is consistent and not alphas (it would be allowed to "work"); however, either my bad luck or who-knows, but the ones you'll remember are the big hits that get through and you have little-to-no scaled resists going on. You have OK regen (about as good as SR will get w/o gimping) and your resist numbers seem ok for most stuff. Though Energy damage is very prevalent in the end game, so any that gets through will hit you darn hard. E/N is actually hard to slot for, since toxic/psi is often achieved in 6-slot bonuses via LotGs, purples and ATO's and a bunch of other stuff.
20 hours ago, marcussmythe said:Attack Cycle is going to be Gloom->Smite->Punch->Siphon->Smite for single target DPS (you could get a bit more weaving in Oblit, but its hard to juggle), or if you want to heal more, Smite->Punch->Siphon->Punch
So you are going to use a 4- and a 3- slotted attack as your mainstay? I think Smite might be unnecessary; I know it hits harder than Shadow Punch, but you'd free up two slots and have a throw-away power (like Rescuscitate w/ an absorb proc or spirit ward, etc) - move the two slots into siphon and either gloom or dark oblit. Shadow Maul should always be in your attack chain, single or aoe. It is so fast and cheap, it is easily spammed.
In fact, I have Sands of Mu and I can Shadow Maul, Sands, Shadow Maul... then siphon/others while sands recharges. But the point is, in the time it takes to activate/animate Sands of Mu, Shadow Maul is up again. Dark hits for not much, but similar to Claws, it is FAST. Siphon is your big single-target damage, after Shadow Maul, and since Midnight Grasp is skipped (wisely).
I guess what I am trying to say is: Make sure you fully-slot out your main attacks, Shadow Punch (you did), Shadow Maul (you did), Siphon Life (almost did), and Gloom (mostly because set bonuses and utility). Depends how much you like Gloom and Dark Oblit I suppose. I'd drop Smite and Dark Oblit, repurpose their slots to Siphon (winter d/e) and Gloom (apoc d/e), take Soul Tentacles and proc it out (posi, bombardment, trap/hunter, grav/anchor) then take either Spirit Ward or Resuscitate (absorb proc, either). Maybe drop the purple hold proc (Grav/Anchor) from Tentacles and add another damage proc to gloom? Lots of options.
I'm thinking a "proc monster" version of tentacles will be more of a return... Mids is showing 224.5 damage with the 3 damage procs (the purple hold proc is optional, but man is that some nice mitigation for Minions and LTs) and it's up every 9.47s Also, the cone is how you're playing this guy, thanks to Shadow Maul, so you should always be in the ideal position (in a perfect world).
SpoilerHero Plan by Mids' Reborn : Hero Designer 2.6.0.7
https://github.com/Crytilis/mids-reborn-hero-designerClick this DataLink to open the build!
Level 50 Magic Tanker
Primary Power Set: Super Reflexes
Secondary Power Set: Dark Melee→change: Added 1 slot to Siphon Life (4+2), keeps your 6% Fire/Cold resist lost from Dark Oblit (level 47) being swapped out:
Level 16: Siphon Life -- SprBlsCol-Acc/Dmg/Rchg(A), SprBlsCol-Acc/Dmg/EndRdx(31), SprBlsCol-Dmg/EndRdx/Acc/Rchg(33), Prv-Heal/Rchg(33), Prv-Heal/Rchg/EndRdx(33), SprBlsCol-Dmg/EndRdx(50)→change: Added 1 slot to Gloom (strong Damage/End apoc IO) for more damage, less end and 12% regen:
Level 44: Gloom -- SprWntBit-Acc/Dmg(A), SprWntBit-Acc/Dmg/EndRdx(46), Apc-Dam%(46), SprWntBit-Dmg/EndRdx/Acc/Rchg(48), Apc-Dmg/EndRdx(50)
→change: Traded Dark Obliteration for Soul Tentacles (and proc'd it out):Level 47: Soul Tentacles -- PstBls-Dam%(A), Bmbdmt-+FireDmg(48), TraoftheH-Dam%(48), GrvAnc-Hold%(50)
→change: Dropped Smite and picked up a 1-slot power-pick to mule an Absorb proc:Level 49: Spirit Ward -- Prv-Absorb%(A)
-
On 5/18/2020 at 10:45 AM, JayboH said:
Triage Beacon and Spirit Tree need much shorter cooldowns. I want them to stay as a place-able object but make the recharge much faster.
They should just be toggle/drops like Nature's Lifegiving Spores, or at the very least have similar cooldown, etc.
-
1
-
-
I use siphon life as 4/2 damage/heal: 4xSuperior Blistering Cold + 2xPreventive Medicine. It's a meh heal that is ok for topping off, but it's also my 2nd best attack (shadow punch, siphon, shadow maul). I dropped Midnight Grasp, as it slowed my DPS/DPA chain due to decent recharge. As I'm sure you know by now, Mids is wrong in the heal% for Siphon Life. It is about 10% (base?). @Bopper or some other numbers guru would know best.
For me, Siphon (in-game) is this (I have 2410.52 hp):
Spoiler
I added in Aid Self for an "oh crap" situation, that heals me for ~745hp and it's up every 6-7 seconds, should I really need to heal. Medicine pool also gives one Injection, which I 4-slot with Cloud Senses for the 6.25% recharge, as well as +max end and E/N resist. It's a great set, and I use it on bosses/AVs for that little debuff.,, not sure how good it is, but hey, a debuff is a debuff.
SpoilerHero Plan by Mids' Reborn : Hero Designer 2.6.0.7
https://github.com/Crytilis/mids-reborn-hero-designerClick this DataLink to open the build!
Roo Oy-v2_aidself: Level 50 Natural Tanker
Primary Power Set: Super Reflexes
Secondary Power Set: Dark Melee
Power Pool: Leaping
Power Pool: Fighting
Power Pool: Medicine
Power Pool: SorceryHero Profile:
Level 1: Focused Fighting -- Rct-Def(A), Rct-Def/EndRdx(39), Rct-EndRdx/Rchg(40), Rct-Def/Rchg(40), Rct-Def/EndRdx/Rchg(40), Rct-ResDam%(43)
Level 1: Shadow Punch -- SprMghoft-Acc/Dmg(A), SprMghoft-Dmg/Rchg(34), SprMghoft-Acc/Dmg/Rchg(34), SprMghoft-Dmg/EndRdx/Rchg(37), SprMghoft-Acc/Dmg/EndRdx/Rchg(39), SprMghoft-Rchg/Res%(39)
Level 2: Focused Senses -- LucoftheG-Def/EndRdx(A), LucoftheG-Def/Rchg+(9), LucoftheG-Def/Rchg(15), LucoftheG-EndRdx/Rchg(21), LucoftheG-Def/EndRdx/Rchg(43), LucoftheG-Def(43)
Level 4: Shadow Maul -- Arm-Dmg(A), Arm-Dmg/Rchg(5), Arm-Acc/Dmg/Rchg(5), Arm-Acc/Rchg(7), Arm-Dmg/EndRdx(7), SprAvl-Rchg/KDProc(15)
Level 6: Practiced Brawler -- RechRdx-I(A)
Level 8: Combat Jumping -- Ksm-ToHit+(A), ShlWal-ResDam/Re TP(9)
Level 10: Taunt -- MckBrt-Taunt/Rchg/Rng(A), MckBrt-Taunt/Rchg(11), MckBrt-Taunt/Rng(11), PrfZng-Taunt/Rchg/Rng(45), PrfZng-Dam%(45)
Level 12: Evasion -- RedFrt-Def/EndRdx(A), RedFrt-Def/Rchg(13), RedFrt-EndRdx/Rchg(13), RedFrt-EndRdx(27), RedFrt-Def/EndRdx/Rchg(46), RedFrt-Def(46)
Level 14: Super Jump -- Jump-I(A)
Level 16: Siphon Life -- SprBlsCol-Acc/Dmg(A), SprBlsCol-Acc/Dmg/EndRdx(17), SprBlsCol-Dmg/EndRdx/Acc/Rchg(17), SprBlsCol-Rchg/HoldProc(19), Prv-Heal/EndRdx(19), Prv-Heal/Rchg(21)
Level 18: Kick -- Empty(A)
Level 20: Injection -- CldSns-Acc/ToHitDeb(A), CldSns-Acc/Rchg(42), CldSns-ToHitDeb/EndRdx/Rchg(42), CldSns-Acc/EndRdx/Rchg(48)
Level 22: Aid Self -- Pnc-Heal/EndRedux(A), Pnc-EndRdx/Rchg(23), Pnc-Heal/Rchg(23), Pnc-Heal/EndRedux/Rchg(33), Pnc-Heal(33), IntRdx-I(34)
Level 24: Tough -- Ags-ResDam/EndRdx(A), Ags-ResDam/EndRdx/Rchg(25), Ags-EndRdx/Rchg(25), StdPrt-ResDam/Def+(27), GldArm-3defTpProc(33), ImpSki-Status(37)
Level 26: Quickness -- Run-I(A)
Level 28: Soul Drain -- SprGntFis-Acc/Dmg(A), SprGntFis-Dmg/Rchg(29), SprGntFis-Acc/Dmg/Rchg(29), SprGntFis-Dmg/EndRdx/Rchg(31), SprGntFis-Acc/Dmg/EndRdx/Rchg(31), SprGntFis-Rchg/+Absorb(31)
Level 30: Weave -- LucoftheG-Def/EndRdx(A), LucoftheG-Def/EndRdx/Rchg(36), LucoftheG-Def/Rchg+(37)
Level 32: Dodge -- LucoftheG-Def/Rchg+(A)
Level 35: Agile -- LucoftheG-Def/Rchg+(A), LucoftheG-Def(36)
Level 38: Lucky -- LucoftheG-Def/Rchg+(A), LucoftheG-Def(42), DefBuff-I(46)
Level 41: Touch of Fear -- CldSns-Acc/ToHitDeb(A), CldSns-Acc/Rchg(48), CldSns-ToHitDeb/EndRdx/Rchg(48), CldSns-Acc/EndRdx/Rchg(50)
Level 44: Spirit Ward -- Prv-Absorb%(A)
Level 47: Mystic Flight -- WntGif-ResSlow(A)
Level 49: Rune of Protection -- UnbGrd-Rchg/ResDam(A), UnbGrd-ResDam/EndRdx/Rchg(50), UnbGrd-EndRdx/Rchg(50)
Level 1: Brawl -- HO:Nucle(A)
Level 1: Gauntlet
Level 1: Sprint -- Clr-Stlth(A)
Level 2: Rest -- RechRdx(A)
Level 4: Ninja Run
Level 2: Swift -- Run-I(A)
Level 2: Health -- RgnTss-Regen+(A), Pnc-Heal/+End(3), NmnCnv-Regen/Rcvry+(45)
Level 2: Hurdle -- Jump-I(A)
Level 2: Stamina -- PrfShf-EndMod(A), PrfShf-End%(3), PwrTrns-+Heal(36)
------------Without accolades/incarnate stuff here are my totals:
-
After playing some more, I realized I rarely used Wild Bastion. An awesome heal in the form of a HoT (heal over time), as well as decent absorb, etc. Problem is, I haven't yet needed an "oh shit, the entire team is dying" power, and it was really only there to mule the Panaceas for the 7.5% global recharge. So I thought: why not drop that and pick up the mag 2 stun, throw in some purples for a 10% recharge, and at least have something you can use more often than Wild Bastion's very long recharge... Also, if one was doing this (or similar) build and did not already have the IO's, Absolute Amazement is easier to acquire than Panacea, I bet. I could be wrong...
Then I thought: I'm moving around a lot, as one needs to with cone-based sets (both nature and dark blast), dump hover/fly/afterburner for cj/sj, gaining 1 power pickup. So I got torrent, proc'd it out some and got another cone attack. Mids says it's almost as damaging as tentacles, so it's ok. Sacrificed two of the slots for the KB-KD proc and the +rech proc. Don't really need the +rech, as Hasten is perma w/o incarnate stuff, and Overgrowth is 7+ seconds off perma.
Defenses suffered a bit, but I bumped resists a hair, but with all the -ToHit flying around, backed by a solid heal/hot (Regrowth), I think survivability will be decent.
I am worried about not hovering while blasting, it's such a life-extender for squishies... I'll see.
SpoilerHero Plan by Mids' Reborn : Hero Designer 2.6.0.7
https://github.com/Crytilis/mids-reborn-hero-designerClick this DataLink to open the build!
Drizzi-CJ-build: Level 50 Natural Defender
Primary Power Set: Nature Affinity
Secondary Power Set: Dark Blast
Power Pool: Leaping
Power Pool: Fighting
Power Pool: Speed
Power Pool: Leadership
Ancillary Pool: Mace MasteryHero Profile:
Level 1: Regrowth -- Prv-Heal(A), Prv-Heal/EndRdx(5), Prv-EndRdx/Rchg(5), Prv-Heal/Rchg(37), Prv-Heal/Rchg/EndRdx(43), Prv-Absorb%(45)
Level 1: Dark Blast -- SprVglAss-Acc/Dmg(A), SprVglAss-Dmg/Rchg(7), SprVglAss-Rchg/+Absorb(40), CldSns-%Dam(42), GldJvl-Dam%(43), Apc-Dam%(43)
Level 2: Wild Growth -- UnbGrd-ResDam(A), UnbGrd-ResDam/EndRdx(7), UnbGrd-ResDam/EndRdx/Rchg(13), UnbGrd-Max HP%(37)
Level 4: Combat Jumping -- Ksm-ToHit+(A), LucoftheG-Def/Rchg+(9), Rct-ResDam%(48), ShlWal-ResDam/Re TP(50)
Level 6: Moonbeam -- StnoftheM-Acc/Dmg(A), StnoftheM-Dmg/EndRdx(9), StnoftheM-Acc/ActRdx/Rng(11), StnoftheM-Dmg/ActRdx/Rchg(15), StnoftheM-Dmg/EndRdx/Rchg(15)
Level 8: Boxing -- Empty(A)
Level 10: Dark Pit -- AbsAmz-Stun(A), AbsAmz-Stun/Rchg(11), AbsAmz-Acc/Stun/Rchg(13), AbsAmz-Acc/Rchg(19), AbsAmz-EndRdx/Stun(42)
Level 12: Corrosive Enzymes -- Acc-I(A)
Level 14: Super Jump -- BlsoftheZ-ResKB(A)
Level 16: Tenebrous Tentacles -- SprDfnBst-Acc/Dmg(A), SprDfnBst-Dmg/Rchg(17), SprDfnBst-Dmg/EndRdx/Rchg(17), SprDfnBst-Acc/Dmg/EndRdx(45), SprDfnBst-Acc/Dmg/EndRdx/Rchg(45), SprDfnBst-Rchg/Heal%(46)
Level 18: Hasten -- RechRdx-I(A), RechRdx-I(19)
Level 20: Night Fall -- SprVglAss-Dmg/EndRdx/Rchg(A), SprVglAss-Acc/Dmg/EndRdx(21), SprVglAss-Acc/Dmg/EndRdx/Rchg(21), PstBls-Dam%(46), Bmbdmt-+FireDmg(46), JvlVll-Dam%(48)
Level 22: Tough -- UnbGrd-ResDam/EndRdx(A), StdPrt-ResDam/Def+(23), GldArm-3defTpProc(23)
Level 24: Weave -- LucoftheG-Def/EndRdx(A), LucoftheG-Def/EndRdx/Rchg(25), LucoftheG-Def/Rchg+(25)
Level 26: Lifegiving Spores -- Pnc-Heal/EndRedux(A), Pnc-EndRdx/Rchg(27), Pnc-Heal/Rchg(27), Pnc-Heal/EndRedux/Rchg(50), Pnc-Heal(50)
Level 28: Torrent -- PstBls-Acc/Dmg/EndRdx(A), PstBls-Dam%(29), Bmbdmt-+FireDmg(29), CldSns-%Dam(34), SuddAcc--KB/+KD(36), FrcFdb-Rechg%(37)
Level 30: Spore Cloud -- DarWtcDsp-ToHitDeb(A), DarWtcDsp-ToHitdeb/Rchg/EndRdx(31), DarWtcDsp-Rchg/EndRdx(31), DarWtcDsp-ToHitDeb/EndRdx(31)
Level 32: Overgrowth -- AdjTrg-Rchg(A), AdjTrg-ToHit/Rchg(33), AdjTrg-ToHit/EndRdx/Rchg(33), AdjTrg-EndRdx/Rchg(33), AdjTrg-ToHit/EndRdx(34), AdjTrg-ToHit(34)
Level 35: Scorpion Shield -- LucoftheG-Def/EndRdx(A), LucoftheG-Def/EndRdx/Rchg(36), LucoftheG-Def/Rchg+(36)
Level 38: Blackstar -- Erd-%Dam(A), ScrDrv-Dam%(39), Obl-%Dam(39), CldSns-%Dam(39), Arm-Acc/Dmg/Rchg(40), Arm-Dam%(40)
Level 41: Maneuvers -- LucoftheG-Def/EndRdx(A), LucoftheG-Def/Rchg+(42)
Level 44: Assault -- EndRdx-I(A)
Level 47: Tactics -- HO:Cyto(A), HO:Cyto(48)
Level 49: Vengeance -- LucoftheG-Def/Rchg+(A)
Level 1: Sprint -- Clr-Stlth(A)
Level 2: Swift -- Run-I(A)
Level 2: Health -- Mrc-Rcvry+(A), Pnc-Heal/+End(3)
Level 2: Hurdle -- Jump-I(A)
Level 2: Stamina -- PrfShf-EndMod(A), PrfShf-End%(3)
------------And the stats (no accolade/incarnate/etc):
-
1
-
-
On 5/23/2020 at 11:44 AM, Falsey said:
I have to agree that Poison is not cone friendly. You can argue that it's possible to use VG along with cones - because it is - but you'll hardly do it efficiently. Especially in a fast moving team which is where Poison usually shines. The time you'd spend on positioning your toon or worrying about hop-n-debuff is time wasted not using the splash-debuff mechanics properly.
I sort of agree, but as a Poison/Dark defender, the only thing that Poison needs you to be in PBAoE range for is the trap and the toggle. Well, I can jumpin, set a trap, jump out (not fly, as you can't be hovering to place it. Grrr.). Anyway, I usually only use my toggle in teams and large mobs that I debuff, jump in... trap & blackstar (pbaoe nuke), then hop out. I'll leave the toggle on for the following traps/nukes. It's an active playstyle to be sure.
Also, because I hover, once the trap is placed, I re-hover and fly up, shoot down. Cone. Cone. Siphon/Snipe *repeat*
/macro pt "powexectoggleoff Hover$$powexeclocation me Poison Trap" makes it a bit easier...
-
On 5/23/2020 at 5:08 AM, Redlynne said:
Ah, another 2D Cone user who doesn't know they can be used in 3D as a PBAoE-ish attack when doing a Hop 'n' Pop.
Yeah, I even do the hop n' pop with Shadow Maul (expanded cone = larger "radius" for my SR/DM tank). It's awesome. PUNCH from ABOVE!
I remember my son watching me farm (we were wondering who was faster) and he said, "You farm way different than I do... why do you always jump up?" Oh, poor kid. Because Throw Spines and the Mu Epic cone (that he doesn't like to use). He was still faster because he's a twitchy twenty-something, and I'm old. Still, the hop n' pop works very well with melee, I'd just jump a bit higher for "real" cones.
Then again, I would NEVER take the Neurotoxin Breath like @Tacheyon did in the original build posted herein. Bad power, skip it.
Also, why on Earth would you not 4-slot Cloud Senses in Weaken? A) You want some Accuracy and Endurance in there, since you might spam it; and B) 6.25% recharge! Not to mention 2.25% max end. Amazing set bonuses for just 4! Also, Envenom would benefit from some Acc/Enh reduction as well, similarly, as it may be spammed. YMMV.
I would probably skip the hold (Paralytic Poison), in fact I did on my Poison/Dark. Dark Blast is such an active set, I never used the hold (or rarely); I would think that Sonic is just as active to maintain the stacking debuffs, so you probably don't want to deviate from those much (and when you do, it's to apply Envenom and Weaken). Similar with the sleep/cone. Unless you're going to solo a lot and want to sleep/hold stuff. In team play, you'll likely never use the mez on this.
Poison defender means 2-trick pony: Envenom and Weaken. Sure, you can take a rez or antidote, but that's rarely used, if ever. So you wisely have chosen a very active secondary and this should pair wonderfully. But you're going to be sonic-blasting (debuffing, really) most of the time. Dropping the Breath and Sleep cones will free up a lot of slots, too. I six-slotted my Venomous Gas (3 to hit / 3 defense debuffs, mostly to lower end cost of the toggle). Not sure about Sonic, but dark blast is so frequent, I was starting to notice endurance issues (not much, but it was there). So I would build for better end management, keeping in mind how much I'm firing off my secondary powers (esp. Nightfall and Tenebrous Tentacles).
-
Sure, it's easy to love nature. It's like Time Manipulation (Temporal Manipulation?) - it's a but OP and feels like it never got nerfed down or "normalized."
I think I might also be a Dark Blast addict. At least on defenders. Their -tohit is crazy, and it's "ok" damage. While not a fireball, one can still spam Tentacles and Night fall back-to-back ad nasuem. Throw in a snipe or siphon life (I didn't take that on this new alt, though) and it's a solid, active attack chain. Perfect for pairing with powersets that are not as active (e.g. Poison, Nature). Well, assuming you're not needing to constantly heal...
Anyway, I was wondering if I should proc up my Dark Blast (last 3 slots) instead of Thunderstrike, but my energy defense is close to soft-cap (42.46%) I'd really hate to lose that 2.5% E/N def. bonus. This is my first stab, I made the toon and am currently level 35 and it is a joy to play.
Ideally, one wants a perma Overgrowth, and this build gets fairly close (incarnates brings it a bit closer). Spiritual Radial Paragon (according to Mids) narrows the downtime/gap. Not bad. I'm not a fan of +Rech in knockback (I didn't take Torrent anyway). I'm torn on 6-slotted Gaussian's (more def) or 6-slotted Adjusted Targeting (more rech). At level 35, I have 4 gaussians, but might end up going with the adjusted targeting to ensure Hasten is perma prior to alpha slot unlock.
I typically fly (hover) on support and ranged toons, so that tightens the build with respect to options, as I'll take Hover/Fly/AB (three power picks vs. standard 2 CJ/SJ for melee/tank types). I think Dark Pit would have been interesting, but Mag 2 is only Mag 2, so probably a good choice to pass that one.
Without incarnates or accolades and both Hasten and Wild Growth on auto (using movement binds: /bind w "+forward$$powexecauto Hasten" etc) here are the stats:
It is a pricey build, two sets of Panacea ain't cheap, but I had enough in my bins to not worry (converters are my friends!).
SpoilerHero Plan by Mids' Reborn : Hero Designer 2.6.0.7
https://github.com/Crytilis/mids-reborn-hero-designerClick this DataLink to open the build!
Drizzi: Level 50 Natural Defender
Primary Power Set: Nature Affinity
Secondary Power Set: Dark Blast
Power Pool: Flight
Power Pool: Fighting
Power Pool: Speed
Power Pool: Leadership
Ancillary Pool: Mace MasteryHero Profile:
Level 1: Regrowth -- Prv-Heal(A), Prv-Heal/EndRdx(3), Prv-EndRdx/Rchg(3), Prv-Heal/Rchg(5), Prv-Heal/Rchg/EndRdx(5), Prv-Absorb%(7)
Level 1: Dark Blast -- SprVglAss-Acc/Dmg(A), SprVglAss-Dmg/Rchg(15), SprVglAss-Rchg/+Absorb(15), Thn-Dmg/EndRdx(17), Thn-Acc/Dmg/EndRdx(34), Thn-Dmg/EndRdx/Rchg(46)
Level 2: Wild Growth -- UnbGrd-ResDam/EndRdx/Rchg(A), UnbGrd-Max HP%(9), UnbGrd-EndRdx/Rchg(11), UnbGrd-Rchg/ResDam(11), Ags-ResDam/EndRdx(13), Ags-ResDam/Rchg(13)
Level 4: Moonbeam -- StnoftheM-Acc/Dmg(A), StnoftheM-Dmg/EndRdx(7), StnoftheM-Acc/ActRdx/Rng(9), StnoftheM-Dmg/ActRdx/Rchg(25), StnoftheM-Dmg/EndRdx/Rchg(25)
Level 6: Hover -- Ksm-ToHit+(A), LucoftheG-Def/Rchg+(23), ShlWal-ResDam/Re TP(23), Rct-ResDam%(36)
Level 8: Boxing -- Empty(A)
Level 10: Corrosive Enzymes -- Acc-I(A)
Level 12: Fly -- WntGif-ResSlow(A)
Level 14: Afterburner -- Flight-I(A)
Level 16: Tenebrous Tentacles -- SprDfnBst-Acc/Dmg(A), SprDfnBst-Dmg/Rchg(21), SprDfnBst-Dmg/EndRdx/Rchg(21), SprDfnBst-Acc/Dmg/EndRdx(45), SprDfnBst-Acc/Dmg/EndRdx/Rchg(45), SprDfnBst-Rchg/Heal%(45)
Level 18: Hasten -- RechRdx-I(A), RechRdx-I(19)
Level 20: Night Fall -- SprVglAss-Dmg/EndRdx/Rchg(A), SprVglAss-Acc/Dmg/EndRdx(37), SprVglAss-Acc/Dmg/EndRdx/Rchg(37), PstBls-Dam%(40), Bmbdmt-+FireDmg(42), JvlVll-Dam%(43)
Level 22: Tough -- Ags-ResDam/EndRdx(A), Ags-ResDam/EndRdx/Rchg(29), StdPrt-ResDam/Def+(31), GldArm-3defTpProc(31), Ags-Psi/Status(48)
Level 24: Weave -- LucoftheG-Def/EndRdx(A), LucoftheG-Def/Rchg+(33)
Level 26: Lifegiving Spores -- Pnc-Heal/EndRedux(A), Pnc-Heal/Rchg(27), Pnc-Heal/EndRedux/Rchg(27), Pnc-Heal(29), Pnc-Heal/+End(31)
Level 28: Maneuvers -- LucoftheG-Def/EndRdx(A), LucoftheG-Def/Rchg+(33), LucoftheG-Def/EndRdx/Rchg(48)
Level 30: Wild Bastion -- Pnc-Heal/EndRedux(A), Pnc-EndRdx/Rchg(34), Pnc-Heal/Rchg(42), Pnc-Heal/EndRedux/Rchg(50), Pnc-Heal(50)
Level 32: Overgrowth -- AdjTrg-ToHit(A), AdjTrg-EndRdx/Rchg(33), AdjTrg-ToHit/EndRdx(34), AdjTrg-ToHit/Rchg(37), AdjTrg-ToHit/EndRdx/Rchg(46), AdjTrg-Rchg(46)
Level 35: Scorpion Shield -- LucoftheG-Def/EndRdx(A), LucoftheG-Def/EndRdx/Rchg(36), LucoftheG-Def/Rchg+(36)
Level 38: Blackstar -- Erd-%Dam(A), ScrDrv-Dam%(39), Obl-%Dam(39), Arm-Dam%(39), Arm-Acc/Dmg/Rchg(40), CldSns-%Dam(40)
Level 41: Spore Cloud -- DarWtcDsp-ToHitDeb(A), DarWtcDsp-ToHitdeb/Rchg/EndRdx(42), DarWtcDsp-Rchg/EndRdx(43), DarWtcDsp-ToHitDeb/EndRdx(43)
Level 44: Tactics -- AdjTrg-ToHit/EndRdx/Rchg(A), AdjTrg-EndRdx/Rchg(48), AdjTrg-ToHit/EndRdx(50)
Level 47: Assault -- EndRdx-I(A)
Level 49: Vengeance -- LucoftheG-Def/Rchg+(A)
Level 1: Brawl -- Empty(A)
Level 1: Sprint -- Clr-Stlth(A)
Level 2: Rest -- Empty(A)
Level 2: Swift -- Flight-I(A)
Level 2: Health -- Mrc-Rcvry+(A), NmnCnv-Regen/Rcvry+(17)
Level 2: Hurdle -- Jump-I(A)
Level 2: Stamina -- PrfShf-EndMod(A), PrfShf-End%(19)
------------Any questions, comments or snide remarks will be answered, appreciated and ignored. 😉
-
The only defender I actually like to play (so far) is my Poison/Dark. Dark Blast is amazing on a defender, decent/exotic damage and very customizable (for themes, etc). It also gives a decent heal in siphon life, but with a Poison/Dark, you're not going to be getting hit much at all. So survivable.
A very fun toon to play, either solo or in groups. Even in incarnate trials, I can run into a large mob and start immob/debuff/damaging them. Tentacles, nightfall, etc. I did not bother with resistances, instead I soft-capped S/L/E and have a decent heal that is a useful part of my attack chain (healing 17% and still doing better damage than Dark Blast, at least).
Also, the Poison Trap *is* a crap power, UNTIL YOU PROC IT UP! The original reply earlier in this thread completely missed this. The downside (in my build) is you have to be on the ground to place it (like an ouroboros portal). Crappy oversight, but there it is. I just made a macro that detoggles hover/fly and places it. I then have to re-toggle my hover/fly. Other than that, it's a great power.
Also proc-out Blackstar...
Here is Ursyla's build:
SpoilerHero Plan by Mids' Reborn : Hero Designer 2.6.0.7
https://github.com/Crytilis/mids-reborn-hero-designerClick this DataLink to open the build!
Ursyla-v4: Level 50 Natural Defender
Primary Power Set: Poison
Secondary Power Set: Dark Blast
Power Pool: Flight
Power Pool: Fighting
Power Pool: Leaping
Power Pool: Leadership
Ancillary Pool: Mace MasteryHero Profile:
Level 1: Envenom -- ShlBrk-DefDeb/EndRdx/Rchg(A), ShlBrk-Acc/Rchg(7), ShlBrk-Acc/EndRdx/Rchg(15), AchHee-ResDeb%(15)
Level 1: Dark Blast -- SprVglAss-Acc/Dmg(A), SprVglAss-Dmg/EndRdx/Rchg(3), SprVglAss-Rchg/+Absorb(9), Thn-Acc/Dmg(23), Thn-Acc/Dmg/EndRdx(25), Thn-Dmg/EndRdx/Rchg(43)
Level 2: Weaken -- CldSns-Acc/ToHitDeb(A), CldSns-Acc/Rchg(3), CldSns-ToHitDeb/EndRdx/Rchg(13), CldSns-Acc/EndRdx/Rchg(13)
Level 4: Moonbeam -- SprDfnBst-Acc/Dmg(A), SprDfnBst-Dmg/Rchg(5), SprDfnBst-Dmg/EndRdx/Rchg(5), SprDfnBst-Acc/Dmg/EndRdx(11), SprDfnBst-Acc/Dmg/EndRdx/Rchg(11), SprDfnBst-Rchg/Heal%(19)
Level 6: Hover -- Ksm-ToHit+(A), BlsoftheZ-ResKB(9), Srn-EndRdx/Fly(23), Srn-Fly(40)
Level 8: Fly -- WntGif-ResSlow(A)
Level 10: Boxing -- Empty(A)
Level 12: Antidote -- EndRdx-I(A)
Level 14: Afterburner -- Flight-I(A)
Level 16: Tenebrous Tentacles -- PstBls-Acc/Dmg(A), PstBls-Dmg/EndRdx(17), PstBls-Dam%(17), PstBls-Dmg/Rng(34), PstBls-Acc/Dmg/EndRdx(37)
Level 18: Tough -- UnbGrd-Max HP%(A), StdPrt-ResDam/Def+(19), GldArm-3defTpProc(43)
Level 20: Night Fall -- SprVglAss-Dmg/Rchg(A), SprVglAss-Acc/Dmg/EndRdx(21), SprVglAss-Acc/Dmg/EndRdx/Rchg(21), PstBls-Acc/Dmg(34), PstBls-Acc/Dmg/EndRdx(34), PstBls-Dam%(42)
Level 22: Combat Jumping -- LucoftheG-Def/Rchg+(A)
Level 24: Weave -- LucoftheG-Def/EndRdx(A), LucoftheG-Def/EndRdx/Rchg(25), LucoftheG-Def/Rchg+(29)
Level 26: Poison Trap -- Erd-%Dam(A), ScrDrv-Dam%(27), Obl-%Dam(27), UnbCns-Dam%(45), GhsWdwEmb-Dam%(46), NrnSht-Dam%(46)
Level 28: Alkaloid -- Prv-Heal(A), Prv-Heal/EndRdx(29), Prv-EndRdx/Rchg(45), Prv-Heal/Rchg(31), Prv-Heal/Rchg/EndRdx(31), Prv-Absorb%(31)
Level 30: Maneuvers -- LucoftheG-Def/EndRdx(A), LucoftheG-Def/EndRdx/Rchg(36), LucoftheG-Def/Rchg+(45)
Level 32: Venomous Gas -- UndDfn-DefDeb/Rchg/EndRdx(A), UndDfn-DefDeb(33), UndDfn-DefDeb/EndRdx(33), DmpSpr-ToHitDeb/Rchg/EndRdx(33), DmpSpr-ToHitDeb/EndRdx(37), DmpSpr-ToHitDeb(37)
Level 35: Scorpion Shield -- LucoftheG-Def/EndRdx(A), LucoftheG-Def/EndRdx/Rchg(36), LucoftheG-Def/Rchg+(36)
Level 38: Blackstar -- Erd-%Dam(A), ScrDrv-Dam%(39), Obl-%Dam(39), Arm-Dam%(39), CldSns-%Dam(40), OvrFrc-Dam/KB(40)
Level 41: Life Drain -- Thn-Dmg/EndRdx(A), Thn-Acc/Dmg/Rchg(42), Thn-Acc/Dmg/EndRdx(43), Thn-Dmg/EndRdx/Rchg(46), HrmHln-Heal(48), HrmHln-Heal/EndRdx(50)
Level 44: Assault -- EndRdx-I(A)
Level 47: Tactics -- GssSynFr--ToHit/Rchg/EndRdx(A), GssSynFr--Rchg/EndRdx(48), GssSynFr--ToHit/EndRdx(50), GssSynFr--ToHit(50)
Level 49: Vengeance -- LucoftheG-Def/Rchg+(A)
Level 1: Brawl -- Empty(A)
Level 1: Sprint -- Clr-Stlth(A)
Level 2: Swift -- Flight-I(A)
Level 2: Health -- Mrc-Rcvry+(A), NmnCnv-Regen/Rcvry+(42), Pnc-Heal/+End(48)
Level 2: Hurdle -- Jump-I(A)
Level 2: Stamina -- PrfShf-EndMod(A), PrfShf-End%(7)
------------Without incarnate or accolade powers, here are the totals:
-
1
-
-
On 3/28/2020 at 9:41 PM, Keen said:
Beam Rifle blaster -- so far my best blue mito killer yet 😅 (Fire Blast is likely the best)
(not to derail) but yeah, Fire is likely the best, but even my Beam/Bio sentinel feels like it demolishes blues pretty quick. I've yet to do BR on a blaster (corrupter and sentinel only)...
-
5 hours ago, Call Me Awesome said:
With a lot of work you may be able to loosely gather up more than 17 mobs but any extras will immediately loose interest in you when another teammate attracts their attention. Unfortunately herding really is dead, and has been since before IO's came into the game.
Thus, how one should play a tanker. Thank you.
I admit, there are many tankers (players) who cannot achieve this very well or at all; however, some like to show that not only can it be done, but consistently and with great effect.
I know I can hold the attention of well beyond target and herd caps. I do it regularly, it's the only reason or challenge I see in playing a tank in this game.
Also, if I have a brute/scrapper/stalker on the team, I can sure as hell herd up more than one PC can "legally" handle, anything that "loses interest" can become interested in another melee/damage dealer. I guess if I was with a team rockin' full SO's and super timid, it would be a lot of work juggling aggro tables, etc.; however, again, that is what playing a tank is in this game, should one ever wish to push themselves. YMMV.
-
6 hours ago, Sir Myshkin said:
In regards to Power Siphon, you'll want the Gaussian's +BU in there, and also a couple of Force Feedback +Rech procs in places like Burst and Quick Strike to help mitigate its recharge as much as possible. Ideally you'll have 20/s of strong buff, and then 10/s of decay as it wears off, and hopefully have its recharge down to 30-33/s to help keep it cycling often enough.
All of your reply gave me a lot of food for thought. The above is the hardest for me to work around, without significantly lowering the defenses/resists. I understand the logic behind it, and I'm still taking stabs at theory crafting a Tank build that can work while maintaining adequate defense and resistance.
A Brute is easier, as one can split Superior Brute's Fury for 10% (5%x2) melee defense; which allows me to steal slots off the auto-resist powers. Still, I'd like to keep a tank and I am just having a tough go of it.
Do you happen to have an Invuln/KM build handy?
-
2 minutes ago, Bopper said:
I'm admitedly theory crafting a bit. I should defer to others who might have more expertise. I just can see the synergy if you wanted to try a set you havent fully played yet.
Theory crafting is what keeps me interested in this game! So many possibilities. I think you're right: it's a set I have not played, so I'll do it. Even though my red flags are going up on the activation times of the heavy hitters (Burst, Focus Burst, Concentrated Strike). I retired my rad melee toon because of the ungodly activation of the T9 punch.
Thanks, Bopper!
-
8 minutes ago, Bopper said:
Modest was working on a KM build today and he mentioned he could maintain 100% damage buff with power siphon, echoing comments Sir Myshkin made in their Tank Proc Monster thread. It's a 120s recharge that lasts 20s, as opposed to a 90s recharge that lasts 10s. The power gives all your KM attacks a 25% damage buff for 10 seconds, which stacks. If you use fast enough attacks (like your T1-T3) you should be able to build up to a strong buff for a decent amount of time.
Yeah, I was looking at that. I'd have to work in the T2 punch and I'll go with the purple IO's over the Winter Sets for more recharge to limit downtime on Power Siphon. Of course, this all changes the build a bit...
SpoilerHero Plan by Mids' Reborn : Hero Designer 2.6.0.7
https://github.com/Crytilis/mids-reborn-hero-designerClick this DataLink to open the build!
Jugger Thot: Level 50 Natural Tanker
Primary Power Set: Invulnerability
Secondary Power Set: Kinetic Melee
Power Pool: Leaping
Power Pool: Fighting
Power Pool: Speed
Power Pool: FlightHero Profile:
Level 1: Resist Physical Damage -- RctArm-ResDam/EndRdx(A), RctArm-ResDam/Rchg(3), RctArm-ResDam(3), ImpArm-ResPsi(5), StdPrt-ResDam/Def+(5), GldArm-3defTpProc(7)
Level 1: Quick Strike -- Hct-Dmg(A), Hct-Dmg/Rchg(46), Hct-Acc/Dmg/Rchg(48), Hct-Acc/Rchg(48), Hct-Dmg/EndRdx(48), Hct-Dam%(50)
Level 2: Temp Invulnerability -- UnbGrd-ResDam(A), UnbGrd-ResDam/EndRdx(45), UnbGrd-ResDam/EndRdx/Rchg(46), UnbGrd-Rchg/ResDam(46)
Level 4: Body Blow -- SprBlsCol-Acc/Dmg(A), SprBlsCol-Dmg/EndRdx(25), SprBlsCol-Acc/Dmg/EndRdx(27), SprBlsCol-Acc/Dmg/Rchg(29), SprBlsCol-Dmg/EndRdx/Acc/Rchg(31), SprBlsCol-Rchg/HoldProc(50)
Level 6: Smashing Blow -- SprMghoft-Acc/Dmg(A), SprMghoft-Dmg/Rchg(42), SprMghoft-Acc/Dmg/Rchg(43), SprMghoft-Dmg/EndRdx/Rchg(43), SprMghoft-Acc/Dmg/EndRdx/Rchg(43), SprMghoft-Rchg/Res%(45)
Level 8: Resist Elements -- RctArm-ResDam/EndRdx(A), RctArm-ResDam/Rchg(11), RctArm-ResDam(15), ImpArm-ResPsi(34), ImpSki-Status(42)
Level 10: Taunt -- PrfZng-Taunt/Rchg(A), PrfZng-Taunt/Rchg/Rng(11), PrfZng-Dam%(27)
Level 12: Unyielding -- UnbGrd-ResDam(A), UnbGrd-ResDam/EndRdx(13), UnbGrd-ResDam/EndRdx/Rchg(13), UnbGrd-Max HP%(15)
Level 14: Super Jump -- Jump-I(A)
Level 16: Resist Energies -- RctArm-ResDam/EndRdx(A), RctArm-ResDam/Rchg(17), RctArm-ResDam(17), ImpArm-ResPsi(23)
Level 18: Invincibility -- LucoftheG-Def/EndRdx(A), LucoftheG-Def/Rchg+(19), ShlWal-ResDam/Re TP(19), Rct-ResDam%(23)
Level 20: Combat Jumping -- Ksm-ToHit+(A), LucoftheG-Def/Rchg+(21), LucoftheG-Def(21)
Level 22: Dull Pain -- DctWnd-Heal/EndRdx(A), DctWnd-EndRdx/Rchg(34), DctWnd-Heal/Rchg(34), DctWnd-Heal/EndRdx/Rchg(37), DctWnd-Heal(40), DctWnd-Rchg(42)
Level 24: Power Siphon -- AdjTrg-Rchg(A), AdjTrg-ToHit/Rchg(25)
Level 26: Kick -- Empty(A)
Level 28: Burst -- Arm-Dmg(A), Arm-Dmg/Rchg(29), Arm-Acc/Dmg/Rchg(31), Arm-Acc/Rchg(31), Arm-Dmg/EndRdx(33), Arm-Dam%(33)
Level 30: Tough Hide -- LucoftheG-Def(A), LucoftheG-Def/Rchg+(33)
Level 32: Tough -- ImpArm-ResPsi(A)
Level 35: Focused Burst -- Apc-Dmg(A), Apc-Dmg/Rchg(36), Apc-Acc/Dmg/Rchg(36), Apc-Acc/Rchg(36), Apc-Dmg/EndRdx(37), Apc-Dam%(37)
Level 38: Concentrated Strike -- SprGntFis-Acc/Dmg(A), SprGntFis-Dmg/Rchg(39), SprGntFis-Acc/Dmg/Rchg(39), SprGntFis-Dmg/EndRdx/Rchg(39), SprGntFis-Acc/Dmg/EndRdx/Rchg(40), SprGntFis-Rchg/+Absorb(40)
Level 41: Weave -- LucoftheG-Def/EndRdx(A), LucoftheG-Def/Rchg+(50)
Level 44: Hasten -- RechRdx-I(A), RechRdx-I(45)
Level 47: Hover -- LucoftheG-Def/Rchg+(A)
Level 49: Fly -- WntGif-ResSlow(A)
Level 2: Swift -- Run-I(A)
Level 2: Health -- Mrc-Rcvry+(A), Pnc-Heal/+End(7)
Level 2: Hurdle -- Jump-I(A)
Level 2: Stamina -- PrfShf-EndMod(A), PrfShf-End%(9), PwrTrns-+Heal(9)
------------ -
5 minutes ago, Bopper said:
I'm surprised by that experience. The first 3 attacks have cast times of 0.83, 1.07, and 1.2 (although arcanatime does hurt them a lot).
My thought on KM pairing well had to do with the damage debuff. If you are capping your resistances as a tank, the next layer of survivability can come in the form of damage debuffs. If you have 90% resistances and can stack just 21% damage debuff, that equates to you being able to take 26% more damage than a 90% resist tank with no debuff.
As for the Knockback, it looks like only Repulsing Torrent does knockback, everything else is Knockdown. Its possible you were playing -1 level enemies a lot and experienced knockback because of purple patch. For the most part, you shouldn't experience it on harder enemies.
Also, I'm not sure of the Power Siphon mechanic. A lot of the "newer" mechanics added prior to shutdown seem wonky (e.g. rad melee, psi melee, etc). I'd rather just have a buildup. Maybe I'm needing to play this and just see for myself.
So, Invuln/Spines vs. Invuln/KM ?
-
I was thinking Invuln/Spines. I do like spines, haven't played it beyond a fire/spines brute famer. Spines wants to be in the middle of a mob (often), and invuln seems to agree!
Here's my first stab (pun intended), as I have no experience (other than back on live, and that was too long ago) with slotting, etc. I sacrificed soft-cap defense for more recharge (Winter Sets vs. Purples)... is that a mistake? I could have soft-capped S/L/F/C and slightly better E/N (34% vs 39%). But lower defense/higher recharge means more toxic/psi resists... so it's a tough call, I think.
SpoilerHero Plan by Mids' Reborn : Hero Designer 2.6.0.7
https://github.com/Crytilis/mids-reborn-hero-designerClick this DataLink to open the build!
first-stab (see what I did there?): Level 50 Natural Tanker
Primary Power Set: Invulnerability
Secondary Power Set: Spines
Power Pool: Leaping
Power Pool: Fighting
Power Pool: Speed
Power Pool: Flight
Ancillary Pool: Energy MasteryHero Profile:
Level 1: Resist Physical Damage -- RctArm-ResDam/EndRdx(A), RctArm-ResDam/Rchg(3), RctArm-ResDam(3), RctArm-ResDam/EndRdx/Rchg(5), StdPrt-ResDam/Def+(5), GldArm-3defTpProc(7)
Level 1: Barb Swipe -- Hct-Dmg(A), Hct-Dmg/Rchg(46), Hct-Acc/Dmg/Rchg(48), Hct-Acc/Rchg(48), Hct-Dmg/EndRdx(48), Hct-Dam%(50)
Level 2: Temp Invulnerability -- UnbGrd-ResDam(A), UnbGrd-ResDam/EndRdx(45), UnbGrd-ResDam/EndRdx/Rchg(46), UnbGrd-Rchg/ResDam(46)
Level 4: Spine Burst -- SprMghoft-Acc/Dmg(A), SprMghoft-Dmg/Rchg(42), SprMghoft-Acc/Dmg/Rchg(43), SprMghoft-Dmg/EndRdx/Rchg(43), SprMghoft-Acc/Dmg/EndRdx/Rchg(43), SprMghoft-Rchg/Res%(45)
Level 6: Dull Pain -- DctWnd-Heal/EndRdx(A), DctWnd-EndRdx/Rchg(34), DctWnd-Heal/Rchg(34), DctWnd-Heal/EndRdx/Rchg(37), DctWnd-Heal(40), DctWnd-Rchg(42)
Level 8: Resist Elements -- RctArm-ResDam/EndRdx(A), RctArm-ResDam/Rchg(11), RctArm-ResDam(15), ImpArm-ResPsi(34)
Level 10: Taunt -- PrfZng-Taunt/Rchg(A), PrfZng-Taunt/Rchg/Rng(11), PrfZng-Dam%(27)
Level 12: Unyielding -- UnbGrd-ResDam(A), UnbGrd-ResDam/EndRdx(13), UnbGrd-ResDam/EndRdx/Rchg(13), UnbGrd-Max HP%(15)
Level 14: Super Jump -- WntGif-ResSlow(A)
Level 16: Resist Energies -- RctArm-ResDam/EndRdx(A), RctArm-ResDam/Rchg(17), RctArm-ResDam(17), ImpArm-ResPsi(23)
Level 18: Invincibility -- LucoftheG-Def/EndRdx(A), LucoftheG-Def/Rchg+(19), ShlWal-ResDam/Re TP(19), Rct-ResDam%(23)
Level 20: Combat Jumping -- Ksm-ToHit+(A), LucoftheG-Def/Rchg+(21), LucoftheG-Def(21)
Level 22: Kick -- Empty(A)
Level 24: Tough -- UnbGrd-ResDam/EndRdx(A), UnbGrd-ResDam/EndRdx/Rchg(25), UnbGrd-ResDam(25), ImpArm-ResPsi(29)
Level 26: Tough Hide -- LucoftheG-Def(A), LucoftheG-Def/Rchg+(27)
Level 28: Weave -- LucoftheG-Def/EndRdx(A), LucoftheG-Def/Rchg+(29)
Level 30: Impale -- Apc-Dmg(A), Apc-Dmg/Rchg(31), Apc-Acc/Dmg/Rchg(31), Apc-Acc/Rchg(31), Apc-Dmg/EndRdx(33), Apc-Dam%(33)
Level 32: Build Up -- AdjTrg-Rchg(A), AdjTrg-ToHit/Rchg(33)
Level 35: Quills -- Arm-Dmg(A), Arm-Dmg/Rchg(36), Arm-Acc/Dmg/Rchg(36), Arm-Acc/Rchg(36), Arm-Dmg/EndRdx(37), Arm-Dam%(37)
Level 38: Throw Spines -- SprGntFis-Acc/Dmg(A), SprGntFis-Dmg/Rchg(39), SprGntFis-Acc/Dmg/Rchg(39), SprGntFis-Dmg/EndRdx/Rchg(39), SprGntFis-Acc/Dmg/EndRdx/Rchg(40), SprGntFis-Rchg/+Absorb(40)
Level 41: Hasten -- RechRdx-I(A), RechRdx-I(42)
Level 44: Focused Accuracy -- AdjTrg-ToHit/EndRdx/Rchg(A), AdjTrg-EndRdx/Rchg(45), AdjTrg-ToHit/EndRdx(50), AdjTrg-ToHit(50)
Level 47: Physical Perfection -- NmnCnv-Regen/Rcvry+(A)
Level 49: Hover -- LucoftheG-Def/Rchg+(A)
Level 1: Brawl -- Empty(A)
Level 2: Swift -- Run-I(A)
Level 2: Health -- Mrc-Rcvry+(A), Pnc-Heal/+End(7)
Level 2: Hurdle -- Jump-I(A)
Level 2: Stamina -- PrfShf-EndMod(A), PrfShf-End%(9), PwrTrns-+Heal(9)
------------ -
21 minutes ago, Bopper said:
I'm curious as to why Kinetic Melee doesn't pair with Invulnerability. I would have thought it'd be good.
I do love SS, but honestly an Inv/SS tank is a dime a dozen.
Martial Arts isn't bad, as it has an attack that gives 10% defense, that pairs well with Inv.
Street Justice would pair well, but if.you played the set a lot already, that might not be interesting to you.
A lot of kinetic melee seems to be about knocking stuff away. Sure, I can sacrifice a slot and convert KB to KD, but sometimes I want to use all 6 slots for a set bonus. I guess anything *can* work, but it does seem KM looks like it was meant to knock back. I could be wrong, I've only played KM to the first 3 powers (it seemed slow, long activations).
-
1 hour ago, drbuzzard said:
If the concept of aggro caps doesn't make sense to you, I'm not going to bother to explain.
There's also Damage Caps, but people like to get a lot of -Res to circumvent that... does -res not make sense to you or something?
Can say the same thing for ToHit, Defense, etc. Hell, why have debuffs? Why go beyond the caps?
Oy vey.
-
4 hours ago, drbuzzard said:
Also, people need to stop herding. In a game of 17 maximum aggro cap, there is no reason for herding at all (sure, if you want, group up the single spawn, but that's not really herding). If you herd two groups together past the 17 limit it just means your team will be pulling that aggro instead of you. Sure, some builds can handle it, but don't count on that on PUGs.
WHAT?!?
Seriously, WHAT are you doing in the Tanker section?
It should be every tank's goal to successfully herd the entire map, if possible. There are tricks and techniques to bumping that up (e.g. Radial Lore intangible pet). Throw taunts and attacks out to aggro-hop, etc. I've been tanking massive herds for years and I've never seen anyone complain.
Seriously, why would you say to stop herding as a tank?
-
On 5/20/2020 at 8:50 AM, ranster44 said:
I have done some research and am aware of most of the changes since I last played (damage boost ect...). I am looking for a combo suggestion that can be fun soloing from the start that won't struggle too much but can be viable later on when I get established and can tweak it out. For now IOs would be what i would be using for the most part, all the way to 50. I have a friend I play with but right now TFs and such would be a VERY rare occurrence for me. So I'm kinda leveling old school. Any help choosing power sets to start with would be greatly appreciated.
There are many combinations, and who knows what will work for you since only you really know your playstyle and likes/dislikes. That said, I'm assuming when you say "IO's" you mean non-sets, or BASIC IO's. Working from that assumption:
As others have stated, Willpower WILL be the easiest for you. It is very forgivable, needs ZERO attention (nothing to click, but that means no heal or other "oh crap" power. The T9 is very skippable, and the rez... meh)
I would recommend Dark Melee - adds a small heal in a a decent attack, which is part of your chain (Siphon Life, 1 Acc, 2 Dam, 1 Heal, 1 end, 1 rech - or there abouts). The first several powers are all you need, and the set is weak near the end (Dark Consumption is nearly useless, Midnight Grasp is unnecessary, etc). So you'll have Smite, Siphon and Shadow Maul VERY early, and that will be it for the entire time. Shadow Maul carries the set.
Also, since you're not really teaming or "going large" (I'll assume): small mobs, therefore not so dependent on AoE. DM fits that bill, too. Also, WP has decent defense with decent resists and great regen (nice layered system), so the -ToHit of DM helps that Defense. Siphon Life helps that regen (via heals). Good synergy.
It's an active melee set, perfect for an inactive armor set. MIGHT get boring after a spell, I don't know.


Rad Armor/Martial Arts: 45% Melee, Ranged, AoE, 90% resists.
in Tanker
Posted · Edited by r0y
I was posting and replying to @Sovera in another thread when Rad Armor came up. Long story short, I didn't like my Rad/Psi Melee tank, but that might have been because Psi Melee turned me off (especially after the "fix" to Greater Psi Blade), but also that I didn't slot/build as best I could.
So it got me to thinking: maybe I'll do a Rad/MA, since MA (Storm Kick) really makes resistance-based sets viable (in my opinion, obviously). So I made a toon (sitting in Nova P. now, waiting to level up) and this is the build I have planned thus far:
Hero Plan by Mids' Reborn : Hero Designer 2.6.0.7
https://github.com/Crytilis/mids-reborn-hero-designer
Click this DataLink to open the build!
Radiated Roy: Level 50 Natural Tanker
Primary Power Set: Radiation Armor
Secondary Power Set: Martial Arts
Power Pool: Leaping
Power Pool: Fighting
Power Pool: Speed
Power Pool: Leadership
Hero Profile:
Level 1: Alpha Barrier -- UnbGrd-ResDam(A), UnbGrd-ResDam/EndRdx(3), UnbGrd-ResDam/EndRdx/Rchg(3), UnbGrd-Rchg/ResDam(17)
Level 1: Thunder Kick -- SprMghoft-Acc/Dmg(A), SprMghoft-Dmg/Rchg(5), SprMghoft-Acc/Dmg/Rchg(5), SprMghoft-Dmg/EndRdx/Rchg(7), SprMghoft-Acc/Dmg/EndRdx/Rchg(7), SprMghoft-Rchg/Res%(33)
Level 2: Storm Kick -- OvrFrc-Acc/Dmg(A), OvrFrc-End/Rech(9), OvrFrc-Acc/Dmg/End(9), OvrFrc-Dmg/End/Rech(11), OvrFrc-Acc/Dmg/End/Rech(11)
Level 4: Combat Jumping -- Ksm-ToHit+(A), LucoftheG-Def/Rchg+(13), ShlWal-ResDam/Re TP(13)
Level 6: Fallout Shelter -- UnbGrd-ResDam(A), UnbGrd-ResDam/EndRdx(15), UnbGrd-ResDam/EndRdx/Rchg(15), UnbGrd-Max HP%(17)
Level 8: Radiation Therapy -- ThfofEss-Heal/Rchg(A), ThfofEss-+End%(19), Erd-%Dam(19), ScrDrv-Dam%(33), Obl-%Dam(34), Arm-Dam%(50)
Level 10: Warrior's Provocation -- MckBrt-Taunt/Rchg(A), MckBrt-Taunt/Rchg/Rng(40), MckBrt-Acc/Rchg(40), MckBrt-Rchg(43), MckBrt-Taunt/Rng(50), MckBrt-Taunt(50)
Level 12: Beta Decay -- ShlBrk-Acc/DefDeb(A), ShlBrk-DefDeb/EndRdx/Rchg(34), ShlBrk-Acc/EndRdx/Rchg(37), ShlBrk-%Dam(37)
Level 14: Super Jump -- WntGif-ResSlow(A)
Level 16: Proton Armor -- UnbGrd-ResDam(A), UnbGrd-ResDam/EndRdx(46), UnbGrd-Rchg/ResDam(46), UnbGrd-ResDam/EndRdx/Rchg(46)
Level 18: Particle Shielding -- DctWnd-Rchg(A), DctWnd-Heal/EndRdx(39), DctWnd-EndRdx/Rchg(43), DctWnd-Heal/Rchg(43), DctWnd-Heal/EndRdx/Rchg(45)
Level 20: Dragon's Tail -- Arm-Dmg(A), Arm-Dmg/Rchg(21), Arm-Acc/Dmg/Rchg(21), Arm-Acc/Rchg(25), Arm-Dmg/EndRdx(31), OvrFrc-Dam/KB(39)
Level 22: Gamma Boost -- Mrc-Heal(A), Mrc-Rcvry+(23), PrfShf-EndMod(23), PrfShf-End%(25)
Level 24: Kick -- Empty(A)
Level 26: Tough -- ImpArm-ResDam/EndRdx(A), ImpArm-ResPsi(27), StdPrt-ResDam/Def+(27), GldArm-3defTpProc(29)
Level 28: Focus Chi -- GssSynFr--ToHit(A), GssSynFr--ToHit/Rchg(29), GssSynFr--ToHit/Rchg/EndRdx(42), GssSynFr--Rchg/EndRdx(48), GssSynFr--ToHit/EndRdx(48), GssSynFr--Build%(48)
Level 30: Weave -- LucoftheG-Def/EndRdx(A), LucoftheG-Def/EndRdx/Rchg(31), LucoftheG-Def/Rchg+(31), LucoftheG-Def(34)
Level 32: Hasten -- RechRdx-I(A), RechRdx-I(33)
Level 35: Crippling Axe Kick -- SprGntFis-Acc/Dmg(A), SprGntFis-Dmg/Rchg(36), SprGntFis-Acc/Dmg/Rchg(36), SprGntFis-Dmg/EndRdx/Rchg(36), SprGntFis-Acc/Dmg/EndRdx/Rchg(37), SprGntFis-Rchg/+Absorb(39)
Level 38: Maneuvers -- LucoftheG-Def/EndRdx(A), LucoftheG-Def/EndRdx/Rchg(42), LucoftheG-Def/Rchg+(45), LucoftheG-Def(45)
Level 41: Tactics -- EndRdx-I(A)
Level 44: Assault -- EndRdx-I(A)
Level 47: Vengeance -- LucoftheG-Def/Rchg+(A)
Level 49: Super Speed -- EndRdx-I(A)
Level 1: Brawl -- Empty(A)
Level 1: Sprint -- UnbLea-Stlth(A)
Level 2: Rest -- Empty(A)
Level 4: Ninja Run
Level 2: Swift -- Run-I(A)
Level 2: Health -- NmnCnv-Regen/Rcvry+(A), Pnc-Heal/+End(42)
Level 2: Hurdle -- Jump-I(A)
Level 2: Stamina -- PrfShf-EndMod(A), PrfShf-End%(40)
------------
Not sure how it will play out, but I like the idea of proc'ing Radiation Therapy and making it not only a decent heal/end source, but a solid PBAoE. Hopefully this will work.
Because Rad Armor is a slot-heavy set, I had to skip or 1-slot/power-pick some things. I skipped Ground Zero (see Rad Therapy) and Meltdown (I always skip the T9 armor, in general). I also left Tactics 1-slotted (end+5). I didn't get as much +rech as I'd like, but Hasten is only 12s off perma (132s) w/o any buffs.
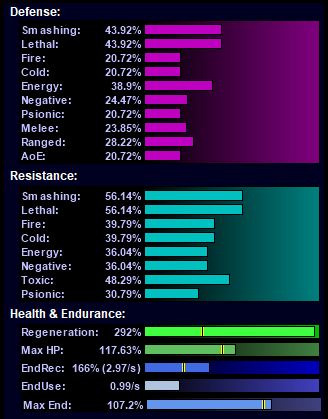
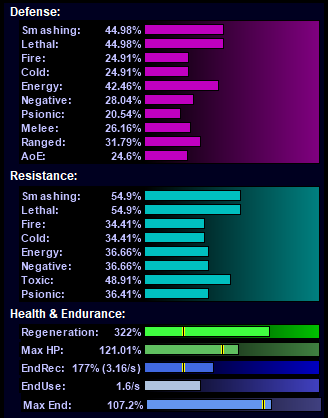
From the Mids' totals, it looks decent enough; neither screen-grab has incarnates or any other buff than bare toggles (no mob-scaling, etc):
___(w/o Storm Kick/ATO, just sitting with toggles on)_____________(with Storm Kick/ATO on, and toggles)_________
Slotting looks like this (so you don't have to d/l the build if you don't want):
Comments welcomed and encouraged! Thanks to @Sovera for the spark to start this!