Plutoria
-
Posts
37 -
Joined
-
Last visited
Content Type
Profiles
Forums
Events
Store
Articles
Patch Notes
Everything posted by Plutoria
-
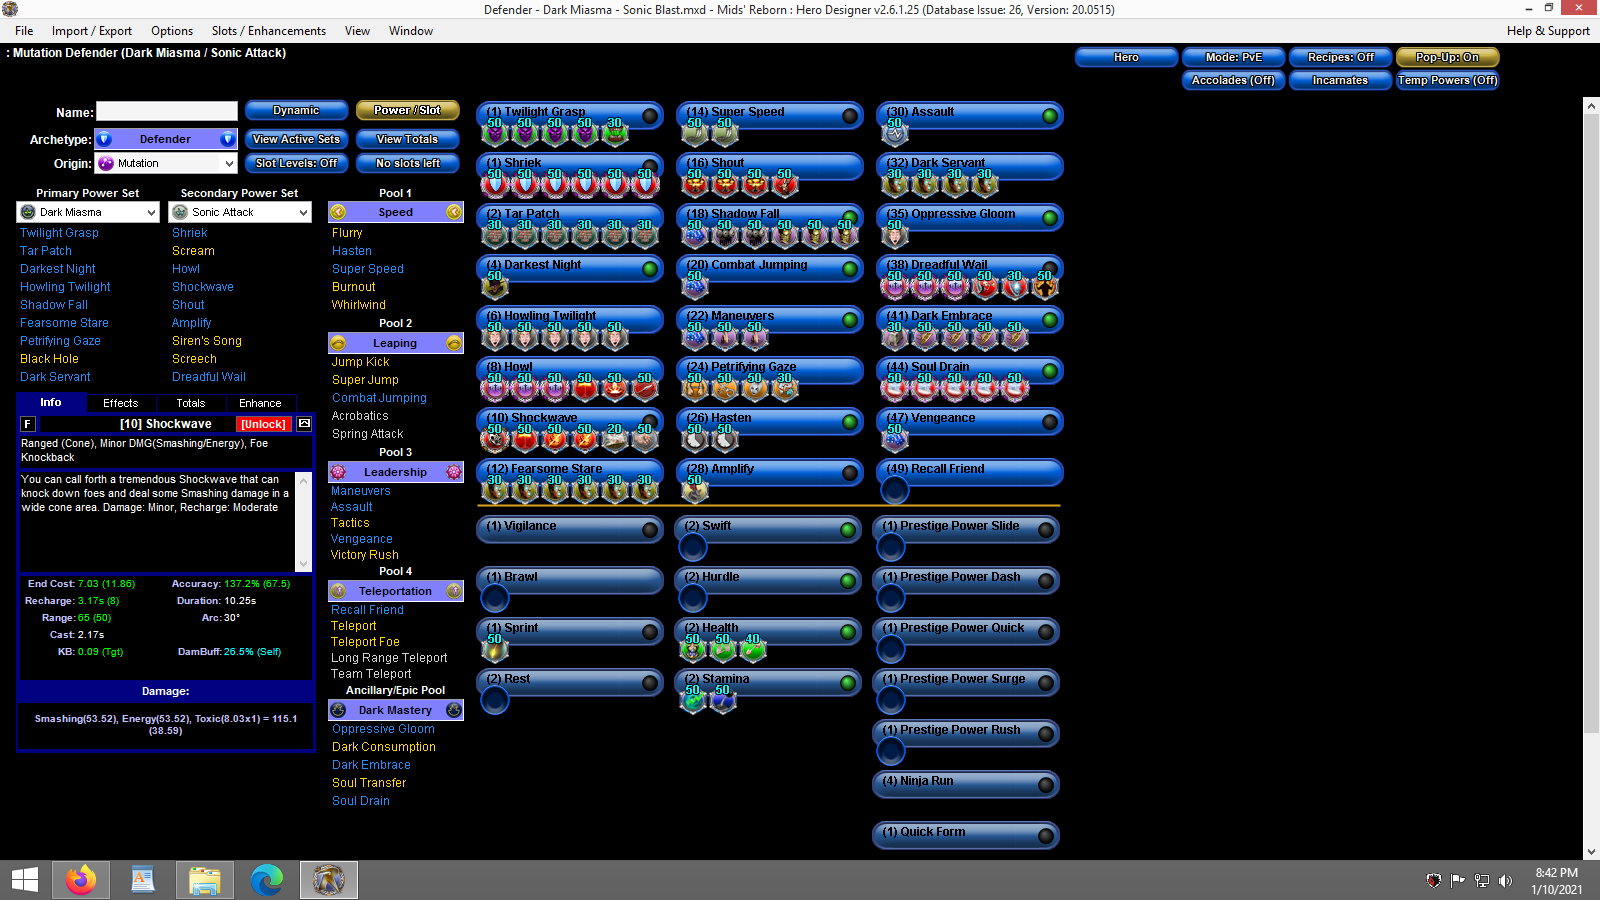
Threw the build up to give an idea of "how little" you really need to aim for defense. To further on what Uun said.. the amount of -tohit always being tossed and stacked you really only require roughly 18-25 and this is assuming you are playing 54/8 solo. Typically opening with just fearsome stare for the -tohit and tossing darkest night on any troublesome bosses or Eb at range secures your safety. Under most basic missions i rarely even have to use darkest night. In regards to dark servant lockdown can be swapped out for an additional nictus for the acc bonus if you are looking for even more acc overkill. Typically aiming for 144 is all which is required and the tohit boost from soul drain pushes you even more over that. This build was tailored to my own aggressive playstyle so may not be ideal for everyone. The proc in spirit ward is totally optional. I don't have any end issues with the build and found it worked nice for team support and keeping fluffy tanky so he can go murder things on his own. | Copy & Paste this data into Mids' Reborn : Hero Designer to view the build | |-------------------------------------------------------------------| |MxDz;1510;713;1426;HEX;| |78DA6594CB4F135114C6EF9D4E41A0A594D2525A5E2D945228A5E36369487848782| |991E85232290336026DA690E8CA60E21F604CD4C49571E3CAA42B8D5BDF71CBDA68| |34D10D60E26361A2E3E97CC7B6C94C32F9CDFDCEB9DF39F7F6DE2E5D9DF63C9EDD9| |B10D237B5A9974AAB5305D3DC2DEE14CCC6955CDED8CE19A2F234D21BAD8656CFEB| |DB1BC65A665A37AFAC4ED2B49D482D36B9BBBE8EC8525E2F6DE9C2B75C286C66160| |D7DCD304B97F345CFFF7131BFBD81C14AC1CC19E6B5660C8A86B1E69F29E6736C43| |FE140C530BA3F47A14C18FA588942A84A68A81217070107C2E292CED1C9708BB6C4| |D09324360A49DD8A38A17925385256459DA312FD5704173BB34C5D6D42C330D36A4| |E1D3B02F6C7ABE2AB6DF4BB270A3B6703F43AE4FC11656FC1A9F22FFD813E67DD46| |C56DC20FBC4E2F07F45E1269EDBB4003FCF59B055624EEB5FAC3BC6DE1A7BF9A968| |0BEF434B10757A17E0DB7B06EC9F075BC9D28B3A2EEF39F80FCC3317C1F125F0355| |9F9E0EBF6B16FDB117CDA0EC1EE9FCC1F5CEF3BE8270B3FAFC7FF115AFB7B26F7DD| |C17BD0C1EB09DD44DD37542AC073039F9113E2DCF027E61730BD2F6D8E7F407F21D| |A8B207A9641EE39F247D839B7124274F219E88CA197DBA475B1D61585F696A645B9| |7EF4377AEA9FE17DDC82E7E025D44DEB5C7F0E7971AADFC3F57B46B1AE183340297| |DECDB97E4B39C00878699BCCEA132EA254FC3F73A0DE37CDEE27BE8E11D21C17E89| |0BC84BF2FC249FFF14F79FE2FB91E273B847C361FE6D878F233632CED4985970EC1| |4E6682922F57DC355B9A3CDF6DD1C7D08FFF40472B50758C71D6A2CC3FB9AE9C41E| |3DA28397652D7B80FC3955F025B6AC6EB57AE72B43CB128B0E6559ADBBC7B672408| |D4859AF1C3A94A39A22E545AC626C1EFC561FFB85EEC7EE62550B23D58EAD11472F| |5987A23994130EE5A443696AABFE0F59413AA01ABAB166EBBECB71FAE69C74474DB| |F17A8E9FF00A2ABF43C| |-------------------------------------------------------------------|
-
Fellow Doomie and freedom player here! I was part of the later crew of doom when Blood was leading. Not 100% sure what common character names I went by at that time since I had a habit of re rolling and making new characters all the time. But I think my "main" was a traps/DP def at the time I think went by the name of Sheoni.
-
Like yourself I too was on a dark theme kick trying different squishy AT combos. Regardless of AT the end issues felt "always there" (more so than the other power choices) when first leveling up and assuming you are without a fully IO'd set build. It is only a temporary pain however. Fully built with with Sets (and more so the vigor alpha for when fighting 54/8 solo) endurance issues vanished. The AT builds I enjoyed the most were the Trollers (dark, earth, illy, plant), the demon/dark MM (necro wasn't as fluid as demons) and lastly the Corr. However prior to reaching 50 and all the tricks that come with it I have found a couple methods that helped offset End issues in early play. 1# Theft of Essence- Chance for +end in life drain (if applicable powerset) but mandatory in twilight grasp. Assuming not in a team the proc in twilight grasp is amazing often times bringing you from empty to full. I noticed it alone could often keep my end in top shape with the Troller and MM anytime it would "heal" the surrounding pets ( even if they are full health). If you are on a team with others players the "hit" by the heal will also contribute to this happening beyond the basic 10%. 2# Panacea HP/END proc in Spirit Ward. Some may not be aware that the proc triggers on both the owner and the target you ward on. This works great assuming you have the slots to build into spirit ward (thus reducing the end cost and increasing the ward effect) and fluffy or any other pet you cast on becomes very tanky with the heal pulse plus absorb. Additionally if you cast this on another player it effectively gives them a double Panacea proc if they have one in their build already ( traditionally in the health power) or if you duo with a friend or a box account you can place a Panacea Spirit ward on each other giving you both the absorb and double Proc effect. 😉 Between Troller, MM and Corr.. I really have to say Dark Affinity really out shines Dark Miasma when it comes to End recovery due to soul absorb. End game solo 54/8 it doesn't matter as much but those early pre 50/IO levels it really pulls its own. I have not mentioned Blasters or Defenders. This is because I found the debuff/buff values overkill on the Def ( in regards to a D3 build) and scourge as a passive added more punch solo via Moonbeam. The Corr and Def both performed nearly identical but when playing the Corr Moonbeam with scourge was a very noticeable boost in single target boss spiking. (For added clarification I made a series of dark squishy themed builds for troller/mm/cor/def/blaster and played them extensively on Test. My "trial" of choice was their ability to handle roughly 3 groups/waves of Carnies rescue missions ( for the ambush) as well as Arach and Malta at 54/8. ) Blaster never made it to live servers either. I always have difficulty justifying my blaster builds when I can make a Corr counter part using soul drain. Soul drain plus your t9 and then tossing in things like judgement effectively clears out and neuters mob groups to the point you always have a large nuke for each spawn. ( Or ideally you are pulling 2-3 groups to get more bang from your AoE rotations) Scaling down in level 50 IO builds tend to smash through content and when on a team in raids or 54 mishes everything gets steamrolled as it is. As someone that enjoys the blasty feelz but values having a support secondary to contribute and support a team.. I haven't been able to feel the appeal to blasters. So its more a personal preference. They do shine however on teams struggling with DPS vs harder content and I always welcome and value having them on my own teams. Also forgot to add Dominator to the list. While I enjoy Dominators as a AT the dark/dark build i created in mids just didn't appeal to me and the other ATs just seemed to offer so much more in damage performance and utility. I did create a Dark/Earth one however that I may play with at some point though.
-
I use to run doms often on live built in different ways. You would be surprised at what you can get away with in regards to no self heal, low defense and low resists ( assumed 4/8 54 solo). But you generally have to be aggressive and proactive in your play style (lock down minions, burn and lock down bosses). In general I've found AoE holds to be the least reliable method to pull a glass cannon dom builds off. Honestly, from my own personal play experience the best AoE type of holds i've ever used were from proc'd poison trap (I've found the /poison variant more reliable than the /trap version) and the aoe location hold in /time both of which obviously are not in the dom kit. Generally Stun/confuse/sleep/knockdown/fear have always been pretty spot on from controlling aggro and alpha. Earth of all the primaries I found to be the easiest and safest method to run a glass cannon style dom on..( volcano gas works fairly well as a aoe hold.) The last dom I built that was played that way was my mind/nrg here on homecoming (less safe than earth but more damage).
-
something I quickly tossed together. Hope it helps as a starting point! 30 def M/R I found allows my poison Corr to tank just fine on 4/8 54 with the -tohit debuffs added into the mix so should work ideal with the dark def too I assume. ( plus you have the dark heal anyway =p ) Defender - Dark Miasma - Sonic Blast.mxd

-
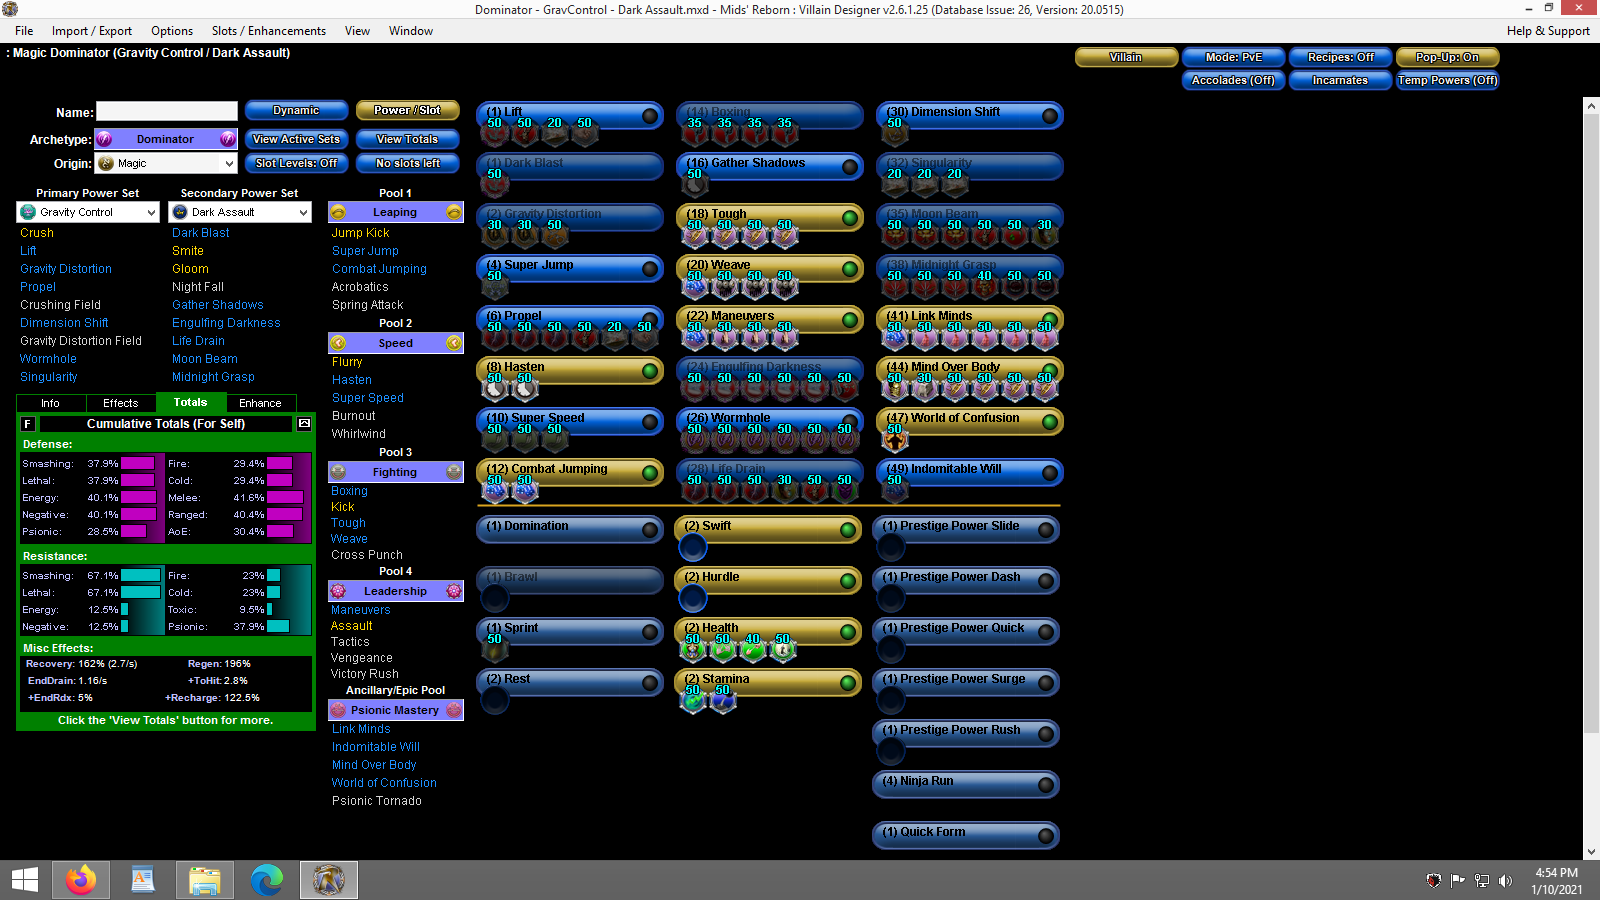
Force feed back procs, P2W vendor buffs and incarnate get your recharge to a comfortable spot. Defense Amp P2W buff gets you to soft cap in range and melee plus 7%-ish resists across the board. If soft cap in defense isn't a big deal then I would suggest putting KB to KD IO in wormhole as an alternative. Dominator - GravControl - Dark Assault.mxd
-
Would it be possible to allow these two sets to share skins? Such as Crey/Rikti on BR and Shard/Cannon ect on Pulse (and I suppose even AR since it already has sci-fi options) ?
-
What Psi hole?
-
I'm currently running a time/beam so I borrowed the beam set up and quickly tossed around the rad part. Keep in mind tohit debuffs = "defense" and you can also boost defense/recharge/status prot ect from p2w vendor. When at 50 its really easy to upkeep the costs of the buffs which last an hour. My time/beam farms 54/8 fairly well I would think Rad wouldn't be any different. I left 2 power slots open, can always move around to fit your needs and concept. I stayed with soul like your original build but I would suggest dark mastery for perma soul drain. The benefit of power boost is very fleeting imho on this build. Hope it helps! Hero Plan by Mids' Reborn : Hero Designer 2.6.1.25 https://github.com/Crytilis/mids-reborn-hero-designer Click this DataLink to open the build! Level 50 Magic Defender Primary Power Set: Radiation Emission Secondary Power Set: Beam Rifle Power Pool: Speed Power Pool: Leadership Power Pool: Leaping Power Pool: Fighting Ancillary Pool: Soul Mastery Hero Profile: Level 1: Radiant Aura -- Prv-Absorb%(A), Prv-Heal/Rchg/EndRdx(9), Prv-Heal/Rchg(48), Prv-EndRdx/Rchg(50), Prv-Heal/EndRdx(50), Prv-Heal(50) Level 1: Single Shot -- SprVglAss-Acc/Dmg(A), SprVglAss-Dmg/Rchg(15), SprVglAss-Dmg/EndRdx/Rchg(17), GldJvl-Dam%(17), FrcFdb-Rechg%(19) Level 2: Radiation Infection -- DarWtcDsp-Rchg/EndRdx(A), DarWtcDsp-ToHitDeb/EndRdx(37), DarWtcDsp-ToHitdeb/Rchg/EndRdx(40), DarWtcDsp-ToHitDeb(48) Level 4: Cutting Beam -- Ann-Acc/Dmg/EndRdx(A), Ann-ResDeb%(5), AchHee-ResDeb%(7), TchofLadG-%Dam(7), PstBls-Dam%(9) Level 6: Accelerate Metabolism -- PrfShf-End%(A), PreOptmz-EndMod/Rech(19), PreOptmz-EndMod/End/Rech(23) Level 8: Enervating Field -- EndRdx-I(A) Level 10: Disintegrate -- SprDfnBst-Rchg/Heal%(A), SprDfnBst-Acc/Dmg/EndRdx(11), SprVglAss-Rchg/+Absorb(11), SprVglAss-Acc/Dmg/EndRdx(13), SprVglAss-Acc/Dmg/EndRdx/Rchg(13), GldJvl-Dam%(15) Level 12: Lingering Radiation -- TmpRdn-Acc/EndRdx(A), TmpRdn-EndRdx/Rchg/Slow(34) Level 14: Super Speed -- Clr-Stlth(A) Level 16: Hasten -- RechRdx-I(A), RechRdx-I(21) Level 18: Maneuvers -- LucoftheG-Def/Rchg+(A), GifoftheA-Def/EndRdx(21), GifoftheA-Def(23) Level 20: Combat Jumping -- LucoftheG-Def/Rchg+(A), Ksm-ToHit+(46) Level 22: Boxing -- Empty(A) Level 24: Tough -- UnbGrd-ResDam(A), UnbGrd-ResDam/EndRdx/Rchg(25), UnbGrd-ResDam/EndRdx(25), UnbGrd-EndRdx/Rchg(43) Level 26: Aim -- GssSynFr--Build%(A), GssSynFr--ToHit/EndRdx(27), GssSynFr--Rchg/EndRdx(27), GssSynFr--ToHit/Rchg/EndRdx(33), GssSynFr--ToHit/Rchg(33), GssSynFr--ToHit(33) Level 28: Penetrating Ray -- Apc-Dam%(A), Apc-Dmg/EndRdx(29), Apc-Acc/Dmg/Rchg(29), GldJvl-Dam%(31), ExpStr-Dam%(31), StnoftheM-Dam%(31) Level 30: Weave -- LucoftheG-Def/Rchg+(A), RedFrt-Def(34), RedFrt-Def/EndRdx(34) Level 32: [Empty] -- Empty(A) Level 35: Piercing Beam -- Dtn-Dmg/EndRdx/Rng(A), Dtn-Acc/Dmg/EndRdx(36), PstBls-Acc/Dmg/EndRdx(36), PstBls-Dam%(36), JvlVll-Acc/Dmg/End/Rech(37), Bmbdmt-+FireDmg(37) Level 38: Overcharge -- SprDfnBst-Dmg/Rchg(A), SprDfnBst-Acc/Dmg/EndRdx/Rchg(39), SprDfnBst-Dmg/EndRdx/Rchg(39), Bmbdmt-+FireDmg(39), TchofLadG-%Dam(40), PstBls-Dam%(40) Level 41: Soul Drain -- SprAvl-Rchg/KDProc(A), SprAvl-Acc/Dmg/EndRdx/Rchg(42), SprAvl-Acc/Dmg(42), SprAvl-Dmg/EndRdx(42), SprAvl-Acc/Dmg/EndRdx(43), SprAvl-Acc/Dmg/Rchg(43) Level 44: Dark Embrace -- GldArm-3defTpProc(A), StdPrt-ResDam/Def+(45), UnbGrd-Max HP%(45), UnbGrd-ResDam/EndRdx/Rchg(45), UnbGrd-ResDam(46), UnbGrd-ResDam/EndRdx(46) Level 47: Power Boost -- RechRdx-I(A), RechRdx-I(48) Level 49: [Empty] Level 1: Brawl -- Empty(A) Level 1: Quick Form Level 1: Prestige Power Dash -- Empty(A) Level 1: Prestige Power Slide -- Empty(A) Level 1: Prestige Power Quick -- Empty(A) Level 1: Prestige Power Rush -- Empty(A) Level 1: Prestige Power Surge -- Empty(A) Level 1: Sprint -- Empty(A) Level 1: Vigilance Level 2: Rest -- Empty(A) Level 4: Ninja Run Level 2: Swift -- Empty(A) Level 2: Health -- Pnc-Heal/+End(A), NmnCnv-Regen/Rcvry+(3), Mrc-Rcvry+(5) Level 2: Hurdle -- Empty(A) Level 2: Stamina -- PwrTrns-+Heal(A), PrfShf-End%(3) Level 50: Vigor Core Paragon Level 50: Support Radial Embodiment Level 50: Ageless Radial Epiphany Level 0: The Atlas Medallion Level 0: Task Force Commander Level 0: Portal Jockey Level 0: Freedom Phalanx Reserve ------------ | Copy & Paste this data into Mids' Reborn : Hero Designer to view the build | |-------------------------------------------------------------------| |MxDz;1538;733;1466;HEX;| |78DA6594CB4F135114C6EF4CA7424B79945279232D2058E8400117AE4C786854300| |41277A619E9B44C52DAA62D018C1B17FE0DBAF099F8222626BE00DD99B865E7D6A8| |11E21375A144124D3D9DEFB4259949A6BF73BF73CE3DE73EA6934B63AE87C72F1E1| |552D5685CCB64C2637A544F44F4B47D528B19B322FF94D1DB5ED0C3230BD1A83AAD| |450C2D6B2413E1F179239321A3A91830AD25627A441DD1B5F9F0B4118DEBEE13893| |93DAD27B26AC1704E2593717526A5EB916AD39CD0354ACDCC192957619C3212B14A| |7370CC88CD6569D43C9E3266D5D1643ABD90CA26D3E199E4423C3CA965B27A7AB98| |17A0CD2BB280B7E7276B16D1322A488F26F60FF5730F485F999F9097C5357CC55C4| |80626A5521B06690D987D8DA4BB2C9258224993936E939B4CE1760F73AD8BF0ABEA| |5F96D3CBF6D0BF3281FC17D2F29C643DC406CF9BA30B94C433BE697ED97E1ABDD45| |2FFBFF82E7492E438C28F321EF1DD572F03E38D650C3F98C791879AE21E630AF95D| |77681E6AB40AE54B122999AEF01D84197A1123E51E9403F7ED2AA515FAAEE45FD3A| |A69B7C6EEEDFEDC51C750AB19BFA2F67528C87F33D1C13FC47C3564548E4F3723D6| |F8E1E6123A59E77BCFE173A6EF8C3FC0D0676C0F7B40B8DBC0B8D2BE8B6E93EF31E| |D87E977987791BFC40B9CD9CDB1C82D632C054C136DEB1B6659C5EDB6BAC5AA11E5| |B79D5ADBC225F15D3099A8B3960FE6E52293F97F23FC6141D8F986B4CBE109D4750| |B253B69BDCA2DC2ECEED7A02DFC155E65326C7766F142E26E65A24778F90CCDC9E5| |BB804876E32AF32AF8181EBCC1BE012E5F66289F6DE41D4E9CB9F0B1D5ADF2E8FF9| |58827C4C413E9E4D97102A5F30952F4A3F33BF21B916A5F8250A6CD4A94051C9052| |CDE018B12B228431665D8A24C5894D325253745B6C45EC9F43A6A8A5F746EDB59FC| |2760EF8F92224B3E2C5D3E83D3574EE2EE7FB764FD2C2992B483CD96F9CBF7D613E| |0CBBDF297EC2B1EB2B98F73CE7C266C6D8F7D768F3DB5C7FE0FDA5E1D6D| |-------------------------------------------------------------------| Defender - Radiation Emission2 - Beam Rifle.mxd
-
First was a Earth/NRG then made a MC/NRG ( didnt have to soft cap either of them, Def in the 30-35 range, resist type didn't matter. always +4/8, perma dom) I then became curious about fortunatas and haven't touched my Doms again sadly. Earth was for sure the easiest and safest but MC allowed me to ramp up kill speed.
-
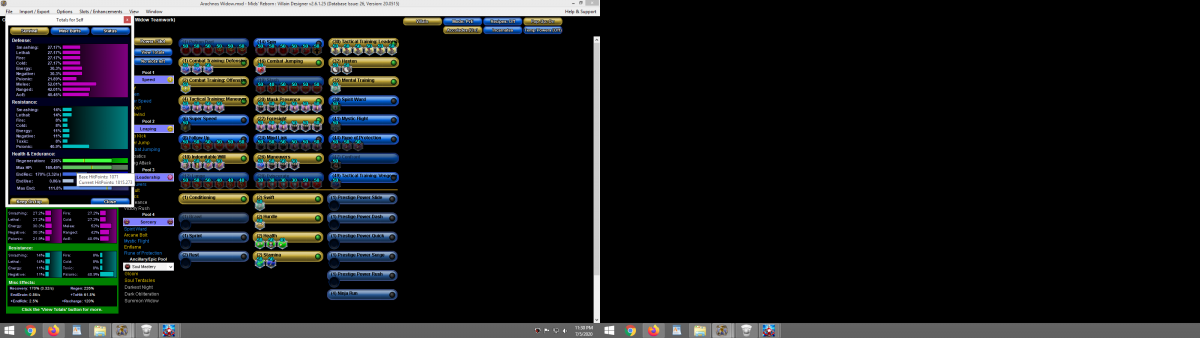
Hi all! I play a Fort on Torch (Ophi) while I prefer the fort kit over the night widow I see many playing or asking for help on a NW variation. This is just a theory craft build. But ideally should help those looking for a base to build from as they adjust it to match their own preferences and play style. http://www.cohplanner.com/mids/download.php?uc=1565&c=730&a=1460&f=HEX&dc=78DA65946B4F1341148667DB2DB5A508A5D07215DAD20BB45D5AF5AB3104F1022D60206030BAD9C006362EDDDA96A01FFD0946054C34C678897EF1F7F813FC201735D11863EAE99E5728E9A6CD73E69D3933EF9C99DDC2832BBE4FD71E5D1652D7A4A9552AEA44595BDD285A1575D958B3B6DDB35A75ABAC994E218477AEB4610C177453D7DDD48CDA03D4C5B266148DE2BA326BAC6F54D5D3626851D736B7ADF23D053A9AC23B6F59A6B250D2F5359F1DE675AD4409DC58B0CAAB7AF9A1DF6E14B4A251DA32B5AA61158353256355599A9A585417AC2D532D68952A0DEC213B19FABFF2093C358730652172B290EF335B8ACC492F754BF61821669CB6F6DA0749D49C5292B52E959A095904EF30A377995394EFE47C97F3078F6DF9CE3C7BC4EC38000F31D7376694EAE6E2752497C7018DF9863CB825873DAF1B1ECE24C038B3079EA2316E8F8D30AF92270F3C7942140CCAC27B9EFBBC8A64D3370E8E313B33CC77B46E2B7B72B562DD20D6E95961F6A10623B741D42242FB69E375A5B694E01A806F69DE76CCDBFE9CE7EDDC63F6ED30C3253E93B0C58C6F325F50AE1FB9FE14D7E79C7A7AED383CC5E12901AF41F21480A74037EF71FCAFB06B7283EAD4CD7D7237FA125D600773D40F069879CA092127849C61E40C7782C80923679A727AE1A1F7BF07CCFF92F6D68FBDF53FE33A0CEC824F99E72E61CF82DBA3356E5FA779077177073FB23643DA10B4A10CD7FE714C8808DE83C83EEECA17E6F857E6131A13E33122D6CFDA0E0949784BFE46DE2F661AF7289D02D3CC0CEED11F1A96426E2AC7DE325930CDCC8DF25CB9349862BEA79A28F0A2983CB640FBCA42CBE24E0DC8C7EF37FDE811634D4AB649C93529179A948B4D4ABE4999938FBF1CB579F9F88B2124BBD7D321EAA765F7EE9377096722E14C0E4F3487B4C435738479FFF2B464DFDD83C6BC24E71D9D6892F493DF0FC72ED7E8A6B7AEF29ACB0DF1AD8678A521DE0B501A3CE6EB31F4CF0DF187483D76D9F13FBCF5F8B2 *edit update* So after playing in game with a NW build I threw it vs a few 54 AVs and the standard 54 content ( ITFs/ PI/Gvill/itrials/DA and AE farms fire, s/l or anything) it also scales down great for TFs. I'm going to post below the version that I now run as a finished 2nd build. A few thing to note, I run both control and assault depending on my goal, I generally always play at 54/8 solo in papers/radios/DA, mindlink value is currently incorrect so it is not selected "on". I run ageless for extra recharge but more importantly for the DDR. However any and all selections of incarnates work. The main slotting goal was to boost HP given our resists scale with HP loss. I dont ever need a self heal ( the random green pop works just fine and often have my insp tray hidden. I always forget to use them tbh) and have tanked and even soloed a few AVs set at lvl 54 ( note poison dart is not in rotation for this.. i found it better to keep up with the melee slashes for the stacking DoTs to eat regen.) Additionally lore pets and daggers does speed up kill time on AVs but can be done without depending on who you are facing and how much free time you want to slowly burn. You can even take the "hit" in the 6th set bonus by removing gaussian's from "tactics" for additional slotting freedom. Poison dart/CJ/Veng/ CT offense are optional. CJ kismet is more for scale down than 50+ content. You can upkeep 2 stacks of follow up on a regular basis. For more lethal targets/situations rotate through RoP and Demonic aura or stack both to reach 85 resist cap easier. I started with focusing on S/L resists but through game play found it was far more efficient and had better results with maxing out HP and using RoP/Demonic during any critical defense failure moments CoH loves to randomly toss your way. Villain Plan by Mids' Reborn : Hero Designer 2.6.1.25 https://github.com/Crytilis/mids-reborn-hero-designer Click this DataLink to open the build! Ophi Melee: Level 50 Natural Arachnos Widow Primary Power Set: Night Widow Training Secondary Power Set: Widow Teamwork Power Pool: Speed Power Pool: Leaping Power Pool: Leadership Power Pool: Sorcery Villain Profile: Level 1: Poison Dart -- SprDmnofA-Dmg/Rchg(A), SprDmnofA-Acc/Dmg/Rchg(5), SprDmnofA-Acc/Dmg(7), Apc-Dam%(13), Apc-Dmg/EndRdx(17), Apc-Dmg(27) Level 1: Combat Training: Defensive -- LucoftheG-Def/EndRdx(A), LucoftheG-Def/Rchg+(50), LucoftheG-Def(50) Level 2: Combat Training: Offensive -- Acc-I(A) Level 4: Tactical Training: Maneuvers -- LucoftheG-Def/Rchg+(A), Rct-Def/EndRdx/Rchg(7), Rct-Def(15), Rct-Def/EndRdx(17) Level 6: Super Speed -- Clr-Stlth(A) Level 8: Follow Up -- GldStr-%Dam(A), GldStr-Acc/Dmg/End/Rech(9), GldStr-Acc/End/Rech(9), SprSpdBit-Rchg/Global Toxic(21), SprSpdBit-Dmg/Rchg(25), SprSpdBit-Acc/Dmg/Rchg(50) Level 10: Indomitable Will -- StdPrt-ResDam/Def+(A), GldArm-3defTpProc(11), UnbGrd-Max HP%(11), UnbGrd-ResDam/EndRdx(13) Level 12: Lunge -- GldStr-%Dam(A), GldStr-Acc/Dmg/End/Rech(15), GldStr-Acc/Dmg(19), TchofDth-Dam%(19), TchofDth-Dmg/EndRdx/Rchg(21), TchofDth-Acc/Dmg/EndRdx(23) Level 14: Spin -- SprDmnofA-Rchg/DmgFear%(A), SprDmnofA-Acc/Dmg/EndRdx/Rchg(23), SprDmnofA-Dmg/EndRdx/Rchg(25), Arm-Dam%(27), Arm-Dmg/EndRdx(37), FuroftheG-ResDeb%(37) Level 16: Combat Jumping -- Ksm-ToHit+(A) Level 18: Slash -- Hct-Dam%(A), TchofDth-Dam%(31), GldStr-%Dam(37), SprSpdBit-Acc/Dmg/EndRdx/Rchg(39), SprSpdBit-Dmg/EndRdx/Rchg(39), SprSpdBit-Acc/Dmg(40) Level 20: Mask Presence -- ShlWal-Def/EndRdx(A), ShlWal-Def(36), ShlWal-Def/EndRdx/Rchg(43), Rct-Def/EndRdx(45), Rct-Def(45), Rct-ResDam%(46) Level 22: Foresight -- Rct-Def/Rchg(A), Rct-Def(36), Rct-Def/EndRdx(42), ShlWal-Def/Rchg(42), ShlWal-Def/EndRdx(43), ShlWal-ResDam/Re TP(48) Level 24: Mind Link -- ShlWal-Def/EndRdx/Rchg(A), ShlWal-Def(33), ShlWal-Def/Rchg(33), Rct-Def/EndRdx(33), Rct-Def/EndRdx/Rchg(34), Rct-Def/Rchg(43) Level 26: Maneuvers -- LucoftheG-Def/Rchg+(A), ShlWal-Def/EndRdx/Rchg(34), ShlWal-Def(40), ShlWal-Def/EndRdx(40) Level 28: Eviscerate -- Erd-Dmg(A), Erd-Acc/Dmg/EndRdx/Rchg(29), Erd-Acc/Dmg/Rchg(29), Erd-%Dam(31), Obl-%Dam(31), ScrDrv-Dam%(42) Level 30: Tactical Training: Leadership -- GssSynFr--Build%(A), GssSynFr--ToHit/Rchg(34), GssSynFr--ToHit/Rchg/EndRdx(39), GssSynFr--Rchg/EndRdx(45), GssSynFr--ToHit/EndRdx(46), GssSynFr--ToHit(46) Level 32: Hasten -- RechRdx-I(A), RechRdx-I(36) Level 35: Mental Training -- Run-I(A) Level 38: Spirit Ward -- Prv-Absorb%(A) Level 41: Mystic Flight -- WntGif-ResSlow(A) Level 44: Rune of Protection -- TtnCtn-ResDam(A), TtnCtn-ResDam/Rchg(48), TtnCtn-ResDam/EndRdx/Rchg(48) Level 47: Confront -- MckBrt-Taunt/Rchg/Rng(A) Level 49: Tactical Training: Vengeance -- LucoftheG-Def/Rchg+(A) Level 1: Brawl -- Empty(A) Level 1: Prestige Power Dash -- Empty(A) Level 1: Prestige Power Slide -- Empty(A) Level 1: Prestige Power Quick -- Empty(A) Level 1: Prestige Power Rush -- Empty(A) Level 1: Prestige Power Surge -- Empty(A) Level 1: Sprint -- Empty(A) Level 1: Conditioning Level 2: Rest -- Empty(A) Level 4: Ninja Run Level 2: Swift -- Run-I(A) Level 2: Health -- NmnCnv-Regen/Rcvry+(A), Pnc-Heal/+End(3), Mrc-Rcvry+(5) Level 2: Hurdle -- Jump-I(A) Level 2: Stamina -- PwrTrns-+Heal(A), PrfShf-End%(3) Level 0: Born In Battle Level 0: High Pain Threshold Level 0: Invader Level 0: Marshal Level 50: Ageless Radial Epiphany Level 50: Musculature Radial Paragon Level 50: Spectral Radial Flawless Interface Level 50: Control Radial Embodiment ------------ ------------ | Copy & Paste this data into Mids' Reborn : Hero Designer to view the build | |-------------------------------------------------------------------| |MxDz;1563;724;1448;HEX;| |78DA6594594F13611486BF99B6D496024596B2D305DA42DBA1552F3584B049298B8| |1809A683381091D2D9D3A85A0F1CA9F6054C044E385807AE385FFCA44C0259A7861| |F074CE2BADE9A4CD73E69DB3CF32F770C2F371FAC9A8905AC7F36AA9941D33D5B55| |CC1286557F57563C739AF6E6D9B6ADE2684702F1473BA7F4ECB6B9A934E43964376| |D954F5825ED850E6F58DDC56F67FD1B7ACA99B3B86795F818E53E15E348CBCB254D| |4B4758F656634B548014DFF4ED635B394D38B7C71C930D734F351FB64515F535626| |C796B34BC6763E3BA796B648EEA06612F47FE31138CE1CE205759CB20BFB2EB3EE3| |9D393922D7A93CCAE3873DC4D6192152B0BAF6469A936B09539413E12FB08A94B58| |DA246936D66C36F8D77DE75A8D274CEF2933445B73707FC2E1E2BA6FA967A790AD9| |E9D51F6BB1001C3CCD607768B1D9BCC54813945B55DA8EDF291D16B17EE4B1CE3FE| |8D797F320FA94E3D76538F3A8DA873310466E97284EADD65B6DF611E506C03621B5| |EB26FFB3EB3638FD9758DE719B80A8EC28F666EC2CE9AFE08ABC75794AF19F99A63| |ECDF87DA03E82D5CE419C306339267A669E616CEE76899C25ED3CCE119661CFB8E6| |3FF891FCC198A6D436CDB37C4C267083143D3C885DC23B3CC0CC5FAD0B30F75FCA8| |EB478C1F3902B8FFC3A8D14C3BE8C47DEAC43312408E08724450EF35EDA61B75BA3| |FCBD6BE7A8EC12FCCBE1350A0E7C7FC2C5EA71E7B315FEF07DE6BE090193E62C6DF| |3113EFC10366907AECE758A93FC6F942E02CE50DE21E0613AC3D1D146210CFF2E03| |1F7F18C8428B468376BBBA4C55893630ACF3E120313CC239A59419C728FFB99A79A| |496849ECACC77EFE7ED38F0E315CA3246B94548D72B946B952A3646A9405FBF917E| |26CD10EB3FC25B0AEBABCA27C37ACABC7D5DF09ECEBB4A2C9D20ACF2307F08D4A4B| |D6B37F521D17E5B8AF154D927EF13B20EFF18E6EB8CB2AD75CADB26F56D9B7ABECF| |D160A438F99B20DFD96AF627F0A56ECBF9D60FE74| |-------------------------------------------------------------------|