

Destruye Arepas YV
-
Posts
74 -
Joined
Content Type
Profiles
Forums
Events
Store
Articles
Patch Notes
Posts posted by Destruye Arepas YV
-
-
Decided today to keep on grinding my little beloved lizard ...
What you guys think would be a proper interface type for him?
Reactive?Degenerative? Cognitive? ... I always get a bit lost with these debuffs and dots , core or radials?
Suggestions welcome, just barely unlocked it today and wonderign where to spend my thread 🙂
-
I found your build in this thread darkir and have begun levelling a dark/dark corr for fun and rp!
Thank you for sharing, it was not ez to find as I had to delve into the search function a bit to find it, but glad it works
Currently low level and having fun with it!
-
Ahhh I see ... well, I was virtually shocked, literally and figuratively into zero endurance so there was not much I could do
In your opinion what would have been a good counter to his zapping draining shenanigans?
-
14 hours ago, plainguy said:
Found the DPS sheet..
If you know how to fill it out, please do! would love to see the total dps, I tried but excel sheets are a bit beyond me to be honest hehe
-
5 hours ago, oldskool said:
I tend to prefer the higher chance to damage vs side effect on Interface, and I tend to prefer the proc-like effect of the Hybrid Assault.
There was a spreadsheet, its likely buried somewhere around here, that would show you the general output of the two Assault Hybrids. The stacking damage buff can be better than the proc effect, but for my characters the difference was so slight it didn't matter to me.
How are you liking it so far? Seems like you're having a good time.
Also, you can build any number of Incarnates for each type. You can only equip one, but you can have several stored. So, if you build one Interface vs the other and then find out one is better later... you can *always* switch it once you build it again. There are also ways to gain a lot of Incarnate materials by farming the Dark Astoria missions. One of those missions can be completed in 15 minutes or less.Yep! It has been a ton of fun and actually enjoying romping around with my gun totin lizardmand around hehe 😄
Though perhaps in parsing or dps graphs and what not it can be lower damage I really dont see it much! When I open full auto on the tightly packed groups in ITF the numbers show up quite nicely so yeah its all I wanted out of the roleplay idea from my old gamma world days!
Cant thank you all enough for helping me create this little killer iguana 😎
Super duper hug man! I really like your rotation idea and slotting some procs on basic attacks!
Cheers!
Now the road begins! I dont have much experience with incarnates, but will prolly do as you say and begin farming them!
-
Hi guys!
Today I was fooling around trying to get pvp badges on one of my toons and out of the blue a guy appeared and just hit me once with a power that fully drained me in one go.
I mean ... needless to say he was joking or trolling me as he didnt kill me right away but I couldnt even sprint lol
So, was wondering, is electric anything the go to build in pvp? without blue you cant do anything!
Anyone has a build for that? I want to try something like that!
Checking logs he hit me with Zapp, Thunderous Blast, Soul Storm filled with a lot of procs (ouch) , Lightning Bolt and Siphon Speed and well, was fun being totally disabled.
Is there any build that can do that?
Truly new to pvp here, never ever tried but want something cool like that! 🙂
-
 1
1
-
-
Hi @underfyre !!!
I began to read this, but I still dont know how to fill your sheet haha!
Will begin trying to understand it better to track dps and add the new two AR/Regen combos on the other thread, but perhaps @plainguy will know how to do it better?
I have to confess shamelessly excel sheets and me do not get along very well but amazing work on the sheet, looks quite detailed!
Big hugs to you! 🙂
-
11 minutes ago, AboveTheChemist said:
You are welcome, and I am glad that you were able to get everything installed (and even remove some of the superfluous files) without too much trouble. When I publish the next update, I do plan to consolidate the manual installation files into one zip package, so manual installation won't be quite such a tedious process.
Ohhh thank you thank you! Yes, that will truly help me and all other linux bros out there 👊!!!
You the best! 😎
-
23 hours ago, underfyre said:
You cats consider putting these builds in my spreadsheet to track dps? It's wildly more accurate than Mid's will be.
Ahhh sure! Where is that and how can we do that? 😄
23 hours ago, plainguy said:Okay first off I discovered some issues with your build.
- You put level 40 IOs in integration and instant regeneration. Which gave you 2 percent less regeneration.
- You had AIM and SPRINT on..
With AIM on and SPRINT on you were doing over 100 DPS more compared to my build and your endurance was way high..
Once I turned them off things were back to normal and Musculature was still the incarnate to pick..
So making some changes and looking at what you did.. We are dam close to splitting hairs here..
If you pull both builds up side by side. you can see the differences that are slight..So this is my build based on those changes..
I also noticed a BUG that some times you need to remove and then re-add an IO to see changes.
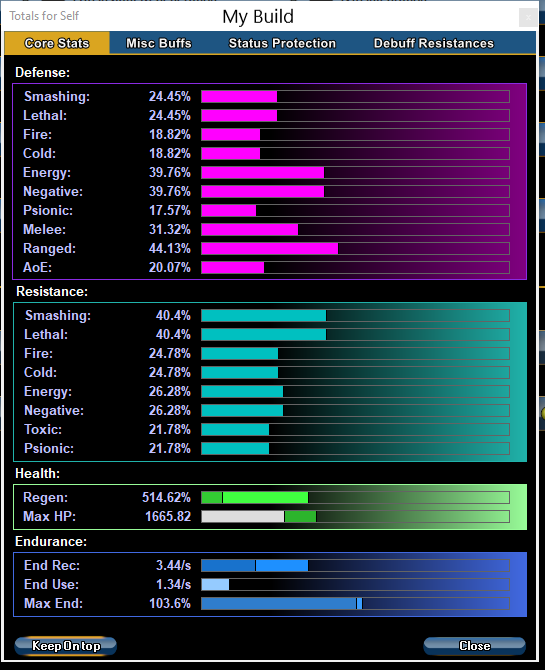
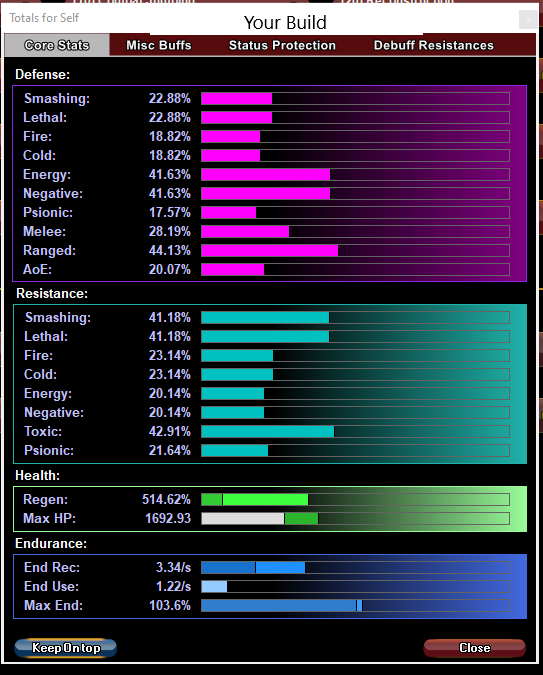
Example Decimation Chance for Build Up IO.. I had to remove and add it to your build because at one point it wasn't registering so you were doing less DPS.Here are some screen shots of the stats.
You are red and I am blue, also added My Build & Your Build

The one thing I tried to play around with is M30.
So If you look at my build but then decide to make changes to this setting to M30. It says that Full Auto can or recharge in 20 seconds which is 8 seconds down from 28 seconds.
Assuming the Force Feed Back proc goes off. Of course all powers get a recharge reduction as well. Just that Full Auto is the biggest change.
I think the biggest issue/difference between the two builds is the Force Feedback going off. Only because you get Full Auto up 8 seconds faster..
The only other difference is my build is doing 5 more points of DPS then your build, which is no big deal honestly.
This Hero build was built using Mids Reborn 3.1.2.5
https://github.com/LoadedCamel/MidsRebornClick this DataLink to open the build!
Level 50 Science Sentinel
Primary Power Set: Assault Rifle
Secondary Power Set: Regeneration
Power Pool: Speed
Power Pool: Leaping
Power Pool: Fighting
Power Pool: LeadershipHero Profile:
Level 1: Burst -- Apc-Dam%(A), Thn-Acc/Dmg(3), Thn-Dmg/EndRdx(39), Thn-Dmg/Rchg(39)
Level 1: Fast Healing -- NmnCnv-Regen/Rcvry+(A), NmnCnv-Heal(15), NmnCnv-Heal/EndRdx(17), NmnCnv-EndRdx/Rchg(17), NmnCnv-Heal/Rchg(36), NmnCnv-Heal/EndRdx/Rchg(23)
Level 2: Reconstruction -- UnbGrd-Max HP%(A), UnbGrd-ResDam(5), UnbGrd-Rchg/ResDam(5), UnbGrd-ResDam/EndRdx/Rchg(7)
Level 4: Quick Recovery -- PrfShf-End%(A), PrfShf-EndMod(7)
Level 6: Super Speed -- BlsoftheZ-ResKB(A), BlsoftheZ-Travel(15)
Level 8: Combat Jumping -- LucoftheG-Def/Rchg+(A), LucoftheG-Def(9), BlsoftheZ-ResKB(9), BlsoftheZ-Travel(11), ShlWal-ResDam/Re TP(11), Rct-ResDam%(13)
Level 10: Instant Regeneration -- DctWnd-Heal/EndRdx(A)
Level 12: Hasten -- RechRdx-I(A), RechRdx-I(13)
Level 14: Kick -- KntCmb-Knock%(A)
Level 16: Dismiss Pain -- Prv-Absorb%(A)
Level 18: Buckshot -- Artl-Acc/Dam(A), Artl-Dam/End(19), Artl-Dam/Rech(19), Artl-Acc/Dam/Rech(21), Artl-Acc/Rech/Rng(21), Artl-End/Rech/Rng(23)
Level 20: Integration -- DctWnd-Heal/EndRdx(A)
Level 22: Tough -- StdPrt-ResDam/Def+(A)
Level 24: M30 Grenade -- ExpStr-Dmg/KB(A), ExpStr-Acc/KB(25), ExpStr-Dam%(25), Bmbdmt-+FireDmg(27), SuddAcc--KB/+KD(27), JvlVll-Dam%(46)
Level 26: Flamethrower -- SprSntWar-Acc/Dmg(A), SprSntWar-Dmg/Rchg(33), SprSntWar-Acc/Dmg/Rchg(33), SprSntWar-Acc/Dmg/EndRdx(33), SprSntWar-Acc/Dmg/EndRdx/Rchg(34), SprSntWar-Rchg/+Absorb(29)
Level 28: Resilience -- GldArm-3defTpProc(A), UnbGrd-ResDam(29), UnbGrd-ResDam/EndRdx(31), UnbGrd-ResDam/EndRdx/Rchg(31), UnbGrd-Rchg/ResDam(31)
Level 30: Aim -- AdjTrg-ToHit/Rchg(A)
Level 32: Weave -- RedFrt-Def/EndRdx(A), RedFrt-Def/Rchg(34), RedFrt-EndRdx/Rchg(37), RedFrt-Def/EndRdx/Rchg(36), RedFrt-Def(36), RedFrt-EndRdx(34)
Level 35: Slug -- ExpStr-Dmg/KB(A), ExpStr-Acc/KB(37), ExpStr-Dam%(37), GldJvl-Dam%(39)
Level 38: Incinerator -- Thn-Acc/Dmg(A), Thn-Dmg/EndRdx(40), Thn-Dmg/Rchg(40), GldJvl-Dam%(40), Dcm-Build%(43)
Level 41: Full Auto -- SprOppStr-Acc/Dmg(A), SprOppStr-Dmg/Rchg(42), SprOppStr-Acc/Dmg/Rchg(42), SprOppStr-Acc/Dmg/EndRdx(42), SprOppStr-Acc/Dmg/EndRdx/Rchg(43), SprOppStr-Rchg/+Opportunity(43)
Level 44: Maneuvers -- RedFrt-Def/EndRdx(A), RedFrt-Def/Rchg(45), RedFrt-EndRdx/Rchg(45), RedFrt-Def/EndRdx/Rchg(45), RedFrt-Def(46), RedFrt-EndRdx(46)
Level 47: Tactics -- GssSynFr--ToHit(A), GssSynFr--ToHit/Rchg(48), GssSynFr--ToHit/Rchg/EndRdx(48), GssSynFr--Rchg/EndRdx(48), GssSynFr--ToHit/EndRdx(50), GssSynFr--Build%(50)
Level 49: Moment of Glory -- LucoftheG-Def/Rchg+(A), RechRdx-I(50)
Level 1: Opportunity
Level 1: Brawl -- Empty(A)
Level 1: Sprint -- Empty(A)
Level 2: Rest -- Empty(A)
Level 1: Swift -- Empty(A)
Level 1: Hurdle -- Empty(A)
Level 1: Health -- Pnc-Heal/+End(A), Mrc-Rcvry+(3)
Level 1: Stamina -- PrfShf-End%(A)
Level 6: Speed Phase
Level 50: Musculature Radial Boost
------------| Copy & Paste this data into Mids Reborn : Hero Designer to view the build | |-------------------------------------------------------------------| |MxDz;1425;686;1372;HEX;| |78DA65944B4F135114C7EF74A6144A1FD6F286822D8F162823F51368441205126C0| |11337A429B7654C33349D1AE16BB871A3B2F1B9F623B831C8CB9DA2AE5CA3266AD4| |D57898F3BF56C32433BF9973CFFBDE330B9B33A17279F6A2D02297AB45C7592D48B| |B61D9B21A28942C6997A438B9027427D4CA6ABE6857E49A79C9718AB7AB8DD5BC55| |AECAE6EA8C2C4BDB91665E56A42DEBC586B561C7AEDAEBB24E1AA67A092E6E6C54C| |D424DCAB590F73A2F8B35CBAE84BD8F59ABB24EDE2A51B5B426EBCEBA55EBBB52B3| |4AE6DF500BC592A487D390F5AD1E4A3149F7ABB45097AB8B9C4F889C217C0F84C7B| |187E036339F216AACEC172B9A278C2C33CF5C07F3CCE102B36B8959C8285B8AA4FD| |D63DA1F11DFCC96CF9C55C22651D9134FD1EA7D57297394CFDF5C393E6FFC0C2C81| |1B38B16032AC74027C76EED00A11C8472708EC385BE3197296C1B8C45DB1C1BA5C8| |63BBCAA57D925B11027DB4185616E12542CA102BE426AA84D163F6BD439D8EA9C46| |2BADF139E35403FB3A3050C30BB5A9937C8635C798C23319D62772A616737BD250C| |B14761BA5598EE3B5467DC103D9BE016B3CFC76EFB3E191EA7529CE33E19F72AE3D| |E5D5E3CB707EE8307CCE42173E00DF3C5B810FD3036FA2FB0C7016CF0E00F101B3C| |880DDFA58809ECA5486CF3B61854D8904A6328C8D526DB9923219CAF3018C17A94F| |99A3CA660ACA7D080113460040D18CB72F803521E55398FE2D8A771ECD338F66928| |4FDCA7EFB4210EC928839CFD99B75CFDF83BF0087CCF9CF8007E64C6A8B64955DB2| |46ACBA2B62C6ACBA2B629D43685DAE2646C2A63F31177EBFC63F009F894997B063E| |67DEA49CA7D5D84C63327238C7B7C6BDD13E192BD71D309A3F85936FD715F3A7458| |B4673A085E6898E83CD1F04B43E9F167DF947A4892437D7774DF39AFBF53F7D4CFE| |CB89E6C4BB3B319241C3FD03B841DD09| |-------------------------------------------------------------------|
Ahhh great! 😄
Yes! Love this " hair splitting" ... haha, AR/Regen is so understudied and underused, compared to all other flashy builds out there! Hope people wantign to try these builds for fun or rp have an option!
My Gun toting regeneration mutant lizardman out of Gamma World now lives in the Rogue Isles! yay!
Thank you for sharing my friend!
You kept me going trying to figure out how to push the limits! Both Builds work wonders!
I believe this is the most we can squeeze out of this particular build powerset combo so I think we now have to look into Post 50 shenanigans:
I hit 50 yesterday and began doing Tinpexes, mishes and tips and wow ... it is actually quite fun!
So far I have managed to fill most slots and spend less than 200 million inf, leaving the gap on the Archetype IOs which I plan to grind using merits as part of the fun.
Currently seeing Musculature is a nice boost to dps and Ageless can literally keep me pumping hot mutant lead (dont have it yet but during the handful of tinpexes I did when people spammed it it kept me going spitting more lead and flame madness!
Now the debate begins besides Musculature and Ageless, which Interface incarnate to use? Theres a TON of people on the forums debating the dreaded 75% debuff smaller percentage dot, vs higher percentage dot and smaller debuff supposedly ticking more and a lot of tech jargon I dont know much about, so I defer to you my friend 🙂
Which ones would you pick?
I am pretty newbie to incarnates , but can literally see the difference with Musculature , as I unlocked alpha on my third tinpex of the day and was truly noticeable so I think I will go core for the 45% final boost, Judgment is a no brainer for me as my Mutant Lizard can spew electricity roleplay wise so ION ... lore will be a matter of aligning it with my own backstory.
Destiny is Ageless for me because due to recharge I drain the blue pretty fast, specially with Full Auto, Incinerate and FT madness but INTERFACE AND HYBRID are a mystery to me at this stage.
So what would you choose and why? 😄
-
Guys thanks a ton for keeping vidiotmaps up and maintaining them! 😄
Since I play on Linux I have to resort to a manual install, but thats ok, At the start I fired up a VM to dowload the client first, installed vidiots the old fashioned way then moved it to a section of my SSD where I can then launch it under WINE and when an update pack comes along just manually overwrite each file, easy peachy!
A tedious process but something that is more or less my life under Linux where everything is on the hands of the user.
Today I installed the latest update pack and it ran smoothly, also discovered about the old citymap.texture files that had to be removed as they were no longer in use and it was flawless.
My main concern and the reason I had to come to the forums is the latest update broke Cimerora, but lo and behold, its fixed!
You guys are the best!
Thank you for keeping the Manual option available for those of us that are non-windows users!
Also thanks to the thousand for having a small file that updates old maps!
You guys are the super duper awesomeness and make my badge hunting on all thousand alts I have a bliss.
Super venezuelan hug to all of you!
Small Tip for Linux Users: If you have a gmail account, just keep on google drive an updated data folder with all maps (its only 120megs) you can copy and paste on any linux install that has the client. No need to redo everything when you switch puters!
-
1
-
-
5 hours ago, plainguy said:
Again I was working on keeping the endurance in at a safe range
Once you finish setting it up share it! The more builds for these odd powerset combos the better for all of us that like sents! 😄
-
Aww thought it might be ongoing.
Would be great if someone else took the reins of this project, quite a good set of data!
-
4 hours ago, plainguy said:
This is what I came up with
First off not much you can swap out..
Incinerator IO sets do not have a lot of damage procs.. Only 1..
M30 Grenade and Buckshot have a few..
So those 2 slots left.
1 went into Incinerator for the build up proc. This thread :https://forums.homecomingservers.com/topic/5290-procs-per-minute-ppm-information-guide/ says it procs every tick.
This link https://cod.uberguy.net./html/power.html?power=sentinel_ranged.assault_rifle.incinerator&at=sentinel says it ticks every .25 second for 2.5 seconds.. So that is 10 ticks for it to proc. Build up.
Tactics has the build up proc as well, but that works with more people in the group..
I changed up M30 if you look at this build and the first build I posted..
IF you use Musculature Incarnate you can do the same thing to buckshot I did with M30..
Again slug has the same IO sets as incinerator so no damage procs.
This Hero build was built using Mids Reborn 3.1.2.5
https://github.com/LoadedCamel/MidsRebornClick this DataLink to open the build!
Level 50 Science Sentinel
Primary Power Set: Assault Rifle
Secondary Power Set: Regeneration
Power Pool: Speed
Power Pool: Leaping
Power Pool: Fighting
Power Pool: LeadershipHero Profile:
Level 1: Burst -- Apc-Dam%(A)
Level 1: Fast Healing -- NmnCnv-Regen/Rcvry+(A), NmnCnv-Heal(15), NmnCnv-Heal/EndRdx(17), NmnCnv-EndRdx/Rchg(17), NmnCnv-Heal/Rchg(36), NmnCnv-Heal/EndRdx/Rchg(23)
Level 2: Reconstruction -- UnbGrd-Max HP%(A), UnbGrd-ResDam(5), UnbGrd-Rchg/ResDam(5), UnbGrd-ResDam/EndRdx/Rchg(7)
Level 4: Quick Recovery -- PrfShf-End%(A), PrfShf-EndMod(7)
Level 6: Super Speed -- BlsoftheZ-ResKB(A), BlsoftheZ-Travel(15)
Level 8: Combat Jumping -- RedFrt-Def/EndRdx(A), RedFrt-Def/Rchg(9), RedFrt-EndRdx/Rchg(9), RedFrt-Def/EndRdx/Rchg(11), RedFrt-Def(11), RedFrt-EndRdx(13)
Level 10: Instant Regeneration -- DctWnd-Heal/EndRdx(A)
Level 12: Hasten -- RechRdx-I(A), RechRdx-I(13)
Level 14: Kick -- KntCmb-Knock%(A)
Level 16: Dismiss Pain -- Prv-Absorb%(A)
Level 18: Buckshot -- Artl-Acc/Dam(A), Artl-Dam/End(19), Artl-Dam/Rech(19), Artl-Acc/Dam/Rech(21), Artl-Acc/Rech/Rng(21), Artl-End/Rech/Rng(23)
Level 20: Integration -- DctWnd-Heal/EndRdx(A)
Level 22: Tough -- StdPrt-ResDam/Def+(A)
Level 24: M30 Grenade -- ExpStr-Dmg/KB(A), ExpStr-Acc/KB(25), ExpStr-Dam%(25), Bmbdmt-+FireDmg(27), SuddAcc--KB/+KD(27), JvlVll-Dam%(46)
Level 26: Flamethrower -- SprSntWar-Acc/Dmg(A), SprSntWar-Dmg/Rchg(33), SprSntWar-Acc/Dmg/Rchg(33), SprSntWar-Acc/Dmg/EndRdx(33), SprSntWar-Acc/Dmg/EndRdx/Rchg(34), SprSntWar-Rchg/+Absorb(29)
Level 28: Resilience -- GldArm-3defTpProc(A), UnbGrd-ResDam(29), UnbGrd-ResDam/EndRdx(31), UnbGrd-ResDam/EndRdx/Rchg(31), UnbGrd-Rchg/ResDam(31)
Level 30: Aim -- AdjTrg-ToHit/Rchg(A)
Level 32: Weave -- RedFrt-Def/EndRdx(A), RedFrt-Def/Rchg(34), RedFrt-EndRdx/Rchg(37), RedFrt-Def/EndRdx/Rchg(36), RedFrt-Def(36), RedFrt-EndRdx(34)
Level 35: Slug -- Thn-Acc/Dmg(A), Thn-Dmg/EndRdx(39), Thn-Dmg/Rchg(39), Thn-Acc/Dmg/Rchg(39), Thn-Acc/Dmg/EndRdx(37), Thn-Dmg/EndRdx/Rchg(37)
Level 38: Incinerator -- Thn-Acc/Dmg(A), Thn-Dmg/EndRdx(40), Thn-Dmg/Rchg(40), GldJvl-Dam%(40), Dcm-Build%(43)
Level 41: Full Auto -- SprOppStr-Acc/Dmg(A), SprOppStr-Dmg/Rchg(42), SprOppStr-Acc/Dmg/Rchg(42), SprOppStr-Acc/Dmg/EndRdx(42), SprOppStr-Acc/Dmg/EndRdx/Rchg(43), SprOppStr-Rchg/+Opportunity(43)
Level 44: Maneuvers -- RedFrt-Def/EndRdx(A), RedFrt-Def/Rchg(45), RedFrt-EndRdx/Rchg(45), RedFrt-Def/EndRdx/Rchg(45), RedFrt-Def(46), RedFrt-EndRdx(46)
Level 47: Tactics -- GssSynFr--ToHit(A), GssSynFr--ToHit/Rchg(48), GssSynFr--ToHit/Rchg/EndRdx(48), GssSynFr--Rchg/EndRdx(48), GssSynFr--ToHit/EndRdx(50), GssSynFr--Build%(50)
Level 49: Moment of Glory -- LucoftheG-Def/Rchg+(A), RechRdx-I(50)
Level 1: Opportunity
Level 1: Brawl -- Empty(A)
Level 1: Sprint -- Empty(A)
Level 2: Rest -- Empty(A)
Level 1: Swift -- Empty(A)
Level 1: Hurdle -- Empty(A)
Level 1: Health -- Pnc-Heal/+End(A), Mrc-Rcvry+(3)
Level 1: Stamina -- PrfShf-End%(A), PrfShf-EndMod(3)
Level 6: Speed Phase
Level 50: Musculature Radial Boost
------------| Copy & Paste this data into Mids Reborn : Hero Designer to view the build | |-------------------------------------------------------------------| |MxDz;1490;684;1368;HEX;| |78DAA5944B6F12511480EFC0002D4F1181969656A095F758FC051A6B13B54D2AD09| |AB821042E30860C84C1D8FE0D376ED4AAF1B9F627B831B52F775AEBCA75D585465D| |8D8739E74A4D974E72E79B3967CE7BEE5D5A9B77371A0BE799E4BDD8AEEA7AA5C4B| |5BEAAF1B6A35453B956E36C7039604585A652AC6A4D5E572EE87AF556BB5F29AA8D| |361F6AE779836B3A578ABCC935DEABF6D58EE6BFACB5780FBE50C48373B9D3692BA| |52EE775B7F9B8C8AB5D556B7ACC9705B5D9026F4D9F50D5794F6FA9DDC8A5AE5A53| |FE865AAAD638DCF43EEFAD8F418A0AAC3749B84966D60663050B2C99155343A18DA| |D4AA6D0BB823C718D5844264AC85019594A095B6658A5DF5653287F27FE44DA7F21| |CBF0B1952249D6BB18DE7E0799803EDAC893643B40A1771F1902A543E4E87062EC1| |117D18D747A885EA4DB875C81B0A3A2EAD1AB288C834797C8C595656841B480D223| |2C3C65405C66ABE0C62784BE432C69133AEA1789F9AD3653785226DA90A7EC44073| |23482BC0E1E03C2638012B342ECA01006C3F01495D93684098B30E1DBD09480CCC6| |D688EBC88805DD463ECB26F371CC71078CC785F1F8162A4F6F137788BBC8D81E72F| |21DF2559AB109329627CEA1C7491AF0D40F220D788A06BE0511A3344B16DDC019CA| |50D8B448639A6618A319CED00C1334C304CD3046337C0B1EE3E4D116BF8F633AF38| |0B8417C889C79447C8CDC05E35951C32C1927C93849C6C91CE69EB907EF4999ED81| |514A444CBDC76EA43F10F7891F919903E227A41F6ACD8A5AB3546B8E6ACD51AD39A| |A354FB5E6A9D600182BC2587982DD3BFB94F88CF81C5978417C89BC0139CF896D34| |17448F05FAAF6FA6CDAD3ED8668631293371198377C3608BC745CBF2708333C9141| |D3A8F9E22A6E8CB71D1D7232289C5B0B9962B92D9DC6FFF28E924B0D049F03A333C| |09FEFFDAF48353E1ED0FAD4B1C3F| |-------------------------------------------------------------------|
Amazing!
I have further tweaked the build to get defenses in three areas to 40 (super close to yours except ranged where you get 5% more)also up all resists when defense fails a bit more (with a bit better placed scaling resist damage IO) and under ideal situations to get a much better dps burst with your build up chance idea in Incinerate (about 30 more damage in incinerate than your build(under optimal conditions of course)
You have given me so many ideas! ... I also decided to keep oldskool basic rotation powers more or less intact (burst had to suffer a slot reduction) but changed tactics to fully emulate your build for that extra final push into ranged defense, which as you explained is much much better than resists.
The thing with this build, which started mostly as roleplaying build using sadly the most underpowered power sets in COH is that now it is not so subpar as I have tried to keep both of your visions into a build that takes a bit of everything from your amazing ideas.
I know I could take some slots from other powers here and there, but I think this is as close as I can get with my own limited building skill sets haha.
The problem my build has as I have tried it is that I have compared to yours is I have less endurance recovery which means I will get out of blue much quicker than you but with a substantial(to the eye in paper) pump in potential DPS sacrificing about 5% in defenses if I keep oldskool rotation idea.
To be in line I need to find a way to make incinerate always call up build up , and someone was telling me most farmers use a keybind of sorts that does this to gobble up inspirations on the go, so I will have to look into that as it can be worked to make certain attacks always try to press a specific power if available when using them.
Compare your latest one to this one, tell me what you think? Dont mind the weird slotting level placement , such trivialities are gone when respeccing as I tried to make a leveling build that will help me when I am exemplared down so I can get access to most attacks and supports for solo/mishes/tfs that are not 50 and mids is hell to reallocate slots when moving powers here and there.
------------------
This Hero build was built using Mids Reborn 3.1.0.10
https://github.com/LoadedCamel/MidsRebornClick this DataLink to open the build!
Level 50 Mutation Sentinel
Primary Power Set: Assault Rifle
Secondary Power Set: Regeneration
Power Pool: Leaping
Power Pool: Speed
Power Pool: Fighting
Power Pool: LeadershipHero Profile:
Level 1: Burst- (A) Thunderstrike - Accuracy/Damage
- (3) Thunderstrike - Damage/Endurance
- (3) Thunderstrike - Accuracy/Damage/Endurance
- (5) Touch of Lady Grey - Chance for Negative Damage
Level 1: Fast Healing
- (A) Numina's Convalesence - Heal/Endurance
- (5) Numina's Convalesence - Heal
- (11) Numina's Convalesence - Endurance/Recharge
- (31) Numina's Convalesence - Heal/Recharge
- (31) Numina's Convalesence - Heal/Endurance/Recharge
- (34) Numina's Convalesence - +Regeneration/+Recovery
Level 2: Buckshot
- (A) Artillery - Accuracy/Damage
- (11) Artillery - Damage/Endurance
- (13) Artillery - Damage/Recharge
- (13) Artillery - Accuracy/Damage/Recharge
- (37) Artillery - Accuracy/Recharge/Range
- (37) Artillery - Endurance/Recharge/Range
Level 4: Super Speed
- (A) Blessing of the Zephyr - Run Speed, Jump, Flight Speed, Range
- (9) Blessing of the Zephyr - Run Speed, Jump, Flight Speed, Range/Endurance
Level 6: Slug
- (A) Thunderstrike - Accuracy/Damage
- (7) Thunderstrike - Damage/Endurance
- (7) Thunderstrike - Accuracy/Damage/Endurance
- (9) Gladiator's Javelin - Chance of Damage(Toxic)
Level 8: Quick Recovery
- (A) Performance Shifter - Chance for +End
Level 10: Combat Jumping
- (A) Luck of the Gambler - Defense/Increased Global Recharge Speed
- (31) Shield Wall - +Res (Teleportation), +5% Res (All)
- (36) Reactive Defenses - Scaling Resist Damage
- (42) Blessing of the Zephyr - Run Speed, Jump, Flight Speed, Range
- (43) Blessing of the Zephyr - Run Speed, Jump, Flight Speed, Range/Endurance
- (46) Luck of the Gambler - Defense
Level 12: M30 Grenade
- (A) Sudden Acceleration - Knockback to Knockdown
- (17) Positron's Blast - Accuracy/Damage
- (17) Positron's Blast - Damage/Endurance
- (23) Positron's Blast - Damage/Recharge
- (25) Positron's Blast - Accuracy/Damage/Endurance
- (25) Positron's Blast - Chance of Damage(Energy)
Level 14: Aim
- (A) Adjusted Targeting - To Hit Buff/Recharge
Level 16: Hasten
- (A) Recharge Reduction IO
- (27) Recharge Reduction IO
Level 18: Flamethrower
- (A) Superior Opportunity Strikes - Accuracy/Damage
- (19) Superior Opportunity Strikes - Damage/RechargeTime
- (19) Superior Opportunity Strikes - Accuracy/Damage/RechargeTime
- (21) Superior Opportunity Strikes - Accuracy/Damage/Endurance
- (21) Superior Opportunity Strikes - Accuracy/Damage/Endurance/RechargeTime
- (23) Superior Opportunity Strikes - RechargeTime/Chance for Opportunity
Level 20: Reconstruction
- (A) Unbreakable Guard - +Max HP
- (36) Unbreakable Guard - Resistance
- (36) Unbreakable Guard - RechargeTime/Resistance
- (37) Unbreakable Guard - Resistance/Endurance/RechargeTime
Level 22: Dismiss Pain
- (A) Preventive Medicine - Chance for +Absorb
Level 24: Instant Regeneration
- (A) Harmonized Healing - Heal/Endurance
Level 26: Incinerator
- (A) Thunderstrike - Accuracy/Damage
- (33) Apocalypse - Chance of Damage(Negative)
- (15) Thunderstrike - Damage/Endurance
- (27) Thunderstrike - Damage/Recharge
- (29) Decimation - Chance of Build Up
Level 28: Resilience
- (A) Steadfast Protection - Resistance/+Def 3%
Level 30: Integration
- (A) Harmonized Healing - Heal/Endurance
Level 32: Full Auto
- (A) Superior Sentinel's Ward - Accuracy/Damage
- (39) Superior Sentinel's Ward - Damage/RechargeTime
- (33) Superior Sentinel's Ward - Accuracy/Damage/RechargeTime
- (33) Superior Sentinel's Ward - Accuracy/Damage/Endurance
- (34) Superior Sentinel's Ward - Accuracy/Damage/Endurance/RechargeTime
- (34) Superior Sentinel's Ward - RechargeTime/Chance for +Absorb
Level 35: Maneuvers
- (A) Red Fortune - Defense/Endurance
- (42) Red Fortune - Defense/Recharge
- (48) Red Fortune - Endurance/Recharge
- (48) Red Fortune - Defense/Endurance/Recharge
- (50) Red Fortune - Defense
- (50) Red Fortune - Endurance
Level 38: Tactics
- (A) Gaussian's Synchronized Fire-Control - To Hit Buff
- (15) Gaussian's Synchronized Fire-Control - Recharge/Endurance
- (42) Gaussian's Synchronized Fire-Control - To Hit Buff/Recharge
- (39) Gaussian's Synchronized Fire-Control - To Hit Buff/Endurance
- (39) Gaussian's Synchronized Fire-Control - Chance for Build Up
- (40) Gaussian's Synchronized Fire-Control - To Hit Buff/Recharge/Endurance
Level 41: Kick
- (A) Kinetic Combat - Knockdown Bonus
Level 44: Tough
- (A) Gladiator's Armor - Resistance
- (40) Gladiator's Armor - TP Protection +3% Def (All)
- (43) Gladiator's Armor - End/Resist
- (43) Gladiator's Armor - Recharge/Resist
- (45) Gladiator's Armor - Recharge/Endurance
- (45) Gladiator's Armor - Resistance/Rech/End
Level 47: Weave
- (A) Red Fortune - Defense/Endurance
- (48) Red Fortune - Defense/Recharge
- (45) Red Fortune - Endurance/Recharge
- (46) Red Fortune - Defense/Endurance/Recharge
- (46) Red Fortune - Defense
- (40) Red Fortune - Endurance
Level 49: Moment of Glory
- (A) Luck of the Gambler - Defense/Increased Global Recharge Speed
- (50) Recharge Reduction IO
Level 1: Brawl
- (A) Pounding Slugfest - Disorient Bonus
Level 1: Opportunity
Level 1: Sprint------------------
Love this thread is so good 🙂
Thank you all! Please keep the critiques going! I love them!
-
Ok just spent the past hour and a half watching Hellraiser and trying to come up with something that merges Oldskool ideas with the basic build from Plainguy focused on defense and came up with ... this.
So again, please tell me if this ok, bad, wrong, what could I change?
I lost a lot of recharge but took oldskool proc ideas for burst, slug , m30 and basic attack powers + plainguy build focused on the regeneration side with an eye to keep mostly ranged defense up following the oldskool philosophy of staying at range all the time and running away when things begin to creep up on you.
This Hero build was built using Mids Reborn 3.1.0.10
https://github.com/LoadedCamel/MidsRebornClick this DataLink to open the build!
Level 50 Mutation Sentinel
Primary Power Set: Assault Rifle
Secondary Power Set: Regeneration
Power Pool: Leaping
Power Pool: Speed
Power Pool: Fighting
Power Pool: LeadershipHero Profile:
Level 1: Burst- (A) Thunderstrike - Accuracy/Damage
- (3) Thunderstrike - Damage/Endurance
- (3) Thunderstrike - Accuracy/Damage/Endurance
- (5) Touch of Lady Grey - Chance for Negative Damage
- (5) Achilles' Heel - Chance for Res Debuff
- (11) Shield Breaker - Chance for Lethal Damage
Level 1: Fast Healing
- (A) Numina's Convalesence - Heal/Endurance
- (15) Numina's Convalesence - Endurance/Recharge
- (31) Numina's Convalesence - Heal/Recharge
- (31) Numina's Convalesence - Heal/Endurance/Recharge
- (34) Numina's Convalesence - Heal
- (36) Numina's Convalesence - +Regeneration/+Recovery
Level 2: Buckshot
- (A) Artillery - Accuracy/Damage
- (11) Artillery - Damage/Endurance
- (13) Artillery - Damage/Recharge
- (13) Artillery - Accuracy/Damage/Recharge
- (37) Artillery - Accuracy/Recharge/Range
- (37) Artillery - Endurance/Recharge/Range
Level 4: Combat Jumping
- (A) Luck of the Gambler - Defense/Increased Global Recharge Speed
- (31) Shield Wall - +Res (Teleportation), +5% Res (All)
- (42) Blessing of the Zephyr - Run Speed, Jump, Flight Speed, Range
- (43) Blessing of the Zephyr - Run Speed, Jump, Flight Speed, Range/Endurance
- (46) Blessing of the Zephyr - Knockback Reduction (4 points)
Level 6: Slug
- (A) Thunderstrike - Accuracy/Damage
- (7) Thunderstrike - Damage/Endurance
- (7) Thunderstrike - Accuracy/Damage/Endurance
- (9) Gladiator's Javelin - Chance of Damage(Toxic)
- (9) Explosive Strike - Chance for Smashing Damage
Level 8: Super Speed
- (A) Blessing of the Zephyr - Run Speed, Jump, Flight Speed, Range
- (40) Blessing of the Zephyr - Knockback Reduction (4 points)
Level 10: Kick
- (A) Empty
Level 12: Quick Recovery
- (A) Performance Shifter - Chance for +End
- (42) Performance Shifter - EndMod
Level 14: Aim
- (A) Gaussian's Synchronized Fire-Control - Chance for Build Up
- (15) Recharge Reduction IO
Level 16: M30 Grenade
- (A) Sudden Acceleration - Knockback to Knockdown
- (17) Positron's Blast - Accuracy/Damage
- (17) Positron's Blast - Damage/Endurance
- (23) Positron's Blast - Damage/Recharge
- (25) Positron's Blast - Accuracy/Damage/Endurance
- (25) Positron's Blast - Chance of Damage(Energy)
Level 18: Flamethrower
- (A) Superior Opportunity Strikes - Accuracy/Damage
- (19) Superior Opportunity Strikes - Damage/RechargeTime
- (19) Superior Opportunity Strikes - Accuracy/Damage/RechargeTime
- (21) Superior Opportunity Strikes - Accuracy/Damage/Endurance
- (21) Superior Opportunity Strikes - Accuracy/Damage/Endurance/RechargeTime
- (23) Superior Opportunity Strikes - RechargeTime/Chance for Opportunity
Level 20: Reconstruction
- (A) Unbreakable Guard - +Max HP
- (36) Unbreakable Guard - Resistance
- (36) Unbreakable Guard - RechargeTime/Resistance
- (37) Unbreakable Guard - Resistance/Endurance/RechargeTime
Level 22: Instant Regeneration
- (A) Harmonized Healing - Heal/Endurance
Level 24: Dismiss Pain
- (A) Preventive Medicine - Chance for +Absorb
Level 26: Incinerator
- (A) Thunderstrike - Accuracy/Damage
- (27) Thunderstrike - Damage/Endurance
- (27) Thunderstrike - Damage/Recharge
- (29) Gladiator's Javelin - Chance of Damage(Toxic)
Level 28: Integration
- (A) Harmonized Healing - Heal/Endurance
Level 30: Resilience
- (A) Steadfast Protection - Resistance/+Def 3%
Level 32: Full Auto
- (A) Superior Sentinel's Ward - Accuracy/Damage
- (33) Superior Sentinel's Ward - Damage/RechargeTime
- (33) Superior Sentinel's Ward - Accuracy/Damage/RechargeTime
- (33) Superior Sentinel's Ward - Accuracy/Damage/Endurance
- (34) Superior Sentinel's Ward - Accuracy/Damage/Endurance/RechargeTime
- (34) Superior Sentinel's Ward - RechargeTime/Chance for +Absorb
Level 35: Tough
- (A) Gladiator's Armor - TP Protection +3% Def (All)
- (43) Gladiator's Armor - End/Resist
- (43) Gladiator's Armor - Recharge/Resist
- (45) Gladiator's Armor - Recharge/Endurance
- (45) Gladiator's Armor - Resistance/Rech/End
- (46) Gladiator's Armor - Resistance
Level 38: Weave
- (A) Red Fortune - Defense/Endurance
- (39) Red Fortune - Defense/Recharge
- (39) Red Fortune - Endurance/Recharge
- (39) Red Fortune - Defense/Endurance/Recharge
- (40) Red Fortune - Defense
- (40) Red Fortune - Endurance
Level 41: Maneuvers
- (A) Red Fortune - Defense/Endurance
- (42) Red Fortune - Defense/Recharge
- (48) Red Fortune - Endurance/Recharge
- (48) Red Fortune - Defense/Endurance/Recharge
- (50) Red Fortune - Defense
- (50) Red Fortune - Endurance
Level 44: Tactics
- (A) Encouraged Accuracy - To Hit Buff
- (45) Encouraged Accuracy - To Hit Buff/Recharge
- (46) Encouraged Accuracy - To Hit Buff/Recharge/Endurance
Level 47: Moment of Glory
- (A) Luck of the Gambler - Defense/Increased Global Recharge Speed
- (48) Recharge Reduction IO
Level 49: Hasten
- (A) Recharge Reduction IO
- (50) Recharge Reduction IO
Level 1: Brawl
- (A) Empty
Level 1: Opportunity
Level 1: Sprint-----------------
Suggestions welcome! I truly like oldskool slotting suggestions and rotation ... currently trying to see if I can bind Build Up to fire whenever I press Incinerate and similar powers than can benefit greatly from it...
Cheers!
-
28 minutes ago, plainguy said:
Here is my thought on this..
MOG is up every 90 seconds. On a 3/8 setting I am guessing it will take you close to 90 seconds to clear out a full group or even 2 if they are close enough with MOG active.
Here is my thoughts though on Resistance VS Defense.
You have 50% resistance but minimal defenses.
Here is the Excerpt from my signature10% & 15% defense.
The idea here is that you're a mid-high level squishy who, while not obsessed with IO's, is trying to get a little survivability out of his build. Remember the zero defense case? It was dismal, but just to re-hash it: Even level minion hits you 50% of the time, +1 LTs hit you 63% of the time, and +2 bosses hit you 78% of the time. The LT will likely land three out of five swings and the boss will likely land four out of five.45% defense.
Even level minions now only hit 5% of the time. Now, after thirteen attacks, it is still likely (51.3% to be exact) that you have dodged all of them. Series of five attacks: The chance of getting hit by two or more is only 2.3%, and that never happens.
Now a +2 boss shows up and you laugh. He only has a 7.8% chance to hit you, which works out so that he's only likely to have hit you by the ninth swing. This is why hitting the soft cap is important, only 10% more defense than the last case, and you're likely to dodge three times as many attacks. In a series of five attacks, it is only 5.2% likely that he has hit you two or more times.
With soft-capped defense, that AV has a surprisingly low 10.5% chance to hit you. With 45% defense, a +4 AV will only hit you one time in ten.
Lets simply discuss the scenarios talking about minions, 8 minions total.
45% Defense.
1 in 13 chances to get hit. You get hit on the 13th time.
They do 100 pts of damage each, lets assume smash lethal since it is the highest on both builds.
30% resistance = 70pts of damage x 8 = 560 pts on the 13th HIT.
10% Defense
50% hit you. So out of 13 swings ( make it 12) 6 hit.
100pts of damage
50% resistance =50pts x 6 hits per minion x 8 minions = 2,400
Again MOG can make this a moot point.. You will be capped.
This only matters in the moments MOG is down or you aggro extra mobs as MOG is going down.But waiting for MOG to be up all the time will slow down your play time.
One luck inspiration 12.5% will put my Melee defense cap to 44 for 60 seconds. So I would be Melee and Range Defense capped.
MOG 90 seconds..You get where I am going.
I would have to joust mobs if not flying with a temp jetpack for 30 seconds waiting for MOG to pop up.
On my build I would swap around stuff like oldskool mentioned.
I would at my damage on my attacks compared to yours. My full auto is doing 100 more dps.
6 slot incinerator with some procs bring up that damage.
Ohh I see, I still get confused a bit about the resists defense thing, thank you for clearly explaining it ... obviously defense is much better and I was always going for resists.
So your original build is still workable? Would you change anything? Wondering to use it as a template then and focus on sheer defense.
-
13 hours ago, oldskool said:
I was in the middle of writing a reply before Plainguy chimed in to add more context and I had to drop it. So, my apologies because without more information you can get mi
This is like managing a scale. On one end you have damage. On the other hand you have defense. You could make this pretty tanky but do pitiful damage. You could build for more damage and be more fragile. You don't really get both with this pairing. Still, this long article on how to squeeze the most damage out of Sentinel AR *may* be helpful. Maybe not. 🙂
Wow ... thats amazing INFO! 😄
I mean ... wow literally haha! Thank you!
I must confess a lot of the info at a glance is a bit hard to understand (english is not main language) but I can see where you are going!
All this makes me know I have a ton to go still in learning how to build things in mids and in game hhehe!
Super hug to you.
Now I need to see how this becomes a solid build
-
Ok, some nice people in the servers gave a quick look to my crap build and told me to fix some things so here is the new build I have come up with.
Unlike Plainguy build, which is good and focused on defenses and some resists I decided to create one based mostly on resists , this is a work in progress so please help me make it better 😄
This Hero build was built using Mids Reborn 3.1.0.10
https://github.com/LoadedCamel/MidsRebornClick this DataLink to open the build!
Level 50 Mutation Sentinel
Primary Power Set: Assault Rifle
Secondary Power Set: Regeneration
Power Pool: Speed
Power Pool: Fighting
Power Pool: Concealment
Power Pool: LeapingHero Profile:
Level 1: Burst- (A) Superior Sentinel's Ward - Accuracy/Damage
- (3) Superior Sentinel's Ward - Damage/RechargeTime
- (3) Superior Sentinel's Ward - Accuracy/Damage/RechargeTime
- (5) Superior Sentinel's Ward - Accuracy/Damage/Endurance
- (5) Superior Sentinel's Ward - Accuracy/Damage/Endurance/RechargeTime
- (7) Superior Sentinel's Ward - RechargeTime/Chance for +Absorb
Level 1: Fast Healing
- (A) Preventive Medicine - Heal
- (17) Preventive Medicine - Heal/Endurance
- (19) Preventive Medicine - Endurance/RechargeTime
- (19) Preventive Medicine - Heal/RechargeTime
- (21) Preventive Medicine - Heal/RechargeTime/Endurance
- (21) Preventive Medicine - Chance for +Absorb
Level 2: Buckshot
- (A) Superior Opportunity Strikes - Accuracy/Damage
- (7) Superior Opportunity Strikes - Damage/RechargeTime
- (9) Superior Opportunity Strikes - Accuracy/Damage/RechargeTime
- (9) Superior Opportunity Strikes - Accuracy/Damage/Endurance
- (11) Superior Opportunity Strikes - Accuracy/Damage/Endurance/RechargeTime
- (11) Superior Opportunity Strikes - RechargeTime/Chance for Opportunity
Level 4: Quick Recovery
- (A) Efficacy Adaptor - EndMod
- (13) Efficacy Adaptor - EndMod/Recharge
- (13) Efficacy Adaptor - EndMod/Accuracy/Recharge
- (15) Efficacy Adaptor - Accuracy/Recharge
- (15) Efficacy Adaptor - EndMod/Accuracy
- (17) Efficacy Adaptor - EndMod/Endurance
Level 6: Reconstruction
- (A) Gladiator's Armor - TP Protection +3% Def (All)
- (27) Unbreakable Guard - +Max HP
- (29) Preventive Medicine - Heal
- (29) Preventive Medicine - Heal/Endurance
Level 8: Slug
- (A) Apocalypse - Damage
- (23) Apocalypse - Damage/Recharge
- (25) Apocalypse - Accuracy/Damage/Recharge
- (25) Apocalypse - Accuracy/Recharge
- (27) Apocalypse - Damage/Endurance
Level 10: Aim
- (A) Gaussian's Synchronized Fire-Control - Chance for Build Up
- (23) Adjusted Targeting - To Hit Buff
- (40) Adjusted Targeting - To Hit Buff/Recharge
- (40) Adjusted Targeting - To Hit Buff/Endurance/Recharge
- (43) Adjusted Targeting - Endurance/Recharge
- (43) Adjusted Targeting - To Hit Buff/Endurance
Level 12: Super Speed
- (A) Winter's Gift - Run Speed, Jump, Flight Speed, Range
- (48) Winter's Gift - Run Speed, Jump, Flight Speed, Range/Endurance
Level 14: Kick
- (A) Empty
Level 16: Stealth
- (A) Luck of the Gambler - Defense/Increased Global Recharge Speed
Level 18: Instant Regeneration
- (A) Preventive Medicine - Heal
- (31) Preventive Medicine - Endurance/RechargeTime
Level 20: Dismiss Pain
- (A) Preventive Medicine - Endurance/RechargeTime
- (31) Preventive Medicine - Heal
Level 22: Integration
- (A) Preventive Medicine - Heal
- (31) Preventive Medicine - Heal/Endurance
Level 24: M30 Grenade
- (A) Superior Frozen Blast - Accuracy/Damage
- (34) Superior Frozen Blast - Damage/Endurance
- (36) Superior Frozen Blast - Accuracy/Damage/Endurance
- (36) Superior Frozen Blast - Accuracy/Damage/Recharge
- (36) Superior Frozen Blast - Damage/Endurance/Accuracy/RechargeTime
- (37) Sudden Acceleration - Knockback to Knockdown
Level 26: Flamethrower
- (A) Positron's Blast - Accuracy/Damage
- (37) Positron's Blast - Damage/Endurance
- (39) Positron's Blast - Damage/Recharge
- (42) Annihilation - Chance for Res Debuff
- (42) Annihilation - Accuracy/Damage
- (43) Annihilation - Damage/RechargeTime
Level 28: Incinerator
- (A) Superior Winter's Bite - Accuracy/Damage
- (37) Superior Winter's Bite - Damage/RechargeTime
- (39) Salvo - Accuracy/Damage
- (40) Salvo - Damage/Endurance/Recharge
- (42) Salvo - Accuracy/Damage/Endurance/Range
Level 30: Resilience
- (A) Titanium Coating - Resistance
- (34) Titanium Coating - Resistance/Endurance/Recharge
- (46) Titanium Coating - Resistance/Endurance
- (46) Titanium Coating - Resistance/Recharge
Level 32: Full Auto
- (A) Ragnarok - Damage
- (33) Ragnarok - Damage/Recharge
- (33) Ragnarok - Accuracy/Damage/Recharge
- (33) Ragnarok - Accuracy/Recharge
- (34) Ragnarok - Damage/Endurance
Level 35: Second Wind
- (A) Doctored Wounds - Endurance/Recharge
- (46) Doctored Wounds - Recharge
Level 38: Combat Jumping
- (A) Luck of the Gambler - Defense/Increased Global Recharge Speed
- (48) Reactive Defenses - Defense
- (50) Reactive Defenses - Defense/Endurance
- (50) Reactive Defenses - Scaling Resist Damage
Level 41: Tough
- (A) Titanium Coating - Resistance/Endurance
- (39) Titanium Coating - Resistance/Recharge
- (45) Titanium Coating - Endurance/Recharge
- (45) Titanium Coating - Resistance/Endurance/Recharge
Level 44: Weave
- (A) Luck of the Gambler - Defense/Increased Global Recharge Speed
- (45) Shield Wall - +Res (Teleportation), +5% Res (All)
- (48) Kismet - Accuracy +6%
Level 47: Moment of Glory
- (A) Luck of the Gambler - Defense/Increased Global Recharge Speed
Level 49: Hasten
- (A) Recharge Reduction IO
- (50) Recharge Reduction IO
Level 1: Opportunity
Level 1: Brawl -
1 minute ago, Six-Six said:
If you're not into the numbers like me (maths and I are also not that close of friends), then focus on your particular play style.
I wholeheartedly agree with this 100% 😄
-
Is this project still ongoing? I find it fascinating! 😄
-
 1
1
-
-
4 hours ago, plainguy said:
This is a tough build in the sense none of the IO sets are conducive to getting some decent numbers..
I started with Range cap hover blaster but changed it up.. Got rid of Hover, Disorienting shot and second wind..
Pickup Kick Tough Weave.. End result was a bit more endurance but resistance and defense numbers went up.. But regardless your endurance is good.
The other reason I got rid of hover is AR Full Auto from above is a bit funky.. its like a flat cone not a circular cone.. So sometimes I fire full auto from top and just get a few mobs.. But just buy the cheap jetpack from PW2 and have 5 hours of flying as needed.in MIDS instant regeneration is broken or just not worth slotting more than one IO into it.. I didn't see any changes adding more health IOs for example.
Reconstruction might be broken as well. I put a heath IO into and didn't see any increases in Reg
I did see an increase in regeneration when adding to Integration..
You have 2 slots left to put where you want.I put one recharge into MOG to get it down to 94 seconds.. Every 94 seconds being fully capped is not a bad thing at all. That is just about every fight.
I would have liked to put more procs but just couldn't.You could 3 slot Integration with Numina for the 3 set bonus for even more regen and hit points.
Add one more to m30 grenade for another proc.. Add another recharge to MOG to get it to 80s..
This Hero build was built using Mids Reborn 3.1.2.5
https://github.com/LoadedCamel/MidsRebornClick this DataLink to open the build!
Level 50 Science Sentinel
Primary Power Set: Assault Rifle
Secondary Power Set: Regeneration
Power Pool: Speed
Power Pool: Leaping
Power Pool: Fighting
Power Pool: LeadershipHero Profile:
Level 1: Burst -- Apc-Dam%(A)
Level 1: Fast Healing -- NmnCnv-Regen/Rcvry+(A), NmnCnv-Heal(15), NmnCnv-Heal/EndRdx(17), NmnCnv-EndRdx/Rchg(17), NmnCnv-Heal/Rchg(36), NmnCnv-Heal/EndRdx/Rchg(23)
Level 2: Reconstruction -- UnbGrd-Max HP%(A), UnbGrd-ResDam(5), UnbGrd-Rchg/ResDam(5), UnbGrd-ResDam/EndRdx/Rchg(7)
Level 4: Quick Recovery -- PrfShf-End%(A), PrfShf-EndMod(7)
Level 6: Super Speed -- BlsoftheZ-ResKB(A), BlsoftheZ-Travel(15)
Level 8: Combat Jumping -- RedFrt-Def/EndRdx(A), RedFrt-Def/Rchg(9), RedFrt-EndRdx/Rchg(9), RedFrt-Def/EndRdx/Rchg(11), RedFrt-Def(11), RedFrt-EndRdx(13)
Level 10: Instant Regeneration -- DctWnd-Heal/EndRdx(A)
Level 12: Hasten -- RechRdx-I(A), RechRdx-I(13)
Level 14: Kick -- KntCmb-Knock%(A)
Level 16: Dismiss Pain -- Prv-Absorb%(A)
Level 18: Buckshot -- Artl-Acc/Dam(A), Artl-Dam/End(19), Artl-Dam/Rech(19), Artl-Acc/Dam/Rech(21), Artl-Acc/Rech/Rng(21), Artl-End/Rech/Rng(23)
Level 20: Integration -- DctWnd-Heal/EndRdx(A)
Level 22: Tough -- StdPrt-ResDam/Def+(A)
Level 24: M30 Grenade -- Artl-Acc/Dam(A), Artl-Dam/End(25), Artl-Dam/Rech(25), Bmbdmt-+FireDmg(27), SuddAcc--KB/+KD(27)
Level 26: Flamethrower -- SprOppStr-Acc/Dmg(A), SprOppStr-Dmg/Rchg(33), SprOppStr-Acc/Dmg/Rchg(33), SprOppStr-Acc/Dmg/EndRdx(33), SprOppStr-Acc/Dmg/EndRdx/Rchg(34), SprOppStr-Rchg/+Opportunity(29)
Level 28: Resilience -- GldArm-3defTpProc(A), UnbGrd-ResDam(29), UnbGrd-ResDam/EndRdx(31), UnbGrd-ResDam/EndRdx/Rchg(31), UnbGrd-Rchg/ResDam(31)
Level 30: Aim -- Empty(A)
Level 32: Weave -- RedFrt-Def/EndRdx(A), RedFrt-Def/Rchg(34), RedFrt-EndRdx/Rchg(37), RedFrt-Def/EndRdx/Rchg(36), RedFrt-Def(36), RedFrt-EndRdx(34)
Level 35: Slug -- Thn-Acc/Dmg(A), Thn-Dmg/EndRdx(39), Thn-Dmg/Rchg(39), Thn-Acc/Dmg/Rchg(39), Thn-Acc/Dmg/EndRdx(37), Thn-Dmg/EndRdx/Rchg(37)
Level 38: Incinerator -- Thn-Acc/Dmg(A), Thn-Dmg/EndRdx(40), Thn-Dmg/Rchg(40), GldJvl-Dam%(40)
Level 41: Full Auto -- SprSntWar-Acc/Dmg(A), SprSntWar-Dmg/Rchg(42), SprSntWar-Acc/Dmg/Rchg(42), SprSntWar-Acc/Dmg/EndRdx(42), SprSntWar-Acc/Dmg/EndRdx/Rchg(43), SprSntWar-Rchg/+Absorb(43)
Level 44: Maneuvers -- RedFrt-Def/EndRdx(A), RedFrt-Def/Rchg(45), RedFrt-EndRdx/Rchg(45), RedFrt-Def/EndRdx/Rchg(45), RedFrt-Def(46), RedFrt-EndRdx(46)
Level 47: Tactics -- GssSynFr--ToHit(A), GssSynFr--ToHit/Rchg(48), GssSynFr--ToHit/Rchg/EndRdx(48), GssSynFr--Rchg/EndRdx(48), GssSynFr--ToHit/EndRdx(50), GssSynFr--Build%(50)
Level 49: Moment of Glory -- LucoftheG-Def/Rchg+(A), RechRdx-I(50)
Level 1: Opportunity
Level 1: Brawl -- Empty(A)
Level 1: Sprint -- Empty(A)
Level 2: Rest -- Empty(A)
Level 1: Swift -- Empty(A)
Level 1: Hurdle -- Empty(A)
Level 1: Health -- Pnc-Heal/+End(A), Mrc-Rcvry+(3)
Level 1: Stamina -- PrfShf-End%(A), PrfShf-EndMod(3)
Level 6: Speed Phase
------------| Copy & Paste this data into Mids Reborn : Hero Designer to view the build | |-------------------------------------------------------------------| |MxDz;1394;663;1326;HEX;| |78DA65944B4F135114C7EF74A6144A1F56E4DD026DC1165A46F01368441215126C0| |113374D536ECB9866683A35D1AFE1C695CFF85CFB11DC18E5E54E1157AE51171A75| |351EE6FCAFC530C9CC6FE67FE7BCEE99338BB7E642D5EAFC39A1452ED4CB8E532A4| |ABB65D9B21E28562C6957A4383C027426D44AA950B66B72CD3CEF38E59BF556A960| |55EBB2BD3A27ABD276A459903569CB66B9656DD8B14BF6BA6CD21BA6BA092E6D6CD| |4CD6243CAB59077BB20CB0DCBAE85BD8779ABB64EDE6A51B5B4269BCEBAD518BAD8| |B02AE6BF508BE58AA48BD392CDDB0394E2189D6F3274D1BCAC5D21667D741AA2906| |D8B7EB1AA7962648579E22A5860A68BCCBE656631AB6C85AB6B7F744F347E80BF98| |1DBF99CBF4B28E489A7E97C377DC61A6691FFDF0A4F9F7598CEC31FB6831A0720C0| |439766737186206C36084198A3257286C97AABAEB0A8B29F2D8AD72E9CE09B6007D| |B4185616E16542CA10ABE426AAC4E80197F496763486ACFD31DDEF89270DD0CF3CD| |50106987D9DCC6BE4B14779EC41623AC5EE55626F3FDD250CB14561FA211AFD0833| |8030030833E403BF181EB7C96850E536F881C5B18FE01EF88999DC67C63F335F4D0| |A31AC220E9FE56AE368ECC84F108D1D41A3372962021145C2A5431854CEA8EADC28| |3A9744E7C6D1B9343A9746E792E8DC3BF2975215A4EE71734EDF071F800F99E38FC| |0C7CC1D329E40647D02C6191867609CC973E6BBF47256A599DDE43D98DC02B7C11D| |E6D42EF89E19A31A73CA38871AF3A8318F1AF3A8711A354EA3C61E323695B1F984B| |FF7334FC167E073E6EC0BF025F33A7D41336A68667AD9E32CBEE21B93DE601F0E95| |EBC60DA10EF7F0995AB3705C5A32DAE32C344F3A081EFD6778D2D7E3D2B72392269| |2BCA9BECBA4640CF1FDBF45CCBD0F73FF7AAA3DF7EE5FEC58D90B| |-------------------------------------------------------------------|
Hmmm ... this looks workable ... Loaded it into mids and I am still so so.
I will try to create one of my own as well ... this one seems to have a bit better resists and is pretty similar damage/accuracy/to hit wise as my other BR/Elec sent ...
What you think?
This Hero build was built using Mids Reborn 3.1.0.10
https://github.com/LoadedCamel/MidsRebornClick this DataLink to open the build!
Level 50 Mutation Sentinel
Primary Power Set: Assault Rifle
Secondary Power Set: Regeneration
Power Pool: Concealment
Power Pool: Speed
Power Pool: Fighting
Power Pool: LeapingHero Profile:
Level 1: Burst- (A) Superior Sentinel's Ward - Accuracy/Damage
- (3) Superior Sentinel's Ward - Damage/RechargeTime
- (3) Superior Sentinel's Ward - Accuracy/Damage/RechargeTime
- (5) Superior Sentinel's Ward - Accuracy/Damage/Endurance
- (5) Superior Sentinel's Ward - Accuracy/Damage/Endurance/RechargeTime
- (7) Superior Sentinel's Ward - RechargeTime/Chance for +Absorb
Level 1: Fast Healing
- (A) Preventive Medicine - Heal
- (17) Preventive Medicine - Heal/Endurance
- (19) Preventive Medicine - Endurance/RechargeTime
- (19) Preventive Medicine - Heal/RechargeTime
- (21) Preventive Medicine - Heal/RechargeTime/Endurance
- (21) Preventive Medicine - Chance for +Absorb
Level 2: Buckshot
- (A) Superior Opportunity Strikes - Accuracy/Damage
- (7) Superior Opportunity Strikes - Damage/RechargeTime
- (9) Superior Opportunity Strikes - Accuracy/Damage/RechargeTime
- (9) Superior Opportunity Strikes - Accuracy/Damage/Endurance
- (11) Superior Opportunity Strikes - Accuracy/Damage/Endurance/RechargeTime
- (11) Superior Opportunity Strikes - RechargeTime/Chance for Opportunity
Level 4: Quick Recovery
- (A) Efficacy Adaptor - EndMod
- (13) Efficacy Adaptor - EndMod/Recharge
- (13) Efficacy Adaptor - EndMod/Accuracy/Recharge
- (15) Efficacy Adaptor - Accuracy/Recharge
- (15) Efficacy Adaptor - EndMod/Accuracy
- (17) Efficacy Adaptor - EndMod/Endurance
Level 6: Reconstruction
- (A) Gladiator's Armor - TP Protection +3% Def (All)
- (27) Unbreakable Guard - +Max HP
- (29) Preventive Medicine - Heal
- (29) Preventive Medicine - Heal/Endurance
Level 8: Stealth
- (A) Luck of the Gambler - Defense/Increased Global Recharge Speed
Level 10: Grant Invisibility
- (A) Luck of the Gambler - Defense/Increased Global Recharge Speed
Level 12: Slug
- (A) Apocalypse - Damage
- (23) Apocalypse - Damage/Recharge
- (25) Apocalypse - Accuracy/Damage/Recharge
- (25) Apocalypse - Accuracy/Recharge
- (27) Apocalypse - Damage/Endurance
Level 14: Aim
- (A) Gaussian's Synchronized Fire-Control - Chance for Build Up
- (23) Adjusted Targeting - To Hit Buff
- (40) Adjusted Targeting - To Hit Buff/Recharge
- (40) Adjusted Targeting - To Hit Buff/Endurance/Recharge
- (43) Adjusted Targeting - Endurance/Recharge
- (43) Adjusted Targeting - To Hit Buff/Endurance
Level 16: Super Speed
- (A) Winter's Gift - Run Speed, Jump, Flight Speed, Range
- (48) Winter's Gift - Run Speed, Jump, Flight Speed, Range/Endurance
Level 18: Instant Regeneration
- (A) Preventive Medicine - Heal
- (31) Preventive Medicine - Endurance/RechargeTime
Level 20: Dismiss Pain
- (A) Preventive Medicine - Heal/Endurance
- (31) Preventive Medicine - Heal
Level 22: Integration
- (A) Preventive Medicine - Heal
- (31) Preventive Medicine - Heal/Endurance
Level 24: M30 Grenade
- (A) Superior Frozen Blast - Accuracy/Damage
- (34) Superior Frozen Blast - Damage/Endurance
- (36) Superior Frozen Blast - Accuracy/Damage/Endurance
- (36) Superior Frozen Blast - Accuracy/Damage/Recharge
- (36) Superior Frozen Blast - Damage/Endurance/Accuracy/RechargeTime
- (37) Superior Frozen Blast - Recharge/Chance for Immobilize
Level 26: Flamethrower
- (A) Positron's Blast - Accuracy/Damage
- (37) Positron's Blast - Damage/Endurance
- (39) Positron's Blast - Damage/Recharge
- (42) Annihilation - Chance for Res Debuff
- (42) Annihilation - Accuracy/Damage
- (43) Annihilation - Damage/RechargeTime
Level 28: Incinerator
- (A) Superior Winter's Bite - Accuracy/Damage
- (37) Superior Winter's Bite - Damage/RechargeTime
- (39) Entropic Chaos - Chance of Heal Self
- (40) Entropic Chaos - Accuracy/Damage
- (42) Entropic Chaos - Damage/Endurance
Level 30: Resilience
- (A) Reactive Armor - Resistance/Endurance
- (34) Reactive Armor - Resistance/Recharge
- (46) Titanium Coating - Resistance/Endurance
- (46) Titanium Coating - Resistance/Recharge
Level 32: Full Auto
- (A) Ragnarok - Damage
- (33) Ragnarok - Damage/Recharge
- (33) Ragnarok - Accuracy/Damage/Recharge
- (33) Ragnarok - Accuracy/Recharge
- (34) Ragnarok - Damage/Endurance
Level 35: Second Wind
- (A) Doctored Wounds - Heal/Endurance
- (46) Doctored Wounds - Endurance/Recharge
Level 38: Kick
- (A) Empty
Level 41: Tough
- (A) Titanium Coating - Resistance/Endurance
- (39) Titanium Coating - Resistance/Recharge
- (45) Titanium Coating - Endurance/Recharge
- (45) Titanium Coating - Resistance/Endurance/Recharge
Level 44: Weave
- (A) Luck of the Gambler - Defense/Increased Global Recharge Speed
- (45) Shield Wall - +Res (Teleportation), +5% Res (All)
- (48) Kismet - Accuracy +6%
Level 47: Combat Jumping
- (A) Luck of the Gambler - Defense/Increased Global Recharge Speed
- (48) Reactive Defenses - Defense
- (50) Reactive Defenses - Defense/Endurance
- (50) Reactive Defenses - Scaling Resist Damage
Level 49: Hasten
- (A) Recharge Reduction IO
- (50) Recharge Reduction IO
Level 1: Opportunity
Level 1: Brawl--------------------------------
I aimed to get as close as possible to 190% recharge (managed 188%) without hasten for when being exemplared and 260+ with haste when doing level 50 content.
-----
I see you went for close to 40 defenses and low 20 or less resists. With this build I get 10 to 15 defenses but 40 to 50 resists ...
Dont know ... for a sent I dont know what is best yet ... Regeneration and AR are being chosen here for flavor , not for uberness and min/maxing, but would really like something solid so I dont faceplant all the time haha 😄
What you guys think?
I know there is a thing about Defenses vs Resists ... so wondering what would be better?
-
42 minutes ago, oldskool said:
Its a new year, and while this could have been a new post (some nice necromancy here), I could go into some lessons learned.
Lesson 1... Your "squeezing out the max" is an *incredibly* low bar with this build. Seriously, the optimization ceiling is not super high with this because of how both AR and Regen work.Lesson 2... Lesson 1 is a sad but very real truth.
Lesson 3... AR does its best damage with absurd levels of recharge. Talking 190%+ with Hasten and may really want Ageless if you're not getting it in set bonuses.
Lesson 4... Flamethrower ticks multiple times for the opportunity meter. It shouldn't, but it does. None of the other powers in this kit do that, but Flamethrower can nearly fill your bar against full targets.
Lesson 5... Regen also does well with really high levels of recharge.
Lesson 6... Stacking regen in bonuses for the sake of getting more health return is a waste of effort. You want actual hit points, defense benefits, recharge, to-hit, accuracy, damage, and then somewhere later down the road... regeneration percentage.
And that's it. Assault Rifle has a lot of powers and they can all have some merit depending on how you slot them. You could dump a few from the build and it really depends on preference/goals. Regen has very little it should skip, like Second Wind is a possibility and maybe Moment of Glory, but it too can be really tight on powers. Don't expect the world from either of these power sets, because right now that's delusional. However, Regeneration is the best version of the set on Sentinels in many ways, and Sentinel AR can be real fun. And fun is all that should matter.Thank you!
So the total build concept out of AR beside some skipabble powers is to fully focus on RECHARGE within slots or enhancement sets + Def, raw HP increases, Acc and+toHit with a final touch if possile of regeneration as a side note.
That is actually quite helpful @oldskool 🙂
I have this character concept of a Gun toting mutant lizardman that regenerates rapidly from my old campaigns in Gamma World that I want to recreate here for fun
I know AR is quite sad compared to other sets ... I played an AR/Traps MM back in live , have a smidgeon of alts here with AR and Traps as a Corruptor and AR as a blaster as well ...
It is something quite noticeable when you have a group with other corruptors for example and you are there trying to kill things and then comes an Ice or Storm corruptor and PWNS everything AOE style while you are just barely trying to go full auto and ... do some damage LOL!
But I dunno, I like AR for some fetishistic reason to RP a soldier, a mutant lizardman from the radioactive wastes or a femme nikkita like assasin ...
Will try to scrounge something up that can be somewhat decent in Mids, see if it will be fun for me as I just usually try to bring to COH most of my more memorable npcs and pcs from tabletop 😎
If you can share a decent build (you really know how to build things man) I would appreciate it! For the sake of us that like AR even when its so low damage and broken!
Cheers!
-
1 hour ago, MoonSheep said:
i’d definitely recommend looking into a sonic/sonic blaster. a lot more damage and powers like Sound Barrier will help with the survival aspect - as will attacks like Sound Cannon, a cone stun which will help mitigate incoming damage
you’ll get a nice S/L res shield in the mastery too to help boost survival if that’s the priority
It is also a possibility, but dont know how well can I get resists to a decent level ... will give it a try though! 😎
Right now will bring this "offender" (love that name) to 50+ and see how it handles
Cheers!
-
1
-
-
10 hours ago, Psylenz0511 said:
I came up with a third option. Ditch stealth, Ditch Grant Inviz. Pick up Sonic Disruption AND superspeed. You can have sonic disruption, stealth-ghosting, AND hover snipe at the cost of 15% recharge off your 270% global recharge. Hmmm, I like this third option, a LOT.
That sounds like an interesting option to choose. Good thing we all get multiple builds as I rarely slot any chars until well past Alpha , thanks for the input! 🙂
-
Small Update: Currently Level 30 on Excel and seems to be holding quite well ...with zero enhancements on the slots to save money as I level.
Still dont know how much damage wise it will be in the long run but build can reach up to 218% extra damage according to mids, not even hitting Amplify or counting Gaussians Proc, which can lead it to 268% and 348% respectively ... dont know if it will be good enough to support solo plays, small mish teams or tfs/trials.
Again, any suggestions on slotting, enhancements etc would be really appreciated as I dont know much about defenders.

First 50: Sentinel AR/Regen
in Sentinel
Posted
That sounds interesting ... but starting out dont have much to work with ... so currently wondering on the interfaces which particular type would be better.
I was eyeing Reactive, it has a fire dot which I can rp as a side effect of my mutant enhanced bullets haha, is reactive good? Which one would be better? You mention you like the one that does more damage vs side effect, so you prefer cores I think?
Hmm ... love my little lizze.
Just finished doing a LAM run and well, only died two times and got antiacid badge haha, just need more incarnate fun out of him 🙂
Love homecoming!