Maelwys
-
Posts
2162 -
Joined
-
Last visited
-
Days Won
30
Content Type
Profiles
Forums
Events
Store
Articles
Patch Notes
Everything posted by Maelwys
-
https://cod.uberguy.net./html/entity.html?entity=pets_traps_timebomb The bomb entity that deals damage also immediately self destructs, so damage procs will do nothing for it and the most you'll get out of it is a Force Feedback +Rech.
-
I had loads of the regular enhancement set IOs (with their flat % proc rate!)... but I thought the old Paragon Market RMT store IOs worked differently and did leverage PPM? Checking the old Paragonwiki page suggests this is the case. Though to be fair I never bought any of those; had a thing against paying real money for in-game "loot"!
-
FWIW; I do remember a time when (most!) damage procs were a flat percentage chance rather than PPM and stuff like this was all new and shiny. (and IMO it was better back then the whole business with local recharge affecting them was only limited to the procs bought from the RMT store!)
-
Very minor increase to AoE (except on Tankers, obviously!) as Eye of the Storm's "bonus damage" got increased by 13-19 base damage. Slightly more noticeable bump to ST damage as Sky Splitter's "bonus damage" got increased by 35-52 base damage. Note that this Bonus damage is affected by damage buffs (like Enhancements and Fury and Build Up and Assault Core Hybrid) but not by Scrapper/Stalker Critical hits.
-
By far the biggest issue with Procs, for me, is that slotting LOCAL recharge aspect into a power can drastically lower its damage. It's both counterintuitive and bloody ridiculous that someone can (often unintentionally) punish themselves by enhancing a power. (and I know the mechanics of why this happens, but IMO the PPM mechanic in general needs nuked from orbit - give each damage proc a lockout period if you need to!) Another issue is how the procs apply in odd/unusual ways; especially where pets/pesudopets are concerned. Pets and Pseudopets can gain the effect of some procs; but not others. depending on what enhancements the summon power itself and its various subpowers accept. And it's not just damage procs - try putting a Panacea Proc into Triage Beacon/Spirit Tree; or into the second Necro MM Upgrade ability. Powers that create an entity that immediately "self destructs" (like Trip Mine) don't benefit from damage procs, but do from buff procs (e.g. Force Feedback). Some powers get far better milage out of procs on specific ATs - the Tanker version of Lightning Rod is coded as a Power Execution (and as such benefits fully from damage procs) but on all the other melee ATs Lightning Rod is coded as an Entity Creation (which procs very poorly) So for me, it's really the counterintuitive punitive nature of local recharge slotting; and the myriad inconsistencies in how procs actually apply (or not!) to different powers.
-
Perhaps, but (a) are they better at single target than Scrappers and (b) how do they compare to Brutes and Tankers? (a) IMO in general they are, yes. Mainly due to Assassin's Strike. AS allows for a much better Single Target attack chain (this is particularly true for sets like Energy Melee, Electric Melee and Staff). It also has a much better guaranteed Critical Hit mechanic in Assassin Focus stacks. The Stalker ATOs are a bit harder to quantify - the "Chance to Hide" IIRC still has a 10 second lockout period; so the benefit it grants is rather attack chain dependent... I typically put it in Assassin's Strike (since that is already getting an elevated crit chance via Assassins' Focus stacks!) and then try and follow AS up with either another hefty ST attack or an AoE like Ball Lightning. The "Chance to Recharge Build Up" one is tricksy too - it means you can get away with just putting a single Gaussian proc into the base slot of Build Up on Stalkers and they'll still be under the effects of it far more than an equivalent Scrapper. The Team Crit bonus is very nice; but it usually doesn't stack well with Assassins Focus stacks or the "Chance to hide" ATO; as Aethereal noted already. I think the Team Crit buff helps to make up for the fact that Stalkers AoE potential is so much worse (e.g. they get access to fewer AoEs; and the ones they do get tend to only have a 50% chance to crit from Stealth) and it makes them even better at non-Assassin-Strike ST damage for spiking down Bosses/EBs/AVs/etc. However my favourite "Team Stalker" is an Elec/Shield and their two biggest AoEs (Lightning Rod and Shield Charge) don't gain the benefit of Crits at all; so the only boost that really affects them is the "Chance to Recharge Build Up" ATO. I will say that I think in general Stalkers are easier to min-max than Scrappers since all you really need is Build Up, Assassin's Strike, a few decent other attacks (typically using the Mu Mastery Patron Pool as a filler if your primary is lacking) and a basic understanding of PPM mechanics. That's child's play compared with Scrappers; where you really need to spend a bit of time with a calculator or spreadsheet to manually work out how to gain the most benefit from your ATOs (e.g. the available buff time window for Scrapper ATO2 is not 3.25s; it's the Slotted Attack's Arcanatime minus its ATBE rounded up for Arcanatime, plus 4.25 seconds.... then after you work that out you need to figure out how to get as much damage out of that narrow window as possible via fitting in one or two low-arcanatime-high-DPA attacks and finishing up with a very low-ATBE-high-DPA attack!) and most Scrappers seem to struggle with anything beyond basic addition. Which brings me to (b)...
-
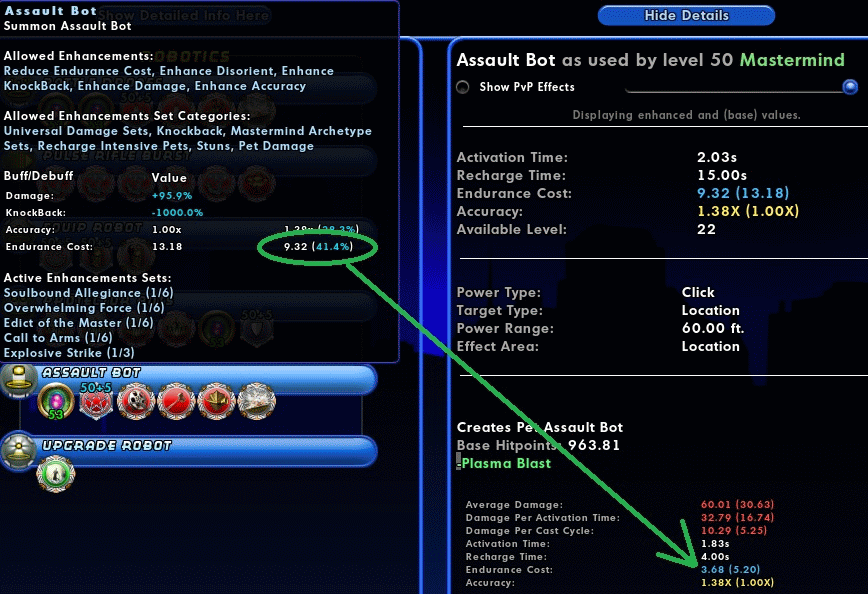
If you check the MAGNITUDE of those knock back effects, you'll see they're all under 1.0 except for the Assault Bot's Swarm Missiles ability. Meaning they end up inflicting knockDOWN rather than knockBACK. There was however a time in years gone by where this wasn't true and Robotics MMs really needed to take an AoE Immobilize power in order to prevent the stupid little dustbins from repeatedly punting foes out of their own burn patches.
-

Question on pet power slotting (procs vs IO bonus)
Maelwys replied to tellania's topic in Mastermind
Yep, that inheritance trick works for any special enhancements that are coded as Procs rather than as Set Bonuses. There are only a couple of enhancement types that are slottable into the henchmen upgrade powers though, and some of them don't end up inheriting down into all the pets. Sticking a Panacea or Regenerative Tissue or Numina proc into the Necro second upgrade ability will work well because that upgrade grants henchmen a passive MaxHP boost that inherits Healing enhancement. And sticking an Impervious Skin Proc into the Bots or Mercs or Necro first upgrade will also work well because those upgrades grant henchmen a passive buff that inherits damage resistance enhancement. However sticking a Panacea or Regenerative Tissue or Numina into the second Bots or Ninja upgrade ability won't give as much benefit because they don't inherit down into a passive effect, instead it only affects the Protector Bots 30s "Repair" and the Ninja 45s "Kuji-In Sha" clickyheals. IMO Panacea is the only real game changer there (in Necro), the rest just give too minor a benefit to be particularly noticeable. -
Those Brute ATOs are probably just pining for the Fjords.
-
Since Firey Melee and Martial Arts aren't your cup of tea, I'd probably recommend either Battle Axe or Titan Weapons. Battle Axe can deal very high damage in both ST and AoE, and Axe Cyclone knocking things flying (yet towards you via inverse repel!) is a thing of mayhemic beauty. But it is also very endurance heavy. /Rad provides multiple recovery tools. Titan Weapons has a simple combo mechanic (building momentum) and solid smashy ST and AoE damage. It also provides an easier route to Softcap your Melee Defense via Defensive Sweep. If neither of those options speak to you... then Street Justice, War Mace or Ice Melee etc. would IMO all still provide a better mechanical starting point than Radiation Melee. Honestly the only time I could recommend Radiation Melee (other than AFK farming!) would be if you really want an offensive powerset with a self-heal - Super Reflexes is sometimes paired with either it or Dark Melee for that reason. Honestly almost any Brute powerset combo can be built to solo at +4x8 and survive indefinitely against AVs/GMs. However many of them will struggle to produce enough Damage and/or -Regen debuffs to defeat the tougher AVs/GMs without Lore Pets and Envenomed Daggers.
-
Radiation Armor got hit with the nerf bat recently - Radiation Therapy's Proc activation rate and Ground Zero's target cap both got drastically reduced (although they've since fixed a bug with Ground Zero's Proc activation rate being lower than it should). Radiation Melee is more of a utility powerset than a powerhouse (although due to its damage aura and hefty PBAoE it has a bit of a niche in AFK "passive" farming) and does not particularly lend itself to soloing AVs/GMs nor to clearing large groups of foes particularly quickly. I'd happily still recommend Radiation Armor since even with the nerfs it still has reasonable levels of AoE damage output, provides +Recharge via Beta Decay and Radiation Therapy inflicts a decent -Regen debuff... but are you dead set on Radiation Melee? Could (for example) Martial Arts, Titan Weapons or Firey Melee work instead?
-
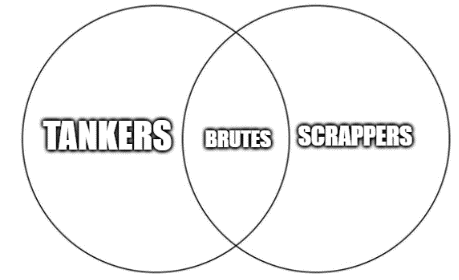
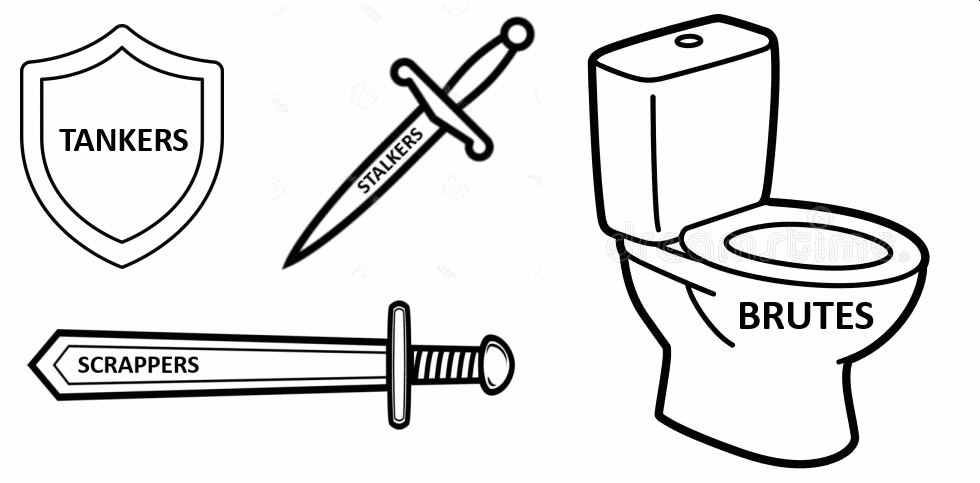
It very much is not. Anyways; since Tidge mentioned Venn diagrams; I thought I'd try making the point via pictures this time. This is what most people seem to envisage: (with Stalkers roughly equal to or a bit ahead of Scrappers when it comes to ST; and behind them in terms of AoE) And IMO that's more or less accurate... until ATOs are involved, at which point it becomes:

-
Because that particular tree is quite clearly ON FIRE. And whilst it's causing the rest of the forest to fill with smoke and get uncomfortably toasty... some people seem to be utterly ignoring it, others appear to be looking at an old thermometer reading and claiming that it's barely lukewarm, and yet others are demanding that we burn down all the neighbouring forests so that they'll match. 🚒
-
Short version: yes. Ranged pets will tend to stay at range now and not randomly charge into melee range to Brawl things. And pets have a "leash range" beyond which they won't chase after runners. They still get stuck on geometry, but they're not as bad at blocking corridors since you can usually push them out of the way. Most of the beneficial AI changes took place in i26p4. https://homecoming.wiki/wiki/Issue_26_Page_4#Pets_&_Henchmen_Updates
-
Some questions about Thugs/Marine (mostly /Marine)
Maelwys replied to Lazarillo's topic in Mastermind
I use two rotating keybind files that make me FACE the target and THEN activate the heal whenever I hammer the Numpad0 key. [c:\Games\coh\binds\hc\marine_face.txt] NUMPAD0 "face$$bind_load_file_silent c:\Games\coh\binds\hc\marine_heal.txt" [c:\Games\coh\binds\hc\marine_heal.txt] NUMPAD0 "powexec_name soothing wave$$bind_load_file_silent c:\Games\coh\binds\hc\marine_face.txt" (Tapping my travel power key also resets the bind to the "face" one so that doesn't get too out of synch) -
you are looking for ways to push (effective) brute damage higher through party amplification -- the more fundamental problem here is that scrapper resilience levels are already sufficient when team buffs are applied. I am not, and it isn't. I am looking for a way to ensure that a Brute, a Tanker, a Scrapper and a Stalker can each provide something beneficial to the team that is sufficiently different that each of those ATs ends up filling a separate worthwhile niche and being attractive as a team member (albeit perhaps more attractive for specific content or team compositions). Brutes' current placing of being "slightly more survivable and dealing significantly less damage than a Scrapper" is unfortunately simply not a worthwhile niche. They therefore are not currently chosen for what the AT can mechanically bring to the team, but because of other factors (such as being friends with the person playing them, or there are no Tankers/Scrappers available, or the difficulty level of the content is so trivial that team composition simply doesn't matter). you can say you did not push 'force multiplier' but you literally did. and i chose the exact phrase you used like 10 times -- 'force multiplier'. your post is still there, you can re-read it if you forgot what you typed. are we just trying to argue in bad faith here? i feel like i agree with you in a lot of ways other than you adamantly wanting to be disagreeable. i am fine with you not liking my hot take to make tanker/brute resilience more relatively meaningful but you follow-up by agreeing with me that tanker/brute resilience levels ultimately dont matter.... you just appear to believe that is a good thing! Expand the quotes above, then read it from start to finish; taking particular note of the yellow highlighted bits. I am not advocating for Brutes to arbitrarily simply deal more damage. In fact I have said multiple times in this thread that IMO Brute damage is currently perfectly fine and balanced whenever ATOs are not being factored in. However when ATOs are being factored in, Scrappers and Stalkers rocket ahead. They are no longer in the same ballpark as Brutes in terms of ST damage (as can be seen very clearly in the various Pylon Time leadership board threads) and my own attempts to put a number on just how much slower Brutes are at completing more common content - an "average regular mission" (GalaxyBrain's AE Mission Simulator at +4x8; which the Devs have recently been using as a performance yardstick to measure comparable Tanker performance) shows an IO'ed+ATO'ed Scrapper being a good 30% faster than an equivalent Brute. As far as I can tell the performance disparity here is 100% due to ATO balance; not pre-ATO damage damage output nor Brute resilience/survivability. I am therefore advocating not for boosting Brute damage itself; but for changing the effect of their ATOs. Both in order to make the ATOs give Brutes an increase in damage that is equivalently proportional to the boost that Scrapper and Stalker ATOs give those ATs; and also to give Brutes something new and unique to help them bring value to a team. If you read through some of my later exchanges with Tidge; you can see me restating this position time and time again: You'll notice that I only actually used the phrase "force multiplier" twice - once in relation to Defenders and another in relation to melee ATs (of which currently only VEATs qualify). The reference to Defenders was carefully chosen because it sets up my intent: Defenders are attractive to teams because they provide buffs and debuffs - which increase the effectiveness of their teammates. I do not wish to make Brutes individually more powerful. Instead I wish that Scrappers, Brutes, Stalkers and Tankers would each be considered attractive and useful to a team - and since IMO there is a gap in the market for a melee buff AT; at least one of those four ATs (likely Brutes and/or Tankers) could become more attractive via applying useful (but limited) allied buffs or enemy debuffs. And because the Brute ATOs are utter goatdung; I think there's an opportunity there to kill two birds with one stone. - - - - - - - - - - - - - - - - - - - - - - - - - - - - - - - - - - - - - - Now that I've (quite literally!) drawn a line underneath all that... I'll try to briefly address your other two points. Firstup - Brute "Active farming": I have Brutes that I farm on. They are currently the most efficient AT for "passive" AFK farming because just like Tankers Brutes can meet the survivability requirements (90% Resist, 45% Defense, 35+ HP/Sec passive regeneration) however Tanker AoE damage output has been nerfed to the point where Brutes hitting 10 targets with an attack now deals more overall damage than Tankers hitting 16 targets with that same attack. However for Active Farming all you need is to deal high AoE damage. That's it. There are no hard survivability requirements for active farming because it's perfectly possible to survive merely via chugging inspirations like candy (one of the more common setups is to consume purples and greens, and combine the rest into reds) especially given that custom AE maps with custom enemy groups are easy to make - you can choose exactly how densely packed the spawns are, you don't need to have any kind of mez effect inflicted on you; and you can give yourself multiple friendly Archvillain level NPC buffbots (and their power selection is not even limited to the default powersets in the mission creator - you can customise each NPC's power list individually). Therefore Blasters and Dominators can be magnificent at it (Plant Dom was recently nerfed; but there are runners up) and Corruptors (especially those with significant AoE -movement speed and rain powers) are decent too. Scrappers that have a Taunt aura will obviously be slightly better off than those without it; but any Scrapper can still simply leap into the middle of 20-30 densely packed foes on an Asteroid map. Many VEAT builds are good there (essentially anything except a Crabbermind; although they can be made to work too with a little extra effort). There are some Kheldian builds that are very good at AoE spam; but I personally detest the Changeling exploit. Brutes are still decent... but IMO they're a bit bland and "pedestrian" by comparison to the other higher-risk, higher-reward AT builds and they're certainly not the quickest to clear an AE map solo; which is what AE active farming is all about - Homecoming allows each player to pilot three simultaneous accounts as long as the shard isn't under heavy load; so take two AFK farmers (both Brutes nowadays - and Rad/Stone is by far the most efficient) and one active farmer (as mentioned, lots of ATs work!) and rake in the drops + inf (see here for some discussion about average ballpark inf/hour). Disclaimer: I've "active farmed" on every AT except for Defenders (not because it's impossible; but because it's never been efficient enough to be viable). I'm also a min/maxer who models and measures and repeatedly tweaks each build I make to ensure that it's as efficient as possible for its intended purpose(s). As as result; I've been an active participant in the farming megathread (and chances are if you open up any thread over the last 2-3 years asking about "Farming" you'll see at least one comment from me there!) and most weeks I'll get multiple unsolicited requests for farming builds in my forum inbox. Secondly - Stalker "Hide": You're correct that Hide only provides 1.875% Defense during combat. However that's exactly the same value as Stealth, Combat Jumping and Hover; so it's hardly an unusually low value. And that's only its base (unslotted) effect... so more commonly it'll be providing a hair under 3% - that's about the same as the Steadfast protection and Gladiator Armor Uniques; which IMO are definitely "non negligible" . As an example: with just a single additional enhancement slot (e.g. 2x 50+5 Def IOs) Hide will give +2.94% Def before Alpha Slots; and it also provides a very efficient spot for a LotG +7.5 Rech IO - potentially freeing up another power selection. Whenever they're up against large packs of enemies and the Stalker can't hit and run; Scrappers will undoubtedly have an edge in terms of survivability (due to their larger base and maximum HP values). But one-on-one (or even one-on-five!) Placate works just fine. That said, I wholeheartedly agree with you that Stalkers and Scrappers are both in a pretty good place right now. Both are high damage melee ATs... but Stalkers are Stealthy Single Target experts with additional survivability options; whereas Scrappers are equally good at ST and AoE with a bit of aggro control via Confront + Taunt Auras. IMO Tankers are almost well balanced too... however the devs have stated a desire to make Tankers the "AoE specialist" melee AT; and at present compared to Brutes they are not dealing as much AoE damage to foes nor do they have notably better aggro control. Unfortunately Brutes seem to lack a real niche (whilst at present they're better at AoE "tanking" than Tankers; prior to the last patch Brutes had almost no mechanical attractiveness to a team at all and the Devs could easily "rebalance" Tanks again. So IMO Brutes need their own niche; instead of always fighting over the same one as a Tanker!) and whenever ATOs are considered they demonstrably underperform. So I'd really like to see those deficiencies addressed.
-
It has "adaptive recharge", meaning (i) the more foes you hit with it the longer it takes to recharge, up to a maximum of 60s (ii) Proc activation rate in it is complete rubbish since the "base" recharge for PPM calculations is treated as being only 5 seconds. But recharge reduction enhancement and global recharge will still reduce the recharge time. So that 60s maximum can become 30s or less pretty easily. And the Tanker/Brute Consume Psyche is indeed a 20ft radius AoE. The 90ft Cone is Devour Psyche which is the Scrapper/Stalker/Sentinel version.
-
-
It shows up in the detailed power effects window. 5.2/1.414 = 3.6775
-
Protector Bots have always guzzled endurance like it was going out of fashion if you didn't slot them for EndRed, but after the set revamp the AssBot became almost as bad, even with the benefit of Conserve Power. I typically try to cram North of 60% EndRed in each of them, with the PBs usually getting 80% ISH unless I have an allied recovery buff. The drones can go all day even with only ~20%.
-
So as an 8ft Toggle, Aura of Insanity would have a 39.47% chance (per target) of a 4.5PPM Proc like Contagious Confusion Proc kicking in every 10 seconds. However Cupid's Crush is only 2.5PPM; which is a 21.93% chance of kicking in once every 10 seconds. (i) When Contagious Confusion kicks in, it applies a 20ft Radius AoE (hitting up to 5 targets; excluding the original) which has a 33% chance to inflict a 10s Mag3 Confusion. The upshot is that there's about a 34.142% likelihood for at least one target to be hit by that Mag3 confusion effect (which will affect up to LTs). (ii) When Cupid's Crush kicks in, it applies an 8s Mag2 Confusion (which will only affect minions) So if you have enough spare enhancement slots then they'd both technically be able to stack with each other; sure. But in terms of comparative power a ~21.9% chance to affect a minion is much worse than a ~34.1% chance to affect at least one minion or LT; so IMO slotting Cupids is probably going to be a waste of a precious enhancement slot.
-
A controversial topic: Is it time to make items scarcer or cost more?
Maelwys replied to Troo's topic in General Discussion
To my knowledge it's just a daily "whose posts got the most reactions today" leaderboard. I've never noticed it doing anything other than a congratulatory message popping up occasionally at the top of your profile page; even when you "win" multiple days in a row. It's not like it results in some kind of tangible reward (unless @Snarky has been siphoning them off...) 🧛♀️ -
MiDs continues it's years long downhill slide
Maelwys replied to Snarky's topic in General Discussion
FWIW: If you're checking for updates within Mids, and it tells you that there's an update available but nothing happens whenever you press the go button to download/install it... then there's very likely something up with your Bootstrapper. Check your Windows Application Event Log (Event Viewer > Windows Logs > Application). Chances are that there'll be an entry in it that looks like this: Faulting application name: MRBBootstrap.exe, version: 1.0.0.0, time stamp: 0x6854594d Faulting module name: MSVCP140.dll, version: 14.29.30133.0, time stamp: 0x60ff28cc Exception code: 0xc0000005 If so, then the issue is that the Bootstrapper (which is a separate application within the Mids folder that is only used to download and install updates) is erroring out because your PC doesn't have the Microsoft Visual C++ Redistributable installed. Download it at https://aka.ms/vs/17/release/vc_redist.x64.exe then install, reboot, and retry. (there are are alternative downloads of that distributable at https://aka.ms/vs/17/release/vc_redist.x86.exe for 32-bit devices and https://aka.ms/vs/17/release/vc_redist.arm64.exe if you're running on a ARM64 device... but most folk here will likely want the x64 one!) Lums is 100% correct in that Mids has now gotten to the point where even the devs are apparently having a hard time keeping track of just what you need to properly run it.