Maelwys
-
Posts
2163 -
Joined
-
Last visited
-
Days Won
30
Content Type
Profiles
Forums
Events
Store
Articles
Patch Notes
Everything posted by Maelwys
-

Focused Feedback: Powerset - Staff Fighting
Maelwys replied to The Curator's topic in [Open Beta] Focused Feedback
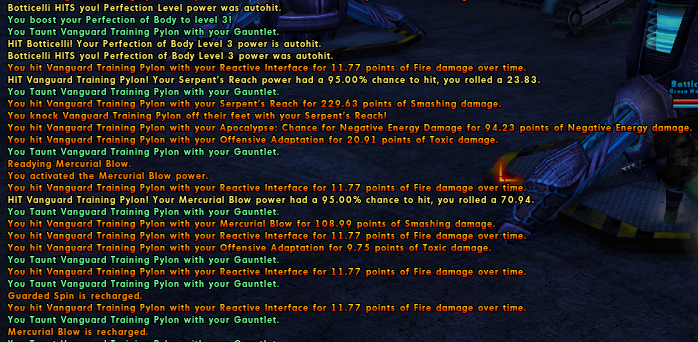
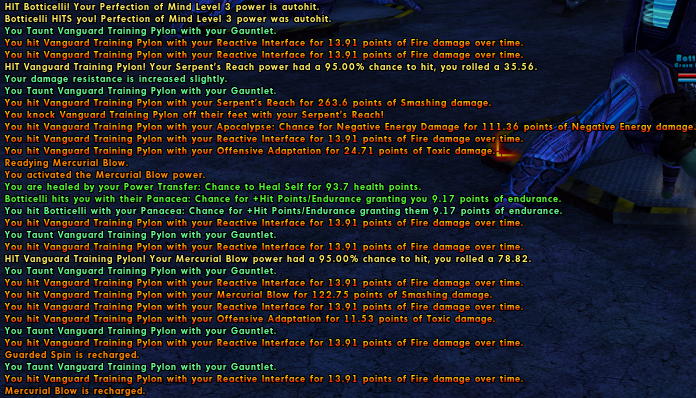
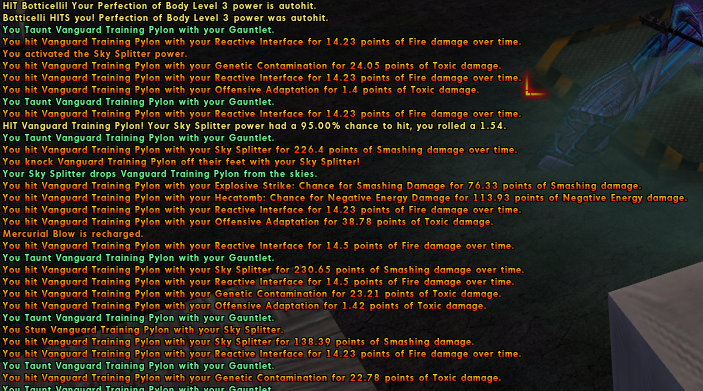
Yeah I'm seeing that too. Doesn't matter what attack I use, it's not refreshing or overwriting the effect when at 3 stacks. All three types are affected so it's not just Perfection of Body this is occurring with. (Can see this with Mercurial Blow in screenshot below) To be fair, when I rechecked on Live the combat log text there doesn't show the stacks refreshing either; however the icon in the buff window never vanishes and SS/EoTS never lose their circles until I click one of them. On Brainstorm, both the icon in the buff window and the circle around SS/EoTS vanish soon after hitting 3 stacks despite spamming regular staff attacks.
-
It's random. 20% chance IIRC https://cod.uberguy.net./html/power.html?power=freakshow.freakshow_inherent_defense.revive&at=boss_grunt
-
Focused Feedback: Powerset - Staff Fighting
Maelwys replied to The Curator's topic in [Open Beta] Focused Feedback
Rough numbers for me (ED-capped damage with Musculature Alpha on a Bio/Staff Tanker) are ~600 on Live and ~735 on Brainstorm; before Procs and Hybrid. EoTS is only adding ~20 damage total unfortunately; so barely noteworthy. But not having the chain mess up due to the occasional miss is nice. Overall a step in the right direction for Staff; even if my Tank's AoE damage potential will be taking a major hit due to the Gauntlet tweak's impact on GS, IS and EoTS... -
Focused Feedback: Powerset - Staff Fighting
Maelwys replied to The Curator's topic in [Open Beta] Focused Feedback
Can confirm bugs fixed on the new build. Damage of the "bonus" ticks looks to be more-or-less right also. Sky Splitter in particular is hitting noticeably harder now. -
Yups. There are going to be a lot of upset Tanker players that never even touched damage procs thinking "why is this taking me so long to clear big groups of mobs now" Although TBF compared to back on Live it's still way ahead (which only goes to show just how good Tankers have had it on HC in recent years!) Things may (emphasis on may) still pan out in favour of Tankers for regular PVE gameplay; but as things stand currently Brutes will have the edge again for AE farming.
-
The bits I were covering above all related to Tanker AoEs and Cones. I do fully accept that not all Tanker secondaries (not primaries!) have lots of AoE. Super Strength is a good example here - Foot Stomp doesn't currently benefit from any radius buffs as its base radius is 15ft... however it does benefit from Target cap increases and under the new rules any targets beyond 10 would be taking far less damage than before. FWIW personally I do believe that nerfs to Tanker AoE damage were needed; as they currently outperform every other melee AT in terms of AoE PVE damage - which is a pretty big niche. And IMO most of these proposed measures, whilst they constitute a nerf, are not world-endingly harsh. So I think @twozerofoxtrot probably put it best in the Focused Feedback thread: However I think the "each target above X will take Y% less damage than the previous target" is a bit harsh - a flat rate (say 50% lower damage) would be far better than the currently proposed curves (e.g. 100%>56%>31%>18%>10%>6% for cones) A few people have already started posting benchmark numbers - Shags is noting a 41% increase in mission cleartimes on their Dark Melee Tanker; and IIRC even Tanker DM doesn't have a stupendously large amount of native AoE damage.
-
Nerfs in red. Buffs in green. The underlined bit in red (the passive global arc/radius buff) is part of the Tanker revamp that they did back in Issue 26 Page 4. They're revoking that bit; so now Tanker AoEs will no longer get any "global" radius/arc buff granted to them via Gauntlet... instead; Tanker AoEs will now have the same increased radius/arc baked into the attack power itself. At first glance this might seem like doing the same thing in different ways... but under the previous method (the global buff) it meant that damage scales and proc activation chances were substantially higher (because these are based on the attack's own inherent radius and arc, so they ignore global boosts). So overall this (the underlined red bit plus both green bits) is a nerf to both raw damage and damage proc activation chance for Tanker AoEs and Cones. On top of that, Tanker AoEs and Cones gained the ability to hit more targets than usual as part of the aforementioned Issue 26 Page 4 revamp. Meaning that cones that have a target cap of 5 on other ATs can currently hit 10 targets on Tankers; and AoEs that have a target cap of 10 on other ATs can currently hit 16 targets on Tankers. The lines above noting that "each target above 10 will take 25% less damage than the previous target" and "each target above 5 will take 44% less damage than the previous target" are a direct nerf to the damage that Tankers on live currently deal to these additional targets. As an example: if I'm surrounded by foes and activate Eye of the Storm or Fire Sword Circle on a Tanker; I can typically hit 16 targets. But 6 of those targets will now be receiving much less damage than before. (On top of which, all the targets will be receiving less damage than before due to the global radius/arc buff removal mentioned above. So it's a double nerf. Triple if you were self-buffing your own damage via something like Build Up or Rage. Quadruple if you were inflicting any -res debuffs!) Clearer?
- 401 replies
-
- 11
-

-

-

-

-

-
Which is actually the point at which the fight becomes somewhat manageable, since the anti-one-shot code won't let you die. But if you have a MaxHP of 2 or more then you're SOL! 🤣 My favourite toon for actually tanking that thing is an Illusion Controller; but most of my MMs can Brute Force it by spreading the debuffs around. Defense helps, as does Absorb... but the sheer frequency and magnitude of the -MaxHP debuffs will cripple most solo toons regardless of their damage resistances.
-
Focused Feedback: Tanker - Archetype Inherent Changes
Maelwys replied to The Curator's topic in [Open Beta] Focused Feedback
Unless they've secretly radically overhauled how the taunt effect functions in PVE, it is heavily weighted in favour of duration (not magnitude!). IIRC one of the major components of the targeting subroutine involves multiplying your damage output by several other factors like distance, etc... and one if those factors is essentially ten times the remaining duration of the currently active Taunt effect. So assuming this new scaling works by reducing the duration of the punchvoke taunt then if you're competing against a non-taunter (like a Blaster) for aggro then you might need to dish out some more damage than before. However if you're competing with a Brute then as soon as your Punchvoke's Taunt duration gets reduced below 50% of theirs it'll become extremely likely that their Taunt effect will suddenly become the active one and as a result they'll pull aggro off you. -
So on Live you have capped MaxHP and an additional 475 Absorb buffer for ~2563 total. And on Brainstorm you have slightly less than capped MaxHP and no absorb for ~2037 total. Not counting Preventive Medicine. I can see how the loss of ~526 effective HP would negatively impact your ability to weather alpha strikes. However the higher base regeneration on Brainstorm should more than counter the loss of absorb whenever you're in the middle of a fight (e.g. so whilst you'll be more likely to die to a quick spike of extreme damage than before, you'll also be able to cope with a greater amount of average incoming damage than before) Chucking more Defense or Damage Resistance at it would potentially help with the alpha strike issue. Or adjusting playstyle to pull less things simultaneously (splitting up an alpha strike so you have a second or two to click a heal between damage spikes will help). To be fair, Sentinel's lower MaxHP cap is probably hurting that AT a lot compared to a Scrapper (let alone a Brute) for mitigating bigger alpha strikes. So if the absorb buffer that was propping that up was suddenly taken away? Yeah that'll be pretty jarring for a lot of players. Swapping the +MaxHP from Ailment Resistance (or the +MaxHP from Dull Pain!) to +Absorb on Sentinels would counteract this a bit; but that assumes that the devs can conscience the idea of keeping some Absorb in a set that is named "Regeneration". [Edit:] - @Devs: I know from personal experience that realistically Regeneration Scrappers and Stalkers are always sitting at the maximum HP Caps; and as shown above Sentinels have it even worse. The proposed changes remove a substantial amount of on-demand +MaxHP from Dull Pain and add a large amount of constant +MaxHP into Ailment Resistance - and whilst more +MaxHP is a boon for ATs with large +MaxHP scalars such as Brutes; other ATs like Sentinels (and Stalkers) will get little if any benefit from slotting Healing Enhancement aspect into these powers. So what would the chances be of a further tweak to Dull Pain (and potentially similar on-demand +MaxHP clicks in the future!) so that whenever it gets activated it performs a check against your current Maximum HP... and any +MaxHP it would normally grant that overflows that cap instead becomes +Absorb? That way nothing would change for regeneration characters with no +Absorb and low +MaxHP; but characters that already sit at or very close to their +MaxHP value would see at least some benefit from taking and slotting up both Dull Pain and Ailment Resistance (honestly the various +HP accolades and set bonuses already eat into Stalker and Sentinel +MaxHP something shocking!).
-
Focused Feedback: Powerset - Radiation Armor
Maelwys replied to The Curator's topic in [Open Beta] Focused Feedback
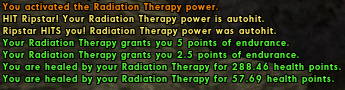
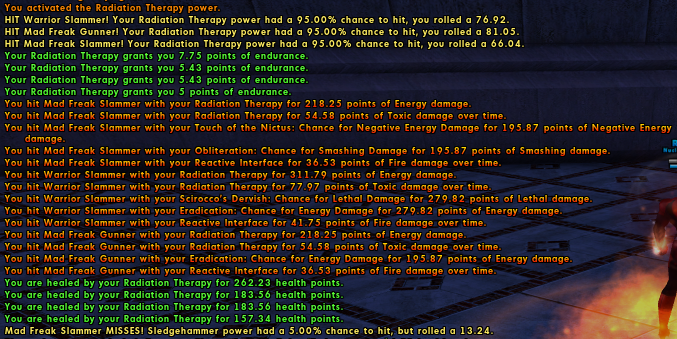
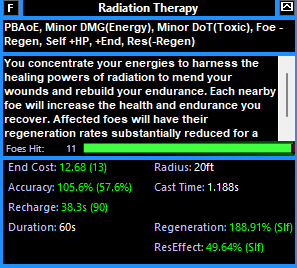
I got around to testing Radiation Therapy a bit more: Below figures are for ED-capped Healing (2x Lv50+5 Heal IOs) and no local recharge (but 65% Global Recharge). Live with nobody nearby: Brainstorm with nobody nearby: That's 7.5 End vs 5 End; 346.15 Health vs 157.34 Health (owch!) It looks like the new version doesn't count yourself as a hit any longer; so you're missing an extra tick compared to what's on live. So "Heal with no enemy in range lowered from scale 11% to scale 6%" is not accurate as it does not include the 57.69 "hit" on myself in the above screenshot. In relative terms this is actually more like moving from scale 13.2% to scale 6% Although to be fair; it recharges a lot faster (~11 sec rather than ~37 in my build) so over time it will still return more HP than before. - - - - - - - - - - Live with 3 foes nearby: Brainstorm with 3 foes nearby: That's 15 End vs 23.61 End; 519.22 Health vs 970.25 Health And it also recharges a bit faster (~31 sec rather than ~37 in my build). The Regeneration is cut in half; for ~8HP/Sec rather than ~16... which when factored in still doesn't catch up to the new figures. So Brainstorm is the clear winner here for HP and Endurance recovery; and damage procs are still kicking in at about half the previous rate.
-
Focused Feedback: Powerset - Staff Fighting
Maelwys replied to The Curator's topic in [Open Beta] Focused Feedback
Yuks notwithstanding; there's really no point in keeping schtum... the only thing the bug with EoTS is good for is activating Sky Splitter; which from what I can tell is also broken and currently always acts as if it's only got a single stack of Perfection of Body active regardless. -
Focused Feedback: Powerset - Staff Fighting
Maelwys replied to The Curator's topic in [Open Beta] Focused Feedback
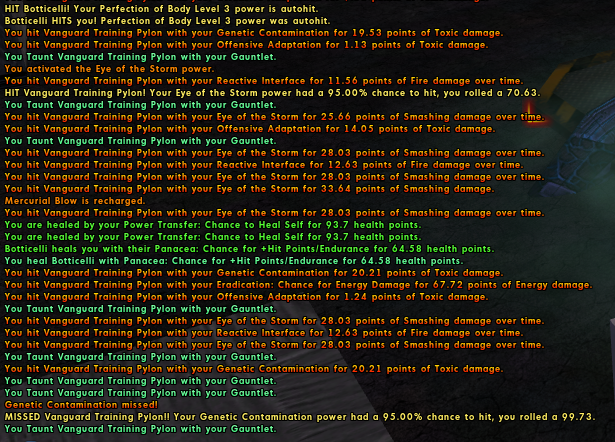
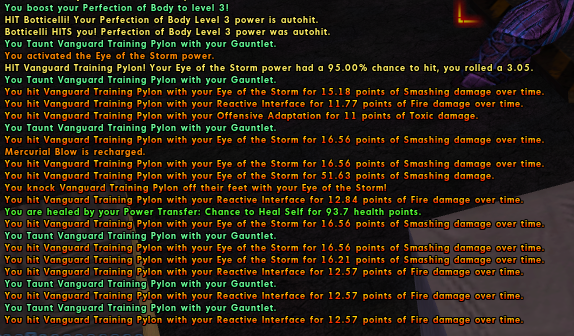
Did a quick test with my Bio/Staff Tanker... On Live: On Brainstorm: (i) Sky Splitter on test is doing something wrong with Perfection of Body stacks - it's consuming 3 then immediately adding 1 before it actually lands. (ii) Eye of the Storm is also doing something wrong - there is a delay of a few seconds before it consumes 3 stacks. This is long enough to get a Sky Splitter off.
-
Focused Feedback: Powerset - Radiation Armor
Maelwys replied to The Curator's topic in [Open Beta] Focused Feedback
3.5PPM procs ought to have gone from 90% (@60s base rech) to... 46.72% (@25s base recharge)... So yeah about half the previous damage, on average; but still a fairly big radius and reasonable target cap. Personally I'll probably keep the existing 4x procs; and swap the Lv50+5 Heal IO to a Lv53 Acc/Heal HO; so something like this (worst-case with 90s elongated recharge) (that's a Touch of the Nictus Lv50+5 Heal IO to nab the 2-piece set bonus) The lessened Regeneration buff is annoying (it means my Scrapper won't quite hit 50 HP/Sec any more!) but the Heal is worth far more if there are only 1-2 enemies nearby. The lessened Accuracy is almost ignorable at endgame; but might hurt whilst levelling up. All-round a nerf, but manageable. However yes, lower the activation time on Ground Zero; please. It's not a meganuke any more; so it doesn't need to feel like we're waiting for Armageddon to arrive.
-
Since Brutes get Fury; little/no damage slotting in their attacks doesn't cripple them as much as a Tanker. As such they're one of the easiest classes to level up (the easiest being a MM) if you're not throwing influence at loads of Procs and Globals.
-
Theft of Essence: Chance for +Endurance in Dark Regeneration. Done. (OK, Panacea and Miracle in Health help too, but I would have killed for the Theft of Essence set on my old Spines/DA Scrapper on live...)
-
Mez Resistance indeed just lowers the duration of status effects; it doesn't negate them. As such building for it via set bonuses is pretty pointless because unless the magnitude of the resistance is in the thousands of percent it tends to not matter very much. Personally I'd aim to pick up Mez Protection via the likes of Rune of Protection or Clarion Destiny instead.
-
Legendary 45% softcap... True/False/Sometimes/BS?
Maelwys replied to shortguy on indom's topic in General Discussion
-
Legendary 45% softcap... True/False/Sometimes/BS?
Maelwys replied to shortguy on indom's topic in General Discussion
-
Legendary 45% softcap... True/False/Sometimes/BS?
Maelwys replied to shortguy on indom's topic in General Discussion
-
Legendary 45% softcap... True/False/Sometimes/BS?
Maelwys replied to shortguy on indom's topic in General Discussion
Team size has no bearing on HitChance. Even Cosmic Balance only grants damage resistance; not defense. And if you're asking if enemies randomly target teammates? No, it's not a straight "roll a d8". The PVE AI builds up a threat list based on factors like distance and previous damage dealt; and the taunt effect overrides whoever would ordinarily be at the top of the list. -
Legendary 45% softcap... True/False/Sometimes/BS?
Maelwys replied to shortguy on indom's topic in General Discussion
Aside from the fact that this -45% ToHitDebuff would need to actually be -93.75% against a regular +3 mob and at least -300% vs a level 50 AV... ...sure. -
Do Necro's Soul Extraction pets count toward Bodyguard damage shares?
Maelwys replied to mistagoat's topic in Mastermind
Nope. Bodyguard mode only kicks in if the pet is within range of Supremacy AND is commandable (with their orders set to Defensive stance plus something other than Attack e.g. Follow/GoTo/Stay). -
Legendary 45% softcap... True/False/Sometimes/BS?
Maelwys replied to shortguy on indom's topic in General Discussion
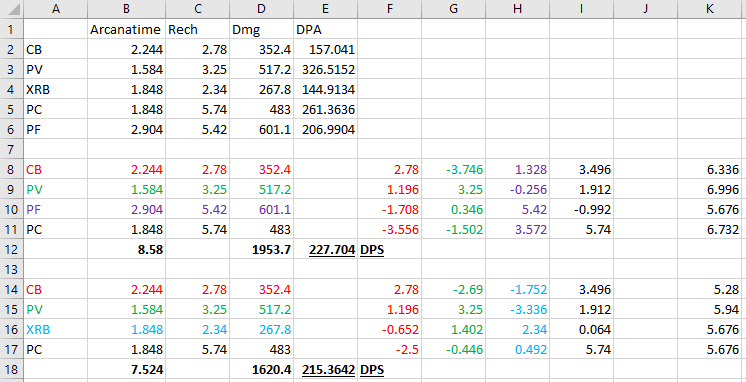
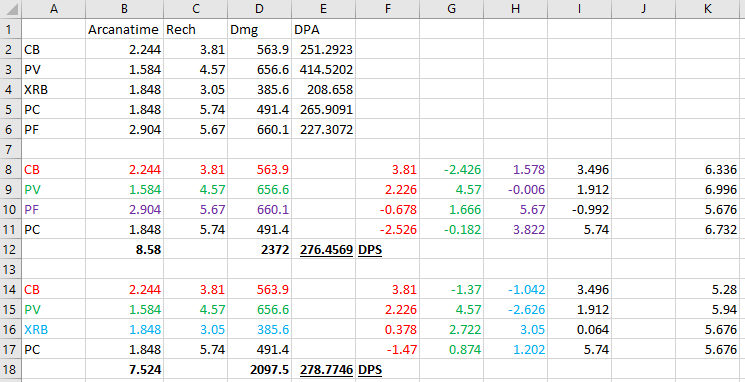
See; that's exactly the sort of toon that provokes comments like "Yeah; I'm sure they have plenty of fun playing it.... but it's inefficient as heck." Currently your main ST rotation of (CB-PV-PF-PC) is 227.70 DPS and your backup ranged rotation (CB-PV-XRB-PC) is 215.36 DPS. However just by dispensing with unnecessary set bonuses in those attacks (ignoring defense, bare minimum recharge and 95% Hit Rate vs +3s) you could easily be hitting 276.46 DPS and 278.77 DPS respectively. Also the 6th IOs in both Atomic Blast and Atom Smasher are also just screaming out to be replaced with another damage or -res proc. And Aim/Build Up can take up to 70.35% local recharge before the Gaussian "Chance for Build Up" IO drops below a 90% activation rate. Actionette - Blaster (Radiation Blast) v2.mbd Those are the kind of tradeoffs we're talking about. You're intentionally forgoing damage output in favour of defense; as well as other things like unnecessary global recharge and accuracy bonuses - although there's an argument that more global recharge is always useful to get your nuke up sooner so that one's less contentious. (I intentionally didn't go poking at the other powers; even though stuff like unboosted Purples gives me the heebie jeebies) None of this really matters outside of niche content. You don't need high damage output; just like you don't need high defence... because the vast majority of content in CoX is ridiculously facerollingly easy. The reason that we're continually being loud about this particular tangent is that it is disingenuous for anyone to claim that you can build a toon for softcapped defense without making non-negligible tradeoffs (such as sacrificing damage output!) - there simply aren't enough power picks and enhancement slots to get everything simultaneously.
-
Legendary 45% softcap... True/False/Sometimes/BS?
Maelwys replied to shortguy on indom's topic in General Discussion
+1 for Carp Melee. (C'mon Devs; we've had Fish Blast / Fish Affinity Ranged toons available for nearly a year... where's my slimy befinned War Mace Weapon customization option??!?)