

SuperPlyx
-
Posts
858 -
Joined
-
Last visited
Content Type
Profiles
Forums
Events
Store
Articles
Patch Notes
Posts posted by SuperPlyx
-
-
1 hour ago, Greycat said:
Nope. Also they ignore taunt. You might be thinking of the final arc where you keep red caps from destroying the portal. That one's insanely easy to cheese. 🙂 I've killed two of the initial Red Cap mob and just hurricaned the third into a corner and gone to have lunch.
Your right, my bad. Sorry about that, OP
-
 1
1
-
-
Got a friend who keeps talking about his new Spines/Ice Scrapper. And after teaming with him, it was impressive. The slows work really good. And he was getting a surprising amount of AoE crits happening
-
 1
1
-
-
So I am pretty sure this is the mission I think it is. And if so the mission has a timer on it. Now unless it has been changed one way to do this used to be to just hold one guy.
How it works is, the next ambush is not spawned till the current ambush is defeated. So do not defeat them all, hold one guy , do not kill him and just let the clock run.
Now when I say hold, I mean just stop him form entering portal. If I remember right last time I did it was on a tank, I just kept him there with taunt.
-
1
-
-
So I couldn't resist playing around with this build/maxhp idea. My poking at it ended up changing couple of powers and that lead to changing Soul Mastery for Pyre.
Also gave up a lot of the resistance for defense. F/C/E/N defense all at or near soft-cap. Max HP sits at 3124 without an Amp, so would be well over with it
I wouldn't call it compete by any means (needs little more accuracy) but the idea of how much HP could you get with these sets and still have a playable guy, well here is my take on that idea:
SpoilerThis Villain build was built using Mids Reborn 3.1.2.5
https://github.com/LoadedCamel/MidsRebornClick this DataLink to open the build!
Level 50 Science Brute
Primary Power Set: War Mace
Secondary Power Set: Willpower
Power Pool: Speed
Power Pool: Fighting
Power Pool: Leadership
Power Pool: Leaping
Ancillary Pool: Pyre MasteryVillain Profile:
Level 1: Pulverize -- Mk'Bit-Acc/Dmg(A), Mk'Bit-Dmg/Rchg(3), Mk'Bit-Acc/Dmg/EndRdx/Rchg(3)
Level 1: High Pain Tolerance -- Prv-Heal/Rchg(A), Prv-Heal(5), Prv-Absorb%(5), RgnTss-Heal/EndRdx(7), RgnTss-Heal/Rchg(7), RgnTss-Regen+(9)
Level 2: Jawbreaker -- SprBrtFur-Dmg/Rchg(A), SprBrtFur-Acc/Dmg/Rchg(11), Mk'Bit-Acc/Dmg/EndRdx/Rchg(13), Mk'Bit-Dmg/EndRdx(13), Mk'Bit-Acc/EndRdx/Rchg(15)
Level 4: Mind Over Body -- StdPrt-ResDam/EndRdx(A), StdPrt-ResDam/Def+(15), StdPrt-ResKB(17)
Level 6: Fast Healing -- NmnCnv-Heal/EndRdx(A), NmnCnv-Heal(17), NmnCnv-Regen/Rcvry+(19)
Level 8: Clobber -- SprBlsCol-Acc/Dmg(A), SprBlsCol-Dmg/EndRdx(19), SprBlsCol-Acc/Dmg/EndRdx(21), SprBlsCol-Acc/Dmg/Rchg(21), SprBlsCol-Dmg/EndRdx/Acc/Rchg(23), SprBlsCol-Rchg/HoldProc(23)
Level 10: Indomitable Will -- LucoftheG-Def/Rchg+(A), ShlWal-Def(25), ShlWal-Def/EndRdx(25), ShlWal-Def/Rchg(27)
Level 12: Hasten -- RechRdx-I(A)
Level 14: Kick -- Empty(A)
Level 16: Rise to the Challenge -- Prv-Heal(A), Prv-Heal/EndRdx(27), Prv-Heal/Rchg/EndRdx(29)
Level 18: Whirling Mace -- Erd-Dmg/Rchg(A), Erd-Dmg(29), Erd-%Dam(31), Erd-Acc/Dmg/EndRdx/Rchg(31), SprBrtFur-Dmg/EndRdx/Rchg(31), SprBrtFur-Acc/Dmg/EndRdx/Rchg(33)
Level 20: Quick Recovery -- PrfShf-EndMod(A), PrfShf-EndMod/Rchg(33), PrfShf-End%(33)
Level 22: Tough -- UnbGrd-Max HP%(A), GldArm-3defTpProc(34)
Level 24: Super Speed -- WntGif-ResSlow(A)
Level 26: Shatter -- OvrFrc-Acc/Dmg(A), OvrFrc-End/Rech(34), OvrFrc-Dmg/End/Rech(34), OvrFrc-Acc/Dmg/End/Rech(36), OvrFrc-Dam/KB(50)
Level 28: Heightened Senses -- LucoftheG-Def/Rchg+(A), LucoftheG-Def/EndRdx(36), LucoftheG-Def(36)
Level 30: Weave -- Rct-Def(A), Rct-Def/EndRdx(37), Rct-ResDam%(37), LucoftheG-Def(37), LucoftheG-Def/EndRdx(39), LucoftheG-Def/Rchg+(39)
Level 32: Crowd Control -- SprBrtFur-Acc/Dmg(A), SprBrtFur-Rech/Fury%(39), Erd-Dmg(40), Erd-Acc/Rchg(40), Erd-Acc/Dmg/EndRdx/Rchg(40), Erd-Dmg/Rchg(42)
Level 35: Ring of Fire -- Dvs-Acc/Dmg(A), Dvs-Dmg/EndRdx(42), Dvs-Dmg/Rchg(42), Apc-Dmg(43), Apc-Dmg/Rchg(43), Apc-Acc/Dmg/Rchg(43)
Level 38: Maneuvers -- ShlWal-ResDam/Re TP(A), ShlWal-Def(45), ShlWal-Def/Rchg(45)
Level 41: Char -- SprEnt-Acc/Hold(A), SprEnt-Hold/Rchg(45), SprEnt-End/Rchg(46), SprEnt-Acc/Hold/End(46), SprEnt-Acc/Hold/End/Rchg(46), SprEnt-Rchg/AbsorbProc(48)
Level 44: Fire Blast -- Apc-Acc/Rchg(A), Apc-Dmg/EndRdx(48), Apc-Dam%(48)
Level 47: Combat Jumping -- LucoftheG-Def/Rchg+(A), LucoftheG-Def(50), LucoftheG-Def/EndRdx(50)
Level 49: Build Up -- GssSynFr--Build%(A)
Level 1: Fury
Level 1: Brawl -- Empty(A)
Level 1: Sprint -- EndRdx-I(A)
Level 2: Rest -- Empty(A)
Level 1: Swift -- Run-I(A)
Level 1: Hurdle -- Jump-I(A)
Level 1: Health -- Pnc-Heal/+End(A), Pnc-Heal/EndRedux(9), Pnc-Heal(11)
Level 1: Stamina -- PrfShf-End%(A)
Level 24: Speed Phase
Level 50: Vigor Core Paragon
Level 50: Mighty Radial Final Judgement
Level 50: Assault Radial Embodiment
Level 50: High Pain Threshold
Level 50: Invader
Level 50: Marshal
Level 50: Born In Battle
-------------
1
-
-
Never much cared for the Von Grun arc myself....but he introduces Operative Grillo and /or Abyss .
Now these 2 have arcs I do like., Grillo has the snake temple mission, this mission alone is worth doing his arc. It's awesome.
Abyss is the Hero killing arc, so many Heroes to deal with....fun stuff
-
4
-
5
-
-
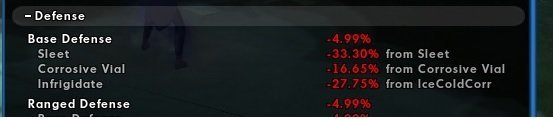
Power Analyzer available from the P2W.
And here it is in action:

-
 1
1
-
1
-
-
Is it just me but the server and character screens are taking a long time to load. I was worried it locked up
-
So I have done things like this, you have a toon at 50, something changed and you want to re-invent it. Even if not the most optimal it's what you got.
Anyways, the one thing I can see looking at the build is High Pain Tolerance, that adds MaxHP so you should 6 slot it with heal IOs to maximize what it can give you. Of course that means adding a slot and moving the resist IOs.
-
1
-
1
-
-
My main guy a fire/time blaster. I have done everything with him and always return to him when I get done making a new alt.
-
1
-
-
4 hours ago, Qabal said:
Have you played around with Time Bomb? I know it's supposed to suck, but does placing it break stealth?
No, placing it does not break stealth. I get a lot of fun stealthing into group and placing a Time Bomb.
Also good if you build up a bit of crowd around yourself. Drop a Time Bomb and knock them away.
-
One thing I would note about Haste in the Totals window...it starts with the base 100% already and adds from that point.
So adding say the Hasten power would make it 170% recharge. However the ingame Combat Attributes does not add the !00% base number so would only see 70%
So if I remember right perma-dom is 125% recharge, but to get that in Mids you need 225% in the Totals window.
I hope that makes sense and I didn't confuse you more
-
1
-
-
Now I just need to let her know I am saving them both......and boom!
-
That list just talked me out of making any new brutes.
-
 1
1
-
-
22 minutes ago, Solarverse said:
However, with the high defense to Energy
I know I am looking at something wrong....I see Energy defense as 32% ...is that right?
Edit: just realized this is a tank build...
-
Lot of builds you get on here, first thing you got to do is go through and shut off all the things like this that are not used or skew the numbers. This is one of the worst though.
-
1
-
-
49 minutes ago, SuperPlyx said:
There was a thread on here about posting your UI picture.
16 minutes ago, biostem said:Could you maybe share a pic or link to what you mean?
*snickers* I quoted myself
-
I tend to go Tactics as well, Like my friend said "Doesn't matter how hard you can hit if you miss"
-
1
-
3
-
-
There was a thread on here about posting your UI picture. I was surprised by a couple but mostly it gave me ideas to try.
-
16 hours ago, Without_Pause said:
2.5+ years is quite some time to allow this to linger.
Or maybe that's an indication of just how bad the code is.
-
1
-
-
35 minutes ago, The Volt said:
There are two patterns called Jester on that piece, the Jester pattern you need will be at the end of the list whilst the one you have used in these screens is in regular alphabetical order.
Found it, all the way down at the bottom. I never would have thought their would be 2 jester patterns. Thank You!
-
1
-
-
As you can see I have them both selected but all it changes is the neck circle thingy
-
So I wanted to use the jester top:
But I can not seem to find how to get the diamonds to alternate colors?
Like this:
Is this really not an option? Am I missing something, I tried baggy and tight ...
-
It would seem the answer is no. Someone do it, I wanna read it.
-
1
-
1
-
-
I am struggling with the leap to American. He is Italian, so he is an Italian hero......, are you saying he fought for the USA in his "gone" period oorr The guy who made his costume used American stuff to do?
-
1
-


Procs not working in Trip Mine
in Bug Reports
Posted
Yeah, and here is an oddity to go with it: The Force feedback +recharge proc works in it. But could not get any damage procs to work and I tried them all.