Sweetcake
-
Posts
45 -
Joined
-
Last visited
Content Type
Profiles
Forums
Events
Store
Articles
Patch Notes
Everything posted by Sweetcake
-
I don't mind playing in teams but to be honest most of my time is spent soloing. This was basically going to be a a badger so wanted something capable of doing all content. Hopefully the image below helps. (it's just over 3 seconds short of perma hasten) Looking at it now I would change the slotting for ROF and Sleet around. As for def vs corr I just found the defensive + resistance values were much easier to hit on the defender and would have to have multiple builds for the corruptor depending on the content I was facing. I do prefer to play corruptors and if I can come up with something decent enough will likely play that too. Thanks again for taking the time to respond.

-
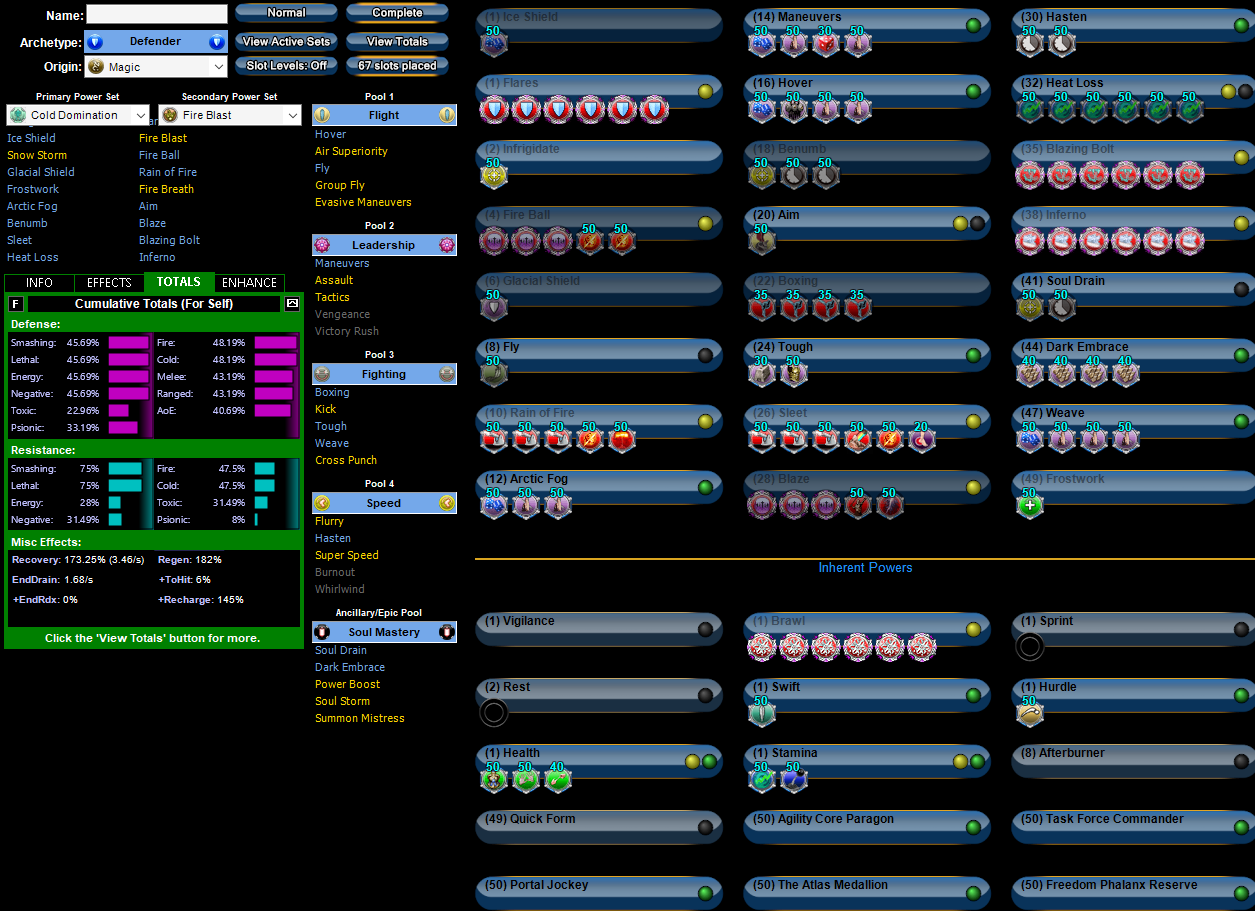
Hi, I'm trying to make what will be my main character on the game. If anyone has any improvements or advice they could give to help improve the following build it would be much appreciated. Thanks in advance 🙂 This Hero build was built using Mids Reborn 3.4.6 https://github.com/LoadedCamel/MidsReborn Click this DataLink to open the build! Level 50 Magic Defender Primary Power Set: Cold Domination Secondary Power Set: Fire Blast Power Pool: Flight Power Pool: Leadership Power Pool: Fighting Power Pool: Speed Ancillary Pool: Soul Mastery Hero Profile: Level 1: Ice Shield (A) Luck of the Gambler - Defense/Increased Global Recharge Speed Level 1: Flares (A) Superior Defender's Bastion - Accuracy/Damage (3) Superior Defender's Bastion - Damage/Recharge (3) Superior Defender's Bastion - Damage/Endurance/Recharge (5) Superior Defender's Bastion - Accuracy/Damage/Endurance (5) Superior Defender's Bastion - Accuracy/Damage/Endurance/Recharge (7) Superior Defender's Bastion - Recharge/Chance for Minor PBAoE Heal Level 2: Infrigidate (A) Accuracy IO Level 4: Fire Ball (A) Superior Vigilant Assault - Accuracy/Damage (7) Superior Vigilant Assault - Damage/RechargeTime (9) Superior Vigilant Assault - RechargeTime/PBAoE +Absorb (9) Annihilation - Chance for Res Debuff (11) Annihilation - Accuracy/Damage Level 6: Glacial Shield (A) Defense Buff IO Level 8: Fly (A) Blessing of the Zephyr - Knockback Reduction (4 points) Level 10: Rain of Fire (A) Artillery - Accuracy/Recharge/Range (11) Artillery - Accuracy/Damage/Recharge (15) Artillery - Accuracy/Damage (17) Annihilation - Chance for Res Debuff (17) Positron's Blast - Chance of Damage(Energy) Level 12: Arctic Fog (A) Luck of the Gambler - Defense/Increased Global Recharge Speed (13) Reactive Defenses - Defense (13) Reactive Defenses - Defense/Endurance Level 14: Maneuvers (A) Luck of the Gambler - Defense/Increased Global Recharge Speed (15) Reactive Defenses - Defense/Endurance (34) Kismet - Accuracy +6% (34) Reactive Defenses - Defense Level 16: Hover (A) Luck of the Gambler - Defense/Increased Global Recharge Speed (21) Shield Wall - +Res (Teleportation), +5% Res (All) (21) Reactive Defenses - Defense (33) Reactive Defenses - Defense/Endurance Level 18: Benumb (A) Accuracy IO (19) Recharge Reduction IO (19) Recharge Reduction IO Level 20: Aim (A) Gaussian's Synchronized Fire-Control - Chance for Build Up Level 22: Boxing (A) Kinetic Combat - Accuracy/Damage (23) Kinetic Combat - Damage/Endurance (23) Kinetic Combat - Damage/Recharge (25) Kinetic Combat - Damage/Endurance/Recharge Level 24: Tough (A) Steadfast Protection - Resistance/+Def 3% (25) Gladiator's Armor - TP Protection +3% Def (All) Level 26: Sleet (A) Artillery - Accuracy/Recharge/Range (27) Artillery - Accuracy/Damage/Recharge (27) Artillery - Accuracy/Damage (29) Ragnarok - Chance for Knockdown (29) Annihilation - Chance for Res Debuff (31) Achilles' Heel - Chance for Res Debuff Level 28: Blaze (A) Superior Vigilant Assault - Damage/Endurance/RechargeTime (31) Superior Vigilant Assault - Accuracy/Damage/Endurance/RechargeTime (31) Superior Vigilant Assault - Accuracy/Damage/Endurance (33) Gladiator's Javelin - Chance of Damage(Toxic) (33) Thunderstrike - Accuracy/Damage/Endurance Level 30: Hasten (A) Recharge Reduction IO (36) Recharge Reduction IO Level 32: Heat Loss (A) Power Transfer - EndMod (34) Power Transfer - Chance to Heal Self (36) Power Transfer - Damage/Recharge (36) Power Transfer - Damage/EndMod (37) Power Transfer - Damage/Accuracy/Endurance (37) Power Transfer - Damage/Accuracy/Recharge/Endurance Level 35: Blazing Bolt (A) Superior Winter's Bite - Accuracy/Damage (37) Superior Winter's Bite - Recharge/Chance for -Speed & -Recharge (39) Superior Winter's Bite - Damage/RechargeTime (39) Superior Winter's Bite - Accuracy/Damage/Endurance (39) Superior Winter's Bite - Accuracy/Damage/Recharge (40) Superior Winter's Bite - Damage/Endurance/Accuracy/RechargeTime Level 38: Inferno (A) Superior Avalanche - Accuracy/Damage (40) Superior Avalanche - Damage/Endurance (40) Superior Avalanche - Recharge/Chance for Knockdown (42) Superior Avalanche - Accuracy/Damage/Endurance (42) Superior Avalanche - Accuracy/Damage/Recharge (42) Superior Avalanche - Accuracy/Damage/Endurance/Recharge Level 41: Soul Drain (A) Accuracy IO (43) Recharge Reduction IO Level 44: Dark Embrace (A) Reactive Armor - Resistance (45) Reactive Armor - Resistance/Endurance (45) Reactive Armor - Resistance/Recharge (45) Reactive Armor - Resistance/Endurance/Recharge Level 47: Weave (A) Luck of the Gambler - Defense/Increased Global Recharge Speed (48) Reactive Defenses - Scaling Resist Damage (48) Reactive Defenses - Defense (48) Reactive Defenses - Defense/Endurance Level 49: Frostwork (A) Healing IO Level 1: Vigilance Level 1: Brawl (A) Superior Blistering Cold - Accuracy/Damage (46) Superior Blistering Cold - Damage/Endurance (46) Superior Blistering Cold - Accuracy/Damage/Endurance (50) Superior Blistering Cold - Accuracy/Damage/Recharge (50) Superior Blistering Cold - Damage/Endurance/Accuracy/RechargeTime (50) Superior Blistering Cold - Recharge/Chance for Hold Level 1: Sprint (A) Empty Level 2: Rest (A) Empty Level 1: Swift (A) Flight Speed IO Level 1: Hurdle (A) Jumping IO Level 1: Health (A) Panacea - +Hit Points/Endurance (43) Numina's Convalesence - +Regeneration/+Recovery (46) Miracle - +Recovery Level 1: Stamina (A) Power Transfer - Chance to Heal Self (43) Performance Shifter - Chance for +End Level 8: Afterburner Level 49: Quick Form Level 50: Agility Core Paragon Level 50: Task Force Commander Level 50: Portal Jockey Level 50: The Atlas Medallion Level 50: Freedom Phalanx Reserve ------------ | Copy & Paste this data into Mids Reborn : Hero Designer to view the build | |-------------------------------------------------------------------| |MxDz;1745;757;1514;HEX;| |78DA65944B4F135114C7CF746EA96D795540A05090220F0B568A1AB70690444AB14| |0E2CE34950E65923A6D4A89F82D7CC68D2F76E263E37BEB5EBF812B173EA2140CEA| |C2C48CA773EE814B996432BFB9E779FF73E62656276A3FBC9F3E035AFD782EBDBC9| |C9A30160D2B6314DD8974D65C80CAE5C13BC4EBA9B195C5C5E8783E97494DE42F9B| |56BA64E6ADE08E752E6D658D4C74D22C1AA9314C580A9CB3968CA26195A20CFE643| |E9F8B4EE6CCEC52A9C1E169238DB1CB4B66A18E6C159369657DCEDB7CC130321D67| |0BE602962D16570AA57C31359F5FC9A51298DF285E6DC3FEFAF18EBB40BD6CBC5B3| |4809880CFCDC8DAAEC50DF05C772C2E78C1F09240C02B86D70435F086600A0B684A| |1A4C19C467CC0B5FB180AE94163A8C08191C233800A718BE503A1F7C2248605EB7D| |AB81BBAC0B1F83D24FF8EC5031F5D8EE51B56F42ABD082F78DC326D0D413DE8048D| |5CB111DE52DEF398C4AF44BBFC2C552D9475099B04016CA04EF1D5EBD8B79E5D7AE| |05F65462A20A3BD18D4A00635705033C47509D2F730A74962570165B7AE00EB7B10| |86AAE03BEEBF4955A609D649190D4BB72816BD0592F80C0B3804B30C73046D304FA| |06350ABD2AFD6EABC862A2EA3D4DD2CA66F5787A89D150FB2E24156BC134EBB2448| |E9BBE01DAE3409F8818D77A8A3D201A342BA9C643821A432C32CD11A7DB830F6195| |2FB0CB120BD0C7358A77B77A06C77376C09F999FE10F4C24F866D8223F08BE137C1| |06F61956B71B8647ECF28CA01FD6191E333C211880A704654CD3A7A6E983BBEC728| |F618DE028DC6778C0F090E00AEA30B8FB0FDBDA208F4684F7BD8A2E43EAC80D39FD| |0F0818862E866E861E02817A46D5A028CFE971D8D6259419E49CCEA0C223EA39308| |29A383DCC88BD4790DD29F69D3CD76847C7E03AC30D8218DC64B8C5709B605AEC3B| |DA6CBC2029D4ECCE89E4AC6FF8F696C5BB9706A8BCDF324896CD2A0B6EB287F61B8| |10B9A6C758A64DBAAF24594A315813B34F9F893ED39BAEC7804555317FEA2474C49| |62A77D550B17AB172E552F24AB17FE03FA6CDDEE| |-------------------------------------------------------------------|
-
Build for a friend for some ideas This Hero build was built using Mids Reborn 3.4.6 https://github.com/LoadedCamel/MidsReborn Click this DataLink to open the build! Level 50 Science Tanker Primary Power Set: Stone Armor Secondary Power Set: War Mace Power Pool: Fighting Power Pool: Leadership Power Pool: Speed Power Pool: Leaping Ancillary Pool: Energy Mastery Hero Profile: Level 1: Rock Armor (A) Luck of the Gambler - Defense/Increased Global Recharge Speed (3) Luck of the Gambler - Defense/Endurance (3) Kismet - Accuracy +6% Level 1: Bash (A) Superior Might of the Tanker - Accuracy/Damage (5) Superior Might of the Tanker - Damage/Recharge (5) Superior Might of the Tanker - Accuracy/Damage/Recharge (7) Superior Might of the Tanker - Damage/Endurance/Recharge (7) Superior Might of the Tanker - Accuracy/Damage/Endurance/Recharge (9) Superior Might of the Tanker - Recharge/Chance for +Res(All) Level 2: Stone Skin (A) Defense Buff IO (13) Aegis - Resistance/Endurance/Recharge (13) Gladiator's Armor - TP Protection +3% Def (All) (15) Aegis - Resistance (15) Aegis - Resistance/Endurance (17) Aegis - Resistance/Recharge Level 4: Jawbreaker (A) Mako's Bite - Accuracy/Damage/Endurance/Recharge (46) Mako's Bite - Accuracy/Damage (48) Mako's Bite - Accuracy/Endurance/Recharge (48) Mako's Bite - Damage/Endurance (48) Mako's Bite - Chance of Damage(Lethal) Level 6: Earth's Embrace (A) Recharge Reduction IO Level 8: Rooted (A) Harmonized Healing - Heal/Endurance (17) Harmonized Healing - Endurance/Recharge (19) Harmonized Healing - Heal/Recharge (40) Harmonized Healing - Heal/Endurance/Recharge (40) Harmonized Healing - Heal (42) Harmonized Healing - Endurance Level 10: Taunt (A) Accuracy IO Level 12: Crystal Armor (A) Luck of the Gambler - Defense/Increased Global Recharge Speed (19) Luck of the Gambler - Defense/Endurance (21) Shield Wall - +Res (Teleportation), +5% Res (All) Level 14: Mud Pots (A) Obliteration - Accuracy/Damage/Endurance/Recharge (43) Obliteration - Damage (45) Obliteration - Accuracy/Recharge (45) Obliteration - Damage/Recharge (46) Obliteration - Accuracy/Damage/Recharge (46) Endurance Reduction IO Level 16: Build Up (A) Gaussian's Synchronized Fire-Control - Chance for Build Up Level 18: Minerals (A) Luck of the Gambler - Defense/Increased Global Recharge Speed (21) Luck of the Gambler - Defense/Endurance (23) Reactive Defenses - Scaling Resist Damage Level 20: Whirling Mace (A) Superior Gauntleted Fist - Accuracy/Damage (23) Superior Gauntleted Fist - Damage/RechargeTime (25) Superior Gauntleted Fist - Accuracy/Damage/RechargeTime (25) Superior Gauntleted Fist - Damage/Endurance/RechargeTime (27) Superior Gauntleted Fist - Accuracy/Damage/Endurance/RechargeTime (27) Superior Gauntleted Fist - RechargeTime/+Absorb Level 22: Boxing (A) Empty Level 24: Tough (A) Steadfast Protection - Resistance/+Def 3% (29) Aegis - Resistance (29) Aegis - Resistance/Endurance (31) Aegis - Resistance/Endurance/Recharge (31) Aegis - Resistance/Recharge (31) Aegis - Psionic/Status Resistance Level 26: Weave (A) Luck of the Gambler - Defense/Increased Global Recharge Speed (33) Reactive Defenses - Defense (33) Reactive Defenses - Defense/Endurance Level 28: Brimstone Armor (A) Aegis - Resistance (33) Aegis - Resistance/Endurance (34) Aegis - Resistance/Recharge (34) Aegis - Resistance/Endurance/Recharge (34) Aegis - Endurance/Recharge Level 30: Clobber (A) Superior Blistering Cold - Accuracy/Damage (36) Superior Blistering Cold - Damage/Endurance (36) Superior Blistering Cold - Accuracy/Damage/Endurance (36) Superior Blistering Cold - Accuracy/Damage/Recharge (37) Superior Blistering Cold - Damage/Endurance/Accuracy/RechargeTime (37) Superior Blistering Cold - Recharge/Chance for Hold Level 32: Maneuvers (A) Luck of the Gambler - Defense/Increased Global Recharge Speed (50) Reactive Defenses - Defense (50) Reactive Defenses - Defense/Endurance Level 35: Shatter (A) Superior Avalanche - Accuracy/Damage (37) Superior Avalanche - Damage/Endurance (39) Superior Avalanche - Accuracy/Damage/Endurance (39) Superior Avalanche - Accuracy/Damage/Recharge (39) Superior Avalanche - Accuracy/Damage/Endurance/Recharge (40) Superior Avalanche - Recharge/Chance for Knockdown Level 38: Crowd Control (A) Armageddon - Damage/Recharge (42) Armageddon - Damage/Recharge/Accuracy (42) Armageddon - Recharge/Accuracy (43) Armageddon - Damage/Endurance (43) Armageddon - Chance for Fire Damage Level 41: Conserve Power (A) Recharge Reduction IO Level 44: Hasten (A) Recharge Reduction IO (45) Recharge Reduction IO Level 47: Super Jump (A) Winter's Gift - Slow Resistance (20%) Level 49: Physical Perfection (A) Endurance Modification IO Level 1: Brawl (A) Empty Level 1: Gauntlet Level 1: Sprint | Copy & Paste this data into Mids Reborn : Hero Designer to view the build | |-------------------------------------------------------------------| |MxDz;1683;720;1440;HEX;| |78DA7594CB4F535110C6BF4B2FD696D6F2AAE50D45B105A4529428AF08022EB4242| |4185D1952CBA154B06D5A16B2F7B9F319372ABAD4BFC3A56E7DE17B2F9898B851AC| |D33B77F450E24D6EF33B337367BE39677AA62E4E785E3C8F8DC2F08C2FC5F3F9D95| |3F1F4A2CA39671229954E28141F27BD0D6C9F9D50F32A9D579199E54C5ACD8EE52E| |64727EDB35A596948A9C8913C5E94BEF7426B314399E4A2E2CA7D2499FB58AA9F89| |CCAE5175259B7B59EC92A35E7115796E26A26B3A9446432AD72C915CA935F56B995| |3AAADF41EF9A8B7E0CC8532803FCB48C9A2843A5C026799A4DF4BBB7C696032F1D5| |688895702AF1976E08DC05B869D58637847250D3D8D8116581E0F0E1A36F471EC2E| |1C224BA808BD0C9588321C26350E2D8DE9C0794ED383798603480924051619DE938| |872FCFB9A16DDECF9481EA72ECF89A3527A94A11A630C211C131867E8C404C31192| |E7D2D2C085062EF0990A54E85B5E215B5E2D5B5E8B93DCFF078AF5EA62BCD61191A| |70B3F19F6E397C06699DDFF6F8120971C20313EBD5B1F9E70C8172A50A58BA91231| |B5226637BEB39821CA52A38BA9C125D30EB9CC50872B0257191A704DE03A8341B3E| |FD7C5F851A0070EB207F4F4016B4983D7644D41B408BD0C2D32292DD63858D0CF60| |529A7ABDA37AE9A80DEB0E1B36183E51F78DFA0C354AA536A9149402412919441FC| |320ED47B32EB81937B8C53DB829704BE036C35EDC11B8CB5045825B75C1AD22382A| |82A32278984AB6EB25DB715FD23D60D8878702AB028F184278CC3042693AF4BE3B3| |0C0F3D08941812119B46181118655D212D60F302CFF9D766AA55BF318DDEC71D170| |DA10A09088FE71048DDCDB532FAC4DFFEBE9A553B0BE6932A13F85E25B9C984E73E| |B855488FD2770DAD4E3C86EB0FD6BC98D466F0F77B2E1DE762F9E36EC7BEC04FFC3| |DD08B2F0F5ED59C29CE55B8987F01EEFA11B3FF828A62924AAF770B6D4102F359C2| |B3578022586675D5B37B9F007376DCEB8| |-------------------------------------------------------------------|
-
Thanks again for the response, I decided to try out a build on the test server and you were not joking about it being an end hog. I was planning on soloing with this but I will likely only team with it now.
-
Awesome, I'll give a go at making a melee defence build later then. With the changes Tex suggested the best I could get for range def was 32% with hardcap s/l resist. Unfortunately doing so put recharge down to 145.25% with hasten active, is that enough for perma dom?
-
Thanks for the in depth responses. Usually I would choose fly/hover over super speed but I noticed a couple of the Earth powers need you grounded to activate. It did not even occur to me to use celerity which I am surprised by as it's normally a 'go to' proc for me when levelling characters. I wasn't sure what attack chain I would be using as it's barely into the teens at the moment. A lot of my previous characters utilise early powers in the chain so thought that Grasp would be a safe bet for the ATO. I'm also unsure why I had the 'Attacked' function unchecked, it was the reason I chose Nerve as it would have put the build over softcap ranged. I had no idea about aura's being poor for proc rate so that is helpful for some of my other toons too. Unleash potential seems to give much more benefit than I thought it would and so it's something I will need to look at. I noticed that you chased melee defence over range, does dark/earth lend itself better for close combat at end game combat? Thanks again both of you, you've given me some things to think about 🙂
-
Hi, I'm new to doms and was hoping for some advice. I like to have a build ready for before I hit 50 but as this is the first dom I have used outside of my farmer on live I am unsure on the power choices or if I should be focussing on procs once I have high enough recharge rather than defence/res. Please be constructive with criticism rather than just "go play scrapper" and let me know what I'm doing wrong. Thanks in advance 🙂 This Villain build was built using Mids Reborn 3.2.17 https://github.com/LoadedCamel/MidsReborn Click this DataLink to open the build! Level 50 Magic Dominator Primary Power Set: Darkness Control Secondary Power Set: Earth Assault Power Pool: Speed Power Pool: Fighting Power Pool: Leadership Power Pool: Concealment Ancillary Pool: Soul Mastery Villain Profile: Level 1: Dark Grasp -- SprAscoft-Acc/Conf/Hold/Immob/Sleep/Stun/Fear(A), SprAscoft-Conf/Hold/Immob/Sleep/Stun/Fear/Rchg(11), SprAscoft-EndRdx/Rchg(13), SprAscoft-Acc/Conf/Hold/Immob/Sleep/Stun/Fear/EndRdx(13), SprAscoft-Acc/Conf/Hold/Immob/Sleep/Stun/Fear/EndRdx/Rchg(15), SprAscoft-Rchg/+Dmg%(15) Level 1: Stone Spears -- Dcm-Acc/Dmg/Rchg(A), Dcm-Acc/Dmg(3), Dcm-Dmg/Rchg(3), Dcm-Acc/EndRdx/Rchg(5), Dcm-Build%(5) Level 2: Living Shadows -- SprDmnGrs-Rchg/Fiery Orb(A) Level 4: Tremor -- FrcFdb-Rechg%(A) Level 6: Possess -- CrcPrs-Conf(A), CrcPrs-Conf/Rchg(7), CrcPrs-Acc/Conf/Rchg(7), CrcPrs-Acc/Rchg(9), CrcPrs-Conf/EndRdx(9), CrcPrs-Conf%(11) Level 8: Super Speed -- WntGif-ResSlow(A) Level 10: Boxing -- Empty(A) Level 12: Heart of Darkness -- Arm-Dam%(A), Arm-Acc/Dmg/Rchg(50) Level 14: Fearsome Stare -- CldSns-ToHitDeb(A), CldSns-Acc/ToHitDeb(17), CldSns-Acc/Rchg(17), CldSns-ToHitDeb/EndRdx/Rchg(19), CldSns-Acc/EndRdx/Rchg(19), CldSns-%Dam(21) Level 16: Power Up -- RechRdx-I(A) Level 18: Tough -- GldArm-3defTpProc(A), TtnCtn-ResDam(21), TtnCtn-ResDam/EndRdx(23), TtnCtn-ResDam/EndRdx/Rchg(23) Level 20: Heavy Mallet -- Hct-Dmg/Rchg(A), Hct-Acc/Dmg/Rchg(43), Hct-Acc/Rchg(43), Hct-Dmg/EndRdx(43), Hct-Dam%(46) Level 22: Weave -- LucoftheG-Def/Rchg+(A), Ksm-ToHit+(25), Rct-ResDam%(25), Rct-Def/EndRdx(34), Rct-Def(46) Level 24: Hasten -- RechRdx-I(A), RechRdx-I(39) Level 26: Shadow Field -- UnbCns-Hold(A), UnbCns-Acc/Hold/Rchg(27), UnbCns-Acc/Rchg(27), UnbCns-EndRdx/Hold(29), UnbCns-Dam%(29) Level 28: Seismic Smash -- Lck-Acc/Hold(A), Lck-Acc/Rchg(31), Lck-Rchg/Hold(31), Lck-EndRdx/Rchg/Hold(31), Lck-Acc/EndRdx/Rchg/Hold(33), Lck-%Hold(33) Level 30: Maneuvers -- LucoftheG-Def/Rchg+(A), Rct-Def(33), Rct-Def/EndRdx(34) Level 32: Umbra Beast -- ExpRnf-Acc/Rchg(A), ExpRnf-Acc/Dmg(34), ExpRnf-Dmg/EndRdx(36), ExpRnf-Acc/Dmg/Rchg(36) Level 35: Mud Pots -- Erd-Acc/Dmg/EndRdx/Rchg(A), Erd-Acc/Rchg(39), Erd-%Dam(39), FuroftheG-ResDeb%(40), EndRdx-I(40), EndRdx-I(40) Level 38: Fissure -- OvrFrc-Dam/KB(A) Level 41: Dark Embrace -- StdPrt-ResDam/Def+(A), TtnCtn-ResDam(42), TtnCtn-ResDam/EndRdx(42), TtnCtn-ResDam/EndRdx/Rchg(42) Level 44: Soul Drain -- Obl-Acc/Dmg/EndRdx/Rchg(A), Obl-Acc/Rchg(45), Obl-Dmg/Rchg(45), Obl-Acc/Dmg/Rchg(45), Obl-%Dam(46) Level 47: Dark Obliteration -- Rgn-Dmg/Rchg(A), Rgn-Acc/Dmg/Rchg(48), Rgn-Acc/Rchg(48), Rgn-Dmg/EndRdx(48), Rgn-Knock%(50) Level 49: Stealth -- LucoftheG-Def/Rchg+(A), ShlWal-ResDam/Re TP(50) Level 1: Brawl -- Empty(A) Level 1: Domination Level 1: Sprint -- Empty(A) Level 2: Rest -- Empty(A) Level 1: Swift -- Empty(A) Level 1: Health -- NmnCnv-Regen/Rcvry+(A), Pnc-Heal/+End(37), Mrc-Rcvry+(37) Level 1: Hurdle -- Empty(A) Level 1: Stamina -- PrfShf-End%(A), PwrTrns-EndMod(36), PwrTrns-+Heal(37) Level 8: Speed Phase Level 50: Nerve Core Paragon Level 50: Born In Battle Level 50: High Pain Threshold Level 50: Invader Level 50: Marshal ------------ | Copy & Paste this data into Mids Reborn : Hero Designer to view the build | |-------------------------------------------------------------------| |MxDz;1470;702;1404;HEX;| |78DA65945B4F135110C767DBADD842AD15B0C582D00A94B652A9D7C4C428A154519| |A6048D418B5AE50DA8DB525DDC5C807F05D9F50C4CBC7F0FAE4273178212614D488| |9700EBF4CC1C5BC226BBBF9DD93333FF9D39BBE97BC9A6A9A9D419503C4305CD303| |2C9D21DBDA899A5B223ADE5F4093BE0D18067E8FF83CC50A968964B8578522BDF2E| |6631861D9DB5258386A1CD14CCF8B05636F3D202D75809C3C6A7B3D949B7B84DE9B| |9BCA917731E618D66B5C96CD9C8EBD35E618F14EFEA867E4B2FE8E66C60785A9F88| |D70A8C97660A99B46698D9F2AC1FE5F5E0B9EEC38B52150C96035EA2F4840AAE57C| |4A6D7CC37C45D6F99EF888FDCD560116DA9F0041156C136C77C4C54E7990BC40D9F| |8C010B944155649AC74C76CE04F6FB36800E153671A5436A735CB389953BAE336F1| |077669837892E8D78A081662032360448B0821EA7743A2D3C00B0138DEC521A4F51| |70E224D142056EA9C0BD48B2767F647E22EEF9CCFC426C59222EE03B7964314F0C4| |4463B2AF07246BBF730C96A89A327E184BD51663FF1296668E6C56A73983445FB98| |116694D81F23AA58A15506B556EFD0E9DF00A1C9FF832A065788FD156208837C1CA| |4F8845627F4326DD8A23699B12D4965F6A5986789EDE79823C467A83D205B17F849| |CEFD6BCC5FCCDFC4AE3FCCBF442FCAE9E0605B07BF435765AB763BCAEA94ADEC5CA| |1C8E02A8FFF1BF33BF139CA094939A1659A50EF576685183E4D99C3417A71C91718| |DC237767CF075AF400D127CBF7559B8719223CC9084F32C2935C6A0288F15E50631| |6693AB8CEDC606EF224812A3C44C465DFE347E8E1A1A3CC63CCE3BC654F10DDD8BA| |0139C9016E5DE202656C57411EB8F3C5FE0FD5B9ACD1EDCFC754F97FA87EAEC2B5E| |CAAFD3378D54A9DCB0697A86A7790AA769F57C4975FD91EB7BA256E8E67B64A3F85| |EE35E2FB68ED53B6869BD1C711D645579D71B9DEB8526F5CAD37FE0164ACED6C| |-------------------------------------------------------------------|
-
That's a fair enough point but I was kind of interested in if he chose it for a secondary power. There are only 23 powers he listed out of 24. I tried to come up with something although I'm not great at builds and haven't played psy since live. The first is softcapped range and perma hasten. The second softcapped s/l/nrg and perma hasten. I didn't bother with the last power selection as I wasn't sure what you wanted. I would advise waiting on someone else to tell you if they're garbage before building them. This Hero build was built using Mids Reborn 3.0.6.0 https://github.com/LoadedCamel/MidsReborn Click this DataLink to open the build! Level 50 Magic Blaster Primary Power Set: Psychic Blast Secondary Power Set: Atomic Manipulation Power Pool: Flight Power Pool: Fighting Power Pool: Speed Power Pool: Leaping Ancillary Pool: Mace Mastery Hero Profile: Level 1: Mental Blast -- Thn-Acc/Dmg/EndRdx(A), Thn-Acc/Dmg(5), Thn-Dmg/EndRdx(7), Thn-Dmg/Rchg(7), Thn-Acc/Dmg/Rchg(9), Thn-Dmg/EndRdx/Rchg(9) Level 1: Electron Shackles -- Thn-Acc/Dmg/EndRdx(A), Thn-Acc/Dmg(40), Thn-Dmg/EndRdx(40), Thn-Dmg/Rchg(42), Thn-Acc/Dmg/Rchg(43), Thn-Dmg/EndRdx/Rchg(43) Level 2: Telekinetic Blast -- Thn-Acc/Dmg(A), Thn-Dmg/EndRdx(11), Thn-Dmg/Rchg(11), Thn-Acc/Dmg/Rchg(19), Thn-Acc/Dmg/EndRdx(19), Thn-Dmg/EndRdx/Rchg(25) Level 4: Fly -- BlsoftheZ-ResKB(A), WntGif-ResSlow(43) Level 6: Positron Cell -- Thn-Acc/Dmg/EndRdx(A), Thn-Dmg/EndRdx/Rchg(37), Thn-Acc/Dmg(39), Thn-Dmg/EndRdx(39), Thn-Dmg/Rchg(39), Thn-Acc/Dmg/Rchg(40) Level 8: Psychic Focus -- GssSynFr--Build%(A) Level 10: Ionize -- RechRdx-I(A) Level 12: Psionic Lance -- SprBlsWrt-Acc/Dmg(A), SprBlsWrt-Dmg/Rchg(13), SprBlsWrt-Acc/Dmg/Rchg(13), SprBlsWrt-Acc/Dmg/EndRdx(15), SprBlsWrt-Acc/Dmg/EndRdx/Rchg(17), SprBlsWrt-Rchg/Dmg%(17) Level 14: Hover -- LucoftheG-Def/Rchg+(A), LucoftheG-Def(15), ShlWal-ResDam/Re TP(48) Level 16: Beta Decay -- AchHee-ResDeb%(A), AnlWkn-%ToHit(33), DefDeb-I(33), EndRdx-I(33) Level 18: Psionic Tornado -- SprDfnBrr-Acc/Dmg(A), SprDfnBrr-Dmg/Rchg(27), SprDfnBrr-Acc/Dmg/Rchg(29), SprDfnBrr-Acc/Dmg/EndRdx(29), SprDfnBrr-Acc/Dmg/EndRdx/Rchg(31), SprDfnBrr-Rchg/+Status Protect(31) Level 20: Metabolic Acceleration -- Prv-Heal(A), Prv-Heal/EndRdx(21), Prv-EndRdx/Rchg(21), Prv-Heal/Rchg(23), Prv-Heal/Rchg/EndRdx(23), Prv-Absorb%(25) Level 22: Evasive Maneuvers -- LucoftheG-Def/Rchg+(A) Level 24: Boxing -- Empty(A) Level 26: Tough -- StdPrt-ResDam/Def+(A), GldArm-3defTpProc(27) Level 28: Atom Smasher -- Obl-Dmg/Rchg(A), Obl-Acc/Rchg(46), Obl-Dmg(48), Obl-Acc/Dmg/Rchg(48), Obl-%Dam(50) Level 30: Weave -- LucoftheG-Def/Rchg+(A), LucoftheG-Def(31) Level 32: Psychic Wail -- Arm-Dmg/Rchg(A), Arm-Dmg(34), Arm-Acc/Dmg/Rchg(34), Arm-Acc/Rchg(34), Arm-Dam%(37) Level 35: Radioactive Cloud -- SprEnt-Acc/Hold(A), SprEnt-Hold/Rchg(36), SprEnt-Acc/Hold/End(36), SprEnt-Acc/Hold/End/Rchg(36), SprEnt-Rchg/AbsorbProc(37) Level 38: Positronic Fist -- Mk'Bit-Acc/Dmg(A), Mk'Bit-Dmg/EndRdx(45), Mk'Bit-Dmg/Rchg(45), Mk'Bit-Acc/EndRdx/Rchg(46), Mk'Bit-Acc/Dmg/EndRdx/Rchg(46), Mk'Bit-Dam%(50) Level 41: Scorpion Shield -- LucoftheG-Def/Rchg+(A), LucoftheG-Def(42), Ksm-ToHit+(42) Level 44: Hasten -- RechRdx-I(A), RechRdx-I(45) Level 47: Combat Jumping -- LucoftheG-Def/Rchg+(A) Level 49: [Empty] Level 1: Brawl -- Empty(A) Level 1: Defiance Level 1: Sprint -- Empty(A) Level 2: Rest -- Empty(A) Level 1: Swift -- Flight-I(A) Level 1: Health -- NmnCnv-Regen/Rcvry+(A), Mrc-Rcvry+(3), Pnc-Heal/+End(5) Level 1: Hurdle -- Jump-I(A) Level 1: Stamina -- PwrTrns-EndMod(A), PwrTrns-+Heal(3), PrfShf-End%(50) Level 4: Afterburner Level 49: Quick Form Level 50: Agility Core Paragon Level 50: The Atlas Medallion Level 50: Task Force Commander Level 50: Portal Jockey Level 50: Freedom Phalanx Reserve ------------ | Copy & Paste this data into Mids Reborn : Hero Designer to view the build | |-------------------------------------------------------------------| |MxDz;1421;668;1336;HEX;| |78DA6593DB4E13511486D7B453B12DE57C1410CAA1A51C8AF5460191C463223469C| |0534C0C194B2DA34DDB4049E4D2A7305101F5CE1B9F413C3C81B73E8027942B2F44| |ACABF3FF2D4DD8C9CCB766EDFDAFB5F6DAB3E38F2ED5BEB9FA78568CC0C58CB5B6B| |67441DF85D4AA276EA5EDA494468D3EDD742F2D58D9746A399A58DB48AED849AC0E| |952717D7F3F9DC6A21BA602DDB56C1CE6597E256D6CEAF679C0FF12772B94CF44AC| |64EAF1402B04BA69D4DFB9CAFC57C2AB55CEB98F3292BAFFECECB793B192D878F5B| |C994BE4AF646871615D26751CAA3E891978A9829E626786C8BDC068FBF205F81672| |247B5616AC3D446A81DA17684DAEB0A835A831A1F353E6A9AA86962EC0E6AFDDA51| |37B486FBB30B71BBDC0E27B5260FE37AA81BA42EC43C21E609314F98796EF0B0542| |B35AF11774AE379E9F38E62DD2D85DF400EFF53E4AD7D463E07EB36C1862D721BF4| |6A8200B4AE40AB1A31AFD4B58013735833AD39EBB1C65DBFA375349BD2F709F5F4F| |5A286BE20785BD1C85A1AC5747C270CB0DB45BAC19326E901CF699E666A9BBF2077| |CB57F21BD8F69DFC0176EC82EF46445AD99756671FA618BAB776FADA8B3AC4AD9E4| |E64303ADBD5E8D1EA4E23C28C66EFC26AB3EB00BB1BFF0B4EEC93FFC09840636ABC| |1EC6EB61F74EB27B77D4DB8B39B37712BAE059728A9C060767C0F35A433F35FD6FD| |195811DF23DF9011CFC08CEAA66885D1BBA8F53184B932BE0B84D3E00630FC1FD06| |91619EFE30EB8FB0FEC88138FDE9D73D8E728FA3CE1FE79531B24DE7A2989328F5A| |54617BBCDCA5514C72341B37CC38AC5F923B309B372FDC4703CBBBECA7A910194FB| |EBD0E7929B3864D73565588F228823F959AD1B866EAF5AB787B6B97E83B12768BDB| |4552E71714E7FA653B4FFA83FC6BAEFF90E6DABCABE5B6527AAECFFFAD3DFAE| |-------------------------------------------------------------------| This Hero build was built using Mids Reborn 3.0.6.0 https://github.com/LoadedCamel/MidsReborn Click this DataLink to open the build! Level 50 Magic Blaster Primary Power Set: Psychic Blast Secondary Power Set: Atomic Manipulation Power Pool: Flight Power Pool: Fighting Power Pool: Speed Power Pool: Leaping Ancillary Pool: Mace Mastery Hero Profile: Level 1: Mental Blast -- SprBlsWrt-Acc/Dmg(A), SprBlsWrt-Dmg/Rchg(5), SprBlsWrt-Acc/Dmg/Rchg(7), SprBlsWrt-Acc/Dmg/EndRdx(7), SprBlsWrt-Acc/Dmg/EndRdx/Rchg(9), SprBlsWrt-Rchg/Dmg%(9) Level 1: Electron Shackles -- EnfOpr-Acc/Rchg(A), EnfOpr-Acc/EndRdx(3), EnfOpr-Acc/Immob/Rchg(3), EnfOpr-Acc/Immob(5) Level 2: Telekinetic Blast -- SprDfnBrr-Acc/Dmg(A), SprDfnBrr-Acc/Dmg/Rchg(11), SprDfnBrr-Dmg/Rchg(11), SprDfnBrr-Acc/Dmg/EndRdx(13), SprDfnBrr-Acc/Dmg/EndRdx/Rchg(13), SprDfnBrr-Rchg/+Status Protect(17) Level 4: Fly -- BlsoftheZ-Travel(A), BlsoftheZ-ResKB(48), WntGif-ResSlow(50) Level 6: Positron Cell -- Apc-Dmg(A), Apc-Dmg/Rchg(17), Apc-Acc/Dmg/Rchg(19), Apc-Acc/Rchg(19), Apc-Dam%(29) Level 8: Psychic Focus -- Empty(A) Level 10: Ionize -- Empty(A) Level 12: Psionic Lance -- Thn-Acc/Dmg/EndRdx(A), Thn-Acc/Dmg(31), Thn-Acc/Dmg/Rchg(34), Thn-Dmg/EndRdx(36), Thn-Dmg/Rchg(36), Thn-Dmg/EndRdx/Rchg(36) Level 14: Hover -- LucoftheG-Def/Rchg+(A), LucoftheG-Def(15), Ksm-ToHit+(15) Level 16: Beta Decay -- AchHee-ResDeb%(A) Level 18: Psionic Tornado -- Rgn-Dmg(A), Rgn-Dmg/Rchg(45), Rgn-Acc/Dmg/Rchg(45), Rgn-Acc/Rchg(46), Rgn-Knock%(46), Ann-ResDeb%(46) Level 20: Metabolic Acceleration -- Prv-Heal(A), Prv-Heal/EndRdx(21), Prv-EndRdx/Rchg(21), Prv-Heal/Rchg(23), Prv-Heal/Rchg/EndRdx(23), Prv-Absorb%(29) Level 22: Evasive Maneuvers -- LucoftheG-Def/Rchg+(A) Level 24: Boxing -- KntCmb-Acc/Dmg(A), KntCmb-Dmg/EndRdx(25), KntCmb-Dmg/Rchg(25), KntCmb-Knock%(27) Level 26: Tough -- StdPrt-ResDam/Def+(A), GldArm-3defTpProc(27) Level 28: Atom Smasher -- SprAvl-Acc/Dmg(A), SprAvl-Dmg/EndRdx(37), SprAvl-Acc/Dmg/EndRdx(37), SprAvl-Acc/Dmg/Rchg(37), SprAvl-Acc/Dmg/EndRdx/Rchg(40), SprAvl-Rchg/KDProc(42) Level 30: Weave -- LucoftheG-Def/Rchg+(A), LucoftheG-Def(31), ShlWal-ResDam/Re TP(31) Level 32: Psychic Wail -- Arm-Dmg(A), Arm-Dmg/Rchg(33), Arm-Acc/Dmg/Rchg(33), Arm-Acc/Rchg(33), Arm-Dam%(34), FuroftheG-ResDeb%(34) Level 35: Radioactive Cloud -- SprEnt-Acc/Hold(A), SprEnt-Hold/Rchg(42), SprEnt-Acc/Hold/End(43), SprEnt-Acc/Hold/End/Rchg(43), SprEnt-Rchg/AbsorbProc(43) Level 38: Positronic Fist -- SprBlsCol-Acc/Dmg(A), SprBlsCol-Acc/Dmg/EndRdx(39), SprBlsCol-Acc/Dmg/Rchg(39), SprBlsCol-Dmg/EndRdx/Acc/Rchg(39), SprBlsCol-Rchg/HoldProc(40), AchHee-ResDeb%(40) Level 41: Scorpion Shield -- LucoftheG-Def/Rchg+(A), LucoftheG-Def(42) Level 44: Hasten -- RechRdx-I(A), RechRdx-I(45) Level 47: Combat Jumping -- LucoftheG-Def/Rchg+(A) Level 49: [Empty] Level 1: Brawl -- Empty(A) Level 1: Defiance Level 1: Sprint -- Empty(A) Level 2: Rest -- Empty(A) Level 1: Swift -- Empty(A) Level 1: Health -- NmnCnv-Regen/Rcvry+(A), Mrc-Rcvry+(48), Pnc-Heal/+End(50) Level 1: Hurdle -- Empty(A) Level 1: Stamina -- PwrTrns-EndMod(A), PwrTrns-+Heal(48), PrfShf-End%(50) Level 4: Afterburner Level 49: Quick Form Level 50: Agility Core Paragon ------------ | Copy & Paste this data into Mids Reborn : Hero Designer to view the build | |-------------------------------------------------------------------| |MxDz;1367;663;1326;HEX;| |78DA6593DB4E13511486F774A662291510CAB1145BE50C538B1A0444123C2542930| |A78883764529A3249D3365012B9F40D08424C94A30FE03388879730DE7B44B9F242| |63EA9AF97FAA0993CC7C7BFEBDD7DA6BADBD76E2D1F5AA97B71E8F2B2D702D6B2D2| |DCD4DC8B7985EF426AC8C9D52CE53216F88F2DCB495CBA4E7CDE4D24A6AC14E6175| |E7D1E4CC72A1905F2C9AD3D6BC6D15ED7C6E2E61E5ECC272D6FD51FE643E9F356F6| |6EDCC423180B133B473994AF76FA6904ECF57B9C3A9B45510BDF946C14E9947EE13| |562A2D1F67BCD2244145E59D7122D49C4FC9AB9EE94AC50D653C074F6C925BE0C96| |D72071CEA517C4ABA5AD55CCDB346AE83C60638EB6CC37D3465B85AA587D4C02A9D| |34C01A2FE8970AEAD8C7A3BFF7B85AEC03186F452CC3128B17FE0D6F3FE66A06C0D| |32619034371F02E0F476C5445491E35225E7C547CAE725FC67E285EFF9E72EDC25B| |6064173CBB4DEE902F409F380F20264F20E8D4C1A74ED5937F446E33D4A8EC588D3| |5AA7A5FE2AA33D403F9AB65AD6A07116BFF05F2223870891C223FA20E57C45F1D6D| |EB3E41ABFF4C7E011BBE92DFC0D001F8BA57A920B30F06716E9AE4D0087F7A63D26| |91A4335DD21A7C196595097B5CD58AB353B46925FCB207C8F495CAD8CAB7513E77A| |6E8BDC2677C0AE5DB0670F34C46F1BEBD8C63A8659C7F024FC3F94D976FA6FBF8C9| |A9C192647C8513032468EC3F6AAC41665EF445F71EF7DB0F70DF9967C078E8B4D07| |F7EB5885D6B9463E21D799CF06C9F3FD5DA35437EBD4CD7C7A984F5472EDE35C5F1| |FFAA89F6C903993BD62D2CE69D252C8285F44E52A2A6294AF7569EAD86CD2E0A428| |9AAB1C5496D773CD8F7F8A47DD4333C46E0BBBE4D24550B8EFC7AC0EFFB73A44DAB| |19F60FC29CAAE1ACAD7B934292D779EE35FA2C719F35F1133DB8C| |-------------------------------------------------------------------|
-
Hi, I know you said you don't want any advice on powers but could you advise me on why you took combat jumping? Also, was the 24th power free reign or did you miss by mistake?
-
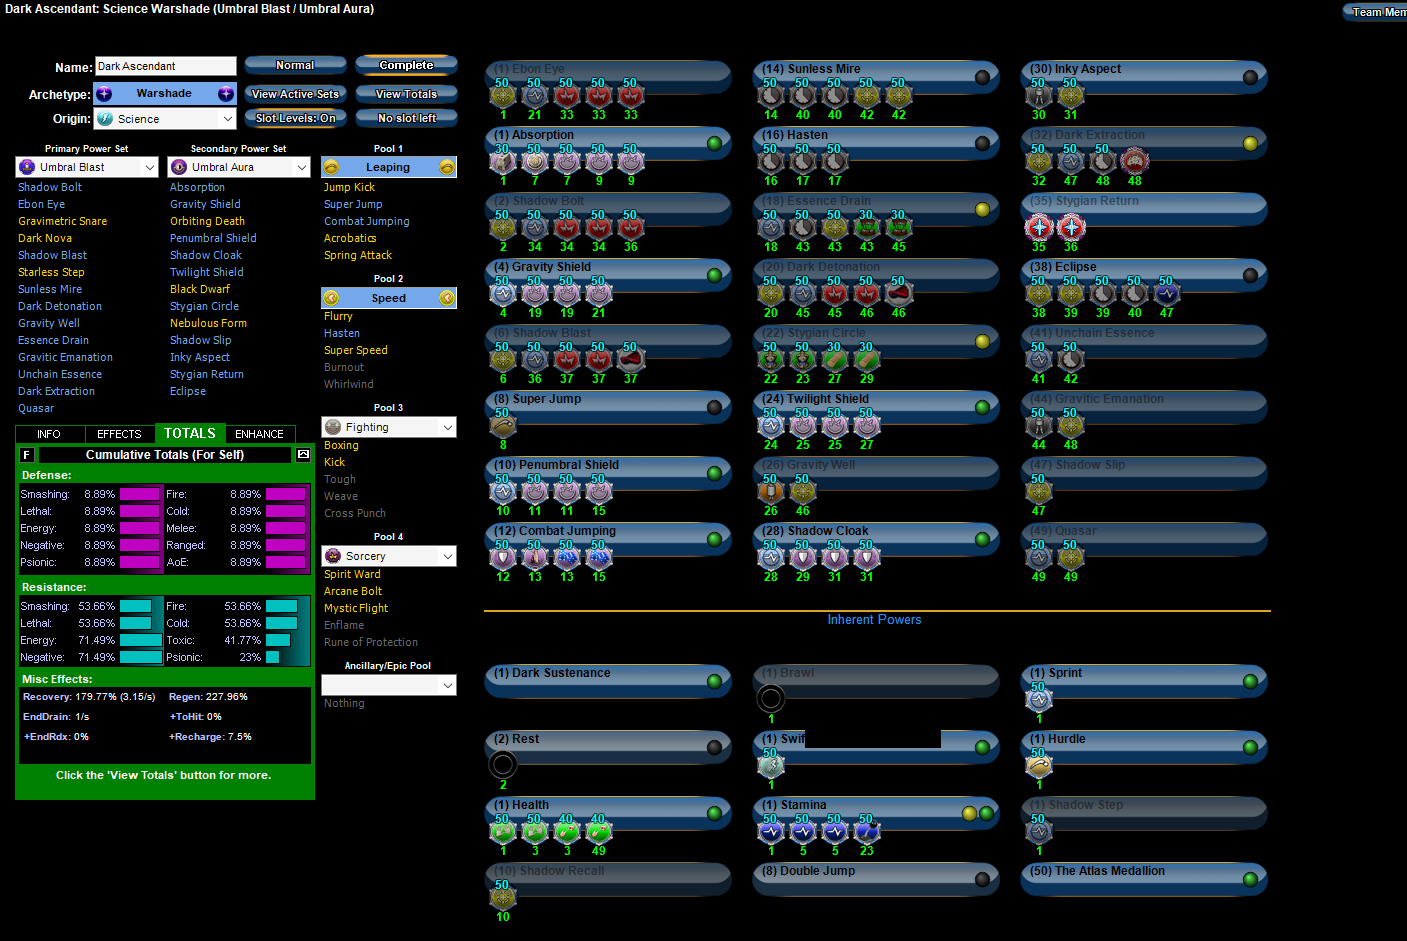
The Panacea proc in Stygian will only have a chance to activate when the power is activated, I would always slot in Health unless I was going for the full set bonus. I've not played a Warshade since live but I would aim to have capped resists and eclipse permanent. I would try to build something but it would be gimped as I'm not sure on the power selections anymore.
-
Wow, I have not seen someone post anything procced out that much. Is this DPS boost from procs vs 100% damage noticeable? (I've never built like that as I've never tested it) If I was to run something like that would it be better to go ageless rather than cardiac? Even with cardiac in there the recovery would be quite low and it seems to have fairly decent sleep/hold mitigation in already. As you could probably tell from my original build, I have no idea what I'm doing so the power choices were more from experience with other powersets 😄 To be perfectly honest I won't be teaming with anyone till level 20+ so I would probably leave the external buffs until 14-20 (for Posi access) Thanks again for your input.
-
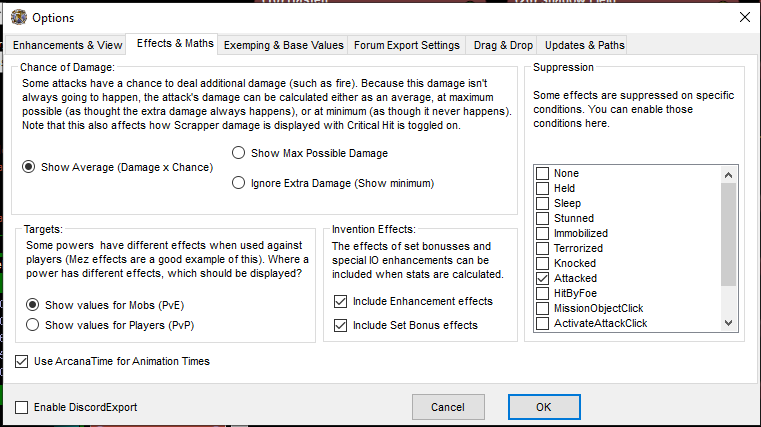
I have no knowledge when it comes to dominators but I'm guessing your defences would be lower due to stealth? If so you can change the settings in mids to reflect that you have been attacked under the options/configurations.
-
Thanks for your response. 1. The enzymes aren't too bad, think they cost me about 8m each last I used them. 2. Yeah, I was just seeing what powers/enhancements I could fit in so the order would be completely off. 3. I would likely take it in place of flight for early on so I can stealth missions, I was considering swapping to tactics once it was 50. Is there any other major flaws you can see?
-
Ok, so I gave it another go using some of your points. Please let me know if it is now worth building or if I still need to work on it. Capped ranged + S/L res. Using psychic mastery as you suggested. This Hero build was built using Mids Reborn 3.0.6.0 https://github.com/LoadedCamel/MidsReborn Click this DataLink to open the build! Level 50 Science Defender Primary Power Set: Sonic Resonance Secondary Power Set: Sonic Attack Power Pool: Flight Power Pool: Leadership Power Pool: Fighting Power Pool: Speed Ancillary Pool: Psychic Mastery Hero Profile: Level 1: Sonic Siphon (A) Accuracy IO (34) Accuracy IO Level 1: Shriek (A) Superior Defender's Bastion - Accuracy/Damage (5) Superior Defender's Bastion - Damage/Recharge (7) Superior Defender's Bastion - Damage/Endurance/Recharge (7) Superior Defender's Bastion - Accuracy/Damage/Endurance (9) Superior Defender's Bastion - Accuracy/Damage/Endurance/Recharge (9) Superior Defender's Bastion - Recharge/Chance for Minor PBAoE Heal Level 2: Sonic Barrier (A) Impervium Armor - Resistance/Endurance/Recharge (33) Impervium Armor - Resistance/Endurance (33) Impervium Armor - Resistance (33) Impervium Armor - Resistance/Recharge Level 4: Howl (A) Superior Vigilant Assault - Accuracy/Damage (11) Superior Vigilant Assault - Damage/RechargeTime (11) Superior Vigilant Assault - RechargeTime/PBAoE +Absorb (13) Annihilation - Accuracy/Damage/Endurance/RechargeTime (13) Annihilation - Accuracy/Damage/Endurance Level 6: Fly (A) Blessing of the Zephyr - Run Speed, Jump, Flight Speed, Range (21) Blessing of the Zephyr - Knockback Reduction (4 points) Level 8: Disruption Field (A) HamiO:Enzyme Exposure (34) HamiO:Enzyme Exposure Level 10: Sonic Haven (A) Reactive Armor - Resistance (23) Reactive Armor - Resistance/Endurance (27) Reactive Armor - Resistance/Recharge (31) Reactive Armor - Resistance/Endurance/Recharge Level 12: Sonic Dispersion (A) Reactive Armor - Resistance (34) Endurance Reduction IO (36) Reactive Armor - Resistance/Endurance (37) Reactive Armor - Resistance/Recharge (37) Reactive Armor - Resistance/Endurance/Recharge Level 14: Maneuvers (A) Luck of the Gambler - Defense/Increased Global Recharge Speed (15) Reactive Defenses - Scaling Resist Damage (15) Reactive Defenses - Defense (17) Reactive Defenses - Defense/Endurance Level 16: Shout (A) Superior Winter's Bite - Damage/Endurance/Accuracy/RechargeTime (17) Superior Winter's Bite - Recharge/Chance for -Speed & -Recharge (19) Superior Winter's Bite - Accuracy/Damage/Recharge (19) Superior Winter's Bite - Accuracy/Damage/Endurance (21) Superior Winter's Bite - Accuracy/Damage Level 18: Boxing (A) Empty Level 20: Amplify (A) Gaussian's Synchronized Fire-Control - Chance for Build Up Level 22: Tough (A) Steadfast Protection - Resistance/+Def 3% (23) Gladiator's Armor - TP Protection +3% Def (All) Level 24: Weave (A) Luck of the Gambler - Defense/Increased Global Recharge Speed (25) Shield Wall - +Res (Teleportation), +5% Res (All) (25) Reactive Defenses - Defense (27) Reactive Defenses - Defense/Endurance Level 26: Clarity (A) Endurance Reduction IO Level 28: Hover (A) Luck of the Gambler - Defense/Increased Global Recharge Speed (29) Kismet - Accuracy +6% (29) Blessing of the Zephyr - Run Speed, Jump, Flight Speed, Range (31) Blessing of the Zephyr - Run Speed, Jump, Flight Speed, Range/Endurance Level 30: Hasten (A) Recharge Reduction IO (31) Recharge Reduction IO Level 32: Liquefy (A) Artillery - Accuracy/Damage (36) Artillery - Damage/Endurance (36) Artillery - Damage/Recharge (46) Artillery - Accuracy/Damage/Recharge (46) Artillery - Accuracy/Recharge/Range (50) Artillery - Endurance/Recharge/Range Level 35: Dominate (A) Apocalypse - Chance of Damage(Negative) (37) Gladiator's Javelin - Chance of Damage(Toxic) (40) Unbreakable Constraint - Chance for Smashing Damage (40) Superior Entomb - Recharge/Chance for +Absorb (43) Thunderstrike - Accuracy/Damage/Endurance (46) Thunderstrike - Accuracy/Damage Level 38: Dreadful Wail (A) Armageddon - Damage/Recharge (39) Armageddon - Accuracy/Damage/Recharge (39) Armageddon - Accuracy/Recharge (39) Armageddon - Damage/Endurance (40) Armageddon - Chance for Fire Damage Level 41: World of Confusion (A) Coercive Persuasion - Confused (42) Coercive Persuasion - Confused/Recharge (42) Coercive Persuasion - Accuracy/Confused/Recharge (42) Coercive Persuasion - Accuracy/Recharge (43) Coercive Persuasion - Confused/Endurance (43) Coercive Persuasion - Contagious Confusion Level 44: Mind Over Body (A) Impervium Armor - Psionic Resistance (45) Impervium Armor - Resistance/Endurance (45) Impervium Armor - Resistance/Endurance/Recharge (45) Impervium Armor - Resistance/Recharge Level 47: Scream (A) Thunderstrike - Accuracy/Damage/Endurance (48) Thunderstrike - Accuracy/Damage/Recharge (48) Thunderstrike - Damage/Endurance/Recharge (48) Superior Vigilant Assault - Damage/Endurance/RechargeTime (50) Superior Vigilant Assault - Accuracy/Damage/Endurance (50) Superior Vigilant Assault - Accuracy/Damage/Endurance/RechargeTime Level 49: Super Speed (A) Celerity - +Stealth Level 1: Brawl (A) Empty Level 1: Sprint (A) Empty Level 1: Vigilance Level 2: Rest | Copy & Paste this data into Mids Reborn : Hero Designer to view the build | |-------------------------------------------------------------------| |MxDz;1373;678;1356;HEX;| |78DA6593CB4F135114C6EF74A694D25240DEA5B4B6145BDA52296A8CAF1815352A1| |822892BB5D63240236909AD89ECC46874EDC69589BAF2BDF0F90718FF02E3468926| |26BA134CD899987A66BECF61C1A4CD6FE69EC7FDCEB9F74C5C1DF3BF38BE7C50698| |123F3856A353F66CE98E56973D133552C99E5A2A9ACC723FFE07F4BFEF0959999EC| |54A55C2A8AF725F90839A63385F2AC394DE3A15AAD50BCAC7C9395CA7CF6D87C697| |6AED662BF8F9B0571AECE95169A61B34CA5F26C93FD35B5609AD31D47174AC5EC64| |75A9382799260AD59AB9B8D4233262F2BFE6527CEA9A0A0A725E15253F5B36CDB6B| |9D54B5DD60C65BC021B5E936FC0C6B7E43B70D9C55055D7B584BC250CB5354E26C9| |4170457C75F81AFA8861C737E5C85DA0FF27F2FA7F803EE9A39BBADD965059EB580| |16F083CD0AD79765B3DD75594BC2E362F757963D8BF2B0C062360380ADE145F1FF2| |183EFA46A3E8CD0063E28C8933A64D743523466FEED46C3D8175680EAC82AD6BE05| |7C9DFC2BA5B9EA1CED6E7E096A7E413B0E311A849FE36C4A8B6BA3CEA9B6469E74A| |FB63744017AF4E76A7B35B54F44B95A33C41B17553613715F69C82AD870A8354784| |BD2F532772F2BF74A7C1FE3FB181FFAABEC3D423C89F0173026BEFD3C89FE34E2C3| |E46D718920B73BA2BB6DFF01837483C30DA407CC35821F75DC5E2B3696C35EF10C3| |4274EE03BF1011D4B3DC07EC3F7C0EF621EE4A90EEE81EFB6BDE43E723F731C00D7| |FD4A253909C973581B3A4F5E20F360EA2259003F89AC34FB951EC22DC97012329C8| |C0C27C16A5B9675656DDD86DA7E9F7C488EA2AEDC0E72273820BD1EE1598D78B177| |C870A65B7ED66D19DFB472DA70A6BC3E693853AB34DBFAABC9B1D27F6D63C5A5CEE| |2FC5D51DEAD93A8637553D4EF8D154DDD813AD75D507539B35C7F9F72AAA8FF91F5| |1C95FD037170CE57| |-------------------------------------------------------------------|
-
Wow, that definitely looks good to me. I do like Rain but I only took it as I ran out of slots for choking. To be perfectly honest it never even occurred to me to check Mu as most people say to use charged armour and I didn't realise it was in both. I've never really built with procs in mind, is the damage difference between being 90% damage enhanced and 3 procs massively noticeable? Thanks for taking the time to help out 🙂
-
I'll have a look into what I can do swapping sets around to try and get a couple more slots. The issue I have with getting rid of Aegis is that I lose 6% s/l resist if they are swapped out. Yeah, I only realised it a week or so ago when I was going to post a build. Doing it the other way is such a pain.
-
Thank you, this is the build I was considering for solo, not sure if AM/Hasten will appear differently for you. This Villain build was built using Mids Reborn 3.0.6.0 https://github.com/LoadedCamel/MidsReborn Click this DataLink to open the build! Level 50 Science Corruptor Primary Power Set: Fire Blast Secondary Power Set: Radiation Emission Power Pool: Flight Power Pool: Fighting Power Pool: Leadership Power Pool: Speed Ancillary Pool: Electricity Mastery Villain Profile: Level 1: Fire Blast (A) Superior Malice of the Corruptor - Accuracy/Damage (7) Superior Malice of the Corruptor - Damage/Recharge (7) Superior Malice of the Corruptor - Accuracy/Damage/Recharge (9) Superior Malice of the Corruptor - Damage/Endurance/Recharge (9) Superior Malice of the Corruptor - Accuracy/Damage/Endurance/Recharge (11) Superior Malice of the Corruptor - Recharge/Chance for Negative Energy Damage Level 1: Radiant Aura (A) Numina's Convalesence - Heal/Endurance (37) Numina's Convalesence - Endurance/Recharge (37) Numina's Convalesence - Heal/Recharge (37) Numina's Convalesence - Heal/Endurance/Recharge (39) Numina's Convalesence - Heal (39) Numina's Convalesence - +Regeneration/+Recovery Level 2: Fire Ball (A) Artillery - Accuracy/Damage (3) Artillery - Damage/Endurance (3) Artillery - Damage/Recharge (5) Artillery - Accuracy/Damage/Recharge (5) Artillery - Accuracy/Recharge/Range (13) Artillery - Endurance/Recharge/Range Level 4: Accelerate Metabolism (A) Preemptive Optimization - Accuracy/Recharge (17) Preemptive Optimization - EndMod/Endurance (34) Preemptive Optimization - EndMod/Recharge (36) Preemptive Optimization - EndMod/Accuracy/Endurance (36) Preemptive Optimization - EndMod/Accuracy/Recharge (36) Preemptive Optimization - EndMod/Endurance/Recharge Level 6: Radiation Infection (A) Endurance Reduction IO (13) Achilles' Heel - Chance for Res Debuff Level 8: Fly (A) Blessing of the Zephyr - Knockback Reduction (4 points) Level 10: Enervating Field (A) Endurance Reduction IO (11) Endurance Reduction IO Level 12: Aim (A) Gaussian's Synchronized Fire-Control - Chance for Build Up Level 14: Hover (A) Luck of the Gambler - Defense/Increased Global Recharge Speed (15) Kismet - Accuracy +6% (15) Reactive Defenses - Defense (17) Reactive Defenses - Defense/Endurance Level 16: Boxing (A) Empty Level 18: Blaze (A) Thunderstrike - Accuracy/Damage/Endurance (19) Thunderstrike - Accuracy/Damage (19) Thunderstrike - Damage/Endurance (21) Thunderstrike - Damage/Recharge (21) Thunderstrike - Accuracy/Damage/Recharge (33) Thunderstrike - Damage/Endurance/Recharge Level 20: Lingering Radiation (A) Accuracy IO Level 22: Tough (A) Steadfast Protection - Resistance/+Def 3% (23) Gladiator's Armor - TP Protection +3% Def (All) (23) Aegis - Resistance (33) Aegis - Resistance/Endurance (34) Aegis - Resistance/Recharge (34) Aegis - Resistance/Endurance/Recharge Level 24: Weave (A) Luck of the Gambler - Defense/Increased Global Recharge Speed (25) Reactive Defenses - Scaling Resist Damage (25) Reactive Defenses - Defense (27) Reactive Defenses - Defense/Endurance Level 26: Blazing Bolt (A) Superior Winter's Bite - Accuracy/Damage (27) Superior Winter's Bite - Accuracy/Damage/Endurance (31) Superior Winter's Bite - Accuracy/Damage/Recharge (31) Superior Winter's Bite - Damage/Endurance/Accuracy/RechargeTime (33) Superior Winter's Bite - Recharge/Chance for -Speed & -Recharge Level 28: Maneuvers (A) Luck of the Gambler - Defense/Increased Global Recharge Speed (29) Shield Wall - +Res (Teleportation), +5% Res (All) (29) Reactive Defenses - Defense (31) Reactive Defenses - Defense/Endurance Level 30: Hasten (A) Recharge Reduction IO (43) Recharge Reduction IO Level 32: Inferno (A) Armageddon - Damage/Recharge (39) Armageddon - Accuracy/Damage/Recharge (40) Armageddon - Accuracy/Recharge (40) Armageddon - Damage/Endurance (40) Armageddon - Chance for Fire Damage Level 35: Thunder Strike (A) Fury of the Gladiator - Chance for Res Debuff (50) Force Feedback - Chance for +Recharge (50) HamiO:Nucleolus Exposure Level 38: EM Pulse (A) Unbreakable Constraint - Hold/Recharge (46) Unbreakable Constraint - Accuracy/Hold/Recharge (48) Unbreakable Constraint - Accuracy/Recharge (48) Unbreakable Constraint - Endurance/Hold (48) Unbreakable Constraint - Chance for Smashing Damage Level 41: Charged Armor (A) Aegis - Resistance (42) Aegis - Resistance/Endurance (42) Aegis - Resistance/Recharge (42) Aegis - Resistance/Endurance/Recharge Level 44: Power Sink (A) Preemptive Optimization - Accuracy/Recharge (45) Preemptive Optimization - EndMod/Endurance (45) Preemptive Optimization - EndMod/Recharge (45) Preemptive Optimization - EndMod/Accuracy/Endurance (46) Preemptive Optimization - EndMod/Accuracy/Recharge (46) Preemptive Optimization - EndMod/Endurance/Recharge Level 47: Rain of Fire (A) Ragnarok - Chance for Knockdown (50) Accuracy IO Level 49: Evasive Maneuvers (A) Luck of the Gambler - Defense/Increased Global Recharge Speed Level 1: Brawl (A) Superior Blistering Cold - Recharge/Chance for Hold Level 1: Scourge Level 1: Sprint | Copy & Paste this data into Mids Reborn : Hero Designer to view the build | |-------------------------------------------------------------------| |MxDz;1386;697;1394;HEX;| |78DA6593594F135114C7EFED4C296DC18208949DA26C5DC656498C8A21015B44204| |1505F9BA61D6092DA36D392C8A30F7E0113E38BE0F2E402A81F41BF834B0C7E04C1| |C407F78CA7F7FC2D244ED2FEEE3DF7ECF7DCF99B171B76A66F4D081998CA67CAE5F| |454D1B6D74A95A2ED59CA5A66216B6A823E0FFDBA6A47E9C54C61C5CC1929CB36D3| |936456091D9C4DAE2D2F1B8B999C95A958C5423A79C32A976921FC0BC562DE48E5A| |D95D54A23AFAB4BABB01250BB39339333EDF2AA55F2A9FD52C93473C164C9CA1AC9| |BC99ADD856D6AAACA7E7299A69AF0729A101FA0DBBE84F565374DC628B724DE8A26| |E1BDC61D6BF005F327DAF986FE521DB2B52C94E2C824BE055E6D035F03A73C40553| |B2959A5BC95C3AE866EA75A087D950CF7C4F861A6CB56FBA92357D67867E308FFF0| |47F81BF99EFC8D6CDB6D21D2224BCA2E13525D3A20BBF872F8ACE8467D7A5F43F90| |BE17FA5EE8FBC008A9F8B97EE17FCAFA5E72D0C832ADB1956B3DF287B63DC43DEE5| |BD33E53926E00F1020E7D224A4E9A5159F323A1B48E6E809BCC630FC087CCFEC7CC| |8F14AC05DE5A3A39438D22B4E2865ADBA5CAA2ED14476F1B934AA73FCE0C2538DBD| |06989AE0BD18E4ADA5149F02BDB065149272A8951DE1DACAB773CE14E773E63F63E| |07B798FDDBCC66F2DF05FF5DF0DF3DCBFEBAE1BF17FE0748B78775654F846B0B830| |6C5EE43ECBEB37C0B43E798C3E7C171F002F3BEC6D34F36AE81098E91B8CD6789F1| |EA7BD5C427F23908BF83493E8BA59827A7C14BE00C73835C8DA0A69131AE69340EA| |2BFA3E8EF26E946D41B70DC114C7114531CC5144731C5314C710C533C4AE10C4CA5| |710679E3CEDF848588630EE2FFFAAAD75EAA1077D9C78C92E5AA32674E17F89CEA9| |6267141AFBD4F2195E4B3EF900F25D93F9048719916C3BA0887B89B7BFF697F39AC| |7D87730EDF638AB6DACB73660FF2772668A0136CE3FC05A88BD6FE| |-------------------------------------------------------------------|
-
Yeah, it allows me to toggle it, just does nothing. I upgraded recently so that could be it. I'll have a look and see if I can find an older version and see if that works
-
Thanks for the response. Yeah, mids seems a bit weird for me right now. Showing -15.35 end recovery too. I play on a low population server so I generally slot as I level it with attuned for stuff I don't need to +5. It's not often there's is anything other than TF teams or 50 content so I mainly solo. I think the two builds will probably be the way to go for me. Thanks again.
-
I'm currently levelling a fire/rad and I wanted some advice prior to finishing it. Should I be focussing more on getting resists rather than def as the debuffs are so strong? (the build I made is around 20 def to positional, is that enough?) Mids seems glitched to me so I can't see if hasten/am would be perma. It shows 126 recharge before activating AM but AM is doing nothing. Would I be correct to assume that would be perma or does AM not affect hasten? I've tried loading it onto the test server but the popmenu function isn't working for me right now and I don't want to go through every enhancement. Thanks in advance.
-
To be honest the thought of the build was not around soul drain. I originally was going to run with s/l range def capped via scorpion shield, however I wanted to try to cap resists to give it more damage mitigation when the def failure happens and by doing so I had a choice of either melee or ranged def. I like to be in close as that was the majority of toons I played on live. As I said, I've not played a sonic character before so from the starting levels and looking at the powers in mids I felt any time I needed to solo would be a terrible experience, so chose soul drain as it helped with my time def. If I came across as disagreeing with anything in your last post I apologise, I agree completely, I was just annoyed at people saying play another AT rather than telling me what I'm doing wrong. If someone is wrong, how can they learn without being told what the issue is. If I have time to play I generally have time for a couple beers so popping in and out is a struggle 😄. I wanted something that would benefit teams on endgame content but with the ability to solo. I play on Reunion so 99% of the time nothing is happening. As I said I will probably bench it at least for a while. Thank you for explaining what the issues were, I will keep them in mind when I attempt to make another build.
-
1 - I play on a low population server so it was for solo most of the time but incarnate trials when available. (I wanted sonic to boost resists for the team) 2 - I misunderstood the active component of it. I was under the impression it acted like destiny with diminishing returns rather than 3 seconds and gone. 3 - The idea was that melee radial would give range softcap long enough to take the alpha strike and a large proportion of mobs have melee attacks which would make them close the distance. I did just test that on the test server doing an ITF and enough of the first mob melted that the rest died shortly after, but as you said the incarnate wore off and when I reached the second mob I got swatted. 4 - I took it mainly as I had taken dark embrace to cap resists. Also the lack of any decent AoE on sonic made me want to pump the DPS if I could. 5 - You're right, I could skip it but the faster Soul drain recharge was a strong lure for me. I do have multiple of a number of AT but I really don't enjoy hover blasting, hence the melee def. (I don't feel particularly heroic flying 20 feet above and raining "arrest" down from above) As I said, I've never played a sonic before so I'm not even sure on what powers are the best choices. I'll bench him for now I think and try to make something more palatable later. Thanks for all the responses.
-
I am looking for some feedback/improvements for my build. It currently has capped melee def and s/l resists. I am unsure if this is a good way to build as I've not played sonic before. The idea would be to have Melee radial active and jump into the group (with 5 enemies it should softcap range) hit soul drain and the nuke and then just pick apart what's left. If one of you kind folks could look it over and see if I am barking up the wrong tree it would be much appreciated.