

Meknomancer
-
Posts
1203 -
Joined
-
Last visited
Content Type
Profiles
Forums
Events
Store
Articles
Patch Notes
Posts posted by Meknomancer
-
-
Some nice cossies in there. Loving the look of Janus.
-
On 8/15/2023 at 4:23 PM, Raikao said:
Ok you have to explain Enflame to me. I've never used it. Isn't it just a little fire trail your buffed target leaves as it runs? That wouldn't even work most of the time if your target stands still or only runs at the enemy. I'm curious though.
You can toss enflame on a hard target or a pet (i prefer a boss/av/gm) and it tics away working a lot like a pseudopet so if you toss a bunch of damage procs in they have a chance to fire off when applied and then something like once/10 seconds after which is useful in av fights. And it looks cool. And takes lots of good sets.
-
 1
1
-
-
On 7/15/2023 at 5:43 PM, ZeroSaint said:
Hey all, there was a thread on Reddit yesterday that piqued my interest enough to come up with a character concept for a Plant/Dark Dom. I looked around a bit this morning but couldn't find any builds and I fully acknowledge that I am absolutely awful at figuring builds out (I can extrapolate some but I know this forum is full of excellent theory crafters). Does anyone have anything lying around? (I'll also add that I'm fairly inf poor so ... just keeping that in mind).
Thank you in advance for any thoughts!
I have one but its ancient and i lost the build. If you post something in here (anything will do) your sure to get a response. Toss in the powers you want and i'm sure someone can shuffle it enough to be workable.
-
On 8/1/2023 at 10:32 PM, Story Archer said:
I'm looking at the Mids tools, trying to figure out the Pet IO sets a little bit:
Pet Damage category
- Edict of the Master +Def
- Sovereign Right +Res
Recharge Intensive Pets category
- Expedient Reinforcement +Res
- Call to Arms +Def
I assume that these Uniques buff the pet, not the character that summoned it, correct? I'm guessing that's the case since 1) it'd be WOW and 2) none of the numbers move on Mids when I slot them.
Those pet uniques will only apply to the pets and you'll find them a waste of slots, pets rarely survive tougher content regardless of slotting.
Slotting is dependent on playstyle you'll see a lot of different builds, proc heavy 0 defence relying on controls and damage, much tankier builds with 45% ranged/smashing/lethal defence (depending on epic/patron pool), it really depends on how you play the game as we all play it differently.
-
5 hours ago, Raikao said:
How long does it take you to kill AVs? I don't see any -regen which is why I'm considering going cold instead.
Depends on the av, solo tf's, very very fast, - regen seems to be irrelevant, dps is everything. GM's are another matter, envenomed daggers are required. I have a necro/cold too its debuffs are miles better than the bubblers tiny - resistance, i don't know why i prefer playing the bubbler i just do. Probably because i don't have sorcery's enflame on the /cold. Yet.
-
On 6/7/2023 at 9:44 PM, ZeroSaint said:
Hey all, I think this is kind of a unicorn pairing but I'm doing it for largely thematic reasons. The only builds I could find were in this thread. I'd like to make this my solo mission and group TF completionist character but don't really think I'll be trying to go crazy with GMs and +4 AVs solo, more of a "I'm experiencing a casual long term play" char. I've set aside about 100m Inf to get started.
My ask is: Does anyone have a good build or even a tweak to the linked one? The only real change I'm looking to make is moving Concealment up much earlier for the sake of running missions alone and enhance what is basically my telekinetic ninja concept. Character is at 10 now and I'm doing xp pause to get through all the low level content/badges I can -so I'm not in a huge rush to max and slot. I also acknowledge that I'm awful with creating builds and almost always rely on the advice of others.
I really appreciate any thoughts that the community has even just using below as a baseline.
So mainly I'd like to move up Concealment and am not married to Mace
Thank you to VashNKives for the build below several years ago 🙂
This Hero build was built using Mids Reborn 3.0.2.19
https://github.com/Reborn-Team/MidsRebornClick this DataLink to open the build!
Level 50 Magic Dominator
Primary Power Set: Mind Control
Secondary Power Set: Martial Assault
Power Pool: Force of Will
Power Pool: Speed
Power Pool: Fighting
Power Pool: Concealment
Ancillary Pool: Mace MasteryHero Profile:
Level 1: Levitate -- FrcFdb-Rechg%(A), FrcFdb-Rchg/EndRdx(17), FrcFdb-Rchg/KB(19), FrcFdb-Acc/KB(19), FrcFdb-Dmg/KB(25), FrcFdb-Dmg/EndRdx/KB(21)
Level 1: Shuriken Throw -- Rui-Acc/EndRdx/Rchg(A), Rui-Dmg/Rchg(3), Rui-Dmg/EndRdx(3), Rui-Acc/Dmg(5), Rui-Acc/Dmg/Rchg(5)
Level 2: Dominate -- GldNet-Acc/Hold(A), GldNet-Acc/Rchg(7), GldNet-Rchg/Hold(7), GldNet-EndRdx/Rchg/Hold(9), GldNet-Acc/EndRdx/Rchg/Hold(9), GldNet-Dam%(17)
Level 4: Trick Shot -- Rui-Acc/Dmg/Rchg(A), Rui-Dmg/EndRdx(11), Rui-Dmg/Rchg(11), Rui-Acc/EndRdx/Rchg(13), Rui-Acc/Dmg(27)
Level 6: Thunder Kick -- SprBlsCol-Rchg/HoldProc(A), SprBlsCol-Dmg/EndRdx/Acc/Rchg(46), SprBlsCol-Acc/Dmg(31), SprBlsCol-Dmg/EndRdx(31), SprBlsCol-Acc/Dmg/EndRdx(37), SprBlsCol-Acc/Dmg/Rchg(33)
Level 8: Confuse -- SprDmnGrs-Rchg/Fiery Orb(A)
Level 10: Weaken Resolve -- SphIns-%ToHit(A), SphIns-Acc/EndRdx/Rchg(29), SphIns-ToHitDeb(15), SphIns-Acc/ToHitDeb(15), SphIns-Acc/Rchg(40), SphIns-ToHitDeb/EndRdx/Rchg(40)
Level 12: Hasten -- RechRdx-I(A), RechRdx-I(13)
Level 14: Kick -- FrcFdb-Rechg%(A)
Level 16: Tough -- GldArm-3defTpProc(A), StdPrt-ResDam/Def+(33), Ags-ResDam/EndRdx(27), Ags-ResDam(34), Ags-Psi/Status(34)
Level 18: Total Domination -- GldNet-Dam%(A), GldNet-Acc/EndRdx/Rchg/Hold(29), GldNet-Acc/Hold(21), GldNet-Acc/Rchg(23), GldNet-Rchg/Hold(25), GldNet-EndRdx/Rchg/Hold(23)
Level 20: Cross Punch -- SprAvl-Acc/Dmg/EndRdx/Rchg(A), SprAvl-Acc/Dmg(50), SprAvl-Dmg/EndRdx(48), SprAvl-Acc/Dmg/EndRdx(48), SprAvl-Acc/Dmg/Rchg(48)
Level 22: Weave -- LucoftheG-Def/Rchg+(A), LucoftheG-Def(46)
Level 24: Envenomed Blades -- GssSynFr--Build%(A)
Level 26: Terrify -- SprAscoft-Rchg/+Dmg%(A), SprAscoft-Acc/Conf/Hold/Immob/Sleep/Stun/Fear/EndRdx/Rchg(34), SprAscoft-EndRdx/Rchg(37), SprAscoft-Acc/Conf/Hold/Immob/Sleep/Stun/Fear/EndRdx(43), SprAscoft-Acc/Conf/Hold/Immob/Sleep/Stun/Fear(45)
Level 28: Caltrops -- SprFrzBls-Rchg/ImmobProc(A), SprFrzBls-Acc/Dmg/EndRdx(31), SprFrzBls-Dmg/EndRdx(33), SprFrzBls-Acc/Dmg/Rchg(45), SprFrzBls-Acc/Dmg(45), SprFrzBls-Dmg/EndRdx/Acc/Rchg(46)
Level 30: Stealth -- LucoftheG-Def/Rchg+(A)
Level 32: Mass Confusion -- CrcPrs-Conf%(A), CrcPrs-Conf/EndRdx(36), CrcPrs-Acc/Conf/Rchg(36), CrcPrs-Conf/Rchg(37), CrcPrs-Acc/Rchg(39)
Level 35: Masterful Throw -- ExtMsr-Dmg/ActRdx/Rchg(A), ExtMsr-Dmg/EndRdx/Rchg(42), ExtMsr-Acc/Rng/Rchg(42), ExtMsr-Acc/Dmg(42), ExtMsr-Dmg/EndRdx(43)
Level 38: Explosive Shuriken -- Apc-Dam%(A), Apc-Dmg/EndRdx(39), Apc-Dmg(39), Apc-Acc/Rchg(40), Apc-Acc/Dmg/Rchg(43)
Level 41: Scorpion Shield -- LucoftheG-Def/Rchg+(A), LucoftheG-Def(50)
Level 44: Personal Force Field -- LucoftheG-Def/Rchg+(A)
Level 47: Grant Invisibility -- LucoftheG-Def/Rchg+(A)
Level 49: Misdirection -- RechRdx-I(A)
Level 1: Brawl -- Empty(A)
Level 1: Domination
Level 1: Quick Form
Level 1: Prestige Power Dash -- Empty(A)
Level 1: Prestige Power Slide -- Empty(A)
Level 1: Prestige Power Quick -- Empty(A)
Level 1: Prestige Power Rush -- Empty(A)
Level 1: Prestige Power Surge -- Empty(A)
Level 1: Sprint -- UnbLea-Stlth(A)
Level 2: Rest -- Empty(A)
Level 4: Ninja Run
Level 2: Swift -- Run-I(A)
Level 2: Health -- Pnc-Heal/+End(A), Mrc-Rcvry+(36)
Level 2: Hurdle -- Jump-I(A)
Level 2: Stamina -- PwrTrns-+Heal(A), PrfShf-End%(50)
Level 0: Freedom Phalanx Reserve
Level 0: Task Force Commander
Level 0: The Atlas Medallion
Level 50: Degenerative Core Flawless Interface
Level 50: Knives of Vengeance Radial Superior Ally
Level 0: Portal Jockey
Level 50: Rebirth Radial Epiphany
Level 50: Intuition Radial Paragon
Level 50: Support Radial Embodiment
------------SM/L/AoE:
If your after a tanky as you can get domi then thats what this is. Need to bear in mind its totally relying on levitates ff+rech to proc to hit perma dom. Can't see the damage being great so i'd assume you'd be relying on mass confuzzle and confuzzle for mobs but even with hasten on MC is taking 70 sec to recharge. Found old mids (one of the version 4 ones) with some saved builds. No idea who put these together now, they could be 3-4 years old. I'll try toss them in to give you some more ideas. I'd look into ice epic although i can see how that might not fit with character toons and i couldn't find one anyway:
SpoilerThis Villain build was built using Mids Reborn 3.4.7
https://github.com/LoadedCamel/MidsRebornMIND MARTIAL SOUL: Level 49 Natural Dominator
Primary Power Set: Mind Control
Secondary Power Set: Martial Assault
Power Pool: Flight
Power Pool: Speed
Power Pool: Fighting
Power Pool: Leadership
Ancillary Pool: Psionic MasteryVillain Profile:
------------
Level 1: Mesmerize
Hamidon Origin:Endoplasm Exposure
Level 1: Shuriken Throw
Hamidon Origin:Nucleolus Exposure
Level 2: Dominate
(A) Apocalypse - Damage: Level 50
(5) Apocalypse - Chance of Damage(Negative): Level 50
(7) Apocalypse - Damage/Recharge/Accuracy: Level 50
(11) Apocalypse - Recharge/Accuracy: Level 50
(23) Apocalypse - Damage/Endurance: Level 50
(49) Ghost Widow's Embrace - Chance of Damage(Psionic): Level 35
Level 4: Trick Shot
(A) Superior Winter's Bite - Accuracy/Damage: Level 50
(47) Superior Winter's Bite - Damage/RechargeTime: Level 50
(47) Superior Winter's Bite - Accuracy/Damage/Endurance: Level 50
(48) Superior Winter's Bite - Accuracy/Damage/Recharge: Level 50
(48) Superior Winter's Bite - Damage/Endurance/Accuracy/RechargeTime: Level 50
(48) Gladiator's Javelin - Chance of Damage(Toxic): Level 50
Level 6: Confuse
(A) Coercive Persuasion - Contagious Confusion: Level 50
(7) Coercive Persuasion - Confused/Endurance: Level 50
(15) Coercive Persuasion - Confused: Level 50
(17) Coercive Persuasion - Confused/Recharge: Level 50
(21) Coercive Persuasion - Confused/Recharge/Accuracy: Level 50
(46) Coercive Persuasion - Recharge/Accuracy: Level 50
Level 8: Mass Hypnosis
(A) Fortunata Hypnosis - Chance for Placate: Level 50
(9) Fortunata Hypnosis - Sleep/Endurance: Level 50
(9) Fortunata Hypnosis - Recharge/Accuracy: Level 50
(11) Fortunata Hypnosis - Sleep/Recharge/Accuracy: Level 50
(13) Fortunata Hypnosis - Sleep/Recharge: Level 50
Level 10: Hover
(A) Luck of the Gambler - Defense/Increased Global Recharge Speed: Level 50
(13) Blessing of the Zephyr - Run Speed, Jump, Flight Speed, Range: Level 50
(17) Kismet - Accuracy +6%: Level 30
(40) Blessing of the Zephyr - Run Speed, Jump, Flight Speed, Range/Endurance: Level 50
(45) Shield Wall - +Res (Teleportation), +5% Res (All): Level 50
Level 12: Fly
(A) Winter's Gift - Slow Resistance (20%): Level 50
Level 14: Hasten
(A) Recharge Reduction IO: Level 50
(15) Recharge Reduction IO: Level 50
Level 16: Envenomed Blades
(A) Gaussian's Synchronized Fire-Control - Chance for Build Up: Level 50
(40) Gaussian's Synchronized Fire-Control - To Hit Buff/Recharge: Level 50
Level 18: Total Domination
(A) Unbreakable Constraint - Chance for Smashing Damage: Level 50
(19) Basilisk's Gaze - Accuracy/Hold: Level 30
(19) Basilisk's Gaze - Accuracy/Recharge: Level 30
(21) Basilisk's Gaze - Endurance/Recharge/Hold: Level 30
(43) Basilisk's Gaze - Accuracy/Endurance/Recharge/Hold: Level 30
(49) Gladiator's Net - Chance of Damage(Lethal): Level 50
Level 20: Kick
(A) Empty
Level 22: Tough
Hamidon Origin:Ribosome Exposure
(39) Gladiator's Armor - TP Protection +3% Def (All): Level 50
Level 24: Weave
(A) Reactive Defenses - Defense/RechargeTime: Level 50
(25) Reactive Defenses - Scaling Resist Damage: Level 50
(25) Reactive Defenses - Defense/Endurance: Level 50
(42) Reactive Defenses - Endurance/RechargeTime: Level 50
(43) Reactive Defenses - Defense: Level 50
(46) Reactive Defenses - Defense/Endurance/RechargeTime: Level 50
Level 26: Terrify
(A) Ragnarok - Chance for Knockdown: Level 50
(27) Ragnarok - Damage/Endurance: Level 50
(27) Ragnarok - Recharge/Accuracy: Level 50
(40) Ragnarok - Damage/Recharge/Accuracy: Level 50
(43) Ragnarok - Damage: Level 50
Level 28: Caltrops
(A) Tempered Readiness - Accuracy/Damage/Slow: Level 50
(29) Tempered Readiness - Endurance/Recharge/Slow: Level 50
(29) Tempered Readiness - Range/Slow: Level 50
(34) Tempered Readiness - Accuracy/Endurance: Level 50
(37) Tempered Readiness - Damage/Slow: Level 50
(37) Tempered Readiness - Accuracy/Slow: Level 50
Level 30: Maneuvers
(A) Red Fortune - Defense/Endurance: Level 50
(31) Red Fortune - Defense/Recharge: Level 50
(31) Red Fortune - Endurance/Recharge: Level 50
(31) Red Fortune - Defense/Endurance/Recharge: Level 50
(45) Red Fortune - Defense: Level 50
(45) Red Fortune - Endurance: Level 50
Level 32: Mass Confusion
(A) Superior Ascendency of the Dominator - Recharge/Chance for +Damage: Level 50
(33) Superior Ascendency of the Dominator - Accuracy/Control Duration/Endurance/Recharge: Level 50
(33) Superior Ascendency of the Dominator - Accuracy/Control Duration/Endurance: Level 50
(33) Superior Ascendency of the Dominator - Endurance/Recharge: Level 50
(34) Superior Ascendency of the Dominator - Control Duration/Recharge: Level 50
(34) Superior Ascendency of the Dominator - Accuracy/Control Duration: Level 50
Level 35: Masterful Throw
(A) Sting of the Manticore - Chance of Damage(Toxic): Level 50
(36) Sting of the Manticore - Damage/Endurance/Recharge: Level 50
(36) Sting of the Manticore - Accuracy/Interrupt/Range: Level 50
(36) Sting of the Manticore - Damage/Endurance: Level 50
(37) Sting of the Manticore - Accuracy/Damage: Level 50
Level 38: Link Minds
(A) Luck of the Gambler - Defense/Increased Global Recharge Speed: Level 50
(39) Adjusted Targeting - To Hit Buff/Recharge: Level 50
(39) Adjusted Targeting - Recharge: Level 50
Level 41: Mind Over Body
Hamidon Origin:Ribosome Exposure
(42) Steadfast Protection - Resistance/+Def 3%: Level 30
Level 44: Indomitable Will
(A) Luck of the Gambler - Defense/Increased Global Recharge Speed: Level 50
Level 47: Tactics
Hamidon Origin:Cytoskeleton Exposure
Level 49: Evasive Maneuvers
(A) Luck of the Gambler - Defense/Increased Global Recharge Speed: Level 50
Level 1: Domination
Level 1: Brawl
(A) Empty
Level 1: Sprint
(A) Empty
Level 2: Rest
(A) Empty
Level 1: Swift
(A) Empty
Level 1: Hurdle
(A) Empty
Level 1: Health
(A) Miracle - +Recovery: Level 40
(3) Panacea - +Hit Points/Endurance: Level 50
(3) Numina's Convalesence - +Regeneration/+Recovery: Level 50
Level 1: Stamina
(A) Performance Shifter - Chance for +End: Level 50
(5) Performance Shifter - EndMod: Level 50
Level 49: Quick Form
Level 12: Afterburner
------------| Copy & Paste this data into Mids Reborn : Hero Designer to view the build |
|-------------------------------------------------------------------|
|MxDz;1667;742;1484;HEX;|
|78DA7594594F135114C7FFD3995A6929B5ECC8D6967DB11422F8E2424331415A24E|
|2BED5093430496949A724FA298C1AF5D1076364FB00AE2F3E6BD488D1E86710509F|
|4D3DED994B2F102699CC6FCE36679B1BBB1D29FDF03E3A0CC53392D44D331E49CF1|
|B293D9BCE3826F4EC62464FAA00BCB1B189882F163E777E2C1CF54D9DBD107590B4|
|69DB363E924E6533E9643066A466C48BBFA80E9BA6BE98CC06637A266BE849F10ED|
|7649A9C4E278DD9B9ACB3C0530B89C48C9BC579A9919AF514DEA2097D269131E78C|
|85E6D105633A38691AE994311D8FE9663691B9C379CFE6BF564BA9F9E93E91CFBC7|
|8E5E81EA25B5371B7758FE6386B4E918FA214357605BD36A05F83867E8603083238|
|D1C7508D104308F3E41BD0708F3EA0CA61542C690593209605AC30F46155C09A805|
|EB500C3F4B04B79DAEDD04512B718CA709DE1106E3054E226C311C419C214C62185|
|D11CB8C69A83B82AE08A28EA3243292E3194906B89548B56822AC532F921BEFD8F3|
|48D1A3AF09325BD18E7125CE4ED925BED423D6B02A4714B7115377A60D564C1036A|
|A34772563C58E6F81D78C63042C1BC728BBC18634D39D66D85A4CAF195A112DF18B|
|AF19D2184514EC646C954C869562047175492574949DAAA709237A55A403B063806|
|B51535F2D06BF09B35B5F82B6093A10B5B0CDDD850AD69FD6188D0A34E9E561D8E7|
|1458731246050B4E1A8CD0A33C0F0905A562FF7A31E6B3CAD06AC0A5861F06399A1|
|154B029E3378A99646B996463859D304978052016EC51A7A99000F43BEBBCD7236C|
|D78CB55FAF046C06B01AF542BAD97025E303CA2A202724B0258E70D69C117019F05|
|7C8255CB478600ED479B3CC336B1C0ED7862B3E029432BD976CAB69D62CC5D45C80|
|F9996A7856C7B245BDA5A2B6E05752F286B821864E777DDA0A5933421E143A7C68E|
|3329D7A0ED39A40A2B19DD473E497245962B2CFFE584ACD8B6DFD847BEB94B4E8D3|
|943AF1DF493C06FFD2DB8C8496FEDB2257C2C8ECBFB0CE3BB2ACED19FB3E344C8FD|
|07AA14DB7A|
|-------------------------------------------------------------------|This Villain build was built using Mids Reborn 3.4.7
https://github.com/LoadedCamel/MidsRebornMIND MARTIAL MACE: Level 49 Natural Dominator
Primary Power Set: Mind Control
Secondary Power Set: Martial Assault
Power Pool: Fighting
Power Pool: Speed
Power Pool: Leaping
Power Pool: Leadership
Ancillary Pool: Mace MasteryVillain Profile:
------------
Level 1: Mesmerize
(A) Superior Ascendency of the Dominator - Recharge/Chance for +Damage
(3) Superior Ascendency of the Dominator - Control Duration/Recharge
(3) Superior Ascendency of the Dominator - Endurance/Recharge
(5) Superior Ascendency of the Dominator - Accuracy/Control Duration/Endurance
(5) Superior Ascendency of the Dominator - Accuracy/Control Duration/Endurance/Recharge
(7) Superior Ascendency of the Dominator - Accuracy/Control Duration
Level 1: Shuriken Throw
Hamidon Origin:Nucleolus Exposure
Level 2: Dominate
(A) Gladiator's Javelin - Chance of Damage(Toxic)
(7) Gladiator's Javelin - Accuracy/Damage
(9) Gladiator's Javelin - Damage/Endurance/Recharge
(9) Entropic Chaos - Chance of Heal Self
(11) Unbreakable Constraint - Chance for Smashing Damage
(11) Ghost Widow's Embrace - Chance of Damage(Psionic)
Level 4: Trick Shot
(A) Superior Winter's Bite - Accuracy/Damage
(46) Superior Winter's Bite - Damage/RechargeTime
(46) Superior Winter's Bite - Accuracy/Damage/Endurance
(48) Superior Winter's Bite - Accuracy/Damage/Recharge
(48) Superior Winter's Bite - Damage/Endurance/Accuracy/RechargeTime
Level 6: Confuse
(A) Coercive Persuasion - Contagious Confusion
(13) Coercive Persuasion - Confused/Endurance
(13) Coercive Persuasion - Confused
(15) Coercive Persuasion - Confused/Recharge
(15) Coercive Persuasion - Confused/Recharge/Accuracy
(17) Coercive Persuasion - Recharge/Accuracy
Level 8: Mass Hypnosis
(A) Call of the Sandman - Chance of Heal Self
Level 10: Boxing
(A) Superior Blistering Cold - Accuracy/Damage
(42) Superior Blistering Cold - Damage/Endurance
(43) Superior Blistering Cold - Accuracy/Damage/Endurance
(43) Superior Blistering Cold - Accuracy/Damage/Recharge
(43) Superior Blistering Cold - Damage/Endurance/Accuracy/RechargeTime
Level 12: Hasten
(A) Recharge Reduction IO
(37) Recharge Reduction IO
Level 14: Tough
(A) Steadfast Protection - Resistance/+Def 3%
(45) Gladiator's Armor - TP Protection +3% Def (All)
Level 16: Envenomed Blades
(A) Rectified Reticle - To Hit Buff/Recharge
(17) Rectified Reticle - To Hit Buff
Level 18: Total Domination
(A) Basilisk's Gaze - Accuracy/Hold
(19) Basilisk's Gaze - Accuracy/Recharge
(19) Basilisk's Gaze - Endurance/Recharge/Hold
(21) Basilisk's Gaze - Accuracy/Endurance/Recharge/Hold
Level 20: Dragon's Tail
(A) Armageddon - Chance for Fire Damage
(21) Armageddon - Damage/Endurance
(23) Armageddon - Damage
(23) Armageddon - Damage/Recharge/Accuracy
(25) Armageddon - Recharge/Accuracy
(25) Force Feedback - Chance for +Recharge
Level 22: Weave
(A) Luck of the Gambler - Defense/Increased Global Recharge Speed
(40) Luck of the Gambler - Defense
(40) Luck of the Gambler - Defense/Endurance
Level 24: Super Speed
(A) Blessing of the Zephyr - Run Speed, Jump, Flight Speed, Range/Endurance
(49) Blessing of the Zephyr - Knockback Reduction (4 points)
Level 26: Terrify
(A) Artillery - Endurance/Recharge/Range
(27) Artillery - Accuracy/Recharge/Range
(27) Artillery - Accuracy/Damage
(29) Artillery - Damage/Endurance
(29) Artillery - Damage/Recharge
(31) Artillery - Accuracy/Damage/Recharge
Level 28: Caltrops
(A) Ragnarok - Chance for Knockdown
(31) Ragnarok - Recharge/Accuracy
(31) Ragnarok - Damage/Recharge/Accuracy
(34) Ragnarok - Damage/Recharge
(36) Ragnarok - Damage/Endurance
Level 30: Combat Jumping
(A) Luck of the Gambler - Defense/Increased Global Recharge Speed
Level 32: Mass Confusion
(A) Malaise's Illusions - Chance of Damage(Psionic)
(33) Malaise's Illusions - Confused/Range
(33) Malaise's Illusions - Accuracy/Endurance
(33) Malaise's Illusions - Endurance/Confused
(34) Malaise's Illusions - Accuracy/Recharge
(34) Malaise's Illusions - Accuracy/Confused/Recharge
Level 35: Masterful Throw
(A) Sting of the Manticore - Chance of Damage(Toxic)
(36) Sting of the Manticore - Damage/Endurance/Recharge
(36) Sting of the Manticore - Accuracy/Damage
(37) Sting of the Manticore - Damage/Endurance
(37) Sting of the Manticore - Accuracy/Interrupt/Range
Level 38: Explosive Shuriken
(A) Apocalypse - Chance of Damage(Negative)
(39) Apocalypse - Damage/Endurance
(39) Apocalypse - Recharge/Accuracy
(39) Apocalypse - Damage/Recharge/Accuracy
(40) Apocalypse - Damage
Level 41: Scorpion Shield
(A) Luck of the Gambler - Defense/Increased Global Recharge Speed
(42) Luck of the Gambler - Defense
(42) Luck of the Gambler - Defense/Endurance
Level 44: Super Jump
(A) Blessing of the Zephyr - Run Speed, Jump, Flight Speed, Range
(48) Blessing of the Zephyr - Knockback Reduction (4 points)
Level 47: Maneuvers
(A) Luck of the Gambler - Defense/Increased Global Recharge Speed
(47) Luck of the Gambler - Defense
(47) Luck of the Gambler - Defense/Endurance
Level 49: Personal Force Field
(A) Luck of the Gambler - Defense/Increased Global Recharge Speed
Level 1: Domination
Level 1: Brawl
(A) Empty
Level 1: Sprint
(A) Empty
Level 2: Rest
(A) Empty
Level 1: Swift
(A) Empty
Level 1: Hurdle
(A) Empty
Level 1: Health
(A) Empty
(45) Empty
(45) Empty
Level 1: Stamina
(A) Empty
(46) Empty
Level 49: Quick Form
Level 24: Speed Phase
Level 44: Double Jump
------------| Copy & Paste this data into Mids Reborn : Hero Designer to view the build |
|-------------------------------------------------------------------|
|MxDz;1673;727;1454;HEX;|
|78DA75945B4F135110C7FFDB6E29942254C082DC6F4A4B59C07B14224D8B09B1254|
|47D5471030D34296DD396443F80896F8AA03EE807F0F601BC3EE98B89468D188DFA|
|EC9B97787DACC3CE0E9C6268B2DDDF999933E73F33BB1B3F1BF5BE781E1B85561D4|
|999F9FC5434339F4C9B854CCE3D6116167266CA09C0171F9F88B6C7C3C74E8C8763|
|748F8CB9C9DABA163B15C9A40BB94CCA8827D333B2E8587787F37973215530E266A|
|E903453B246D56486361D49CECE1592E9598FB53A9E4D2466BC16C6126696ECD5B2|
|9849E4F273C96CD35836396DAC678F9BD309FACB1712B9730DA4AB93AE9155D9EBB|
|FA20B784CA6211D0EDC1778C0A0E3A1C0238632DC63B8D85D9A86AE61BA74270E53|
|80A629076808C9E60043390C81C555593A3C187758160FE6350B16E900456A9132D|
|FD42D4F3F6E09DC6618C01D81BB0CA3B4D5A556E982C907787146E024C3169C1238|
|CD5083298630A5712BB5C08D672C4FA33957A8F22A70898F0E60912188CB024B02C|
|B0C9DB4BB52C9AB55A20F96A75BC04921556A4815FCB46CD111C22EEEDE12B5A85A|
|D1A055E306E9AE5D2DE03A4384227D4A88D387158795652BDE0ABC63A8C37B8665C|
|A5BAB36AF1623DC8F3A0C336CC30181830C0D3824709E41A70AEA950A1CF5D6923C|
|3B512750C3D045B17EB5143F3E7296417C628852298DAAAA4694BB2CCF76B8059C0|
|CCDD0055C0CAD2863B842C535A9836BC27E871DB257600F4307763374619F5D2EE9|
|6C511F8816A9698CE4B5A9F2DAF0973DEDF82DF04BE0A7661FF043E00FC3D56E7E4|
|DD7E4756205B68637022FE5597925F09AE11AEDEE5177F7608885EFC0A0C08080E1|
|B0871062B84025F4AA03EB95E20232B0800CCC4F8DE85307D6870F0EFB1DB407E6A|
|310434D67483A43D21992EEB3173469A5AF83124B1F87920F4DB159FFEFCB53A41F|
|629BD827C9AEA9768DED5F3C501D6BF15F37B17FDB6077D8F650C9EDFB8628CD8EE|
|AE7DBD160699DC527C1D207BFF83458DAD8E23F4EE0EBEF|
|-------------------------------------------------------------------|This Villain build was built using Mids Reborn 3.4.7
https://github.com/LoadedCamel/MidsRebornMIND MARTIAL: Level 49 Natural Dominator
Primary Power Set: Mind Control
Secondary Power Set: Martial Assault
Power Pool: Leadership
Power Pool: Concealment
Power Pool: Leaping
Power Pool: Fighting
Ancillary Pool: Psionic MasteryVillain Profile:
------------
Level 1: Levitate
(A) Devastation - Accuracy/Damage/Endurance/Recharge
Level 1: Shuriken Throw
(A) Decimation - Accuracy/Damage
(5) Decimation - Damage/Endurance
(7) Decimation - Damage/Recharge
(7) Decimation - Accuracy/Endurance/Recharge
(9) Decimation - Accuracy/Damage/Recharge
Level 2: Dominate
Hamidon Origin:Peroxisome Exposure
Level 4: Trick Shot
(A) Apocalypse - Chance of Damage(Negative)
(15) Apocalypse - Damage/Recharge/Accuracy
(15) Apocalypse - Recharge/Accuracy
(17) Apocalypse - Damage/Endurance
(17) Apocalypse - Damage/Recharge
Level 6: Maneuvers
(A) Red Fortune - Defense/Endurance
(19) Red Fortune - Defense/Recharge
(19) Red Fortune - Endurance/Recharge
(21) Red Fortune - Defense/Endurance/Recharge
(21) Red Fortune - Defense
(23) Red Fortune - Endurance
Level 8: Stealth
(A) Red Fortune - Defense/Endurance
(23) Red Fortune - Defense/Recharge
(25) Red Fortune - Endurance/Recharge
(25) Red Fortune - Defense/Endurance/Recharge
(27) Red Fortune - Defense
(27) Red Fortune - Endurance
Level 10: Mass Hypnosis
(A) Fortunata Hypnosis - Chance for Placate
(29) Fortunata Hypnosis - Sleep/Endurance
(29) Fortunata Hypnosis - Sleep/Recharge
(31) Fortunata Hypnosis - Sleep/Recharge/Accuracy
(31) Fortunata Hypnosis - Recharge/Accuracy
Level 12: Super Jump
(A) Blessing of the Zephyr - Knockback Reduction (4 points)
Level 14: Combat Jumping
(A) Luck of the Gambler - Defense/Increased Global Recharge Speed
Level 16: Boxing
(A) Empty
Level 18: Envenomed Blades
(A) Adjusted Targeting - Recharge
(31) Adjusted Targeting - To Hit Buff/Recharge
(33) Adjusted Targeting - To Hit Buff/Endurance/Recharge
(33) Adjusted Targeting - Endurance/Recharge
(33) Adjusted Targeting - To Hit Buff
Level 20: Total Domination
(A) Superior Ascendency of the Dominator - Recharge/Chance for +Damage
(34) Superior Ascendency of the Dominator - Control Duration/Recharge
(34) Superior Ascendency of the Dominator - Endurance/Recharge
(34) Superior Ascendency of the Dominator - Accuracy/Control Duration/Endurance
(36) Superior Ascendency of the Dominator - Accuracy/Control Duration/Endurance/Recharge
(36) Superior Ascendency of the Dominator - Accuracy/Control Duration
Level 22: Infiltration
(A) Luck of the Gambler - Defense/Increased Global Recharge Speed
Level 24: Tough
(A) Gladiator's Armor - TP Protection +3% Def (All)
Level 26: Weave
(A) Red Fortune - Defense/Endurance
(36) Red Fortune - Defense/Recharge
(37) Red Fortune - Endurance/Recharge
(37) Red Fortune - Defense
(37) Red Fortune - Defense/Endurance/Recharge
(39) Red Fortune - Endurance
Level 28: Terrify
(A) Ragnarok - Chance for Knockdown
(39) Ragnarok - Recharge/Accuracy
(39) Ragnarok - Damage/Recharge/Accuracy
(40) Ragnarok - Damage/Endurance
(40) Ragnarok - Damage/Recharge
Level 30: Caltrops
(A) Tempered Readiness - Endurance/Recharge/Slow
(40) Tempered Readiness - Range/Slow
(42) Tempered Readiness - Accuracy/Damage/Slow
(42) Tempered Readiness - Damage/Slow
(42) Tempered Readiness - Accuracy/Slow
Level 32: Tactics
(A) Rectified Reticle - Increased Perception
Level 35: Mass Confusion
(A) Coercive Persuasion - Contagious Confusion
(43) Coercive Persuasion - Confused/Endurance
(43) Coercive Persuasion - Confused/Recharge
(43) Coercive Persuasion - Confused/Recharge/Accuracy
(45) Coercive Persuasion - Recharge/Accuracy
(45) Coercive Persuasion - Confused
Level 38: Masterful Throw
(A) Sting of the Manticore - Chance of Damage(Toxic)
(45) Sting of the Manticore - Damage/Endurance/Recharge
(46) Sting of the Manticore - Damage/Endurance
(46) Sting of the Manticore - Accuracy/Interrupt/Range
(46) Sting of the Manticore - Accuracy/Damage
(47) Devastation - Accuracy/Damage/Endurance/Recharge
Level 41: Indomitable Will
(A) Luck of the Gambler - Defense/Increased Global Recharge Speed
Level 44: Mind Over Body
(A) Steadfast Protection - Resistance/+Def 3%
(47) Impervious Skin - Resistance/Endurance
(48) Impervious Skin - Resistance/Recharge
(48) Impervious Skin - Endurance/Recharge
(48) Impervious Skin - Resistance/Endurance/Recharge
(49) Impervious Skin - Status Resistance/Regeneration
Level 47: Link Minds
(A) Luck of the Gambler - Defense/Increased Global Recharge Speed
Level 49: Grant Invisibility
(A) Luck of the Gambler - Defense/Increased Global Recharge Speed
Level 1: Domination
Level 1: Brawl
(A) Empty
Level 1: Sprint
(A) Empty
Level 2: Rest
(A) Empty
Level 1: Swift
(A) Empty
Level 1: Hurdle
(A) Empty
Level 1: Health
(A) Panacea - +Hit Points/Endurance
(3) Numina's Convalesence - +Regeneration/+Recovery
(3) Miracle - +Recovery
Level 1: Stamina
(A) Synapse's Shock - EndMod/Increased Run Speed
(5) Synapse's Shock - EndMod
Level 49: Quick Form
Level 12: Double Jump
------------| Copy & Paste this data into Mids Reborn : Hero Designer to view the build |
|-------------------------------------------------------------------|
|MxDz;1670;724;1448;HEX;|
|78DA75945B4F135110C7FFDB2E56A0A5D6CA9D022D45904B295E9FBC341413B425C|
|418EF5A5720B0496D497731F2298C31DEE32D3E60D40F205EDE7CD4A811A30F7E02|
|13C56F50A73B1D38C5B0C9667FE7CC9C99FF9C397BD25793DE8F1F5287A0F947B28|
|6656592F9CB66CEB0F305CFB861CF178CAC1B80373D369EEC4C278E1D1F4BA43C34|
|D1BEEA9619C9E7EC423E1B4B9BB9291984D7CC09CB32E6B3762C6D146CD3C8CA18F|
|E893C2D4A4D1B53D3056BD69C0B38E3B1DC15D3322F9959D35EF08AC79C999BF139|
|83C3E6CCAC4DA38ED1397332366199F99C3999491B963D5D5860E933A5AC4D24314|
|CEF8192F8B5A748EF22BDC33AAE452B2D3A709BBE3D3A74DC61D884BB02F71836E3|
|3EC3418AAB29ABAB342CBB8050C9E51B430DBE0BFC60F062C0E5E4F6623F2DD2DDB|
|84E22DCAA083786D9A50E318121862D880B0C3204A811559A22A20A359A63D98A5A|
|012FC336F804EA181AE067F051188F1AC623611A244C93846992302D12A645C224A|
|8906AB5966A9C659D6D38237092A11DA7044E333492885AB551B5F8C99606B2F814|
|79F0A19E336A64F1AB6BFC28D2831BB4AB015549004F25DD23864E3C167822F0906|
|184EA08AAAD0DE29DDBB184B124F05AE00D4317DE0ABC62F093B87A555CBDC87693|
|A5512DA8113B798D4E9666B513CDD2892EE944543A11950644A525DBA513498AD6A|
|AD6DF8A7DAEB2CB1E81DD0C3DD82BB08BE126ED5E485D1DC20BADECF29C61075E0A|
|3C1358640852091D6A711D784071833A46495544DDD7080CCED8878B02E7052E300|
|C2023708EE116C9EB56C37463196597AF0C83F82CF045E013434C7EFF2E3A20BDAA|
|CE5E694F942CFD6A13FA9D6E854A8B9B1986D022D02AD0C6104788214261626A829|
|824A8A32D8AAB27232E96885E792715DBF4FFAE2FE784A736989FD02BAF251A38F3|
|BF6BA01A56FDFF6C30BFB26E9EB63ECC47D485135A198E68CE55F8779D2FE18ACEC|
|719BF188EF655565C7CDF57F9B717FF01DB34D694|
|-------------------------------------------------------------------| -
I've had one for a few years now and its just like @Parabolasaid. No amount of respecs and trying different builds has got this pumping out any damage at all it truly could be ranked as one of the lowest damage dealing combos in game. Doesn't mean its not fun though. I have fun with my elec/elec too and the damage output on that is equally pitiful. Elec control is just a relaxing fun set to play so long as you don't mind spending 10 min once your all incarnate and kitted out taking down a +4 mob. Unless you go /storm or /kin. Much better. But nowhere near as relaxing.
-
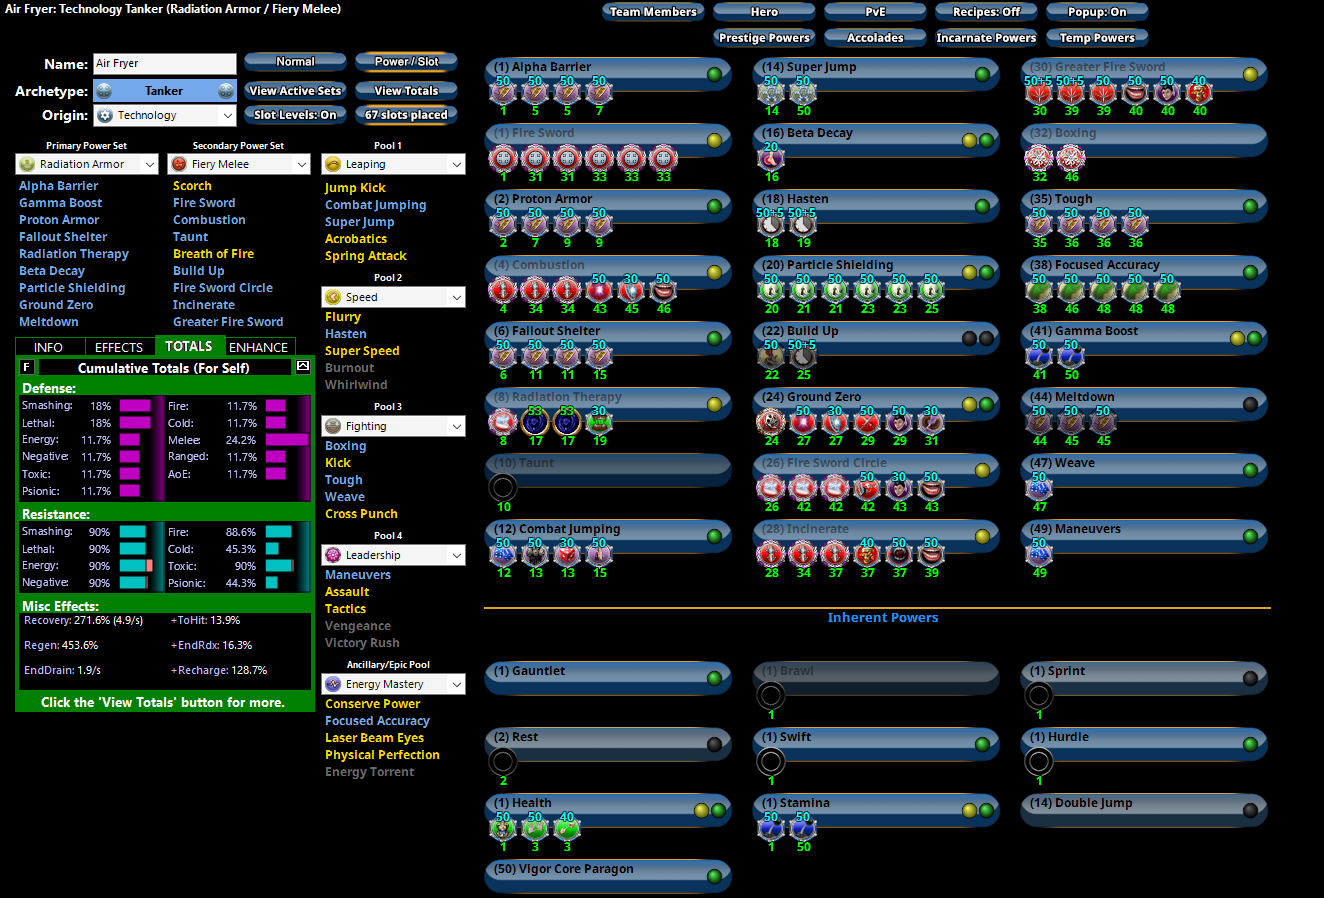
15 hours ago, Spaghetti Betty said:
To my knowledge, the newer versions of Mids don't allow a long form type of export anymore. Here's a screenshot.

If some IOs aren't obvious, let me know!
How did you split up the AT set in combustion+fsc and what hecatombs are in gfs? No matter what i chuck in the accuracy looks terrible without vigor. So how does it fare exempting down? (Really considering going back to previous mids)
-
4 hours ago, THEDarkTyger said:
It pretty much sweeps my whole forward arc slightly longer than melee range. It's a melee power. I'm not expecting to hit guys across the room with it and it's kind of ridiculous if you are expecting that. It's good damage in a wide arc. Like....you have no clue what you're talking about here. I NEVER see it skipped in Savage Melee. People skip proton sweep because its damage vs end cost just straight up suck. That's not the case with all or even most melee arc attacks. Especially not with Shred.
I quite like the animation. I like that it slots pbaoe sets which give better set bonuses. I still have it on a single savage toon that hasn't respecced out of it and its vet level 107+, its not like i haven't given the power a good run out. You've never seen it skipped in savage melee toons? Thats odd. I've only seen it taken on a couple. I'm not sure where you get the idea that i expect to hit stuff across the room with it. Clearly you love the power, that doesn't mean everyone else has to and it doesn't mean the teeny cone isn't teeny.
-
Goto for fun times is usually mercs/time mm but lately i've been playing an ill/poison pretty much non-stop (at least til it died attempting a solo lrsf at Valkyrie/Swan/Mynx/Lumi) I love ill trolls /dark and /cold used to be my favourites for a long time but /poison has 0 set up time and just has a great 'feel' to it and makes for an unusual pairing i rarely see but just works so well together. Its not mini maxed by a long shot, i'm sure it would be better if it had perma PA, doesn't have anywhere near softcapped defence/resistance to anything and yet it just works and turned into one of my favourite characters. It was a surprise to me how well it could solo tough stuff even exemped down without venemous gas or Phantom Army. So much of the game is played flat out at max speed by teams its rough on mm's and trollers but this combo is awesome for speeding/kill alls/solo play, it just doesn't seem to have a downside.
-
4 hours ago, THEDarkTyger said:
What?! Shred's cone isn't the widest, but it's not teeny by any stretch either. Not only should you take Shred, you should have it procced out and fire it every time it's up even if you're only fighting a single target. It's an AMAZING power.
7 foot cone is teeny however you look at it, its comparable to the most skippable powers in melee sets such as rad melees proton sweep. Sure you can proc it out but a power that rarely hits more than a single target is better replaced with....a single target attack which procced out will do more damage.
-
20 hours ago, honoroit said:
i didn't even get drain life yet on the necro/kin, who's about 40 now. and that's a good skill. I simply don't have room between summoning ghosts, buffing them, and /kin on blast.
thats the real downside of kin, it takes ~50% of your action time when you're full bore at it.
Dark blast, Gloom, Life Drain. If you have time for all 3 they are worth it, each one has a chance to summon your tanky lil spectre types and even though they won't keep up with you at pace by blasting away they get desummoned and resummoned on the current mob. And they will keep aggro off you. Thats some serious amount of clicking on a /kin which is already click heavy so its a bit of a toss up on if you want to blow all those power picks and some slots or just focus on the tier 1/2/3 pets and soul extraction (and possibly even some team mates although it'll be tough to spot them in a mob with 12-15 necro pets out)
-
On 5/15/2023 at 1:48 AM, honoroit said:
mm /kin - it works.
anyone got one they enjoy?
dunno past the 30s yet, but by compare with my seismic/kin corruptor - its going well.
extremely busy, but rewarding.
solo wise i can street hunt well while waiting about for groups.
you can buff the spirits and the soul extractions. which is crazy hail of green black ghost goo for the duration.
leaving the pets passive and moving them in hops then flipping them agressive works for me, theyll stay in range for kin buffs.
anyway, /kin works for necro, and I'll bet is good with beasts too.
I was dreadfully worried the healing would be insufficient, but its trivial to resummon to now (alt+q, alt+e, alt+c - someone told me how to make a bind to pop them out 10ft away, works a treat).
I spent 420bn × 2 on CoT costumes for the mms, and i love the necro/ff I have aside.
but, as with everywhere its present, /kin is king.
Paired every primary with kin. Much as i love necro the only 2 i still run are bots and mercs. On any other AT /kin is b tier at worst but on mm's i'd rate it well below /dark /time /storm /traps, possibly even /rad. High level content its some serious micro management and even then your pets will splat more often than not at which point you become just a kin with 0 dps which is how i see most speedy **** content/tf's run when a player shows up with one.
On the other hand any content below 50 and m /kins are fantastic. Tons of fun and a blessing to teams if you don't mind constant buffing of team mates and pets. I recommend repel with a sudden acc kb/kd and an ff+rech slotted, it'll let you take alphas and keep mobs flopping til pets catch up all you have to do is stand there and heal yourself til they arrive for a fulcrum. Even with speed boost they will feel like they are moving at a walking pace compared to the movement you have from siphon speed and a travel (if you took one)
-
 1
1
-
1
-
-
1 hour ago, Snarky said:
So i was just informed MiDs does not export anymore. I will not be posting that igly Fire build I mentioned. No great loss
Share build, via forum export, continue. Right click and paste in here. Looks like gibberish but once you post you'll see it.
-
1
-
-
Mids is updating daily it seems. Its not letting me import yours, when i try it opens version 4 up and fails to load. Test export:
-
15 hours ago, Marshal_General said:
OK, testing to see if the new mids will post the build properly.
mrb://erNkaj8YTfg
Paste that in your browser address bar and it should open up the build.
Pretty sure anyone who has new mids is waiting til builds can be exported to forums as they used to be so you may not get any advice for a bit. If you check furthur down in the blaster forums you'll find a bunch of rifle/dev builds although they won't be updated for page 6 yet.
-
18 hours ago, Muwu said:
Thanks so much for this. How do you feel about your damage? both single target and AoE at end game? Is it still decent without proc spamming?
Never had any issues its soloed pretty much everything i wanted it too, great on teams (who doesnt want a /cold) I dont really use much beyond PA/sleet/heat loss, the rest are just mules for recharge and ranged defence.
-
1
-
-
I went psi epic. Still using old mids:
SpoilerThis Hero build was built using Mids Reborn 3.4.7
https://github.com/LoadedCamel/MidsRebornILL COLD PSI: Level 50 Magic Controller
Primary Power Set: Illusion Control
Secondary Power Set: Cold Domination
Power Pool: Flight
Power Pool: Speed
Power Pool: Leadership
Power Pool: Fighting
Ancillary Pool: Psionic MasteryHero Profile:
------------
Level 1: Spectral Wounds
(A) Decimation - Accuracy/Damage
(3) Decimation - Damage/Endurance
(3) Decimation - Damage/Recharge
(5) Decimation - Accuracy/Endurance/Recharge
(5) Decimation - Accuracy/Damage/Recharge
(7) Gladiator's Javelin - Chance of Damage(Toxic)
Level 1: Ice Shield
(A) Luck of the Gambler - Defense/Increased Global Recharge Speed
Level 2: Blind
(A) Basilisk's Gaze - Accuracy/Hold
(7) Basilisk's Gaze - Accuracy/Recharge
(9) Basilisk's Gaze - Endurance/Recharge/Hold
(9) Basilisk's Gaze - Accuracy/Endurance/Recharge/Hold
(11) Gladiator's Javelin - Chance of Damage(Toxic)
(11) Gladiator's Javelin - Accuracy/Damage
Level 4: Deceive
(A) Coercive Persuasion - Contagious Confusion
(13) Coercive Persuasion - Confused/Endurance
(13) Coercive Persuasion - Confused/Recharge
(15) Coercive Persuasion - Confused/Recharge/Accuracy
(15) Coercive Persuasion - Recharge/Accuracy
(17) Coercive Persuasion - Confused
Level 6: Hover
(A) Luck of the Gambler - Defense/Increased Global Recharge Speed
(40) Kismet - Accuracy +6%
(42) Shield Wall - +Res (Teleportation), +5% Res (All)
Level 8: Fly
(A) Blessing of the Zephyr - Run Speed, Jump, Flight Speed, Range/Endurance
(37) Blessing of the Zephyr - Knockback Reduction (4 points)
Level 10: Glacial Shield
(A) Luck of the Gambler - Defense/Increased Global Recharge Speed
Level 12: Hasten
(A) Recharge Reduction IO
(37) Recharge Reduction IO
Level 14: Maneuvers
(A) Luck of the Gambler - Defense/Increased Global Recharge Speed
(42) Luck of the Gambler - Defense/Endurance
Level 16: Tactics
(A) Adjusted Targeting - To Hit Buff
(42) Adjusted Targeting - To Hit Buff/Recharge
(43) Adjusted Targeting - To Hit Buff/Endurance/Recharge
(43) Adjusted Targeting - Endurance/Recharge
(43) Adjusted Targeting - To Hit Buff/Endurance
Level 18: Phantom Army
(A) Expedient Reinforcement - Accuracy/Damage
(19) Expedient Reinforcement - Damage/Endurance
(19) Expedient Reinforcement - Accuracy/Damage/Recharge
(25) Expedient Reinforcement - Endurance/Damage/Recharge
(27) Soulbound Allegiance - Chance for Build Up
(27) Soulbound Allegiance - Damage/Recharge
Level 20: Arctic Fog
(A) Reactive Defenses - Scaling Resist Damage
(21) Reactive Defenses - Defense/RechargeTime
(21) Reactive Defenses - Endurance/RechargeTime
(23) Reactive Defenses - Defense/Endurance
(23) Reactive Defenses - Defense
(25) Reactive Defenses - Defense/Endurance/RechargeTime
Level 22: Kick
(A) Force Feedback - Chance for +Recharge
Level 24: Tough
(A) Steadfast Protection - Resistance/+Def 3%
Level 26: Spectral Terror
(A) Superior Will of the Controller - Recharge/Chance for Psionic Damage
(29) Superior Will of the Controller - Accuracy/Control Duration/Endurance/Recharge
(31) Superior Will of the Controller - Accuracy/Control Duration/Endurance
(31) Superior Will of the Controller - Endurance/Recharge
(31) Superior Will of the Controller - Control Duration/Recharge
(33) Superior Will of the Controller - Accuracy/Control Duration
Level 28: Benumb
D-Sync Origin:D-Sync Provocation
Level 30: Weave
(A) Luck of the Gambler - Defense/Increased Global Recharge Speed
(45) Luck of the Gambler - Defense/Endurance
Level 32: Phantasm
(A) Expedient Reinforcement - Accuracy/Recharge
(33) Expedient Reinforcement - Accuracy/Damage
(33) Expedient Reinforcement - Damage/Endurance
(34) Expedient Reinforcement - Accuracy/Damage/Recharge
(34) Expedient Reinforcement - Endurance/Damage/Recharge
(34) Expedient Reinforcement - Resist Bonus Aura for Pets
Level 35: Sleet
(A) Ragnarok - Recharge/Accuracy
(36) Ragnarok - Damage/Recharge/Accuracy
(47) Ragnarok - Damage/Recharge
(47) Ragnarok - Damage
(48) Ragnarok - Damage/Endurance
(48) Achilles' Heel - Chance for Res Debuff
Level 38: Heat Loss
(A) Preemptive Optimization - EndMod/Endurance/Recharge
(39) Preemptive Optimization - EndMod/Accuracy/Recharge
(39) Preemptive Optimization - EndMod/Accuracy/Endurance
(39) Preemptive Optimization - EndMod/Recharge
(40) Preemptive Optimization - EndMod/Endurance
(40) Preemptive Optimization - Accuracy/Recharge
Level 41: Indomitable Will
(A) Recharge Reduction IO
(46) Recharge Reduction IO
Level 44: Mental Blast
(A) Apocalypse - Chance of Damage(Negative)
(45) Apocalypse - Damage/Endurance
(45) Apocalypse - Recharge/Accuracy
(46) Apocalypse - Damage/Recharge/Accuracy
(46) Apocalypse - Damage
Level 47: Evasive Maneuvers
(A) Winter's Gift - Slow Resistance (20%)
Level 49: Mind Over Body
(A) Unbreakable Guard - +Max HP
(49) Unbreakable Guard - Resistance
(49) Gladiator's Armor - TP Protection +3% Def (All)
Level 1: Containment
Level 1: Brawl
(A) Empty
Level 1: Sprint
(A) Empty
Level 2: Rest
(A) Empty
Level 1: Swift
(A) Empty
Level 1: Hurdle
(A) Empty
Level 1: Health
(A) Panacea - +Hit Points/Endurance
(17) Numina's Convalesence - +Regeneration/+Recovery
(36) Miracle - +Recovery
(36) Preventive Medicine - Chance for +Absorb
Level 1: Stamina
(A) Performance Shifter - Chance for +End
(37) Power Transfer - Chance to Heal Self
Level 8: Afterburner
Level 50: Agility Core Paragon
------------| Copy & Paste this data into Mids Reborn : Hero Designer to view the build |
|-------------------------------------------------------------------|
|MxDz;1655;731;1462;HEX;|
|78DA7594EB4E134114C7FFBBDD5A69A980E52A201444AE968297AF1A8B2660894D4|
|8FCA4D6060A6CB2B6B52D893E80CF809744C044F0F214FA59A3261A4DF415807289|
|0A6AEAE99E3DE9806193CDFCE6DCE6CC3933337E77A4F2DDDBE80568D5112B91CBC|
|523E9543E9BB6AC64D63D9E983127415FE56834DA1EB91A1D698F4D8C7A48D059B6|
|1287D0A865CDE5CC744A046D8ACDC5B9E9E950246D4DC547D2B7CD54224F76F0C5D|
|2E476D9326766F35E9B2732C9E454958DD164622A99CDCD9A193F9B95ACCCD44CED|
|A58C39198A95163227E3E3895C3E99BDD7482905E95FD0A07E4537304F63B7011D0|
|F041E32187824F098E110065CC09001CB4F8272A822FD759AAD59D454052DA0E193|
|0EB4969C3F331CC61781AF0C5E89EB452FC312C570A9615C48E8B6A612B7046E301|
|CC14D81384335AE3354502BDC4A9EBA5BF2ECC65FD86BF7E20A2FE9235B8F62AB79|
|F08DA39CC07786146DBB42C98A264EB80E72F6A9CE3EF4C37176A0864CFCAA895F9|
|C7B51CD1020932AC5C4A8C213DD315960E8C3A2C092C0538667E459A3D6AC0605D6|
|1CC586C0264323B6188E2122709E21439B0C2849B803D8E20AD56243A0E0B20F443|
|DD659528F359713789341F794CE8456AE551DEEF3022ED234A887A7C19E522F9669|
|685277D084571CAD052F198EE385C073811586762C33DCA11D34AB956EC6301D740|
|314C601837268554D5AA51903D28C151ADAD464DAB0AE3B0B15049CBA06A5AE41A9|
|6B10DB0C594AA6432D6707CEB2A613671842382D30CC30887302AF0902067214A6A|
|B7CB58AEE2EFC316C9393F82DB02BB0633887FC97C04F860F54A11E75DF3D723C4F|
|09BC27937E65DF463F8674A734618141DD710A090C30BCE903426A734368E6AE7CA|
|421ACDEC530765813C6B6C030039D853DCF54B1659FC016168B881E208F197B9F21|
|9AD8F255EF7F0F972D5F3B40BEBE4F4EE9055DCE1B734D73DA38A6D997A113ABAC2|
|AEC73229C9797E407F7812E0C3CEA06774930A4F814FF01B7D3DFA3|
|-------------------------------------------------------------------| -
Depends on the secondary, not a single one of my /dark or /time /elec /nature trollers runs it, every single one of my /traps /colds /kins and /rads /poison /ta /storms do. FF its about 50/50 depending on primary. No /emps /pains /sonics.
-
On 4/29/2023 at 2:43 AM, honoroit said:
has anyone tried out storm / ice?
it seems that frigid protection (30ft), cold damage on the whole, and frozen aura might be nice with (anything) storm.
ive tried storm/elec affinity, and enjoy that, but am so upset by empowering circuit being expensive and underpowered -> because it doesnt stack.
so I'll probably focus on blaster for storm, as Im super happy with how seismic/kin works and havent the strength for another kin right now.
(so far, on blasters, i think the real winner this patch is psi. my psi/mental is like a fortunata with no nonsense now its got extra cones.)
Made a stormx2 corr and a storm/ice blaster. Corr was very impressive, blaster not so much. Snipe animation is the best going by far i love it. Having that t2 water blast as an animation for the t3 attack in storm puts me off a lot and in teams you feel like your always waiting for storm cell to recharge and by the time you summon it the mobs been nuked. The aoe cone got dropped even with a kb/kd in its too short range. The aoe is fantastic...if it hits it hits everything. If it misses your standing there getting pummelled as it won't tag anything in the mob. With the corr its just dump the debuff and attack most times as there isn't time to wait for storm cell animation on top. Its one of those blast sets where you need to be aggressive in getting to the mobs ahead of everyone and setting it up, kind of reminds me of playing anything /dark and running ahead to drop tar patch and darkest night before attacking.
So far psi is ahead it got a massive jump in my opinion, especially scramble minds? i think its renamed as. That power on a closely packed mob is hilarious.
And assault rifle is just leaps and bounds ahead of where it was, beanbag and ignite were always insta skips for me but now they just flow into a smooth attack chain now and its a constant stream of dot's on enemies. And full auto is a stupidly massive cone.
-
2
-
1
-
-
43 minutes ago, JulioThom33_2 said:
I'm playing around with a now Level 29 Storm Blast/Elec Manipulation blaster. I've 6-slotted Storm Cell with Posi's, but I'm not seeing where Storm Cell actually does damage. It looks like it's an amplifier for any Storm Blast attacks I make within the cell itself.
So, does Storm Cell need slots at all to be effective? Are Posi's not the play here? Should I be using something else, or just insert 2 recharges and call it a day?
Lot of ways to slot it, you want to max recharge on it so its up every mob. Treat it the same way you would tar patch in /dark toss it out on the mob before attacking it'll bump your damage when effects kick in. There's so many good aoe sets for it pretty much anything goes.
Cheap full set artillery for ranged defence.
Full Frozen Blast set for aoe defence and a chance to immob.
A couple pieces of Frozen Blast with a force feedback +recharge for slow resists. Maybe a proc or 2 but from what i've seen they have minimal chance to fire off.
5 bombardment/5 ragnarok and a force feedback+recharge for a few good bonuses.
You could try tossing in the ATo set defiant barrage but i can't imagine thats a good place to slot it.
Positron set is probably the last 1 i'd slot- its got the least recharge in the set.
-
1
-
-
22 hours ago, Raserei said:
Thank you for the notes and build.. it's much better.
The thunderstrikes are extra I have from another toon, I figured I would replace them down the line, plus they are cheap.
Honestly the character is still mid level. In general, should I be going for resist/recharge/defense/damg? (in that order?)
Depends how you play, i'll pick the powers/travel i want first then start tossing in sets to see what i have before shuffling stuff to get what i want in this case melee defence high enough not to go splat when i hop in a mob with resists to back it up->slow resistance+recharge, you want enough recharge for an attack chain and enough slow resist so that you can keep it running (there's tons of in game mobs that can apply slow debuffs)->damage procs because sent damage is underwhelming if you straight 6 slot full sets. If you look closely at the set bonuses you often find the 6th is essentially useless unless its stacking with other set bonuses providing the same thing. Found an old fire/rad/fire build, you could swap cremate for rain of fire with a ragnarok set for same bonuses but it loses the single target attack chain, fire blast/blaze/cremate, i just don't find fire epic as good as either psi/dark/elec but its a better fit thematically. Inferno slotting is just leftover pieces and could easily be changed/swapped over with fire sword circle or maybe a full set of oblits for more recharge and melee def:
SpoilerThis Hero build was built using Mids Reborn 3.4.7
https://github.com/LoadedCamel/MidsRebornFIRE RAD FIRE: Level 50 Magic Sentinel
Primary Power Set: Fire Blast
Secondary Power Set: Radiation Armor
Power Pool: Leaping
Power Pool: Fighting
Power Pool: Leadership
Power Pool: Speed
Ancillary Pool: Fire MasteryHero Profile:
------------
Level 1: Fire Blast
(A) Superior Sentinel's Ward - RechargeTime/Chance for +Absorb
(3) Superior Sentinel's Ward - Accuracy/Damage/Endurance/RechargeTime
(3) Superior Sentinel's Ward - Accuracy/Damage/Endurance
(5) Superior Sentinel's Ward - Accuracy/Damage/RechargeTime
(5) Superior Sentinel's Ward - Damage/RechargeTime
(7) Superior Sentinel's Ward - Accuracy/Damage
Level 1: Alpha Barrier
(A) Unbreakable Guard - +Max HP
(7) Unbreakable Guard - Resistance
(9) Unbreakable Guard - Resistance/Endurance
(9) Unbreakable Guard - Resistance/Endurance/RechargeTime
(11) Gladiator's Armor - TP Protection +3% Def (All)
(11) Steadfast Protection - Resistance/+Def 3%
Level 2: Fire Ball
(A) Superior Frozen Blast - Accuracy/Damage
(21) Superior Frozen Blast - Accuracy/Damage/Endurance
(21) Superior Frozen Blast - Damage/Endurance
(23) Superior Opportunity Strikes - RechargeTime/Chance for Opportunity
(23) Positron's Blast - Chance of Damage(Energy)
(27) Bombardment - Chance for Fire Damage
Level 4: Gamma Boost
(A) Numina's Convalesence - +Regeneration/+Recovery
(27) Performance Shifter - Chance for +End
Level 6: Blaze
(A) Apocalypse - Chance of Damage(Negative)
(29) Apocalypse - Damage/Endurance
(29) Apocalypse - Recharge/Accuracy
(31) Apocalypse - Damage/Recharge/Accuracy
(31) Apocalypse - Damage
(31) Gladiator's Javelin - Chance of Damage(Toxic)
Level 8: Combat Jumping
(A) Luck of the Gambler - Defense/Increased Global Recharge Speed
(37) Kismet - Accuracy +6%
(39) Shield Wall - +Res (Teleportation), +5% Res (All)
Level 10: Proton Armor
(A) Unbreakable Guard - RechargeTime/Resistance
(13) Unbreakable Guard - Resistance
(13) Unbreakable Guard - Resistance/Endurance
(15) Unbreakable Guard - Resistance/Endurance/RechargeTime
Level 12: Fallout Shelter
(A) Unbreakable Guard - RechargeTime/Resistance
(15) Unbreakable Guard - Resistance
(17) Unbreakable Guard - Resistance/Endurance
(17) Unbreakable Guard - Resistance/Endurance/RechargeTime
Level 14: Kick
(A) Empty
Level 16: Proton Therapy
(A) Preventive Medicine - Heal/RechargeTime
(19) Preventive Medicine - Heal/RechargeTime/Endurance
(19) Preventive Medicine - Heal
Level 18: Tough
(A) Unbreakable Guard - RechargeTime/Resistance
(33) Unbreakable Guard - Resistance/Endurance
(34) Unbreakable Guard - Resistance
(34) Unbreakable Guard - Resistance/Endurance/RechargeTime
Level 20: Particle Acceleration
(A) Run Speed IO
Level 22: Weave
(A) Luck of the Gambler - Defense/Increased Global Recharge Speed
(46) Reactive Defenses - Scaling Resist Damage
(47) Reactive Defenses - Defense/Endurance
Level 24: Particle Shielding
(A) Preventive Medicine - Chance for +Absorb
(25) Preventive Medicine - Heal/RechargeTime
(25) Preventive Medicine - Heal/RechargeTime/Endurance
Level 26: Inferno
(A) Superior Avalanche - Accuracy/Damage/Recharge
(43) Superior Avalanche - Accuracy/Damage/Endurance/Recharge
(45) Obliteration - Chance for Smashing Damage
(45) Obliteration - Damage/Recharge
(46) Fury of the Gladiator - Chance for Res Debuff
(46) Fury of the Gladiator - Damage/Recharge
Level 28: Ground Zero
(A) Superior Avalanche - Recharge/Chance for Knockdown
(39) Superior Avalanche - Accuracy/Damage
(39) Touch of the Nictus - Chance for Negative Energy Damage
(40) Scirocco's Dervish - Chance of Damage(Lethal)
(40) Obliteration - Chance for Smashing Damage
(40) Eradication - Chance for Energy Damage
Level 30: Maneuvers
(A) Luck of the Gambler - Defense/Increased Global Recharge Speed
(34) Luck of the Gambler - Defense/Endurance
Level 32: Tactics
Hamidon Origin:Cytoskeleton Exposure
Level 35: Fire Cages
(A) Bombardment - Chance for Fire Damage
(36) Bombardment - Accuracy/Damage/Recharge/Endurance
(36) Bombardment - Damage
(36) Bombardment - Accuracy/Recharge/Endurance
(37) Bombardment - Damage/Recharge
(37) Bombardment - Accuracy/Damage/Recharge
Level 38: Cremate
(A) Hecatomb - Chance of Damage(Negative)
(43) Hecatomb - Damage/Endurance
(48) Hecatomb - Recharge/Accuracy
(50) Hecatomb - Damage/Recharge/Accuracy
(50) Hecatomb - Damage
Level 41: Fire Sword Circle
(A) Armageddon - Chance for Fire Damage
(42) Armageddon - Damage/Endurance
(42) Armageddon - Recharge/Accuracy
(42) Armageddon - Damage/Recharge/Accuracy
(43) Armageddon - Damage
Level 44: Hasten
(A) Recharge Reduction IO
(45) Recharge Reduction IO
Level 47: Super Speed
(A) Winter's Gift - Slow Resistance (20%)
Level 49: Aim
(A) Gaussian's Synchronized Fire-Control - Chance for Build Up
(50) Recharge Reduction IO
Level 1: Opportunity
Level 1: Brawl
(A) Empty
Level 1: Sprint
(A) Empty
Level 2: Rest
(A) Empty
Level 1: Swift
(A) Empty
Level 1: Hurdle
(A) Empty
Level 1: Health
(A) Panacea - +Hit Points/Endurance
(33) Miracle - +Recovery
Level 1: Stamina
(A) Synapse's Shock - EndMod/Increased Run Speed
(33) Synapse's Shock - EndMod
(48) Synapse's Shock - EndMod/Recharge
Level 47: Speed Phase
------------| Copy & Paste this data into Mids Reborn : Hero Designer to view the build |
|-------------------------------------------------------------------|
|MxDz;1651;731;1462;HEX;|
|78DA7594CB4F534114C6BFDB7B2B02E55111282F69414A4BE102262646348A02090|
|A092989DBA6A1D7720DB6F516138D7F817B0D1B1375E952A3C6BD5BF0F107B8373C|
|356AD405D6C33D7370246112C26F66CE77CE3767A677F6CE44686D75E6228CFACB4|
|BD9723933EF1496DD82B3149CCDE6DD05D0A89B9A4E4F46D3E313D13DA8A2957609|
|CAA4B385BC93B3A75CCFC95C22FD72747F6BC2B9EE14CA8E9DCEE6DCECB25B2C64C|
|6BD9B452F3C5D58743C0AB2054273C5E2923DE3644B6E215FE74FA6DCFC2265C937|
|C856CEF1CA8B6EA9C69FCF971C27D73E597217ECFD6ABE835932E078772364314A7|
|FA5F89E7D036A5482C0470B18B510C00781F70C16DE09AC311CC12AC37A42CFE2A7|
|F96DAA90EF0C47F143E017430D4E09B492B6CBC2ADF85E16CD8D81975CE0385E0BB|
|C6268C1278137F0A11D81A00FCF9380A9B9314C5C3354C84AC0078F2A050DAD5210|
|A3BCD3891181618613B00506F7819DB7D055576995025568E64A27B10BFF4C715CE|
|5D80DEA51B5166B56E327EF84A44721E951BDF4689344B5BAA85644F5226A1451A3|
|88C805EAF04F44930A0D7CA5640DBADB066CB0E21836053E33989423AC170E4BE1A|
|8D48B898398147E418D6FD24468C210DF8D45E99AF5D2CDD2A8217C63B18D1D862D|
|B2D9AAC7B6628B7722E237227EEFD33DB6E92FA60D8FF9590CE009C3203D0605BB0|
|155F282A9608C619B4A76E8693AF094D5713C1288706C3FEE410164653BE0DF7598|
|4ED9A53FBC2E39650C8D0C4D14D2ADB7A81BA7E9BF65E20179E8D13DF4C87BEE852|
|1B06B29F863A967561100C73CA4347D5A1AAB0FA980EAC800C330920CA34808C419|
|56489DD0D5099CE79D24CE098C099C95C467187AE87029FDFC29A4A07AAFA097426|
|CFDFC363AB88BB7E92A47B4D2C6089E893B25BE91F43F334109A9745AD047C55FA4|
|973E73C8FA9CA57FA668DDE0F5AD9AFFBF5F12BF7DC8FACE8175C298FC3AAED0A4D|
|FC297032174941D4B85AC5BEA1E3619DE0E5053345B95BFD43BEA99|
|-------------------------------------------------------------------| -
4 hours ago, Raserei said:
Im a new player returning and want to make a Fire/rad Sent. I kind of threw this build together, let me know if its trash.
]
Sentinel - Fire Blast - Radiation Armor.mxd 4.52 kB · 2 downloads
First welcome back to the game. You picked a nice sent combo to begin with.
Second (this is just my opinion) the sentinel At is basically just a scrapper running ranged attacks instead of melee one. Its easy to get sidetracked into thinking it should be played at range but the epics once taken usually change your opinion and you realise they become much more effective in melee.
Open mids, click slots/enhancements- set all relative levels to +5. Now look at meltdown (which you left running) and you'll see the 3rd rech io is wasted once its boosted to +5. Toss that in hasten. You want a lot more recharge. You skipped particle shielding, its a great power for the aborb-taking alphas, and the bump in regen you get which means you don't need to use the heal as often. Looks like you used a full set of annihilation, good for e/ne res but the f/c/aoe def does nothing for you when its not stacked with other sets offering the same defence. Seems like you went for a lot of ranged defense using thunderstrike and artillery pieces, 2 of my least favourite sets which sacrifice the ability to slot procs, which you want in sents as damage isn't great and slow resistance which /rad armr really needs. I still run psi epic on mine but i play it as a scrapper first rather than a blaster so my melee def is up instead of the ranged def. I don't think much of the fire epics on sent's, its nice to toss out cages and rain of fire but if you compare the recharge and radius of powers like fire sword circle to psi shockwave you realise how some are far superior to others. I'll post the build but with different epics+power picks i'm not sure how much help it will be:
SpoilerThis Hero build was built using Mids Reborn 3.4.7
https://github.com/LoadedCamel/MidsRebornLevel 50 Magic Sentinel
Primary Power Set: Fire Blast
Secondary Power Set: Radiation Armor
Power Pool: Fighting
Power Pool: Speed
Power Pool: Leaping
Power Pool: Leadership
Ancillary Pool: Psionic MasteryHero Profile:
------------
Level 1: Flares
(A) Superior Sentinel's Ward - RechargeTime/Chance for +Absorb
(3) Superior Sentinel's Ward - Accuracy/Damage/Endurance/RechargeTime
(3) Superior Sentinel's Ward - Accuracy/Damage
(5) Superior Sentinel's Ward - Damage/RechargeTime
(5) Superior Sentinel's Ward - Accuracy/Damage/RechargeTime
(7) Superior Sentinel's Ward - Accuracy/Damage/Endurance
Level 1: Alpha Barrier
(A) Unbreakable Guard - +Max HP
(7) Unbreakable Guard - Resistance
(9) Unbreakable Guard - Resistance/Endurance
(9) Unbreakable Guard - Resistance/Endurance/RechargeTime
(11) Gladiator's Armor - TP Protection +3% Def (All)
(11) Steadfast Protection - Resistance/+Def 3%
Level 2: Fire Ball
(A) Superior Frozen Blast - Accuracy/Damage
(15) Superior Frozen Blast - Accuracy/Damage/Endurance
(15) Annihilation - Chance for Res Debuff
(17) Bombardment - Chance for Fire Damage
(17) Javelin Volley - Chance of Damage(Lethal)
(19) Positron's Blast - Chance of Damage(Energy)
Level 4: Gamma Boost
(A) Numina's Convalesence - +Regeneration/+Recovery
(19) Performance Shifter - Chance for +End
Level 6: Blaze
(A) Apocalypse - Chance of Damage(Negative)
(21) Apocalypse - Damage/Endurance
(21) Apocalypse - Recharge/Accuracy
(23) Apocalypse - Damage/Recharge/Accuracy
(23) Apocalypse - Damage
(25) Gladiator's Javelin - Chance of Damage(Toxic)
Level 8: Aim
(A) Gaussian's Synchronized Fire-Control - Chance for Build Up
Level 10: Proton Armor
(A) Unbreakable Guard - RechargeTime/Resistance
(33) Unbreakable Guard - Resistance
(33) Unbreakable Guard - Resistance/Endurance
(33) Unbreakable Guard - Resistance/Endurance/RechargeTime
Level 12: Fallout Shelter
(A) Unbreakable Guard - RechargeTime/Resistance
(31) Unbreakable Guard - Resistance
(31) Unbreakable Guard - Resistance/Endurance
(31) Unbreakable Guard - Resistance/Endurance/RechargeTime
Level 14: Boxing
(A) Empty
Level 16: Proton Therapy
(A) Preventive Medicine - Heal/RechargeTime
(29) Preventive Medicine - Heal/RechargeTime/Endurance
(29) Preventive Medicine - Heal
Level 18: Tough
(A) Unbreakable Guard - RechargeTime/Resistance
(25) Unbreakable Guard - Resistance
(27) Unbreakable Guard - Resistance/Endurance
(27) Unbreakable Guard - Resistance/Endurance/RechargeTime
Level 20: Particle Acceleration
(A) Run Speed IO
Level 22: Weave
(A) Luck of the Gambler - Defense/Increased Global Recharge Speed
(34) Reactive Defenses - Scaling Resist Damage
(50) Reactive Defenses - Defense/Endurance
Level 24: Particle Shielding
(A) Preventive Medicine - Chance for +Absorb
(36) Preventive Medicine - Heal/RechargeTime
(36) Preventive Medicine - Heal/RechargeTime/Endurance
Level 26: Inferno
(A) Armageddon - Chance for Fire Damage
(34) Armageddon - Damage/Endurance
(34) Armageddon - Recharge/Accuracy
(45) Armageddon - Damage/Recharge/Accuracy
(45) Armageddon - Damage/Recharge
(46) Fury of the Gladiator - Chance for Res Debuff
Level 28: Ground Zero
(A) Overwhelming Force - Damage/Chance for Knockdown/Knockback to Knockdown
(40) Obliteration - Accuracy/Recharge
(40) Touch of the Nictus - Chance for Negative Energy Damage
(40) Scirocco's Dervish - Chance of Damage(Lethal)
(43) Obliteration - Chance for Smashing Damage
(45) Theft of Essence - Chance for +Endurance
Level 30: Hasten
(A) Recharge Reduction IO
(39) Recharge Reduction IO
Level 32: Super Speed
(A) Winter's Gift - Slow Resistance (20%)
Level 35: Mind Probe
(A) Superior Blistering Cold - Accuracy/Damage
(36) Superior Blistering Cold - Accuracy/Damage/Endurance
(37) Hecatomb - Chance of Damage(Negative)
(37) Touch of Death - Chance of Damage(Negative)
(37) Gladiator's Strike - Chance for Smashing Damage
(39) Mako's Bite - Chance of Damage(Lethal)
Level 38: Combat Jumping
(A) Shield Wall - +Res (Teleportation), +5% Res (All)
(39) Luck of the Gambler - Defense/Increased Global Recharge Speed
(50) Kismet - Accuracy +6%
Level 41: Dominate
(A) Gladiator's Net - Chance of Damage(Lethal)
(42) Ghost Widow's Embrace - Chance of Damage(Psionic)
(42) Unbreakable Constraint - Chance for Smashing Damage
(42) Superior Winter's Bite - Accuracy/Damage
(43) Superior Winter's Bite - Accuracy/Damage/Endurance
(43) Superior Winter's Bite - Damage/Endurance/Accuracy/RechargeTime
Level 44: Psychic Shockwave
(A) Superior Avalanche - Accuracy/Damage
(46) Superior Avalanche - Accuracy/Damage/Endurance
(46) Superior Avalanche - Recharge/Chance for Knockdown
(48) Eradication - Chance for Energy Damage
(48) Obliteration - Chance for Smashing Damage
(50) Scirocco's Dervish - Chance of Damage(Lethal)
Level 47: Maneuvers
(A) Luck of the Gambler - Defense/Increased Global Recharge Speed
(48) Luck of the Gambler - Defense/Endurance
Level 49: Tactics
Hamidon Origin:Cytoskeleton Exposure
Level 1: Opportunity
Level 1: Brawl
(A) Empty
Level 1: Sprint
(A) Empty
Level 2: Rest
(A) Empty
Level 1: Swift
(A) Empty
Level 1: Hurdle
(A) Empty
Level 1: Health
(A) Panacea - +Hit Points/Endurance
(13) Miracle - +Recovery
Level 1: Stamina
(A) Power Transfer - Chance to Heal Self
(13) Power Transfer - EndMod
Level 32: Speed Phase
------------| Copy & Paste this data into Mids Reborn : Hero Designer to view the build |
|-------------------------------------------------------------------|
|MxDz;1620;722;1444;HEX;|
|78DA7594594F535110C7FF77A9CABE0994AD94225028B4D4C407B7B881890A0981C|
|4D7A6A1D77215DADA62A2F113F8667CF1C598F8A6C6178D31BEFB0A2E1FC1C42DEC|
|C63DD1D4E99D3370D070939BFECE9C99F9CF9933BDE357472A1717C68EC3A83E359|
|B2C1412534E66DECD38B3BEF164DA9D46E9D94D6FABD81393C94CDA49454FBB7927|
|719242E6839B5B23CE05275370A293C9949B9C77B399C489FC5C368FAA896C76962|
|2D233E4972EF7565339C749557A38E6247364AF9145CAC91766DC5CCB68CE9D8E6E|
|269F28B889719273F2D7FC545090DE6C6FA93C03EA29FA80373610B761E2B5C0028|
|38D4581970CBBF08A6129AC67F1D2FCB294CB57863DF826F093A11CFB059A29B6C3|
|C665AAC630B46A0C3C65816A3C13F8C841B5307D0A426CA9C77378F0B81FB0B46A0|
|C0BE70DE572DBF4204F4A3E5DC98738EFECC5B0408CA109518141063F0659F24A6F|
|E96EB7D2D0E201BB2C5347CAB41AAC32FCE098A07424281D094A475628A8420FAA9|
|0A080040524282041060D5715B6826851A4079F29598D96CCACC13247B46345E013|
|834539EA74E13A11F68B70AB08B78AF0136A73831684060CF105D894AE51976EF49|
|6B4D3852F1C1CC73AC32A95D9ACFB36639577BAA5DE6EA9F706B5BB451FB3161C35|
|55DE23028719067148E020C3108E719A35926CD387BE0D6F79A70FBF4D057EB15CE|
|7330DD04CA97CF59637AD213A65873E661D88B06FAF4037B974EA77D38936CEF28E|
|9A17D20730849BB63AED2D867D88980A12E4D25782B0A5042EB1401309F4E8DDEBC|
|13971512D8FE30FBC7ADF9364583F7618A3ECDB8F3943C11953C17D5B1DFBA1C023|
|860F9426A2571EC11D5B35F8AEC03D8618D64C4F3B26DD8B4B3FEBA8F2A8DEBDA81|
|41C432D4303B90CEB03368C03F46B5BB8D8EF7D6F7CB2536CB7A13F45CF487F82B1|
|1DEC13B6FEBD22BBC1F6D5F2ED1F32F15FDBC1BEFE8F9DB08B0F5A89B38677691BF|
|FBB7CB795CB06C38B81ED6352FC0BD9DCE13C|
|-------------------------------------------------------------------| -
Just finished a Renault and got hit by something called Healing Wave.
Healing Wave heals you with their Healing Wave for 11482.5 health points over time.
Healing Wave hits you with their Healing Wave granting you 1346.88 points of endurance.What power is this and where does it come from?


Returning player, considering which characters to offer to bring for 4* content
in Archetypes
Posted
Most 4* content is run at speed now, so knowing the maps well (especially on aeon) is a good place to start, try running a few solo to see how you do on low rep, its not too difficult with a decent build. Priority toons tend to be kins and colds for support, sometimes nature or empathy if theres room on the team. If you've been keeping up with forum posts you may have seen some all blaster runs which will point you in the direction of what most teams want- massive dps. A good tank is essential and t4 barriers/rebirths/possibly a single incandes for ghosting are the goto destinies, often you'll see an offtank, especially for the aeon fight vs the vanguard crew to get mobile dummy accolade with 1 person handling hero 1 although i've seen some great tanks take them all at once.
In 4* content hanging at the back tends to get you killed as you miss out on all the buffs firing off and the enemies can be seriously tough, you don't want to get stuck solo with any unless your able to put out huge burst damage, debuffs are ridiculous and you'll find yourself faceplanting before you know what hit you. I haven't tried any sents yet (i do have an elec/sr too) if i did i'd go /bio or /rad. Bio gets the extra dps and rad has the extra procced out nuke. Domi's are good for the last fight on 4*itf, on aeon your better off with a plant for all the mobs, the ability to chuck out the confuse/immob/creepers really speeds things up and its all about how fast you can take out mobs, the av fights there's usually the cold corr and kin and all the blasters so you don't have to worry about those so much. I have an ill/poison and i'm uncertain about its ability to survive or how useful it would be, debuffs are fantastic but your permanently over the aggro cap, PA won't cover you, your totally reliant on getting heals off someone else by playing in melee (and melee is where you'll be getting debuffed to bits) and it can be quite squishy-on 4* stuff its 1 shot and your dead and venemous will draw aggro to you. Might have to try it and see how it goes, its always a fun play.
Bubbles/dark fenders seem popular good buffs and some - to hit, don't see a lot of seismic (did you slot for 0 kb? )
Yet to run my poison/fire fender through, can't even remember which server its on, again i'd have high expectations of squish squish.
If i were you i'd check out some other threads, theres a lot of players asked the same question, whats best for 4* content?