Kruunch
-
Posts
155 -
Joined
-
Last visited
Content Type
Profiles
Forums
Events
Store
Articles
Patch Notes
Everything posted by Kruunch
-
You can reach soft caps on Defense with a Sentinel. Resists are capped at 75%. So it depends how tough you want your Sentinel to be. If you want to stand in the middle of a pack of mobs, I'd suggest Defense for a Sentinel.
-
Typically Build Up, Lightning Rod, Shield Charge, Spring Attack, Zapp (if strong boss) otherwise Thunderstrike, Chain Induction, Havoc Punch (rinse and repeat between BU, Zapp, TS, CI, HP). Normally I'll have the telenukes up every pack. Sometimes I can double telenuke chain longer fights. For Incarnate Alpha I've gone Agility to get my Defense where I like it to be (~50%+ all positional).
-
Slightly improved version of this build I'm currently running: Villain Plan by Mids' Villain Designer 1.962 http://www.cohplanner.com/ Click this DataLink to open the build! Kraash: Level 50 Technology Stalker Primary Power Set: Electrical Melee Secondary Power Set: Shield Defense Power Pool: Leaping Power Pool: Fighting Power Pool: Speed Power Pool: Leadership Ancillary Pool: Mu Mastery Villain Profile: Level 1: Havoc Punch -- Mk'Bit-Acc/Dmg(A), Mk'Bit-Dmg/EndRdx(3), Mk'Bit-Dmg/Rchg(3), Mk'Bit-Acc/EndRdx/Rchg(5), Mk'Bit-Acc/Dmg/EndRdx/Rchg(5), Mk'Bit-Dam%(7) Level 1: Hide -- DefBuff-I(A) Level 2: Deflection -- LucoftheG-Rchg+(A), LucoftheG-Def/EndRdx(7), LucoftheG-Def(9), LucoftheG-Def/EndRdx/Rchg(9) Level 4: Battle Agility -- LucoftheG-Rchg+(A), LucoftheG-Def(11), LucoftheG-Def/EndRdx(11), LucoftheG-Def/EndRdx/Rchg(50) Level 6: Assassin's Shock -- SprStlGl-Acc/Dmg(A), SprStlGl-Dmg/Rchg(13), SprStlGl-Acc/Dmg/Rchg(13), SprStlGl-Dmg/EndRdx/Rchg(15), SprStlGl-Acc/Dmg/EndRdx/Rchg(15), SprStlGl-Rchg/Hide%(17) Level 8: Super Jump -- Jump-I(A) Level 10: Combat Jumping -- BlsoftheZ-Travel(A), BlsoftheZ-Travel/EndRdx(50), BlsoftheZ-ResKB(50) Level 12: Kick -- Empty(A) Level 14: Spring Attack -- Obl-Dmg(A), Obl-Acc/Rchg(23), Obl-Dmg/Rchg(23), Obl-Acc/Dmg/Rchg(25), Obl-Acc/Dmg/EndRdx/Rchg(25), Obl-%Dam(27) Level 16: Active Defense -- RechRdx-I(A), RechRdx-I(27) Level 18: Chain Induction -- SprAssMar-Acc/Dmg(A), SprAssMar-Dmg/Rchg(29), SprAssMar-Acc/Dmg/Rchg(29), SprAssMar-Dmg/EndRdx/Rchg(31), SprAssMar-Acc/Dmg/EndRdx/Rchg(31), SprAssMar-Rchg/Rchg Build Up(31) Level 20: Build Up -- GssSynFr--ToHit(A), GssSynFr--ToHit/Rchg(33), GssSynFr--ToHit/Rchg/EndRdx(33), GssSynFr--Rchg/EndRdx(33), GssSynFr--ToHit/EndRdx(34), GssSynFr--Build%(34) Level 22: Against All Odds -- EndRdx-I(A) Level 24: Hasten -- RechRdx-I(A), RechRdx-I(34), RechRdx-I(36) Level 26: Thunder Strike -- Obl-Dmg(A), Obl-Acc/Rchg(36), Obl-Dmg/Rchg(36), Obl-Acc/Dmg/Rchg(37), Obl-%Dam(37), Obl-Acc/Dmg/EndRdx/Rchg(37) Level 28: Tough -- StdPrt-ResDam/Def+(A) Level 30: Weave -- LucoftheG-Rchg+(A), LucoftheG-Def(39), LucoftheG-Def/EndRdx(39), LucoftheG-Def/EndRdx/Rchg(39) Level 32: Lightning Rod -- Obl-Dmg(A), Obl-Acc/Rchg(40), Obl-Dmg/Rchg(40), Obl-Acc/Dmg/Rchg(40), Obl-Acc/Dmg/EndRdx/Rchg(42), Obl-%Dam(42) Level 35: Shield Charge -- Obl-Dmg(A), Obl-Acc/Rchg(42), Obl-Dmg/Rchg(43), Obl-Acc/Dmg/Rchg(43), Obl-Acc/Dmg/EndRdx/Rchg(43), Obl-%Dam(45) Level 38: Maneuvers -- LucoftheG-Rchg+(A), LucoftheG-Def(45), LucoftheG-Def/EndRdx(45), LucoftheG-Def/EndRdx/Rchg(46) Level 41: True Grit -- GldArm-3defTpProc(A) Level 44: Zapp -- SprWntBit-Acc/Dmg(A), SprWntBit-Dmg/Rchg(46), SprWntBit-Acc/Dmg/EndRdx(46), SprWntBit-Acc/Dmg/Rchg(48), SprWntBit-Dmg/EndRdx/Acc/Rchg(48), SprWntBit-Rchg/SlowProc(48) Level 47: Grant Cover -- DefBuff-I(A) Level 49: Assault -- EndRdx-I(A) Level 1: Assassination Level 1: Brawl -- Empty(A) Level 1: Prestige Power Dash -- Empty(A) Level 1: Prestige Power Slide -- Empty(A) Level 1: Prestige Power Quick -- Empty(A) Level 1: Prestige Power Rush -- Empty(A) Level 1: Prestige Power Surge -- Empty(A) Level 1: Sprint -- Clr-Stlth(A) Level 2: Rest -- Empty(A) Level 4: Ninja Run Level 2: Swift -- Run-I(A) Level 2: Health -- Mrc-Rcvry+(A), NmnCnv-Regen/Rcvry+(17), Pnc-Heal/+End(19) Level 2: Hurdle -- Jump-I(A) Level 2: Stamina -- PrfShf-End%(A), PrfShf-EndMod(19), PrfShf-EndMod/Rchg(21), PrfShf-EndMod/Acc(21) ------------
-
I want Taunt to say "Hey! Over here flapjack!"
-
As good a reason as any ... I guess? Just not exactly intuitive as how it interacts with the Hidden status 😉
-
I had the same initial reaction to having status protection on a click power but in practice it works just fine. The downside is the 1 second animation that *always* interrupts you in whatever you're doing (just annoying, not functionally impacting). The upside is you can double stack if for more status protection and more importantly, extra defense debuff resistance (huge for defense based sets).
-
All of the telenukes (LR, SC, SA) are classified as pseudopets (why? I have no idea) which do not break the Hidden status.
-
Except Fireball doesn't synergize with the build well. It isn't able to crit (neither is SA), would block you from raising Assassination stacks (especially due to its low recharge), breaks hide (SA doesn't) and doesn't offer passive control (SA has a high percentage AOE knockdown effect). The only upside to FB in my mind is range which usually isn't an issue on a telenuke build 😉
-
Yeah this build is recharge heavy. If you're looking for the budget version, Fireball might be the way to go. My SA is at about 30 seconds recharge currently. With all of the other AOEs in this build, Fireball seems redundant to me but build to flavor. As for the Hide ATO, other Stalker vets can chime in here (I'm a Stalker newb) but as far as my game play goes, it works well enough that I generally never Assassinate from hide (I use ither Chain Induction for the guaranteed crit or Thunderstrike for the multi-crit if there are still a lot of mobs up) and I respec'd out of Placate. Placate just slows the whole chain down I've found.
-
In the current condition of the game, you shouldn't let money stop you from making whatever build you want. There are a ton of guides on the forums on how to milk farms, black market, merits, etc ... where you can easily accumulate the resources you need for the build that you want.
-
Generally speaking once you get the Stalker ATO that puts you back into hide, Placate becomes superfluous. Once you get your normal heavy hitting attacks, Assassin Shock is generally just done as an instant.
-
I like Spring Attack but it's nowhere near the power of LR/SC. However it is more powerful than fireball (by about x2) and also has a high chance for AOE knockdown. I haven't tried both together, but I don't feel the need to add another AOE attack (LR/SC/SA/TS seems to work really well).
-
So I tested Moonbeam out on my Elec/SD Scrapper and it worked into the rotation really well. Not sure it's needed for the Stalker version but I liked it well enough to try it out. The FF proc however is barely noticeable overall. Shadowmeld is ok ... but I used it twice just to try it and haven't needed it otherwise.
-
This is my current Scrapper version. Cheap(er) build, no purples. Defense (m/r/aoe): 56/51/47 Damage: +45% Haste: +135% Hero Plan by Mids' Hero Designer 1.962 http://www.cohplanner.com/ Click this DataLink to open the build! Kapitan Amerika: Level 50 Science Scrapper Primary Power Set: Electrical Melee Secondary Power Set: Shield Defense Power Pool: Fighting Power Pool: Speed Power Pool: Leaping Power Pool: Leadership Ancillary Pool: Soul Mastery Hero Profile: Level 1: Havoc Punch -- Mk'Bit-Acc/Dmg(A), Mk'Bit-Dmg/EndRdx(3), Mk'Bit-Dmg/Rchg(3), Mk'Bit-Acc/EndRdx/Rchg(5), Mk'Bit-Acc/Dmg/EndRdx/Rchg(5), Mk'Bit-Dam%(7) Level 1: Deflection -- LucoftheG-Rchg+(A), LucoftheG-Def/EndRdx(7), LucoftheG-Def/EndRdx/Rchg(9), LucoftheG-Def(9) Level 2: Battle Agility -- LucoftheG-Rchg+(A), LucoftheG-Def/EndRdx(11), LucoftheG-Def/EndRdx/Rchg(11), LucoftheG-Def(13) Level 4: Jacobs Ladder -- Obl-Dmg(A), Obl-Acc/Rchg(13), Obl-Dmg/Rchg(15), Obl-Acc/Dmg/Rchg(15), Obl-Acc/Dmg/EndRdx/Rchg(17), Obl-%Dam(17) Level 6: True Grit -- StdPrt-ResDam/Def+(A) Level 8: Thunder Strike -- FrcFdb-Rechg%(A), ScrDrv-Acc/Dmg(19), ScrDrv-Dmg/EndRdx(19), ScrDrv-Dmg/Rchg(21), ScrDrv-Acc/Rchg(21), ScrDrv-Acc/Dmg/EndRdx(23) Level 10: Active Defense -- RechRdx-I(A), RechRdx-I(23) Level 12: Kick -- Empty(A) Level 14: Tough -- GldArm-3defTpProc(A) Level 16: Weave -- LucoftheG-Rchg+(A), LucoftheG-Def/EndRdx(25), LucoftheG-Def/EndRdx/Rchg(25), LucoftheG-Def(27) Level 18: Chain Induction -- Mk'Bit-Acc/Dmg(A), Mk'Bit-Dmg/EndRdx(27), Mk'Bit-Dmg/Rchg(29), Mk'Bit-Acc/EndRdx/Rchg(29), Mk'Bit-Acc/Dmg/EndRdx/Rchg(31), Mk'Bit-Dam%(31) Level 20: Phalanx Fighting -- LucoftheG-Rchg+(A) Level 22: Against All Odds -- EndRdx-I(A) Level 24: Build Up -- GssSynFr--ToHit(A), GssSynFr--ToHit/Rchg(31), GssSynFr--ToHit/Rchg/EndRdx(33), GssSynFr--ToHit/EndRdx(33), GssSynFr--Rchg/EndRdx(33), GssSynFr--Build%(34) Level 26: Hasten -- RechRdx-I(A), RechRdx-I(34), RechRdx-I(34) Level 28: Combat Jumping -- LucoftheG-Rchg+(A) Level 30: Super Jump -- Jump-I(A) Level 32: Lightning Rod -- Obl-Dmg(A), Obl-Acc/Rchg(36), Obl-Dmg/Rchg(36), Obl-Acc/Dmg/Rchg(36), Obl-Acc/Dmg/EndRdx/Rchg(37), Obl-%Dam(37) Level 35: Shield Charge -- Obl-Dmg(A), Obl-Acc/Rchg(37), Obl-Dmg/Rchg(39), Obl-Acc/Dmg/Rchg(39), Obl-Acc/Dmg/EndRdx/Rchg(39), Obl-%Dam(40) Level 38: Spring Attack -- Obl-Dmg(A), Obl-Acc/Rchg(40), Obl-Dmg/Rchg(40), Obl-Acc/Dmg/Rchg(42), Obl-Acc/Dmg/EndRdx/Rchg(42), Obl-%Dam(42) Level 41: Moonbeam -- StnoftheM-Acc/Dmg(A), StnoftheM-Dmg/EndRdx(43), StnoftheM-Acc/ActRdx/Rng(43), StnoftheM-Dmg/ActRdx/Rchg(43), StnoftheM-Dmg/EndRdx/Rchg(45), StnoftheM-Dam%(45) Level 44: Shadow Meld -- RechRdx-I(A) Level 47: Maneuvers -- LucoftheG-Def/EndRdx(A), LucoftheG-Def(48), LucoftheG-Def/EndRdx/Rchg(48), LucoftheG-EndRdx/Rchg(48) Level 49: Assault -- EndRdx-I(A) Level 1: Brawl -- Empty(A) Level 1: Critical Hit Level 1: Prestige Power Dash -- Empty(A) Level 1: Prestige Power Slide -- Empty(A) Level 1: Prestige Power Quick -- Empty(A) Level 1: Prestige Power Rush -- Empty(A) Level 1: Prestige Power Surge -- Empty(A) Level 1: Sprint -- Run-I(A) Level 2: Rest -- Empty(A) Level 4: Ninja Run Level 2: Swift -- Run-I(A) Level 2: Health -- Mrc-Rcvry+(A), NmnCnv-Regen/Rcvry+(50), Pnc-Heal/+End(50) Level 2: Hurdle -- Jump-I(A) Level 2: Stamina -- PrfShf-EndMod(A), PrfShf-EndMod/Rchg(45), PrfShf-EndMod/Acc/Rchg(46), PrfShf-Acc/Rchg(46), PrfShf-EndMod/Acc(46), PrfShf-End%(50) ------------
-
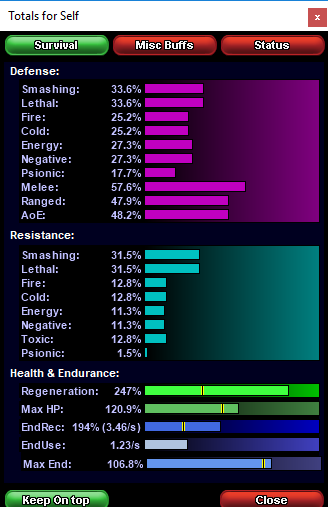
59% defense is basically the over-achiever number for high end content. I would look to get past 50% if you can (especially on melee/ranged).
-
I've found the way around this with all sets that don't have some form of endurance mitigation/recovery is to have some (or all) of the following: Performance Shifter: Chance for +End Miracle: Recovery Numina's Convalescence: Regen/Recovery Panacea: +HP/+End I have at least one (if not multiple) on every toon I make now.
-
So I'd suggest Mako's sets in your single target attacks that had the ATOs. Fairly cheap set.
-
You won't have time to double up on the Gaussian's proc. Generally speaking I'll hit BU every time its up unless I'm in the middle part of a chain that's working.
-
What's your Melee defense at?
-
TLDR: Not so far. If I was building an SD/* Tanker, then I'd concentrate on my resists a bit more, the idea there being I'm receiving a lot more of the attention (read as attempts to hit me) which would translate into damage that can be resisted. On my Stalker however, I receive less attempts to hit, so less actually hits, so less damage for me to resist against. So far it's worked out that way well, including even taking a 1200 HP shot from an AV and being able to move on. Also keep in mind that since we're playing the statistics game here, the fact that all three of the telenukes (Lightning Rod, Shield Charge and Spring Attack) are AOEs with large percentage knockdowns and Thunderstrike also falls into this category, a large percentage of potential attacks against you never happen because the mobs are on their butts.
-
I think you meant this for me? I find against +8s that the three telenukes will leave only the bosses standing at about half life on average. With +8/+4s you'll also have the LTs up at around 25% life or so (excluding stragglers out of the area and/or just flat being missed by one or more telenuke). Following up the telenuke chain with Thunderstrike (while still hidden) will usually clear out the rest of the LTs (in the latter scenario) and gets the bosses to around 30% life. Then you go through your normal chain cleaning them up. Between Assassin Shock and critting from hidden, I haven't found the need for an additional single target attack but I would like to play around with Moonbeam to see if it works better. My concern there would be that it interrupts building up Assassination buffs. Will let you know if/when I work it out.
-
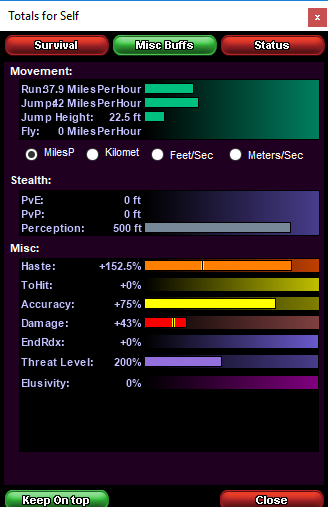
Sniper Attacks: Cool, I'll need to check that out. I assume since it's a single target attack it's a guaranteed crit from hidden? Defense Debuff Resistance is showing the same because Pine's isn't factoring double stacking the buff, which is what would happen with two recharges in it while having 150%+ recharge natively (actually this will cause it to triple stack for a short duration). Not sure what you're referencing with the Force Feedback proc as far as cool downs go? How much recharge does the FF proc give and how long is the buff?
-
1) Yes, a fully slotted Gaussian's gives 2.5% defense to all positional. You can go other routes to get there, this is the one I chose. 2) I need to look into Force Feedback's +Recharge proc. I'm not really light on +recharge, but I'd like to try out the benefits. 3) So Endurance can become an issue in prolonged fights and I find having the extra Performance Shifter mule to cure that. Also Moonbeam is a sniper attack which means a prolonged sniper animation that can be interrupted. While I should have enough +accuracy to make it insta-cast, I haven't played around with that new mechanic yet (another thing to try out). 4) So if you're dropping powers, you want to gain a power that is better (usually). While Jacob's Ladder is a bit clunky (as most of the T3 cones are) I find that it makes up for it when you draw extra packs of mobs, in that the AOE isn't too hard to manage in a crowd (I average 3 hits per usage). When not in that position, I generally just cycle between Chain Induction, Havoc Punch, Thunderstrike and Assasin Shock for my non-telenuke chain. You also dropped Spring Attack, which means you have one less AOE in your rotation. If you're doing +8/+4 this will be telling. Other notes: 1) Shadow Meld I have yet to play with and a 3 second activation time is the reason why. Since I'm using some of the best Alpha breakers in the game (telenukes), I'm having a hard time finding a usage for this power. 2) On Defense sets, cascading failure due to defense debuffs are the clear and present danger. Single slotting Active Defenses is giving you 21.8% DDR. My build is currently running with 56% DDR. I originally single slotted Active Defense but running full packs in Cimerora, I saw the difference (good place to test DDR) (thanks @Heraclea for that bit of wisdom). 3) Your build just barely reaches the soft cap. In my experience with Defense based sets you really need over 50% to be safe generally speaking and I find that shooting for 56-59% defense to be end game capable. I tend to build from a tanking perspective in terms of survivability but if you run with a regular group where your support/tanking are taken care of, this might be fine. I like to be ready for the most amount of scenarios I can be with any toon I play (that's what I build towards) and I run with a bunch of friends who refuse to make survivable toons, so I end up being the one who usually does the tanking/pseudo tanking in our groups (again if this isn't you, build to suit).
-
No, this is the actual build I'm playing currently. Theory crafting is fun, but not at the expense of actually playing the game (for me at least).
-
Per a few requests, here is the build for my Elec/Shield Stalker that I'm working towards (currently L46). This is a pre-incarnate build (I like to play my 50s out a little before I decide an Incarnate path for them). My current build is running everything fully slotted as seen except for the Body Mastery powers. I ended up taking Maneuvers (thanks to @Auroxis ) and double slotting Active Defenses for the additional DDR (thanks to @Heracleafor pointing this out to me). **EDIT** Slightly better version of the build: Click this DataLink to open the build! Villain Plan by Mids' Villain Designer 1.962 http://www.cohplanner.com/ Click this DataLink to open the build! Jump Start: Level 50 Technology Stalker Primary Power Set: Electrical Melee Secondary Power Set: Shield Defense Power Pool: Fighting Power Pool: Speed Power Pool: Leaping Power Pool: Leadership Ancillary Pool: Body Mastery Villain Profile: Level 1: Havoc Punch -- Mk'Bit-Acc/Dmg(A), Mk'Bit-Dmg/EndRdx(3), Mk'Bit-Dmg/Rchg(3), Mk'Bit-Acc/EndRdx/Rchg(5), Mk'Bit-Acc/Dmg/EndRdx/Rchg(5), Mk'Bit-Dam%(7) Level 1: Hide -- LucoftheG-Rchg+(A) Level 2: Jacobs Ladder -- Obl-Dmg(A), Obl-Acc/Rchg(7), Obl-Dmg/Rchg(9), Obl-Acc/Dmg/Rchg(9), Obl-Acc/Dmg/EndRdx/Rchg(11), Obl-%Dam(11) Level 4: Deflection -- LucoftheG-Rchg+(A), LucoftheG-Def(48), LucoftheG-Def/EndRdx(48), LucoftheG-Def/EndRdx/Rchg(48) Level 6: Assassin's Shock -- SprStlGl-Acc/Dmg(A), SprStlGl-Dmg/Rchg(13), SprStlGl-Acc/Dmg/Rchg(13), SprStlGl-Dmg/EndRdx/Rchg(15), SprStlGl-Acc/Dmg/EndRdx/Rchg(15), SprStlGl-Rchg/Hide%(17) Level 8: Battle Agility -- RedFrt-Def/EndRdx(A), RedFrt-Def/Rchg(17), RedFrt-EndRdx/Rchg(19), RedFrt-Def/EndRdx/Rchg(19), RedFrt-Def(46), RedFrt-EndRdx(46) Level 10: Boxing -- Empty(A) Level 12: True Grit -- GldArm-3defTpProc(A) Level 14: Tough -- StdPrt-ResDam/Def+(A) Level 16: Active Defense -- RechRdx-I(A), RechRdx-I(21) Level 18: Chain Induction -- SprAssMar-Acc/Dmg(A), SprAssMar-Dmg/Rchg(21), SprAssMar-Acc/Dmg/EndRdx/Rchg(23), SprAssMar-Acc/Dmg/Rchg(23), SprAssMar-Dmg/EndRdx/Rchg(25), SprAssMar-Rchg/Rchg Build Up(25) Level 20: Against All Odds -- EndRdx-I(A) Level 22: Build Up -- GssSynFr--ToHit(A), GssSynFr--ToHit/Rchg(27), GssSynFr--ToHit/Rchg/EndRdx(27), GssSynFr--Rchg/EndRdx(29), GssSynFr--ToHit/EndRdx(29), GssSynFr--Build%(31) Level 24: Hasten -- RechRdx-I(A), RechRdx-I(31), RechRdx-I(31) Level 26: Thunder Strike -- Obl-Dmg(A), Obl-Acc/Rchg(33), Obl-Dmg/Rchg(33), Obl-Acc/Dmg/Rchg(33), Obl-Acc/Dmg/EndRdx/Rchg(34), Obl-%Dam(34) Level 28: Combat Jumping -- LucoftheG-Rchg+(A) Level 30: Weave -- LucoftheG-Rchg+(A), LucoftheG-Def/EndRdx(37), LucoftheG-Def(37), LucoftheG-Def/EndRdx/Rchg(39) Level 32: Lightning Rod -- Obl-Dmg(A), Obl-Acc/Rchg(39), Obl-Dmg/Rchg(39), Obl-Acc/Dmg/Rchg(40), Obl-Acc/Dmg/EndRdx/Rchg(40), Obl-%Dam(40) Level 35: Shield Charge -- Obl-Dmg(A), Obl-Acc/Rchg(42), Obl-Dmg/Rchg(42), Obl-Acc/Dmg/Rchg(42), Obl-Acc/Dmg/EndRdx/Rchg(43), Obl-%Dam(43) Level 38: Super Jump -- Jump-I(A) Level 41: Spring Attack -- Erd-Dmg(A), Erd-Acc/Rchg(43), Erd-Dmg/Rchg(45), Erd-Acc/Dmg/Rchg(45), Erd-Acc/Dmg/EndRdx/Rchg(45), Erd-%Dam(46) Level 44: Superior Conditioning -- PrfShf-End%(A) Level 47: Physical Perfection -- RgnTss-Regen+(A) Level 49: Maneuvers -- LucoftheG-Rchg+(A), LucoftheG-Def(50), LucoftheG-Def/EndRdx/Rchg(50), LucoftheG-Def/EndRdx(50) Level 1: Assassination Level 1: Brawl -- Empty(A) Level 1: Prestige Power Dash -- Clr-Stlth(A) Level 1: Prestige Power Slide -- Empty(A) Level 1: Prestige Power Quick -- Empty(A) Level 1: Prestige Power Rush -- Empty(A) Level 1: Prestige Power Surge -- Empty(A) Level 1: Sprint -- Empty(A) Level 2: Rest -- Empty(A) Level 4: Ninja Run Level 2: Swift -- Run-I(A) Level 2: Health -- Mrc-Rcvry+(A), NmnCnv-Regen/Rcvry+(36), Pnc-Heal/+End(37) Level 2: Hurdle -- Jump-I(A) Level 2: Stamina -- PrfShf-End%(A), PrfShf-EndMod(34), PrfShf-EndMod/Rchg(36), PrfShf-EndMod/Acc(36) ------------