Nemu
-
Posts
1223 -
Joined
-
Last visited
-
Days Won
2
Content Type
Profiles
Forums
Events
Store
Articles
Patch Notes
Everything posted by Nemu
-
Change in playstyle and learning mob AI/mechanics first and foremost. Not every engagement involves you standing right next to the tank, and if you don't adapt some factions will decimate you with Mez/AoEs. Know when to attack and when to hold back, when to use AoE and when to focus on single target. For a game as easy as this, there's still a lot of value in movement and positioning. Then inspiration management, downtime means time to combine inspirations to those that you need the most. You should always have some breakfrees in your inventory as a squishy, then defense inspirations. Prioritize those inspirations that you need and combine the rest into them. Lastly build. Most people jump on this as the first point to remediate and I can tell you that if you master the previous 2 items you'll be less dependent on builds covering for your other shortcomings.
-
Whether you take 1, 2 or all 3 of the T1/2 powers that you can use when mezzed depends on the build. The practical approach is to look at the recharge vs cast time on the power on a final build. On any build that has decent recharge, that bonus + the recharge enhancement in those individual powers may mean that you can form a seamless attack chain with just 1 or 2 of those picks. If that's the case, then the powers that you don't use are redundant with them being set mules in the best case scenario.
-
If you guys are looking for build help, there are also a lot of capable people in the AT forums that provide assistance on how to design good builds that can pick up where JJ left off. Tips for requesting help: "What's the best xyz?" is very subjective and that's not going to get you the answer that you are hoping for. Even if you get responses, you will most likely get builds that are out of your budget range or builds that don't align with your playstyle. State your goals with the build, your budget, your playstyle, must have powers/concept. "I need an primary/secondary build" doesn't give people much to work on, and if you don't know what's good, anything looks good to you. "I am looking for a pure range arch/ta blaster build that costs no more than 100 million inf that I'll use to hover blast" gives people a lot more context and provides a starting point to home in on a build that works for YOU. Hope to see some of you in those forums and get the assistance that you need.
-
Hello, Some feedback on general build process: Slot attacks as attacks, and not for secondary effect because you want to chase bonuses. If you take nothing else away from this post, this is the only comment that I would ask you to walk away with. Just because every other build does it doesn't mean you need to do it on this build. If touch of the beyond lands you have more end recovery than most builds that instinctively slot the recovery uniques in health. Blasters in general do not need those miracles/numinas if they slot their sustains for endurance recovery. Death shroud is not worth taking, at all. It's an end hog, it basically demands you be in the danger zone and stand there like a brain-dead melee player, and unlike some other non-sustain damage auras that blasters get, it doesn't do anything to help mitigate damage (hotfeet at least slows and screws with mob AI). The defenses that you build is not meant to enable you to stand in melee forever and duke it out. You don't have the sturdiness of melee ATs. Plus, blasters already do enough burst damage that they don't really need the pitiful trickle of damage from damage auras in my opinion. It's the ultimate trap power. Shadow Maul has a 3 second cast time, you can make it work but that cast time might be a turn off for those that are looking for a more fluid playstyle. Keeping the goal of survival via S/L/range defense, lets fix a few of the obvious items I talked about: - remove slots from health and stamina (for now), leave a panacea proc in health and a Pshifter +end in stamina - reslot midnight grasp with mako's bite, keeping the 3.75% range defense - reslot shadow maul with 5 piece avalanche, we'll come back to that Kinetic combat is not a very good set if you have funding. Blistering cold is far better - add a slot to smite, reslot with 5 piece blistering cold Weave gives you the most +def to all and deserves more than unique mule slotting. all your defense toggles only have one slot and you are missing the forest for the trees when you look at what slotting some of these can do for you instead of focusing on stacking set bonuses. Scorpion shield and weave in particular. The former give you 4% more s/l defense if you just add two more slots to it, how many slots would you have to dedicate to get that number via set bonuses? At this point, if I added 2 slots that I salvaged from health/stamina to Scorpion shield (LOTG Def and LOTG def/end), you will be at 43%S/L and 44%Range - reslot Scorpion shield with LOTG 7.5, DEF, and DEF/End As a blaster you have a lot of weaknesses, therefore I'd get combat jumping a lot sooner because I don't want to wait 38 levels to not to have to worry about immobilizes. Since we dropped death shroud we can push CJ up to level 4. I don't like to miss, so my preference is to slot CJ with an LOTG 7.5 and a kismet +to hit. We lost the range bonus from 2 piece blessing of the zephyr. That will put us down at 43% range and 43% S/L defense. - move CJ to level 4, reslot with LOTG 7.5 and Kismet +to hit But we recovered a slot from CJ, and I'm going slot up weave with 1 lotg 7.5 + shield wall Def, Def/end and unique, If you have money boost the def and def/end to +5. That brings your defense up to ~44.5% S/L and ranged unboosted. Weave gives defense to all, it's the best bang for the buck and deserves slotting rather than being a mule. - reslot weave with LOTG 7.5, Shield wall Def, Def/End and +resist unique The next eyesore is the lack of slotting on Rain of Fire, Blazing bolt, soul drain and Inferno, and the extravagant amount of slotting you dedicated to tactics and aim. If you want recharge, 5 slot sting of the manticore gives you 7.5%, yet you went with 5 slot adjusted targeting in tactics for 5%. And you already have 3 piece sting of the manticore in the snipe. 2 additional slots for 7.5% recharge vs 4 additional slots for 5%, there is a clear winner here. - remove all slots from tactics, add 2 more slots to blazing bolt and 5 slot with sting of the manticore. leave tactics at base slot with end reducer. Soul drain is a build up replacement and requires an accuracy check, you also most likely want it available as often as possible. 2 slotting it with rectified reticle in this power doesn't align with how this power wants to be used. The 2 piece RR is better suited for aim. Soul drain deserves more slotting. - remove 3 slots from aim, reslot with 2 piece rectified reticle and a guassian's build up proc Avalanche goes better in soul drain, the KD proc is useful to knock stuff down as you buff yourself, so we will move the avalanche set from shadow maul to soul drain - add 3 slots to soul drain, move avalanche set from shadow maul to soul drain. At this point you have 43% s/l defense and 42% range defense. The next set of decisions is trickier. It's easier to slot a power that grants +defense to all to bring both ranged and S/L defense closer to softcap. Manuevers consumes more endurance than combat jumping so it's a good target to put more slots in. - add 3 slots to Manuevers and slot with LOTG 7.5, reactive defense Def, Def/End and +resist unique This brings you to 44% s/l and ~43% range defense This leaves you with a 3 slotted inferno, a 3 slotted rain of fire and a 5 slotted shadow maul. I'm inclined to drop shadow maul because it's a melee cone that's awkward to aim for some people, and it has a 3 second cast. I can then reinvest those slots in RoF and inferno. 6 slotting RoF with artillery will give you another 3% defense which will put you over the top on range defense, you can take a slot out of superspeed, lose 1.25 range defense from blessing of zephyr and gain 3% instead. At this point you are pretty close to softcap to S/L and Ranged and you can use the remaining slots to get more useful bonuses such as recharge. - drop shadow maul and reclaim 4 slots, remove a slot from super speed and add 3 slots to RoF and 6 slot with artillery - slot remaining 2 slots into inferno and slot with 5 piece armageddon. This also leaves you with 2 open power picks, since you already have combat jumping, picking up super jump for the slow resist unique and the acrobatics for some additional mez protection makes sense, and they require no slotting investment. If you want to edge closer to softcap you can also +5 the defense and defense/end IOs in Scorpion shield, weave and manuevers. I also like to exemp well so power pick progression matters to me. reshuffling some power picks around gives me a build that is self sufficient and can steamroll teams by level 30 The end result is much cleaner, with leveling progression that enables you to be self sufficient by level 30, as you will have access to scorpion shield and achieve almost softcap to S/L range when you exemp to that level. Blaster (Fire Blast - Darkness Manipulation).mbd Nemu edit.mbd
-
I suppose that you and I can go back and forth but there's no value in that. In the end I disagree with quite a few of your claims, but I'm not going to drag it out here. People that want to learn can learn from our posts and reach out if they need more guidance. Those that don't can copy builds and still have fun. This game is easy enough that most builds are viable. If people decide to reach out to me, then I'll provide them contextual breakdown of build, playstyle, and notable mechanics based on their ask. That's my commitment to helping this community.
-
This thread has insights on how to build regen. You are right, it's not passive regen that you need to focus on. It should be recharge first and foremost and a lot of slow resistance. I've seen people stack resists but usually that means cutting into recharge bonuses, so there's a balance. Also, that's the brute forum and brutes don't have access to shadow meld. For a scrapper you can address survival by having high recharge and cycle moment of glory and shadow meld to soak up alpha strikes. You can certainly focus on defense, but again, as a scrapper you have access to shadow meld, and claws does not have powers that give you defense such as parry/divine avalanche/guarded spin that alleviates the need to dump a tremendous amount of slotting to get melee defense up high enough.
-
I'd focus on the IO sets that give you recharge first and foremost. Crushing impacts, doctored wounds, obliteration, etc... You can manage survival with inspirations. Use IOs to patch the things you can't get from inspirations - Recharge and slow resist. The latter is more expensive but at the very least you should put a winter's gift 20% slow resist in a travel power.
-
Beam Rifle and Temporal Manipulation - Enhancement Advice/Opinions
Nemu replied to Urban Justice's topic in Blaster
Take a look at this thread for some insight into the general approach to how to optimize your slotting -
Take a look at this thread for some insights into regen
-
I really don't think you got the gist of what I'm saying. There's no benefit to having S/L defense for a build focused on keeping at range. If you are hover blasting you are intentionally eliminating some of the damage vectors and restricting the attacks against you to either those with a ranged tag or an AoE (some ranged aoe attacks have an aoe tag instead of ranged, but it's a minority and isn't worth overbuilding for). If anything this should be the one takeaway for you from this post: ATTACKS DO NOT CHECK MULTIPLE TIMES AGAINST ALL YOUR DEFENSES. IT JUST CHECKS FOR THE HIGHEST DEFENSE YOU HAVE AGAINST THOSE TAGS. For example: Range gun attack that has the Lethal damage tag and the ranged tag You have 45% ranged defense and 44% S/L defense. That attack will only check against the 45% range defense that you have. If you fail the check it will NOT check again against the 44% S/L defense as a backup. It's also important to note this: Multi-element attacks like an attack that has 60energy damage and 40 smashing damage will only check against energy defense, because energy is the highest damage. All that investment into S/L defense is just cutting into your offense, taking away from other useful bonuses such as recharge. Your defensive investment is better for blasters that venture into melee range, as S/L defense does cover quite a bit of melee and PBAoE attacks that mobs throw around. There are valid reasons for building for S/L defense. Your game plan does not align with why you are pursuing this. As long as you are out of melee range (and it does not have to be 50ft away from mobs, most melee attacks have a range of 10ft at most), you are forcing mobs to either 1) chase you, or 2) shoot you. And range defense defends against the latter far better than S/L defense can. Supplement that with a resist epic shield backed up by soft controls, and you get a durable blaster that you are looking for. Now you may construe this as me telling you what to do, but I'm just trying to enable you to make the most informed decision that you possibly can. And I do not think you are thoroughly informed as to why you should do what you are planning to do. If you want an example of a build that applies range defense and S/L defense with purpose look at this: I also see slotting that doesn't align with your goal of Range + S/L defense in your builds such as the 6th slot of the winter set that does nothing for you. If you want an example on optimizing you set bonuses and slotting look at this:
-
Range defense covers ALL attacks that have a ranged tag. Doesn't matter if it's S/L/E/N/F/C/Psi/Toxic (if the latter two have ranged tags, some do, some don't, and none of those are covered by s/l defense). And attacks don't check for defense multiple times, it will just check against whatever defense of the appropriate tags that you have the highest of. As long as your range defense is higher than your S/L defense all ranged attacks will just check against your ranged defense. If your game plan is to hover and stay at range there is absolutely ZERO value in scorpion shield other than it being an LOTG 7.5 mule. Most sturdy range builds will instead opt to pick up a resist shield and add another mitigation layer to softcap range defense. Even though it was slightly nerfed, bonfire is still potent with the kd proc and a lot of people opt for fire mastery for that and a resist shield. So now you have 4 layers of mitigation - kill stuff quick, soft controls, defense, resist
-
If your game plan is to play at ranged let's break down the rationale for having the kind of defense you focused on: S/L defense - covers attacks that primarily have S/L type, this may cover some ranged attacks, but others with pure energy/cold etc... anything that's not primarily S/L type will still get through Range defense - Covers ANY attack with a ranged tag, doesn't matter which damage type. SOOOOO, why S/L defense?
-
I see the majority of initial discussions here (all 3 posts) on Arsenal Control skipping the T1. I have a different opinion. 1 - It does good damage for a control power, not great, but it's a good attack during early levels where most builds are sorely lacking a good density of attacks. 2 - It slows so it can slot the ice mistral set, and I have a thing for that set 3 - It is an autohit sleep so you get value whether you do damage or not. It's handy at lower levels, but I also noticed that it resets or at least delays AV behavior when you sprinkle it into your attack chain at higher levels. For example Hopkins spent much of his time during the Manticore TF in the stunned animation when I liberally sprinkled Tranquilizer in my attack chain. Conventional wisdom tells people that they should skip one of the T1/T2 available at character creation. I would highly recommend a re-evaluation of this power as you plan out your build. FYI here's my Arsenal/Elec that I took to 50. I find Arsenal to be very OP with layers and layers of area denial and an autohit ST sleep and proc monster hold, not to mention the myriad of potent debuffs that these controls also carry. I saw no synergy with Arsenal assault, however, especially with the lack of immob and ignite (I do think Grav/Arsenal can be a really janky paring though with singularity, enflame and ignite). But having 2 floaty pets even if one is really poo poo, that's my level of jank! Peacekeeper Panda - Villain Dominator Build plan made with Mids' Reborn v3.6.6 rev. 3 ────────────────────────────── Primary powerset: Arsenal Control Secondary powerset: Electricity Assault Pool powerset (#1): Leaping Pool powerset (#2): Speed Pool powerset (#3): Leadership Pool powerset (#4): Flight Ancillary powerset: Mu Mastery ────────────────────────────── Powers taken: Level 1: Tranquilizer A: Ice Mistral's Torment: Damage/Recharge 43: Ice Mistral's Torment: Damage/Slow 46: Ice Mistral's Torment: Accuracy/Damage/Endurance 46: Ice Mistral's Torment: Accuracy/Damage/Endurance/Recharge 47: Ice Mistral's Torment: Chance for Cold Damage Level 1: Charged Brawl A: Hecatomb: Damage 3: Hecatomb: Damage/Recharge/Accuracy 3: Hecatomb: Recharge/Accuracy 9: Hecatomb: Damage/Endurance 40: Hecatomb: Chance of Damage(Negative) Level 2: Cryo Freeze Ray A: Gladiator's Net: Chance of Damage(Lethal) 42: Ice Mistral's Torment: Chance for Cold Damage 42: Gladiator's Javelin: Chance of Damage(Toxic) 42: Apocalypse: Chance of Damage(Negative) 43: Neuronic Shutdown: Chance of Damage(Psionic) 43: Unbreakable Constraint: Chance for Smashing Damage Level 4: Lightning Bolt A: Superior Winter's Bite: Accuracy/Damage 5: Superior Winter's Bite: Accuracy/Damage/Endurance 5: Superior Winter's Bite: Accuracy/Damage/Recharge 7: Superior Winter's Bite: Damage/Endurance/Accuracy/RechargeTime 9: Superior Winter's Bite: Recharge/Chance for -Speed & -Recharge Level 6: Combat Jumping A: Luck of the Gambler: Defense/Increased Global Recharge Speed 7: Kismet: Accuracy +6% Level 8: Cloaking Device A: Luck of the Gambler: Defense/Increased Global Recharge Speed 48: Shield Wall: +Res (Teleportation), +5% Res (All) 49: Reactive Defenses: Scaling Resist Damage Level 10: Sleep Grenade A: Impeded Swiftness: Chance of Damage(Smashing) 11: Ice Mistral's Torment: Chance for Cold Damage 11: Positron's Blast: Chance of Damage(Energy) 17: Bombardment: Chance for Fire Damage 19: Javelin Volley: Chance of Damage(Lethal) 19: Annihilation: Chance for Res Debuff Level 12: Smoke Canister A: Coercive Persuasion : Confused 13: Coercive Persuasion : Confused/Recharge 13: Coercive Persuasion : Confused/Recharge/Accuracy 15: Coercive Persuasion : Recharge/Accuracy 15: Coercive Persuasion : Confused/Endurance 25: Coercive Persuasion : Contagious Confusion Level 14: Super Jump A: Winter's Gift: Slow Resistance (20%) Level 16: Hasten A: Invention: Recharge Reduction 17: Invention: Recharge Reduction Level 18: Flash Bang A: Superior Ascendency of the Dominator: Accuracy/Control Duration 25: Superior Ascendency of the Dominator: Control Duration/Recharge 34: Superior Ascendency of the Dominator: Endurance/Recharge 34: Superior Ascendency of the Dominator: Accuracy/Control Duration/Endurance 34: Superior Ascendency of the Dominator: Accuracy/Control Duration/Endurance/Recharge 36: Superior Ascendency of the Dominator: Recharge/Chance for +Damage Level 20: Zapp A: Sting of the Manticore: Accuracy/Damage 21: Sting of the Manticore: Damage/Endurance 21: Sting of the Manticore: Accuracy/Interrupt/Range 23: Sting of the Manticore: Damage/Endurance/Recharge 23: Sting of the Manticore: Chance of Damage(Toxic) Level 22: Maneuvers A: Luck of the Gambler: Defense/Increased Global Recharge Speed Level 24: Tactics A: Cytoskeleton Exposure Level 26: Tri-Cannon A: Expedient Reinforcement: Accuracy/Recharge 27: Expedient Reinforcement: Accuracy/Damage 27: Expedient Reinforcement: Damage/Endurance 29: Expedient Reinforcement: Accuracy/Damage/Recharge 29: Expedient Reinforcement: Endurance/Damage/Recharge 31: Expedient Reinforcement: Resist Bonus Aura for Pets Level 28: Thunder Strike A: Superior Avalanche: Accuracy/Damage 31: Superior Avalanche: Accuracy/Damage/Endurance 31: Superior Dominating Grasp: RechargeTime/Fiery Orb 33: Fury of the Gladiator: Chance for Res Debuff 33: Overwhelming Force: Damage/Chance for Knockdown/Knockback to Knockdown 33: Force Feedback: Chance for +Recharge Level 30: Voltaic Sentinel A: Synapse's Shock: Damage/Rechage 36: Synapse's Shock: EndMod 36: Synapse's Shock: Damage/Recharge/Accuracy 37: Synapse's Shock: Damage/Accuracy/Endurance 37: Synapse's Shock: EndMod/Increased Run Speed Level 32: Build Up A: Gaussian's Synchronized Fire-Control: Chance for Build Up Level 35: Charged Armor A: Gladiator's Armor: End/Resist 37: Gladiator's Armor: Resistance 40: Gladiator's Armor: TP Protection +3% Def (All) Level 38: Ball Lightning A: Ragnarok: Damage/Recharge 39: Ragnarok: Damage/Recharge/Accuracy 39: Ragnarok: Recharge/Accuracy 39: Ragnarok: Damage/Endurance 40: Ragnarok: Chance for Knockdown Level 41: Surge of Power A: Steadfast Protection: Resistance/+Def 3% Level 44: Tear Gas A: Unbreakable Constraint: Hold 45: Unbreakable Constraint: Hold/Recharge 45: Unbreakable Constraint: Hold/Recharge/Accuracy 45: Unbreakable Constraint: Recharge/Accuracy 46: Unbreakable Constraint: Hold/Endurance Level 47: Liquid Nitrogen A: Invention: Recharge Reduction Level 49: Vengeance A: Luck of the Gambler: Defense/Increased Global Recharge Speed ────────────────────────────── Inherents: Level 1: Domination Level 1: Brawl (Empty) Level 1: Sprint (Empty) Level 2: Rest (Empty) Level 1: Swift (Empty) Level 1: Hurdle (Empty) Level 1: Health A: Panacea: +Hit Points/Endurance 48: Miracle: +Recovery Level 1: Stamina A: Performance Shifter: Chance for +End 47: Power Transfer: EndMod 48: Power Transfer: Chance to Heal Self Level 14: Double Jump Level 49: Quick Form GyRkACwK7MbihKAXFapvzi7sw6EaRKRr7+aayg8oNwXkUoSkPyFnmWJypM0P6MkTitPZJGU/Tc4tC7Q9AKVfyfmqq75qUf5xQ0/R/1t9ZJI3YE2ws7azs6y0R8tcZCzGISQylrZvLArhf2f3JrXeh9Yu9DL3n6PVrtMsTRrQcUiVGdou/SxC4hIXvIuQ2BimJv1/LygqEmK7NXymWKSVil4j9YW9p5C5+qchgJySwM/LpHB4azlXAD2kMAUoZiDQx8jrtCnODfl2GA9aSNlFx3EAxu0qu16T29+6MoVaAmtKx6WALJdAB23GCYke1AzL2YsQBxuCBpX+6SWjRlLpQ5r0fEn2DggzW/xHeOrfB1Zlwm42ozmE2mn/5Hn2/4qPapttkDMJ99FM11X6kD60zQnUWfa7QHErWBItreBkDEBld9fpzmX+0PY8so2m6EoL+mCAYE6KBmPtjGU3lb/TDopk4F4wDyN5Gtz4FZaosmo+cVCYwGpImeCb20zL3TZyV6cUB/H7NVLx5OWAQeJ/03B1NNicjMfm23DwNOp96oNm72+Fn2ZthRky7uS76zXgC6bMHkbt0xlqj1Wu3625fSFE5VyCn/giCkWla/L6uXO9T2qAQdDUanTZVaCHZ33zjm9gGveO6g3NLFve4PitrIVWb2RzdKNcoMRZtaCJtNRhL/2AgMQwrLnRziiohU810xsAcYDjKd1VIcaVnNtWzZYwh9RZGD0aC9vMoVDouUV4LoFoH8vHGParl+ghIga2ns/YsuWm+yg6ZDRNrxuM6s/67D59YTbJc0hjSrs0GwPOy0TXxl86xYxso8p4s/tTFQQxBpuEOKh9CU1eMv3ijydOl0cL9IzGQpu/2tAXLvMRIHYt1K7uiObbPg/erwXDVLhMfIyo+qDIHTRnlZXvhNMwiTRBiwBj35j4YMRx5R+PT/KDZc/rwfhJHcKy55GWyMpfO8UOVInMf3bYfY/gQMGCF/dy8wLBLIr8kPgV8Rzpbf4SK0IMsGmpJJejI+swL095XMVeTap0dQNpx4rNxQWBXc1Sz40ih3HeRfiYv+UUl1YFtPVXm1g6twZbLTHVLIptRlCO9KmYaCJY/Lk+sp8Q81z2BOeT2vMsm4RNqW6gMk8soIS/474tJjxhv7dnER2MVpuVNHoFhDfbDDR0taBglS9+cDrzYIqwlb4UbxOhQtlSqAtfcaHGssOYwh6pjDhleTDKEGVrEM8RWaHHsdjLMes/f3ZU1IkffAuB+yrI3bMpqKQ1szzPHc/0ps7rUSqXFI1cyGIm0lLEpVPc5SKncnCr5ND66Myc4rXilKd/emhruKRdvhPKSijCBxeCY9TQHHfoMyls43Zbv/2pd2RJwh6whcd0ihlJhZVU7/9Mg/kgZ5XpPlLlNhw1JjglAKQ8Kz8S7NhAcuI6+XskDD/JjzOEsmbQzjq8DXachQfadBMsKUcd2wiax06xUW6jLXcV6dH1iAUsMDzs2akIpMpZ958deUAGtMeVbCkuNNRGOAs2IpDNwoP2P9/sDlhluz4Lkj3ceDxuX41gtQ/0AqmQckllcDhQgbgd9yWnhuVPWXP6bY8wLzB2eaTfUu4xVWYIjVewZJAN4Y6VMXFdLFe4SqcCCvAiVlWfJxv1eXoZ3dFmLOYGy06eYTeTBBe17rdgIslfHyryDgkyMvISMBs9FiKhjJNyyNgkxpRAnYtZOYf8KuC2FocyKY9ZpEwRWXvInAy2GQglPXY6odh9yivU72gIldYJ08FrJpW/w++Nj1lcC4exXPp4URnqHpdTXO+DfumoDImJwHJTKxgvhR/bdK7BQCfxnnEmw9ElCQYxkTEhUbjufhels+oX3QiV4RMOowKTnmqFXGt46fWZWe482eNx2058Nvg+UyMpRylJrZKjQE4mIx4TGCFn/iBr5H2l5jqCWQzDrqnahkmxpplhEhIcXySBOoBIcGLmD2FyJZhOUkjdRNFyr/qQ5VZgqAEfkgwoYAsaWx4nVjUEQrk48yw+tKiWQswh2/Qq+r0uGdaGl1B3fDrA8oyuKpuoND+CIamW+lOrz/mPIuxGY0EIDBNFNzooUQlJOw2RisjFm2D6WAfkiStNBPHuAbhVzPUsDXcm6ZsuaSFp7hVVt7Lqh6ginmwA8OKJ17aTJmjQ5sIkaKdaenUXx1B3/FtABBGkcilSyRW1C/vf+F02awCF+/3GH0OhIRyOJBdHi5Ah/C8R1Fqu5aM7j8cpnmGWaBcyvRtJ+l20fsfkWUYQIvteVPMjdFuwsCkGk4l42A7rj/AS0qXYWUG3911rHYKqCUXK3mMpVf0CfP7rcxjB8rkDZNmSU4GzqQFHbARCTy6WTax16Hofub74OJD/SwyILxaXijCYpomjbbxu4qfBNRe+5/gdwp08bsdA1ZuNcsaiB2RHWMBP55wIf9OshkyAr2a+kcCqI1KB/w7BbUPYQc1VqlWwJ/VwBTdA88OJSMcTHLXHdK7S2f/jazA0IKFp1W0P2jSqUspZflMEPZJQAa3AcfwWnAyL64qnj8xGpWEFLXnorKczreTBYrINqw2iR4SQgxIjqXd0cjLQBoyDwGrk/2Baqp1uQ6Xg66NhJTAXj2d0cLCHf52Yq/5qa+zzl6aJrAKMVZ3Uy8OrIY/Mwr1Ygtv6fQ==
-
I slotted storm cell with some damage procs for a hot minute to see what would happen. The procs don't trigger when you place it, but they do trigger when other powers proc storm cell's effects. It was not very reliable and fired off rarely, so I relegated the power to be either a set bonus mule or frankenslot mule. The one proc that does activate consistently is the force feedback +rech proc, I highly recommend slotting at least that in storm cell.
-
There's no need to take scorpion shield if you are just shooting from range. See this post for rationale and general approach to making builds: In general it's better to slot attacks as attacks and not for their secondary effect (the exception is when an attack does very little damage like tesla cage from Blaster Electric Blast or archery stunning shot). I generally also skip stuff like ESD arrow from blaster secondaries, too long a recharge for too short a duration and no damage. Those generally give terrible ROI for slots invested. Lean into strengths of the AT which is kill stuff before you get killed. As for the combo itself, I wrote up a cheap build for it. It's not softcapped, but a single luck and put you close.
-
Leveling new Elect/Elect Blaster -What should I take/avoid?
Nemu replied to Bacon Wrangler's topic in Blaster
i shared some of my insights on electric manipulation here. I normally don’t endorse same/same builds due to general lack of functional synergy but Elec/elec has a lot of synergy. Besides the chain knockdowns you can also add stacking holds and end drain into your toolkit. Damage wise electric blast is in a better place and you can still supplement ST with high DPA melee attacks from the secondary. the addition of the end drain toolkit is pretty huge in helping you face tank stuff. You can essentially open with force of thunder-short circuit-thunder strike-powersink to drain mobs dry while they are knocked down. This is much safer than my fire/elec just leaning on cycling knockdowns. -
It's where they hold the racial draft, and where WuTang went to the Chinese Delegation.
-
PSI/Martial Blapper, Calling all Blapper Experts! Blapperts?!
Nemu replied to Kung Fu Cow's topic in Blaster
Initial assessment without plugging this into mids: 1 - Too many full sets where the 6th slot doesn't do anything meaningful for your build. For example the purple sets, and additional 6% psi/toxic resist and 5% psi defense isn't going to win you any medals at survival. You might be close on F/C softcap with the 6th slot in all the winter sets but that's a rarer damage type and in my experience not critical for most game content. Range defense is much more useful even if you play in melee. 2 - Reaction time is under slotted in my opinion, you went the conventional way of slotting all the uniques in health just because every other build does it, without looking at base recovery numbers in reaction time. 3 - Not seeing the Gladiator's armor 3% defense unique or the reactive defense +resist unique, those are fairly easy includes. 4 - You might be close to 95% chance to hit vs +4s based on your slotting, if you care about that. At level 50 with incarnates a lot of people settle for 95% chance to hit against +3s due to incarnate level shift. 5 - Mental blast and lance are your only 2 ranged attacks. Maybe your goal is to make heavy use of your melee secondary and forego ranged attacks and that's fine, but I prefer to have a well rounded ranged ST attack chain for those times where standing in melee isn't a good idea. 6 - Personal preference. I hate blind, you don't have an answer to blind. I prefer tactics to assault for that reason. -
Playstyle + experience and game knowledge > builds. Good luck.
-
I don't know about everyone else but I look at siphon life more than the -tohit when I consider synergies between DM and a defense secondary like shield or SR.
-
FB/TA/FM Build could use some help please! Cinder Shot!
Nemu replied to GanjaGamer501's topic in Blaster
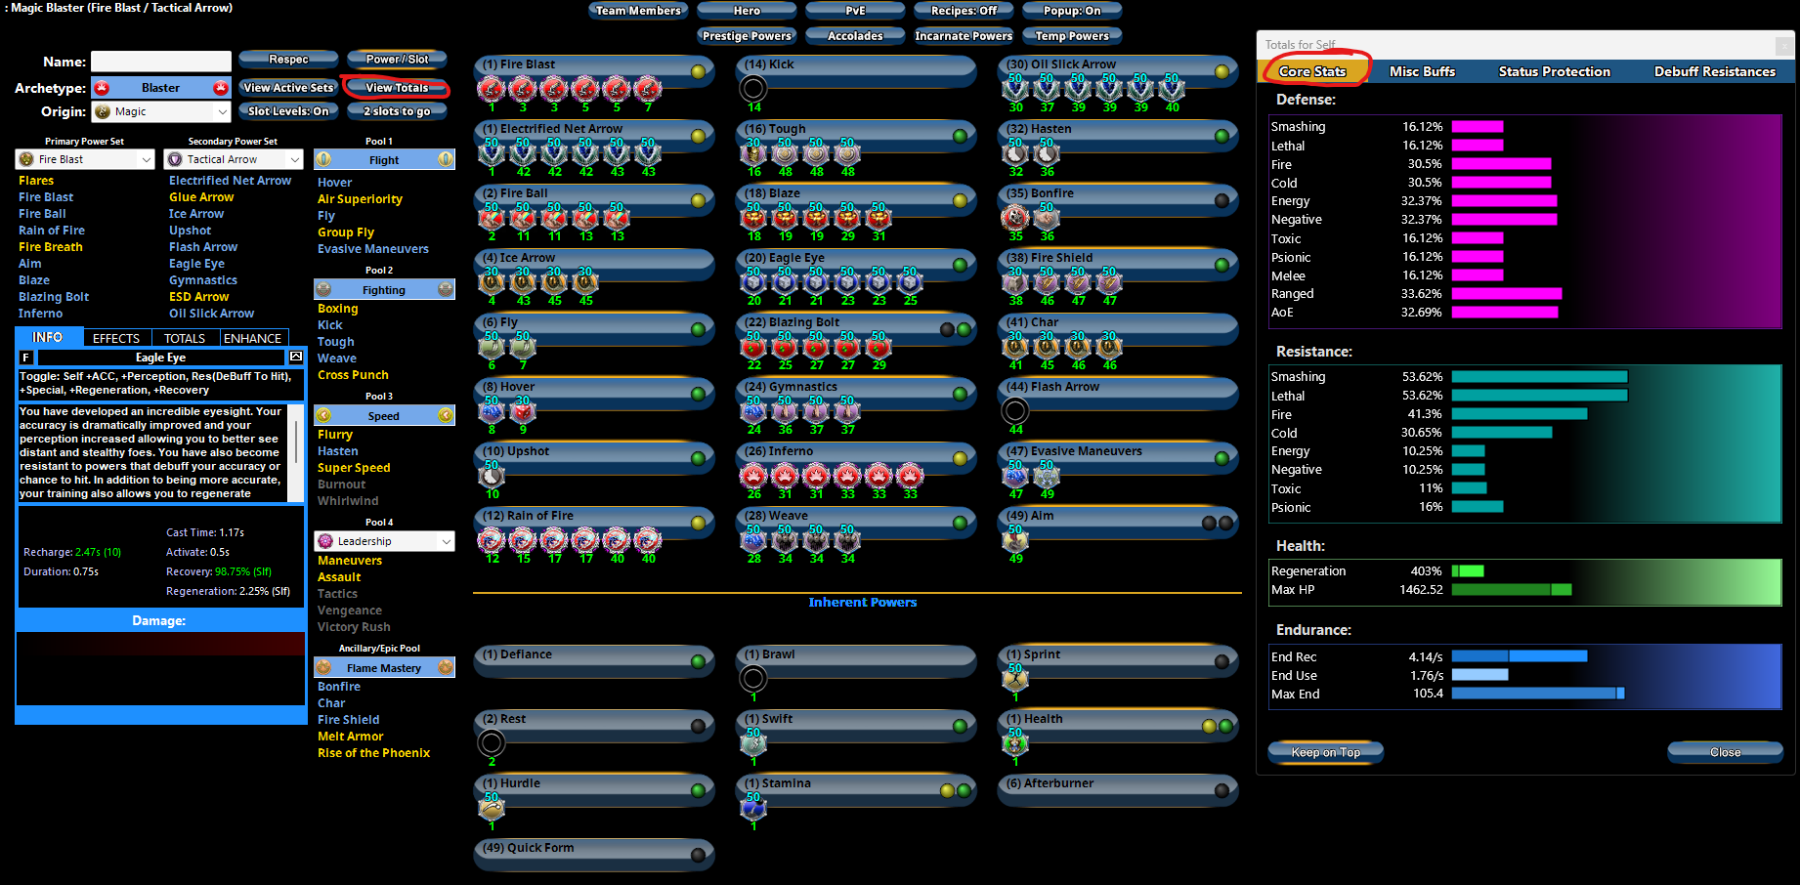
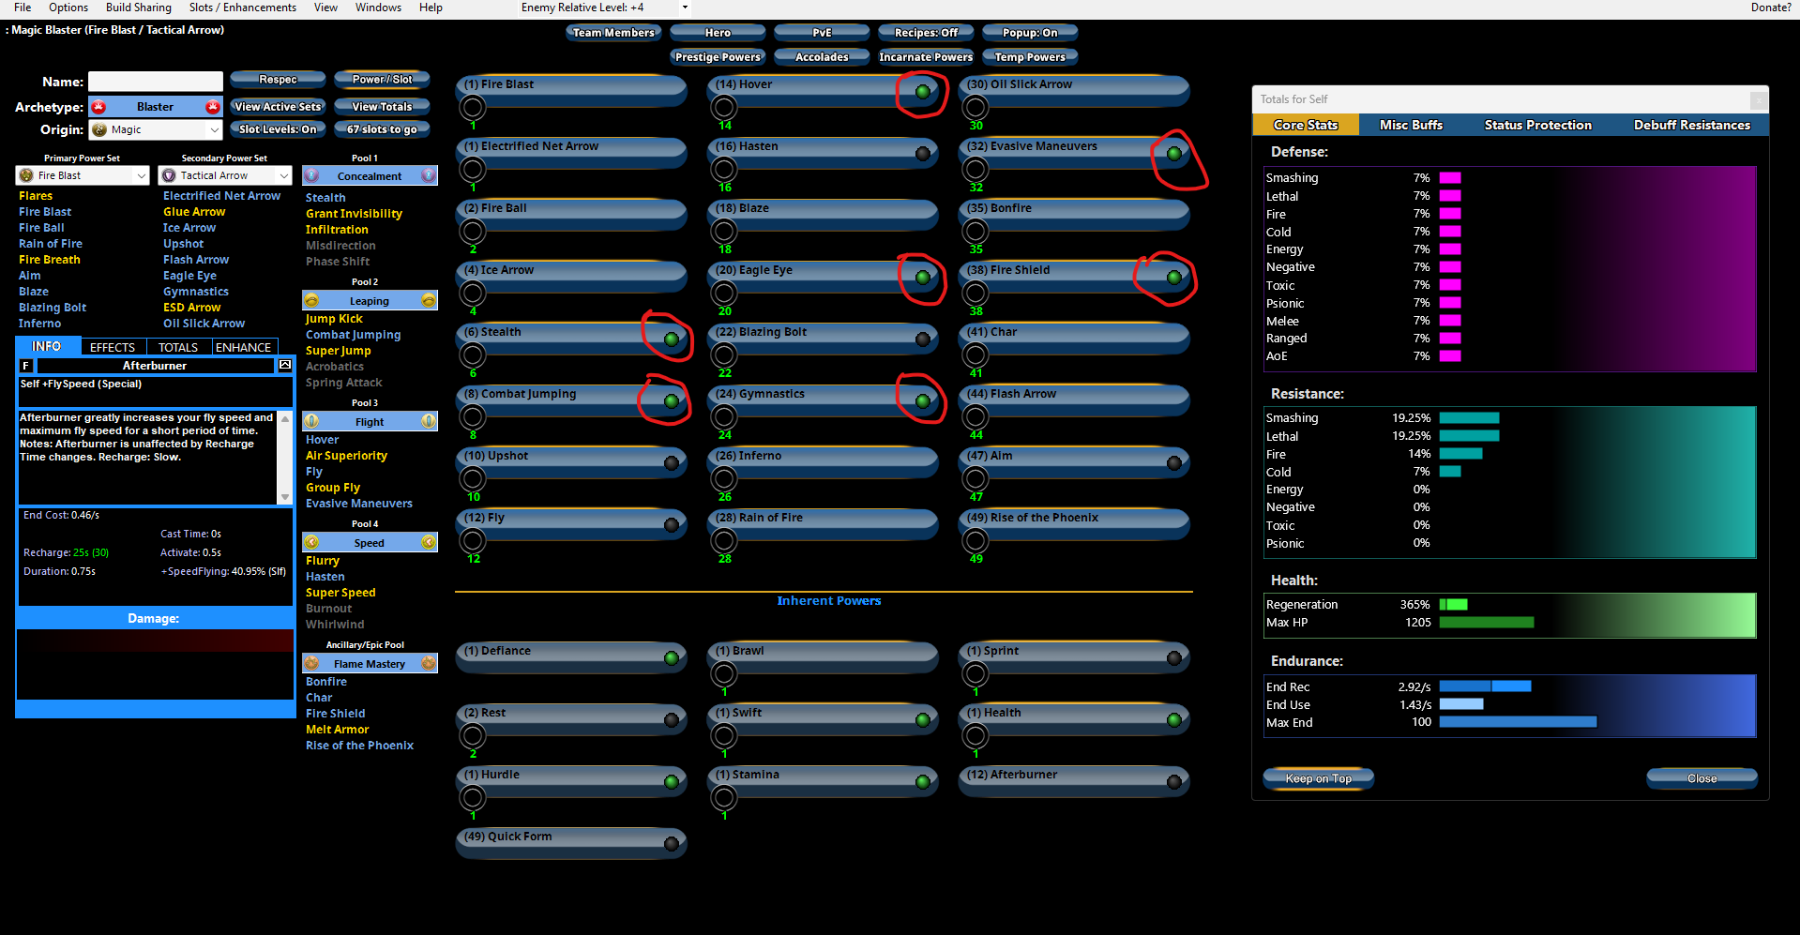
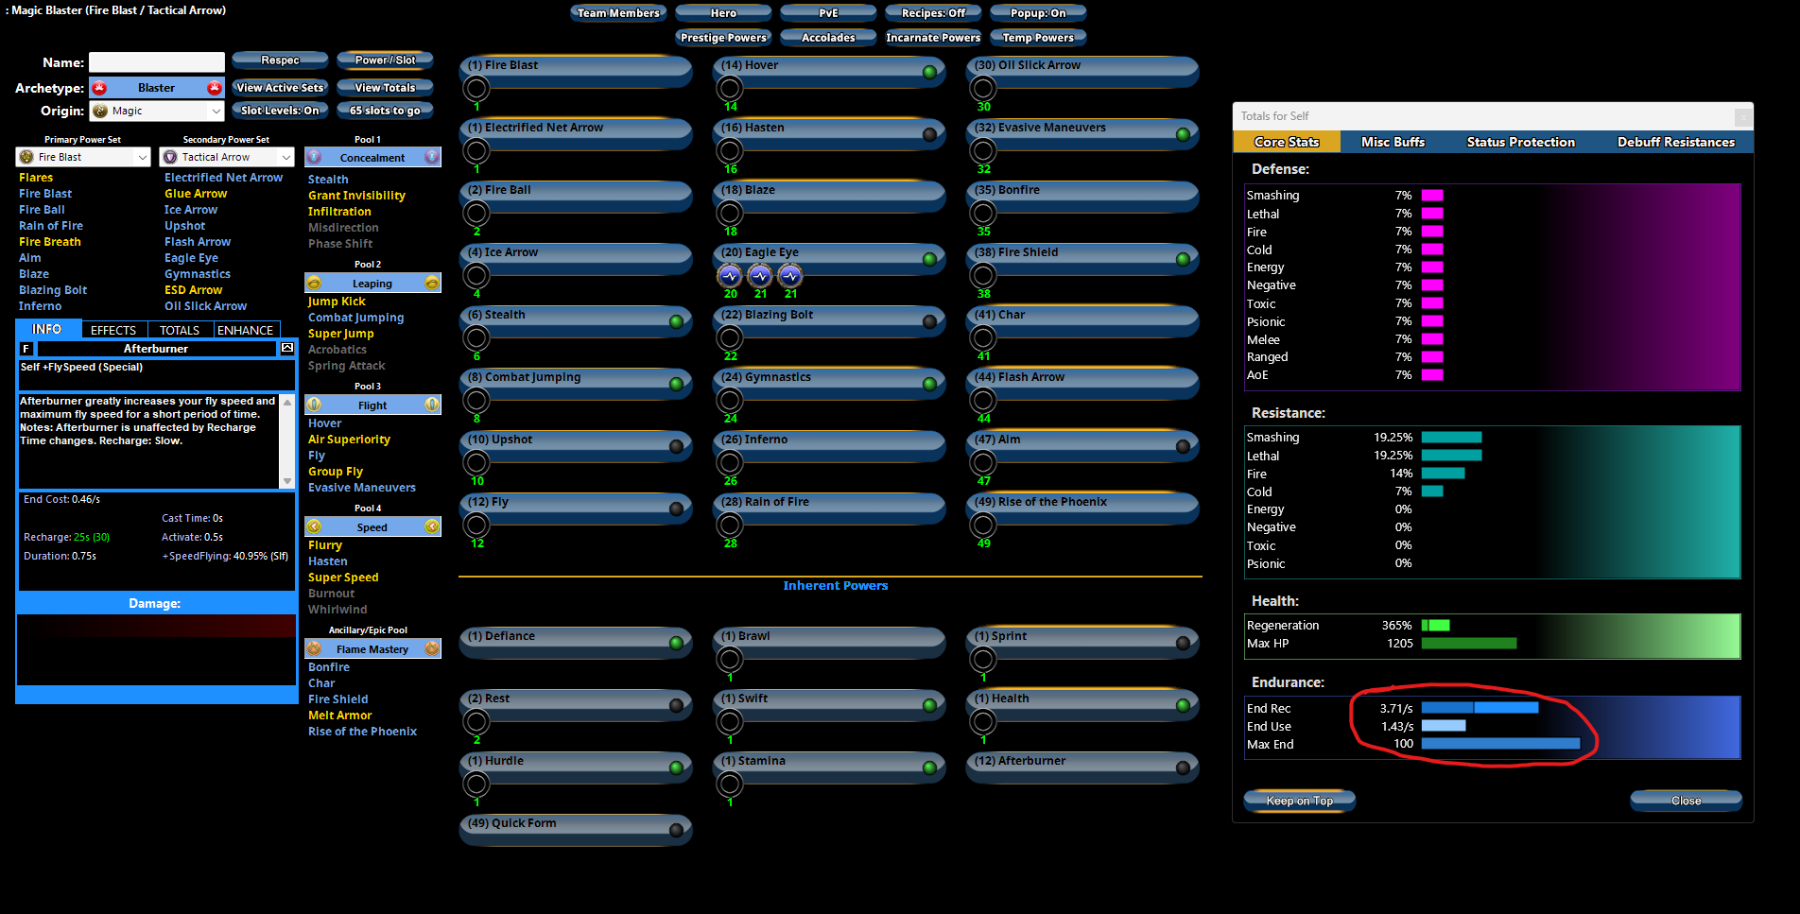
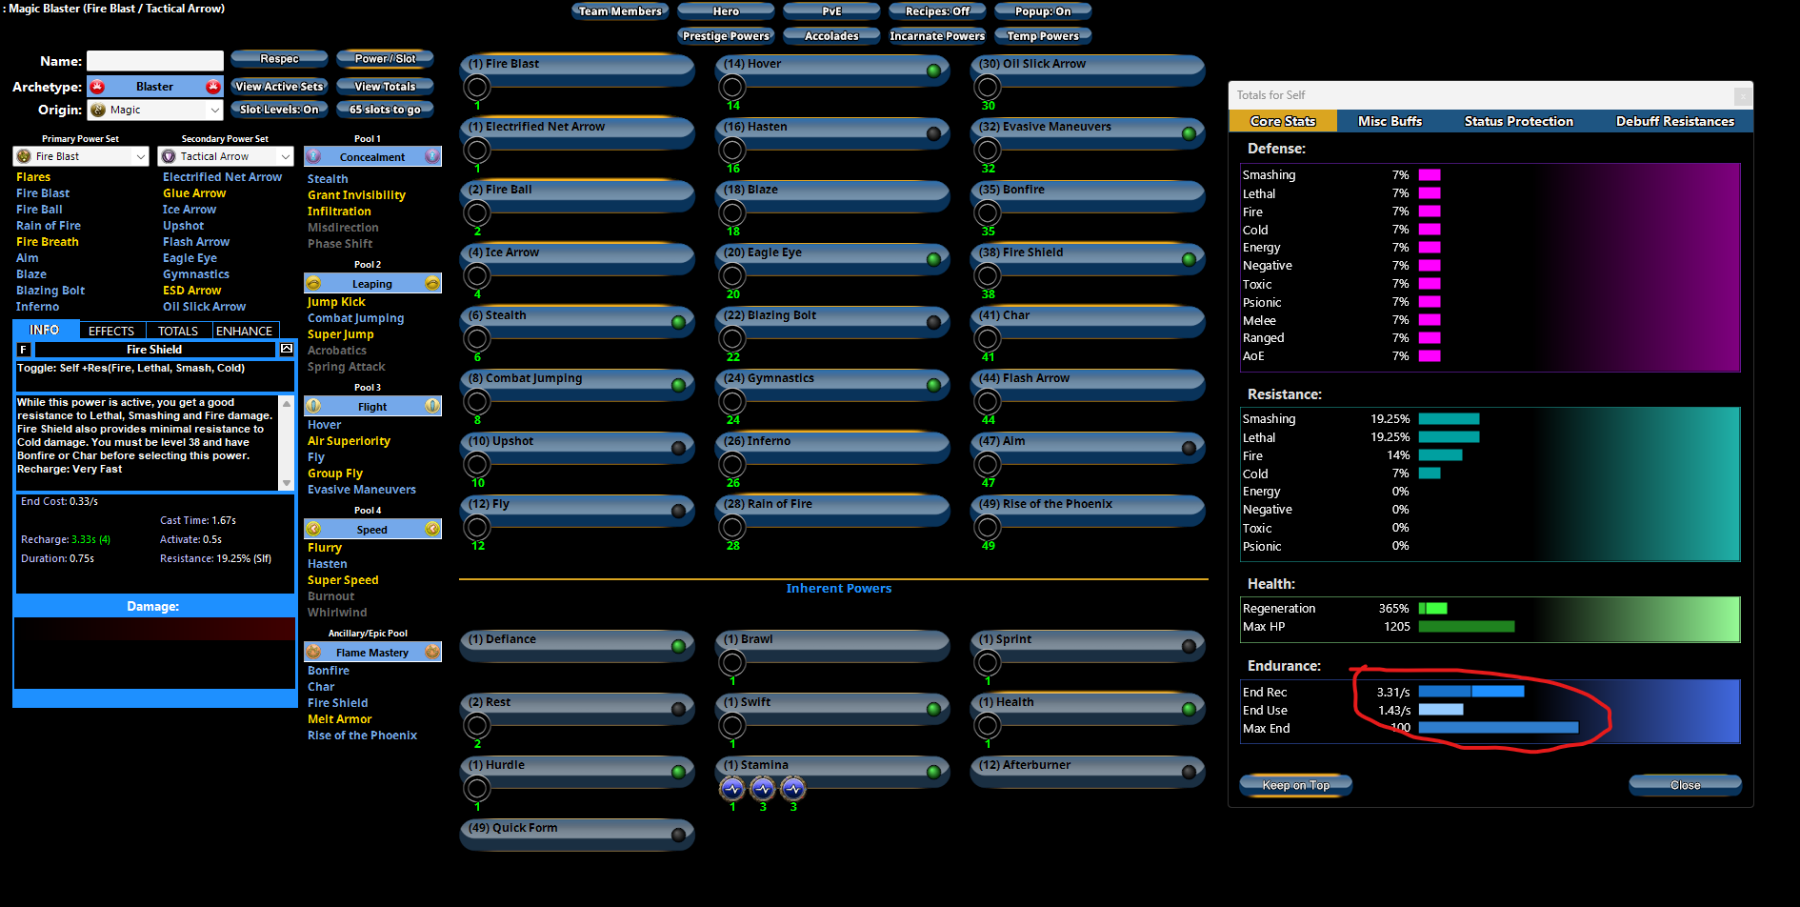
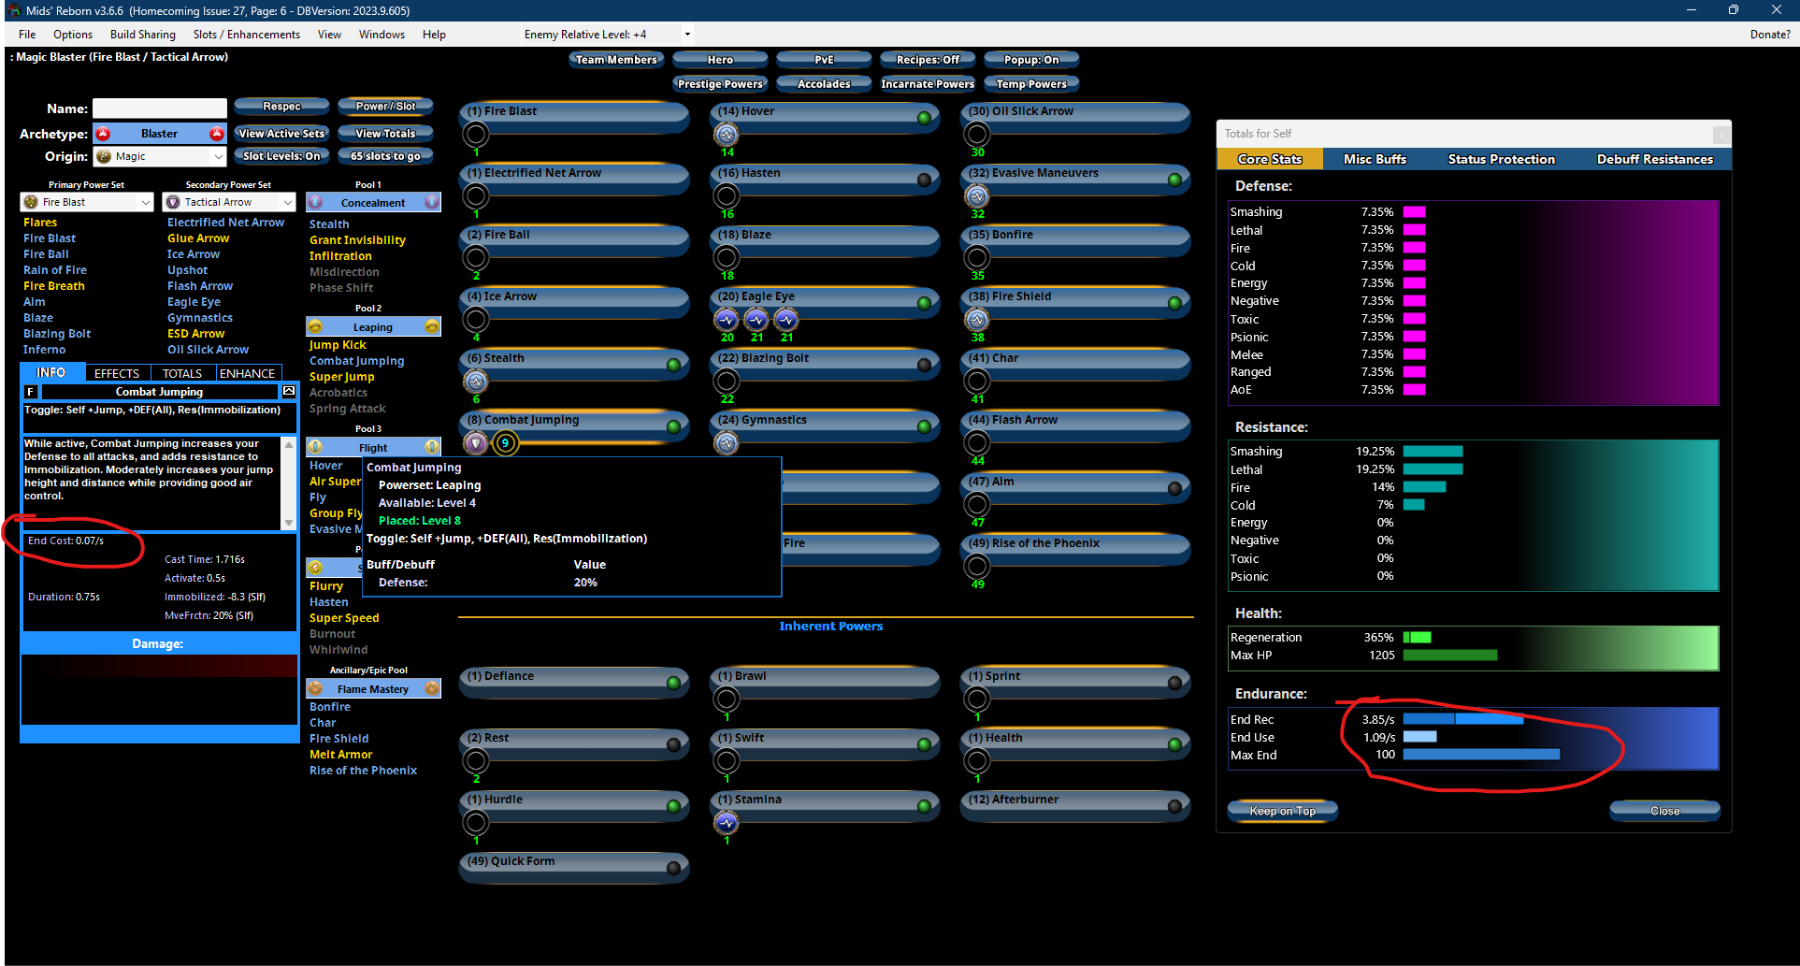
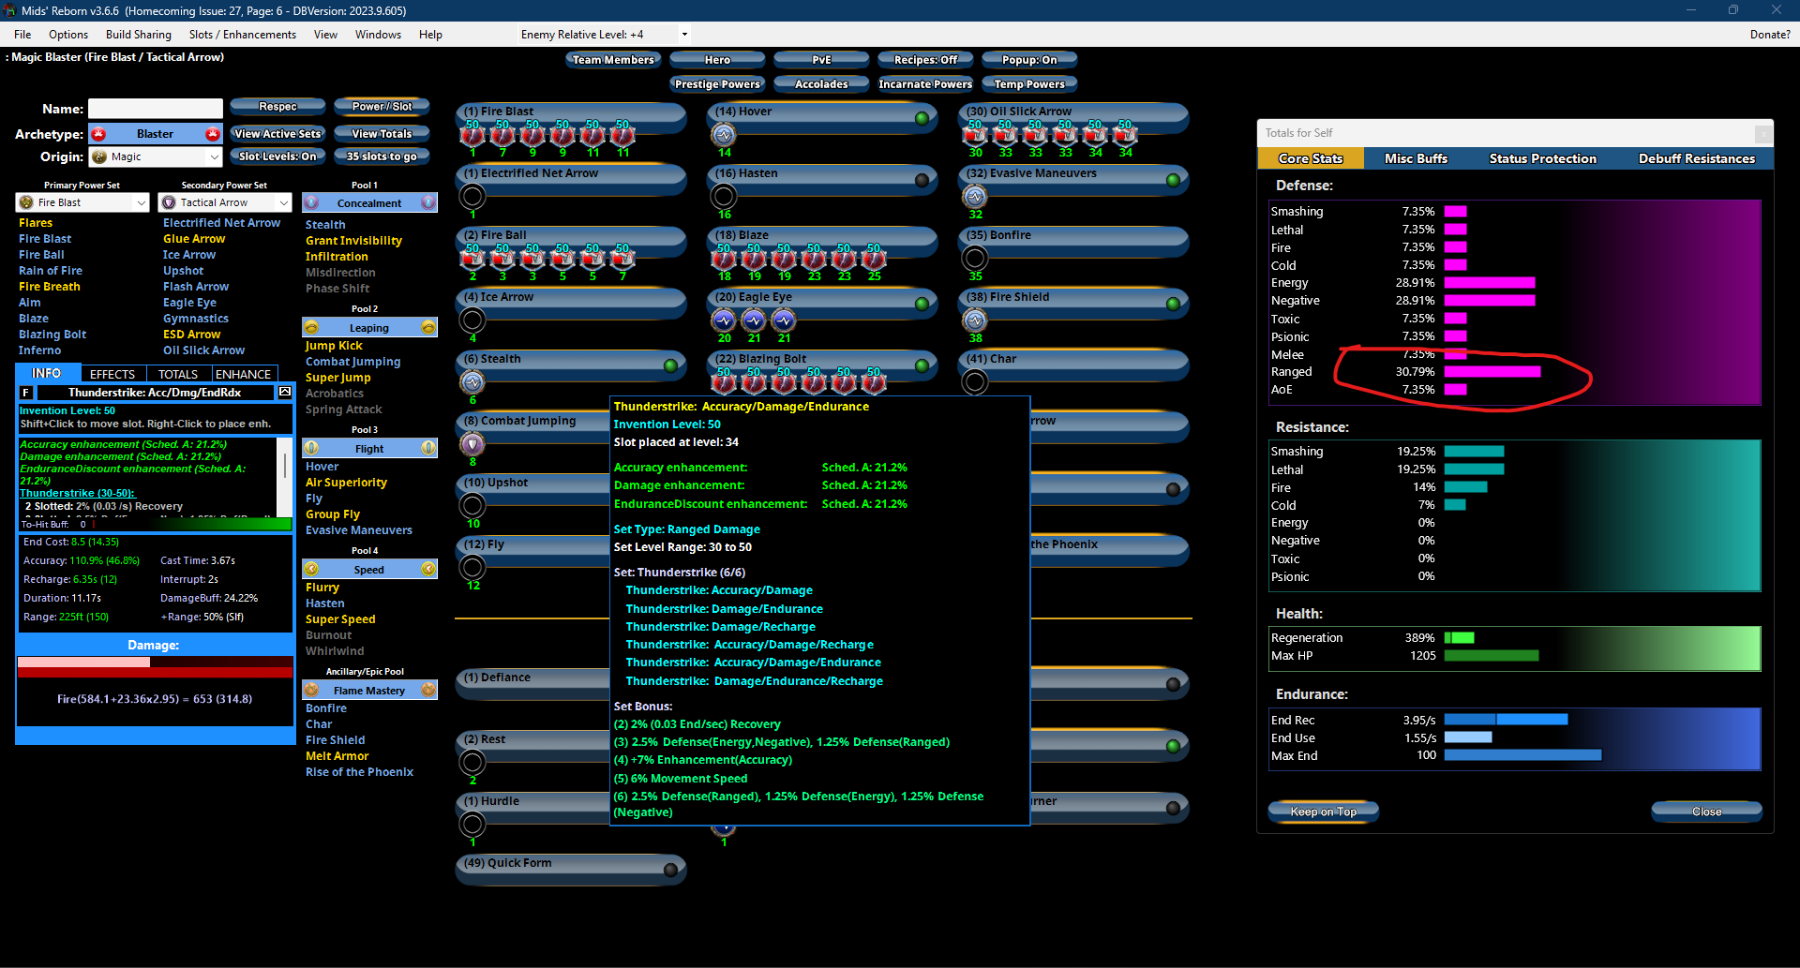
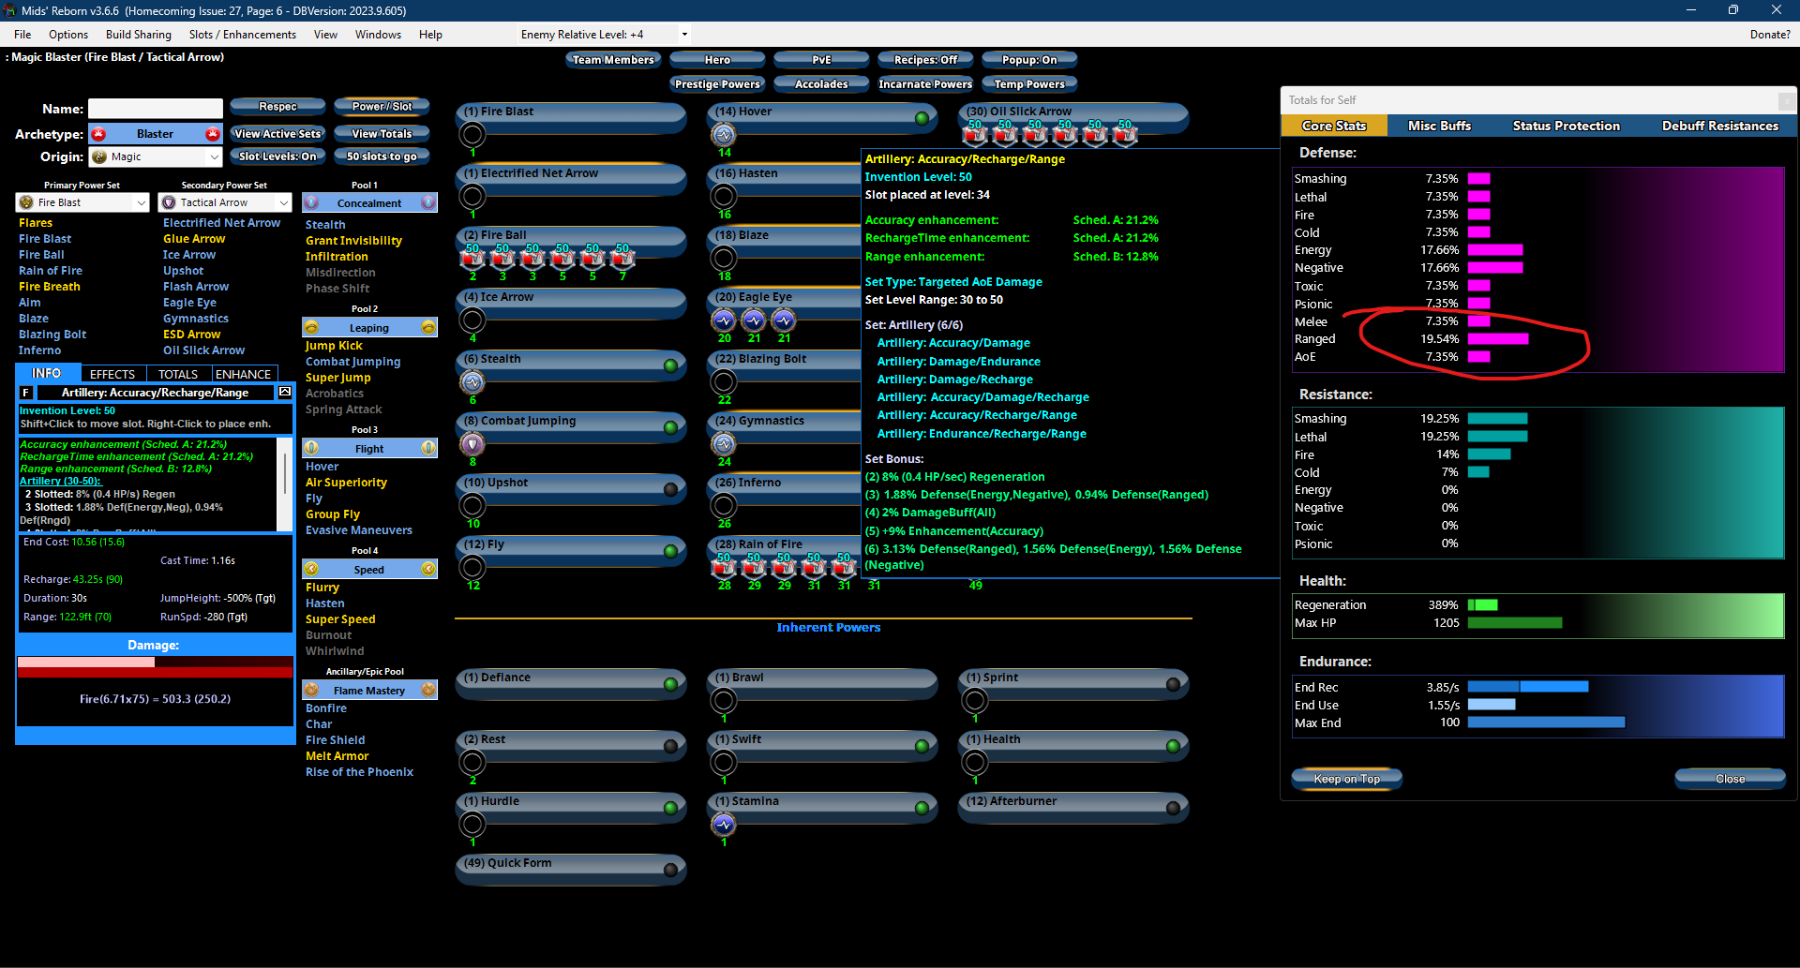
Mids can be daunting at first, there's a lot to unpack with the tool. But it is the most popular way to share builds so it's a good tool to have. Familiarity with it come over time but for now it's a good way to see how other people are building. The key when reviewing builds is looking at the set bonuses slotted in each power and understanding WHY they are used and how they contribute to the end goal. It's easy to spot the goal with focused builds because you will see repetition in the types of bonuses accrued. Just a quick tip on mids, one of the first things I open up when I look at a build is to click the view totals button: This is pop up a window that shows you some core stats for the build. The first tab has all the defensive stats. A lot of ranged builds shoot for 45% defense to range defense. Because you are just starting out, I hesitate to give you any complete builds and chose instead to focus my first two posts on blaster and game play overview. Like I said, understanding those will do far more for you than just tossing you a build. But I did commit to giving you some build information in my third post so I'm going to tier these builds out based on budget, with the goal of getting you a bit more survival solo and addressing some of those challenges you described. The goal is to make a build that has good endurance management and some range defense (shooting for around 30% so you can use one luck to achieve high avoidance) so you can have an easier time soloing, and so that teammate buffs can more easily put you into softcap. First endurance. All blasters get a "sustain" power by level 20 from their secondary that basically gives them unlimited endurance, you just need to slot it. For Tactical Arrow that power is Eagle Eye. It gives twice the base endurance recovery than stamina, so slot that with endurance modification first and you may never have to slot stamina. While it does help with regeneration my take is that the regeneration bonus from slotting it is far less ROI than slotting it for endurance. If I had to prioritize between the two, endurance all day every day. Eagle eye is a toggle, so make sure you toggle on for it to work. A basic skeleton of power picks for my core build looks like this: I toggle on the useful combat toggles (excluding travel power like fly). At this point my defense is 7% and my endurance recovery minus endurance use from toggles at the bottom of the totals tab is about 1.5 end/s First thing I will do is 3 slot eagle eye with 3 end mod SOs You see end recovery jump to 3.71. Compare that to 3 slotting stamina: Eagle eye is way better than stamina, as are all blaster sustains. If you can recover net 2 endurance/second, then you are in decent shape for endurance management. Next I added end reducer to each toggle except combat jumping, look at the end cost in the powers window for combat jumping, it costs practically nothing. so I put a defense SO in there instead Now your net endurance recovery is almost 3 end/sec. Next we are going to work on defense, we will be using some budget sets, and I'll be focusing on attack sets since the blaster mantra is to kill before you get killed, so damage is important. I want to focus on the ones that are cheap and gives me the most bang for my buck. I know this by heart, so the first place I look to slot sets are in my targeted aoes - fireball, oil slick arrow and rain of fire, with the artillery set which gives me 4% total range defense at 6 slots. My range defense went from 7% to almost 20% The next set I'll use is Thunderstrike which slots into your ranged single target attacks. It gives a total of 3.75% range defense We hit 30% range defense! Its worth mentioning that there are 2 Unique resist set IOs that give you 3% defense to all, one is more expensive than the other. The cheaper one is the steadfast protection res/def unique IO and you can slot that in Fire Shield You are at 33% range defense, which means a small luck will put you at softcap where enemies have a 5% chance to hit you. At this point the primary 2 goals are done. you can start filling out the rest of the slots with SOs if you are on a budget. Blaster (Fire Blast - Tactical Arrow).mbd I put a blessing of the zephyr -KB IO in fly so you have some protection against knockdown/knockback. I also slotted bonfire with the IOs you mentioned. The build still has 4 slots to spare. The budget will run you around 50-80 million inf (excluding SOs) depending on how patient you are with the auction house. While it sounds like a lot, you can earn a few million inf at 50 during a play session, and if you compliment that with other money making tactics like selling stuff on the auction house or converting reward merits to influence, you'll get there pretty quickly. FYI top end builds have a budget in the billions, so sub 100 million builds are VERY cheap in comparison. Having said that, play style and learning the game will contribute far more to your success, and I can teach you. Reach out to me in game whenever you want to team up and I can show you a few things.
-
FB/TA/FM Build could use some help please! Cinder Shot!
Nemu replied to GanjaGamer501's topic in Blaster
Ok your build. I need to know how much influence you have to work with. Builds aren't cheap, and even the cheapest build can run into into double digit millions of inf. Which is why I would prioritize learning the game and adopting a playstyle while you make that money to outfit a build suited for you, and then upgrade. As to how to make influence there are a few ways, you can run content like task forces and story arcs for reward merits and turn those merits in for crafting supplies such as enhancement converters and sell them on the auction house for a quick profit. Just doing content as a level 50 will also net you a few million inf per play session if doing group content. On large teams there'll usually be two types of players, those that can carry the team and those that tag along. And it's perfectly ok to tag along. There are many detailed guides on making influence in the market section of the forums and I'm not going to give any more advice here since I'm not an expert (though I do well enough to out fit every one of my characters with top end builds that work for me). General philosophies with making builds: 1 - define your goals 2 - identify synergies in your power pairing/pools that contribute to your goals 3 - identify and triage gaps that you need to address (to the best of your ability, some gaps aren't addressed and that is ok too) 4 - put plan to action via mids Rather than providing you a build right away take a look at this for general build principals and a very loose outline of the build making process: What you will see from that thread is that like most other games there's little value in spreading out your focus when you build when it comes to set bonuses. There are at most 2 core attributes you really want to build on, and the rest are "nice to haves." Most builds I see on the forums lack focus. The link above gives you an example of how to bring focus to a build. You don't need to memorize all the sets and their bonuses, what's important is that you understand the "why." For part 3 I'll chime in on your actual build. -
FB/TA/FM Build could use some help please! Cinder Shot!
Nemu replied to GanjaGamer501's topic in Blaster
Ok, I'm going to cover few basics about blasters. Some of which you might already know, some of it might give you new insights. Blasters are squishy out of the box. They have the following weaknesses: no defense, no mez protection, no resistance to debuffs. They make up for this by doing a lot more damage out of the box, most, but not all blasters have a lot more AoE alpha strike fire power than other ATs They are not necessarily a pure ranged AT, rather they are a pure damage AT. However, the combo that you picked with Tactical Arrows favor pure ranged play. Other secondaries have melee attacks that hit hard. The trick is to balance offense with survival. Survival can be accomplished a few different ways, none of which are exclusive with each other: Kill things before they kill you. This above all is the blaster mantra. Dead things don't fight back, and you don't get XP for just surviving. Using inspirations proactively. As a blaster you should prioritize stocking your inspiration tray with breakfrees and lucks and their variants. You can convert 3 of the same inspirations into another. You should take a moment during your downtime to do so. Leveraging your mitigation toolkit. Blasters have access to a small arsenal of mitigation tools in the form of holds/stuns/knockdowns, either from the primary or secondary or even pools. Some of these are worth taking to give you momentary respite from problem mobs. You are not trying to be a controller though, you only need to disable them long enough to either retreat or kill them. So don't over invest in slotting those powers for holds/stuns/etc.. especially if they do damage, remember the mantra. Learning game mechanics and taking advantage of them. There are a few ways you can influence mob AI to buy you time. If you are getting shot at out in the open hide behind something and break line of sight. This stops the attacks and forces mobs to chase you, which gives you time to pop inspirations. If you alpha strike a group and enough mobs die from the volley, this will trigger fear in other mobs sometimes and make them run, which also buys you time. Movement is a pretty critical skill that is taken for granted. A lot of blasters die because they don't move when they should. Learning problem mobs in a group that you need to take out first. This comes with experience. Typically you want to target debuffers, things that mez, healers/buffers in a group first, when those don't exist then it should be whatever is the highest threat, typically bosses. Sometimes you can do that with your AoE alpha volley, some times you need to focus a bit more with your single target attacks. Making a build with IO sets that shores up your defense. This will have the biggest immediate impact to your performance, but learning/mastering the other bullet points will make you a much better player. General game tips you might find useful: The current build meta is focused on defense. 45% defense is the softcap for regular content, that means mobs without buffs will have a 5% chance of hitting you. Since blasters have high damage out of the box, many blaster builds choose to build this way and still retain respectable offense. Defense is broken in to two categories - positional and defense against damage types. Positional defense has 3 types - Melee, Range, and AoE Defense against damage types have a much more diverse roster - Smashing/Lethal is the most common type of damage type, Energy damage is very prevalent as well, then there's fire/cold/negative energy/psi and toxic damage. Very very few builds can softcap all these defenses, your play style will determine which defense you prioritize. If you haven't already and you own a windows PC. You can use mids reborn to review and plan out your builds. Go download mids reborn here: https://midsreborn.com/ In game you can monitor up to 10 attributes via the power - combat attributes selection. The typical ones I monitor are some combination of defenses, some resists, regeneration, recovery, recharge, and damage. These numbers will tell you how many inspirations you need to softcap defense and whether you are being debuffed or not. Speaking of debuffs, blasters have no debuff resistance so while softcapping is nice, it can and will get stripped when you face overwhelming odds. Remember the blaster mantra. General play style tips and showcase. It's perfectly fine to hover blast so don't feel compelled to joust as I demonstrated in the videos in the following link Please read my commentary in the first post about range defense. I have maintained for a long time that range defense is the most important defensive attribute to build for on a blaster focused on survival. It's certainly the case for your build since tactical arrow leans heavily into the pure range play style, but it's just as important for blasters that punch face. I'll give build commentary in a bit. -
FB/TA/FM Build could use some help please! Cinder Shot!
Nemu replied to GanjaGamer501's topic in Blaster
Welcome to the game! I'll provide a detailed write up in a bit. Stay tuned! -
You can't joust effectively with hover. It's too slow and lacks momentum. The point of jousting is to use movement momentum to carry you past the point of execution so you are not in danger of melee retaliation when you stop moving and animate your attack. Consider taking more pools, you can have up to 4. Speed is a good one for hasten, which gives you a buff that improves your recharge. Stealth is also good for beginner solo builds, it lets you get closer to mobs without them noticing for alpha strikes. Combat jumping from the leap pool gives you protection from immobilize effects. The fighting pool is meta, most people will take it for tough/weave but that's when you want to graduate from simple generic IO builds to builds with sets which are considerably more costly.