

KaoticKarl
-
Posts
47 -
Joined
-
Last visited
Content Type
Profiles
Forums
Events
Store
Articles
Patch Notes
Posts posted by KaoticKarl
-
-
I'd love to see any alternatives you can think up, so if you have it already that would be great. I just didn't want to keep taking up your so much of your time 🙂
I did get curious about the LOTGs and attunement though, since you'd mentioned it, and went to go do some testing. Poor Positron is probably confused to all get out with the amount of times I picked up his TF and dropped it, but I did find some interesting results (at least for me it was new).
You're 100% correct on the single slot SW vs Common IO Def Buff (CIO). Each one behaved the exact same as the other whether level 50 or 15, +0 or +5. Same % bonuses for each.
However, for the LOTG Def/global rch IO test, it seems there is absolutely no reason whatsoever to attune these unless you want to keep the set bonus. At level 50 I had 4.50% base Smashing Defense due to picking up Stone Skin. Tried different combos of slotting and toggles:
Hide on - unslotted:
50 Def 6.75% / 15 Def 6.29%
Hide +5 LOTG
50 Def 7.12% / 15 Def 6.44%
Attuned/Unattuned LOTG (no difference with similar level)
50 Def 7.05% / 15 Def 6.41%
So, not much of a difference here overall between attuned and boosted, but the +5 is still slightly higher even at level 15. Thought maybe it was Hide having some effect on this, so I tested both again on Rock Armor and CJ:
Unslotted at 50 and toggled on separately for RA base Def 18.90% and CJ base Def 7.65%
LOTG+5
RA 50 Def 21.29% / 15 Def 18.86%
CJ 50 Def 7.12% / 15 Def 6.44%
LOTG Att/UnAtt
RA 50 Def 20.81% / 15 Def 18.67%
CJ 50 Def 7.05% / 15 Def 6.41%
Like I said, not much of a difference here, unless when all is combined it changes ability to softcap at 15 versus just under (which I'd probably never notice either way), but something to consider regardless. Probably something others have already long figured out, but I had not idea how it worked and it was fun to do anyways, so might as well share in case.
-
13 hours ago, Bopper said:
The BU proc is actually a global enhancement. So it doesn't proc off the power it's slotted in, it can proc off of any attack you use. This is why it's so good when you have AoEs as it gives you more chances for the proc.
It honestly makes no difference. A LotG/LotG versus LotG/SW is the same amount of enhancement and both will not necessarily give you a set bonus. But a LotG is cheaper than a SW. You could make it a +5 defense IO if you want to go ultimate cheap route.
I can take a look at your build. I was thinking I could take some of the slots I used to add EN resist to give you an extra recharge. If I see something, I'll share it.
So, BU proc is one that activates globally when the power is used at least once on a map? That's also another good thing to know, and can help a few of my other stalker builds. Now I'm really glad I asked for your help, as I also had it in my mind that the only +5 that retained their full values were purples and PVP IOs when exemped. So, if level 50+5 Common IOs are the same raw boost at level 20, then using a SW as the 2nd slot truly would be a silly waste of inf to do so. (I'll blame "old age comes with bad memory" here.. 😄)
Any other tweaks you can find would be terrific Bopper, but if not, no worries. You've already helped me a bunch already, so anything else would just be gravy at this point, thanks!
-
2 hours ago, Bopper said:
I like the approach you took with chasing softcap to all types. I took a look at your build and I think I was able to improve upon it. The only downside would be how you feel about Build Up not being 6-slotted. Personally, with the Stalker ATO I feel there is no need to care about the cooldown of build up as it will typically proc for you anyways. So if you don't mind the fact I turned the 26s cooldown into a 33s cooldown, I think you'll like the small tweaks I did.
I was able to increase your type defense by a little bit (+0.11%) while pushing up your psionic defense by quite a bit (+3.22%). I also increased your S/L resistance (+3.4%) and your E/N resistance (+9.4%) . Net endurance recovery slightly increased (+0.02/s) and Regen slightly increased (+10%). Oh, and I swapped the slotting between Total Focus and Energy Punch. I figure having Total Focus recharge faster would be preferred, but you may not need it and would like to keep the Hold proc in Total Focus.
| Copy & Paste this data into Mids Reborn : Hero Designer to view the build |
		|-------------------------------------------------------------------|
		|MxDz;1570;728;1456;HEX;|
		|78DA5594696F126110C79F85A5C816DA223D387A504A29054AC1E80BAFA8B1476CA|
		|96942E23B43B07D4A890864C1A4F5F80E5AAB8DFACEC4A4F5F8147E01AF267E044D|
		|D3C32BBEC46167266C3781DFCECC3333FF9D679F5D589B72AEACCC5C168AEB6A295|
		|FABE5B2F57CE9B6D4EDD9A5A22C2F490157D775BD90AD57CA32C84170FAE93EB720|
		|4B5226A7CB522FACA311E0D0945C91E59A4C1AC9B92BFA9D8A2EB4C54AA594CC56A|
		|55C761AB71999AF16CB059761CC140BAB75B03A39B42CF5DA6AB1EA9BAE1697925C|
		|375BB95BCA2DE46B75A9AF7B414B027E9B0EF8539A7245C3261EA942A45561794CD|
		|C40AA4F889BC8B6A7C4782B59113D70977688B639AB413B04150AAA0A05350A3A67|
		|88B3C88E79AB51F1042459598E95923A4E2B46B02B4D4C214FF6010780DDB8EE193|
		|C8B8D936D1FB162F727E26764EF17E257A477171982DDB1F3B334B5372B7A89BD10|
		|7470D041B2FCD4760BDAB6E3181AA27DC762941B810C97C00CE10A600F0DCA75729|
		|9CEEFE8F4FF403E87326E56EF3E6B316AF79F239E470E5E205EC436839730B91D2A|
		|7B78D81E1218A4610769D8411AF6F035A403927A2849F4EC61250584F7B1F03EBF3|
		|09C2F419B8FB5F9D670F787D789F79023F7890F880F914E6813A0644BE00FB609FF|
		|25FE435AA1ED003FC0006D78F8140623B4E1117A012267902F40D610CB1A8AE168C|
		|6C68851E238723C428CE3E854E818E2E4D001761A3F44C68E883F89BF9089DF4817|
		|3CD328255B4769CE099A739AE69BA67937373ACA9DA2DB3895C40E72E20DF12DF11|
		|D72F23DD20D32E3DC294E9D26A9D3E4ECF18E1D202BC9AF62721FB57AA0428A7734|
		|F50AA71050055F8D46BFC9804F14EE79466D1D6E78FB71688B2AFBC0A90470E5BE6|
		|65E398147E6E098338ACE4393D32286E9CCCF81670C780377F548337F55B6B0B1B6|
		|817C1D6B051B1F62AD43D6980723C5914437AC66E39BC764EC854DC676C8306C86B|
		|1D55CC6D532E69C45CD64DC341B79B371CB6CFC07FB10DE74|
		|-------------------------------------------------------------------|
Overall, really nice suggestions Bopper, thanks! I have no issue losing the six slot for BU, as it was mainly to obtain the IO Set bonus. Since you've neatly covered that elsewhere, not a biggie, and as you've said the proc should take care of any recharge there anyways. I also have no issue switching up EP and TF slotting, as the hold isn't a big deal and I assume I get more mileage with the BU proc in TF giving a better chance of it going off due to its natural recharge, correct?
I did a little more tweaking to the build to suit my tastes, as I really wanted that perma-hasten (not sure why, lol, but it just irks me having it that close and yet not perma). I also switched up CJ back to the LOTG/SW mix, since mids was showing regen 10% cap with six sets, and reduced the boosted in SS so I could retain the attuned bonus when exemplared. My issue was trying to figure out how to get the one more slot in the build needed to keep perma-hasten without sacrificing too much elsewhere.
Pull the one from Rooted, and I'd lose the S/L Res & higher regen you'd increased. Pull the extra Aegis or SW and again, I lose the boost to S/L or E/NE res there as well. Finally settled on taking the Dam/End slot from ET. I lose the 6% to Toxic/Psi res and about 23 damage for the power, so not a big deal to me, as I don't see how 13% vs 19% res makes all that much difference in the long game, especially with the Psi Def getting cranked up with this too. New build below:
I really appreciate your taking the time to help Bopper, thanks!! 🙂
Spoiler| Copy & Paste this data into Mids Reborn : Hero Designer to view the build | |-------------------------------------------------------------------| |MxDz;1581;736;1472;HEX;| |78DA5594594F535110C7CF6D6F292D2D58CADAB29452A0D0525AA20F6E512360643| |1244D7C334D854369AC6D735B1370F90E8A2851DF4C4CC0E553F8055C133F828600| |AEF1B14EEFFC4F7A3D49FBBB3373663933F7DCA58D19CFDADADC79A1792F16B2954| |A265DCD166E48C3995EC9CBE28A14B47C578C5CBA5A2ACA108CD34ED20620649664| |41CAC46C511AB94D1682CA3423D764B12213A677E68271B36408F772A95448A4CB5| |2AE7ACCC745992DE78B39AF29CCE573EB5592DA9469551A95F57CB977B69C5F49A8| |B8E9D2AD4266295BA94A63B3876A49D06FDB457F5ABD5E517388FBBA10295DD81E8| |05B4CFD21B8CD6C7A04C61ACE9AE8A4A7944B34CDDB4D3AC9A8C1A86B30BA61F4CC| |819798AD0B7633623339D9553976D34917AD1DCC63C7C124B33DC54C7513FB75F19| |8CEE250CE8E771CB1FD3DB3E303F891D9F509FCCC0CD3749C70B6D56BAF97D50CF6| |805DB4C9A50EECC2997A70A61D4ADFC2EDA889963D9B1976983CBC823D8437C8B9D| |C14AE4D8569FBC6CAF1AFCC2714C6A74EE13B693363074E31FB4E836798036739CD| |C039766EA1C87ED5743F0A1C408121343D84A6872E335DE4D40927D1B9CF4A8D0AE| |F568577078419FE19D5D6AB6AEBDDE0B7606813BC0DDE610EDF05EF313D9426A83A| |1CFCCD050FFF6146FE32ED94B65F1DA01F038F60E0110C7CF40438CD4E4FA9AC41D| |4AA0F8E726B46C7986351701C8C71CB74CA145667091F620847E077E6C40FF027F8| |8BE9A5B38CC0D93E82FEC6D1DF38FA1A479FEB838DAA4CD15DEEC6E41EF8127CC59| |C7A0DBE61FAA8CC98CA1443A629644A21430A195B63F55B8D573071C0B5FA294252| |4D32F99CBB10D4855AB55A9F45A04F14CF7A516F5C6E7AEBB969CBBAD291520BF2C| |E03B775E7245F95C3FF9451561E59943631843B3F4F9A315D04AEF254BFBBAD5F95| |1D4EECDE62BE9868186B6F271A97ABB640425259E21DB45B095FFC16613F621176C| |3A6E030859DFA3615CD5CCB6ECBDE6B56216B15AE5B05732D5A33FE03B42FE8D0| |-------------------------------------------------------------------|
-
Little late to the party here, but I have a relatively expensive build that leverages sets to reach softcap+ to all types including Psi, decent resists (not great), max HP, perma-hasten, and recovery gain around 1.94, so no endurance problems I've experienced. I only get around 50% recharge resists, compared to @Bopper's 80%, but with less chance of being hit in the first place, I've not noticed any issues, and everything else seems pretty comparable.
I took it for a test drive and managed around 450 dps on pylon (avg. 120 seconds), which makes me pretty happy since I'm fumble-fingered as a stalker. My chain was whatever happened to light up first, followed as much by TF>ET as possible. So, in the hands of someone who knows what they're doing, it might go even higher. 🙂
Take a look and let me know if you guys feel something can be improved upon. I could switch the third hasten slot out easily, but that would drop it to just under perma at 122.6 seconds recharge, and personal preference is to not worry on perma and still able to take musculature instead of agility:

Build below:
Spoiler| Copy & Paste this data into Mids Reborn : Hero Designer to view the build | |-------------------------------------------------------------------| |MxDz;1570;725;1450;HEX;| |78DA5594596F52511080CF854B5B2874A32B748516289B60F4C12D6A6C317631242| |4BE1982F4408908E48249EBF21FB45689FA66ACB62EBFC23FE09AF813344D17B7F8| |88C39D9970BD097C7766CE6C67CEB9CB6B73F65C2E714E288E0BC54CB59A4ED532C| |5EB526B4F650BB29495029E9ECB5A3E552B97E4241B41E9A2F7F4B22C4A199D2F49| |2DBF8E829B4D7332274B5519D59DD3E7B51B654DD892E572319AAA48B962D75F976| |4A65228E51DBA9028E4576B2075B369456AD5D5426564BE52C846396EAA7CB3985E| |CE546B525B1F865AC2F0DBB4C29FD22C57342C624D1522AE0AD33AF11652BD8DECB| |B83ECBF8B6C0BB59C1531006F71ABE85F30EB6C07A342465521E320190713C8E18B| |C445B31EB1039CCC5C8E999C5CC714DDE88A23478F13878063AA183F8ACE8FA0170| |B3B5BDEA3B2ED03F12365F884B47D267E417A603AEDE46C6AD6DECCDC41F4120761| |91951BB6527953D4531DD277E276342C9DCF4D7AD8AE2DE20B64CF4BE236B26F07E| |985C80E819185C34DB541DA6E4ED7FD0D95F1EFC8C790AE97BBED3D61D26B387292| |788A781A193F8369E267D1B913223B79384E6A244C8D446838111A4EE412D20A4E0| |3E4240676319202850F71E1432EA12B9F426D235CDBC83D3C2DE3F7891BC8C907C4| |4DE243A41DD2B87912EEDF9866EA0FF12FD20C69C778D1181D106F8C4807E509943| |1C1654C04712BFC7E6280388B0CFA90E1106E950A193CECECD9C7B4D307C443E20F| |A4EF27F117D2013DCCF0E466685F7DB4AFCD41063872601BBB9EDD21BE22BE4606D| |F10DF227BA1AC10470E51E43045EE82B4513A8222BA87B538C123C6138A3DC32EDD| |AAE0A7D1183508F089C2192EA9ADCB0DA71E3725A9B20E948A1B57EED98C2B23785| |5F6FF5306507960509AC414D6A72E80C60F73BF82533BB419BF2A754C6CDF406E05| |5BC6C6BB60EBD234164188B125DC0FAB59F8EA3408BBD30661DBA30B165DA837977| |1B425A390B4197CAE1A858C51B86614FE011CC9E098| |-------------------------------------------------------------------|
-
 1
1
-
-
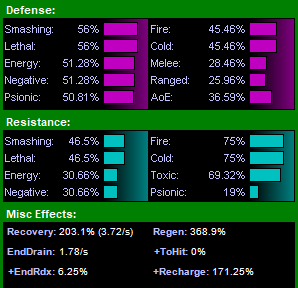
EnM/Stone Stalker: Averaged around 2:00 time on test server +/- 2 seconds. So, ((30677+(102.26*120))/120/(.8)) = 447.38 DPS I think?
Zero survivability issues (soft-capped+ to all types incl. Psi plus max HP due to EE). Ran with T4 Agility Radial, T4 Ageless Core, and T4 Assault Core toggled on (no pets/amp/etc.). Not sure if it's wonky in Mids, but running Agility T4 with BU procs shows as higher dps than straight up Musc Core T4. Strange, but something to note.
With the extreme caveat that I know absolutely bupkis about Stalker endgame mechanics (this will be my first 50 stalk on live/HC), and just mashing buttons as they popped up with rings, I think it's pretty good for an old fart like me with bad reflexes. 😄
-
I did a quick modify of my WP/Ice build, which is not cheap by any means, but it does provide a solid tank with pretty good dps. I'm showing in mids that this has softcap to all but Psi (~33%DEF) prior to incarnates, hasten ~128 seconds recharge, and dps looking like 150 or so without rage. I'm not a big fan of SoW, so I'd probably sub that out for either Assault or Darkest night, but folks were including it prior:
Spoiler| Copy & Paste this data into Mids Reborn : Hero Designer to view the build | |-------------------------------------------------------------------| |MxDz;1540;720;1440;HEX;| |78DA5593596F125114C7EF3083C894DA2220ADB416B00BEB008D3E6BB4D6A4B609E| |D54FB6408D20B4C244058A2BE1B9737D7E80770FD0ABEFA1DB4EAAB4BF7C525EA83| |C1D339E7A6D349E037E77FEE99F3BFDBCCF50957B138799A49AEB3957CB3999BCF5| |7AFF286432F18BC5AE00C1EF74236A9EB414C04F55ABBE200B50FE3DC042FF26A93| |6B0B46A552AF5DE38D0025667885734D6FD7E15D6F3578B5D42A3357B656AB68D33| |C5F37AA25D50CF43AE78BDDE6EBA4512AB720D123462DF246B36CD4FDE7EA46413B| |D368B7786EB77F6E26DF6CF1C68D3EF01183DF1727FC49BB5E5947663F65C6320AB| |3FD22FE462A7F90099589A76367F7144C3E441E7844BC8F3CF880F818F9193A49D4| |C92E8DE3170FF9411904FEC5B8971CF49283C3E44083CEB22896DF517209E9FD48F| |C803CF21E99F984FC069DED54CCEC3E78CB38D932880E89C9E6171DCB54B982EC5B| |25AE218FAE1337905FA1D829EC386725531C9823EAC863F3C48BC44BC81528EE127| |6BA9ED8B0331C8C6E126DDDFF98B92A411F5604BDC8E330A887D69FF504D0CB2A7C| |CE4D958A9B6617BC80C9D0946CC6A149E2796406D6D3238A3CA336534C458851642| |6468CA34709DAFBA8BDECCB02C2E069963847D491320CF65307C94FDB3A4CDBAA40| |B25FAC5FFF0F4A7E276E2247B788DBC41DE438780FE051EAD803CFD0DBD873E20BE| |24B64F415F135320C9D0785ADC13833271825BA2139249243B4F8315AFC02740FD3| |EC95700A9726A611D3C8448298C17627C0EB88B8312337F126246E21937788B7897| |791A95338D175D8D988D8EEC849B4E1018F71717AE221349E82369A10B526F6F6C2| |C8B4284FD36CA2CADE7DEF0C28D6CB4F1BAAD286AAB4A1AE79E4B465309C7EEC915| |58406A21460A6B8A15A472651DCDC274650DCB288120BE1B45D53A08C296C7B5F05| |DD93B7B1BD2BD04978411393591BB6044F3D1088616FC266605EF5CE9235336D0DB| |2AA25B86C0DF2D6E08A35F80F7644E01E| |-------------------------------------------------------------------|
Hopefully, this works or at least helps to give a few more ideas for your own builds. The bonus is you're free to take whatever suits your fancy for incarnates, although I'd strongly suggest keeping in the Ageless radial as an "oh ish" button to avoid any debuffing crashes. DDR is pretty pathetic, but still better than nothing on WP.
-
On 1/6/2022 at 5:41 PM, Shocktacular said:
pretty much everything, really. I'm not always sure what was from the first days of HC vs the last days of Live. It kind-of blends together.
This right here, where we can't be sure which team did what for the game, is a testament to how well the HC team is doing things right now.
Amazing job guys, and thanks for bringing it back to us! Looking forward to what's still to come
-
2
-
-
Or you could mix all three of the above and go for a Dominator. A Dom can get controls, pets, and blasts in a pretty fantastic little package. Once you can achieve perma-domination, you also get full time protection to mezzes/stuns the other three don't have access to until incarnates. It's not the best AT in terms of raw power or min/max, but I think a dom is quite good on the fun factor scale.
-
 2
2
-
-
On 12/31/2021 at 10:54 PM, Snarky said:
/macro Bliz "powexecname Blizzard$$powexec_location target Blizzard"
/macro IceS "powexecname Ice Storm$$powexec_location target Ice Storm"
/macro MeBz "powexecname Blizzard$$powexec_location me Blizzard"
/macro MeIS "powexecname Ice Storm$$powexec_location me Ice Storm"
This is only trying to save you some time typing, @Snarky, but you can execute these commands with even less:
/macro Bliz powexec_location target "Blizzard"
/macro MeBz powexec_location me "Blizzard"
(change up to whichever power you need to execute here - the quotes are optional, but I like them to make it look cleaner in case of edits)
if you want to have these for any keyboard key, switch to bind command with X integer below as whichever key you feel comfortable with. Also, I use powexec_name when no target is needed, mainly for binds as well:
/bind X powexec_location target Blizzard
/bind X powexec_name Warmth
You can also set these up as macros/binds to do various other things as well, such as a location a few feet in front/behind/left/right depending on numeric values and distance - great for pet summoning. 0 = degree arc around your character, so value between 0-359, and 5 = distance in feet(?) away from your central point. For example, to summon fire imps with a key press five feet directly in front of you:
/bind X powexec_location 0:5 Fire Imps
Lots of good info on this from the HC Wiki: https://hcwiki.cityofheroes.dev/wiki/Powexec_location_(Slash_Command)
On 1/1/2022 at 10:41 AM, Aurora_Girl said:That's because...I got nothing. It was a long night.
Don't worry @Aurora_Girl, I'm right there with you. I will bind the same keys as necessary across several different heroes. I use:
Q for my heal-clickies, such as Warmth, Heal Other, Dull Pain, et al;
E for Aim, build up, target toggles like Darkest Night;
Z for most of my ground target attacks (Blizzard, Savage Leap, etc.);
X for anything similar or debuffs like Tar Patch.
Makes it much easier to click those quickly in case of "ish hits the fan" moments no matter the toon I'm on, rather than try to hunt a click in the power trays. I also set up C as my de-target in the key listing, so I don't fire off a 'flares-oops' when running up to the next group, and accidentally pull the alpha strike with my squishy defender. 😄
-
 1
1
-
-
2 hours ago, DreadShinobi said:
Like katana, claws, and dual blades being mutually exclusive with shield defense, you should probably expect dual pistols and shield defense to be invalid as we do not have character models sporting 3 arms.
Yeah, but if we're sending wishes to Santa Claws, might as well go big, right? 😄
Intentional misspell, of course!
-
1
-
-
On 12/18/2021 at 7:45 PM, Saikochoro said:
I want shield defense for sentinels so much. I would be beyond ecstatic if they got it.
Said it in another thread.. I want to pair Shield with Dual Pistols... hopping blasting kapow-pow wholesome goodness!
Or maybe fire and elec too. Regardless the primary, I'd be super excited for a shield sent.
-
Oh just GREAT! 🥺
Now I want a Shield Sentinel... with DP guns
Would be hella fun, especially running Fiery Bullet Rain into Charge, then straight to Hail of Bullets
-
First, rename your pet to make this easier. Sparky, Spot, Jade, whatever... we'll go with Sparky here. The command is:
/bind (desired key) pet_select_name (pet's name)
I personally like to bind Q to Sparky summon, E to target Sparky, and C to bounce heal. Makes it really easy to summon, target, and heal while solo, so do this type in each line separately:
/bind q powexec_location me "Galvanic Sentinel"
/bind e pet_select_name Sparky
/bind c powexec_name "Rejuvenating Circuit"
To create a macro instead:
/macro PET pet_select_name Sparky
-
1
-
1
-
-
3 hours ago, Without_Pause said:
Personal opinion, StJ is a faster playing set so it just feels smoother.
I've started a Shield/Savage tanker that has been pretty fun in the lower levels. Really fast playstyle and good damage that's smooth as butter, plus I'm looking forward to the double porting AoEs when it gets higher 🙂
I've done the Savage/Bio combo on a brute to 50 (would recommend, tons of fun!), so I'm curious to see how they differ between the two ATs in the leveling process.
-
I have a huntsman build that can reach incarnate softcap defense if I slot T4 agility, with resists ranging around 30-50% to most. Damage isn't much to write home about, but that's ok, as I built him for more of a support role that can solo decently well rather than a omg-bbq-wtf-dps-god (not even sure soldiers can even be one of those anyways, to be honest).
My question is, does anyone know what the floor is for defense/resist numbers to where you don't eat pavement too much, provided you have at least some stacking maneuvers and possible resist buffs thanks to teammates? Just curious as to how much is considered enough for both by tier of the new SF.
(Also trying to see if it might be a good idea to level my thermal characters some more as well, thanks!)
-
2 hours ago, Guardian Rhykon said:
Of course they're on. I used the Invulnerability/Energy Melee build
I'm thinking PLVRIZR is just joking with you here. Doubt it was meant any other way than playful banter. 🙂
The difference might be that the incarnates are toggled on in the build uploaded by Infinitum. If you changed incarnates or don't have them yet, your numbers would be expected to be lower overall. Not enough to really make it so you are getting your rear end kicked in though, so some more context than what's been given would help us talk through this.
Are you 50 yet? Fully incarnated?
Going against +4x8? What enemy types?
Malta / Carnies flooring your endurance? Taking on Cimerorans and getting Defense-debuffed? Certain enemies punching through what should be high resists?
These might seem to be silly questions, and apologies if not really applicable, but until asked we don't know what the issue might be and how to solve it.
-
Ok, after this last post, I fiddled around a bit more, and I think I've found a winner for me. Absolutely fun to play, and does well with crowds or single targets. Very survivable, and overall good damage. Thanks again for the input guys, it truly helped!
| Copy & Paste this data into Mids Reborn : Hero Designer to view the build |
|-------------------------------------------------------------------|
|MxDz;1522;715;1430;HEX;|
|78DA4D93CB4F135118C5EF745A81522CA5A5054A0B2D8F628142DD185F21860AE19|
|59098B812EB08B554B06DDA9AE8D27FC18D2B15DDB971ED0317C63F408D185DB8F4|
|B1300801E32331D6CF3907A69334BF3BE7DE6FCEB9F77E9DBB96723D9CBC31A634F|
|7F8AA512EA753852BB9BC5129941C734636B7A8E4A94FA5A6BA453F52272FD1FD05|
|E9F142BE522AAC26524669259F915A0A616BC9A972D9B8BA5A3197ECBD28F77C41A|
|A6633C652A6545ECE155D7BEFC55C3EEB345FCE143399A526733891CB2E5764A2E3|
|7431B798985ACCA4E78C722553BA6E456D935C43F2FB13507CAABADAB02915B22BD|
|B5BF23D687F07EE586B1DEAB620297377C00377C935B0FE1E791FDC955A4D43AD76|
|099A2B0B1E5C267360F3657205FC2EB53A7D75FAB6D0B785BE3EFAFAE8EBA7EF5FA|
|975D0D7714EF6916C50FE05B0ED3C99063B2E9086CDACF5C8E5D5A1D656D7AA9973|
|E169DDE4C88C6EAEA9CAF71B787E0D1F714E9D9FC82F60F833A8E4D01B99A5F111E|
|AC38FC1EE27E453721D8C3C03FD92A509B55A13B34498A547E6DCC8A0DC1F905D13|
|CD43CDD381B3F82959BDF4F71EC75E23C7C09E13E451F224BED33B067F5DBED74AF|
|FD6C3D07A031AFA43E60298D303663699F381FDCDA407B4C919B4F3BCDAD96FFDEC|
|B718FB2DC67EFB257983586B0F7662AFB11078284C7691DD6054B284983334A84C2|
|D4EEAE2DD45EFAE2DEC2FBE4DEE8043BBE06FF18E6A7EF3ACA22F717E43AFC957E0|
|F01B72034C2679F6E2D3479F3EFA0CD367843E23F469934B1A405E35F05C34AF5D0|
|5451B64DF0DF2AE93BCEBE404F843F22578BF09EEAF5DEA46A98D6EE28EA2D2760A|
|DFAA76DAF7FFBF4AB12766AD796964649AB753124D0B62DDA6B366DD30B46FB5DA0|
|0B42D4BB3A9083238A7458809CFA207B6AD359ABA054FD74D70262E7B60DE59AF48|
|1CF7F8ACF17A8DFEB5D71AAFFDD791BBFA206AE9F34E6BBC5033366AC6176BC6E6F|
|322BEFFA7AAFE03B800ECD0|
|-------------------------------------------------------------------|
-
Thanks for looking the build over guys, and I appreciate the feedback from both you and Tex. I should have mentioned that I am a mostly solo player, with the very occasional teaming up for TFs and the like, so I mostly build with that in mind. On normal radios, I will tag confusion on a few mobs first, then come in with the damage afterwards.
On 11/6/2021 at 4:03 PM, Uun said:Slot Fearsome Stare to enhance the -tohit, not the fear. Cloud Senses is a good choice. Move the Ascendency of the Dominator set to Heart of Darkness - the damage is minimal and the Avalanche set is kind of wasted there.
Another option to consider is Diamagnetic Core for Interface. This adds another 5% -tohit to all your powers.
Avalanche was mainly for the 2.5% to S/L defense more so than the damage, plus the possible knockdown for any not stunned. Moved the set as you'd suggested though, but I used 5 Siphon insight instead of cloud senses as replacement to keep the defense hovering around 40% for barrier to fill in the last bit. Switched to diamagnetic as well. Great ideas!
On 11/8/2021 at 5:45 PM, oedipus_tex said:Not a bad start for a build. Here are a few comments:
- I'd skip Midnight Grasp. It has lower DPA than Smite, and is actually barely more DPA than Gloom.
- Consider slotting Life Drain as a heal instead as a blast. That its main feature. The actual DPA isn't that great. If you can fit both heal and damage, that's fine, to avoid losing a lot of DPS when you use it in longer fights, but I think the heal is more important.
- I think skipping Haunt is a mistake. The Haunts do damage a bit below Fire Imps.
-
If you can somehow sneak them in, Hibernate and Ice Storm are worth taking. You'll probably also want Living Shadows.
- To get these, I'd drop Grant Invis at a minimum and make up the lost Recharge elsewhere.
- For this particular build I don't think you actually need Tough/Weave. You can probably reach similar Defense numbers taking Maneuvers and shifting some slots. Tough/Weave is more critical on Resistance armor builds to close the defense gap. 22% Slash/Lethal resist isn't terrible, but also to me not worth skipping better powers like Ice Storm or Hibernate.
While I like having MG as a finisher move, I honestly tried every way I could think of to switch it with Haunt (I do like that power), while still keeping the goals on defense/perma-hasten/dominate. I just couldn't get it to work out, plus I couldn't see how I could drop T/W and just slot Maneuvers while keeping the defense up there, as Tough is the only spot I can slot in the two unique IOs. Did take the advice on Life Drain though. Switched it to 5 Panacea, which boosts the heal portion to double what was before, while also keeping most of the global recharge I would be missing with Apoc.
Hoping I don't ever need Hibernate, but if I take it and one-slot it with the PM abs proc it would probably be good to have as an OS! button. Only issue is that would drop me out of perma-hasten to 120.9. Doubt it would cause much rift if I did this, but not entirely sure, so is being just outside perma all that noticeable? As for IS, not a big fan of storms - I have an Ice Corruptor that uses it, just to watch all the mobs scatter from it. I'm guessing the goal would be to fire off LS > Sleet > IS, in order keep mobs in the patch, but it just sounds clunky with those cast times. Plus, that's a bit of damage I might take while this is all going on, since the mobs are just immobilized. On a team, sure.. but solo might be ouch.
Ok, so on to round two of the build. Let me know what you guys think 😄
Spoiler| Copy & Paste this data into Mids Reborn : Hero Designer to view the build | |-------------------------------------------------------------------| |MxDz;1518;712;1424;HEX;| |78DA4D934B4F53511485CFEDC3D29602A5A5054A8196424B0B951A27BE420C55C32| |B21317124D682B55CA92D69AB91A17FC18923159D3971EC0307FE02356234D17F60| |1422C6578C7573D792DB26CDB7EF3A67DFBDCE3EFBCEDFC8B63E3A73735269ED53A| |57CAD96CB56AEEAE57CBD52B5CFE78BFAB2925F4B363B3D28FA61873C44F737E4A6| |2AE57AB5524A67F3D5D572417229F49B5B4ED66AF96BA5BAB1E5FF83F22E54246BB| |A7C5DAFE94B7A49AFAFBB0DE574492FAED43D88F742BD5C74194F67D70A854BBDA7| |D6F4E5F4F47221379FAFD50BD575D36BB7184BC9FF4F50F1D7B0AA2D8B52619BB2B| |C25DF83B677E05773AF5DDD116464ED2E78E01EB901B6DC271F80BB92AB69C8D52E| |436B2D826D2BA40E765C2157C16F926B655D2BEB76B26E27EBFA59D7CFBA01D6FD2| |BB976D6B59F9773649C2AB008765F207360EF45326F31723D727B0EE42A479766AC| |35E47D4E78B1395BACC6BE3E27E906FB5DA40354D26C373DB81F73ED0938F8947C4| |66E8291E7A0533C78E8C1430F6ED1DAE1416BFF08AF910FA0266B5EAC296F2F7AF0| |433CFB58DF770C678C1C05878E9347C813784F6C12F5ADF2BE2EE46A5D87A0C5821| |AE642D68258B306E92DE607473A482F68911EF470CE7A3867239CB338E72CCE39FB| |297E43EC71A8CF6AE4C7C3E0683F39400E8251F112A6CFF0DE608B9624AD527B80B| |507B671BEE40EF9151CDB057F49EDA816307A157D89FE8DBD265F81E36FC82D3093| |41EE6FC91D8607DBF028FA399E000F26C93899424EB75C5682F79B78219ACFA642A| |2A5A05952EC6B6606E7CCCCE20EBE4BAD34EF39CD73B6490F26A84D302F2AE3A7F0| |AE469F6DFFFB558AB33167AECB60C3D3828D92685A08FB3EBB9AF68D43FBD2AC25A| |06D9B9A4545E0D53523425C784E339E77CC3D9ABA8D9AADB7C0D9A49C817EE77C22| |311EF29BF16693FE2966C61B7B3A7C371E464D7DC165C68B4D71BE295E6A8A5560F| |FFB6AFC037E28E189| |-------------------------------------------------------------------|
-
MORE TANKS
in Tanker
5 hours ago, Aeroprism said:Not gonna lie, I want to try a /Psi tank now. I wanted to try Bio with TW but I might just reconsider.
I'll also note that even though it's a set filled with cones, TW has really not been popular in the suggestions here.
Or maybe Shield/Psi... hmmm...
Well, since you expressed interest in both, I hastily threw together a couple of builds for both Bio and Shield Psi tankers. There's a whole mess of people who have been making builds longer than me that could probably make these far better, but I figured you could use each of the below on the test server as a baseline to see which one you enjoyed more in actual play, and go from there on making your own build. Feel free to add/replace powers as you'd rather for each 😄
Disclaimer: I build my tanks to survive first, damage second, and I don't take taunt, like... ever. Probably because I don't have the patience to deal with teammates as a tank, and I make damn sure I can solo what I want to instead. I set these at 1 enemy in range, no teammates as a result. Also, remember that this is single stack of tanker resist proc, so add 6.7% to final resistances as it should be easy to double stack that for higher resists.
(sorry guys, I tried to use spoiler tags, stunk it up badly, and just gave up)
Bio/Psi build
This Hero build was built using Mids Reborn 3.0.6.0
https://github.com/LoadedCamel/MidsRebornClick this DataLink to open the build!
BioPsi Tanker2: Level 50 Natural Tanker
Primary Power Set: Bio Armor
Secondary Power Set: Psionic Melee
Power Pool: Speed
Power Pool: Leaping
Power Pool: Fighting
Power Pool: Teleportation
Ancillary Pool: Energy MasteryHero Profile:
Level 1: Hardened Carapace -- UnbGrd-ResDam(A), UnbGrd-ResDam/EndRdx(3), UnbGrd-Rchg/ResDam(3), UnbGrd-Max HP%(5), StdPrt-ResDam/Def+(5), GldArm-3defTpProc(7)
Level 1: Mental Strike -- KntCmb-Acc/Dmg(A), KntCmb-Dmg/EndRdx(7), KntCmb-Dmg/Rchg(9), KntCmb-Dmg/EndRdx/Rchg(9)
Level 2: Environmental Modification -- LucoftheG-Def/Rchg+(A), ShlWal-Def(15), ShlWal-Def/EndRdx(17), ShlWal-Def/Rchg(17), ShlWal-Def/EndRdx/Rchg(19)
Level 4: Telekinetic Blow -- SprBlsCol-Acc/Dmg(A), SprBlsCol-Dmg/EndRdx(19), SprBlsCol-Acc/Dmg/EndRdx(21), SprBlsCol-Acc/Dmg/Rchg(21), SprBlsCol-Rchg/HoldProc(23)
Level 6: Adaptation
Level 8: Ablative Carapace -- Prv-Heal(A), Prv-Heal/EndRdx(23), Prv-EndRdx/Rchg(25), Prv-Heal/Rchg(25), Prv-Heal/Rchg/EndRdx(27), Prv-Absorb%(27)
Level 10: Inexhaustible -- PrfShf-End%(A)
Level 12: Evolving Armor -- EndRdx-I(A)
Level 14: Super Speed -- WntGif-ResSlow(A)
Level 16: Psi Blade Sweep -- SprGntFis-Acc/Dmg(A), SprGntFis-Dmg/Rchg(29), SprGntFis-Acc/Dmg/Rchg(29), SprGntFis-Dmg/EndRdx/Rchg(31), SprGntFis-Acc/Dmg/EndRdx/Rchg(31), SprGntFis-Rchg/+Absorb(31)
Level 18: Hasten -- RechRdx-I(A), RechRdx-I(33)
Level 20: Combat Jumping -- LucoftheG-Def/Rchg+(A), Ksm-ToHit+(33), Rct-ResDam%(33), Rct-Def(34)
Level 22: DNA Siphon -- Arm-Acc/Rchg(A), Arm-Dam%(34), TchoftheN-%Dam(34)
Level 24: Boxing -- KntCmb-Acc/Dmg(A), KntCmb-Dmg/EndRdx(36), KntCmb-Dmg/Rchg(36), KntCmb-Dmg/EndRdx/Rchg(36)
Level 26: Genetic Contamination -- SprMghoft-Acc/Dmg(A), SprMghoft-Dmg/Rchg(37), SprMghoft-Acc/Dmg/EndRdx/Rchg(37), SprMghoft-Dmg/EndRdx/Rchg(37), SprMghoft-Rchg/Res%(39)
Level 28: Tough -- UnbGrd-ResDam(A), UnbGrd-ResDam/EndRdx(39), UnbGrd-Rchg/ResDam(39), UnbGrd-ResDam/EndRdx/Rchg(40)
Level 30: Weave -- LucoftheG-Def/Rchg+(A), ShlWal-Def(40), ShlWal-Def/EndRdx(40), ShlWal-Def/Rchg(42), ShlWal-ResDam/Re TP(42)
Level 32: Parasitic Aura -- Prv-Heal/Rchg(A), Prv-Heal/Rchg/EndRdx(42)
Level 35: Greater Psi Blade -- Hct-Acc/Dmg/Rchg(A), Hct-Acc/Rchg(43), Hct-Dmg/EndRdx(43), Hct-Dmg/Rchg(43), Hct-Dam%(45)
Level 38: Mass Levitate -- SprAvl-Acc/Dmg(A), SprAvl-Acc/Dmg/EndRdx(45), SprAvl-Acc/Dmg/Rchg(45), SprAvl-Dmg/EndRdx(46), SprAvl-Acc/Dmg/EndRdx/Rchg(46), FuroftheG-ResDeb%(50)
Level 41: Concentration -- GssSynFr--ToHit(A), GssSynFr--ToHit/Rchg(46), GssSynFr--ToHit/Rchg/EndRdx(48), GssSynFr--Rchg/EndRdx(48), GssSynFr--ToHit/EndRdx(48), GssSynFr--Build%(50)
Level 44: Focused Accuracy -- EndRdx-I(A)
Level 47: Combat Teleport -- RctRtc-ToHit/Rchg(A), RctRtc-Pcptn(50)
Level 49: Physical Perfection -- PrfShf-End%(A)
Level 1: Gauntlet
Level 1: Brawl -- KntCmb-Acc/Dmg(A), KntCmb-Dmg/EndRdx(11), KntCmb-Dmg/Rchg(11), KntCmb-Dmg/EndRdx/Rchg(13)
Level 1: Sprint -- Clr-Stlth(A)
Level 2: Rest -- IntRdx-I(A)
Level 1: Swift -- Run-I(A)
Level 1: Hurdle -- Jump-I(A)
Level 1: Health -- Pnc-Heal/+End(A), NmnCnv-Regen/Rcvry+(13), Mrc-Rcvry+(15)
Level 1: Stamina -- PrfShf-End%(A)
Level 14: Speed Phase
Level 50: Musculature Core Paragon
Level 50: Void Radial Final Judgement
Level 50: Diamagnetic Core Flawless Interface
Level 50: Banished Pantheon Radial Superior Ally
Level 50: Ageless Radial Epiphany
Level 50: Melee Radial Embodiment
Level 50: Freedom Phalanx Reserve
Level 50: Portal Jockey
Level 50: Task Force Commander
Level 50: The Atlas Medallion
Level 6: Defensive Adaptation
Level 6: Efficient Adaptation
Level 6: Offensive Adaptation
------------| Copy & Paste this data into Mids Reborn : Hero Designer to view the build | |-------------------------------------------------------------------| |MxDz;1528;741;1482;HEX;| |78DA4D94594F135114C7EF74062BA58050F68274812E9456CAAB31446589025A85F| |8669A11C7DA58DB665A137934717D7389D107501EDC1FFC02FAE677D0A85F4045D0| |080828584FEFF987CE24EDEFDC73CF76EF39339397879DAFC7AE0C09C57938A3170| |AC9693D7BC130EDC7F4E22553CF087AEA0EA5738942DAC33B837652414E0E1BE78C| |6CC1889145F2B899D2B3E999E441F362CEEC80C1A491318C1879E7CA5B72251C895| |C2E139BCA1BC659A714270C3D9FCEA66AE562349D3A5FA455A35C4D93473E6716F5| |2245708DE4D333B191AC61A66693937AA16898B36D544D947EBFFCF4A794CB2D558| |9555588B8266C6BE03A53DB045BC9B04B13BB0679BDDEBBE3AB8A04C1477B2798BB| |4F8253CC55CAA3B0ADA6349310AF16754755C93DA3E018B3F1087393E2AB827DD4D| |B9ACCD97887D97417BCC76CB9CF5CA33C559CA7B449B29DFDABEC5FB8E696AFCCB6| |6FE022B3E33BB8C45C21DF6A8E23AA1FD8A4EE0FE96AA0ABF10A59A39F12D4720E5| |1EB66DFBF54773DEEB4FE2AD7D5790DBCCEDC7B03BC09DE62FA285E03FB2A0D11CE| |E1015B68CF85FB76E10E3DDB42F6C4B3C2B9BDCBA8816A6D96B757B235EFB7495BE| |F013E87B78D6D148AD7CAB5ABADE89F1FFDF3A37F7EF46F8BE2B5A37FEDEFD9BFE7| |03F809FCC80C7C66AA14DF8D7ADD98AD00662B80D90A6E60B6C8B60BF1BB70B620E| |62388F908633EC2E3ECB34D357573FD4A37FA18461FFF510F7C981D5F88CFDF1706| |FBC020B33FC2F752229F5EF4AD778EFBD1FF087CCC8CCE830BCCF810E7DB22DF106| |62DF484E3459F32F73D039F832F98F197CC050A11C15C45305701BA8F18E6203647| |762EB29F67BEA2811B80FD006633ACEDBC8BA54E4DE0A9BC970EF4D581BE3AD1D78| |98A1F0D3CC74A6850914E710BA95B7258ECA2AC5BB6EA42ACFB51D1D98497EFC679| |4A91AC3B4A0C6AE2A7D50FF5BFEBDB798F4AE32E52E12CFD4D15F9AD45BFD853911| |F96F5F07DE32BEB1529271C159BD31659B7C8672CF27AF9DB8138BF2DF28645FE0F| |BC0DF3E7| |-------------------------------------------------------------------|
Shield/Psi build
This Hero build was built using Mids Reborn 3.0.6.0
https://github.com/LoadedCamel/MidsRebornClick this DataLink to open the build!
SDPsi Tanker: Level 50 Natural Tanker
Primary Power Set: Shield Defense
Secondary Power Set: Psionic Melee
Power Pool: Speed
Power Pool: Leaping
Power Pool: Fighting
Power Pool: Teleportation
Ancillary Pool: Energy MasteryHero Profile:
Level 1: Deflection -- UnbGrd-ResDam(A), UnbGrd-ResDam/EndRdx(3), UnbGrd-Rchg/ResDam(3), UnbGrd-Max HP%(5), GldArm-3defTpProc(5)
Level 1: Mental Strike -- Mk'Bit-Acc/Dmg(A), Mk'Bit-Acc/EndRdx/Rchg(7), Mk'Bit-Dmg/EndRdx(7), Mk'Bit-Dmg/Rchg(9), Mk'Bit-Acc/Dmg/EndRdx/Rchg(9), Mk'Bit-Dam%(11)
Level 2: True Grit -- UnbGrd-ResDam(A), UnbGrd-ResDam/EndRdx(13), UnbGrd-Rchg/ResDam(15), UnbGrd-ResDam/EndRdx/Rchg(15), StdPrt-ResDam/Def+(17)
Level 4: Telekinetic Blow -- SprBlsCol-Acc/Dmg(A), SprBlsCol-Dmg/EndRdx/Acc/Rchg(19), SprBlsCol-Dmg/EndRdx(19), SprBlsCol-Acc/Dmg/EndRdx(21), SprBlsCol-Acc/Dmg/Rchg(21), SprBlsCol-Rchg/HoldProc(23)
Level 6: Active Defense -- RechRdx-I(A)
Level 8: Against All Odds -- EndRdx-I(A)
Level 10: Battle Agility -- LucoftheG-Def/Rchg+(A), ShlWal-Def(23), ShlWal-Def/EndRdx(25), ShlWal-Def/Rchg(25), ShlWal-Def/EndRdx/Rchg(27)
Level 12: Phalanx Fighting -- LucoftheG-Def/Rchg+(A)
Level 14: Super Speed -- WntGif-ResSlow(A)
Level 16: Psi Blade Sweep -- SprMghoft-Acc/Dmg(A), SprMghoft-Dmg/Rchg(27), SprMghoft-Acc/Dmg/Rchg(29), SprMghoft-Dmg/EndRdx/Rchg(29), SprMghoft-Rchg/Res%(31)
Level 18: Hasten -- RechRdx-I(A), RechRdx-I(31)
Level 20: Combat Jumping -- LucoftheG-Def/Rchg+(A), Ksm-ToHit+(31), Rct-ResDam%(33), Rct-Def(33)
Level 22: Grant Cover -- LucoftheG-Def/Rchg+(A)
Level 24: Boxing -- Acc-I(A)
Level 26: Shield Charge -- SprAvl-Acc/Dmg(A), SprAvl-Dmg/EndRdx(33), SprAvl-Acc/Dmg/EndRdx(34), SprAvl-Acc/Dmg/Rchg(34), SprAvl-Acc/Dmg/EndRdx/Rchg(34), SprAvl-Rchg/KDProc(36)
Level 28: Tough -- Ags-ResDam/EndRdx(A), Ags-ResDam/Rchg(36), Ags-EndRdx/Rchg(36), Ags-ResDam/EndRdx/Rchg(37), Ags-ResDam(37), Ags-Psi/Status(50)
Level 30: Weave -- LucoftheG-Def/Rchg+(A), ShlWal-Def(37), ShlWal-Def/EndRdx(39), ShlWal-Def/Rchg(39), ShlWal-ResDam/Re TP(39)
Level 32: Boggle -- CrcPrs-Conf(A), CrcPrs-Conf/Rchg(40), CrcPrs-Acc/Conf/Rchg(40), CrcPrs-Acc/Rchg(40), CrcPrs-Conf/EndRdx(42), CrcPrs-Conf%(42)
Level 35: Greater Psi Blade -- Hct-Acc/Dmg/Rchg(A), Hct-Acc/Rchg(42), Hct-Dmg/EndRdx(43), Hct-Dmg/Rchg(43), Hct-Dam%(43)
Level 38: Mass Levitate -- SprGntFis-Acc/Dmg(A), SprGntFis-Dmg/Rchg(45), SprGntFis-Acc/Dmg/Rchg(45), SprGntFis-Dmg/EndRdx/Rchg(45), SprGntFis-Acc/Dmg/EndRdx/Rchg(46), SprGntFis-Rchg/+Absorb(46)
Level 41: Concentration -- GssSynFr--ToHit(A), GssSynFr--ToHit/Rchg(46), GssSynFr--ToHit/Rchg/EndRdx(48), GssSynFr--Rchg/EndRdx(48), GssSynFr--ToHit/EndRdx(48), GssSynFr--Build%(50)
Level 44: Focused Accuracy -- EndRdx-I(A)
Level 47: Combat Teleport -- BlsoftheZ-ResKB(A), BlsoftheZ-Travel/EndRdx(50)
Level 49: Physical Perfection -- PrfShf-End%(A)
Level 1: Gauntlet
Level 1: Brawl -- Acc-I(A)
Level 1: Sprint -- Clr-Stlth(A)
Level 2: Rest -- IntRdx-I(A)
Level 1: Swift -- Run-I(A)
Level 1: Hurdle -- Jump-I(A)
Level 1: Health -- Pnc-Heal/+End(A), NmnCnv-Regen/Rcvry+(11), Mrc-Rcvry+(13), Prv-Absorb%(17)
Level 1: Stamina -- PrfShf-End%(A)
Level 14: Speed Phase
Level 50: Musculature Core Paragon
Level 50: Void Radial Final Judgement
Level 50: Reactive Radial Flawless Interface
Level 50: Banished Pantheon Radial Superior Ally
Level 50: Ageless Radial Epiphany
Level 50: Melee Core Embodiment
Level 50: Freedom Phalanx Reserve
Level 50: Portal Jockey
Level 50: Task Force Commander
Level 50: The Atlas Medallion
------------| Copy & Paste this data into Mids Reborn : Hero Designer to view the build | |-------------------------------------------------------------------| |MxDz;1495;710;1420;HEX;| |78DA4D934B4F135114C7EF3083D8D282509E2D8552A094162A455DBBB080BC4C138| |82BB18E7029234DDBB43591A589CF9DCFE8C20726BE177E00B77C07C5E03730A089| |1A248AE3E99CBF7426697FF7FECFFDDF73EE6BE652C2F56EFCF271A1B84E64F4623| |135A7675764A1E6945EBA58D033823ED76C225934020890E0E7662A219764B62863| |B3CB86CC2CFEEF7A119D91192963E4CC658D05EE09673297CBC466F3522EBAACE6B| |4D4F34636EDB63A63467AB944BD46AB37478E7CAE50D24B348367346F2CC446B3B2| |905E4DCDE8C5922CACB6512911FA25DCF4A7942B3535F1431522AE89AA9FE00E53D| |B0547983B7DFB9E6AB1242CED8001A6990797C10B4CE70A738CF229C8A7209F0BF9| |EA90AFEE17F3502B0DF43BC42EE55305E7536F6956ACF11E789BD97407BCCB6CB9C| |F1CA77CD59C4F5447CB3538C449D26AAC224C51D3CDDA28690ED4E568562CAD6552| |B5D836068E33BD13CC09F2D462EE5A787AE88CDD5CAB70FB781DBFA9FE7ACC5DFF8| |135EF4766C706F889D9B9C90CD23C0DEC511A507727D842310FC7540FF276EE95EF| |962602DFD91FD8664E5231CDA8B1196315F2B7A2C6562F21A889291AD78E336D7FC| |47B1778CCEC7E023E05D7983DCF982ACDE783D737AC702C0E8E307B8F804799F163| |4C8DBC7EEC8D1FF5F562DF43D8F710F63D34C56BDAA3FDEC42BEAE335556AC7F1E3| |C0BA69803E740BDCAF2FE256F90D7AE05C3880D302311B01F8CB2C7244F1FF2F55D| |E1350F5E05AF81D7994337C09BCC3FE40DE3EE869FF37C432F98875F82AFC0D7CCF| |81BE61A2D378AB38BE29E8668BF62B817B1CF18BFC97C4B67388CF1C30F581BD0F6| |DFAAD9A1097CA61038F7E94A9C1E007B921A24D2141FBFDB2DA76DDC106BDB762DC| |CDAD78AA68A6E3E2FE7693E6BD724B19FDEF516EBDFEC7ED4BB1ED97F3FE6948724| |D43ED854696FD8F42FBD95F6C3B20EEFFB6059B7DEB8997456C6CCDBDABAAD7DDED| |6FE07A67ADF3D| |-------------------------------------------------------------------|
-
MORE TANKS
in Tanker
3 hours ago, PeregrineFalcon said:Personally I learned to really dislike Psi Melee. The animations are slow and clunky and the damage just wasn't great. I suspect that, once you try it, you'll find that the sound FX isn't actually the worst part of the set.
I'm thinking about trying a SD/SS Tank. Shield Charge + Hand Clap (with a KB>KD IO) + Foot Stomp just sounds like a ton of fun.
That's funny to me, because I actually like the Psi animations from my limited testing on Brainstorm, while I have to force myself to level up the Rad/SS cause of the power animations. Only level 20 so far, but the plodding thump-thump-thump of the punches for so-so damage sounds just like a metronome to me and drives me bonkers. I'm sure FS and KOB will help alleviate it somewhat, but until I get there, the powerset has been causing me to have sudden bouts of narcolepsy. 😄
-
MORE TANKS
in Tanker
Have a Shield/EM, would recommend for overall toughness and monstrous ST damage. However, since you want to focus more on AoE...
My current leveling projects:
WP/Ice - Frost is an early and surprisingly good cone power. Frozen aura is as satisfying as footstomp (no rage though). Can softcap def, build good resists, and the regen is insane. Grab ageless radial for the DDR and -End holes. Added bonus of ice slick - easy to perma, watch everything close by play slip and slide games for hours! NEVER-GETS-OLD 🙂
Dark/Staff - early cone as well, which also buffs defense. Dark will help with PBAoE damage aura and OG. Staff helps dark's endurance issues early. These synch well together.
Rad/SS - don't need to say much here, well documented.
SR/Claws - Ask the one and only original, Bill, for good builds. Tons of fun while leveling up from 1-45 so far.
Bio/Psi (disclaimer: concept only right now, may be terrible) - I'm hoping that Bio Off mode helps out with any Psi-resistant mobs. Sweep at 16 is one of the best animations in the game to me. Mass levitate should be fun. Can't hurt to try, no?
Just some fun combos that have worked for me. YMMV of course.
-
This is my plan. It's relatively expensive, but no more than the OP's seems to be, and I did have to go Ice vs. Soul to hit goals here. This build hits soft cap to ranged, 45% to S/L/E/N with barrier, perma-hasten/domination without relying on FF procs, and does a decent amount of damage overall. I'm still in the process of leveling, but I tried it out on the test server, and was pretty happy with the overall results. The only thing that was a hindrance was the endurance usage over time, but not really enough to warrant a concern. Anyone with more experience with the AT is welcome to shred it up if it will help make it better, though. I'm open to suggestions:
Build:
SpoilerThis Hero build was built using Mids Reborn 3.0.6.0
https://github.com/LoadedCamel/MidsRebornClick this DataLink to open the build!
DDI Dom2: Level 50 Magic Dominator
Primary Power Set: Darkness Control
Secondary Power Set: Dark Assault
Power Pool: Concealment
Power Pool: Flight
Power Pool: Fighting
Power Pool: Speed
Ancillary Pool: Ice MasteryHero Profile:
Level 1: Dark Grasp- (A) Basilisk's Gaze - Accuracy/Hold
- (3) Basilisk's Gaze - Accuracy/Recharge
- (3) Basilisk's Gaze - Accuracy/Endurance/Recharge/Hold
- (5) Basilisk's Gaze - Endurance/Recharge/Hold
Level 1: Dark Blast
- (A) Thunderstrike - Accuracy/Damage
- (5) Thunderstrike - Damage/Endurance
- (7) Thunderstrike - Damage/Recharge
- (7) Thunderstrike - Accuracy/Damage/Recharge
- (9) Thunderstrike - Accuracy/Damage/Endurance
- (9) Thunderstrike - Damage/Endurance/Recharge
Level 2: Smite
- (A) Mako's Bite - Accuracy/Damage
- (13) Mako's Bite - Damage/Endurance
- (15) Mako's Bite - Damage/Recharge
- (15) Mako's Bite - Accuracy/Endurance/Recharge
- (17) Mako's Bite - Accuracy/Damage/Endurance/Recharge
- (17) Mako's Bite - Chance of Damage(Lethal)
Level 4: Gloom
- (A) Thunderstrike - Accuracy/Damage
- (19) Thunderstrike - Damage/Endurance
- (19) Thunderstrike - Damage/Recharge
- (21) Thunderstrike - Accuracy/Damage/Recharge
- (21) Thunderstrike - Accuracy/Damage/Endurance
- (23) Thunderstrike - Damage/Endurance/Recharge
Level 6: Possess
- (A) Coercive Persuasion - Confused
- (23) Coercive Persuasion - Confused/Recharge
- (25) Coercive Persuasion - Accuracy/Confused/Recharge
- (25) Coercive Persuasion - Accuracy/Recharge
- (27) Coercive Persuasion - Confused/Endurance
- (27) Coercive Persuasion - Contagious Confusion
Level 8: Stealth
- (A) Luck of the Gambler - Defense/Increased Global Recharge Speed
Level 10: Fearsome Stare
- (A) Superior Ascendency of the Dominator - Accuracy/Control Duration
- (31) Superior Ascendency of the Dominator - Control Duration/Recharge
- (31) Superior Ascendency of the Dominator - Endurance/Recharge
- (31) Superior Ascendency of the Dominator - Accuracy/Control Duration/Endurance
- (33) Superior Ascendency of the Dominator - Accuracy/Control Duration/Endurance/Recharge
- (33) Superior Ascendency of the Dominator - Recharge/Chance for +Damage
Level 12: Heart of Darkness
- (A) Superior Avalanche - Accuracy/Damage
- (33) Superior Avalanche - Accuracy/Damage/Recharge
- (34) Superior Avalanche - Accuracy/Damage/Endurance
- (34) Superior Avalanche - Damage/Endurance
- (36) Superior Avalanche - Recharge/Chance for Knockdown
Level 14: Hover
- (A) Luck of the Gambler - Defense/Increased Global Recharge Speed
Level 16: Fly
- (A) Blessing of the Zephyr - Knockback Reduction (4 points)
- (36) Blessing of the Zephyr - Run Speed, Jump, Flight Speed, Range/Endurance
Level 18: Boxing
- (A) Accuracy IO
Level 20: Engulfing Darkness
- (A) Armageddon - Accuracy/Recharge
- (29) Armageddon - Accuracy/Damage/Recharge
- (34) Armageddon - Damage/Endurance
- (37) Armageddon - Damage/Recharge
- (50) Armageddon - Chance for Fire Damage
- (50) Fury of the Gladiator - Chance for Res Debuff
Level 22: Tough
- (A) Gladiator's Armor - TP Protection +3% Def (All)
- (36) Steadfast Protection - Resistance/+Def 3%
Level 24: Weave
- (A) Luck of the Gambler - Defense/Increased Global Recharge Speed
- (29) Luck of the Gambler - Defense
- (37) Luck of the Gambler - Defense/Endurance
- (48) Luck of the Gambler - Defense/Recharge
Level 26: Shadow Field
- (A) Basilisk's Gaze - Accuracy/Hold
- (37) Basilisk's Gaze - Accuracy/Recharge
- (39) Basilisk's Gaze - Accuracy/Endurance/Recharge/Hold
- (39) Basilisk's Gaze - Endurance/Recharge/Hold
Level 28: Life Drain
- (A) Apocalypse - Accuracy/Recharge
- (39) Apocalypse - Accuracy/Damage/Recharge
- (40) Apocalypse - Damage/Endurance
- (40) Apocalypse - Damage/Recharge
- (40) Apocalypse - Chance of Damage(Negative)
- (42) Theft of Essence - Chance for +Endurance
Level 30: Hasten
- (A) Recharge Reduction IO
- (42) Recharge Reduction IO
Level 32: Umbra Beast
- (A) Expedient Reinforcement - Accuracy/Recharge
- (42) Expedient Reinforcement - Accuracy/Damage
- (43) Expedient Reinforcement - Accuracy/Damage/Recharge
- (43) Expedient Reinforcement - Endurance/Damage/Recharge
Level 35: Moon Beam
- (A) Sting of the Manticore - Accuracy/Damage
- (43) Sting of the Manticore - Accuracy/Interrupt/Range
- (45) Sting of the Manticore - Damage/Endurance
- (45) Sting of the Manticore - Damage/Endurance/Recharge
- (45) Sting of the Manticore - Chance of Damage(Toxic)
Level 38: Midnight Grasp
- (A) Hecatomb - Accuracy/Recharge
- (46) Hecatomb - Accuracy/Damage/Recharge
- (46) Hecatomb - Damage/Endurance
- (46) Hecatomb - Damage/Recharge
- (48) Hecatomb - Chance of Damage(Negative)
Level 41: Sleet
- (A) Achilles' Heel - Chance for Res Debuff
Level 44: Frozen Armor
- (A) Luck of the Gambler - Defense/Increased Global Recharge Speed
- (48) Shield Wall - Defense
- (50) Shield Wall - +Res (Teleportation), +5% Res (All)
Level 47: Gather Shadows
- (A) Recharge Reduction IO
Level 49: Grant Invisibility
- (A) Luck of the Gambler - Defense/Increased Global Recharge Speed
Level 1: Domination
Level 1: Brawl- (A) Accuracy IO
Level 1: Sprint- (A) Celerity - +Stealth
Level 2: Rest- (A) Interrupt Reduction IO
Level 1: Swift- (A) Run Speed IO
Level 1: Hurdle- (A) Jumping IO
Level 1: Health- (A) Panacea - +Hit Points/Endurance
- (11) Miracle - +Recovery
- (11) Numina's Convalesence - +Regeneration/+Recovery
Level 1: Stamina- (A) Performance Shifter - Chance for +End
- (13) Performance Shifter - EndMod
Level 49: Quick Form
Level 50: Musculature Radial Paragon
Level 50: Void Radial Final Judgement
Level 50: Reactive Radial Flawless Interface
Level 50: Banished Pantheon Radial Superior Ally
Level 50: Barrier Core Epiphany
Level 50: Assault Radial Embodiment
Level 50: Freedom Phalanx Reserve
Level 50: Portal Jockey
Level 50: Task Force Commander
Level 50: The Atlas Medallion
Level 16: Afterburner
------------Data chunk:
Spoiler| Copy & Paste this data into Mids Reborn : Hero Designer to view the build | |-------------------------------------------------------------------| |MxDz;1518;715;1430;HEX;| |78DA4D934B6F125114C7EF65062950DA522850E893D296420BA53B5F694C51D357D| |2C4C49515A715E9588406D0D8A55FC18D1BFB72E7C6B5CF859F408D3536B1DFC068| |9BD6F88A110FF33F329090DF99FF3DE79EFF9D7B66FE6EBAF9C9C57B9342B64EE5B| |57239932EDED20B5AA558B2CE6B397D59D0AF299D9EEE237DC2460FE17A4266AA58| |A8948AF9445A2BAD16B254CB428F9972AE5CD66EE72B46CAFF07E15E2852D574E18| |E5ED697F4BC5E59771ACA85BC9E5BA9B810D742BD9073184F97D6B2D9EBC1F36BFA| |72627A399B99D7CA956C69DDF41A206371FAFFF10BFE5515B16B11A25B15960FCC3| |D50FD081E99B956B14148D1DA2678628BB90D36ED301F81C7542B256AE50D68CD39| |B06585A9836D3799ABE037AA55B8AFC27DDBB96F3BF7F5725F2FF7F571DFBF546BE| |5BED62B748E945DF816C1C05566060C5E636A16A3D645B76743ADB0754863AD4AFB| |D9793FFB53C5C8EB79C67CCE7C01F6BD64BE0205BD7427CEA13A1FAA58DB02FB379| |91BE0C00E68270F2EF6E0620F4ED25AB18F6CDD87D7814FA0A43537D6843B8877F0| |833C7BD8B3E734CED8750AEC3F03464E82A9B3D8273509CF0AEDD7815AD931016DC| |02F3117B4E6C79AE2676F5D5E30D20626DDA085CEDEC973D6C97316E1391BE2391B| |E239FB497E43EC379484AFA104383CCE1C63A6E077A45D316AC3E4A99BFD76D7069| |C7246980A79E8650FBD075C7708C68E98C7E02FF210963EE3AEC26FF01E63EFC0D1| |B7CCF7CC5DF037D50CA2B73A38027F6351668C390C26E3E813A0CB8AF2FD465F93E| |6514588B438344B9CDF6B7246C1FDCCE20EBE53AF04DF7382CFD742671F676D9CEB| |C23446027B55BBD4FAF72B04CFC69CB94E830D4F0B2A4BA4C910F2BE381AF2C6A07| |D6DD4A2D00E4CCD22FAE1D53143C230F1B2349E0FCD1C291EA067F37D7036466760| |BF731E92381EF59AF15E83FE3962C6DB351DBEAB8FC3A6BEE030E3C586586B88971| |A62E1AB7F5FD57F0B07E4B5| |-------------------------------------------------------------------|
-
If I'm not sure how I'll like a powerset pairing on different ATs, or want to compare the differences between sets on the same AT, I always make a character on the Brainstorm test server. You can crank it up to 50 and just slot IO freebies, and run it around PI/Grandville or take on a radio mission to see how a set feels to play at 50 versus just looking at the powers in Mids or the creation tool.
Link to how to download the needed launcher and what you can do there:
I've scrapped quite a few concepts I've had, even though I thought they would work together, because I absolutely hated the powers when I played them myself, after having read about how fun and great they were for others. I suggest going there before bothering with starting anything up, just to possibly save yourself some anguish later on.
-
1
-
-
On 10/8/2021 at 1:41 AM, rockroom said:
only real downside to shield is learning to use a teleport skill. (gives me motion sickness.) but still love it
Mine's bound to my Z key for a quick and easy ring finger tap. It's so quick you could literally just blink and probably avoid the motion sickness effect if you wanted (being a little bit facetious here, but with it mapped and within easy reach for quick acclimation, closing your eyes for a second or two is no big deal)
/bind z powexec_location target "Shield Charge"
I do this with all my ground target powers (Rain of Fire, Blizzard, Savage Leap, etc.). Just make sure to put the power of choice in quotes. Trying to target the ground during a fight is just a giant PITA, so I avoid it as much as possible 🤣
-
1
-
Geothermal Power - Energy/Stone/Mu Stalker
in Stalker
Posted
Doh.. I didn't even think to test the recharge portion. Good call, and thanks. I think this one's a winner for me! 🙂