

KaoticKarl
-
Posts
47 -
Joined
-
Last visited
Content Type
Profiles
Forums
Events
Store
Articles
Patch Notes
Posts posted by KaoticKarl
-
-
Simple to drive, good to solo and team, strong ST & AoE damage without any real endurance issues, plus cheap to kit out with IOs early on?
I'd say Willpower/Claws - covers just about everything the OP is asking for. It can get overwhelmed in higher content like +4/x8 without sets and incarnates, but for a newer leveling player?
Easy mode. (Just make sure to slot a KB 2 KD in Shockwave, relatively cheap IO)
-
 1
1
-
-
Willpower?
in Tanker
I actually had an idea for a WP/Ice Tanker, which I've found to be fun and pretty survivable. Tested it on Brainstorm against +4/x8 radios in PI, and it seemed really good against Arachnos, Carnies, and Tsoo. The only times I had an issue was when the debuffs started to roll in, but that's what I have Ageless for to counter. Frozen aura works like footstomp, Frost is great for extra AoE, and I basically used the four attacks from Ice as both single and multi-target chains, which flowed smoothly without gaps. In the process of leveling it now, but will let you all know how it fares in harder content:
Build - Incarnates not toggled on
SpoilerThis Hero build was built using Mids Reborn 3.0.6.0
https://github.com/LoadedCamel/MidsRebornClick this DataLink to open the build!
WP-Ice Tanker Pyre: Level 50 Science Tanker
Primary Power Set: Willpower
Secondary Power Set: Ice Melee
Power Pool: Leaping
Power Pool: Fighting
Power Pool: Speed
Power Pool: Leadership
Ancillary Pool: Pyre MasteryHero Profile:
Level 1: Mind Over Body- (A) Unbreakable Guard - Resistance
- (3) Unbreakable Guard - Resistance/Endurance
- (3) Unbreakable Guard - Resistance/Endurance/RechargeTime
- (5) Unbreakable Guard - RechargeTime/Resistance
Level 1: Frozen Fists
- (A) Superior Blistering Cold - Damage/Endurance/Accuracy/RechargeTime
- (5) Superior Blistering Cold - Accuracy/Damage
- (7) Superior Blistering Cold - Damage/Endurance
- (7) Superior Blistering Cold - Accuracy/Damage/Endurance
- (9) Superior Blistering Cold - Accuracy/Damage/Recharge
- (9) Superior Blistering Cold - Recharge/Chance for Hold
Level 2: High Pain Tolerance
- (A) Gladiator's Armor - TP Protection +3% Def (All)
- (15) Steadfast Protection - Resistance/+Def 3%
- (15) Unbreakable Guard - +Max HP
- (17) Unbreakable Guard - Resistance
Level 4: Frost
- (A) Ragnarok - Accuracy/Damage/Recharge
- (17) Ragnarok - Accuracy/Recharge
- (19) Ragnarok - Damage/Endurance
- (19) Ragnarok - Damage/Recharge
- (21) Ragnarok - Chance for Knockdown
Level 6: Indomitable Will
- (A) Luck of the Gambler - Defense/Increased Global Recharge Speed
Level 8: Rise to the Challenge
- (A) Preventive Medicine - Heal
- (21) Preventive Medicine - Heal/Endurance
- (23) Preventive Medicine - Endurance/RechargeTime
- (23) Preventive Medicine - Heal/RechargeTime
- (25) Preventive Medicine - Heal/RechargeTime/Endurance
- (25) Preventive Medicine - Chance for +Absorb
Level 10: Fast Healing
- (A) Numina's Convalesence - Heal/Endurance
- (27) Numina's Convalesence - Endurance/Recharge
- (27) Numina's Convalesence - Heal/Recharge
- (29) Numina's Convalesence - Heal/Endurance/Recharge
- (29) Numina's Convalesence - Heal
- (31) Numina's Convalesence - +Regeneration/+Recovery
Level 12: Quick Recovery
- (A) Performance Shifter - Chance for +End
Level 14: Combat Jumping
- (A) Kismet - Accuracy +6%
- (31) Luck of the Gambler - Defense/Increased Global Recharge Speed
- (31) Luck of the Gambler - Defense
Level 16: Build Up
- (A) Gaussian's Synchronized Fire-Control - Chance for Build Up
- (33) Gaussian's Synchronized Fire-Control - To Hit Buff
- (33) Gaussian's Synchronized Fire-Control - To Hit Buff/Recharge
- (33) Gaussian's Synchronized Fire-Control - To Hit Buff/Recharge/Endurance
- (34) Gaussian's Synchronized Fire-Control - Recharge/Endurance
- (34) Gaussian's Synchronized Fire-Control - To Hit Buff/Endurance
Level 18: Heightened Senses
- (A) Luck of the Gambler - Defense/Increased Global Recharge Speed
- (34) Shield Wall - +Res (Teleportation), +5% Res (All)
- (36) Shield Wall - Defense
- (36) Shield Wall - Defense/Endurance
- (36) Shield Wall - Defense/Recharge
Level 20: Ice Patch
- (A) Endurance Reduction IO
Level 22: Boxing
- (A) Kinetic Combat - Accuracy/Damage
- (37) Kinetic Combat - Damage/Endurance
- (37) Kinetic Combat - Damage/Recharge
- (37) Kinetic Combat - Knockdown Bonus
Level 24: Tough
- (A) Unbreakable Guard - Resistance
- (39) Unbreakable Guard - Resistance/Endurance
- (39) Unbreakable Guard - Resistance/Endurance/RechargeTime
- (39) Unbreakable Guard - RechargeTime/Resistance
Level 26: Weave
- (A) Reactive Defenses - Scaling Resist Damage
- (40) Reactive Defenses - Defense/Endurance/RechargeTime
- (40) Reactive Defenses - Defense
- (40) Reactive Defenses - Defense/Endurance
- (42) Reactive Defenses - Endurance/RechargeTime
- (42) Reactive Defenses - Defense/RechargeTime
Level 28: Freezing Touch
- (A) Superior Gauntleted Fist - Accuracy/Damage
- (42) Superior Gauntleted Fist - Accuracy/Damage/RechargeTime
- (43) Superior Gauntleted Fist - Damage/Endurance/RechargeTime
- (43) Superior Gauntleted Fist - Accuracy/Damage/Endurance/RechargeTime
- (43) Superior Gauntleted Fist - RechargeTime/+Absorb
- (50) Superior Entomb - Recharge/Chance for +Absorb
Level 30: Hasten
- (A) Recharge Reduction IO
- (45) Recharge Reduction IO
Level 32: Maneuvers
- (A) Luck of the Gambler - Defense/Increased Global Recharge Speed
- (45) Luck of the Gambler - Defense
- (45) Luck of the Gambler - Defense/Endurance
Level 35: Char
- (A) Apocalypse - Accuracy/Damage/Recharge
- (46) Apocalypse - Chance of Damage(Negative)
Level 38: Frozen Aura
- (A) Superior Might of the Tanker - Accuracy/Damage
- (46) Superior Might of the Tanker - Accuracy/Damage/Recharge
- (46) Superior Might of the Tanker - Damage/Endurance/Recharge
- (48) Superior Might of the Tanker - Accuracy/Damage/Endurance/Recharge
- (48) Superior Might of the Tanker - Recharge/Chance for +Res(All)
- (50) Fury of the Gladiator - Chance for Res Debuff
Level 41: Melt Armor
- (A) Analyze Weakness - Accuracy/Recharge
- (48) Analyze Weakness - Accuracy/Endurance/Recharge
- (50) Achilles' Heel - Chance for Res Debuff
Level 44: Tactics
- (A) Endurance Reduction IO
Level 47: Super Speed
- (A) Winter's Gift - Slow Resistance (20%)
Level 49: Vengeance
- (A) Luck of the Gambler - Defense/Increased Global Recharge Speed
Level 1: Gauntlet
Level 1: Brawl- (A) Kinetic Combat - Accuracy/Damage
- (11) Kinetic Combat - Damage/Endurance
- (11) Kinetic Combat - Damage/Recharge
- (13) Kinetic Combat - Knockdown Bonus
Level 1: Sprint- (A) Celerity - +Stealth
Level 2: Rest- (A) Healing IO
Level 1: Swift- (A) Run Speed IO
Level 1: Hurdle- (A) Jumping IO
Level 1: Health- (A) Panacea - +Hit Points/Endurance
- (13) Miracle - +Recovery
Level 1: Stamina- (A) Performance Shifter - Chance for +End
Level 47: Speed Phase
Level 50: Musculature Radial Paragon
Level 50: Void Radial Final Judgement
Level 50: Degenerative Core Flawless Interface
Level 50: Banished Pantheon Radial Superior Ally
Level 50: Ageless Radial Epiphany
Level 50: Melee Core Embodiment
Level 50: Freedom Phalanx Reserve
Level 50: Portal Jockey
Level 50: Task Force Commander
Level 50: The Atlas Medallion
------------DataChunk
Spoiler| Copy & Paste this data into Mids Reborn : Hero Designer to view the build | |-------------------------------------------------------------------| |MxDz;1487;712;1424;HEX;| |78DA4D93C94F535114C6EF6B1FD69622435B06195B66680B755CB21021222465505| |68654B84263539A9644599A18879D63F40F70DCF807B833C6BD716150B70E0C32A8| |187561EAE17D9FF49194DFBDDF3DE79E73DE3977E462BFF7D9E0A53E65788FA512B| |9DCD444227D5E675DE3D3499D9ED64AFE2A26E39113D3BA09274DF1C5AC76895C8D| |FD54BF3EA7D3391D9D4CA65299F90B3A5BC983119DD23A2A9E58296F7C7E3E151DD| |6894C323D5B626D0692B3730BB2F358BBF18CD633A5FFAD6674363797CC941FCF24| |A7A33B41A74612B9059D5DAC96E05DF2FBE4967FC64E8679A7DA762A153395E327F| |91B347F81FB3DBBB645EA8E89B31BE09E9BE42D70EF6DF22EF851E2188C631CC07D| |FBAA44A817FEC1BE8CF1EB248E13B6A6F3904334B72A3B0C561C210F82FEA30ECBE| |78BDC5F041F551430ACB365D15C56D07C916B1977FB57C0CA55720DACFE4AAE839F| |C5D7CD5ADDA306EA1F23C7C1BA09F214D8701A5C11DF62E6527C0FF9554AB74BA03| |94AFE2AABEE8600FDFCA4D45DAA10B3F429FC9A1E900FC94760F031F9045C9598E5| |FC66E5AC3F7812B5340F39AD7DF3003908364A3C1FE2295F50599A217906D8A7405| |C103255CB2839464E804EB1ADA26D157BD7C6D969E3ECB471764CB1ADE1F7ACF901| |ADFD3BB9416E829D5BE437B049F2ACA56FED65CC53E715B0EB2A798DBC0EC65E812| |1895B0F5FA3BE1B3586C972396B644F1AD98B307B112E0397248510FD4351CC5C24| |866F1E92BC5A9957EB5BE41A5922DF813DEFC90F60AC0FDCF62AD5816FEFE8788DF| |B7ADE80B117429FA97C925F37E7A89BFD69162DCA9E456B39D3A2F552EB651D9DE6| |EE5BCDD799B637CE9E7AD8530F7BEA654F870BB6F200904FDCA4249AD1A22C6DDD6| |3B38B40DBB06B1DD0360B9AA182C8D73B2442BBA9B6ECF67C272FBB76EBCB0FCB70| |C6B80EFB65CD7A06AA0AFA5A4B41BF6FB37F1EDA595B6F3F1FF7146CCED8D609DBF| |AAC6DFD0FB4ACDD2D| |-------------------------------------------------------------------|
-
1
-
I had to do a double take on this thread, as I thought it was a joke at first 😆
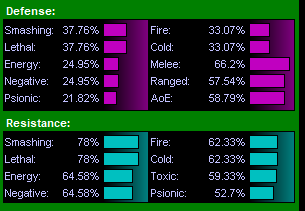
This is my Shield/Energy Tanker with one enemy in range, solo, no incarnates running, single stack of Tanker ATO:

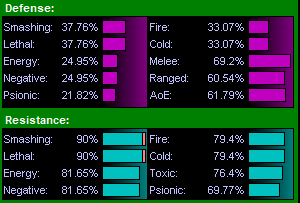
Add in one party member in range and incarnates running, you get this:
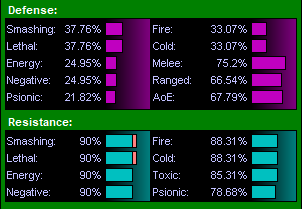
And for the pièce de résistance, fully saturated with 3 other players in range. Adding in double stack of Tanker ATO (+6.7%), and my lowest is Psi at 85.38% resists with all others above cap:
Tell me again how resistances will be low on a shield tanker? Sure, my damage isn't that of a scrapper, but it never would be, and that's ok with me. I can solo pretty much any TF I want, provided I expect the final boss to take a bit of extra time. Although since I went energy, it's not as bad as you might think, but still.. pretty much unkillable to anything, as my regen offsets both hits and self-damage from ET in a blink. Funny thing is, I didn't even like Shield at first and never gave it a real try, but soon grew to love it. Shoutout to @Infinitum for his help on my build - gave great examples and general advice!
-
 1
1
-
 5
5
-
-
18 hours ago, Werner said:
Maybe still doable, just slower, but I'm not sure and I don't know if I care to find out.
Don't blame you here. I soloed the ITF once with my tanker no amps, and took me long enough that I won't bother doing that again on any toon, especially if the clutter mobs are now buffed even more. It was fun to a degree, until I hit the Rommie fight and the slog started. Never once in danger, but so slow I was almost bored to death instead, lol.
-
10 minutes ago, Triumphant said:
What's Werner Rules? 🤔 Google hath failed to enlighten me. 🤷♂️
It's about midway down the page:
MoITF +4x8 no temps no insps no base buffs no Lore no deaths enemies buffed player debuffed = Werner's Rules
-
1
-
-
I like it with Bio. Mine is only in the mid-30s, so not sure how it would fare end game, but so far been really the most fun I've had on a brute. Non-step blender thanks to the endurance supply of Bio, decent resists and defense, and attacks feel strong and quick. This is while leveling on DOs only too.
-
6 hours ago, DocRadio said:
Because Opportunity effing sucks. It's a confusing mechanic that doesn't seem to make a difference.
I'd change it to similar to Brute Fury in a sense in function, making us build a % bar that would start as base the damage numbers we have now with higher bar = higher damage numbers. Would make them on par with other ATs, in terms of damage overall, with just slightly less targets affected. A bump up from what it is now a little, say 2 or 3 more targets added to cap would be nice, but only if it doesn't add more recharge time to the powers to compensate - otherwise, leave it alone, I like being faster and having a nuke up for every mob spawn.
Now to slightly differ from the Fury mechanic, they can give us a toggle to go from offensive stance to defensive stance, where the extra percent damage we would be normally adding to our attacks now instead heals us similar to the numbers we see currently with defensive opportunity running. Removes the clunky build to proc system in place, and replaces it with an on-demand decision to make of 'burn or survive.' I'm sure the numbers could be tweaked to keep balance, but I'd love to see this implemented for the AT to make it more interesting and fun.
Just my two inf to add in. On topic, Sents are fun because they are tankmages who sit there pew-pewing without having to stop drinking their beer when mobs close in. The other guys call it jousting - I call it interruption of imbibing!
-
2
-
2
-
-
On 7/25/2021 at 11:38 AM, Bill Z Bubba said:
I got around this by going black nrg pompoms and the dark shield.
Mine is dark purple pom-poms with the Nictus shield. I never notice clipping, and it looks pretty sharp overall with the matched-coloring armor I use.
-
1 hour ago, Snarky said:
I have tried it a few times. Ice/Time Ice/Ice baby! I may try it again. I had real good luck with Elec/Time. I may tray Ice/Energy for the range and effect boost. My biggest issue with Ice (besides it not being my true love Dark) is that it is location AoE. I never figure out / coded a hot button to turn it into targeted AoE either. Sigh. I think this will be my next project though. I briefly tried Beam/Energy last night ( PL'd to 20 and looked. It is CONSTANT redraw....every time I use any of the 4 boosts from Energy the rifle disaapears and the poor little blaster looks like he is being electroshocked)
It's been a while since I set mine up, so don't hold me to this as certain, but I think it's:
/bind (whatever key you want here) powexeclocation target "(power name as shown)"
So to bind blizzard to C for example, it would be:
/bind C powexeclocation target "blizzard" --- and for powers with multiple word names make sure to use spaces exactly as displayed i.e., "rain of fire"
-
1
-
-
1 minute ago, StriderIV said:
One bonus for /Temp is the fact that it provides -regen for fighting AV's/GM's. Do /elec or /Eng provide anything like that? Or does their damage just blow right past an AV's regen rate?
We're talking a combined -75% requiring two powers in Time Wall and Time Stop that lasts maybe 12 seconds tops? Oops, almost forgot EoT that has -50% for 20 seconds. So... -125% total combined with an uptime of around 20 seconds max. Not exactly earth-shattering to me, and a P2W dagger can do the same or better IIRC.
Electricity doesn't have -regen, instead having -Recovery and -end instead in almost every power. Not going to be flooring an AV's (or even minions really) blue bar with those. The more important thing to me was the ability to KD in Havoc and TS, and if wanted, slotting KB2KD in FoT for the third. It also comes with a nice End steal in powersink that allows six-slot for Preemptive Op for max End, slight recharge bonus, and solid ranged defense. Again, not a make or break power, but it is nice to have.
For Energy, I'll let Cap answer since I'm not all that familiar with the set. 🙂
-
1
-
-
40 minutes ago, CaptTastic said:
NRG is just an, in my opinion, unrivalled box of tricks from a self-buffing point of view.
Energize is the best sustain power for me. Boosts Regen a lot, gives a self heal, and huge end redux. You have the usual damage buff, and boost range too.
So you combine that with the incredible damage of fire, and it’s just a Rolls Royce of a build. Great in teams and eats through everything, including AVs, solo.
Energy does have a neat set of boost powers. I'm just forgetful as all get out (and admittedly lazy enough to a point to not remember, lol), so the click component of Energize really threw me off too much. If you're anything not like me though, it's a powerhouse I'm sure.
I just prefer the toggle on and forget of Electricity regen/recovery more for my old, addled brain 😆
-
 1
1
-
-
Just curious, but are you sold on Temporal? I started off my blaster/blapper with Fire/Temporal and made it to mid-20s before I realized I hated the DoT component on the melee and nothing else in the set really appealed to me. So I switched up to Fire/Atomic, thinking that would be better and it was to an extent, but it still didn't click for me, overall.
It wasn't until I tried Fire/Electric that I settled on my blaster to level and IO. It's missing the recharge component of either of the first two, but it has something the other two don't in three powers with KD, which is really helpful with Fire's total lack of mitigation (other than blow those guys up first! mitigation, of course). I'd suggest going to the test server and mocking up Temp and Elec (and whatever else you'd like to try out) on simple 50 IOs, and see which one suits you best. You may be surprised with the results. If you do decide to go Electricity, @Nemu has a build floating around here that's a good one to follow. If not, I'm sure someone can help with Fire/Temporal as well.
-
1
-
-
I'm thinking of trying out a WP/Stone Melee tanker. Don't really have a build for it yet, but I think it would probably synergize very well with all the knockdowns to alleviate the lower defenses and WP could supply the fuel well enough.
-
1
-
-
Not only because we were all able to return thanks to the HC dev team, but in hopes of how the real world should be one day:
Unified
-
17 minutes ago, Linea said:
EnM would have been either an @Infinitum build or @Hyperstrike Build. They both contributed builds and ideas. I personally don't do EnM.
- I would suggest Inv/ with RadM or DM. The more Psionic resilient builds of Infinitum and Hyperstrike will make the better overall builds. DM is less fiddly than RadM, adds to-hit buffs and endurance management, but at the cost of lower AoE and lower Self-Healing.
- SD has better peak performance and better psionic performance, but requires more player resources, and possibly temp powers and extras. I plan on making a Psionic variant of SD, but I also don't mind the extra expense in both temps and player resources. I'm ok with burning 10m/hr on temps, you might not want to be. Therefore, I primarily recommend Inv/.
- SR can peak even higher, but it's impractically expensive in player resources, temps, and so on. Unless you are the twitch king, you are going to blink and die, frequently. In my testing I died at least 10 times in less than 5 minutes each before I finally managed the 30+m run in 801.A. It was very frustrating. Furthermore, the Rune changes will impact the SR the most, making it even more likely to blink and die. The SD is performing well enough, with a lower peak, but also much less frustration.
Gotcha. Then I have to thank both of you then, @Infinitum for creating the build and you for posting it on March 18 above. 🙂
Yeah, I'm still just getting my legs under me, so 10MM inf/hour is too pricy right now for me. Sounds like I'd be happy with Inv/RadM, but I'll give both a whirl on the test server to see which melee set suits me more. Good to know about SR though.. sudden face-planting isn't really something I want to go through, so it helps immensely to have your experience relayed. Thanks again!
-
1
-
On 3/18/2021 at 2:48 PM, CaptTastic said:
I just wish they’d give Sentinels a bit of a buff. Completely understand the initial caution, but think we know enough now to know they need a little extra something.
I love mine and probably consider Sentinels my AT, but they shouldn’t have to be so reliant on procs and so limited in terms of AoE. They shouldn’t be Blaster level damage, obviously, but right now it’s a massively unfair trade off.
Sentinels have to give up damage, range, AoE cap, and build-up for... *checks notes*... a little bit more survivability.
That’s a bad deal and they should be given some help.
I have and play both ATs, and I think Sents could be set to blaster damage modifiers, lose the range limitation, and add +2 to cap for AoE and still be ok. Since they have a quicker recharge on T9, it should be less affected mobs, so that one power can stay as is. Blasters still have an entire secondary set they can use to add to their damage as well, which Sents couldn't come close to in overall numbers. For a kind of trade-off, bake in Mez/Stun/Hold/KB protect into the blaster level 20 toggle. I doubt many leveling blasters would argue too much with that, and to me this is win-win territory.
If that's too much for Sents, I like my earlier idea of turning opportunity into a kind of Fury mechanic, so they can ramp up damage the faster they go and maintain. With the armors as secondary, they can also survive easier mob to mob, and it would make them a fast-paced fun ranged AT for folks who don't want to actually blap.
-
I'd like to give a big thank you to @Linea for the SD/EM build above. I couldn't find a single build for this post-EM changes that fit what I was looking for until this one, so I very much appreciate it! Still saving up for the winter sets right now, as it'll be my first IO'ed 50 on Live, but running missions solo on test with it and it is 110% rock solid no matter what common mobs I face +4x8 (carnies, malta, etc.). I did do a few minor tweaks to fit my style a little more, and found zero endurance or health problems with the build at all afterwards.
Probably doesn't kill as fast as others would, but that's ok to me, as I prize survivability well over dps, and haven't found it to be any sort of slog to solo with on those settings for missions. I do wish I could somehow get an extra 2% to ranged to hit hard cap solo with it, and a way to fit in Bone Smasher, but oh well. I'm not going to sweat it too much or enough to change things up majorly for those, since I'll be grouping for any incarnate stuff anyways. C'est la vie, non?
SpoilerThis Hero build was built using Mids Reborn 3.0.4.7
https://github.com/Reborn-Team/MidsRebornListing:
SpoilerSDEM Endgame: Level 50 Natural Tanker
Primary Power Set: Shield Defense
Secondary Power Set: Energy Melee
Power Pool: Leadership
Power Pool: Leaping
Power Pool: Speed
Power Pool: Fighting
Ancillary Pool: Energy MasteryHero Profile:
------------
Level 1: Deflection
(A) Unbreakable Guard - Resistance
(3) Unbreakable Guard - Resistance/Endurance
(5) Unbreakable Guard - RechargeTime/Resistance
(13) Unbreakable Guard - Resistance/Endurance/RechargeTime
(17) Steadfast Protection - Resistance/+Def 3%
(19) Aegis - Psionic/Status Resistance
Level 1: Barrage
(A) Superior Blistering Cold - Accuracy/Damage
(7) Superior Blistering Cold - Damage/Endurance
(42) Superior Blistering Cold - Accuracy/Damage/Endurance
(45) Superior Blistering Cold - Accuracy/Damage/Recharge
(46) Superior Blistering Cold - Damage/Endurance/Accuracy/RechargeTime
(48) Superior Blistering Cold - Recharge/Chance for Hold
Level 2: Battle Agility
(A) Luck of the Gambler - Defense/Increased Global Recharge Speed
(3) Shield Wall - Defense
(9) Shield Wall - Defense/Endurance
(15) Shield Wall - Defense/Recharge
(19) Shield Wall - Defense/Endurance/Recharge
Level 4: True Grit
(A) Unbreakable Guard - Resistance
(7) Unbreakable Guard - Resistance/Endurance
(9) Unbreakable Guard - RechargeTime/Resistance
(11) Unbreakable Guard - Resistance/Endurance/RechargeTime
(11) Unbreakable Guard - +Max HP
(13) Impervium Armor - Psionic Resistance
Level 6: Maneuvers
(A) Shield Wall - +Res (Teleportation), +5% Res (All)
(29) Shield Wall - Defense
(29) Shield Wall - Defense/Endurance
(34) Shield Wall - Defense/Recharge
(45) Shield Wall - Defense/Endurance/Recharge
(46) Shield Wall - Endurance/Recharge
Level 8: Active Defense
(A) Recharge Reduction IO
Level 10: Against All Odds
(A) Endurance Reduction IO
Level 12: Combat Jumping
(A) Luck of the Gambler - Defense/Increased Global Recharge Speed
(37) Luck of the Gambler - Defense
Level 14: Hasten
(A) Recharge Reduction IO
(15) Recharge Reduction IO
Level 16: Whirling Hands
(A) Superior Might of the Tanker - Accuracy/Damage
(17) Superior Might of the Tanker - Damage/Recharge
(21) Superior Might of the Tanker - Accuracy/Damage/Recharge
(21) Superior Might of the Tanker - Damage/Endurance/Recharge
(43) Superior Might of the Tanker - Accuracy/Damage/Endurance/Recharge
(45) Superior Might of the Tanker - Recharge/Chance for +Res(All)
Level 18: Phalanx Fighting
(A) Reactive Defenses - Scaling Resist Damage
Level 20: Grant Cover
(A) Luck of the Gambler - Defense/Increased Global Recharge Speed
Level 22: Total Focus
(A) Mako's Bite - Accuracy/Damage
(23) Mako's Bite - Damage/Endurance
(23) Mako's Bite - Damage/Recharge
(25) Mako's Bite - Accuracy/Endurance/Recharge
(25) Mako's Bite - Accuracy/Damage/Endurance/Recharge
(34) Mako's Bite - Chance of Damage(Lethal)
Level 24: Kick
(A) Force Feedback - Chance for +Recharge
Level 26: Shield Charge
(A) Superior Avalanche - Damage/Endurance
(27) Superior Avalanche - Accuracy/Damage
(27) Superior Avalanche - Accuracy/Damage/Endurance
(31) Superior Avalanche - Accuracy/Damage/Recharge
(31) Superior Avalanche - Accuracy/Damage/Endurance/Recharge
(33) Superior Avalanche - Recharge/Chance for Knockdown
Level 28: Build Up
(A) Gaussian's Synchronized Fire-Control - To Hit Buff/Recharge
Level 30: Tough
(A) Unbreakable Guard - Resistance
(31) Unbreakable Guard - Resistance/Endurance
(33) Unbreakable Guard - RechargeTime/Resistance
(43) Unbreakable Guard - Resistance/Endurance/RechargeTime
(43) Unbreakable Guard - Endurance/RechargeTime
(50) Impervium Armor - Psionic Resistance
Level 32: Weave
(A) Shield Wall - Defense
(33) Shield Wall - Defense/Endurance
(34) Shield Wall - Defense/Recharge
(40) Shield Wall - Defense/Endurance/Recharge
Level 35: Power Crash
(A) Superior Gauntleted Fist - Accuracy/Damage
(36) Superior Gauntleted Fist - Damage/RechargeTime
(36) Superior Gauntleted Fist - Accuracy/Damage/RechargeTime
(36) Superior Gauntleted Fist - Damage/Endurance/RechargeTime
(37) Superior Gauntleted Fist - Accuracy/Damage/Endurance/RechargeTime
(37) Superior Gauntleted Fist - RechargeTime/+Absorb
Level 38: Energy Transfer
(A) Hecatomb - Damage
(39) Hecatomb - Damage/Recharge
(39) Hecatomb - Accuracy/Damage/Recharge
(39) Hecatomb - Accuracy/Recharge
(40) Hecatomb - Damage/Endurance
(40) Hecatomb - Chance of Damage(Negative)
Level 41: Focused Accuracy
(A) Gaussian's Synchronized Fire-Control - To Hit Buff/Endurance
(42) Gaussian's Synchronized Fire-Control - To Hit Buff
(47) Gaussian's Synchronized Fire-Control - To Hit Buff/Recharge
(48) Gaussian's Synchronized Fire-Control - To Hit Buff/Recharge/Endurance
(48) Gaussian's Synchronized Fire-Control - Recharge/Endurance
(49) Gaussian's Synchronized Fire-Control - Chance for Build Up
Level 44: Physical Perfection
(A) Performance Shifter - Chance for +End
Level 47: One with the Shield
(A) Gladiator's Armor - TP Protection +3% Def (All)
Level 49: Super Jump
(A) Winter's Gift - Slow Resistance (20%)
Level 1: Gauntlet
Level 1: Brawl
(A) Accuracy IO
Level 1: Sprint
(A) HamiO:Microfilament Exposure
Level 2: Rest
(A) Healing IO
Level 2: Swift
(A) Run Speed IO
Level 2: Hurdle
(A) Jumping IO
Level 2: Health
(A) Panacea - +Hit Points/Endurance
(5) Miracle - +Recovery
(42) Preventive Medicine - Chance for +Absorb
(46) Numina's Convalesence - +Regeneration/+Recovery
Level 2: Stamina
(A) Performance Shifter - Chance for +End
Level 1: Energy Focus
Level 50: Degenerative Core Flawless Interface
Level 50: Ageless Radial Epiphany
Level 50: Melee Core Embodiment
Level 50: Cardiac Core Paragon
Level 50: Ion Core Final Judgement
Level 50: Carnival Radial Superior Ally
Level 50: Freedom Phalanx Reserve
Level 50: Portal Jockey
Level 50: Task Force Commander
Level 50: The Atlas Medallion
------------Totals:
Spoiler------------
Set Bonus Totals:
12% DamageBuff(Smashing)
12% DamageBuff(Lethal)
12% DamageBuff(Fire)
12% DamageBuff(Cold)
12% DamageBuff(Energy)
12% DamageBuff(Negative)
12% DamageBuff(Toxic)
12% DamageBuff(Psionic)
21.94% Defense(Smashing)
21.94% Defense(Lethal)
17.25% Defense(Fire)
17.25% Defense(Cold)
9.12% Defense(Energy)
9.12% Defense(Negative)
6% Defense(Psionic)
30.38% Defense(Melee)
12.25% Defense(Ranged)
13.5% Defense(AoE)
3.6% Max End
7.5% Enhancement(Max EnduranceDiscount)
15% Enhancement(Accuracy)
42.5% Enhancement(RechargeTime)
7.5% SpeedFlying
GrantPower Preventive Medicine (0% chance, if Scourge)
386.5 HP (20.63%) HitPoints
7.5% JumpHeight
7.5% SpeedJumping
MezResist(Confused) 151.3%
MezResist(Held) 151.3%
MezResist(Immobilized) 151.3%
MezResist(Sleep) 151.3%
MezResist(Stunned) 151.3%
MezResist(Terrorized) 151.3%
MezResist(Teleport) 100% (20% chance)
14.5% (0.24 End/sec) Recovery
56% (4.37 HP/sec) Regeneration
50% ResEffect(SpeedFlying)
50% ResEffect(RechargeTime)
50% ResEffect(SpeedRunning)
23.75% Resistance(Smashing)
32% Resistance(Fire)
32% Resistance(Cold)
34.25% Resistance(Energy)
34.25% Resistance(Negative)
32.75% Resistance(Toxic)
49.75% Resistance(Psionic)
23.75% Resistance(Lethal)
7.5% SpeedRunning
| Copy & Paste this data into Mids Reborn : Hero Designer to view the build |
|-------------------------------------------------------------------|
|MxDz;1491;699;1398;HEX;|
|78DA5D934B4F53511485CF6D2F144A4B85524A81425B81BEA0808923070C6C79634|
|830CE0CB9DA4B5BA9A5693191A189F898F98C0E7C6022BE06FE007F88CFDF809AF8|
|1EE1B66BD1DBD8A4FDF65DE7ECB3D7D9BB77E962DAF57AE6D294D25CC78B46B5BA7|
|AD228AD9B15C70963F342C5282AF9B856D299A550A694CD19E74D870841EC594D9B|
|6B66A96AA656F205B3983D780C7075C92C9A662A53322BB92D3C28CFF2C64631B56|
|81A59B352CD17CAAE83E772A19473D61E56CAA69975D7C2E9422EBF290BDE4CB970|
|B67E9051DD342B5B3D622321DFB45B7EB47F2EF79BD477BB5293BAB2FD00F55FA0E|
|B3778C82F1B83BAEA3C2A8CEAAAC5A9F891DC1B7A6D4FF34D307E0B1CBD0D8EDD01|
|C7EF8219A9ABA1AEAEF924986C55B679D4699906DB67C0CE39705A72ECF46AA7D76|
|67A6DA15727BD3AFFD07B1C5E3BA4EF4DCC6D5AC05A3FEBF5B35E98F546596F6C16|
|9C91BA0EE42A4752D5BCCE8AD65ABBC0BE6A0D43EB961A6DD8A7B5F14E435D6044D|
|6DC5C73F38C76D2257DF4D09BE72D7BFD0EEC7A4F7E00131FE9F11338273E3AE8AD|
|E31BB479D1BCD4BC351F729ED4F07156BE3555D3BA73641EEC2990E7C0F03A6813E|
|F7E9EE7DFB6D5B405A911E07981879869EF03F21138F098DC01434FC076F1D2875C|
|D5B78BF3EC5223C81E0439DB01CE36C4D92638DBC44F7092B3D5257710B9F641CE3|
|4F4DF4CA39CA95B6A47582772197E0E6F9357C8ABE0D035F23AE891DC61DE797804|
|BE47A2648C8C83D104990477A47C8C75632FA0C59F8229F660FC19F91C9C7809BE9|
|25E27D9FFE43D688BA2A5D8C3D411DCCD2F7D98A036D1072DAED7DFEFFD7EBDFEBE|
|2AD58BD92E5AEB4A1D13C819CB3A25D1B421ECDB73D6DF57A58D41FBDCA8C5A07DB|
|134BB16B6633EF398537C8FEFD529FC27BF36E6F35EBB09CBEFB45F24C6F7BD56FC|
|2662C5530D7AA0CB8A359F152F3BADF874436C34C4671AE2BFCDB4D6BE|
|-------------------------------------------------------------------|I was thinking of starting another Supertanker, and wanted your opinion on the tougher of the two sets you've found from testing. Of the two pairs of SR/Inv and DM/RM.. which do you feel goes best together for survivability and performs well? Was thinking Inv/RM, but if another set pairing is better, I'm all ears for the perfect tank builder. 🙂
-
12 hours ago, Bill Z Bubba said:
Very high on my list of movies. Up there with Blues Brothers and Kung Fu Hustle. Edit: And Airplane. One of the greatest comedies of all time.
A hospital? What is it?
It's a big building with patients, but that's not important right now - and don't call me Shirley!
16 minutes ago, BrandX said:I always feel I'm one of the few who loves and even knows of Kung Fu Hustle. If it's ever for sale on 4k Steelbook, I'm upgrading my copy! 🙂
Definitely not alone here - KFH was an instant masterpiece classic, chock full of over the top MA tropes and terrific physical comedy gags. The actors' faces all sold it very well, especially the protagonist. Very Buster Keaton-ish (for all you young kids... Jackie Chan modeled his acting style after Keaton. Wait.. I don't have to explain Jackie Chan too, do I?? 🤣).
-
Guess I'm just simple in my wants compared to a lot of folks here, but I think it'd be asking too much of a volunteer team of devs to do some of these suggestions. Mine are this:
1. Port the MB version from Sent SR to all ATs, and while we're at it, add in SD as well with the DDR double stack values as inherent for that set.
2. Round-file the Sent opportunity inherent completely as it stands. Make it a Fury mechanic instead where the more you blast the mobs, they more damage and scaling -RES generated, up to 20% for the latter. Would love to see a Brute Blaster version for them.
3. Offer No Redraw options to all sets if possible (and fix it so crab backpacks can be skipped/removed - it's the sole reason I have a Rifle Huntsman, hate the looks of the Pack and Mace redraw sucks).
I don't think that's too unreasonable an ask for these powers/ATs, and I'm sure other folks will disagree with some or all of this, but it's what I'd like to see in the game to make it better for some of my guys. If I had to choose only one of the above though, I'd say the SR port to all ATs/SD port is the top choice for me, since that's a number of ATs that would benefit from this QOL improvement.
-
1
-
-
On 2/27/2021 at 11:46 AM, oldskool said:
Master Brawler isn't a toggle. Master Brawler shifts all of the mez protection that you would have gotten out of Practiced Brawler into the toggles you'd use anyway. Then, as a completely separate effect, Master Brawler has a hit point absorb barrier that it creates as a click effect.
So if you use Elude and your toggles drop, you don't even have to click Master Brawler. You just turn your toggles back on as you would have done anyway.Plus you get a nice little absorb shield to hopefully not die that can be clicked while they toggle them back on (not really sure, since I never take elude.. like.. ever). Really, really, really wish MB would get ported to all SR sets - my tanker, stalker, scrapper, etc. would greatly benefit from this QoL benefit.
I'd say Shield too should get the treatment if they can up the DDR on the set, so that double stacking from the click isn't necessary. Not SR levels, but at least the same as Invulnerability or maybe a tad bit higher since the set lacks a heal like SR. Maybe around halfway between that and SR levels would work, since I think that's around 66% right now after the double-click? Plus, an extra absorb would be great too for both SD and SR - my tankers would love it.
-
1
-
-
First time making an end-game build, but I wanted to see if this one had any merit. I'm also leveling an Ice/SR Sent along with my Fire/Bio and Elec/Bio (which are both great), as I wanted to see what I could do with the powersets. I'm open to suggestions on how to improve, including skipping some powers, but I liked the idea of a good single target chain as @oldskool showed above, plus two decently powerful AOEs to work with.
I was going for:
soft cap def or higher
Decent amount of resists to work alongside scaling
Recharge for perma-hasten
Recharge resists (it sucks to get slowed)
highest possible DDR
Decent damage for the powers (took PM as that seems to be the best of the epic pools)
This will be mostly a solo toon, but I also hope to be able to bring my share of damage when teaming as well. Let me know how I can improve, guys, thanks!
Spoiler| Copy & Paste this data into Mids' Reborn : Hero Designer to view the build | |-------------------------------------------------------------------| |MxDz;1494;705;1410;HEX;| |78DA6594C94F535114C6EF6B1F42CB2C6341E6A12D950E0E3BA3890206848450E2C| |6A156B8949ADA36141358FA2F600C4E5B176E5C39FE0F8E3B077048742983A8D138| |D4C3FB3EA0495FD2FC7ABFFB9D7BCE3DEFDE3732D75772F7F8E523CA283B9688663| |291B04ECEC6933AE11CD713D3C95422159B57F2940D4EE84078ACB53F39198B5ED4| |8522B9B6AC91B16832A627FD62891C9545665BB667FAF4944E66B43F7C29AD67226| |37A2AA1E77446958CA65209FFB08EA6E3C958A9351888C7A62526E6B446E1B4D693| |E55BAE493D93998EA75DFDE9F8847F7BEDD14C3C3222D9F4CC7CBD94D32DBF9F6EC| |527AB94D7AE54C854A73C32342CCDAE6A0C4B332BC05DD56415785ABC06BD06BD45| |F416D1EBA4F78C78EDF01A767A9DF4FC963A0A504741C1A2C06DAA926BA0FB3A790| |3F4DE246F81B5D2DB42ACAB0AB9EE59C9E5602EC761F9D324EB1D02FF48AE62E432| |8AEFD82CBFF736F857E64A5947E93DD3D2CAEE930FC0D687E423F23118959CE5C85| |950FE035AC51AB90E366C90DFC0E6EFE03FC95BC9BC95AFA0ED7E4DBE01ABDF924B| |60ED32784EF25671AF55DC7F2DFB6A486F6AB0AEADE62AFCA105F20A68174F1DDF6| |15D1D7A54BF0F67A1FE20C6815F1867A54E17EB743D417CE753B0FB19F99C7C01BA| |5F82A6E469647F1A57B0DE9E55F22BD8BC0606D6C1D006D82EB14DDC63934FC14B2| |AD97F0B6B6A5982BF6D997C47BE073B3F901FC109896DE7DEDB4F40EB182207C841| |F0BC78BB78CEBA7A91FB93D74A6FE5F674E30CF5B8490FE905F7F6903EF0B3C4FA1| |06BFA7A39E7077B0364900C8195D2073FFBE0670F03EC6187CC057997838DECAB99| |73BF1B50F305EFE6FDDEBC6DD96C4FEE7C561E15CC534279CAFE3CE5409E329CAB3| |850FDA8C90F8B6806DF9EA342BE0AD0B2E332EFE0BCC35AE58B73FBFBA20CF67C75| |47B3194386F50DB0B561BFB69338F72BB9711EC4ADED6886B1888ACC05F03F51CCE| |B32| |-------------------------------------------------------------------|
Sorry for my posts and asking questions Ill stop
in Tanker
Posted
You know I tried that, and that stupid Panda just whipped my butt, stole the bamboo and my lunch money, and finished it all off with a nice flipped bird to the face...
I guess I'm just irredeemable. 😢