The Beta Account Center is temporarily unavailable
×


Maelwys
-
Posts
2010 -
Joined
-
Last visited
-
Days Won
23
Content Type
Profiles
Forums
Events
Store
Articles
Patch Notes
Everything posted by Maelwys
-
To be fair; it was touched on rather a lot in the "How do you folks build?" thread just last week. Personally I think it's still worthwhile when levelling to use level 25-30 Common IOs as placeholders until I can replace those with whatever enhancement will end up in that slot for the final build. That typically saves a bit of cash compared to using SOs every few levels and keeps the boosts constant (frankenslotting cheap Set IOs can certainly save even more if you buy the recipe and craft it yourself - but if you've inf to burn or exemplar a lot, then by all means buy precrafted attuned...) Inf generation is pretty easy these days even if you don't participate in market PVP; but there are plenty of folk out there sitting on 100mil or less. (which can honestly change your outlook on building - I must have spent 300m yesterday just restocking my base's salvage storage with boosters after my most recent toon dinged 50...)
-
It'll depend on your other buffs (Tactics, global Accuracy bonuses etc). Minimum slotting (for me) is probably One +5 Level 50 Acc IO plus One +5 Level 50 Rech IO. Two Rech and Two Acc (or 2x Provocation DSyncs if you've more inf than sense) if you want to max it out. However honestly as long as it ends up reaching 95%+ hitrate versus +3 enemies you're good for most PVE content. 4 star Hardmode content adds 30% Defence to all, and some of the enemies there are level-shifted... so if you really wanted to max it out then you'd be shooting for "125%+ accuracy versus +4 enemies" (personally I don't bother doing that for anything other than Fulcrum and Transfusion)
-
There are a few. This video gives a visual overview of the entire thing and this guide on the Homecoming forums is a decent text-based summary. The Wiki entry has the nuts and bolts. Once you've read over those, honestly I'd probably recommend starting to play around in Mids Reborn - there are plenty of example builds dotted around the various archetype subforums here as well as on discord. In my experience the learning curve goes something like: Using SOs --> Using Common IOs (at level ~25 and upwards they become direct replacements for SOs that you never outlevel) --> Using "Frankenslotted" Set IOs (a single IO can cover multiple aspects much like HOs; and slotting two "Acc/Dam" set IOs gives more benefit than one "Acc" plus one "Dam" IO at the same level) --> Using "Global" IOs (some IOs provide very useful standalone bonuses like recovery, defence or recharge) --> Using Set IOs for their set bonuses (pick a straightforward goal to start with here such as "softcapped melee defence" or "Perma Hasten" etc and build towards it) --> Using Damage Procs (understanding PPM mechanics and tweaking your build to have the optimal activation chances is a stretch goal here) --> Optimising further (Factoring in Exemplaring and Incarnate Slot Boosts and Hami/DSync enhancements, etc.)
-
Toggle Binds are a bit involved and I doubt you'll spot it on the Wiki - The Incomplete and Unofficial Guide to Bind is a great resource but doesn't really cover it either beyond a few very brief example mouse movement remapping binds. It's mentioned in places like this and this though (the first link assumes you need to use a sacrificial command at the start. Currently on Homecoming a simple "+$$" works) Whenever I was checking the binds I posted earlier... the first keypress always dropped out of Nova form and activated Essence Boost. Then as long as I waited for long enough before pressing the key a second time it successfully shifted back into Nova form. Sometimes Nova form wasn't recharged in time and in that case it would queue it up (Nova form became highlighted in red until it was fully recharged; then it activated). If I "double clicked" the key too quickly then sometimes it would skip the Essence Boost activation and/or the Nova form retoggle; which I assume is due to the game only being able to process a single power activation every Arcanatime tick (0.132 seconds). But I needed to really hammer the key for that to happen.
-
Unfortunately this always just continually attempts to activate Essence Boost, even whenever it's already on cooldown. You might be able to kludge your way past it via setting Essence Boost to Auto via "powexecauto"; but I get a wicked case of the heebie-jeebies whenever macros start mucking around with my precious big green circle...
-
I suspect the problem here is that you're trying to perform three things with one key/macro. (i) Detoggling Nova Form (ii) Activating Essence Boost (which isn't usable unless you're already dropped out of Nova Form) (iii) Retoggling Nova Form (this might also require a very brief wait since you've only just detoggled it) It's possible to perform up to TWO things with a single keybind (one event triggers on holding the key down, the next on releasing the key) but not three. You could link all three commands to a single bind and repeatedly hammer it, but then (as you've already noted!) the timings might get tricky in the heat of battle. I suspect that the cleanest way to do this may be to use something like the below rotating Keybinds: KEYNAME "powexec_toggle_off Bright_Nova$$bindloadfile c:\temp\cohbind2.txt" KEYNAME "+$$powexec_name essence boost$$bindloadfile c:\temp\cohbind3.txt" KEYNAME "powexec_toggle_on Bright_Nova$$bindloadfile c:\temp\cohbind1.txt" [In this case you tap the chosen key twice: The first time whenever you depress the button it detoggles Nova Form, then when you release the button it triggers Essence Boost. The second time you tap the button it retoggles Nova Form. I did a brief test on Brainstorm and seems to work fine as long as you don't utterly machine-gun the button...] If you're using Macros rather than Keybinds then you'll likely need to tap the key three times (since macros don't differentiate between trigger key states, so you can't use "+$$" at the start of a macro to trigger a command twice with one activation!)
-
Happy Friday Diantane. Sentinel Epic Pools don't give "armor" because Sentinel Secondary Pools already give "armor". Just like Brutes, Scrappers, Stalkers and Tanks. As for "really cool powers"... do you perhaps mean things like Debuffs? Buffs? Pets? Heals? Debuff Resistance? Mez? Damage Auras? 'cause they already get all of that. And the only archetype that gets access to a pet (for example) at a low level is a Mastermind.

-
Would probably help to specify whether this was pylon/street-sweeping, missions or a Mothership raid. A lot of casual empaths play reactively (e.g. suboptimally); but to be fair triggering the auras and then blasting is probably more useful than trying to keep Fortitude up on 6-8 random needles in a massive mothership haystack.
-
I've found the Test server to be very helpful there - it just takes a few minutes to copy a character across, then all incarnates can be crafted for free and tested fully before you decide on what one(s) you want for live. The only caveat is that you can't unlock your Hybrid slot "from scratch" on test by buying exp with the free merits. Alpha for me tends to be +Damage (Musculature Core > Musculature Radial = Intuition Radial) unless the character can reliably self-cap damage% buffs (e.g. a Kinetics or Warshade). Lore pets are very unbalanced mechanically; with all but a few options being "traps". Outside of things like controlled pylon tests, the damage-orientated pets tend to die so quickly that they're ignorable... but the buff pets have varying levels of effectiveness/uptime. Carnival or Seers can permanently buff one ally (e.g. YOU) raising their damage plus either tohit or defence by a decent amount. Clockwork can keep 2-3 allies defence bubbled permanently. Talons and Arachnos have non-permanent-but-still-very-powerful aura buffs that affect large numbers of pets/henchmen. Banished Pantheon actually deal damage to foes whilst remaining intangible. The rest are mostly a mix of poor-uptime buffs/debuffs or heals. Best Judgement is almost always going to be Void for the -damage debuff; or Pyro for the additional raw damage. Best Interface is almost always going to be either Degenerative or Reactive (depending on what you're fighting and other available -res debuffs) Destiny and Hybrid are where the real choices comes in IMO. + Ageless Destiny gives either major Defence Debuff Resistance or extra Recovery. + Barrier Destiny is a Survivability GodMode button. + Clarion Destiny is either permanent mez protection; or nearly-permanent mez protection plus a Power Boost effect. + Incandescence Destiny and Rebirth Destiny are more situational, but I've seen both used pretty well. + Assault Hybrid is a pure damage output increase; either damage%-buff-based or proc-based. + Melee Core Hybrid is another Survivability GodMode button - major damage resistance plus mez protection. + Support Core Hybrid (+12% to everything for pets) is almost always going to be the optimal choice for Masterminds/Crabberminds. + Control is... also an option, I guess. The Core variant can be useful for Dominators/Controllers, even if it doesn't typically quite parse as well as Assault Radial.
-
Are you sure about that? Currently Sleep Grenade's damage component just kicks in once upon casting, but the Slow component kicks in once upon casting and then lingers for 30s (giving it two additional chances for procs to activate after the 10s and 20s mark). CoDv2's database is out of date - it doesn't show the most recent Arsenal tweaks. My in-game testing showed all the procs currently perform quite decently in SG, although the two Slow Set damage Procs (Impeded Swiftness and Ice Mistral's Torment) are obviously slightly better due to the additional lingering proc activation chance. The guaranteed Dominator Firey Orb ATO spawn rate was also a pleasant surprise; even if it's only useful when you treat the power as an PBAoE.
-
Base damage isn't great, but the powers do take a heck of a lot of damage procs - Sleep Grenade in particular can take 2x Slow procs and 3x Targeted AoE procs and always (for some convoluted coding reason) triggers a Firey Orb ATO spawn; and the slow set procs have additional chances to kick in multiple times over its duration. Liquid Nitrogen seems to be mostly a trap pick for damage since it only kicks in whenever the mobs fall over; but between Procced Sleep Grenade/Cryo Freeze Ray plus the Confuse from Smoke Grenade, plus the Tri-Cannon... I've definitely noticed the Arse Control set providing a decent stream of AoE and ST damage. Still needs to mesh with a good secondary though - and I much prefer /PsiAssault to /ArseAssault despite any potential giggles over the naming convention.
-
https://homecoming.wiki/wiki/Rogue_Robots ? AFAIK It's not currently available in Ouroboros; and there's no special badge/merit reward... but it's an interesting alternative villain group so might be worth suggesting as an addition there. I remember coming across it whilst levelling up a recent toon in the 30-35 bracket; although can't remember offhand exactly which contact it came from.
-
 I'll always have a "level 50 Fully IOed + T4 Incarnates all purpled out and money-is-no-object" build that I'm aiming towards. Whenever I'm first planning a new toon's powerset combination, often I'll start off with a few variations in Mids - one build might have a different Epic Pool and another might be geared for slightly more damage at the expense of some survivability; etc... but I'll generally iron out which build I want by playing around on the Brainstorm test server until I'm happy with its performance; then after that I'll start levelling it up on a "real" server. It's rare that one of my toons actually ends up with multiple builds in-game.... off the top of my head it's currently really only my VEAT Soldier (with one "Crabbermind" build, and one "Mace-Wielding Stalker" build). Whilst I'm levelling up, I'll typically place my enhancement slots wherever they're going to end up in the final level 50 build... but until the toon gets high enough level to actually slot those final enhancements, I obviously still need to fill those slots somehow... so I start off with DOs/SOs; then move to Common Crafted IOs at level 22. And after a certain point (level 30 ish?) I may start frankenslotting some random disposable set IOs. I'll always slot attuned versions of the important procs/globals ASAP though; particularly Panacea/Miracle/Celerity, plus a KB Protection for non-melee toons. I'm not generally a fan of powerlevelling myself up - I like to get all the contacts within each level range up to at least a "phonable" level of familiarity, complete any story arcs they're offering me and grab all the passive accolades enroute to level 50. If I ever run out of contacts then I'll powerlevel myself up just enough to reach the next tier of contacts. If/when I hop on a TF whilst levelling up then EXP gain gets turned off; otherwise it's easy to earn too much EXP and overshoot contacts. Completing the story arcs as they come up typically provides me with enough merits that my toons are mostly self-financing until they hit 50; but I'll always transfer a hundred million or so to each new toon as a "starter fund" in order to let them grab all the START powers and a few sets of ATOs etc. After the toon hits 50, THEN I'll throw it into some TFs/Farming maps in order to quickly bump it to Veteran level 100; crafting the T4 Incarnates along the way. Any leftover Empyrean Merits will then get sent to a new alt; and the toon itself will probably get stabled until I fancy using it on a TF. Oh, and lastly - whilst I'm not a RPer by any stretch of the imagination... I'll always write up a bio (although it might not always be a sensible one!) and have a particular badge title in mind for each toon; and it'll not feel "complete" to me until I have that particular badge displayed underneath its character name. I love tweaking stats and theorycrafting in Mids... but oddly enough having a decent Backstory/Badge combination seems to be the main thing that gets me emotionally invested in each toon and actually entices me back to play it again after its build is "fully completed".
 -
This is a headache for me too actually. My main desktop PC doesn't even notice... but my old laptop really struggles to run Mids Reborn whereas the original version of Mids ran on it just fine. It seems that all the new graphical fluff they've added in recent versions has bloated everything down to a crawl on any kit with a lighter and/or no dedicated graphics card. The current version of Mids Reborn actually has a noticeably longer startup time and requires substantially more resources on my laptop than running the CoH client itself! Regarding the rest, as far as I'm aware the Mids database files are "standalone", which is how it lets you swap between Rebirth/Homecoming/etc. in the options menu. However updating them requires a good deal of manual curmudgeonry (it'd be lovely if both MR and CoD were able to automatically import new database changes from the game client files; but no such luck!) and for some reason minor program updates seem to keep borking the edit feature (and gaining access to the Database Edit Menu in the first place still requires typing in an incoherent string of keypresses for some reason - [Ctrl+Shift+Alt+A] IIRC...)
-
-
I certainly tend to keep the siphons around. Siphon Speed for extra +Recharge (obviously) and Siphon Power because yes, occasionally you'll find yourself in a target-poor environment. Against an AV an extra stackable -20% damage debuff/+20% damage buff can be plenty useful; so I find I get far more mileage out of Siphon Power than the likes of IR or Repel.
-
Mids is by many metrics quite an amazing program. I remember some of the development work put into the original version and the "marketing" of the program itself on the UK forums (now unfortunately lost to the mists of time) and it really was head and shoulders above the rest at that point, even prior to Inventions (and the other planners like Suckerpunch's never coped with Inventions to my knowledge). The sheer amount of work that has been put into it over the years in order to create an interface that lets you work with all the Invention types and their resultant set bonuses, boost them, factor in external buffs like Incarnates etc. etc. is staggering; and that's the main reason why attempts to produce a viable alternative have been doomed to failure. Long gone are the olden days where all players had to work with (and therefore all the builders had to worry about coding!) was SO enhancements plus the occasional Hami-O. The "Reborn" variant of Mids unfortunately suffers from the age old problem of having a team of new devs stuck with a bunch of old legacy code; and changes in CoH (particularly new Powersets and Enhancements) can take a long time to be implemented. But to be fair, they've kept it in a mostly usable state (despite the installer issues and DotNet Core v6 requirement creep) and most of the consistent inaccuracies in its database [like Robotics MM's Protector Bot Bubble +Defence value] can be manually edited and worked around. I dare say that if we didn't have MR, it'd become infeasible for most of the playerbase to properly plan and build new characters... The test server is great, but continually respeccing to test a bunch of different enhancement slot positions gets really tedious really quickly. City of Data v2 is a brilliant resource, but it often gets updated infrequently. Poor @UberGuy has to manually sync it all up, and at the time of writing the Live Data timestamp is currently more than 3 months old (27th Feb 2024) so it's currently missing a few patches worth of changes. Ultimately tools like CoD and MR aren't the work of paid teams of employees; so the fact that they're still going at all is something to be celebrated.
-
Since you're already played Ramiel's mission line... I'm not spoiling anything for you by stating that in-game the player characters are supposed to be taking the "long way" to becoming an Incarnate. So rather than being bestowed the powers automatically by the well, instead they have to work for it. That's probably as close lorewise as you're going to get to a reason for why there is so little handholding in-game for incarnate power crafting. As to how you actually craft Incarnate stuff and progress? Well, others have already pointed out the wiki and this guide on the forums; but I'll add my 2p below: Just "continuing to play" once a character hits level 50 will get you Incarnate Experience Points as well as plenty of "Incarnate Shard" and "Incarnate Thread" salvage. Shards and Threads can both be used to purchase various sorts of useful Incarnate Components within the incarnate crafting interface (accessible via your character's Powers Tab). This salvage is in turn converted into the different Incarnate Abilities themselves. This conversion/upgrading process is a bit like Invention Enhancement Crafting. First gather the ingredients (shards/threads/components/etc) then use those to craft something you want, such as a better ingredient (higher-tier incarnate components; and lower-tier Incarnate Abilities) then ultimately an "Enhancement" itself (amaximum-tier Incarnate Ability). After you have some Incarnate Abilities fully crafted, you can select one of them to place into each of your available empty Incarnate Slots; which activates them. Some Incarnate Abilities are passive, others are toggles, and others are clicks. They'll all appear in your available powers list so try dragging them out onto your power tray. Higher tier Incarnate Abilities are generally "better"; and some of them grant very useful additional bonus effects like a "+1 level shift" in regular and/or incarnate content. On Homecoming, after you hit level 50 you get granted Incarnate Threads and Empyrean Merits just for "continuing to level up" - see Veteran levels. You can also gain additional Empyrean Merits and higher-tier Incarnate Components for completing certain content arcs. Empyrean Merits (along with some other merit types) can be used in place of threads/shards/etc within your incarnate crafting interface. They are an extremely efficient means at crafting "Rare" and "Very Rare" Incarnate components (which normally require a ridiculous amount of threads/shards/influence to craft); so typical advice is to use threads/shards to craft "Common" and "Uncommon" Incarnate components; and save your Empyrean Merits for crafting "Rare" and "Very Rare" Incarnate components. Any spare Empyrean Merits you end up with can be emailed to other characters on your same account in order to give them a head start - and you can also convert 50 Empyrean Merits to/from 1 Transcendent Merit at the merit vendors in order to make this process faster (because only one merit can be sent per email!). Also, in case you missed it; Alpha Slot Abilities are likely the only thing that you'll realistically be using Incarnate Shards on. There are two sets of recipes used for creating each of the Alpha Slot abilities - one set requires components that are crafted using Shards, the other requires components that are crafted using Threads. The other types of Incarnate Slot Abilities - Destiny, Lore, Judgement, Interface, Hybrid - all just use components that are crafted using Threads. So after you've completed all the T4 Alpha Slot Abilities you want then you'll likely just convert any leftover/future Shards into Threads. After you've completed all of your T4 Incarnate Abilities... Threads can still be useful to purchase Super Inspirations at Luna's store in Ouroboros. For anyone who really doesn't want to engage with the Incarnate System; Luna's store is a useful means of converting all those pesky Incarnate Threads into sellable stuff...
-
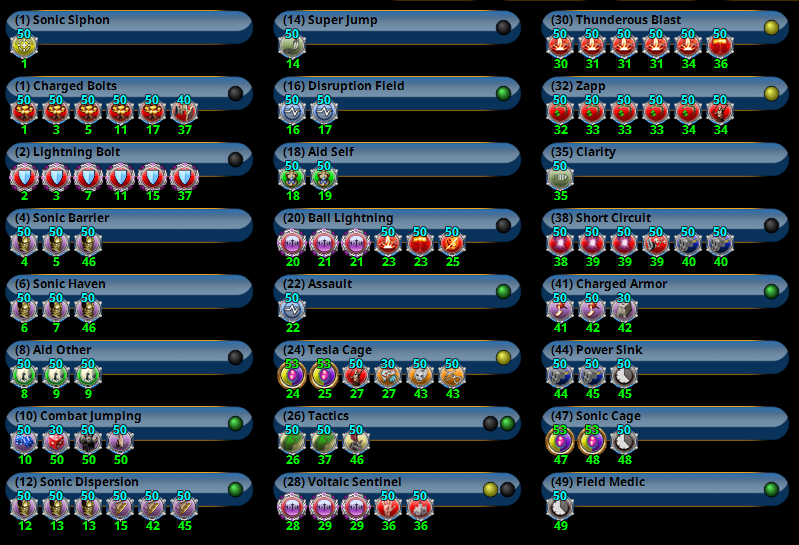
I mained a Sonic/Elec Defender on Live. I still have a copy of their original circa-issue-9 build actually. Red Noise - IOs.mxd "Charge Up" was "Aim" back then, and the missing powers/slots are: Level 8: Hurdle (2x level 50 Jump IOs) Level 18: Health (Numina and Miracle Uniques) Level 20: Stamina (Performance Shifter Endmod, Endmod/Rech and "Chance for Endurance" Proc; plus a regular level 50 EndMod IO) Note the three ST attacks; the two low-level blasts (which had ED-capped Damage) plus Dominate (which had ED-capped Damage and Hold). Voltaic Sentinel was slotted for ED-Capped Damage and a bit of Endurance Modification. Short Circuit had ED-Capped Endurance Modification and Recharge. This was by far my least damaging Defender (in terms of raw damage output) but it still had a passable ST attack chain that didn't compromise on ED Damage Slotting. It could also buff allies res by ~55%; heal them, grant them all permanent mez protection, inflict 60% Damage Resistance debuff on the enemy, drain an entire enemy mob (with two applications of Short Circuit); keep a AV perma-caged and floor the ToHit chance of a group in an emergency via Liquefy. - - - - - In Issue 19 (when inherent Fitness got added) he went through a few changes, even finding room for Thunderous Blast. - - - - - These days on Homecoming I've played around with the idea of making them again several times. The below effort takes Ball Lightning and the Snipe; and swaps Dominate out for Tesla Cage (which I had at several points on Live; but Dominate was always better performing). With Barrier available I could potentially push the allied +res buffs up to +60.1%. I'd taken Power Sink previously on and off during live to let me "two-shot" mob endurance bars together with Short Circuit... but ultimately I found it made little practical difference and the smaller radius of PS got rather annoying to juggle in practical gameplay; so it's never been a must-have for me. However... ultimately I've actually ended up rerolling him as a Corruptor instead. Short Circuit can *still* drain groups in two applications; and whilst the +res buffs are a smidge lower than before (~46.3%) the difference in damage output is night and day and it really doesn't affect its other forms of mitigation like holds, -tohit debuffs and healing. I also dropped Cage since the HOs no longer increase the magnitude, making it useless vs AVs now (rassin' frassin' stealth nerfs...) 🤣 Anyways, my point (if there is one other than all that reminiscing!) is that it's perfectly possible to build a toon that is fully effective at its major "powerset roles" (e.g. +res mitigation from Sonic/ and -endurance drain from /Elec) without skimping on the +damage slotting. I appreciate that Elec Blast has been through some major changes... but draining a mob and keeping them drained still seems to be just as straightforward today as it was back in the single-digit issues.
-
Firstly, this thread is more than a year old. So there's a distinct whiff of Necromancy in the air. Secondly, this particular Original Poster has something of a reputation for... oh, let's be charitable.... for possessing a set of very peculiar but extremely fiercely held opinions that run contrary to well-established convention, common sense, and (occasionally) the laws of physics; which they insist on broadcasting as "fact" on the forums every so often whilst outright ignoring any helpful advice, well-intentioned replies and/or ironclad irrefutable evidence to the contrary. You're not going to get anywhere here. Believe me, we've tried. - - - - - - - - - - "THE SKY IS GREEN!" "Are you sure? It looks Blue to me." "Pretty sure it's Blue..." "It's been Blue since Issue 5." "I guess it can maybe look a bit Green if you squint?" "Nope, it's Blue, and this is why --> [Link to NASA article Explaining atmospheric refraction]" [a few weeks later...] "WHY IS THE SKY SO GREEN?" ((Cue Memes and exasperated sighs)) Most of the rest of us will find it extremely difficult to build a character in CoH that can't deal decent damage; and "FF Offenders" were a thing from early days on Live. However the OP has apparently somehow managed not to take any damaging attacks until after level 10 or even until after level 20 despite them being mandatory at level one... so unfortunately there's a bit of a reality distortion field to contend with here in addition to your general everyday "reluctance to being proven wrong on the internet".
-
The shortlist @Ukase provided above is a great starting point. A Panacea Proc in Health, a KB Protection IO in your Travel power, and a Celerity: Stealth IO in Sprint are all potential game changers at low-level. To add a few things : If you're coming back from aaaaaages ago then check out this thread . Particular standouts are stuff like Enhancement Diversification (Issue 6), the Invention system and Auction Houses (Issue 9), the Flashback/Ouroboros system (Issue 11), the Inherent Fitness Pool and the Incarnate system (Issue 19) etc. etc. Regarding Financing IOs. Certain players will actually give you a big handout of influence for your first toon if you're new and don't have billions saved up... but assuming that you want to work for it, there are plenty of cash-building guides on the forums here. The usual methods are: collect merits via exploration badges and story arcs (you can repeat arcs via Ouroboros - Freaklympics is extremely good return) then exchange these for enhancement convertors/boosters at the merit ATM... or play the Auction House... or get a Tanker to level 50 and Farm AE missions.
-
AE: How to get Max XP from your custom mobs?
Maelwys replied to OldTimeRocker's topic in General Discussion
I'm not one of the folk that live + breathe AE; but I have made several custom-damage farming mission arcs and played around quite a bit with the settings trying to optimally tweak things. So a few observations/rules of thumb that may be worth considering. + Do NOT use the automatic easy/hard/etc. mode selections. Always use Custom. + The general idea is to get "100% standard experience at level 50" critters without giving them any abilities that are very detrimental to the character trying to farm them. + You can choose primary/secondary powerset combinations that are not valid for regular player characters; such as a melee damage Scrapper powerset plus a melee damage Dominator powerset (and this can be a good method of making custom enemies that don't have much in the way of damage mitigation and have a lot of low-damage attacks!) + Different powersets are capable of contributing more "standard exp" than others. Some combinations are simply not capable of 100% standard exp at level 50 for Bosses etc. + Steer clear of debuffs; especially attacks with "-Defense" in them. + Steer clear of buffs; especially resistance buffs, +ToHit buffs and long-duration clicky "godmode" powers. + CC powers like Stun/Hold/Sleep/etc? If you're a Tank/Scrapper then you probably won't care... but if you're a Blaster then you might want to skip them. + Self-Rez that don't apply intangible can be OK as fighting the same mob again will give extra exp/reward - think olden-days Freakshow "Dreck" map farming. + In general; if you want enemies that run into Melee then pick ONE ranged attack from their primary or secondary powerset; because after this attack gets used if they have no other ranged attacks available to chain with it they'll queue up a different (melee) attack and try to hug you. + It can be worth giving enemies MORE melee attacks even whenever they're already at "100% standard exp" - as if you are surrounded by critters who each only have one heavy-hitting melee attack available then they're always going to use that particular attack on you... but if they also have five other piddly minor-damage attacks available then chances are that they'll not all choose to simultaneously hit you with that heavy-damage attack. + Do not give enemy mobs flight capabilities. + If you're struggling, give yourself a custom Archvillain NPC ally that has almost no damaging attacks but lots of buffs/debuffs/heals (my personal favourite is a flier with Cold Domination [+Defence bubbles only] and Water Blast [Dehydrate + Whirlpool only]) and set them to follow you with the "Defensive" AI. + Map selection is very important. Some maps only allow a few spawns/patrols/allies etc. Classic farming maps include the "small" meteor, "big" meteor and tunnel. Note also that some maps will allow for initial enemy spawns to be within sight of the mission entrance point (so if you're bringing low-level characters to "sit" then they'll be far more likely to die on a meteor map than on a tunnel map!) + It's possible to have no regular enemies and the mission complete criteria set to simply clicking a glowie; then after you click that glowie the mission completes and all the ambushes etc. spawn. Doing this allows the "exit mission" button to function as an emergency exit, but prevents you from inviting any extra teammates onto the already-technically-completed mission map. I'm sure there are plenty of others, but that's all I can currently think of off the top of my head whilst maintenance is running... In regards to Bosses or no-Bosses; it will make a difference to drops... but chances are that you will also be able to kill more mobs faster if you're not having to mow through all that extra HP. So it can possibly become a wash, depending on your character's farming speed. Personally I prefer staying on a single map for longer and will therefore tend to include Bosses + EBs; but YMMV! 🙂 -
❤️ Dark Miasma. Bot/Dark was my very first MM on Live; and even on SOs it could handle hordes of mobs providing you got Fearsome Stare up + nobody killed your Darkest Night anchor + you spammed Twilight Grasp like it was going out of fashion. It leant on that AoE heal HARD though; and slotting Shadow Fall for Defence helped... (I'm still bitter that Controllers got a better version of Dark than everyone else. I'd have thumb wrestled Recluse himself for access to something like Fade!) 🎢 🤣
-
Yeah that sounds like a generic debuff secondary build to me alright. You could slot your ninja upgrade powers for +Defence, take Maneuvers and a +Def Alpha Slot, Support Hybrid and Barrier etc to try to push them all to softcap.... ...or alternatively just swap to /Cold which was already suggested a few times further up the thread. Having the extra mitigation from the Defense bubbles, Arctic Fog and Frostwork will increase your survivability a LOT, and its main debuff is a long-duration pseudopet (Sleet) which lets you concentrate on doing other stuff as long as you just remember to pop it every 45 seconds. The extra defense also frees you up to take Clarion Destiny (for the mez protection) instead of Barrier. /Time is the other obvious standout, but it needs a smidge more IO love than /Cold does (and also essentially locks you into taking a particular Patron pool for Power Boost!)
-
To be fair, the elder gods themselves live in fear of what can happen if one of those same retirees actually decides to get off their lawnchair and do something about it...