The Beta Account Center is temporarily unavailable
×


Maelwys
-
Posts
2010 -
Joined
-
Last visited
-
Days Won
23
Content Type
Profiles
Forums
Events
Store
Articles
Patch Notes
Everything posted by Maelwys
-
How do you know that for certain? Supposedly there's a lot of new players coming in all the time, many of whom are used to playing other games where skins of trademarked characters are readily available for free. Case in point... The NCSoft announcement and positive press HC has gotten recently has 100% brought more newbies into the fold - including those who want to play a clone of/homage to their favourite childhood superperson. I imagine there's a mix of "don't care" and "not aware" in play here; and so whilst it's unlikely to be a silver bullet, having the odd in-game reminder might at least lessen the numbers that our friendly neighbourhood GMs have to deal with a tad. I definitely remember a lot of questionable spidermen running around back on Live...
-
The default stance whenever pets are first summoned/resummoned is "Defensive Follow"; which enables bodyguard mode. You will need to re-upgrade them after resummoning though; if you want them to use their additional abilities (which are absolutely worth it). Thankfully the upgrade powers are AoE these days and you don't need to do each pet in turn after a wipe 🙂 One exception: whenever you change zones the pets will follow you and keep their upgrades; but their HP and Endurance gets refilled and they'll swap back to Defensive Follow (it's basically a "resummon" under the hood; but keeping the upgrades) Disclaimer: I do not like pure "debuff" support powersets (Dark doesn't count!) and Trick Arrow has historically always been one of my least favourite MM secondaries (beaten only by Poison; which IMO is the #1 rotten egg). Because debuffs are fantastic if you're fighting even-level mooks, but higher level foes and Archvillains just laugh at them. That said, /TA has a fair number of ways to lessen the impact of a big group of foes suddenly trying to rip your face off. EMP Arrow is much better than it used to be as a capstone; but its recharge is still very long. So Oil Slick would likely be my #1 choice for mitigation, followed by Flash/Glue Arrow. Acid and Disruption arrow are more DPS-magnifiers. I'd probably also stack Oil Slick with Fireball, and take Bonfire and slot with a Knockback > Knockdown IO for extra shenanigans. However there are a lot of people out there who are much more familiar with /TA MMs than me!
-
Whilst it's possible to micromanage your pets through lots of clicking on buttons in the regular User Interface... a lot of players (myself included) find it far, far easier to rely on binds. Looky here (for the original idea) and here (for the homecoming revision) to get started. My personal preference is here. In actual gameplay, whenever I'm paying attention on my MMs and not in lazy mode I'll typically do something like this: Set All Pets -> Defensive Follow (default), then for each enemy group I'll give an order like T3 Pet --> Attack My Target (which makes one of my henchmen start firing on my current target) followed by actually firing off my own attack powers (by this point the remaining henchmen will have noticed that something is shooting at them, and start shooting back); followed by positioning myself and the pets appropriately to make best use of AoEs (if necessary). Some Primaries like Robotics will tend to stay back and shoot from Range; others like Ninjas and Necro are mostly Melee and things become more of a Zergling rush. My Bot/Kin MM has a ridiculously min/maxxed endgame build and plays a little different - aside from keeping their buffs up, they'll generally just order the pets to PASSIVE FOLLOW ("stop whatever you're doing and come here dammit") then immediately swap them to DEFENSIVE GOTO (with the T3 pet set to AGGRESSIVE GOTO) and direct them right into the middle of the nearest huge mob of foes (enabling Bodyguard mode and attracting enemy attention). Then the MM themselves will dash in; hit Fulcrum Shift; drop Fireball/Bonfire/etc. then repeatedly spam Transfusion whilst their buffed ball of henchmen basically transform into a big metal blender. Sometimes I'll bother to use Group Fly to stay ~10 feet up and/or hit Support Hybrid and Barrier and/or summon Lore pets... but that's overkill unless I'm herding an entire map (which admittedly happens a fair bit!).
-
https://archive.paragonwiki.com/wiki/Mastermind_Strategy#Bodyguard There's a section there on the controls as well; but it boils down to the various pet "stances" and "orders" that Masterminds can set on each of their pets. Your pets are always set to something from each of the following two lists: + "Stances": Aggressive, Defensive, or Passive. + "Orders": Attack, Follow, or Goto ("Stay" exists as well, but it's essentially just a "Goto" command targeted at the pet's current location) Whenever your pets are in the "Defensive" stance then giving them either the "Follow" or "Goto" orders will enable Bodyguard mode. Bodyguard Mode makes the pet absorb a certain amount of damage that its master takes. Setting multiple pets to Bodyguard mode makes each of them absorb a different 'share' of this damage. Pets that are in Bodyguard Mode become particularly susceptible to AoE attacks, since they'll be taking their own damage in addition to sharing some of the Master's damage - which is part of why positioning and layering Pet Defense and/or AoE healing is so important on a Mastermind. Personally when my MM wants to play in "lazy mode" I tend to set just one pet (usually the T3) to Aggressive, and the rest to Defensive. That way the T3 always initiates combat and absorbs the Alpha without worrying about also taking a share of the Master's damage; and the rest of the pets will automatically return fire whilst constantly keeping the master reasonably well protected.
-
You mean you're not secretly Will Ferrell in a spotty red-and-yellow onesie...? 🤯
-
Another vote for SS/INV here. And if for some reason you can't install .Net Core v6 (AFAIK that means Win10 1803 - which went EOL in 2019 - or later) then there are older releases of Mids available on their GitHub page. Apparently 3.2.17 was the last one that was usable pre-Core v6. The Mids Discord also has a few folk who've gotten it running under WINE + Linux. https://discord.com/channels/593336669004890113/1181650420104429648/1181650420104429648
-
Much less productive than sticking an AoE damage power on auto, granted. But still a smidge more productive than attempting to farm whilst dead 😸 (I mean, the twin damage toggles will probably kill everything before the weekly maintenance...) More seriously they should be completely fine fighting a few mapfuls of S/E enemies, particularly "Elec Melee", so I very much suspect that the main problem isn't with the build itself.
-
There are a few things worth noting here. + Pets often inherit the owners "boosts". This means that pets will get the benefit of any buffs that are currently active on their summoner at the point when the pet is summoned. For LONG DURATION buffs like Fulcrum Shift and Forge - great. However things like Toggles and Set Bonuses are out of luck - these are ongoing constantly-refreshing effects, which means they wear off quite quickly and they will typically only be active on the pet for its initial summoning... the pet's own powers will not get the benefit of them. In practice, this means that any pseudopets that create an useful effect immediately upon their summoning will benefit from +Accuracy set bonuses, but real pets and pseudopets with "sub powers" that activate after summoning will NOT benefit from +Accuracy set bonuses. You'll see something like this in your combat log for a "Real" pet: (The second Image has an extra +60% Accuracy from Set Bonuses) In both cases the Tricannon Pet's "Tri-Gatling Gun" attack shows the same actual chance to hit, so Accuracy Set bonuses are doing nothing for it. And this for Pseudopets: (Again, Second Image has an extra +60% Accuracy from Set Bonuses) In this case there are three pseudopet powers activated - Sleep Grenade, Smoke Canister and Liquid Nitrogen... each of which do slightly different things. Note that the INITIAL HIT from Sleep Grenade and Smoke Grenade is getting a benefit from the Accuracy Set Bonuses, but their ongoing effects are not. + Sleep Grenade Burst ["Damage" component] - 47.08% -> 75.33% + Sleep Grenade [Initial Sleep/Slow] - 59.44% -> 87.68% + Sleep Grenade [Ongoing Sleep/Slow] - 47.87% -> 47.87% + Smoke Grenade [Initial] - 75.95% -> 94.64% + Smoke Grenade [Ongoing] - 62.58% -> 62.58% (There are a few ticks where the ongoing effect has a 70.74% chance; which is likely due to the buff from Leadership pool Tactics lingering for an extra second or two) + Liquid Nitrogen = "Autohit" (however Incarnate Reactive Interface damage is triggering far more often in the second screenshot. Damage Procs require a ToHit check even if the power itself is Autohit; and Incarnate Interface powers are a bit funky in that they're linked back to the caster and actually inherit Accuracy Set Bonuses!) TL; DR: For Pets, ignore set bonus. For Pseudopets it's more complicated, but as a rule of thumb any effects they possess which have a "duration" listed probably also ignore set bonuses.

-
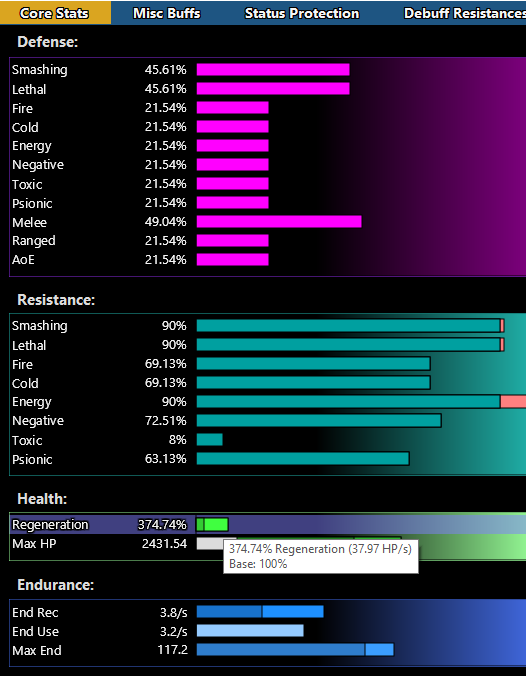
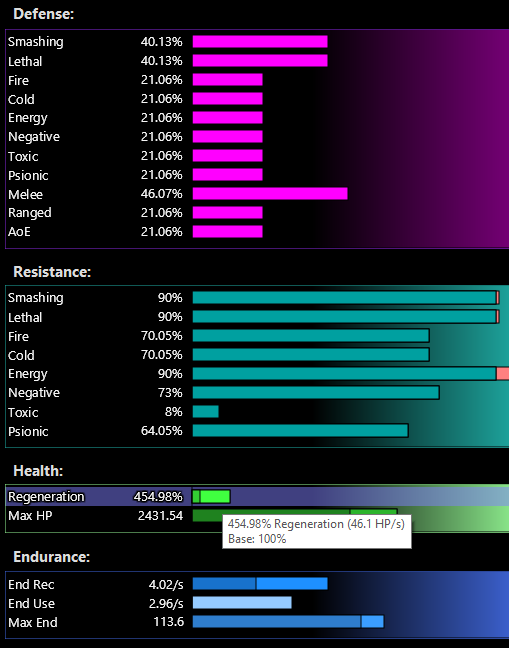
Looks like >90% S/L/E Resistance and >45% Melee Defence and reasonable regen? I don't see any glaring holes other than no DDR (which isn't surprising since you're /Elec) and that won't be a problem if you're fighting foes which don't have defense debuffs. Are the actual stats that you're seeing in-game the same as the ones here in Mids? Also are you definitely fighting foes that only have Melee attacks that deal E/L/S damage and don't have defence debuffs? (a lot of "Lethal" damage powers inflict -Defense...) Anyways here's a slight revision with substantially higher passive Regen/Recovery and an extra Power Transfer Proc. The additional recovery should be enough to let you put Atom Smasher on Auto. If you keep having trouble, divert a few extra slots into Energize and put THAT on auto instead. Slightly lower S/L Defense but still Melee softcapped. Elec-Rad 105 AFK Tanker v2.mbd
-
Arsenal (Control/Assault/etc) might be another contender if you want to open up a few other ATs (e.g. Dominators/Controllers) Maybe even a Mercs/Traps MM (as companions are a thing)? Or a Soldier of Arachnos VEAT (the default tree, not the Crab/Bane)...
-
I've always preferred to use Keybind files for Teleport so that it automatically zooms out more and hides the larger parts of the UI whenever I'm chain teleporting. An example is below - Hold down Key1 to enable "teleporting mode", then press the left mouse button to actually teleport. [C:\FILEPATH\tp_off.txt] KEY1 "+down$$powexec_name teleport$$camdist 100$$shadowvol 2$$ss 2$$window_hide health$$window_hide chat$$window_hide tray$$window_hide target$$bindloadfilesilent C:\FILEPATH\tp_on1.txt" KEY1+lbutton nop [C:\FILEPATH\tp_on1.txt] KEY1 "-down$$powexec_unqueue$$camdist 30$$shadowvol 0$$ss 0$$window_show health$$window_show chat$$window_show tray$$window_show target$$bindloadfilesilent C:\FILEPATH\tp_off.txt" KEY1+lbutton "+down$$bindloadfilesilent C:\FILEPATH\tp_on2.txt" [C:\FILEPATH\tp_on2.txt] KEY1+lbutton "-down$$powexec_name teleport$$bindloadfilesilent C:\FILEPATH\tp_on1.txt" (Adjust the CAMDIST value and other graphical settings to whatever your usual setup is in TP_ON1.TXT and can zoom out more than CAMDIST 100 if desired in TP_OFF.TXT)
-
My Fire/Ice is my favourite Blaster. His build philosophy is completely the opposite of most of my toons; with very little in the way of raw defensive stats (5-7% Defense plus 30-40% S/L/F Resistance via an Epic Shield). However their sustainable raw AoE damage output is extremely high... and anything that doesn't die to the first volley tends to end up either bouncing or mezzed between its two ST holds, Bonfire and Frozen Aura (all of which do high damage) plus Ice Patch and Shiver. Maximum HP and Absorb rate is also rather decent (>1600HP plus ~540 Absorb) and Rise of the Phoenix is on a ~90s recharge. There are a few flavours of his build, depending on whether or not I want to use "Burnout" (e.g. Frozen Touch/Char/Fire Breath/Burnout - pick any three!) Blaster - Fire Blast - Ice Manipulation (No Burnout).mbd zBlaster - Fire Blast - Ice Manipulation (Char+FB).mbd zBlaster - Fire Blast - Ice Manipulation (Char+FT).mbd zBlaster - Fire Blast - Ice Manipulation (FB+FT).mbd They do actually make use of Hover quite a bit on teams to play "keepaway" - many of the AoEs don't need you to be near the enemy, and the Snipe buffs your Range by 50% for 10 seconds; which helps a lot with Fire Breath positioning. Dropping a Bonfire, a Rain of Fire and a few Fireballs on a mob from >100ft away can be a lot of fun... 😸 Blasters are I think one of the trickier ATs to build because they have little in the way of inherent mitigation and different players' playstyles are so different. Some people like staying in melee range and stack Melee or S/L Defense (the latter is less effective than it used to be); others are constantly in the backline and so stack Ranged Defense; and then you've the folk like myself who prefer to be hyper-mobile, darting quickly between locations firing abilities off and "jousting" with foes to keep the enemy AI on the back foot (and that's why in the above builds Clarion is taken for Mez Protection, rather than Barrier!) So decide what playstyle you like, and build towards it. Proccing out your Powers effectively for maximum damage is something that lots of people here are familiar with; and whilst Procs are due for a revamp "SOON"(tm)... at the moment it mostly boils down to: "unless the attack is a pseudopet (like Rain of Fire and Bonfire) then if you're putting damage procs into it slot as little recharge reduction enhancement as possible into the power itself - instead stack global recharge". There are calculators out there and caps to be aware of (e.g. Inferno recharge is long enough that you can slot lots of recharge% into it without negatively impacting your proc rate) but that's the general rule of thumb.
-
Kitty'd definitely be an /SR or /Ninjitsu Stalker with Phase Shift, Ninja Run and a little miniature dragon vanity pet. Martial Arts for the most part; but perhaps Ninja Blade in her Shadowcat persona? 90's Cartoon Rogue would be a Super Strength Tanker or Brute; with either Invulnerability or Willpower for her defensive powerset. Mainstream comics Rogue would probably be a MartialArts/EnergyAura Scrapper instead (Energy Drain + Energize + Overload to represent the "Power Sapping") Gambit is an Energy Blaster, with either a Martial Combat (he uses his fists a fair bit in the comics) or Ninja Training secondary (reskin a Staff instead of the Katana). You could also rig him up as a Staff/SR Scrapper or Stalker, with the Force of Will pool (for Project Will and Wall Of Force) and Weapon Mastery (Exploding Shuriken). Longshot I'd likely place as a Spines/SR/PsiMastery Scrapper or maybe an Arachnos Widow... (Spines = Daggers) That or a Mind/Psi Dominator. Just make sure to give her /Fire Mastery for Rise of the Phoenix... 😸
-

Earth themed control hero. Controller, dominator or tank?
Maelwys replied to NiklasWB's topic in Archetypes
An Earth/Thermal Controller mechanically speaking works extremely well? You could potentially headcanon the secondary as (Geo)thermal or "Lava Manipulation"... or just recolour its powers into something more suitable for you (healing and damage resistance are both rather thematic for earth; so I can't picture many problems there!) Alternatively; Radiation Emission (plenty of radioactive metals underground), Kinetics (tap into the momentum of the Earth), Pain Domination (smack allies upside the head with a Rock or three to keep them in line) could all have their merits? -
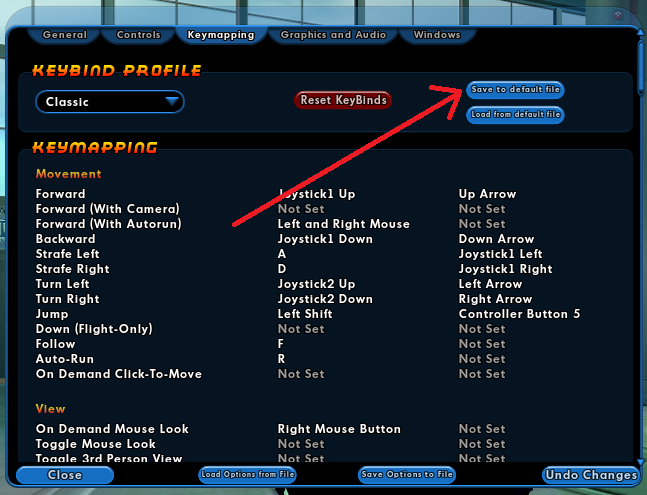
There was a change to the default control scheme a while back, but any older characters you have that were created prior to that should still be using the previous scheme. If older characters are still working; great. Then the easiest way to lock this into place will be to open your menu, go to the keymapping tab and save their scheme/binds as your "default file"... then load it again on your newer characters. There's also a "Profile" dropdown box at the top left of that tab which lets you swap between a few sets of default binds - like "Modern" (the new one) or "Classic" (the old one). If older characters are NOT working then that suggests your controller itself is playing up or that the driver's been updated and your computer isn't binding it to the same outputs as before. So check it's working in a different game, and update your drivers. Personally I have an old DualShock2 pad that I tend to use for CoH, with character movement bound to the left analogue stick and camera movement bound to the right analogue stick. Sometimes depending on the driver update; one of those sticks might get picked up as Joystick3 instead of Joystick2; or the X axis might become the Y axis etc. My current binds are below as an example: JOYSTICK1_DOWN "+backward" JOYSTICK1_LEFT "+left" JOYSTICK1_RIGHT "+right" JOYSTICK1_UP "+forward" JOYSTICK2_DOWN "+turnright" JOYSTICK2_LEFT "+lookdown" JOYSTICK2_RIGHT "+lookup" JOYSTICK2_UP "+turnleft" JOYSTICK3_DOWN "+turnright" JOYSTICK3_LEFT "+lookdown" JOYSTICK3_RIGHT "+lookup" JOYSTICK3_UP "+turnleft" (Also, Controllers rock. My favourite is an Illusion/Time...) 😉
-
If Pets are this bad, what is the point of Masterminds?
Maelwys replied to Caios's topic in Mastermind
THIS more than anything else IMO. It typically takes only a short time for new Mastermind players to realise that their T1 pets eventually spawn at 2 levels below them, and their T2 pets spawn at 1 level below them. However it can take much longer for them to appreciate that due to the purple patch that means those lower-level pets are going to get absolutely wrecked when fighting anything that is +5 to them or higher (+3 to the Mastermind themselves). So do yourself a big favour and stick to +2/x8 at most unless you really know what you're getting into... By all means softcap your pets defences and increase their resistances via good powerset selection + aura IOs; and buff them via Leadership Pool and Support Hybrid and Barrier Destiny etc. etc... but the main thing is to understand what you're actually going up against! 😀 -
It summons a little orange flame (a bit like the Animus Arcana "fireballs") and it typically spawns on top of you, not on your foes; and if it's close enough to an enemy then it'll run up and hug them; dealing a bit of AoE damage in the process. Its stats are here. It's only 1-2 PPM so won't spawn hugely often in a fast-recharging attack. The actual damage output is a tiny bit better than a regular damage proc if it only gets a tick or two off before dying to enemy fire. It can last for up to 20 seconds though, and you can have multiple copies of it out simultaneously if you're lucky enough with the RNG. It's markedly better in AoEs; and I've found that the Superior ATO version procs almost every time in a lot of the Arsenal Control powers like Sleep Grenade.
-
I mained a Sonic Defender extensively on Live for years. A lot of teams back then didn't appreciate just how much it made life easier until they teamed with it. The +resist buffs are handy, no question - between the Bubbles and Sonic Dispersion, a Resilient Core Alpha slot and Barrier these days you can buff everyone's resistances by ~70% constantly to everything except Psionic. Disruption Field and Sonic Siphon are obviously both brilliant. Clarity is often overlooked - but keeping it up on everyone constantly becomes second nature and you can easily stack enough on a single target to keep a Tank going through Ghost Widow's hold. Liquefy's debuffs are HUGE; and with enough recharge you can get its downtime to the < 10 second mark. Sonic Cage I actually used a fair bit in multiple-AV situations, as Acc/Mez HOs increased the Mag of the untouchable effect and allowed it to properly affect them (Mids claims this is still the case; but I've not personally tested it for years)... although I did need to co-ordinate with teammates a fair bit and making the effect more obvious via the tailor helped immensely. I had an /Elec secondary and I used it for sapping, but endurance drains are nowhere near as powerful as they used to be. So these days I'd lean towards Dark or Water (for the uninterruptable self-heal; plus either lots of -ToHit or Whirlpool+Geyser) or Beam Rifle (Piercing Beam and Overcharge are brilliant; and Disintegrate provides -Regen). RE Epic... Psi Mastery is the obvious choice (Psi Resistance and World of Confusion) or Ice (+Def Armor plus Hoarfrost, Build Up + a decent pet) All that said: have you considered Thermal instead? It'd be remiss of me not to point out that Sonic is in a bit of a difficult spot right now; and in the vast majority of content a Thermal's toolset will soundly beat a Sonic's.
-
End game 1-4 star content AT/Powerset optimization
Maelwys replied to Snarky's topic in General Discussion
How much accuracy/to-hit is needed for a 4*? Am I fine if I'm at 95% chance to hit against +4? Is that a 95% chance to hit a +4 in 4* content or a 95% to hit a +4 foe in regular content? In 4* content all enemies gain +30% Defense[All] as a baseline (see here) so even without any other buffs/debuffs in play, you'd want to aim for 125%+ in Mids etc. in order to actually cap your chances of hitting them. If you're not getting any teammate buffs (unlikely!) then hitting that number might require some build concessions. For a regular 1.0 modifier power; you'd be looking at a very rough ballpark of ED-capped Accuracy% slotting + a Kismet IO + Tactics + another ~30% accuracy from Set Bonuses. If you only really care about a single long-recharge ability (e.g. Fulcrum Shift) and have access to something like "Aim" + the Gaussian Proc then that might help a bit; but you'd be underperforming the rest of the time. In practice it really depends on what debuffs/buffs are in play; and also on what else you can bring to the table. My /Kin MM's regular PVE build actually has a 125% hit chance vs +4s with Fulcrum Shift (and his personal attacks), 131% with Transference and 143% with Transfusion... but he'd still not exactly be my first choice for running 4* content. -
The Stalker version gets a clickyheal IIRC. But yeah the rest just have the piddly amount of DDR in Heightened Senses plus the T9. (I suppose they could run away to find more mobs to cuddle in order to buff RTTC's regeneration rate...? MUST FIND MORE THINGS TO HIT ME SO THAT I CAN HEAL FASTER!!)
-
Arsenal Control/Arsenal Assault Build Dominator ??
Maelwys replied to smnolimits42's topic in Dominator
Slight Necro, but are you still finding that Flashbang is your goto? I'm honestly leaning towards skipping it entirely. I'll admit I've been using a few binds to make the location-targeting powers into foe-targeting though. e.g. /bind A "powexec_location target smoke canister" /bind B "powexec_location target sleep grenade" /bind C "powexec_location target liquid nitrogen" (Tear Gas is already foe-targeted) I'm finding that Sleep Grenade in particular is a complete monster when procced out.
-
I suspect that Arsenal Control is actually substantially better on a Dominator than on a Controller; since it lacks an immobilise to set up containment but has a plethora of fast recharging and long duration AoE CC; plus a large number of debuffs (-Recharge from Cryo Freeze Ray, Sleep Grenade and Liquid Nitrogen; -ToHit and -Perception from Smoke Canister; -Damage from Tear Gas). Arse/Psi is definitely an AoE-damage-friendly combination, which isn't the usual for Doms... in fact it's so good that I'm actually veering towards a purely debuff-centric Epic Pool (Dark) rather than taking another AoE attack like Dark Obliteration/Fireball/Ball Lightning/PsiTornado; or even WaterSpout (which is one of my main gotos for hybrid damage and control). Sleet is usually king here; but Tar Patch has no KD to interfere with Liquid Nitrogen and the debuffs from Darkest Night would stack very nicely with Smoke Canister and Tear Gas (for a total of -37.5% damage and -22.5% ToHit unslotted!) I was especially surprised at just how good of a proc-bomb Sleep Grenade is: mine was actually doing more damage than PSW. The Slow Set damage procs in particular (Impeded Swiftness and Ice Mistral's Torment) both have a chance to repeatedly proc over its duration, not just upon cast... and the way it's coded seems to make it particularly well suited for the Superior Dominating Grasp "Firey Orb". The builds I've been playing around with on test are below, in case anyone's interested. Dominator - Arse_Psionic (FlashBang).mbd Dominator - Arse_Psionic (Subdue).mbd (A smidge over 1400HP and can technically hit softcap against even-level foes via the ~31.5% ToHit debuffs from Darkest night and Tear Gas... but it's really not chasing much in the way of damage mitigation other than "just CC and kill everything". Procced Spirit Ward is for the Tri-Cannon. Vengeance is just for funsies. Flashbang seems like the most skippable power in the set after Tranquillizer TBH: the -ToHit is tiny, it deals no damage and I don't actually need another Mag3 AoE CC!)
-
Creating Overlay to speak NPC mission dialog
Maelwys replied to Heliopause's topic in Tools, Utilities & Downloads
There's this which watches the chatlog and performs text to speech on NPC dialogue? Raw Optical Recognition performed on the screen itself would probably be a bit flaky due to the transparency settings etc. -
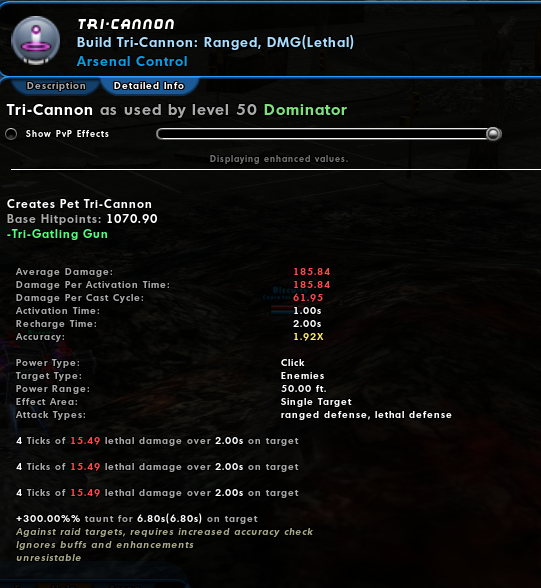
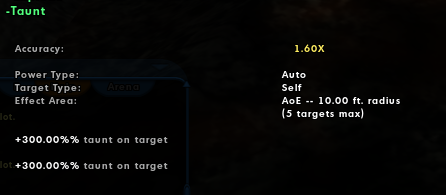
That might be a good shout, it's usually pretty quick to update, but the timestamp for the two databases are currently showing "Brainstorm-20240301_5940" and "Homecoming-20240227_5928". If neither of those include the changes in those mid-March patches then all the entries for the Tricannon powers are likely inaccurate. Looks like Uberguy last updated the CoDv2 thread at the start of March so perhaps something may have come up + updates are halted at present? RE Tricannon's in game performance, the somewhat inconsistent taunting behaviour is still throwing me a bit... but it's nice to have a viable alternative to Stoney. And if it turns out most of the time I can get away with 4x Expedient, the Soulbound BU Proc and Perfect Zinger Proc, fantastic. ----- [EDIT] ----- I had a scan through the in-game power data and did another CWK test or three on Brainstorm. The short version is that the Tricannon's "Tri-Gatling Gun" attack *DOES* appear to be capable of taunting RAID-flagged foes now, contrary to what the (apparently outdated!) CoD entry says. But it's not doing so reliably. Looking at the Pet's stated powers in-game (a bit light on detail; but the only accurate info we have available at present. Don't even get me started on Mids): For the Tricannon's Tri-Gatling Gun power; in order for the Taunt Component to actually kick in against RAID-flagged targets it's requiring an "increased accuracy check" (this seems to be "ToHitRoll+0.2" like most similar powers out there). However this Taunt Component itself is also set to "Ignore Buffs and Enhancements"; therefore any slotting within the power itself will very likely be doing nothing for it. The attack has an inherent 1.2 accuracy bonus, but the -20% ToHit roll penalty for the Taunt effect vs RAID foes combined with that "Ignores buffs and enhancements" flag is likely why I'm observing it being so inconsistent at grabbing the CWK's attention. The Tricannon's Taunt power looks to have a 10ft radius now instead of the original CoD-listed 8ft; and it no longer mentions ToHit Rolls or RAID-flagged targets at all. Unfortunately there's no way of telling by the in-game display if this power is still flagged as "Autohit" against Foes; whether it still does not inherit Accuracy or Taunt duration enhancements from the main pet, or whether the actual tick rate and taunt durations under-the-hood are unchanged... however I very much suspect all that to still be the case. Testing in fights seems to show it never missing; which suggests it does still have the Autohit flag. So it seems that the Tricannon now has an automatic autohit Mag3 taunt that affects any 5 critters within 10ft of it regardless of whether they have the RAID flag or not... and which will reliably keep up to +2 foes (with only a ~0.05s gap vs +3 foes) constantly taunted. Without a CoD update we can't say for sure, however given the above I suspect that currently Taunt Duration enhancements are unfortunately doing bugger all for the Tricannon; and that it'll only be able to reliably taunt higher-level foes whenever it's within 10ft of them. However at least its Taunt Aura thankfully doesn't seem to care any longer whether the foe has the RAID flag or not! In any case I suspect I'm going to roll up a Arse/Psi - it seems to provide a viable alternative to Stoney tanking as long as you can juggle the locations a bit! Thanks again 👍