

FUBARczar
-
Posts
807 -
Joined
-
Last visited
Content Type
Profiles
Forums
Events
Store
Articles
Patch Notes
Posts posted by FUBARczar
-
-
20 hours ago, Cyber Bishop said:
I have quite a few xx/ Dev blasters
Main toon is Fire/dev
archery/dev
electric/dev
Ice/dev
water/dev
dual pistols/dev
Beam rifle/dev
assault rifle/dev
CB, besides Fire which is your next best combo with Dev?
-
 1
1
-
-
On 9/22/2022 at 5:18 AM, Lazarillo said:
Definitely Willpower's big hole. Although at endgame, one can Ageless one's way through a lot of those. It's only a band-aid since it doesn't have any sort of base to work with, but I find it works decently on that front, at least.
Versus the previously-griped-about Mez hole that other sets have, and WP does not, I feel generally better about WP+Ageless than, say, about Elec or Invuln+Clarion when fighting Knives and Longbow (the latter of which is a lot, because Redside Bestside).
I have always wondered why WP doesn't have Slow resistance. 🤔
I would add slow resistance to indomitable will, raise HPT 2.5% to 10% (for Tankers, adjust other ATs appropriately) resistance to all, increase S/L defense in Heightened Senses to the same as E/N/C/F. And lastly add additional fear and confuse protection to Strength of Will.
That smidge of an improvement would bring WP up just the right amount IMO. It wouldn't radically change WP in any way, and it would differentiate itself more from other sets, especially Bio. Most wonderfully, it would increase build flexibility.
-
1
-
-
On 10/31/2019 at 9:38 PM, Rathulfr said:
Much of the concerns about knockback are overblown, and one can completely ameliorate most concerns by simply being a little more thoughtful about it. As a once and current Energy Blaster, here are my simple rules for managing knockback on Energy Blast:
- Put KB-to-KD IOs in your AoEs. You don't need KB-to-KD IOs on all of your attacks. KB is fine on single-target attacks, especially when soloing: it's a form of damage mitigation/control. KB is a headache on AoE attacks, as it affects you and your team. Therefore, only your AoE powers really need to the KB2KD IOs: Energy Torrent, Explosive Blast, and Nova. I usually skip Energy Torrent (I hate cones), so I have the KB2KD IOs in the latter two, only.
- You knock it, you kill it. If you do keep KB on your single-target attacks, then you take full responsibility for your KB targets. Don't KB and run: stay on target until it's down.
- Pay attention to your targets. Don't KB buff/debuff anchors. Don't KB tank/brute targets. Focus on picking off the stragglers or those menacing the other squishies.
- Pay attention to your backstop. What's behind your intended target: a wall or a ledge? Try to KB into solid objects, or towards the rest of the team. You don't necessarily have to line up every target like a billiard shot, but do try be aware of what's going on around the targets and elsewhere on the field of battle.
- Hover over and blast down. Hover is the Energy Blast-er's best friend. Get above the fray and KB down into the floor, if possible. Hover also offers great mobility, a little defense, and a slot for LotG +Recharge and/or Kismet +ToHit.
Have fun and happy blasting!
I can affirm that Energy Blast is overblown. Blowing enemies everywhere.
Perhaps the only thing more annoying than having Energy Blast on the team is someone running around with hurricane.
And KB>KD is most assuredly a heavy tax.
Also I have tried Energy Blast / Ninja Blaster. And I must say that EB was very underwhelming DMG-wise, and Nova still sent bodies hurling even with the heavy KB>KD tax IO slotted. So I rolled as PSI/Ninja and it's awesome.
So to the OP you will most likely regret it if you roll Energy Blast.
-
-
Fire blast goes with anything, but I would also say that anything can go with devices.
But my personal preferences would be Fire, Beam Rifle, Elec, Dual Pistols, Ice and Water.
-
 1
1
-
-
On 9/3/2022 at 5:15 PM, siran said:
I'm going to prefix this with 'I've not tried hard mode yet'. I do get it is hard mode, especially after reading this thread
My question: will dark armor work. I have found in normal content that Dark Armor is superb. I can cap the defences (normal content), cap most resists (even energy with the P2W Kinetic armor if I really need to, which I hardly ever do), the best heal in the game (total heal every 10 seconds or so) and level 4 stuns AOE all the time (paired with super str, stone or electric melee)
On normal +4x8 ITF these guys usually don't loose any hps, and if they do the total heal every 10 seconds or so helps a lot. Of course they don't have any DDR which a lot of this thread has been about... but I find after a handclap and an oppressive gloom most things aren't hitting me any (on normal difficulty) . Clearly EBs and AVs are not in the 'most things'.... but that heal helps a lot.
Edit: oh and soul transfer is great for standing up quickly if you do fall over. (as the previous post said about Rise of the Phoneix) But I've only used it once or so every 50 veteran levels... I suspect I will use it more now...
Is the hard mode such that 'it's all about the DDR?' at the highest level of difficulties?
It's not all about DDR, defense or resistance. It's about all of the above and more.
DA can do fine, but not because of OG or whatever (although CoF>OG in HM) It's because of team support, innate high resists and powerful heal.
-
3
-
-
On 9/18/2022 at 8:53 AM, StriderIV said:
Which offensive sets would these be? Just curious!
Well personally I have had the most success with my Fire/EM/Soul.
And for First Aura, fire melee should be good.
Next one has good success with Bio/SS.
Off the top of my head, other than EM and SS I would consider Stone. Maybe even make TW, WM, and IM work.
-
1
-
-
8 hours ago, Nemu said:
I took my Fire/Elec as is (40% s/l def 45% Range Def and no notable S/L resistance, no melee core, no rune of prot) to hardmode Aeon and ITF and it does just fine, I even stood next to stuff and punched them in the face. You'll probably die a few or a lot on your first tries but as soon as you learn the mechanics (bricknauts boom, Nictus posession, Rom void judgement, etc...) you can avoid those completely avoidable sources of death if you pay attention.
As I noted in another post, most often people die on those TFs because of the following:
1 - Not moving/poor positioning/getting stuck in animation (learn to joust people!)
2 - Lack of awareness
3 - Stubborness (scrapperlock or whatever you want to call it, especially stupid when one dies and resurrects and for whatever reason believes the power of Thor has been bestowed upon him and decides to single-handedly take revenge against the 6 EBs that swatted them)
4 - Poor priorities. A lot of people still tab - closest target and call it a day. And support that doesn't buff Rezzed teammates.
5 - Getting separated from the team. Like the blaster that thinks backing away from the lone EB chasing it and distancing himself farther and farther away from the team, while continuing to shoot the said EB is a good idea.
This list is no different than how people die on normal content. It's just more pronounced for HM.
Start with how you play and not the build. Playstyle and understanding game mechanics > build.
But the build has some impact on your performance too. some observations from dying a few times with my Fire/Elec on these runs.
Sustain auras that aggro can be bad for your health, especially after you rez. You are at your most vulnerable after you rez and a sustain aura that aggros is just inviting death. Also not too great if you are speeding because you can't wait 5 seconds for it to suppress and it'll invite extra pokes as you speed by mobs..
Flying, at least for ITF is OP. You can avoid a lot of things with fly.
About the only thing that is highly recommended from a loadout perspective is T4 barrier. Strategic cycling of that among you and your teammates is how you power through stuff like the vanguard encounter in Aeon. I also recommend T4 void judgement, the -dmg it does helps you and the team.
Jousting is of limited utility. Especially with the increased perception of say a 4* ITF. I see players leaving the "pocket" where team heals and buffs are and they don't just miss out on those heals and buffs, but the also aggro a neighboring Mob! They then die, and then place the rest of the team in greater jeopardy.
The ability to stay in the pocket helps the team with buffs/Dennis and DPS,
-
4 hours ago, Troo said:
Oh my bad for not e-peening to your level.
My descriptions were "affordable and easily upgrade-able" NOT uber or the-best.
It's a different build than what you might shoot for, sure. It's also available by Level 48. (drop a slot from Twilight, Tar Patch, & Dark Consumption or elsewhere)
'Solid' to me is obviously different than to you.
To me by level 48, safe-ish at range (45+% R/E/N) and able to -tohit debuff (20 to 40+%) with 300-ish dps in 30s bursts seems fairly solid. Maybe you've long forgotten having just SOs.
Note: Fearsome Stare is pretty luxurious for casual solo play. For some, Fearsome Stare > Darkest Night. Together = comfy.
It is sometimes laughable to see T4s and Superior ATOs in the brag builds. No wonder Homecoming has become Farmville.
The build you posted last is fine. (the gap to 45% on many of the other defenses is larger than your -tohit when solo. Fluffy might cover)
It's not about "my level" or the IOs, it's purely about the omission of the snipe and nuke. Leaving out the two most powerful attacks available to the character is what makes that build unsolidified.
-
 1
1
-
-
1 hour ago, Falsey said:
It's funny, I actually see HM as the perfect chance to go full damage on my blasters. It's about the only scenario in this game where I know the Tank will be tanking and support characters will be supporting, giving damage dealers the opportunity to do what they do best - kill things faster.
Granted, this requires proper team coordination, and you may still die here and there. But I find it refreshing and fun. With that said, I'm not saying this is the way to go. It's just one more option for you to explore!This isn't damage light, and one could easily swap Vigor for Musculature and go Assault Hybrid.
So if you want a little more damage and not worry about defense like a real Joker then maybe something more like this....
This Hero build was built using Mids Reborn 3.2.17
https://github.com/LoadedCamel/MidsRebornClick this DataLink to open the build!
Level 50 Technology Blaster
Primary Power Set: Fire Blast
Secondary Power Set: Fire Manipulation
Power Pool: Leaping
Power Pool: Fighting
Power Pool: Sorcery
Power Pool: Speed
Ancillary Pool: Soul MasteryHero Profile:
Level 1: Flares -- SprDfnBrr-Dmg/Rchg(A), SprDfnBrr-Acc/Dmg/Rchg(48)
Level 1: Ring of Fire -- SprDfnBrr-Acc/Dmg(A), SprDfnBrr-Acc/Dmg/EndRdx(3), SprDfnBrr-Acc/Dmg/EndRdx/Rchg(3), SprDfnBrr-Rchg/+Status Protect(5)
Level 2: Fire Ball -- Bmbdmt-Dam(A), Bmbdmt-Acc/Rech/End(5), Bmbdmt-Dam/Rech(7), Bmbdmt-Acc/Dam/Rech(7), Bmbdmt-Acc/Dam/Rech/End(9), Bmbdmt-+FireDmg(9)
Level 4: Fire Sword -- Hct-Dmg(A), Hct-Acc/Dmg/Rchg(13), Hct-Acc/Rchg(15), Hct-Dmg/EndRdx(15), Hct-Dam%(17), TchofDth-Dam%(17)
Level 6: Combat Jumping -- LucoftheG-Def/Rchg+(A), Ksm-ToHit+(19), Rct-ResDam%(19), Krm-ResKB(21)
Level 8: Boxing -- SprBlsCol-Acc/Dmg(A), SprBlsCol-Acc/Dmg/EndRdx(21)
Level 10: Fire Sword Circle -- Arm-Dmg(A), Arm-Acc/Dmg/Rchg(23), Arm-Acc/Rchg(23), Arm-Dmg/EndRdx(25), Arm-Dam%(25), FuroftheG-ResDeb%(27)
Level 12: Aim -- RechRdx-I(A)
Level 14: Tough -- UnbGrd-ResDam(A), UnbGrd-ResDam/EndRdx(27), UnbGrd-ResDam/EndRdx/Rchg(29), UnbGrd-EndRdx/Rchg(29), StdPrt-ResDam/Def+(31), GldArm-3defTpProc(31)
Level 16: Build Up -- GssSynFr--Build%(A)
Level 18: Blaze -- SprBlsWrt-Acc/Dmg(A), SprBlsWrt-Dmg/Rchg(31), SprBlsWrt-Acc/Dmg/Rchg(33), SprBlsWrt-Acc/Dmg/EndRdx(33), SprBlsWrt-Acc/Dmg/EndRdx/Rchg(33), SprBlsWrt-Rchg/Dmg%(34)
Level 20: Cauterizing Aura -- Prv-Heal(A), Prv-Heal/EndRdx(34), Erd-Dmg/Rchg(34), Erd-Dmg(36), Erd-Acc/Dmg/Rchg(36), Erd-%Dam(36)
Level 22: Weave -- ShlWal-Def/EndRdx(A), ShlWal-Def(37), ShlWal-Def/EndRdx/Rchg(37), ShlWal-ResDam/Re TP(37), LucoftheG-Def/Rchg+(39)
Level 24: Spirit Ward -- Prv-Absorb%(A)
Level 26: Blazing Bolt -- Apc-Dmg(A), Apc-Acc/Dmg/Rchg(39), Apc-Acc/Rchg(39), Apc-Dmg/EndRdx(40), Apc-Dam%(40), Dcm-Build%(40)
Level 28: Hasten -- RechRdx-I(A), RechRdx-I(42)
Level 30: Super Speed -- BlsoftheZ-ResKB(A)
Level 32: Inferno -- Obl-Dmg(A), Obl-Acc/Rchg(42), Obl-Dmg/Rchg(42), Obl-Acc/Dmg/Rchg(43), Obl-Acc/Dmg/EndRdx/Rchg(43), Obl-%Dam(43)
Level 35: Dark Embrace -- UnbGrd-ResDam/EndRdx(A), UnbGrd-EndRdx/Rchg(45), UnbGrd-ResDam/EndRdx/Rchg(45), UnbGrd-ResDam(45)
Level 38: Hot Feet -- IceMisTrmt-End/Slow(A), IceMisTrmt-Dam/Rech(46), IceMisTrmt-Dam/Slow(46), IceMisTrmt-Acc/Dam/End(46), IceMisTrmt-Acc/Dam/End/Rech(47), IceMisTrmt-+ColdDmg(47)
Level 41: Consume -- EndMod-I(A)
Level 44: Super Jump -- BlsoftheZ-ResKB(A)
Level 47: Mystic Flight -- WntGif-ResSlow(A)
Level 49: Rune of Protection -- UnbGrd-ResDam(A), UnbGrd-ResDam/EndRdx(49), UnbGrd-Rchg/ResDam(49), UnbGrd-ResDam/EndRdx/Rchg(49)
Level 1: Defiance
Level 1: Brawl -- Empty(A)
Level 1: Sprint -- Qck-EndRdx/RunSpd(A)
Level 2: Rest -- Empty(A)
Level 2: Swift -- Run-I(A)
Level 2: Hurdle -- Jump-I(A)
Level 2: Health -- Mrc-Rcvry+(A), NmnCnv-Regen/Rcvry+(11), Pnc-Heal/+End(11)
Level 2: Stamina -- PrfShf-End%(A), PrfShf-EndMod(13)
Level 49: Quick Form
Level 30: Speed Phase
Level 44: Double Jump
Level 50: Vigor Core Paragon
Level 50: Freedom Phalanx Reserve
Level 50: Portal Jockey
Level 50: Task Force Commander
Level 50: The Atlas Medallion
-------------
1
-
-
Or try it with Dark Embrace
This Hero build was built using Mids Reborn 3.2.17
https://github.com/LoadedCamel/MidsRebornClick this DataLink to open the build!
Level 50 Technology Blaster
Primary Power Set: Fire Blast
Secondary Power Set: Fire Manipulation
Power Pool: Leaping
Power Pool: Fighting
Power Pool: Sorcery
Power Pool: Speed
Ancillary Pool: Soul MasteryHero Profile:
Level 1: Flares -- Thn-Acc/Dmg(A)
Level 1: Ring of Fire -- SprWntBit-Acc/Dmg(A), SprWntBit-Acc/Dmg/EndRdx(3), SprWntBit-Acc/Dmg/Rchg(3), SprWntBit-Dmg/EndRdx/Acc/Rchg(5), SprWntBit-Rchg/SlowProc(5)
Level 2: Fire Ball -- SprDfnBrr-Acc/Dmg(A), SprDfnBrr-Dmg/Rchg(7), SprDfnBrr-Acc/Dmg/Rchg(7), SprDfnBrr-Acc/Dmg/EndRdx(9), SprDfnBrr-Acc/Dmg/EndRdx/Rchg(9), SprDfnBrr-Rchg/+Status Protect(11)
Level 4: Fire Sword -- Hct-Dmg(A), Hct-Acc/Dmg/Rchg(15), Hct-Acc/Rchg(15), Hct-Dmg/EndRdx(17), Hct-Dam%(17)
Level 6: Combat Jumping -- LucoftheG-Def/Rchg+(A), Ksm-ToHit+(19), Rct-ResDam%(19), Krm-ResKB(48)
Level 8: Boxing -- SprBlsCol-Acc/Dmg(A), SprBlsCol-Acc/Dmg/EndRdx(21), SprBlsCol-Acc/Dmg/Rchg(21), SprBlsCol-Dmg/EndRdx/Acc/Rchg(23), SprBlsCol-Rchg/HoldProc(23)
Level 10: Fire Sword Circle -- Arm-Dmg(A), Arm-Acc/Dmg/Rchg(25), Arm-Acc/Rchg(25), Arm-Dmg/EndRdx(27), Arm-Dam%(27)
Level 12: Aim -- RechRdx-I(A)
Level 14: Tough -- UnbGrd-ResDam(A), UnbGrd-ResDam/EndRdx(29), UnbGrd-ResDam/EndRdx/Rchg(29), UnbGrd-EndRdx/Rchg(31), StdPrt-ResDam/Def+(31), GldArm-3defTpProc(31)
Level 16: Build Up -- GssSynFr--Build%(A)
Level 18: Blaze -- SprBlsWrt-Acc/Dmg(A), SprBlsWrt-Dmg/Rchg(33), SprBlsWrt-Acc/Dmg/Rchg(33), SprBlsWrt-Acc/Dmg/EndRdx(33), SprBlsWrt-Acc/Dmg/EndRdx/Rchg(34), SprBlsWrt-Rchg/Dmg%(34)
Level 20: Cauterizing Aura -- Prv-Heal(A), Prv-Heal/EndRdx(34), Erd-Dmg/Rchg(36), Erd-Dmg(36), Erd-Acc/Dmg/Rchg(36), Erd-%Dam(37)
Level 22: Weave -- ShlWal-Def/EndRdx(A), ShlWal-Def(37), ShlWal-Def/EndRdx/Rchg(37), ShlWal-ResDam/Re TP(39), LucoftheG-Def/Rchg+(39)
Level 24: Spirit Ward -- Prv-Absorb%(A)
Level 26: Blazing Bolt -- Apc-Dmg(A), Apc-Acc/Dmg/Rchg(39), Apc-Acc/Rchg(40), Apc-Dmg/EndRdx(40), Apc-Dam%(40), Dcm-Build%(42)
Level 28: Hasten -- RechRdx-I(A), RechRdx-I(42)
Level 30: Super Speed -- BlsoftheZ-ResKB(A)
Level 32: Inferno -- Obl-Dmg(A), Obl-Acc/Rchg(42), Obl-Dmg/Rchg(43), Obl-Acc/Dmg/Rchg(43), Obl-Acc/Dmg/EndRdx/Rchg(43), Obl-%Dam(45)
Level 35: Dark Embrace -- UnbGrd-ResDam/EndRdx(A), UnbGrd-EndRdx/Rchg(45), UnbGrd-ResDam/EndRdx/Rchg(45), UnbGrd-ResDam(46)
Level 38: Hot Feet -- SprAvl-Acc/Dmg(A), SprAvl-Dmg/EndRdx(46), SprAvl-Acc/Dmg/EndRdx(46), SprAvl-Acc/Dmg/EndRdx/Rchg(47), SprAvl-Rchg/KDProc(47)
Level 41: Consume -- EndMod-I(A)
Level 44: Super Jump -- BlsoftheZ-ResKB(A)
Level 47: Mystic Flight -- WntGif-ResSlow(A)
Level 49: Rune of Protection -- UnbGrd-ResDam(A), UnbGrd-ResDam/EndRdx(49), UnbGrd-Rchg/ResDam(49), UnbGrd-ResDam/EndRdx/Rchg(49)
Level 1: Defiance
Level 1: Brawl -- Empty(A)
Level 1: Sprint -- Qck-EndRdx/RunSpd(A)
Level 2: Rest -- Empty(A)
Level 2: Swift -- Run-I(A)
Level 2: Hurdle -- Jump-I(A)
Level 2: Health -- Mrc-Rcvry+(A), NmnCnv-Regen/Rcvry+(11), Pnc-Heal/+End(13)
Level 2: Stamina -- PrfShf-End%(A), PrfShf-EndMod(13)
Level 49: Quick Form
Level 30: Speed Phase
Level 44: Double Jump
Level 50: Vigor Core Paragon
Level 50: Freedom Phalanx Reserve
Level 50: Portal Jockey
Level 50: Task Force Commander
Level 50: The Atlas Medallion
------------ -
Here I recently put one together for a buddy. This gives you a good base of defense 40+ to S/L/E (because you cant survive without buffs anyhow), and then you can rotate between Rune and Core Melee Hybrid
This Hero build was built using Mids Reborn 3.2.17
https://github.com/LoadedCamel/MidsRebornClick this DataLink to open the build!
Level 50 Technology Blaster
Primary Power Set: Fire Blast
Secondary Power Set: Fire Manipulation
Power Pool: Leaping
Power Pool: Fighting
Power Pool: Sorcery
Power Pool: Speed
Ancillary Pool: Mace MasteryHero Profile:
Level 1: Flares -- Thn-Acc/Dmg(A)
Level 1: Ring of Fire -- SprWntBit-Acc/Dmg(A), SprWntBit-Acc/Dmg/EndRdx(3), SprWntBit-Acc/Dmg/Rchg(3), SprWntBit-Dmg/EndRdx/Acc/Rchg(5), SprWntBit-Rchg/SlowProc(5)
Level 2: Fire Ball -- SprDfnBrr-Acc/Dmg(A), SprDfnBrr-Dmg/Rchg(7), SprDfnBrr-Acc/Dmg/Rchg(7), SprDfnBrr-Acc/Dmg/EndRdx(9), SprDfnBrr-Acc/Dmg/EndRdx/Rchg(9), SprDfnBrr-Rchg/+Status Protect(11)
Level 4: Fire Sword -- Hct-Dmg(A), Hct-Acc/Dmg/Rchg(15), Hct-Acc/Rchg(15), Hct-Dmg/EndRdx(17), Hct-Dam%(17)
Level 6: Combat Jumping -- LucoftheG-Def/Rchg+(A), Ksm-ToHit+(19), Rct-ResDam%(19)
Level 8: Boxing -- SprBlsCol-Acc/Dmg(A), SprBlsCol-Acc/Dmg/EndRdx(21), SprBlsCol-Acc/Dmg/Rchg(21), SprBlsCol-Dmg/EndRdx/Acc/Rchg(23), SprBlsCol-Rchg/HoldProc(48)
Level 10: Fire Sword Circle -- Arm-Dmg(A), Arm-Acc/Dmg/Rchg(23), Arm-Acc/Rchg(25), Arm-Dmg/EndRdx(25), Arm-Dam%(27)
Level 12: Aim -- RechRdx-I(A)
Level 14: Tough -- UnbGrd-ResDam(A), UnbGrd-ResDam/EndRdx(27), UnbGrd-ResDam/EndRdx/Rchg(29), UnbGrd-EndRdx/Rchg(29), StdPrt-ResDam/Def+(31), GldArm-3defTpProc(31)
Level 16: Build Up -- GssSynFr--Build%(A)
Level 18: Blaze -- SprBlsWrt-Acc/Dmg(A), SprBlsWrt-Dmg/Rchg(31), SprBlsWrt-Acc/Dmg/Rchg(33), SprBlsWrt-Acc/Dmg/EndRdx(33), SprBlsWrt-Acc/Dmg/EndRdx/Rchg(33), SprBlsWrt-Rchg/Dmg%(34)
Level 20: Cauterizing Aura -- Prv-Heal(A), Prv-Heal/EndRdx(34), Erd-Dmg/Rchg(34), Erd-Dmg(36), Erd-Acc/Dmg/Rchg(36), Erd-%Dam(36)
Level 22: Weave -- ShlWal-Def/EndRdx(A), ShlWal-Def(37), ShlWal-Def/EndRdx/Rchg(37), ShlWal-ResDam/Re TP(37), LucoftheG-Def/Rchg+(39)
Level 24: Spirit Ward -- Prv-Absorb%(A)
Level 26: Blazing Bolt -- Apc-Dmg(A), Apc-Acc/Dmg/Rchg(39), Apc-Acc/Rchg(39), Apc-Dmg/EndRdx(40), Apc-Dam%(40), Dcm-Build%(40)
Level 28: Hasten -- RechRdx-I(A), RechRdx-I(42)
Level 30: Super Speed -- BlsoftheZ-ResKB(A)
Level 32: Inferno -- Erd-Acc/Dmg/Rchg(A), Erd-Acc/Rchg(42), Erd-Acc/Dmg/EndRdx/Rchg(42), FuroftheG-Acc/Dmg/End/Rech(43), FuroftheG-Dam/End/Rech(43), FuroftheG-ResDeb%(43)
Level 35: Scorpion Shield -- ShlWal-Def/EndRdx(A), ShlWal-Def(45), ShlWal-Def/EndRdx/Rchg(45), ShlWal-EndRdx/Rchg(45), LucoftheG-Def/Rchg+(46)
Level 38: Hot Feet -- SprAvl-Acc/Dmg(A), SprAvl-Dmg/EndRdx(46), SprAvl-Acc/Dmg/EndRdx(46), SprAvl-Acc/Dmg/EndRdx/Rchg(47), SprAvl-Rchg/KDProc(47)
Level 41: Consume -- EndMod-I(A)
Level 44: Super Jump -- BlsoftheZ-ResKB(A)
Level 47: Mystic Flight -- WntGif-ResSlow(A)
Level 49: Rune of Protection -- UnbGrd-ResDam(A), UnbGrd-ResDam/EndRdx(49), UnbGrd-Rchg/ResDam(49), UnbGrd-ResDam/EndRdx/Rchg(49)
Level 1: Defiance
Level 1: Brawl -- Empty(A)
Level 1: Sprint -- Qck-EndRdx/RunSpd(A)
Level 2: Rest -- Empty(A)
Level 2: Swift -- Run-I(A)
Level 2: Hurdle -- Jump-I(A)
Level 2: Health -- Mrc-Rcvry+(A), NmnCnv-Regen/Rcvry+(11), Pnc-Heal/+End(13)
Level 2: Stamina -- PrfShf-End%(A), PrfShf-EndMod(13)
Level 49: Quick Form
Level 30: Speed Phase
Level 44: Double Jump
Level 50: Vigor Core Paragon
Level 50: Freedom Phalanx Reserve
Level 50: Portal Jockey
Level 50: Task Force Commander
Level 50: The Atlas Medallion
------------ -
One doesn't need to get the expensive Winter or Purple IOs, but one also doesn't have to be a miser either (unless you are role playing Scrooge McDuck), but it's ok to spend a little more sometimes for a few unique IOs and ATO sets. So Voilà...
This Villain build was built using Mids Reborn 3.2.17
https://github.com/LoadedCamel/MidsRebornClick this DataLink to open the build!
Level 50 Magic Corruptor
Primary Power Set: Fire Blast
Secondary Power Set: Dark Miasma
Power Pool: Flight
Power Pool: Fighting
Power Pool: Speed
Power Pool: Leaping
Ancillary Pool: Dark MasteryVillain Profile:
Level 1: Fire Blast -- Thn-Acc/Dmg(A), Thn-Dmg/EndRdx(3), Thn-Dmg/Rchg(3), Thn-Acc/Dmg/Rchg(5), Thn-Acc/Dmg/EndRdx(5), Thn-Dmg/EndRdx/Rchg(48)
Level 1: Twilight Grasp -- TchoftheN-Heal(A), TchoftheN-Acc/Heal(7), TchoftheN-Acc/EndRdx/Heal/HP/Regen(7)
Level 2: Fire Ball -- Bmbdmt-Dam(A), Bmbdmt-Acc/Rech/End(15), Bmbdmt-Dam/Rech(17), Bmbdmt-Acc/Dam/Rech(17), Bmbdmt-Acc/Dam/Rech/End(19), Bmbdmt-+FireDmg(19)
Level 4: Tar Patch -- RechRdx-I(A)
Level 6: Darkest Night -- EndRdx-I(A), EndRdx-I(21)
Level 8: Hover -- LucoftheG-Def/Rchg+(A), Ksm-ToHit+(21), ShlWal-ResDam/Re TP(23), Rct-ResDam%(23)
Level 10: Howling Twilight -- Artl-Acc/Dam(A), Artl-Dam/End(25), Artl-Dam/Rech(25), Artl-Acc/Dam/Rech(27), Artl-Acc/Rech/Rng(27), Artl-End/Rech/Rng(29)
Level 12: Aim -- GssSynFr--Build%(A), RechRdx-I(29)
Level 14: Boxing -- Empty(A)
Level 16: Shadow Fall -- TtnCtn-ResDam/EndRdx(A), TtnCtn-ResDam/EndRdx/Rchg(31), TtnCtn-ResDam(31), TtnCtn-EndRdx(31), LucoftheG-Def/EndRdx(33), LucoftheG-Def/Rchg+(33)
Level 18: Blaze -- SprMlcoft-Acc/Dmg(A), SprMlcoft-Dmg/Rchg(33), SprMlcoft-Acc/Dmg/Rchg(34), SprMlcoft-Dmg/EndRdx/Rchg(34), SprMlcoft-Acc/Dmg/EndRdx/Rchg(34), SprMlcoft-Rchg/Dmg%(36)
Level 20: Tough -- TtnCtn-ResDam/EndRdx(A), TtnCtn-ResDam/EndRdx/Rchg(36), TtnCtn-ResDam(36), TtnCtn-EndRdx(37), GldArm-3defTpProc(37)
Level 22: Weave -- RedFrt-Def/EndRdx(A), RedFrt-Def/Rchg(37), RedFrt-EndRdx/Rchg(39), RedFrt-Def/EndRdx/Rchg(39), RedFrt-Def(39), RedFrt-EndRdx(40)
Level 24: Hasten -- RechRdx-I(A), RechRdx-I(40)
Level 26: Blazing Bolt -- StnoftheM-Acc/Dmg(A), StnoftheM-Dmg/EndRdx(40), StnoftheM-Acc/ActRdx/Rng(42), StnoftheM-Dmg/ActRdx/Rchg(42), StnoftheM-Dmg/EndRdx/Rchg(42), StnoftheM-Dam%(43)
Level 28: Combat Jumping -- LucoftheG-Def/Rchg+(A)
Level 30: Fly -- Empty(A)
Level 32: Inferno -- SprScrBls-Dmg/EndRdx/Rchg(A), SprScrBls-Acc/Dmg/Rchg(43), SprScrBls-Acc/Dmg/EndRdx/Rchg(43), SprScrBls-Rchg/+End(45)
Level 35: Dark Consumption -- Acc-I(A)
Level 38: Dark Servant -- CldSns-ToHitDeb(A), CldSns-Acc/ToHitDeb(45), CldSns-Acc/Rchg(45), CldSns-ToHitDeb/EndRdx/Rchg(46), CldSns-Acc/EndRdx/Rchg(46), CldSns-%Dam(46)
Level 41: Dark Embrace -- UnbGrd-ResDam(A), UnbGrd-ResDam/EndRdx(47), UnbGrd-Max HP%(47), StdPrt-ResDam/Def+(47)
Level 44: Soul Drain -- ScrDrv-Acc/Rchg(A), Arm-Acc/Rchg(48), Arm-Acc/Dmg/Rchg(48)
Level 47: Evasive Maneuvers -- LucoftheG-Def/Rchg+(A)
Level 49: Soul Transfer -- Prv-Absorb%(A)
Level 1: Brawl -- Empty(A)
Level 1: Scourge
Level 1: Sprint -- Empty(A)
Level 2: Rest -- Empty(A)
Level 1: Swift -- Flight-I(A)
Level 1: Health -- Mrc-Rcvry+(A), NmnCnv-Regen/Rcvry+(9), Pnc-Heal/+End(9)
Level 1: Hurdle -- Jump-I(A)
Level 1: Stamina -- PreOptmz-Acc/Rech(A), PreOptmz-EndMod/End(11), PreOptmz-EndMod/Rech(11), PreOptmz-EndMod/Acc/End(13), PreOptmz-EndMod/Acc/Rech(13), PreOptmz-EndMod/End/Rech(15)
Level 49: Quick Form
Level 30: Afterburner
Level 50: Born In Battle
Level 50: High Pain Threshold
Level 50: Invader
Level 50: Marshal
Level 50: Musculature Radial Paragon
-------------
1
-
-
10 hours ago, Troo said:
Can definitely swap Fire Breath or Rain for Inferno, their set bonuses can be similar (just push everything down one level).
Tar Patch helps with scatters from Rain.
I like the Snipes in my builds but cest la vie. A lot of playstyle choices are available when not looking for soft cap everything and the perfect gapless attack chain.
While it is an inexpensive build, the intention was to show a solid playable version that didn't overly chase defense and could have more expensive sets and Incarnates added later.
Only using Flares and power pool attacks is "playable" but not effective. And describing that build as "solid" is obscenely generous with no Snipe or Nuke...
-
1
-
-
14 hours ago, Rudra said:
I'm actually in agreement with @Greycat on the crashes. Having a super-ultra-deluxe power that saves the day and clinches your victory/survival? Is definitely worth a crash. The problem as I see it though? Even before incarnate stuff? The T9s weren't that. I'd pop my enhanced T9 nuke on a Blaster and be lucky to drop the minions swarming me, let alone the lieutenants. Sure, I was probably enhancing them wrong, but I would routinely have 3-4 damage SOs in them and still be surrounded. (IOs didn't exist then.) And the armor crashes? If I was in a position where I needed the T9? It would fail while I'm still trying to clear out the support mobs on the AV ripping my face off while I'm trying to buy breathing space for my friends to rez themselves.
Strictly my opinion, and I probably slotted wrong, but the T9s until they introduced Willpower were too underwhelming for the associated crash. (That said, when the mobs popped their T9 armors? I'd curse, and rant, and scream at how unkillable they became....)
The great thing is we could have a decision tree, the old ones don't even have to be discarded. Players could have an either/or option.
Right now there is only one T9 that might be worth the crash, and that's Energy Aura's T9. The resist ones...are totally not worth it.
-
17 hours ago, TheZag said:
I dont think making them perma is the way to go unless they get some drawbacks as well. T9 armors were perma back in the day and it made for some very boring gameplay. With so much survival packed into 1 power, its possible to ignore most of the other survival powers, turning 1 skippable power in a set into 5 or more skippable ones.
I do agree that T9 armors are mostly useless as they stand right now though. With set bonuses and ease of access to set enhancements, its been possible to nearly max out defense and resistances without the use of the T9. Why click a T9 that basically does nothing for survival and just makes you die after a few minutes when it crashes?
But how do you make it useful without making it overpowered? Granite nerfs your damage, recharge, and speed in exchange for a perma (toggle) T9 armor. Other crashless T9s have a fixed recharge that is longer than the duration and cannot be reduced.
The T9s that crash are from the game era when we had to speed boost the entire team individually every 2 minutes and couldnt even join the team in the first place if speed boost wasnt 4 slotted for endurance recovery. Team missions took 30 minutes and accidently pulling a second group meant a team wipe. The crash was less of a problem back then when it would happen when your team was recovering between pulls. Todays pace of constant pulls isnt very compatible with the old design of T9s with a crash.
For me, the T9 represents a skippable power and the ability to choose something else that i want. I think without a major redesign, thats all the T9 armors will be for quite awhile longer.
No one is suggesting Perma. They would not be Perma. Like SD and WP are on a set timer, can't shorten the recharge. From the other sets that have good T9's that accept+recharge, the recharge is so long that making them Perma is impossible.
The aim is something useful, without the huge godmode bonus or the associated crash.
-
1
-
-
2 hours ago, Hellclaw said:
This looks weird to me - no Inferno? I'm still tinkering on a new version of the original build, but I'm not looking for a budget build - I play the market enough to have a stable income.
Also have an honest question, to all present - does Rain of Fire actually make it into the final build? I originally chose it for the Scourge synergy, but (in normal content at least) it feels out of place for the pace of the game.
Potentially phrased in a different way, what kind of attack chain is considered "optimal" for Fire?
Personally I always take the Nuke and never the rains, because the scatter mobs. They hinder teams more than help.
-
2
-
-
10 hours ago, Troo said:
@FUBARczar We're talking teaming and +1/8, right?
I saw your Psi/Dark Incarnate build.
I just chose to show a Fire-Dark-Soul that has:
No Incarnates
No Superior Winter enhancements
No Purples enhancements
No ATO enhancements
No HO enhancements
No PvP IO enhancements (well, one Gladiator's Armor +3%)
and embraces more /Dark powers like Fearsome Stare and Dark Servant.. ( I like perma Fear and -tohit )
You know, for those regular players who want to play before t4-ing and dropping a billion.
We don't all need to shoot the moon t4-ing and dropping a billion on every build before playing them. ( not saying you do and if you do, I'm not judging )
The -tohit and Fear on top of the soft capped ranged defense is good for Soul Drain.
As they say, if it's worth doing, then it's worth doing right
besides you exaggerate the cost, play the game, earn merits, they will get you those expensive IOs. I have never actually spent more than 500m IOing a character to this lvl
-
1
-
-
That's what I was looking to mostly do with my suggestions. Remove the crash by ..
Elec Armor could get a direct port of Bio's T9., Set to a different animation
Energy Aura would be the same as it is with a little less +defense, but on the same timer scheme as WP/SD
Invulnerability could a copy of EA's without the +HP
Ninjitsu could get a port of Radiation's T9
SR could be the same as it is with a little less +Def but add +recharge and dry to a static timer.
-
On 9/13/2022 at 10:03 PM, sovryn said:
Is there anyway to maybe get a second option for it, like small and big, so that we can use the classic design as well? I beg of thee, it's put me off from using the main costume of the character that I've been using for years and years.
I think that was answered. It was a No, because the smaller version doesn't work with certain animations. It has to be increased by 20%.
-
As if "classic coh" is a legitimate suggestion for development?
I too would never want to go back to grinding for SG base rent...
Or desire many other things the way they were.
-
 1
1
-
-
But really, it is about suggesting improvements for the hard crash temporary buffs found in defensive power sets as the last power that is unlocked in those sets.
-
6 hours ago, RogerWilco said:
I have no clue what this discussion is about.
No need to understand, just comply
-
1
-
-
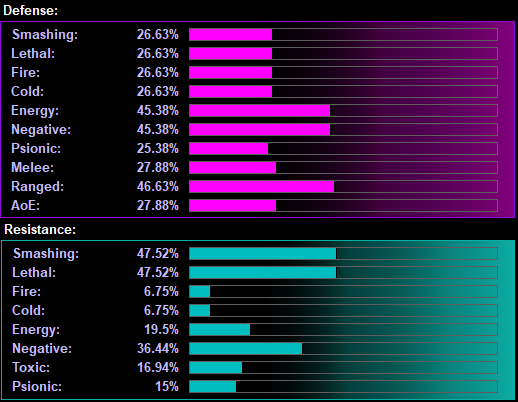
6 hours ago, Troo said:
It's the one above:
Psychic Blast / Dark Miasma / Dark Mastery
Positional Melee 45 and Range 42
Here's a little simpler Fire-Dark-Sole that is affordable and easily upgrade-able.

This Villain build was built using Mids Reborn 3.1.2.5
https://github.com/LoadedCamel/MidsRebornClick this DataLink to open the build!
Level 50 Magic Corruptor
Primary Power Set: Fire Blast
Secondary Power Set: Dark Miasma
Power Pool: Speed
Power Pool: Flight
Power Pool: Fighting
Power Pool: Leadership
Ancillary Pool: Dark MasteryVillain Profile:
Level 1: Fire Blast -- Thn-Acc/Dmg(A), Thn-Dmg/EndRdx(46), Thn-Dmg/Rchg(46), Thn-Acc/Dmg/Rchg(48), Thn-Acc/Dmg/EndRdx(50), Thn-Dmg/EndRdx/Rchg(50)
Level 1: Twilight Grasp -- TchoftheN-Heal(A), TchoftheN-Heal/HP/Regen/Rchg(43), TchoftheN-Acc/Heal(43), TchoftheN-Acc/EndRdx/Heal/HP/Regen(45), TchoftheN-Acc/EndRdx/Rchg(46)
Level 2: Fire Ball -- PstBls-Acc/Dmg(A), PstBls-Dmg/EndRdx(5), PstBls-Dmg/Rchg(37), PstBls-Acc/Dmg/EndRdx(40), PstBls-Dam%(43)
Level 4: Tar Patch -- RechRdx-I(A), RechRdx-I(5)
Level 6: Rain of Fire -- PstBls-Acc/Dmg(A), PstBls-Dmg/EndRdx(7), PstBls-Dmg/Rchg(7), PstBls-Acc/Dmg/EndRdx(34), PstBls-Dam%(34), RechRdx-I(34)
Level 8: Fire Breath -- PstBls-Acc/Dmg(A), PstBls-Dmg/EndRdx(9), PstBls-Dmg/Rchg(9), PstBls-Acc/Dmg/EndRdx(11), PstBls-Dam%(33)
Level 10: Darkest Night -- DarWtcDsp-ToHitDeb/EndRdx(A), DmpSpr-ToHitDeb/EndRdx(11)
Level 12: Howling Twilight -- Bmbdmt-Dam(A), Bmbdmt-Acc/Rech/End(13), Bmbdmt-Dam/Rech(13), Bmbdmt-Acc/Dam/Rech(15), Bmbdmt-Acc/Dam/Rech/End(29)
Level 14: Hasten -- RechRdx-I(A), RechRdx-I(15)
Level 16: Shadow Fall -- LucoftheG-Def/Rchg+(A), LucoftheG-Def(17), LucoftheG-Def/EndRdx(17)
Level 18: Blaze -- Thn-Acc/Dmg(A), Thn-Dmg/EndRdx(19), Thn-Dmg/Rchg(19), Thn-Acc/Dmg/Rchg(25), Thn-Acc/Dmg/EndRdx(27), Thn-Dmg/EndRdx/Rchg(27)
Level 20: Fearsome Stare -- CldSns-ToHitDeb(A), CldSns-Acc/ToHitDeb(21), CldSns-Acc/Rchg(21), CldSns-ToHitDeb/EndRdx/Rchg(23), CldSns-Acc/EndRdx/Rchg(23), CldSns-%Dam(25)
Level 22: Super Speed -- Run-I(A)
Level 24: Hover -- LucoftheG-Def/Rchg+(A), LucoftheG-Def(50)
Level 26: Boxing -- Empty(A)
Level 28: Tough -- StdPrt-ResDam/Def+(A), StdPrt-ResKB(29), GldArm-3defTpProc(31)
Level 30: Weave -- LucoftheG-Def/Rchg+(A), LucoftheG-Def(31), LucoftheG-Def/EndRdx(31)
Level 32: Maneuvers -- LucoftheG-Def/Rchg+(A), LucoftheG-Def(33), LucoftheG-Def/EndRdx(33)
Level 35: Tactics -- GssSynFr--ToHit(A), GssSynFr--ToHit/Rchg(36), GssSynFr--ToHit/Rchg/EndRdx(36), GssSynFr--Rchg/EndRdx(36), GssSynFr--ToHit/EndRdx(37), GssSynFr--Build%(37)
Level 38: Dark Servant -- CldSns-ToHitDeb(A), CldSns-Acc/ToHitDeb(39), CldSns-Acc/Rchg(39), CldSns-ToHitDeb/EndRdx/Rchg(39), CldSns-Acc/EndRdx/Rchg(40), CldSns-%Dam(40)
Level 41: Dark Consumption -- Erd-Acc/Rchg(A), Erd-Dmg/Rchg(42), Erd-Acc/Dmg/Rchg(42), ScrDrv-Acc/Rchg(42)
Level 44: Dark Embrace -- RctArm-ResDam(A), RctArm-ResDam/EndRdx(45), RctArm-ResDam/Rchg(45)
Level 47: Soul Drain -- Erd-Acc/Rchg(A), Erd-Dmg/Rchg(48), Erd-Acc/Dmg/Rchg(48)
Level 49: Fly -- Flight-I(A)
Level 1: Scourge
Level 1: Brawl -- Empty(A)
Level 1: Sprint -- Clr-Stlth(A)
Level 2: Rest -- IntRdx-I(A)
Level 2: Swift -- Flight-I(A)
Level 2: Hurdle -- Jump-I(A)
Level 2: Health -- NmnCnv-Regen/Rcvry+(A), Mrc-Rcvry+(3)
Level 2: Stamina -- EndMod-I(A), EndMod-I(3)
Level 22: Speed Phase
Level 50: Born In Battle
Level 50: High Pain Threshold
Level 50: Invader
Level 50: Marshal
Level 49: Afterburner
------------So now we have come full circle (hover - grounder - hover)
You created one that hovers which is totally different, and your low melee def puts you at risk everyone you move in to use Soul Drain.
It's also more difficult to be in the right position, while maximizing soul drain's buff and more busy try to move in and out just so.
Hover builds also typically forgo status protection by default pigeon hole themselves into Clarion.
Scrapper Tier Lists
in Scrapper
Posted
Yes it's not as necessary because you don't have a heal or some other life line to wait for to recharge. For this reason many skip hasten as well
But Willpower thematically screams slow resist to me. It also helps with attack speed And movement.