-
Posts
5895 -
Joined
-
Last visited
-
Days Won
30
Content Type
Profiles
Forums
Events
Store
Articles
Patch Notes
Posts posted by Troo
-
-
-
20 minutes ago, twozerofoxtrot said:
I like the suggestions of improving under-picked powers, and buffing the damage in the first three single target attacks. I'd prefer a slightly different modification to the powers themselves (a 270 arc cone for Hand Clap + damage/vectored KD and Hurl basically getting the Dominator version from Earth Assault), but as a long time SS player, that's the general direction I'd like to see.
These may actually be along the line of what to expect.
"Making every power in a set worth taking" is definitely the tone from the Devs and confirmed with their 'reworks'.
With those changes will come adjustments, likely some janky mechanic, and a number of required powers in order to take advantage of said janky mechanic.
I'd love to see a simple straight forward Super Strength with Build Up leaning into disorient and knockup. (this is sooo very unlikely)
-
Silas Farts Carcinogens And So Can You!
So. Radiation. Did you know that the following is absolutely true?
If someone approaches you and says hey, radiation emission is awesome and you should play one, they are 100% correct!How wild is that? Truth is stranger than fiction, folks. This is all the information you require. But what if you want more information? What if you want more detail and nuance than will ever be necessary? What if you not only want detail and nuance, you want to delve tirelessly into the deepest trenches of detail and soar through the loftiest clouds of nuance of the set and learn more information than anyone will ever care to know? What if you just don’t have anything to do to distract yourself from the crushing, crushing loneliness and the booze cabinet is empty?
THEN YOU ARE IN THE RIGHT PLACE.
So.
Why Rad is Rad and You want to be Rad too: (okay I swear that is the last time I use rad like that in this guide)
• Great self and team +rec +rech +dam (and +mez resistance if you care) buff
• Two very powerful debuff toggles to make stuff die faster and harder. Uhn tiss uhn tiss.
• Self heal because having to eat green inspirations means there are less inspirations being converted into purples for SHENANIGANS
• Generally a rad (ahaha I lied) strong all-round support set. Good buffs, good debuffs with a nice dash of general team utility.
• Fantastic at facilitating the destruction of AVs and GMs.
• Fairly low maintenance, no targeted ally buffs if you can’t stand that kind of thing BECAUSE YOU’RE A SCRAPPER GO ON GET OUT OF HERE WHO LET YOU IN
• God, those guys. I swear.
• I wrapped some attack chain calculations around a brick and threw it into a river, that should keep them away for a while.
• Radiation gets its core powers very early on so you’re a force to be reckoned with from, you know, early on. Unless you don’t take the toggles until 40+ because well, your mother fed you paint chips or something, god, I don’t know, what am I, psychic?
• (Yes!)Level 50 Magic Corruptor
Primary Power Set: Fire Blast
Secondary Power Set: Radiation Emission
Power Pool: Speed
Power Pool: Fighting
Power Pool: Leaping
Power Pool: Leadership
Ancillary Pool: Mace MasteryVillain Profile:
------------
Level 1: Fire Blast Dcm-Acc/EndRdx/Rchg(A), Dcm-Dmg/Rchg(3), Dcm-Dmg/EndRdx(3), Dcm-Acc/Dmg(5), Dcm-Acc/Dmg/Rchg(5)
Level 1: Radiant Aura DctWnd-Heal(A), DctWnd-EndRdx/Rchg(7), DctWnd-Heal/EndRdx(7), DctWnd-Heal/Rchg(9), DctWnd-Heal/EndRdx/Rchg(9)
Level 2: Fire Ball Rgn-Acc/Rchg(A), Rgn-Acc/Dmg/Rchg(11), Rgn-Dmg/Rchg(11), Rgn-Dmg(13), Rgn-Dmg/EndRdx(13), EndRdx-I(15)
Level 4: Accelerate Metabolism EffAdp-EndMod/Rchg(A), EffAdp-EndMod/Acc/Rchg(23), PrfShf-EndMod/Rchg(25), PrfShf-EndMod/Acc/Rchg(31)
Level 6: Hasten RechRdx-I(A), RechRdx-I(21), RechRdx-I(23)
Level 8: Radiation Infection DarWtcDsp-ToHitdeb/Rchg/EndRdx(A), DarWtcDsp-Rchg/EndRdx(17), DarWtcDsp-ToHitDeb/Rchg(19), DarWtcDsp-ToHitDeb/EndRdx(19), AchHee-ResDeb%(21)
Level 10: Enervating Field EndRdx-I(A), EndRdx-I(15)
Level 12: Rain of Fire PstBls-Dmg/Rchg(A), PstBls-Dmg/EndRdx(31), PstBls-Dam%(33), PstBls-Acc/Dmg/EndRdx(33), PstBls-Acc/Dmg(33), EndRdx-I(34)
Level 14: Super Speed Empty(A)
Level 16: Fire Breath Dtn-Acc/Dmg/EndRdx(A), PstBls-Acc/Dmg/EndRdx(17), Dtn-Dmg/EndRdx/Rng(45)
Level 18: Blaze Apc-Dam%(A), Apc-Dmg/EndRdx(37), Apc-Dmg/Rchg(39), Apc-Acc/Dmg/Rchg(39), Apc-Acc/Rchg(39), EndRdx-I(40)
Level 20: Lingering Radiation Acc-I(A), Acc-I(34), RechRdx-I(34), RechRdx-I(36), EndRdx-I(40)
Level 22: Boxing KntCmb-Dmg/EndRdx(A), KntCmb-Dmg/Rchg(36), KntCmb-Dmg/EndRdx/Rchg(37), KntCmb-Acc/Dmg(37)
Level 24: Tough StdPrt-ResDam/Def+(A), StdPrt-ResKB(25)
Level 26: Weave LucoftheG-Def/Rchg+(A), RedFrt-Def(27), RedFrt-Def/EndRdx(27), RedFrt-EndRdx(29), RedFrt-Def/Rchg(29), RedFrt-Def/EndRdx/Rchg(31)
Level 28: Combat Jumping LucoftheG-Def/Rchg+(A)
Level 30: Super Jump Empty(A)
Level 32: Acrobatics EndRdx-I(A)
Level 35: Aim RctRtc-ToHit/Rchg(A), RctRtc-Pcptn(36)
Level 38: EM Pulse UnbCns-Dam%(A), UnbCns-EndRdx/Hold(40), UnbCns-Hold/Rchg(43), UnbCns-Acc/Hold/Rchg(45), UnbCns-Acc/Rchg(45)
Level 41: Scorpion Shield LucoftheG-Def/Rchg+(A), RedFrt-Def(42), RedFrt-Def/EndRdx(42), RedFrt-Def/Rchg(42), RedFrt-EndRdx(43), RedFrt-Def/EndRdx/Rchg(43)
Level 44: Maneuvers LucoftheG-Def/Rchg+(A), GifoftheA-Def/EndRdx(50), GifoftheA-Def/EndRdx/Rchg(50)
Level 47: Assault EndRdx-I(A)
Level 49: Mutation EndRdx-I(A)
Level 1: Scourge
Level 1: Brawl KntCmb-Dmg/EndRdx(A), KntCmb-Dmg/Rchg(48), KntCmb-Acc/Dmg(48), KntCmb-Dmg/EndRdx/Rchg(50)
Level 1: Sprint
Level 2: Rest
Level 2: Swift
Level 2: Hurdle
Level 2: Health NmnCnv-Regen/Rcvry+(A), Mrc-Rcvry+(48)
Level 2: Stamina PrfShf-End%(A), PrfShf-EndMod(46), PrfShf-EndMod/Acc(46), PrfShf-EndMod/Rchg(46)
Level 4: Ninja Run
Level 50: Born In Battle
Level 50: High Pain Threshold
Level 50: Invader
Level 50: Marshal
Level 30: Double Jump
Level 14: Speed Phase
------------ -
An old one from Silas circa 2011 (some of which may no longer be applicable)
But for shits & giggles I'd like to see this updated. Feel free to point out areas of improvement.
| Copy & Paste this data into Mids Reborn : Hero Designer to view the build |
|-------------------------------------------------------------------|
|MxDz;1515;688;1376;HEX;|
|78DA7593EB4E135110C7CF76B72285524A8116CA450A482FB0A5DE3E1B902A4A954|
|BA2C62FCDA6DDB69B60DB6C4BA20FA11FD488D787F016D06F465FC16BE223787983|
|75D8F91FBBC6B849FBDB993373CEFC67F6146E9CE9AD54F2A785125ADE365AADE27|
|2C3B6779AED86ED2F1855ABA40A7ABAE817FFB350DC34EA55B3ACE72DDB2C2E5152|
|7BAAB3B6B453A9E89B46D932DA56A35E5CB96EB55AF4125EADD74CDBACB775F9125|
|86F34B6F5ADA6699683EE6BDEAAD6DA56BDDAEB5A6BA6D12423248DB269B76A5633|
|BED2B44A7AE7B8825132E9AFD536ED9B31AA3243BF399F908FA38947071E4DF81E8|
|20F98DA2EF898F941F1265D222BA789436BE005E6E102789199A49390E7F895933E|
|D71938011E67F61E034F31FBA684CB4F94A972B6A3AAB77871F83633769739718F9|
|9A011F811ECF3677887417018FCA8F0A85C0D5DFB9CD9FF9A39B007BE610EBE2546|
|34F19992BA91A474A33659638A627AA4C09E57EC9C78C93CB20FEE812F9853489EA|
|65A82A859041D7A449AF60B613F5FE819C7F5237FFE39484161796838C7E5CE2C32|
|8F2E803A9865CEE1D0AF746044F620328A8A24D1A86950262954E91092D4A10D428|
|2823699335BE03A53A5E0A86C58344AE78DD3BC624C8D1647A0D93F32C49FC9681F|
|18608E85C01EE64490394CC971D9B03892A3E41CC77162DCED628C5C93326E121A3|
|2D487842C2BF184873BFD94F98DA26765576657D1B273CCF40A733E0F9E6536E9EE|
|27A59624CA49414B0A5A52D09086A634B484A9C68CFC603307C974C9721AD8C51CA|
|0205D0AD121E40B3916A5E0453857B5CEF574C63C862A30AE2CC695C5987218DB9A|
|27F82099FAB7AE75AEAD505CD7F700B994BF5C3FFE75FDF4B814E5322BCD9E6731B|
|F3C8BAAB2CB3D5CB803DE0771AFBBFBE9F24B3DFF7D3668CB1CB674AE788DAB5EE3|
|9AD7789FEE7C2FCE3B3282D2F80DDA84F401|
|-------------------------------------------------------------------|
Notes from Silas
- 65% recharge is enough to have Hasten/AM just about perma. About a second downtime, pretty good times though.
- With decent recharge Shout actually causes a loss in DPS, so I only use that when its guaranteed to Scourge. My usual attack chain is Screech, Scream and the stun to stack the –res.
- No Fallout or Choking Cloud. Both of these are very situational at best and I wanted a softcap range build so I didn’t have room for either of these. I decided of the three (mutation, fallout and choking) Mutation would be the most useful.
- In the absence of any shields to speak of, I’ve got AM bound to G and Radiant Aura bound to Q.
- I monitor endurance consumption because Enervating Field and Radiation Infection (as well as travel power/patron shield) can put a big dent in your endurance. This number doesn’t factor in your end/sec use from attacks, but I find it pretty handy to monitor for Conserve Power use.
- Enervating Field and Radiation Infection placement. You want these close enough at hand so that you can hit them easily, but not so close that you’ll hit them by accident detoggling them. If you want to bind them, that works too
How To Not Be Awful:
- Get comfortable with the range on AM. While the team shouldn’t grind to a halt for you to use it, consistently hitting only 2-3 people with it is fail. Unless the team is really all over the place you should be able to consistently get 4-6 people with it. The only time where I’d make sure to hit the whole team would be on a really low level team where people don’t have Stamina and stuff yet, so the +rec comes in very handy.
- Learn who to use Radiation Infection and Enervating Field on. While you want them to be on something tough enough to warrant the debuffs, on a team with several stalkers or scrappers a lieut might live longer. On fast moving/high level teams don’t bother with Radiation Infection unless it’s a boss or EB. Depending on the situation I’ll often also will throw the toggles on different mobs (unless its an AV fight ofc) so that 1: the debuffs are spread around and 2: they won’t both get shut down if the target dies.
- Toggle pulling. Get good at it. What I mean by this is throwing either of the toggles (RI preferably) on a spawn to pull them. You can do this to bring a spawn to where the team is currently killing, to make better use of whatever AoE debuffs have been dropped. If you block Line of Sight you can also herd the enemies into nice little bundles to be AoEd. Radiation Infection is a better choice for this because the -tohit will make them miss you more so you don’t get splattered trying this.
- Bear in mind that Radiant Aura is not a huge heal, so if you wait until you’re at half health and dropping it might not be enough to keep you on your feet. I generally start using it at 70%-80% because then you’ll only need to use it once or twice to top yourself off.
- You must never forget this.
- Fallout for Fun and Profit: Radiation is in a great position to take advantage of team mates who die a bunch because you can make them go kablooie and then get them back up on their feet. Vengeance + Fallout + Mutation = everyone on the team is happy when someone dies. Fallout is great to clear out the spawn hovering over someone to ensure they don’t get cut right the **** back down when you Mutation them. This is good. However, if there’s only one or two mobs around I wouldn’t bother with Fallout, The animation is long enough to warrant discretion in its use. Unless you like seeing your team mates explode then crumple to the floor again. Which, of course, is pretty awesome. Especially if you then don’t rez them. Serves you right for dying, chump. Take that to the bank and smoke it, buddy. Wait, what?
- lern2manage the EMP crash. It’s not as severe as the damage nukes or a godmode crash, but can be nasty if you don’t have a way to mitigate it. No recovery sucks when you’re burning 1end/sec running your toggles. Keep a supply of blues on hand if you don’t have something like Conserve Power. If you don’t have stuff to make the crash manageable its not –too- bad to be very reserved with your EMP use. It is a great power, but not so great that you’ll suck for not using it. Not using EMP all the time because of endurance = okay, not using fireball all the time because of endurance = scorned by colleagues, unloved by women, frowned on by YHWH.
Radiant Aura: PBAoE ally +heal
SpoilerSlotting Recommendation: There are several good options for this depending on how you’re building your character. If you want recharge Doctored Wounds are a good choice, if you want +hp/+regen/+rec Numinas or Miracles are a good choice. If you’re building for ranged defense 6 slots gives a nice bonus but bear in mind unless you’re hitting it once every 2 mins you’re not getting the bonus from the Numina +/+. There are also better places to get +ranged def. So I went with Doctored Wounds. And so should you. Or uh, a few heals and end reducers if you are POOR
How to Use: Self heal, mostly. It doesn’t really pack enough oompf for you to be relying on it to keep a team on their feet. Don’t get me wrong, it certainly helps especially if you can top off a few people at once with it, but generally there are more important things you should be doing to keep the team going. Bear in mind the radius is reasonably large so if you want to heal several people at once you can. Some people feel the need to put this on auto. This makes me sad. I do not know why they would think that this is a good thing to doRadiation Infection: Enemy based AoE toggle, foe –def- tohit
SpoilerSlotting Recommendation: Decent endurance reduction, as while this doesn’t guzzle as much as Enervating Field it still uses .52 end/sec base which is tones bazillions. As for whether to enhance the –def or –tohit, I would say its personal preference. At lower levels I would say the –def is more important, as teams don’t have a lot of +tohit or accuracy slotted yet, but at higher levels the –tohit stacks with all the +def most teams have flying around. I went with 4 Dark Watchers because yay +recharge. I would have put in an Achilles proc if I had the slot.
How to Use: Find a big nasty dude. Chuck it on the big nasty dude. Rejoice. That’s the basic gist of it, but I’m gonna go into more detail in a separate section for Radiation Infection/Enervating Field.Accelerate Metabolism: PBAoE ally +speed, +rech, +recovery, +damage, +res (Sleep, Hold, Disorient, Immobilize, End Drain)
SpoilerSlotting Recommendation: Maximize the recharge. You want 90-99% recharge in this. Beyond that, endurance mod slotting is also worthwhile since at base it gives more recovery than Stamina but recharge is more important if you’re hurting for slots. Best of both worlds is frankenslotting end mod sets.
How to Use: Get in the middle of as many people as you can and fire it off. Really, it’s that simple. Please, please don’t make some lame-*** bind or macro that demands the team grind to a halt and gather around you. Especially if you make some joke about hugs or snuggles. **** is tedious. The radius is the same as Radiant Aura so if you want to get a feel for how big it is [Obvious Joke] you can practice with that.Enervating Field: Enemy based AoE toggle, -damage, -resistance (all)
SpoilerSlotting Recommendation: 2 endurance reductions. 3 if you can, really. This power eats a ton of endurance and you’ll be running it all the time. You can’t enhance the –damage or –resistance so yeah.
How to Use: Similar to Radiation Infection. Find a baddy and throw this on him. Proceed to bring the ruckus until it has been done brought. Much faster animation though, I generally lead with this.Mutation: Ally +special (+200% rec, +100% rech, 40% damage buff (to all) +30% tohit) for 90 seconds, +special (-40% damage(all) -30% tohit) for 45 seconds after 90 seconds
SpoilerSlotting Recommendation: A recharge and/or endurance reduction.
How to Use: If someone dies, you can rez them with this. IT IS REALLY THAT SIMPLE, DEAR READERS! You might want to pick up Vengeance and Fallout to go with this, so you pee your pants a little with glee every time someone dies.Lingering Radiation: Targeted AoE –regen –recharge -speed
SpoilerSlotting Recommendation: 2 accuracy, 2 recharge. Bruv, it is most imperative that this hits and recharges fast, innit.
How to Use: I don’t bother unless I’m fighting an AV/GM/whatever that has bunches of regen. This will basically flat-line the regen of whatever it hits, which is totally good times for AVs and GMs and other stuff that would otherwise regen thousands of hp a tic. If you’re fighting one of the aforementioned things use this as soon as it recharges. Preface with Aim if you’ve got it, because this missing (especially if you’re the only person with –regen on the team) is >:C Its not really worth it to use on anything weaker than an EB unless you need something to do because you don’t know how to blast or do controllery things because you’re an IDIOT*.
*Addendum: Since I've rerolled my Sonic/Rad into a Fire/Rad, I get a lot more use out of LR against normal spawns. The slow component stacks really nicely with RoF to keep stuff melting in there. If you've got powers that cause scatter and/or other slows to stack it with (basically Ice or Fire blast) using it in conjunction with them can be very good.Choking Cloud: PBAoE Foe Hold
SpoilerSlotting Recommendation: If you don’t have a bunch of slots for this, don’t even bother picking it up. It’s a great power, but it needs a lot of slots to make the most of it. Running a power that eats as much endurance as this one and having it miss all the time and not hold anything for very long = fail harder, failbot. Get good values for acc/hold/end reduction because this has crappy base accuracy, short duration and eats endurance like whoah. Hold procs are also good times.
How to Use: Turn on, be in melee range. More in the How To Not Be Awful Section.Fallout: Target dead ally, boom. Stuff dies. But it’s also a very respectable debuff, to the order of 30% -dam -30% tohit, -30% defense and -50% res.
SpoilerSlotting Recommendation: The numbers are pretty good, so if you really wanted to slot it out I’d go 5 posi blasts and an Achilles Heel –res proc. You’ll get nice values for the damage aspect of the power and the proc will ensure that 20% of the mobs hit by it will have their resistances dropped by 70%. Boosh. That said, it’s a –highly- situational power. I would say if you’ve got the slots for it go nuts, but it’s a very low priority and if you’re only gonna have 1-2 slots in it you might as well not bother.
How to Use: Well, target a dead ally, hit this and like, kaboom, dude. While looking at the numbers it looks like a fantastic power, the reality is that unless you’re porting a corpse round, you’re not gonna get much use out of it. If you do decide you want to make the most of it, (which is fairly understandable), I would say go whole hog with it. Pick up recall friend and Vengeance. Make everyone squee with delight whenever that one blaster dies. Maybe the emp/therm/pain on the team gets a little careless.
Accidents happen, right?EMP: EE EMM PEEEE: PBAoE HUUUUGE radius foe hold, -end, -regen, damage vs bots, self -recovery
SpoilerSlotting Recommendation: Get good values for hold and accuracy, max the recharge.
How to Use: As both a panic button as well as a general hold. Unless you’ve got Conserve Power or a bunch of blue insp just use it as a panic button. The AoE is stupid ******* huge so while it is PBAoE you don’t need to worry too much about being right in the middle of the spawn. The special damage vs robots is nice, but nothing to write home about. Stick to how you’re doing at school, momma ain’t care about damaging robots, especially since the damage is fairly small (about the same as most blast tier
2s). Unless you slot it for damage, in which case there will be consequences. -
1 hour ago, Lusiphur Malache said:
I've yet to die because of a crash.
excellent point
-
18 minutes ago, Yomo Kimyata said:
Replace Rage with Build Up and then you can port it to scrappers and stalkers.
So simple and almost elegant.
-
3+ years later, is PvP still broken or has it been fixed?
I ask as there are still changes happening specifically for PvP which further diverge from PvE.
-
We must have some new quotes from the new release 🙂
-
1 hour ago, Snarky said:
And i lift weights, so I have a lot of cool super strength concepts.
😞
I guess we'll never get Lobo Snarky or Snark-inator
Spoiler

-
 1
1
-
-
1 hour ago, Erratic1 said:
I would crib from Combat Teleport's multiple activations bit and from Adaptive Recharge--use it once and you get a moderate buff, use it twice within a certain period and get a full duration bigger buff which comes with a crash and increased recharge.
interesting..
Energy Transfer has a player damage component.
Maybe the consecutive uses could have a bigger End cost, slightly less +Dam, and increase recharge. Use it too much and risk flooring your Endurance.
-
 1
1
-
 1
1
-
-
Stalker
T1 - Street Justice>Initial StrikeT2 - Martial Arts>Thunder Kick
T3 - Energy Melee>Bone Smasher
T4 - Kinetic Melee>Assassin's Strike
T5 - Build Up
T6 - Placate
T7 - Kinetic Melee>Burst
T8 - Street Justice>Spinning Strike
T9 - Energy Melee>Energy Transfer
additional detailsSpoilerHolding a small knife or dagger in one hand using the animations below
T1 - Street Justice>Initial Strike (Melee, DMG(Lethal), DoT(Toxic) -SPD, -Recharge)T2 - Martial Arts>Thunder Kick (Melee, DMG(Smash/Negative), Disorient)
T3 - Energy Melee>Bone Smasher (Melee, DMG(Smash/Negative), Disorient)
T4 - Kinetic Melee>Assassin's Strike (Melee, DMG(Smash/Negative))
T5 - Build Up ( )
T6 - Placate ( )
T7 - Kinetic Melee>Burst (PBAoE Melee, DMG(Smash/Negative), Foe Knockdown)
T8 - Street Justice>Spinning Strike (Melee, DMG(Smash/Negative), Foe DisorientMelee, Extreme(Negative), Foe Disorient, +Energy Focus)
T9 - Energy Melee>Energy Transfer (Melee, DMG(Negative), Foe Disorient, Self -HP, Special) -
There are powers I love and then very similar powers on another set that I really dislike sometimes just because of the animation.
Many players have a favorite power or powers maybe they wish they could build a powerset around.
So why not imagine the perfect à la carte set?
Cherry pick powers / animations from across primary or secondary powersets for an archetype.
If you choose to accept this challenge, here are some guidelines:
- T1s have to be from powers available at level 1
- T2s have to be from powers available in T1 & T2
- T3s have to be from powers available in T1, T2, or T3
- T4s have to be from powers available in T4
- T5s have to be from powers available in T5 and so on..
- Only one Build Up, Snipe, Assassin Strike, T9, etc per powerset.
Rules: If we can justify it we can do it. (basically no rules) -
Looking for a few good ideas to roll into a suggestion.
Me, I love some of the set's powers but others not so much.
We've had some discussions about Rage previously:
-
1 hour ago, Rudra said:
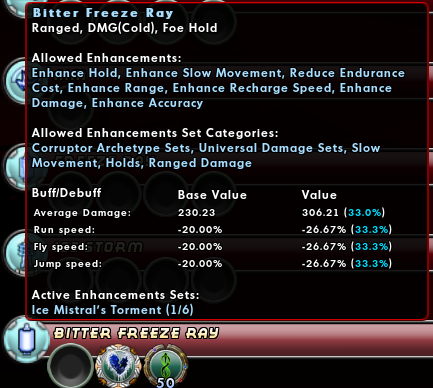
Bitter Freeze Ray
Should take Slows. It appears it did take Slows at some point, I have it in builds. Will check in-game.


-
one solution is on beta


-
If anyone wants to follow along
-
-
4 minutes ago, arcane said:
…where is the rifle?
classic shitposting
I'll take the powers with laser beam eyes, thank the devs, and be on my merry way without quibbling over minor suspension of disbelief in a super hero fantasy game.
-
 1
1
-
-
On 6/26/2025 at 11:54 AM, Wordsalad said:
I always get tunneled into a Kin/Time/Nature build
When you diversify into more secondaries some additional gems might pop out of the primaries list. I always recommend /Dark for Corruptors.
Good write up on your experience with various sets.
Also, some primaries are just better on other archetypes. Psychic might be a good example.
-
-
 @Jeff Krock You've nailed the average user experience with Mids'
-
25 minutes ago, Snarky said:
Ice/dark corr is fully ranged. It leverages two AoE DoT (one a nuke!) on top of Tar patch. Solid ST damage. Fearsome Stare. Darkest Night ranged targeted AoE debuff, and Fluffy. it is a sweet mix. add some +range bonuses and intuition alpha for +range/+dam..... very wicked stand away from combat and F stuff up
Bingo.
Ice/Dark/Soul.. Chef's kiss even on a lower price builds before incarnates.
Freeze Ray - It's a hold that does cold damage.
Bitter Freeze Ray - Is the hold that does cold damage and slows.
-
 1
1
-
-
3 hours ago, The Curator said:
Regeneration > Reactive Regeneration:
-
[PvP only] Corrected a bug where only Brutes got the base +regen reduction change, change now also applies to Scrappers, Stalkers and Tankers.
-
[PvP only] Reduced +regeneration stacks from scale 0.25 to scale 0.08.
-
[PvP only] Regen Resistance granted by stacks in this power has been removed in PvP.
-
[PvP only] Reverted the removal of -Regen Resistance, as it was removed from the incorrect power.
Does this mean the Instant Healing change is being reverted as well?
-
Regeneration > Instant Healing [PvP only]
- [PvP only] Reduced unenhanceable regeneration from scale 6.00 to scale 4.00
-
-
hmmm.







Patch Notes for July 8th, 2025 - Issue 28, Page 2
in Patch Notes Discussion
Posted
[reserved]