ROBOKiTTY
-
Posts
55 -
Joined
Content Type
Profiles
Forums
Events
Store
Articles
Patch Notes
Everything posted by ROBOKiTTY
-
Sleet started out at -30%. To adjust the secondary version downward to -22.5 or -26.25 would not be an unbiased normalization but a nerf. Envenom in poison, originally a mastermind exclusive, is at -30% for secondaries and -40% for defenders, in line with AT mods, so adjustment to cold and/or storm should be upward instead to stay consistent with it. Cold, storm, and poison all share a lack of a self-heal or significant self-protection like sonic has (more below), so they get higher -res numbers to aid in their more offensive nature. I don't think adjusting all -res powers to a uniform value is at all desirable, because it homogenizes them while ignoring intrinsic differences between sets. Sonic resonance, on another note, seriously underperforms right now. Disruption field has an obnoxious 1.04/s endurance cost and does -30% res and nothing else on a defender. Liquefy has a base recharge of 5m for a 30s patch with completely underwhelming effects (on a defender, -35.7% def/tohit, KD patch, mag 2 hold, -fly/-jump, and -28.5% recharge). Its main saving grace is a mez protection bubble.
-
No, sleet was a copy of freezing rain, which does -35% res on defenders and -30% on the rest. The non-defender version was used for corruptor sleet, but when cold was ported to defenders, the number was left untouched. They did however adjust heat loss (a pseudopet), so it does -24% on secondary ATs and -30% res on defenders. Freezing rain and heat loss are examples of tailor-made versions of the same powers that do not slavishly follow AT mods. Not every power has to be a clone of each other. Poison started out as a mastermind exclusive. Envenom does -30% res on ATs with it as a secondary and -40% res on defenders. This does follow AT mods. What cold, storm, and poison have in common is a relative lack of personal protection, e.g. a self-heal or sonic's mez-protection bubble (although sonic severely underperforms right now). It seems like a clear enough trade-off.
-
Well, if you're going to adjust sleet, just keep in mind that cold domination began as a corruptor exclusive before being ported over to defenders, so corr numbers are currently being used.
-
This may be somewhat off-topic, but here it goes. Can people on all three sides not resort to insults and cavalier dismissals of different points of view? Categorizing support of, disagreement with, and indifference towards announced change as 'nerd rage' or 'crying' or otherwise not worth considering is incredibly unproductive. It was one of the most toxic elements of the old forums that I was saddened to see revived here. We all comment here because, I presume, we love the game and feel extremely strongly about it in the aftermath of the loss of it. Change will always upset some and please others, and sometimes you fall on one side and sometimes the other. Most of us waited for the better part of a decade to have another chance at playing CoX again. At this point, this is more than just a game for many of us. I realize this may not be true for some of you, but try to have some empathy. It's time to stop the drama, to be charitable, and to stop assuming that people who disagree with your point of view are stupid or out to start trouble. Take a step back to consider how high the stakes really are in the grand scheme of things, whether it's worth widening the rift in the community over. I sense that some people have carried over old resentments and hard feelings from live and/or the SCoRE years. It's unhealthy and probably hurts you more than the people you're angry at, so try to let it go. People in this community like to brandish the friendliness of the CoX community, so can we try to show it? I recognize I fail at this a lot myself. I'm only feline, but I'm trying. I'd like to ask all of you to try as well. If that's not possible, at least remember that this is not the only place you can play CoX. Thank you for listening. By reading this far, you have agreed to subscribe to my newsletter.
- 290 replies
-
- 13
-

-
No? Ranged attacks in melee ATs used to use melee numbers until HC decided to tweak them to follow ranged mods (albeit they did so without changing the resulting numbers). This is also why melee AT ranged attacks in epic pools outdamage their defender equivalents despite defenders having a higher ranged mod. Powers shared between blasters and doms, between blasters and melee ATs, and between doms and melee ATs have different base numbers irrespective of AT mods. Widow/fortunata versions of attacks have different base numbers compared to equivalents in other control/blast/melee ATs. Bane/war mace attacks have different base numbers. Sometimes the result is that the version with the lower AT mod does more damage. Sometimes the result is that two ATs with different mods do about the same damage. AT mods were a shortcut used to facilitate easier porting of powers between ATs. Cryptic/Paragon were never strictly bound by them.
-
Cryptic/Paragon devs were never strictly bound by a rule like that. They had the means of disabling AT scaling, and they frequently made separate versions of powers with different base numbers. HC also had the option of buffing the defender version of the power. They didn't have to nerf the other versions.
-
Paragon had adjusted pseudopets in the past, by making new versions. Defender blizzard was a good example (it used to use the blaster pseudopet). HC is 'fixing' them in the exact same way, by making new versions of the pseudopets. Cryptic/Paragon didn't always just use a single pseudopet for all versions of the same power. Shield charge and lightning rod are pseudopets that never did the same damage across all ATs. Dark affinity was a very late addition to the game where Paragon gave controllers a revamped version of dark miasma. They had a chance to fix it then if it was really an error, so it seems intentional that they kept the same pseudopet. Lately there's been too much 'fixing' of things that were either likely or definitively pragmatic design choices rather than bugs. HC seems to have an arbitrary goal of achieving some ideal state of consistency even if it means changing how things have worked since the beginning and nerfing sets that don't deserve nerfing. Odd how the forums almost unanimously pooh-poohed me when I last brought it up.
-
Unfortunately, this doesn't really address most of the concerns brought up. Custom mobs doing less damage was by design, because stock NPCs have always followed a very different set of rules than custom NPCs in AE. Most stock NPC in the game have much smaller pools of powers than a PC, and most of them are attacks with few defensive powers (most of which don't work like player defensive powers). Instead, purple patch, rank scaling, and NPC passive defences make up for that lack of defensive powers. Most stock NPCs have gaps in their attack rotation, and most AVs don't have enough attacks to have a full attack chain. This is not the case for custom mobs in AE. Custom mobs inherit the benefit of purple patch, rank scaling, and passive protection that all mobs of equivalent ranks have by default. On top of that, they also have access to two full powersets, which usually grant them a much more seamless attack rotation even with just one damage set. If a defensive powerset is chosen, then they get access to defensive powers designed for player characters, meaning they are generalized against a wide spectrum of damage types, unlike stock NPCs which tend to have more specialized defences. It's not even possible to give custom mobs in AE weaknesses that many stock NPCs have (e.g. robots have negative smashing resistance, and Clockwork have negative psi resistance; almost a fifth of stock mobs have some kind of negative resistance). DPS from custom mobs is already higher than just about anything the game is able to dish out. Not much in the base game deals as much damage as an aggro-capped AE farm, despite the fact that they're designed to do minimum damage to optimally-built characters. The ITF is a good comparison, as the ambushes and scripted spawns are easily aggro capped, and they are far more survivable to a greater variety of builds than an S/L AE farm, even with the additional benefits of the massive -def and mez protection Cimeroran mobs have. Then there's the fact that this blanket change will alter the balance of every arc out there -- not just farms -- that uses custom mobs. The EB and AV change in particular will disproportionately affect non-farm arcs. A lot of the Hall of Fame/Dev's Choice arcs were made by players who are no longer active, so they're not going to be adjusted, potentially making them unplayable to a significant portion of their intended audience. Finally, I question the idea of making the telegraphing-attack-and-twitch-reaction mechanic a part of AE. It was always one of the more controversial additions to the game, as it made the game less accessible to players with disabilities or slow reaction times. Adding the mechanic as an additional toy to the arc writer's toolbox might be interesting for variety, but adding it to every AV with a nuke or extreme-damage attack seems rather drastic. So I don't understand what the purpose of this change is. It's likely to exacerbate the death spiral of AE. The one-two punch of 1/3 XP and significantly harder mobs will discourage people from trying out arcs containing custom mobs. It will hurt roleplayers who rely on custom NPCs for storytelling. The effect on farming will be relatively low, because worst comes to worst, farmers could just switch to stock mobs.
-
Being mezzed also used to detoggle everything. If the animation time was ever meant to be a balancing factor, it was long obsolete, as leadership faced devastating nerfs over the years, most notably GDN. I think of it as an artifact like how Superior Invisibility cost 1.04/s endurance on live despite its defence (the tooltip still calls it "extremely high") being a paltry 2.25% in combat.
-
AVs aren't just fought by full teams of 8. Low-level characters with weak builds also face AVs. Buffing AVs will just make tanks and perhaps healers required to take on AVs, which is counter to what CoH is about. Farms don't use AVs. Only story and challenge arcs use AVs. Buffing AV damage by almost a hundred percent hurts those very disproportionately. Farmers will also get hit, but not in a good way. This will turn AE farming into even more of a monoculture than it already is, because optimized builds will be able to take the increased damage, but not builds that were already marginal to begin with. Farming gets a bad rep, but it is a legitimate part of the game. One thing that is not often acknowledged is that farmers, both on live and on HC now, are a backbone of the in-game economy, as they generate a significant proportion of the drops that go on the market. Less farming means a scarcer market. It's almost certainly even more pronounced on HC than on live because of the lower player population. And as has been pointed out above, the lower damage scale is not an error but working as the Paragon devs explicitly intended.
-

The MacGyver Manual, or "You used X to make Y?!?"
ROBOKiTTY replied to Raevyn_Darke's topic in Base Construction
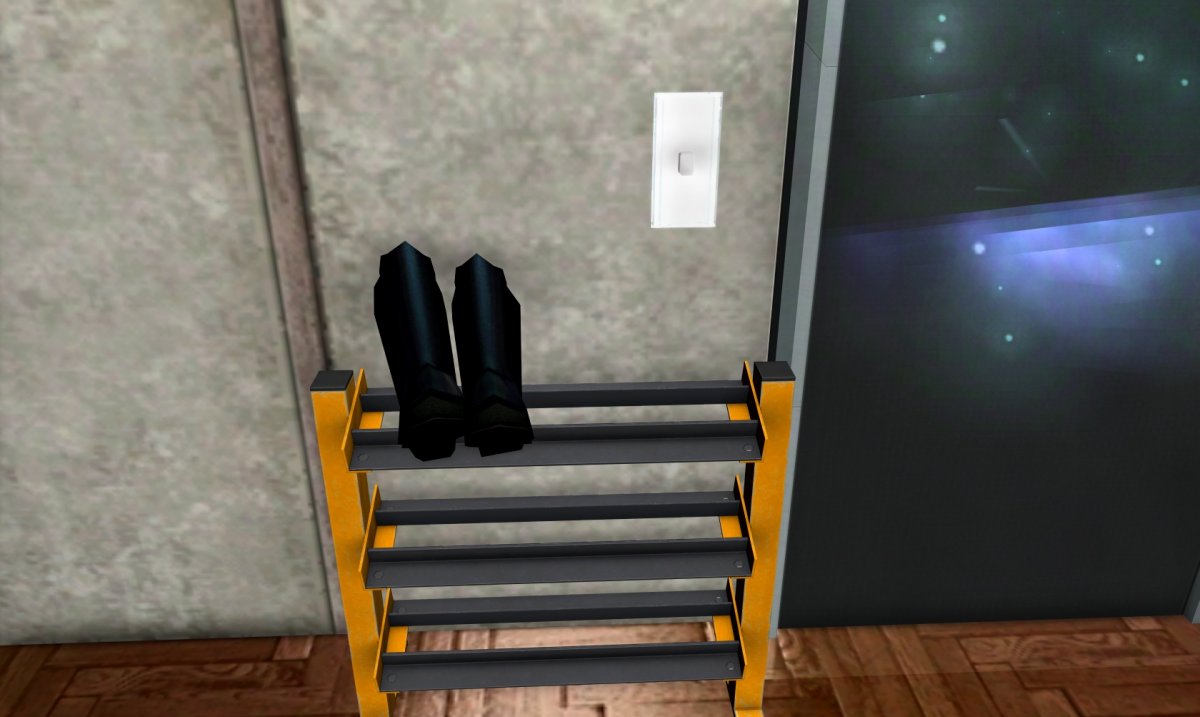
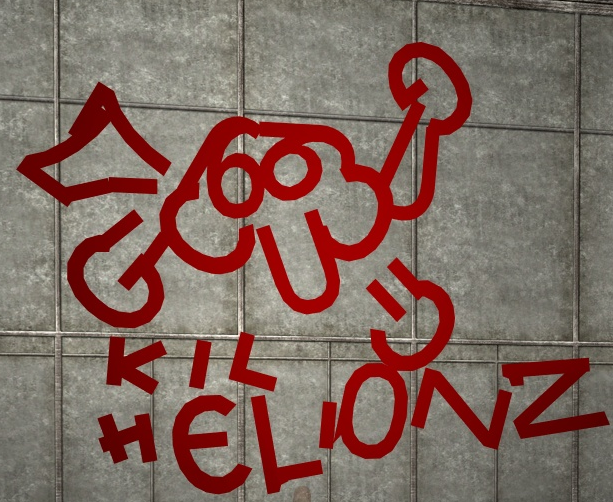
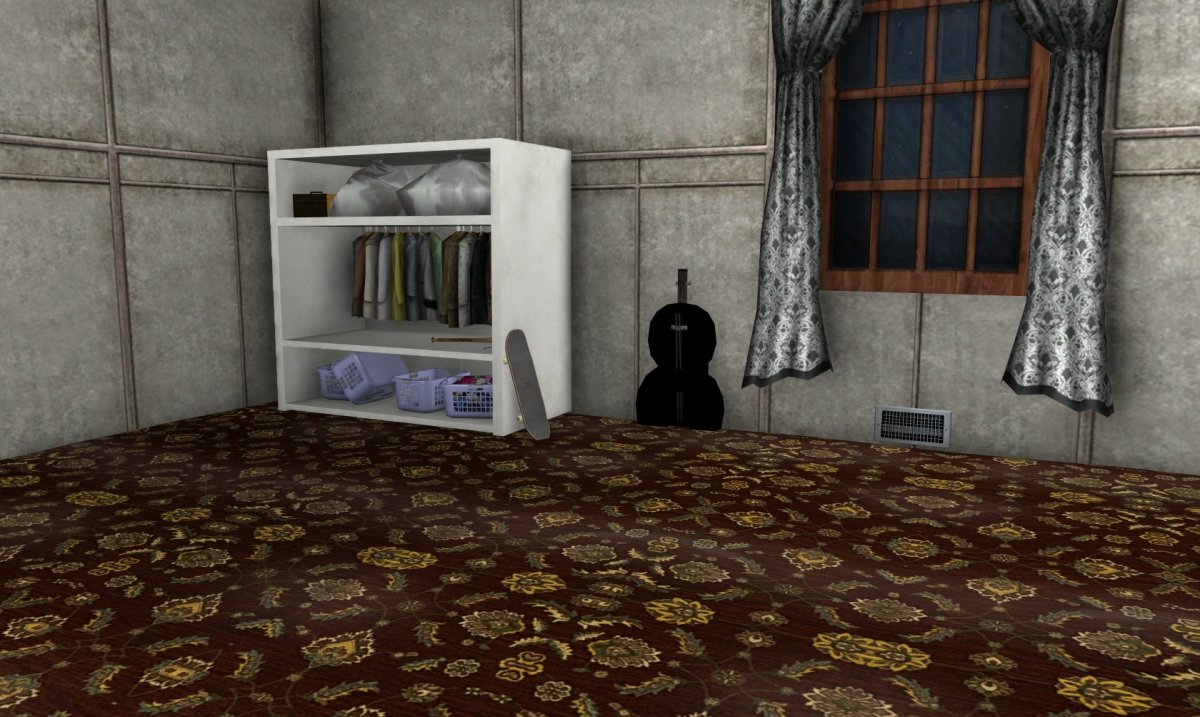
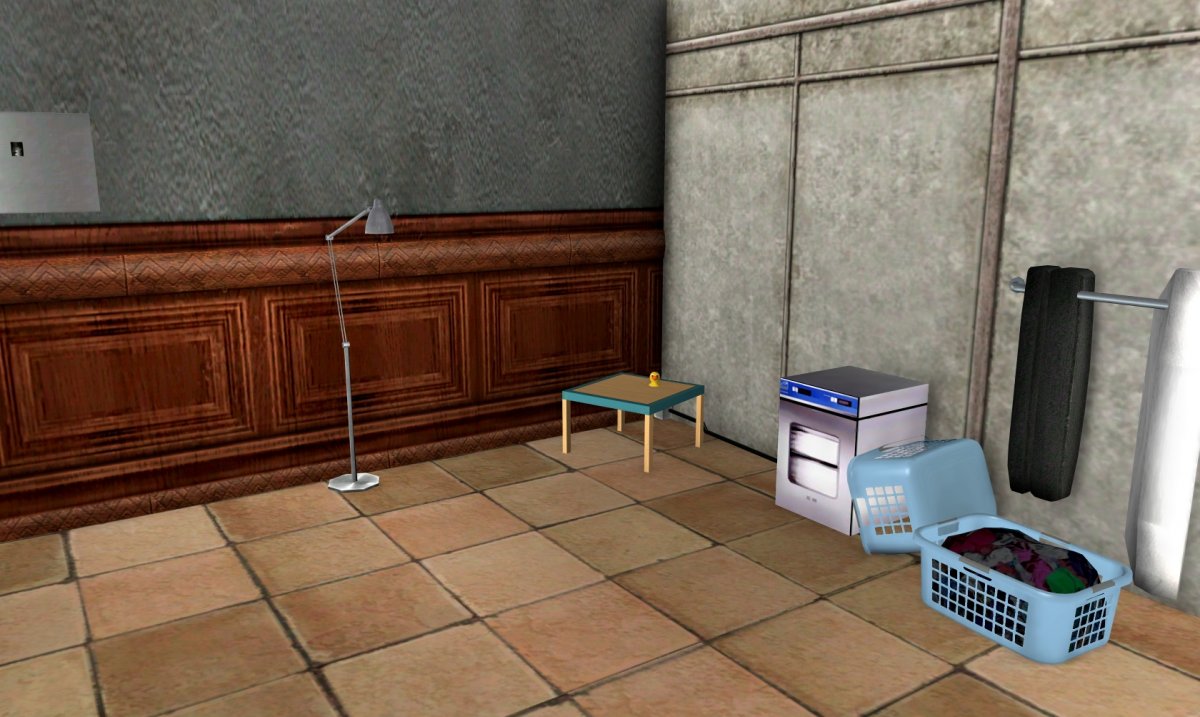
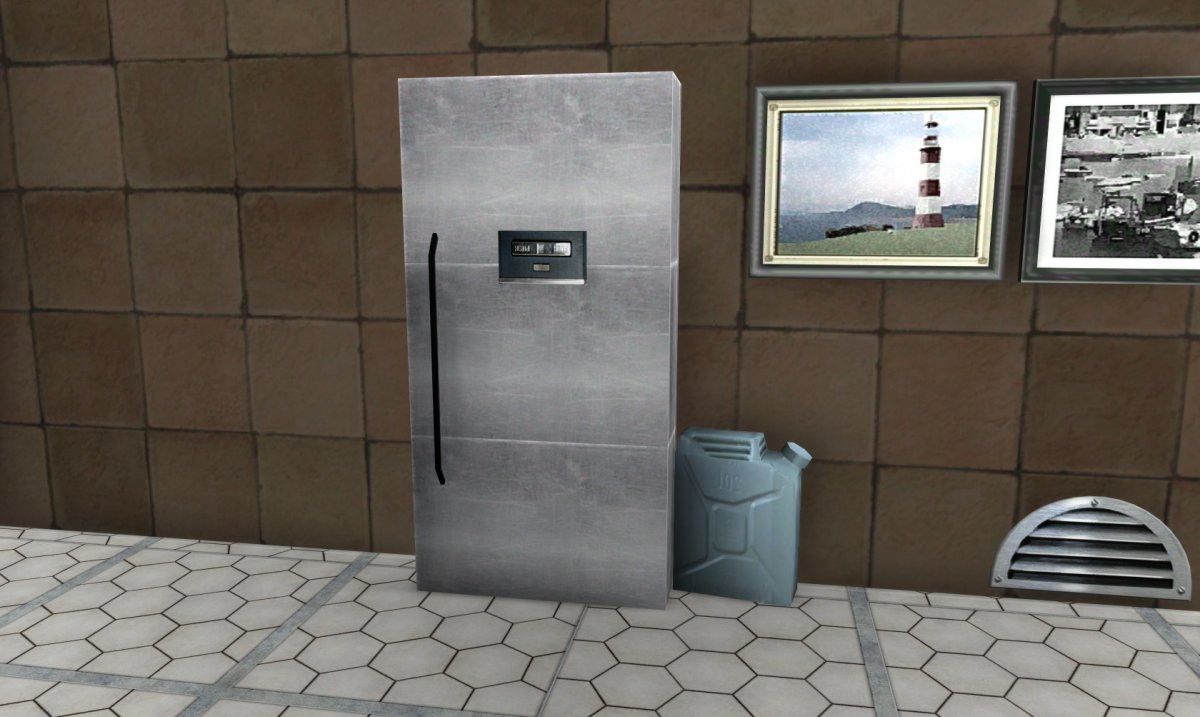
Shoe rack with a pair of boots to make it clear what it is. The boots are an Arachnos wolf spider armour suit partially buried in the wall. The light switch is a security camera and a sauce packet. Wall graffiti. All letters or numbers buried into the wall to appear completely 2D when viewed from the side. Cello made with the number 8 filled in with hyphens. Also standing closet made with shower floors and clothing racks with some clipping. Alternate light switch using a patient monitor and the handle of a knife tilted downward. Also two towels using chairs. Couch cushions using chairs clipped into the ground. Wall decals using letters and numbers. Freezer with control panel made from an upside-down water fountain. The handle is a single power cable. Bath mat is the back of an exec chair. Mould with dirt pile and grave mound.
-
The AE damage change seems misguided, The damage was deliberately tuned this way for balance reasons. It's always been the case that custom AE critters are overpowered relative to standard critters, especially the higher in rank you go. Powersets in AE were based on player versions but use NPC modifiers, so they scale to absurd values in cases where the numbers differ significantly from NPC versions. This was known on live and deliberately adjusted for. The XP curve means at higher ranks, every custom critter has more attacks than their standard counterparts, giving them more fluid attack chains with less downtime. The change to AVs is going to make them do too much damage. People already use AE to build challenges beyond anything seen in game. This is going to invalidate those overnight and also make existing AE arcs with custom enemies much harder than designed. Some numbers from quick testing using level 50 AVs on a solo stone tanker running nothing but rooted for mez protection. Resistance is 19% S/L, 7.5% fire/cold, 6% energy/negative, 29% psi, 6% toxic. Custom AV: (Damage aura) [12:42:49] Corrupted Positron hits you with their Death Shroud for 147.98 points of Negative Energy damage. [12:42:36] Corrupted Positron hits you with their Barrage for 318.71 points of Smashing damage over time. [12:42:36] Corrupted Positron hits you with their Barrage for 118.38 points of Energy damage over time. [12:42:29] Corrupted Positron hits you with their Energy Punch for 446.19 points of Smashing damage. [12:42:29] Corrupted Positron hits you with their Energy Punch for 221.98 points of Energy damage. [12:50:21] Corrupted Positron hits you with their Bone Smasher for 637.42 points of Smashing damage. [12:50:21] Corrupted Positron hits you with their Bone Smasher for 473.56 points of Energy damage. [12:42:46] Corrupted Positron hits you with their Total Focus for 637.42 points of Smashing damage. [12:42:46] Corrupted Positron hits you with their Total Focus for 1894.28 points of Energy damage. [12:43:05] Corrupted Positron hits you with their Energy Transfer for 994.38 points of Smashing damage. [12:43:05] Corrupted Positron hits you with their Energy Transfer for 2219.86 points of Energy damage. [13:07:12] Corrupted Positron hits you with their Knockout Blow for 2269.25 points of Smashing damage. Standard AVs for reference at equal level: [12:44:39] Back Alley Brawler hits you with their Punch for 733.04 points of Smashing damage. [12:44:43] Back Alley Brawler hits you with their Hurl for 721.31 points of Smashing damage. [12:45:09] Back Alley Brawler hits you with their Bone Smasher for 733.04 points of Smashing damage. [12:45:09] Back Alley Brawler hits you with their Bone Smasher for 544.6 points of Energy damage. [12:43:57] Back Alley Brawler hits you with their Total Focus for 703.72 points of Smashing damage. [12:43:57] Back Alley Brawler hits you with their Total Focus for 850.94 points of Energy damage. (Back Alley Power Punch is BAB's version of energy transfer) [12:45:13] Back Alley Brawler hits you with their Back Alley Power Punch for 469.14 points of Smashing damage. [12:45:13] Back Alley Brawler hits you with their Back Alley Power Punch for 850.94 points of Energy damage. [13:06:10] Statesman hits you with their Knockout Blow for 1249.36 points of Smashing damage.
-
I updated BadgeList.mnu on the last page per AboveTheChemist's changelog. I split the Praetorian badges but kept them in the same category with the text "(Praetorian)" prepended.
-
Focused Feedback: New IO Sets (Build 3)
ROBOKiTTY replied to Jimmy's topic in [Open Beta] Focused Feedback
Bombardment in its current state will make Annihilation largely obsolete, as the non-overlapping set bonuses are more desirable, and the enhancement values are also better, trading a little accuracy (made up for with its accuracy set bonus) for more recharge enhancement, which is fairly low in all non-unique TAoE sets, with Annihilation formerly being the best (but still mediocre). Bombardment also gives more recharge enhancement than the purple version of the winter TAoE set, and its set bonuses are almost entirely superior to the the winter TAoE set when uncatalyzed, in addition to having a much better proc. Shrapnel has similar issues in terms of the enhancement values being better than anything else currently available. The enhancement values are better than Ragnarok across the board. -
I tested the new mapping. It seems to be all correct, but feel free to double-check since I derped on first sweep. On the plus side, I got three characters all Faultline/Echo: Faultline exploration badges. I've updated my menu accordingly.
-
I endorse this message for weekend Abyss Hamidon raids~
-
Another batch of typographical fixes courtesy of AboveTheChemist.
-
Added a few missing badges and fixed a few errors. New version up in previous page.
-
Do you remember which badge(s) you tried clicking on? I picked a few random badges I had via the popmenu, and it set the titles correctly. It's possible you just so happened to pick an option or a series of options that had incorrect ID's. I'll move Hero Slayer to villain defeats.
-
I also added settitle functionality to my version of the popmenu.
-
(old post body archived) Features: All badges in the game sorted alphabetically by category with accolade requirements included, Click on any available badge to set it as title. To install this, go to your HC install folder. Look for the folder data/texts/English/menus, and drop BadgeList.mnu in it. If you're using the new HC launcher, that's not where the launcher executable is located but the root folder where you see other folders like accounts, assets, bin, etc. If data/texts/English/menus does not exist, create this folder structure. Place BadgeList.mnu there. If the game is open when you place the file, you have to restart, and any change to the file is only reflected after relaunching the game. Once this is done, use the slash command /popmenu BadgeList to use it. It will open the popmenu wherever your mouse pointer happens to be at. It's recommended that you make a macro or bind it to a key. Syntax for macro/bind is as follows: /macro Badge "popmenu BadgeList" /bind b "popmenu BadgeList" Changelog: Edit 1: I've found the missing badges and added them. There are now 1533 entries, and so the list is complete, assuming no duplicates. Edit 2: Cold as Ice added Edit 3: all missing tags filled in (h/t AboveTheChemist), only The Constant missing now Edit 4: The Constant added Edit 5: Now when you click on an option, it will assign the badge as your title. Edit 6: removed a duplicate/outdated entry Edit 7: moved Hero Slayer to villain defeats Edit 8: miscellaneous fixes Edit 9: added a bunch of missing badges and fixed various errors, h/t AboveTheChemist Edit 10: miscellaneous typographical fixes by AboveTheChemist Edit 11: Tried and True moved to exploration -> multiple zones, fixed tag Edit 12: Attempted fix of Faultline exploration badges Edit 13: I derped Edit 14: fixed Praetorian badges Edit 15: fixed Praetorian version of Patroller badge Edit 16: reorganization Edit 17: added new anniversary badge (Resurgent) Edit 18: HCi27p1 badges added Edit 19: Updated for patch of 1 Dec 2020. Added requirements for various accolades. Edit 20: HCi27p2 beta badge added. Edit 21: 17th anniversary badge added Edit 22: Sinister Summoner Edit 23: HCi27p3 beta badges added. Edit 24: License to Chill Edit 25: master badges Edit 26: p4 badges. Dunno why the duplicate attachments won't go away. The current one is 220.5kb. Edit 27: Halloween E28: p6 badges BadgeList.mnu
- 66 replies
-
- 11
-
-

-

-
This is an update/addendum to my old Issue 18 guide, mostly with new information to account for changes since i18. Information in the old guide should still be current unless superseded in this addendum. I may update this as I think of more to add. This addendum assumes you have read the Issue 18 guide linked above. Incarnate powers and the greatly relaxed alignment system are the main highlights of what's changed since i18. The general gist of how a Hamidon raid operates and the strategies have not changed greatly, but it is generally easier nowadays, given a similar level of experience in raiders. Quick Recap The Hamidon raid is a multi-team task characterized by some special mechanics. Hamidon appears as a giant single-celled organism with a nucleus in the middle surrounded by three rings of protective mitochondria. The ultimate goal is to defeat the nucleus. However, the mitochondria, which come in three varieties and are usually identified by their colours, pose a serious threat. Mitochondria Antibodies, which are yellow, fire large, devastating AoE blasts that stun and cause knockback. Mitochondria Electrolytes, which are blue, shoot chaining blasts that cause fear and drain endurance. Mending Mitochondria, which are green, send healing pulses to mitos and Hamidon itself and also deals toxic damage and debuff healing and regeneration. Yellows are the primary threat and are vulnerable mainly to melee attacks. Blues are vulnerable to ranged attacks. Greens are virtually invulnerable until locked down by holds, after which they quickly crumble. Hamidon itself has very high resistance and fires large, hard-hitting AoE blasts that cause stun/KB, mildly debuff healing and regeneration, and also drain a little endurance. Hamidon and its mitochondria ignore traditional defence and resistance. Instead, only the special inspiration Essence of the Earth, dropped by monsters that inhabit the zones Hamidon is found in, provides protection -- an EoE provides, for one minute, full Hamidon resistance and lowers yellow and Hamidon damage down to a manageable level. When Hamidon reaches certain health thresholds (75%, 50%, and 25%) for the first time, it will spawn a new set of mitochondria on top of any that has still not been defeated. These spawn events are called 'blooms'. The canonical strategy for defeating Hamidon, therefore, is to clear out the initial set of mitochondria, reduce Hamidon down to 75%, break off to engage and clear out the bloom (allowing Hamidon to heal back to full), and so on for the next two blooms before finally finishing off Hamidon. This mechanic has been copied in some later content, such as the Lord Winter trial. This addendum uses some jargon from Virtue that may be unfamiliar to many. Tanks or taunters are responsible for drawing the attention of Hamidon or yellow mitos, preferably from a range away from others. Spikers are meleers who descend en masse on yellows to rapidly defeat them. Assaulters are ranged attackers who neutralize blue mitos. Control means using holds to lock down green mitos in order to shut down their regenerating shields. Rewards Hamidon raid now grants, on completion, 80 merits, 4 Empyrean merits (which convert to 40 merits), or a random Hamidon enhancement (HO). The Emp merits and HO may only be chosen once every 18 hours, while the merit option is subject to diminishing returns (halved each time) within that same timeframe. Raids in both the Hive and the Abyss are considered the same activity and share the same timer. To qualify for the reward window, your team (not league) must have dealt damage to the Hamidon nucleus; you need not have personally damaged Hamidon, so a Hamidon tank with no ranged attack who taunts from a range will still get credit as long as their team as a whole has dealt damage. You can run two back-to-back raids, keep the second reward window up for 18 hours, and claim a full reward again after the time has elapsed. It is possible (if a hassle) to continue playing with the reward window up through most content. Note that another reward window will replace the old one, so avoid participating in tasks that open a reward window (e.g. incarnate trials and certain task forces, missions, and zone events). Hamidon's mitos used to be a good source of rare salvage drops, but this appears to have changed, and now they mostly drop common salvage. Because of their high enemy rank, Hamidon buds have decent enhancement converter and catalyst drop rates. Variation in strategies since i18 In general, some of the finer details of Hamidon raid mechanics are less relevant thanks to increased player power level. A brute-force approach can overpower many of the obstacles that were once a challenge. Green heals on yellows come in pulses, and it is trivial these days for a less-than-full team of spikers to output enough damage so that redirecting green heals elsewhere is less essential. The wide availability of long-lasting destiny buffs also reduces the threat posed by Hamidon blasts and removes a need for the Hamidon tank to stay at range. Raid groups with experienced yellow tanks may also skip the step of assignment, which was a lengthy part of pre-launch preparations. Instead, the raid leader could trust that yellow tanks have enough situational awareness to react in a timely fashion and that the rest of the raid group have the wherewithal to survive stray yellow blasts. The need for coordination and leadership is less stringent now with the league system allowing a raid leader to micromanage everything. The league can simply be told to follow a designated leader for yellows, blues, and greens respectively. The availability of the /ah command opens up the market in a raid, both as a storage place and as a means to acquire more inspirations. Be aware that EoE prices tend to spike during raids. Enterprising raiders might consider setting out low bids ahead of time to ensure a ready supply of EoEs, which reduces dependence on monster hunts yielding enough drops. Required roles 1 Hamidon tank 2-6 yellow tanks 3+ spikers 3+ assaulters 4+ control specialists 1-2+ support The above forms the core of what I think of as the bare minimum to pull off a Hamidon raid that is not an exercise in sheer frustration. Obviously, the more you have, the better it is likely to go. Typically, a raid will not need more than one Hamidon tank and six yellow tanks. If a raid group is low on yellow tanks, each may have to take on two or three yellows simultaneously. In a pinch, the Hamidon tank can also take on a yellow. In general, the fewer people you have, the more they'll have to take on dual duties. Spikers may split up and solo a yellow each to alleviate the burden on the tanks. Support should assist with assault and control when buffs are on cooldown. I'm usually comfortable with starting a raid if I have 20 or more people able to fill the above required roles. When a raid has 30 or more people, I become open to skipping the last two blooms depending on DPS. The more people are level 50+1 with all incarnate slots filled, the smoother a raid should be. Experience level of participating players is probably the most important factor. If no one knows what they're doing, then even a full league may run into trouble. While some ATs are more suitable than others, there is no hard restriction on the AT to perform each role. A tank does not have to be a tanker or brute. I myself have done Hamidon tanking as a tanker, brute, scrapper, stalker, and defender. Yellow tanking is best done by a tanker, brute, or scrapper because of their access to an autohit taunt power. However, any AT may take on yellow aggro by attacking them in melee, as long as splash damage on spikers is deemed an acceptable tradeoff. Regarding leagues When you try to invite people to a league, sometimes you may get the message, "Could not invite <Name>, BlockingAccept". This doesn't mean what it sounds like. They have not blocked anything. Simply send another invite. When you invite someone to a league, occasionally it may fail to actually put them on a team despite them appearing as such in the league UI. They will not get team credit for tasks or receive teamwide buffs. If the team or league is overfilled with someone glitched in this manner, it will glitch out the league UI. One method to check is to ask each individual to check their team window to make sure they are on a team. The team leader should have received the message, "Name was unable to join your team", and the victim should have also received the message "You were unable to join Name's team". You may also use /search to see if anyone on the league and in the zone is unteamed. This glitched state can be fixed by moving them to another team (and back) by dragging them in the league window, or you can kick them or ask them to quit and reinvite them. Sometimes, the league window may spontaneously become unpinnable and stretched out horizontally instead of rescaling vertically as normal. At the bottom right corner of the window, there are two arrows to readjust the league window. The right arrow stretches the window horizontally and the down arrow vertically. This adjustment should allow the league window to be pinnable again. If someone joins the league and appears to be in a locked team, they may still be on a TF, Ouroboros flashback, or AE arc. They will have to quit and be reinvited. A league is just a convenient assemblage of multiple teams. It does not replace team mechanics (although powers that target a friendly PC like recall friend and vengeance can work on leaguemates). Defeat credit is still only shared teamwide, as are team buffs. It is best not to leave someone solo on a league (unless that is what you want). You may reorganize teams by dragging bars around in the league window. Check to see that each team is led by a level 50, or the rest of the team will be exemped to a lower level. You may allow the team itself to resolve the issue, or you could move the team leader to another team, which will automatically pass the star to the next person in the team list (the order of which may not match the league display). You could also appoint new team leaders by dragging the desired person to an empty space in the league window (only possible if the league has 5 or fewer teams) and then dragging each member of the old team to the newly opened team. Note that the league UI may decide to flip the team order while you're doing this. There is no known slash command for most league operations, so the GUI is the only way to accomplish most tasks. There is no way to league-invite someone if they are not physically present or have not recently spoken. You can get around that by ensuring your own team has an open spot and then using the team invite command /invite to add them to your team. They can be moved after. An alternative is to (temporarily) add them as a server friend (/friend <name>) and then use the right-click context menu to send a league invite. Someone who is not in the same zone cannot be moved. If they happen to be a team leader, you cannot alter their team. There's not much you can do about it other than waiting or removing them from the league. If, when you try to move a player, you receive the message, " Player can't be moved to that team. The team may be full, locked, or you may have moved another player too recently and need to wait briefly before making another move." and none of the suggested reasons is true, that may mean that the player has the team leader on ignore. A league can have at most 48 members, while the Hive and the Abyss have a zone cap of 50. It's an unfortunate mismatch that means around two people may be left on their own. A raid leader could consider splitting the main league (e.g. two leagues of 25 each or capping the league at about 42 to allow an overflow team to form) or even forgoing leagues at all and coordinating the raid the old-fashioned way. Or the unteamed could just curse their luck and follow along. You can invite a whole team to a league, assuming you have enough space left. Mobility The Hamidon protoplasm is normally blanketed in a slow/interrupting effect. However, area effects appear to be bugged and apply inconsistently, so there is no longer a reliable jump height buff within the goo. Fortunately, jetpacks are cheap and accessible. Hamidon Buds Hamidon Buds have made a return. When Hamidon's body despawns, remnants called Hamidon Buds spawn randomly at players in the zone and as such may appear quite far from the main raid group, depending on player position. All Buds need to be cleared for Hamidon to spawn again. A thorough post-raid sweep is recommended if a subsequent raid is to follow. Incarnate powers The Hamidon nucleus and the monsters in the zones are levelless, but the mitos are level 50. Therefore, having an alpha level shift provides a noticeable benefit. For example, a yellow mito deals 521.6 upfront and 41.34x5 DoT damage to a level 50 character without an Essence of the Earth active. For a level 50 character with an alpha level shift, the damage goes down to 469.44 upfront and 37.2x5 DoT. Destiny is a game changer, though some are less useful than others. Barrier core has almost no noticeable benefit, as Hamidon raid mechanics almost entirely negates defence and resistance. Green mitos deal toxic damage, but the damage from green blasts alone is seldom a great threat in a Hamidon raid. Barrier radial's areal rez may come in handy situationally, though there are better uses for the slot. Rebirth core is simply outclassed by rebirth radial, as many ATs have low HP caps that don't benefit from a buff to max HP. Increasing max HP indirectly increases regen, but the amount from rebirth core is negligible compared to what rebirth radial grants. Rebirth core epiphany gives 374.8 max HP for the first 10 seconds, 160.62 for 30 seconds, 107.08 for one minute, and 53.54 for two minutes. My willpower tanker, as an example, has 3180 HP and 2.9%/s (about 92 HP/s) regen assuming one target in range for Rise to the Challenge and no debuffs. Rebirth core epiphany will hardcap the HP and raise regen to about 102 HP/s, so roughly an increase of 10 HP/s in the first 10 seconds. On the other hand, in the last 60 seconds alone, rebirth radial epiphany grants more than 15 HP/s. It's not even a contest. The timely use of rebirth radial aids in survival greatly and reduce dependence on EoEs. In short, rebirth radial is probably the best destiny power for a Hamidon raid. Ageless is probably the most popular destiny power, so in a raid setting, plenty of it should be going around, which will largely nullify the endurance drain from blue mitos. The extra recharge is also quite handy. Clarion helps cope with the mez effect from blue mitos and yellow and Hamidon blasts. This in combination with EoEs can allow a raid to endure enough yellow blasts from multiple blooms to finish off Hamidon. More on this later. Incandescence is situational. It can be used for emergency evacuation or when the raid needs to regroup. The healing buff roughly negates one green blast. It's not much, but there may be some limited benefit for the Hamidon tank, at the expense of staying ungrouped to avoid porting team/league mates along. There's not much to say about interface other than the fact that in a raid setting, it's likely that at least one person will have degenerative interface slotted. The consequence is that Hamidon's max HP can no longer be taken to be a constant, so the base numbers for the health thresholds will fluctuate. Raid leaders will have to use their own discretion as to when to call a bloom. Lore adds a lot of damage and is highly helpful in a DPS push through one or more blooms. Make sure to order lore pets to attack Hamidon and/or set them to aggressive. Of note, the highest damage lore type is Banished Pantheon core branch, while Longbow Cataphract from Longbow core has a large regeneration debuff. Assault and support hybrid may be saved for a DPS push as well. Melee hybrid can be of use in personal survival. Non-melee support for Mitochondria Antibodies (yellows) Yellow mitos have capped defence to attacks tagged ranged and AoE. There are a few nonpositional attacks that bypass that defence. Examples include blind from illusion control and mesmerize, dominate, and levitate from mind control, fortunatas, or defenders/corruptors with psychic mastery epic pool. These powers are not high damage but may come in handy when melee needs just a bit of help. Enough ToHit buffs, e.g. aim after power build up, may allow ranged attacks have a non-negligible chance of hitting. It's not an optimal use of resources, but it is an option. Fulcrum shift may be cast off a yellow mito to boost meleers in range. It is not necessary for the kin to be in melee range, though being so will give an extra boost. Autohit debuffs like enervating field can be applied on a yellow mito to lower its resistance. Absorb Hamidon ignores absorb shields. Power analysis Dark armour, with enough knockback protection, can survive tanking Hamidon for extended periods, potentially indefinitely, without EoEs or external buffs. Dark regeneration is not affected by the heal debuffs from Hamidon and green blasts. The main drawback is that missing can be deadly. It's possible to sandwich oneself in range of Hamidon and a low green mito to ensure two targets to use dark regeneration off. The spot can be tricky to find in a timely fashion, however. Siphon life from dark melee (and less reliably, radiation siphon from radiation melee) can further supplement the healing. Sets with capped or near-capped toxic resistance, such as stone armour and radiation armour, make excellent green aggro absorbers. Once yellows are out of the picture, they may stand or hover next to greens nearest the Hamidon tank to shield them from green blasts. Summons are great for absorbing green blasts as well. Carrion creepers from plant control is exceptional for this purpose. The downside is that pets also serve as jumping points for blue contagion, though this is usually much less of an issue than green or yellow blasts. Kinetics is highly beneficial in a Hamidon raid, because with Hamidon's high resistance, damage buffs add more damage than resistance debuffs. Kins should spam fulcrum shift and siphon power off Hamidon as much as possible. Something to note is that only the resistance component of increase density is AoE; the stun and KB protection still applies only to a single target. Skipping bloom(s) When Hamidon is defeated, all mitos despawn, so it is not necessary to clear every bloom, and a strong enough raid group can power through with sheer DPS and momentum. The key to a successful push is a judicial use of buffs and EoEs. A 100% push, sometimes called a Hamikaze, is the most risky and involves going straight for Hamidon without defeating any mito. By the end of the attack, there will be four sets of mitos. Failure to defeat Hamidon at this point essentially means a failed raid, as a quadruple bloom is simply not worth trying to recover from (except for the challenge). A somewhat safer alternative is to clear the initial set of mitos and then take Hamidon from 100% to 0. Destiny and aura buffs and EoEs should be used for right around the time of the first bloom to spawn. A triple bloom is salvageable but rarely worth the effort to clean up. A 50% push is a compromise between speed and recoverability. This involves clearing the starting set of mitos, taking Hamidon down to 75%, clearing that bloom, and then taking down Hamidon. There will be a double bloom by the end. It's possible for a raid to wipe here, but cleaning up the aftermath is not especially difficult, though it can be rough if the raid is short on people or resources, or if morale takes a heavy hit from repeated wipes, and people start leaving. A 25% push skips the final bloom and was a reasonably safe option even back in Issue 18. Even if it fails, there is not much difference from the traditional method of clearing every bloom. Hamidon doesn't spawn a bloom immediately upon reaching a health threshold. There's often a slight, unpredictable delay, the length of which can vary. It takes a further moment for the newly spawned mitos to begin to react. The length of this indeterminate window can sometimes be a decisive factor in the success or failure of a push. Failure is generally the consequence of yellow blasts incapacitating the raid with stacking knockback and stuns and outright defeating players who have not activated an EoE. For extra safety, a raid may trade off a little DPS by sending the yellow aggro management team to disengage from Hamidon and get in position to intercept yellow blasts right before the first bloom. A yellow tank may in some cases have to manage up to six or more yellows at once in a triple bloom, which can be overwhelming, but they only have to last long enough to DPS to finish its job. Some stray yellow fire is difficult to avoid, but clarion, rebirth, and EoEs should suffice if DPS is sufficient. Clearing a double bloom A double bloom takes more coordination to clean up. Spike teams should focus on the same targets at a time. Sometimes it may be helpful to call a retreat to regroup and reapply aura buffs. Every mito defeated makes it progressively easier. The large amount of green blasts is devastating for the Hamidon tank, as EoEs do not protect against them. It is inadvisable for the tank to stay in range. A hit-and-run approach is likely to be safer: i.e., the tank should get in range to taunt and/or attack Hamidon and dart out of the protoplasm, only going back in occasionally to repeat the process. They should take care not to get too far, or Hamidon will aggro on another target. Clearing a triple bloom In a triple bloom, the protoplasm is deadly to squishies. The sheer amount of blue and green blasts will immediately incapacitate and defeat any who gets too close. Yellow tanks will need mez protection buffs, and the raid should focus on chipping away at the yellows one at a time. Green teams should focus on distraction and not bother going after greens until yellows are finished. Going into close range with green mitos is a bad idea until the whole league can gather up for green phase. Be prepared for many wipes while making only incremental progress. It'll get easier with every yellow and blue taken down though. Many if not most raid groups will find a triple bloom simply too much to clear. It's okay to cut your losses and try again elsewhere and/or elsewhen. Clearing a quadruple bloom Like triple bloom but dialled up to eleven. Hamidon spawn RNG It takes between 5-50 monsters to spawn Hamidon. Sometimes the RNG leans more towards the latter, making the monster hunt long and tedious. At the entrance to the Hive, there are police drones that you can pull monsters to. Droning monsters counts towards spawning Hamidon. Hive/Abyss comparison Now that the alignment system has been greatly relaxed, most characters can go to both the Hive and the Abyss for Hamidon raiding, so how do they compare? Unfortunately, since devs hated villains, the Hive is the better choice. The Abyss is a more graphically intensive zone, so raid lag tends to be worse there. Monster density there is lower, with no monster walls as in the Hive, so monster hunts tend to take longer. There is a lack of drones to expedite a slow hunt, and that also means the hospital and the entrance to the zone is unguarded. Verticality is also more of an issue in the Abyss, with a lot of nooks and crannies for Hamidon buds to hide in and slow to navigate for nonflyers. HOs vs IOs With the introduction of enhancement boosters, IOs have further edged out the position HOs used to occupy. A level 50+5 dual IO is about equivalent to an equal-level dual HO. HOs can be combined to reach 50++, at which point they are slightly better. The difference is minor, only about 3% for Schedule A and 2% for Schedule B (defence, ToHit, resistance, range). Triple HOs are much better for powers that can make use of all three enhancement types. Examples include enzyme exposure (-ToHit/-defence/-endurance) in a power like radiation infection in the radiation emission powerset and membrane exposure (+ToHit/+defence/+recharge) in powers like mind link in Arachnos Widows and fortitude in empathy. No IO can replicate the effect. There are some movement powers that increase more than one type of travel speed and do not take universal travel set pieces (e.g. swift, qucikness, lightning reflexes, sprint). It is possible to slot a microfilament (+travel/-endurance) here. This is also an effect that no IO can replicate..