

Onlyasandwich
-
Posts
1036 -
Joined
-
Last visited
-
Days Won
2
Content Type
Profiles
Forums
Events
Store
Articles
Patch Notes
Posts posted by Onlyasandwich
-
-
On 6/5/2024 at 9:03 PM, WhiskeyDingo said:
FF proc, how many powers should you really be putting it into?
There is no set number, but simply whether a given power has better slot options, a good proc rate, and if that rotation is already saturated pretty well with FFback.
I don't like it in shield charge, as it isn't happening enough to be all that worthwhile (5 second buff).
I do like it in at least one ST and one AOE attack if possible, as mcdoogss mentioned. If you have two aoes capable of slotting it, you'll really be able to cycle them smoothly.
On SS specifically, I put it in Foot stomp, Handclap, and Haymaker. You could put it in KO blow, but I prefer extra damage procs there. It could go either way.
The FFback buff is 5 seconds, and does not stack. However, it does refresh the duration on a new proc. With enough powers cycling in, you can keep pretty high uptime.
-
2 hours ago, tidge said:
Unleashed Potential
This is my new favorite power! A lot of tanks just need a boost to get out of a tough spot and stabilize, rather than permanent immortal resists. Unleash does so much and asks so little. The prereqs are even pretty universally decent.
-
9 hours ago, Maelwys said:
Grenade's damage
My results reflect yours. Slow procs are a nice addition if you have room. Targeted AOE not amazing.
Worth noting the base damage is quite decent as well! Base damage enhancement is a good start before procs here.
Tranq takes the two extra slow procs too, making it a better than average st blast with a useful control effect.
-
 1
1
-
-
On 6/4/2024 at 4:06 PM, Spaghetti Betty said:
tiny bump in recovery
As mentioned before, I don't have ageless, but I did some testing and indeed I don't think the extra recovery, though substantial, really matters too much. Great call-out!
Between Burn's incredible efficiency, and the fact that ET takes zero end, this combo is actually really end friendly where it counts most (clickies!)
I still didn't put it in Build Up though. That extra slot indeed went over the the Overwhelming Force KD proc. I tested it on some crowded maps and it's outstanding!
Avalanche KD proc plus Overwhelming KD proc = every 10 seconds roughly one third of the crowd gets knocked on its rear, and half a second later, one fifth of them do. Weirdly, they seemed to not engage at the same time, and had this tiny half second spacer. I can only guess it's due to the unique nature of the Overwhelming proc. It isn't a normal PPM proc, but set to a flat 20% chance no matter what. Perhaps the timing for its check is slightly different somehow. This is especially helpful, as otherwise they may risk stacking mag and turning into KB instead. In many minutes of standing amongst Rikti, no KB, and plenty slipping on their rears. 😄
This is a substantial amount of passive mitigation, and even affects bosses that lack KD protection! Makes a noticeable difference on a primary that is lacking extra layers of mitigation like Fire.
Update after my respec and playing:
Really satisfied! As @Sovera suggested, Burn and Whirling Hands is definitely enough aoe. I am kept plenty busy between them popping total focus and ET on bosses, then ready for the next round.
As in my initial testing, the double KD procs in Blazing Aura are also very effective. I'm going to consider this combo on more of my tanks!
This is my first time messing with the reworked Phoenix Rising as well. The control effects are very strong indeed. Between this and Unleash, I have two emergency buttons that can be followed up with Healing flames to recover and stabilize in a tough spot.
End management isn't remotely a problem. I didn't once have to rely on consume, even. I could probably pull the miracle and not notice much difference, but don't want to stress my baseline too much in exemping situations. Maybe I would consider siphoning it or Numina for that extra recharge in BU as @Spaghetti Bettysuggested - we'll see! As it is I sometimes forget to hit buildup in time anyhow, or it comes back when my TF+ET combo isn't quite ready for maximum impact.
I tested him on a +8X4 S/L farm, against +8X4 level 50 council, and the same for carnies. I was a little surprised that the psi damage mixed in with carnies didn't give me much trouble, though a more dedicated psi faction would probably pose issues. The soft controls really make a difference. Smooth sailing across the board so far.
Here's my final build for reference. I did move slots around a little to support some extra KB protection. Ignore the fact that I forgot to drop an enhancer in Taunt 😄
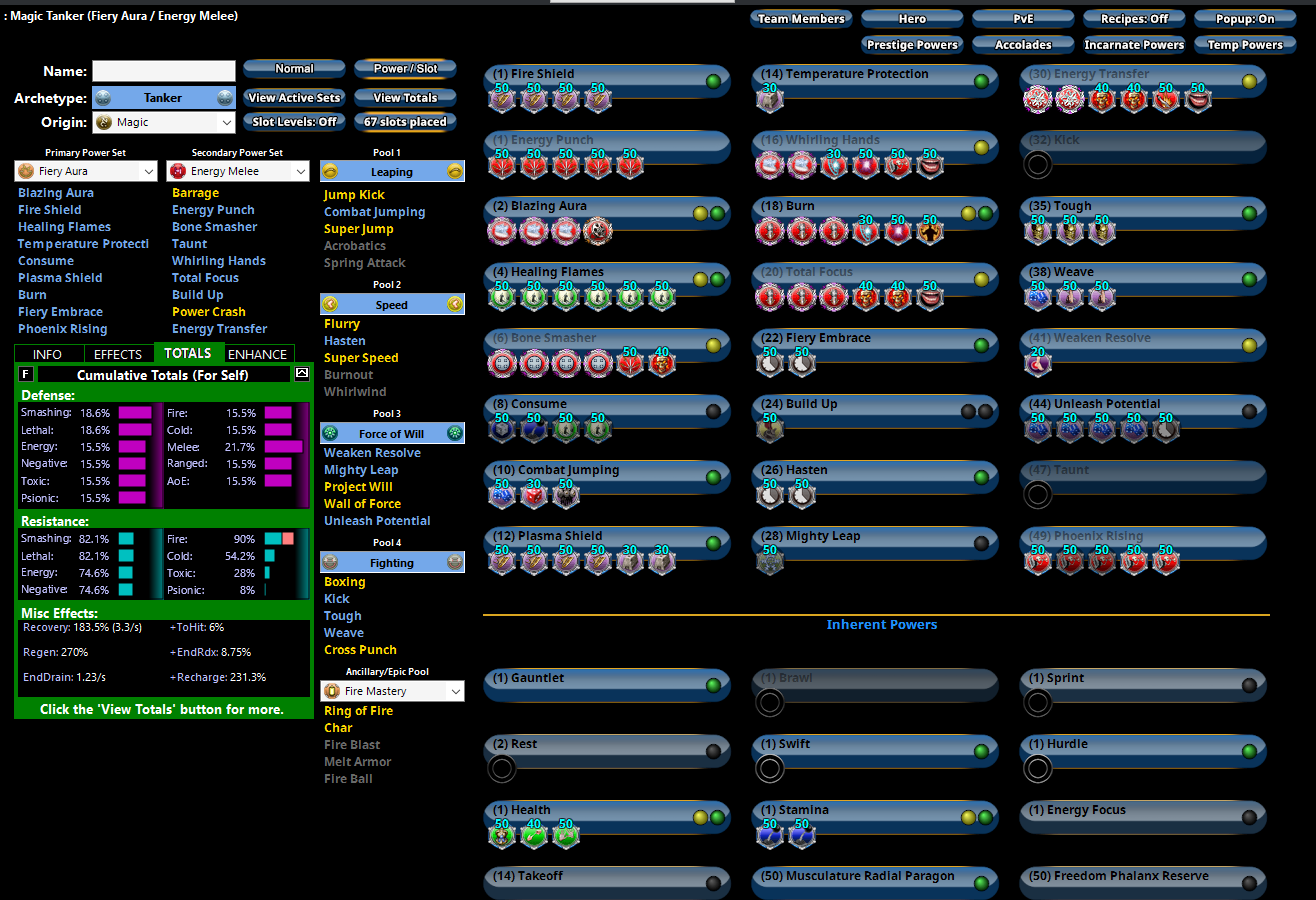
Tanker (Fiery Aura - Energy Melee) unleash.mbd
Chunk:
Spoiler|MBD;24110;1605;2140;BASE64;|
|Gy1eERWcFACtDnhq1Jk7MXpwUA1sWPmv605HpejZEalHflxo08mIlxG9CnMqP31C2bT|
|NCDr4bxQmS1df67CAdNWxYay7gLVr5ipD3LmHDYEHSOqwqtfu3VFFlqckOfn9f/eqhC|
|4WggLo/EJxGG0kfWVv1LGRY9QlT6FKMAMVumwDMiZFE4O+j3Qfso16CsNi5oaVs5aV9|
|dRiOL0K7UzSyZHBQ3gZk5UwLJK/VIgPC7muRq0j/25gJvdaOL+5cdzsJpuXYIe03ciK|
|Xgn2Zdb7yVCct3az52uskG5pnHco3KvNy9NiCXeD0RJKaXyvDMp2WmzPlD+S/Ix5jNV|
|S8W6SrIgNvUCVi9ueWdk8H3ROJMabDyrjQ2QHWpfvq2nkEUtJ71dbH+sNy46KuNQf98|
|oGy+yV/ZWst9Jgy1xgTLNe3eKX9qP7CEqspa6PdmnXpVhebHZPOI0XNn49m4U6dxVm4|
|O0HNShxKm20lVo4K1Go/2CJGRH0LnWx+uJ0bm7Gpk1Vzw80vZL7yaDXc+U7/z85ro+L|
|fSO5/Xkzm7XNYD3PDzXx2dJQX/ordC0mHV/vWwP34pDJC79k8wFJN2KINNIA3ddolrM|
|lX5/k0rkXk7108V38ld5iM5d+6k/8gabXxUFBCraNH6QPvF2aYADhw6sjbsV0Z7v6VS|
|gfzIJ23W3vZ/3bztgbdr+3aiftUKf+LXNTLEKBMJsAlELUQBlEnQh3LhjKt8n5MHyqP|
|xZYe1whIRlPh34iVds5flNeYfB+UqzFCG/WvBIwDk+TDNsiL4ZZ6fnGwL37GtiXEfYI|
|GibzjBt4jpBLA+5e0leKtwidbnEEpc0sgKKIYMGrgdDmRwS+ZYP3H4XllJjIkwHcQah|
|pBycWKn87OZ6y9z85EkRH+jWkNif8O6Ctm+J+B05Uv5FDh2yOS+UQK1ew8i6tnDKUe4|
|SP0uW5J0XkwDOZrPpWOP1fW9TLeeW3V+nUT+1IM4lvqHt+R1unMyOO2CcaQ5S6+943/|
|R4LlqFYV/KiQ9e8oaTYc5E9RgqM5BlJhj4wbchpSjFvlnJMPvNSc7JkBbpUKVp71UZk|
|gdlowqd2hpyQOKnaNWAlVpVaKo3WSkM4YMg6YX1EFDHuyBK7kqYRyLgY/JiAEhB2dii|
|YDXnztKUecACQFU9oBOf8cmoMVqugRPYKBx6EHk0Gof3Bc2lzpDC3cz5pDVWaUSj3cu|
|x9nu3NtBiE0YNtiWmaCDVOLjaq/4Cwl7zUH4wu8xHsaDeAD8Fv6PBvKMX2MhaHULPER|
|HQvF6wbCOnIuYyoZjNIOJe542MY5hfEMBS1QiunwjHOiFW9bfwDjBQbaiIhlVx0zAXv|
|AAwR1rohAXBAWWwBiezvDupXH+3zFuiUhsBCrUedVgd6AFFRXCm6+Ib7hlFFNj4s03V|
|1v1HEfpc/9s5zdq9PsTMVnhIfPretmU9ZvBZ0BKNWC21XpEcfGbLo6xl46huPA1aNck|
|5nM4eRy0MfUhF1bagjUxASPj3bgeWU0O7Z4+9j4rlb181rpGDu5F+Fada5A/lDdJlus|
|FFM8jiA2x6mACFJGYZI1taYQGdKiQp9cf5g1134Yi/l6eM7f9hiDVitx+gslTNHea4f|
|136cCbhyPFzL/emSmCuMAg/ajzizAuo1tn4hXpmArwQze0Z1/jMgoKNomGGPH2sKWIu|
|m402WwoV4ocvkd2xHPWAmz0xfv/RTzZiSkbbVgsFVfM/kRuQp3/PJvgZO695qE3nxLc|
|g4bsEbxdAABRhzo5NsGq2tH7G9xAXywsduCLjXW1waNFmYHt2di67vqwP4tU3hnmUTF|
|DQYDikzKkBSjF3Bp4FkhBdzu3C8YjTwlEM9Vcu2HoE3uyIsycPyWG22z6DiCvVKhwfm|
|CViIVUj/pZzbYbzpvSKtub85c8p2DOP+xCasoun9vHVwdMI/tPPUGuhG5Y5v3v4Lb/Z|
|UR4ouf4Ux6f2xeoG0XGCXjffVO+gTKroRlDcH0ks029PKBJh0d6TqftODteZ1ZCFkb+|
|kIR/H4I77sq3f2bQ6KnzRgKEw6BB5Ois1fdMcnpjAwI5e8Lg/pfRkG83f6e+668ITB3|
|2U6jhVmQ3HOkFs5sYI06t/E9A4y9OE/zpMiZUipOWCmy496TpmdXYrVX/jBfrkB|Text:
SpoilerHero Tanker
Build plan made with Mids' Reborn v3.7.4 rev. 9
──────────────────────────────- Primary powerset: Fiery Aura
- Secondary powerset: Energy Melee
- Pool powerset (#1): Leaping
- Pool powerset (#2): Speed
- Pool powerset (#3): Force of Will
- Pool powerset (#4): Fighting
- Epic powerset: Fire Mastery
──────────────────────────────
Powers taken:
Level 1: Fire Shield
- A: Unbreakable Guard: Resistance
- 45: Unbreakable Guard: Resistance/Endurance
- 46: Unbreakable Guard: Resistance/Endurance/RechargeTime
- 46: Unbreakable Guard: Endurance/RechargeTime
Level 1: Energy Punch
- A: Hecatomb: Damage
- 40: Hecatomb: Damage/Recharge
- 40: Hecatomb: Damage/Recharge/Accuracy
- 46: Hecatomb: Recharge/Accuracy
- 48: Hecatomb: Damage/Endurance
Level 2: Blazing Aura
- A: Superior Avalanche: Accuracy/Damage/Recharge
- 3: Superior Avalanche: Recharge/Chance for Knockdown
- 3: Superior Avalanche: Accuracy/Damage/Endurance/Recharge
- 36: Overwhelming Force: Damage/Chance for Knockdown/Knockback to Knockdown
Level 4: Healing Flames
- A: Preventive Medicine: Heal
- 5: Preventive Medicine: Heal/Endurance
- 5: Preventive Medicine: Endurance/RechargeTime
- 7: Preventive Medicine: Heal/RechargeTime
- 7: Preventive Medicine: Heal/RechargeTime/Endurance
- 43: Preventive Medicine: Chance for +Absorb
Level 6: Bone Smasher
- A: Superior Might of the Tanker: Accuracy/Damage
- 27: Superior Might of the Tanker: Accuracy/Damage/Endurance/Recharge
- 27: Superior Might of the Tanker: Damage/Endurance/Recharge
- 36: Superior Might of the Tanker: Recharge/Chance for +Res(All)
- 36: Hecatomb: Chance of Damage(Negative)
- 51: Touch of Death: Chance of Damage(Negative)
Level 8: Consume
- A: Preemptive Optimization: EndMod/Accuracy/Recharge
- 9: Performance Shifter: EndMod/Accuracy/Recharge
- 9: Preventive Medicine: Heal
- 43: Preventive Medicine: Heal/RechargeTime
Level 10: Combat Jumping
- A: Luck of the Gambler: Defense/Increased Global Recharge Speed
- 11: Kismet: Accuracy +6%
- 45: Shield Wall: +Res (Teleportation), +5% Res (All)
Level 12: Plasma Shield
- A: Unbreakable Guard: Resistance
- 13: Unbreakable Guard: Resistance/Endurance
- 13: Unbreakable Guard: Resistance/Endurance/RechargeTime
- 40: Unbreakable Guard: +Max HP
- 42: Steadfast Protection: Resistance/+Def 3%
- 43: Steadfast Protection: Knockback Protection
Level 14: Temperature Protection
- A: Steadfast Protection: Knockback Protection
Level 16: Whirling Hands
- A: Superior Avalanche: Accuracy/Damage
- 17: Superior Avalanche: Accuracy/Damage/Endurance
- 17: Eradication: Chance for Energy Damage
- 37: Obliteration: Chance for Smashing Damage
- 37: Armageddon: Chance for Fire Damage
- 39: Perfect Zinger: Chance for Psi Damage
Level 18: Burn
- A: Superior Gauntleted Fist: Accuracy/Damage/RechargeTime
- 19: Superior Gauntleted Fist: Damage/Endurance/RechargeTime
- 19: Superior Gauntleted Fist: Accuracy/Damage/Endurance/RechargeTime
- 34: Eradication: Chance for Energy Damage
- 34: Obliteration: Chance for Smashing Damage
- 34: Fury of the Gladiator: Chance for Res Debuff
Level 20: Total Focus
- A: Superior Gauntleted Fist: Accuracy/Damage
- 21: Superior Gauntleted Fist: Damage/RechargeTime
- 21: Superior Gauntleted Fist: RechargeTime/+Absorb
- 23: Touch of Death: Damage/Endurance
- 25: Touch of Death: Chance of Damage(Negative)
- 25: Perfect Zinger: Chance for Psi Damage
Level 22: Fiery Embrace
- A: Invention: Recharge Reduction
- 23: Invention: Recharge Reduction
Level 24: Build Up
- A: Gaussian's Synchronized Fire-Control: Chance for Build Up
Level 26: Hasten
- A: Invention: Recharge Reduction
- 33: Invention: Recharge Reduction
Level 28: Mighty Leap
- A: Winter's Gift: Slow Resistance (20%)
Level 30: Energy Transfer
- A: Superior Blistering Cold: Accuracy/Damage
- 31: Superior Blistering Cold: Damage/Endurance
- 31: Touch of Death: Accuracy/Damage
- 31: Touch of Death: Chance of Damage(Negative)
- 33: Gladiator's Strike: Chance for Smashing Damage
- 33: Perfect Zinger: Chance for Psi Damage
Level 32: Kick
- (Empty)
Level 35: Tough
- A: Gladiator's Armor: End/Resist
- 39: Gladiator's Armor: Resistance
- 39: Gladiator's Armor: TP Protection +3% Def (All)
Level 38: Weave
- A: Luck of the Gambler: Defense/Increased Global Recharge Speed
- 42: Reactive Defenses: Defense/Endurance
- 42: Reactive Defenses: Scaling Resist Damage
Level 41: Weaken Resolve
- A: Achilles' Heel: Chance for Res Debuff
Level 44: Unleash Potential
- A: Luck of the Gambler: Defense/Increased Global Recharge Speed
- 48: Luck of the Gambler: Defense/Recharge
- 48: Luck of the Gambler: Defense/Endurance/Recharge
- 50: Luck of the Gambler: Defense
- A: Invention: Recharge Reduction
Level 47: Taunt
- (Empty)
Level 49: Phoenix Rising
- A: Armageddon: Damage/Recharge
- A: Armageddon: Damage
- A: Armageddon: Damage/Recharge/Accuracy
- 50: Armageddon: Recharge/Accuracy
- 50: Armageddon: Damage/Endurance
──────────────────────────────Inherents:
Level 1: Gauntlet
Level 1: Brawl- (Empty)
Level 1: Sprint
- (Empty)
Level 2: Rest
- (Empty)
Level 1: Swift
- (Empty)
Level 1: Hurdle
- (Empty)
Level 1: Health
- A: Panacea: +Hit Points/Endurance
- 11: Miracle: +Recovery
- 15: Numina's Convalesence: +Regeneration/+Recovery
Level 1: Stamina
- A: Performance Shifter: Chance for +End
- 15: Performance Shifter: EndMod
Level 1: Energy Focus
Level 14: Takeoff
Picture:
Spoiler
-
1
-
1 hour ago, Spaghetti Betty said:
Consume and Ageless
I don't have ageless. I'd probably go barrier, but don't account for incarnates beyond the alpha in my builds. I'm not sure why the total looks a bit too high. Current mids is borked. I don't have any ffback to account for it.
Build up is still a good slot move suggestion! I may need to just see how end balanced it is in practice and calibrate from there. If I were to swap the 4th, the overwhelming kd proc for twice the passive aura kd actually sounds fun.
-
4 hours ago, tidge said:
For a point of comparison, I like Beam Rifle a lot more on my Sentinels and Defenders.
I think you're right on target, @tidge!
I like storm blast best on sentinels. The secondary proc mechanic doesn't get nerfed by sent target caps, so a lot of the power ports over nicely.
Also, storm blast wants you to be using more storm blasts. Secondary attacks get in the way of more stormy procs. Sents don't have this split focus, and can just toggle on defenses and focus on storm blasting.
-
 1
1
-
1
-
-
7 hours ago, Spaghetti Betty said:
think having the 4-piece Avalanche in Blazing Aura is a bit of a waste. If you were going for the melee DEF, I could see it being worth, but if you're stopping at 4, I think I would go with the slotting I offered above - Moving a 3-piece Gauntleted Fist there (one piece being the absorb proc, a suggestion made by Sovvy I haven't dropped since). This would save you a slot, and it could go, well, anywhere! Personally, I would put it in Build Up for a +5 Recharge IO.
Thank you for your insight, Betty! Looking at your builds historically, I think we have a very similar approach overall.
A few things regarding my odd slotting in Blazing Aura here, as indeed it does seem silly on the surface to go so far into the Winter set without wanting the melee defense:
- I do want the slow resist.
- I also want the KD proc (I find it very useful in auras! Roughly 20% chance of KD every 10 seconds - even thinking about swapping in Overwhelming KD for a second 20%)
- The third slot is to round out acc/dam/end with the happy bonus of some cold resist.
- The fourth slot was a flex slot in the build. The endredux here combined with the set recovery bonus makes this roughly equal to as miracle in recovery savings, which I felt was pretty decent compared to other places that slot could serve. Other considerations were a final proc in energy punch, extra heal in Consume, or the recharge in build up as you mentioned.
As for Total Focus, indeed base damage is most of the game here! However, maxing ED on recharge compared to what I have gains me less than a second of recharge, so no big loss here. Meanwhile, my absorb proc lives in a place that is guaranteed to pop at the beginning of battle, as TF will be second in my ST rotation, I get a happy E/N bonus, and the procs present are running at 89% chance.
As for Phoenix, I really just need the purple set bonuses here, especially the global acc to maintain totals against +3's. We'll see how much I end up wanting that extra bacon saver with a beefier heal! Meanwhile, I'm hoping the strong mitigation provided by the KD and stun is sufficient, and explosions are nice.
My global recharge isn't all that great. I just have hasten toggled on. I have 61.25% from set bonuses.
As for HO's, I definitely use them where they make a meaningful difference! I'm revamping enough builds these days that I don't sweat the very marginal difference a +3 HO has versus a fully boosted set IO that hits the same stats. Acc/Dam for example is only a 5% enhancement value difference, which is not very impactful at all given the rising prices of Nucleolus.
I'll use an HO/DO when:
- They are cheap enough to compare anyhow and I don't need the set bonus.
- They offer a unique combo not available in a set (Provocations infamously) and the power needs this enhancement.
- The power has a strong enough base value that the little advantage is more meaningful. Hurricane for example is a great one-slot wonder these days.
Meanwhile, my ToD Acc/Dam paired with the proc still gets me the accuracy I need, ED capped damage, and a handy set bonus for much less money. If you see any slots that would especially benefit from HO usage, let me know!
-
5 hours ago, Sovera said:
Currently Mids has the ATO proc borked
Thanks @Sovera! Yeah, I noticed the proc issues. It looks like a lot of procs and secondary effects aren't being represented properly in this version. Very annoying.
I like your perspective on Burn/Whirling Hands, and think I might give dropping power crash a shot! If I open with my aoes, my ST rotation should take enough time to keep me productively busy before cycling aoes back in so I don't feel like I'm twiddling my thumbs too much. I do think power crash or the epic aoe would offer a more seamless aoe rotation, but at the end of it I'll be wailing on bosses anyhow, so it's maybe not such a bad trade.
I've iterated further, and think I'm good with leaving my fire APP behind for now. If I miss it, I'm only another espec away. 🙂
Meanwhile, I'm debating my flex power pick left when dropping Power Crash and cannibalizing its slots. Taunt or Focused Accuracy? FA would let me re-optimize my Blazing Aura slotting a bit if I like, and the debuff protection is really nice, but Taunt doesn't put any further pressure on my end, and comes in clutch at times.
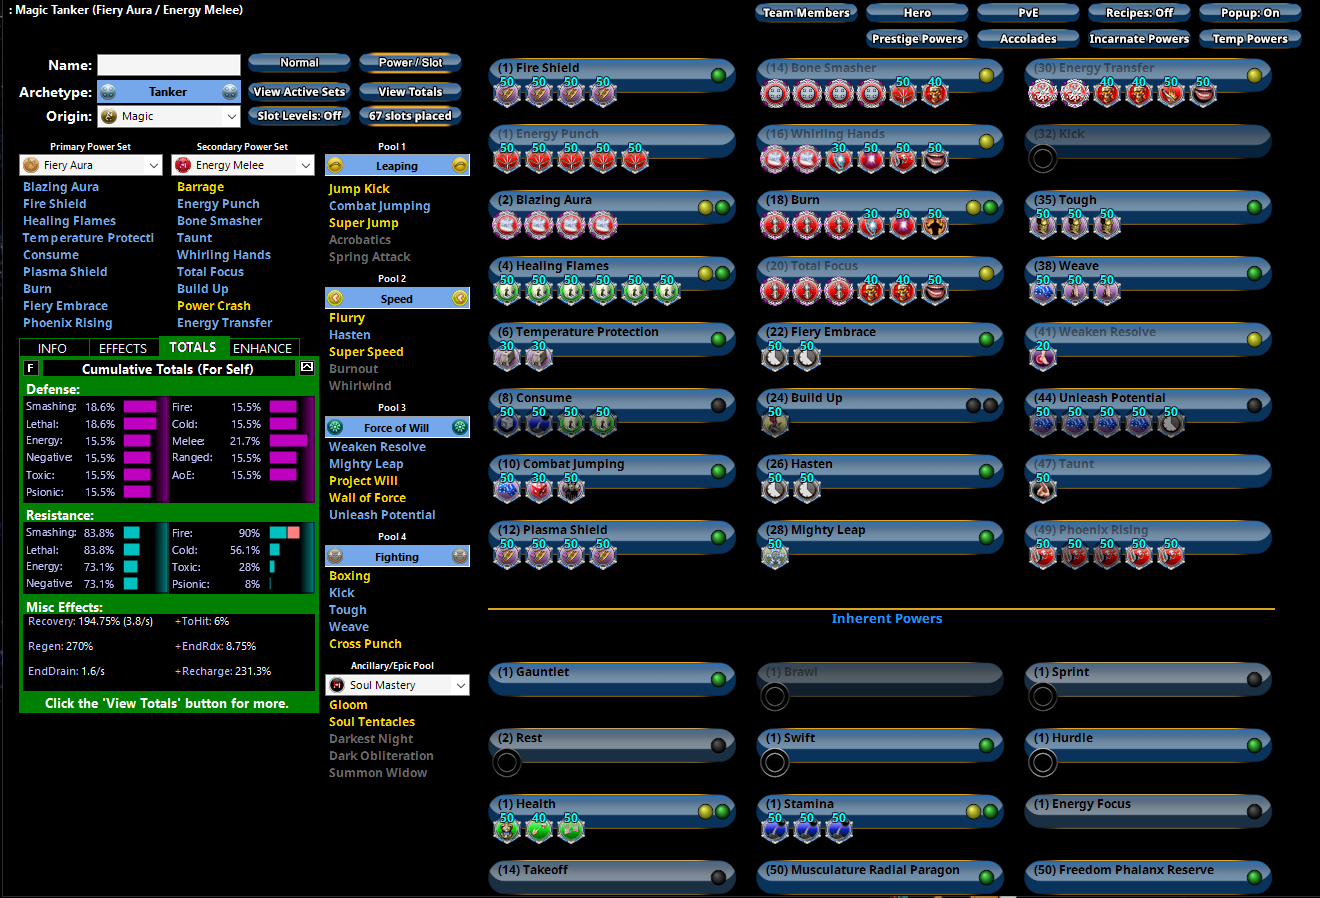
Tanker (Fiery Aura - Energy Melee) unleash.mbd
Text:
SpoilerHero Tanker
Build plan made with Mids' Reborn v3.7.4 rev. 9
──────────────────────────────- Primary powerset: Fiery Aura
- Secondary powerset: Energy Melee
- Pool powerset (#1): Leaping
- Pool powerset (#2): Speed
- Pool powerset (#3): Force of Will
- Pool powerset (#4): Fighting
- Epic powerset: Soul Mastery
──────────────────────────────
Powers taken:
Level 1: Fire Shield
- A: Unbreakable Guard: Resistance
- 45: Unbreakable Guard: Resistance/Endurance
- 46: Unbreakable Guard: Resistance/Endurance/RechargeTime
- 46: Unbreakable Guard: RechargeTime/Resistance
Level 1: Energy Punch
- A: Hecatomb: Damage
- 40: Hecatomb: Damage/Recharge
- 40: Hecatomb: Damage/Recharge/Accuracy
- 46: Hecatomb: Recharge/Accuracy
- 48: Hecatomb: Damage/Endurance
Level 2: Blazing Aura
- A: Superior Avalanche: Accuracy/Damage/Recharge
- 3: Superior Avalanche: Recharge/Chance for Knockdown
- 3: Superior Avalanche: Accuracy/Damage/Endurance/Recharge
- 36: Superior Avalanche: Damage/Endurance
Level 4: Healing Flames
- A: Preventive Medicine: Heal
- 5: Preventive Medicine: Heal/Endurance
- 5: Preventive Medicine: Endurance/RechargeTime
- 7: Preventive Medicine: Heal/RechargeTime
- 7: Preventive Medicine: Heal/RechargeTime/Endurance
- 43: Preventive Medicine: Chance for +Absorb
Level 6: Temperature Protection
- A: Steadfast Protection: Resistance/+Def 3%
- 45: Steadfast Protection: Knockback Protection
Level 8: Consume
- A: Preemptive Optimization: EndMod/Accuracy/Recharge
- 9: Performance Shifter: EndMod/Accuracy/Recharge
- 9: Preventive Medicine: Heal
- 43: Preventive Medicine: Heal/RechargeTime
Level 10: Combat Jumping
- A: Luck of the Gambler: Defense/Increased Global Recharge Speed
- 11: Kismet: Accuracy +6%
- 45: Shield Wall: +Res (Teleportation), +5% Res (All)
Level 12: Plasma Shield
- A: Unbreakable Guard: Resistance
- 13: Unbreakable Guard: Resistance/Endurance
- 13: Unbreakable Guard: Resistance/Endurance/RechargeTime
- 43: Unbreakable Guard: +Max HP
Level 14: Bone Smasher
- A: Superior Might of the Tanker: Accuracy/Damage
- 27: Superior Might of the Tanker: Accuracy/Damage/Endurance/Recharge
- 27: Superior Might of the Tanker: Damage/Endurance/Recharge
- 36: Superior Might of the Tanker: Recharge/Chance for +Res(All)
- 36: Hecatomb: Chance of Damage(Negative)
- 51: Touch of Death: Chance of Damage(Negative)
Level 16: Whirling Hands
- A: Superior Avalanche: Accuracy/Damage
- 17: Superior Avalanche: Accuracy/Damage/Endurance
- 17: Eradication: Chance for Energy Damage
- 37: Obliteration: Chance for Smashing Damage
- 37: Armageddon: Chance for Fire Damage
- 39: Perfect Zinger: Chance for Psi Damage
Level 18: Burn
- A: Superior Gauntleted Fist: Accuracy/Damage/RechargeTime
- 19: Superior Gauntleted Fist: Damage/Endurance/RechargeTime
- 19: Superior Gauntleted Fist: Accuracy/Damage/Endurance/RechargeTime
- 34: Eradication: Chance for Energy Damage
- 34: Obliteration: Chance for Smashing Damage
- 34: Fury of the Gladiator: Chance for Res Debuff
Level 20: Total Focus
- A: Superior Gauntleted Fist: Accuracy/Damage
- 21: Superior Gauntleted Fist: Damage/RechargeTime
- 21: Superior Gauntleted Fist: RechargeTime/+Absorb
- 23: Touch of Death: Damage/Endurance
- 25: Touch of Death: Chance of Damage(Negative)
- 25: Perfect Zinger: Chance for Psi Damage
Level 22: Fiery Embrace
- A: Invention: Recharge Reduction
- 23: Invention: Recharge Reduction
Level 24: Build Up
- A: Gaussian's Synchronized Fire-Control: Chance for Build Up
Level 26: Hasten
- A: Invention: Recharge Reduction
- 33: Invention: Recharge Reduction
Level 28: Mighty Leap
- A: Winter's Gift: Slow Resistance (20%)
Level 30: Energy Transfer
- A: Superior Blistering Cold: Accuracy/Damage
- 31: Superior Blistering Cold: Damage/Endurance
- 31: Touch of Death: Accuracy/Damage
- 31: Touch of Death: Chance of Damage(Negative)
- 33: Gladiator's Strike: Chance for Smashing Damage
- 33: Perfect Zinger: Chance for Psi Damage
Level 32: Kick
- (Empty)
Level 35: Tough
- A: Gladiator's Armor: End/Resist
- 39: Gladiator's Armor: Resistance
- 39: Gladiator's Armor: TP Protection +3% Def (All)
Level 38: Weave
- A: Luck of the Gambler: Defense/Increased Global Recharge Speed
- 42: Reactive Defenses: Defense/Endurance
- 42: Reactive Defenses: Scaling Resist Damage
Level 41: Weaken Resolve
- A: Achilles' Heel: Chance for Res Debuff
Level 44: Unleash Potential
- A: Luck of the Gambler: Defense/Increased Global Recharge Speed
- 48: Luck of the Gambler: Defense/Recharge
- 48: Luck of the Gambler: Defense/Endurance/Recharge
- 50: Luck of the Gambler: Defense
- A: Invention: Recharge Reduction
Level 47: Taunt
- A: Mocking Beratement: Threat/Placate/Range
Level 49: Phoenix Rising
- A: Armageddon: Damage/Recharge
- A: Armageddon: Damage
- A: Armageddon: Damage/Recharge/Accuracy
- 50: Armageddon: Recharge/Accuracy
- 50: Armageddon: Damage/Endurance
──────────────────────────────Inherents:
Level 1: Gauntlet
Level 1: Brawl- (Empty)
Level 1: Sprint
- (Empty)
Level 2: Rest
- (Empty)
Level 1: Swift
- (Empty)
Level 1: Hurdle
- (Empty)
Level 1: Health
- A: Panacea: +Hit Points/Endurance
- 11: Miracle: +Recovery
- 15: Numina's Convalesence: +Regeneration/+Recovery
Level 1: Stamina
- A: Performance Shifter: Chance for +End
- 15: Performance Shifter: EndMod
- 40: Performance Shifter: EndMod/Accuracy
Level 1: Energy Focus
Level 14: Takeoff
Picture for @Spaghetti Betty (Consume and Unleash toggled off for this), ATO proc not represented in totals as Sovera mentioned.
Edit. Noticed I left mighty leap on, so end drain is actually a bit lower. Certainly don't run this in battle.
Spoiler
-
 1
1
-
Edit - ack - went to correct the chunk and pasted over my reply.
Thanks for sharing, @Spaghetti Betty!
I understand that burn's procability was nerfed in the last pass, but I suppose it's still pretty good for procs even accounting for this?
I'm curious, are you able to load chunks into your older mids?
Chunk:
Spoiler|MBD;24196;1576;2104;BASE64;|
|G4NeERWcCACtjreFYcVCSkqCJpvy11aHZWHGyhFNjvyAqmXWInqV1lT+9AhlUniCPs7|
|oJUtXX+uwgHTVsWGsu4C1a6pmVb3u69w1i56YSJOYCEUZJJV9z4/25pSIi1ERtq9LnE|
|129s9PozbVimp1ri7qr0tTyJNUYUq1qmrBrto30BUax7lLFHgXJAqT0fQqtDOhdjAIT|
|z5kTLaFYZH9pUK8XOC6Go2O/LeRiTzQwvnpjftpTzm9hB3S3kZSXCbI08TlrCvOK3va|
|5zeNFdIVjeclUbi3Nx/PiiXcKUaLK6WpLf1CKbbF9ozGI9lbPIOxWireadKB2HARVC6|
|uemNlc650g8wY8qmujE/BDrROP6uhkYcvJbfd3rquM5cdNXGlzEWRyZWtqtZGi08gwy|
|yOYNOsC1vs0n7dA5DF+Gy3ll3E83AzH8qFx7Cp+20R6dLXZBKefbgGJU6ljZat5/ZBF|
|Op/WGKOD70jfaweXczOja3ayEHfy9VB4SeDXm+2Ku3J6H6l2DeSe5+zSdaSwc4ir6q8|
|tcLZl/sanYhZx1f8ysC9OGT24m/ZvESyjRiCRhag+wTtcrYU60aO7PfAaK+Ivo696C1|
|Wc8VNv+Z/3PS6OChY0bbrP9KLXi4NMITx0dWQt2K2o6x+TUoIjujW/fZ+1r+9OXvTXu|
|2t2llLVGvj6qdYhAJhNQkogamBUpg6E+ZdMDRuk8+k4Uv9ESG2uMIYicc6DBBUbedYp|
|7xg8H5SpMUIb9YKObgg07CF1YxEhT5ZmPtzwm7jhsk84gYVJ6sL77VH9EUZehHPEmYG|
|pa0sgSLIYKGsAsXwFcRbA/4eSjs5HOomUZMIqYc7GON5hShi3JElOrjmZQi6OtWNiY+|
|BRFBWbifLc08WDiNnnNVfdezjvHg++AenfuEVyRb7K357qSOek4Gd3xaja4X4FkBiF9|
|pYilrd68MOWfOGknLPKKlxAUaoGMEOpbbq4/XO/6RkmDdj9FYWmAx/aJXmZIm1I6QL7|
|yKywmwx43V7Q05InFRdPbCCqgrfVRrfVxrGrYbjlbmcEhN5MgCcECqKrjKSHFRwk1Lk|
|AgoevkptSvQ3oCi+Sg/AHa2vE4iH7DiX5EHGZjC5Y2meMpQl5cH11FD7kq8c+Qw8CD0|
|rBCLaLj6XtkYEP26wuVSQGgHFuwfj7H2Q3c20GITRg72IaTEHNQ4+dDN/QdhLfuoPRs|
|/LehqTogz4YOrKyEsybC9j3fcY1ywRMZHdS4XuCjWsu0Nu4ebEuleaIAAj5Iasj6ink|
|x1ToTsB4wjrRW4D9EDZbAEd6W//3ae3t3kLdEpDYKHdWtftI0cixLLCi+jiG/4bRvKw|
|ulTm625wyiTWPv6QP/a23bZMT86wMxWeEp8+x6a5L1m8IzggJbZaKEc/3P7IkUXPZ+C|
|pbzoOPhSMZVG7HAAfQp62AEYRMoTVBNQ0wBAGJx2r3ziCXaGL12/XwEQZx2madexF/h|
|BZNipfLiSPQ/jtFBlAlJRhHGPsJ2SGoagVORIhIo2ztkajIcBzx0rTrZ9iriZFHLDQ7|
|s6mm23GbzEl03uJZC//Suvt9yORWTq47iaieRxpZco8pblzWvtxBuArQ+FOpPxaiLnC|
|tHix/YirC0B7je1ciRcHigEzKEvT3OqjHnS+PVgJOpe7dLJOQTt+7ko86TIlH1mYgYM|
|xzruPfqoZU3LS2nIMZvENsxuRp3wnKnkPvNB2xUUGx1tbAkXxFRRAMXwFXqghK/SOjJ|
|okefv+XHT9ECJG3uKvQrhn5AXFdXseKSsKIAkmrtBTEaXjCn7cdHzCtikxu2JqlW0nA|
|+92F7FqIyz3rSZ7DSquUK+wdGQegIVcheKfvrkbxrveyxOa/4c1p3zHMG5/2oSVt7vV|
|Ww9HJ0Zc955GA924DqlqPv4Pb/dUR4osf8GY9P7aukDaWmCXxufWXV5EVHTDl3fq/Eo|
|25p6GpVu2oSCj/qgXo1pe3ru11rz2KoTsFR3hKB5/Hpizmp19m9un1xoxFCY9Ag/XT9|
|9+0Y0oJ0cwJ6c8KQ/0vgyD+dsCnrw/94TBP2Sij8lMxqkJ+RR9cTlvhHS+/BM9KShDS|
|sMBMy1FbqqavVzK1Z/8JL+1AQ==| -
22 hours ago, PLVRIZR said:
ATO procs in the first two melee attacks
I've considered it further, and agree! Putting Might ATO in bone smasher also let's me open with it for a quick proc, whereas ET would need to wait for TF to complete in my initial rotation.
Thanks for taking the time to provide input, @PLVRIZR.
Both builds only have ~15 Psi defense, 8% resist, so basically nothing. The unleash build hits 39% when it's up, which is something at least. I imagine I'll eat it pretty hard against Psi 😄
EDIT - looks like newest mids isn't actually accounting for ATO procs. Annoying. This does mean my potential psi resist isn't terrible with a couple stacks going though.
-
Hello Tankers!
I'm trying to decide how much theme is really important to me with this guy, and would love your insight. He's a basketball player, and currently I find Fireball not only an excellent aoe addition, but also a very satisfying thematic proxy for a flaming basketball, so am hesitant to drop Fire APP.
However, the two power commitment to get there pulls away from other priorities, and dropping this thematic element really frees me up to optimize my ST potential and survivability, while still maintaining good aoe.
The main difference is Bone Smasher. The thematic build lacks it! It's a really great power, and I find a necessary part of the /EM rotation when you are waiting to recharge that focus from TF.
On both builds I'm okay with being a little shy of S/L resist cap, as the second ATO proc will make up for it more often than not when it counts.
How bad of a sacrifice do you think this is?
Fireball build:
Tanker (Fiery Aura - Energy Melee).mbd
Pros:
- Fireball, melt armor add substantially to aoe potential.
- Ring of Fire is moderately useful for run happy AVs.
Cons:
- Slightly lower recharge.
- Lacking Bone Smasher - ST could be painful at times. Perhaps sufficient to fill gaps with burn?
Text:
SpoilerHero Tanker
Build plan made with Mids' Reborn v3.7.4 rev. 9
──────────────────────────────- Primary powerset: Fiery Aura
- Secondary powerset: Energy Melee
- Pool powerset (#1): Leaping
- Pool powerset (#2): Speed
- Pool powerset (#3): Fighting
- Pool powerset (#4): Force of Will
- Epic powerset: Fire Mastery
──────────────────────────────
Powers taken:
Level 1: Fire Shield
- A: Unbreakable Guard: Resistance
- 45: Unbreakable Guard: Resistance/Endurance
- 46: Unbreakable Guard: Resistance/Endurance/RechargeTime
- 46: Unbreakable Guard: RechargeTime/Resistance
Level 1: Energy Punch
- A: Hecatomb: Damage
- 40: Hecatomb: Damage/Recharge
- 40: Hecatomb: Damage/Recharge/Accuracy
- 46: Hecatomb: Recharge/Accuracy
- 48: Hecatomb: Damage/Endurance
Level 2: Blazing Aura
- A: Superior Avalanche: Accuracy/Damage/Endurance
- 3: Superior Avalanche: Recharge/Chance for Knockdown
- 3: Multi-Strike: Damage/Endurance
Level 4: Healing Flames
- A: Preventive Medicine: Heal
- 5: Preventive Medicine: Heal/Endurance
- 5: Preventive Medicine: Endurance/RechargeTime
- 7: Preventive Medicine: Heal/RechargeTime
- 7: Preventive Medicine: Heal/RechargeTime/Endurance
- 43: Preventive Medicine: Chance for +Absorb
Level 6: Temperature Protection
- A: Steadfast Protection: Resistance/+Def 3%
- 45: Steadfast Protection: Knockback Protection
Level 8: Consume
- A: Preemptive Optimization: EndMod/Accuracy/Recharge
- 9: Performance Shifter: EndMod/Accuracy/Recharge
- 9: Preventive Medicine: Heal
- 43: Preventive Medicine: Heal/RechargeTime
Level 10: Combat Jumping
- A: Luck of the Gambler: Defense/Increased Global Recharge Speed
- 11: Kismet: Accuracy +6%
- 29: Reactive Defenses: Scaling Resist Damage
- 45: Shield Wall: +Res (Teleportation), +5% Res (All)
Level 12: Plasma Shield
- A: Unbreakable Guard: Resistance
- 13: Unbreakable Guard: Resistance/Endurance
- 13: Unbreakable Guard: Resistance/Endurance/RechargeTime
- 43: Unbreakable Guard: +Max HP
Level 14: Super Jump
- A: Winter's Gift: Slow Resistance (20%)
Level 16: Whirling Hands
- A: Superior Avalanche: Accuracy/Damage
- 17: Superior Avalanche: Damage/Endurance
- 17: Eradication: Chance for Energy Damage
- 37: Obliteration: Chance for Smashing Damage
- 37: Armageddon: Chance for Fire Damage
- 39: Perfect Zinger: Chance for Psi Damage
Level 18: Burn
- A: Superior Gauntleted Fist: Accuracy/Damage/RechargeTime
- 19: Superior Gauntleted Fist: Damage/Endurance/RechargeTime
- 19: Superior Gauntleted Fist: Accuracy/Damage/Endurance/RechargeTime
Level 20: Total Focus
- A: Superior Gauntleted Fist: Accuracy/Damage
- 21: Superior Gauntleted Fist: Damage/RechargeTime
- 21: Superior Gauntleted Fist: RechargeTime/+Absorb
- 23: Touch of Death: Damage/Endurance
- 25: Touch of Death: Chance of Damage(Negative)
- 25: Perfect Zinger: Chance for Psi Damage
Level 22: Fiery Embrace
- A: Invention: Recharge Reduction
- 23: Invention: Recharge Reduction
Level 24: Build Up
- A: Gaussian's Synchronized Fire-Control: Chance for Build Up
Level 26: Phoenix Rising
- A: Armageddon: Damage/Recharge
- 27: Armageddon: Damage
- 27: Armageddon: Damage/Recharge/Accuracy
- 36: Armageddon: Recharge/Accuracy
- 36: Armageddon: Damage/Endurance
Level 28: Power Crash
- A: Obliteration: Accuracy/Damage/Recharge
- 34: Obliteration: Damage
- 34: Obliteration: Accuracy/Damage/Endurance/Recharge
- 34: Obliteration: Accuracy/Recharge
- 36: Obliteration: Chance for Smashing Damage
Level 30: Energy Transfer
- A: Superior Might of the Tanker: Accuracy/Damage
- 31: Superior Might of the Tanker: Accuracy/Damage/Endurance/Recharge
- 31: Superior Might of the Tanker: Damage/Recharge
- 31: Superior Might of the Tanker: Recharge/Chance for +Res(All)
- 33: Hecatomb: Chance of Damage(Negative)
- 33: Touch of Death: Chance of Damage(Negative)
Level 32: Hasten
- A: Invention: Recharge Reduction
- 33: Invention: Recharge Reduction
Level 35: Kick
- (Empty)
Level 38: Tough
- A: Gladiator's Armor: End/Resist
- 39: Gladiator's Armor: Resistance
- 39: Gladiator's Armor: TP Protection +3% Def (All)
Level 41: Weave
- A: Luck of the Gambler: Defense/Increased Global Recharge Speed
- 42: Luck of the Gambler: Defense/Endurance
- 42: Luck of the Gambler: Defense
- 42: Luck of the Gambler: Defense/Endurance/Recharge
- 50: Luck of the Gambler: Endurance/Recharge
Level 44: Ring of Fire
- A: Trap of the Hunter: Accuracy/Endurance
Level 47: Melt Armor
- A: Analyze Weakness: Accuracy/Recharge
- 48: Achilles' Heel: Chance for Res Debuff
- 50: Invention: Recharge Reduction
Level 49: Fire Ball
- A: Superior Frozen Blast: Accuracy/Damage
- A: Superior Frozen Blast: Damage/Endurance
- 51: Positron's Blast: Chance of Damage(Energy)
- 51: Javelin Volley: Chance of Damage(Lethal)
- 51: Bombardment: Chance for Fire Damage
──────────────────────────────Inherents:
Level 1: Gauntlet
Level 1: Brawl- (Empty)
Level 1: Sprint
- (Empty)
Level 2: Rest
- (Empty)
Level 1: Swift
- (Empty)
Level 1: Hurdle
- (Empty)
Level 1: Health
- A: Panacea: +Hit Points/Endurance
- 11: Miracle: +Recovery
- 15: Numina's Convalesence: +Regeneration/+Recovery
Level 1: Stamina
- A: Performance Shifter: Chance for +End
- 15: Performance Shifter: EndMod
- 29: Performance Shifter: EndMod/Accuracy
Level 1: Energy Focus
Level 14: Double Jump
Unfireball build:
Tanker (Fiery Aura - Energy Melee) unleash.mbd
Pros:
- Bone Smasher! Heavily procced as well.
- Very powerful defense steroid in Unleash potential. Brings me to melee softcap when online.
- A little more recharge.
Cons:
- Must rely on power crash more heavily for aoe rotation. Decent when focus is op, meh when focus is down.
- No flaming basketball!
Text:
SpoilerHero Tanker
Build plan made with Mids' Reborn v3.7.4 rev. 9
──────────────────────────────- Primary powerset: Fiery Aura
- Secondary powerset: Energy Melee
- Pool powerset (#1): Leaping
- Pool powerset (#2): Force of Will
- Pool powerset (#3): Speed
- Pool powerset (#4): Fighting
- Epic powerset: Energy Mastery
──────────────────────────────
Powers taken:
Level 1: Fire Shield
- A: Unbreakable Guard: Resistance
- 45: Unbreakable Guard: Resistance/Endurance
- 46: Unbreakable Guard: Resistance/Endurance/RechargeTime
- 46: Unbreakable Guard: RechargeTime/Resistance
Level 1: Energy Punch
- A: Hecatomb: Damage
- 40: Hecatomb: Damage/Recharge
- 40: Hecatomb: Damage/Recharge/Accuracy
- 46: Hecatomb: Recharge/Accuracy
- 48: Hecatomb: Damage/Endurance
Level 2: Blazing Aura
- A: Superior Avalanche: Accuracy/Damage/Endurance
- 3: Superior Avalanche: Recharge/Chance for Knockdown
- 3: Multi-Strike: Damage/Endurance
Level 4: Healing Flames
- A: Preventive Medicine: Heal
- 5: Preventive Medicine: Heal/Endurance
- 5: Preventive Medicine: Endurance/RechargeTime
- 7: Preventive Medicine: Heal/RechargeTime
- 7: Preventive Medicine: Heal/RechargeTime/Endurance
- 43: Preventive Medicine: Chance for +Absorb
Level 6: Temperature Protection
- A: Steadfast Protection: Resistance/+Def 3%
- 45: Steadfast Protection: Knockback Protection
Level 8: Consume
- A: Preemptive Optimization: EndMod/Accuracy/Recharge
- 9: Performance Shifter: EndMod/Accuracy/Recharge
- 9: Preventive Medicine: Heal
- 43: Preventive Medicine: Heal/RechargeTime
Level 10: Combat Jumping
- A: Luck of the Gambler: Defense/Increased Global Recharge Speed
- 11: Kismet: Accuracy +6%
- 45: Shield Wall: +Res (Teleportation), +5% Res (All)
Level 12: Plasma Shield
- A: Unbreakable Guard: Resistance
- 13: Unbreakable Guard: Resistance/Endurance
- 13: Unbreakable Guard: Resistance/Endurance/RechargeTime
- 43: Unbreakable Guard: +Max HP
Level 14: Bone Smasher
- A: Superior Blistering Cold: Accuracy/Damage
- 29: Superior Blistering Cold: Damage/Endurance
- 29: Touch of Death: Chance of Damage(Negative)
- 50: Mako's Bite: Chance of Damage(Lethal)
- 50: Gladiator's Strike: Chance for Smashing Damage
- 51: Perfect Zinger: Chance for Psi Damage
Level 16: Whirling Hands
- A: Superior Avalanche: Accuracy/Damage
- 17: Superior Avalanche: Damage/Endurance
- 17: Eradication: Chance for Energy Damage
- 37: Obliteration: Chance for Smashing Damage
- 37: Armageddon: Chance for Fire Damage
- 39: Perfect Zinger: Chance for Psi Damage
Level 18: Burn
- A: Superior Gauntleted Fist: Accuracy/Damage/RechargeTime
- 19: Superior Gauntleted Fist: Damage/Endurance/RechargeTime
- 19: Superior Gauntleted Fist: Accuracy/Damage/Endurance/RechargeTime
Level 20: Total Focus
- A: Superior Gauntleted Fist: Accuracy/Damage
- 21: Superior Gauntleted Fist: Damage/RechargeTime
- 21: Superior Gauntleted Fist: RechargeTime/+Absorb
- 23: Touch of Death: Damage/Endurance
- 25: Touch of Death: Chance of Damage(Negative)
- 25: Perfect Zinger: Chance for Psi Damage
Level 22: Fiery Embrace
- A: Invention: Recharge Reduction
- 23: Invention: Recharge Reduction
Level 24: Build Up
- A: Gaussian's Synchronized Fire-Control: Chance for Build Up
Level 26: Phoenix Rising
- A: Armageddon: Damage/Recharge
- 27: Armageddon: Damage
- 27: Armageddon: Damage/Recharge/Accuracy
- 36: Armageddon: Recharge/Accuracy
- 36: Armageddon: Damage/Endurance
Level 28: Power Crash
- A: Obliteration: Accuracy/Damage/Recharge
- 34: Obliteration: Damage
- 34: Obliteration: Accuracy/Damage/Endurance/Recharge
- 34: Obliteration: Accuracy/Recharge
- 36: Obliteration: Chance for Smashing Damage
Level 30: Energy Transfer
- A: Superior Might of the Tanker: Accuracy/Damage
- 31: Superior Might of the Tanker: Accuracy/Damage/Endurance/Recharge
- 31: Superior Might of the Tanker: Damage/Recharge
- 31: Superior Might of the Tanker: Recharge/Chance for +Res(All)
- 33: Hecatomb: Chance of Damage(Negative)
- 33: Touch of Death: Chance of Damage(Negative)
Level 32: Hasten
- A: Invention: Recharge Reduction
- 33: Invention: Recharge Reduction
Level 35: Kick
- (Empty)
Level 38: Tough
- A: Gladiator's Armor: End/Resist
- 39: Gladiator's Armor: Resistance
- 39: Gladiator's Armor: TP Protection +3% Def (All)
Level 41: Weave
- A: Luck of the Gambler: Defense/Increased Global Recharge Speed
- 42: Reactive Defenses: Defense/Endurance/RechargeTime
- 42: Reactive Defenses: Scaling Resist Damage
Level 44: Mighty Leap
- A: Winter's Gift: Slow Resistance (20%)
Level 47: Weaken Resolve
- A: Achilles' Heel: Chance for Res Debuff
Level 49: Unleash Potential
- A: Luck of the Gambler: Defense/Increased Global Recharge Speed
- A: Luck of the Gambler: Defense/Recharge
- 51: Luck of the Gambler: Defense/Endurance/Recharge
- 51: Luck of the Gambler: Defense
- 51: Luck of the Gambler: Endurance/Recharge
- 51: Invention: Recharge Reduction
──────────────────────────────Inherents:
Level 1: Gauntlet
Level 1: Brawl- (Empty)
Level 1: Sprint
- (Empty)
Level 2: Rest
- (Empty)
Level 1: Swift
- (Empty)
Level 1: Hurdle
- (Empty)
Level 1: Health
- A: Panacea: +Hit Points/Endurance
- 11: Miracle: +Recovery
- 15: Numina's Convalesence: +Regeneration/+Recovery
Level 1: Stamina
- A: Performance Shifter: Chance for +End
- 15: Performance Shifter: EndMod
Level 1: Energy Focus
Level 14: Takeoff
Questions that apply to both builds:
- Would you put the Might proc in ET or Bone Smasher? ET will have good percentages, and is theoretically good to spam, but maybe not always suitable to use as often.
- Consume slotting. I think I've enhanced healing well enough, with a little endmod to help me through tough times. Do you think the extra ~100 max HP is that big a deal?
- Psionic Damage. Will I survive it at all? I guess I have healing flames, at least! The incidental stun stacking and bit of knockdown will help.
If you see any other elements that stand out as silly to you, I'm open to your review!
-
24 minutes ago, PhotriusPyrelus said:
.5 PPM on a 20 second CD ability is 90% proc rate, so I guess that's good. Drop the Acc/Heal for it?
Dark Regen ultimately deserves a solid 6 slot.
However, tighter slotting would be:
- Touch of Nictus Acc/Heal
- Touch of Nictus Heal
- Touch of Nictus damage proc
- Theft of essence end proc
Given that Dark Regen is typically an overkill amount of healing in the first place, this should be plenty of heal enhancement to work with, and it refills your end, as well as doing some nice damage while you're at it.
Depending on how much global accuracy you end up with in your build, you may need some additional acc slotting here as well. Between kismet and global acc, I typically don't need more than this.
I personally like to fill the last couple slots with more damage procs, as it makes a very reliable aoe damage power that pops while you are doing something you'd be doing anyhow (healing!). I get that you don't like them, but they work very well here, as the proc rate will be high.
-
 1
1
-
A solid foundation for sure!
A few notes:
- Guassian proc in FA is pretty pointless. It will only have a chance every 10 seconds to proc, and a low one at that. Either ditch it entirely, or toss it in rage for the extra bump when you re-up.
- Highly recommend working FFback into Footstomp, and ideally one of your ST powers as well.
- Hurl is fun thematically and sometimes useful to have. Overall still an underperformer these days, and the set bonuses aren't doing anything for you here. Bare minimum I'd swap for laser beam eyes, energy torrent, or even Handclap. Handclap with KD conversion, FFback, and a damage proc along with accuracy to boot is a strong mitigation tool. Ignore if you simply must have it for theme.
- Your ST attacks could use a little love (top off damage, some procs). One benefit of Rage is that it allows you to go easy on accuracy slotting. Energy Mastery is a bit suboptimal for this reason - FA isn't really doing much for you. You also have Energy Absorption to lean on for End, so Physical Perfection isn't amazing here either. I'd consider another epic.
- Especially if you follow the above advise of working FFback into your ST chain, you only need one of Jab or Punch. I'd choose punch, as it has more proc potential. Jab is even worse than Boxing. I like the split for your ATO set here, but you could work things around with some effort, or even just go for a full ATO set in whichever one you keep. Gaining the extra S/L resist isn't a bad trade.
- Unless Incarnate softcap is really important to you, you can afford to lay off a few S/L defense bonuses. Blistering cold in KO blow is nice, but you could save a ton of influence and do more damage if you pulled back to just a two slot blistering Acc/Dam and Dam/End, then focused on proccing it out. This also helps you maintain damage during rage crashes, as procs aren't affected by the damage debuff. You're only going halfway on F/C defense, so while the 5% is substantial, it's not a huge loss since you aren't near softcap.
- Hibernate is actually a really great power. Some folks don't like it, but give it a shot if you haven't before. You do maintain aggro for a bit after popping it, and it activates pretty much instantly, so can really save your bacon and allow you to reset in a bad situation. As a bonus, it only really needs one slot to do its job.
One thing you might consider is:
- Drop Super Jump, Hurl, and one other power (maybe one of the epics, Jab?).
- Pick up Mighty Leap, Weaken Resolve, and Unleash Potential in their place. Unleash is really strong, and will give you a handy steroid to pop into incarnate softcap for most defenses, overcome defense debuffs, assist with end, and handle many other problems.
Alternatively, going for Rune would be helpful for similar reasons, though you may not wish to fly, so would lack power choice efficiency in that case.
There's more that I would do if working from the ground up, but I hope you find this helpful!
-
1
-
It would be pretty bad to skip any one of these unless you're living in granite. Even then, mud pots is your taunt aura. I would recommend either recoloring ice to be in theme if you can, going pure granite, or maybe just grabbing rock armor from an epic on another AT.
Brimstone has a significantly different alt effect you might like.
-
3 hours ago, StriderIV said:
For META, would you say it’s pretty much Rad/, Bio/ or bust?
For easy street high level performance, it's pretty much Rad/, SR/, Shield/, Invuln/, and to an extent Bio/. Bio is actually sort of tricky to balance optimally for survivability and damage.
Everything else is still quite good, but not quite on that level. Honestly Electric is pretty close. It isn't really fair to compare other resist sets to Rad though. The proc damage potential, strong resists across the board, lack of true weaknesses, and abundant endurance are just that good.
DA is all about Dark Regen, which is amazing. The control auras are sort of a sideshow that can be pretty useful. Honestly if DA just had native KB protection and its end management were better, that's all it would take to bring it in line with the big guns.
Still, every Tanker armor set is really good when built appropriately. Theme and how fun you find the powers is what should guide you.
-
1
-
-
On 5/27/2024 at 2:58 AM, StriderIV said:
I’ve always wondered what would have a bigger upside: Elec Armor/Dark Melee or Dark Armor/Elec Melee.
Both of these are fairly middle of the road combos from a Meta power perspective, but I'd give the edge to EA/DM overall.
This is due to:
- EA's superior overall resist package.
- End management.
- DM benefitting very strongly from Tanker aoe's (Shadow Maul becomes outstanding)
- No extra slotting needed for KB protection.
That being said, both would be very workable and good.
DA/EM's main trick as others have noted is stun stacking, which to be fair is really great.
-
1
-
We had a fun and detailed exploration of it in this thread:
-
2
-
-
Thanks for sharing your build, @EnjoyTheJourney!
How have you been enjoying this particular journey? I felt inspired by the combo and think it will be my next alt.
I went a more heavily procced out on aoes, and doubled down on the epic aoe as well in mine.
Still debating:
- Ways to maintain (more or less) S/L softcap without muling out Brawl. I could swap tentacles for smite and pop the set there where it's actually useful. However, I'm not sure if perhaps my attack chain will be fine as is. You parsed yours quite a bit - what do you think? I actually like tentacles as an opener. The immob is really handy, and it has a good sized cone and target cap.
- E/N resists. I see you really focused on shoring this up, which isn't a bad idea. I'd have to sacrifice some end management or procs to refocus mine. I wonder how much of an issue this will be in practice with softcap defense here, and Geode as a backup to recover.
- Stone Skin slotting. I typically try to do something clever here, but am not impressed by what I can gain refocusing with low hanging set bonuses. Perhaps there is something I'm missing!
- Earth's Embrace. I think I'm okay with the fairly minimal slotting here. On Sent /Stone, base recharge is high enough that this isn't a super operable heal to rely on, and mostly here to pump your max hp. I'd love to squeeze in full PM set, but had to pull slots to address defense priorities. This is an interesting build to balance.
- Umbral Torrent. I really want to like this power, and would even consider giving it a shot with the low target cap if the cone were longer and wider. Does anyone enjoy it? It is rather snappy, and has interesting proc options. My experience with 40 ft 30 degree cones is not super positive. Meanwhile it's a skip.
- T1 vs T2 blast. Dark Blast looks slightly lower DPA, though pretty close if you're not proccing. Did you choose it because the attack chain needs the extra bit of filler here and there, or other reasons?
Here's my build for reference:
Sentinel (Dark Blast - Stone Armor).mbd
Text:
SpoilerHero Sentinel
Build plan made with Mids' Reborn v3.7.4 rev. 9
──────────────────────────────- Primary powerset: Dark Blast
- Secondary powerset: Stone Armor
- Pool powerset (#1): Leaping
- Pool powerset (#2): Speed
- Pool powerset (#3): Leadership
- Pool powerset (#4): Fighting
- Epic powerset: Dark Mastery
──────────────────────────────
Powers taken:
Level 1: Gloom
- A: Superior Opportunity Strikes: Accuracy/Damage
- 39: Superior Opportunity Strikes: Damage/RechargeTime
- 39: Superior Opportunity Strikes: Accuracy/Damage/RechargeTime
- 39: Superior Opportunity Strikes: Accuracy/Damage/Endurance
- 40: Superior Opportunity Strikes: Accuracy/Damage/Endurance/RechargeTime
- 48: Superior Opportunity Strikes: RechargeTime/Chance for Opportunity
Level 1: Stone Skin
- A: Invention: Resist Damage
- 15: Invention: Resist Damage
- 45: Invention: Defense Buff
- 46: Invention: Defense Buff
Level 2: Rock Armor
- A: Luck of the Gambler: Defense/Increased Global Recharge Speed
- 5: Red Fortune: Defense/Endurance
- 34: Red Fortune: Defense
Level 4: Earth's Embrace
- A: Preventive Medicine: Heal
- 5: Preventive Medicine: Heal/RechargeTime
Level 6: Abyssal Gaze
- A: Superior Sentinel's Ward: Accuracy/Damage
- 7: Superior Sentinel's Ward: Accuracy/Damage/Endurance
- 7: Neuronic Shutdown: Chance of Damage(Psionic)
- 9: Ghost Widow's Embrace: Chance of Damage(Psionic)
- 9: Unbreakable Constraint: Chance for Smashing Damage
- 40: Cloud Senses: Chance for Negative Energy Damage
Level 8: Aim
- A: Gaussian's Synchronized Fire-Control: Chance for Build Up
Level 10: Terra Firma
- A: Invention: To Hit Buff
Level 12: Dark Obliteration
- A: Superior Frozen Blast: Accuracy/Damage
- 13: Superior Frozen Blast: Damage/Endurance
- 13: Positron's Blast: Chance of Damage(Energy)
- 15: Javelin Volley: Chance of Damage(Lethal)
- 43: Bombardment: Chance for Fire Damage
- 45: Cloud Senses: Chance for Negative Energy Damage
Level 14: Combat Jumping
- A: Kismet: Accuracy +6%
Level 16: Rooted
- A: Panacea: +Hit Points/Endurance
Level 18: Antumbral Beam
- A: Superior Winter's Bite: Accuracy/Damage
- 19: Superior Winter's Bite: Accuracy/Damage/Endurance
- 19: Superior Winter's Bite: Damage/Endurance/Accuracy/RechargeTime
- 37: Gladiator's Javelin: Chance of Damage(Toxic)
- 37: Apocalypse: Chance of Damage(Negative)
- 37: Cloud Senses: Chance for Negative Energy Damage
Level 20: Crystal Armor
- A: Luck of the Gambler: Defense/Increased Global Recharge Speed
- 21: Shield Wall: Defense/Endurance
- 21: Shield Wall: Defense
- 36: Shield Wall: +Res (Teleportation), +5% Res (All)
- 36: Performance Shifter: Chance for +End
- 36: Performance Shifter: EndMod
Level 22: Life Drain
- A: Gladiator's Javelin: Accuracy/Damage
- 23: Gladiator's Javelin: Chance of Damage(Toxic)
- 23: Apocalypse: Damage/Endurance
- 34: Touch of the Nictus: Chance for Negative Energy Damage
- 34: Cloud Senses: Chance for Negative Energy Damage
Level 24: Brimstone Armor
- A: Aegis: Resistance/Endurance
- 25: Aegis: Resistance
- 25: Aegis: Resistance/Recharge
- 33: Aegis: Psionic/Status Resistance
- 46: Steadfast Protection: Resistance/+Def 3%
Level 26: Blackstar
- A: Armageddon: Damage/Recharge/Accuracy
- 27: Armageddon: Recharge/Accuracy
- 27: Armageddon: Damage/Endurance
- 31: Armageddon: Damage/Recharge
- 31: Armageddon: Damage
- 33: Eradication: Chance for Energy Damage
Level 28: Minerals
- A: Luck of the Gambler: Defense/Increased Global Recharge Speed
- 29: Reactive Defenses: Defense
- 29: Reactive Defenses: Defense/Endurance
- 31: Reactive Defenses: Scaling Resist Damage
Level 30: Geode
- A: Preventive Medicine: Chance for +Absorb
Level 32: Hasten
- A: Invention: Recharge Reduction
- 33: Invention: Recharge Reduction
Level 35: Maneuvers
- A: Luck of the Gambler: Defense/Increased Global Recharge Speed
- A: Red Fortune: Defense
- A: Red Fortune: Defense/Endurance
Level 38: Netherworld Tentacles
- A: Superior Frozen Blast: Accuracy/Damage/Endurance
- 50: Superior Frozen Blast: Recharge/Chance for Immobilize
Level 41: Engulfing Darkness
- A: Superior Avalanche: Damage/Endurance
- 42: Superior Avalanche: Accuracy/Damage
- 42: Eradication: Chance for Energy Damage
- 42: Obliteration: Chance for Smashing Damage
- 43: Armageddon: Chance for Fire Damage
- 43: Cloud Senses: Chance for Negative Energy Damage
Level 44: Kick
- (Empty)
Level 47: Tough
- A: Gladiator's Armor: End/Resist
- 48: Gladiator's Armor: Resistance
- 48: Gladiator's Armor: TP Protection +3% Def (All)
Level 49: Weave
- A: Luck of the Gambler: Defense/Increased Global Recharge Speed
- 50: Red Fortune: Defense/Endurance
- 50: Red Fortune: Defense
──────────────────────────────Inherents:
Level 1: Opportunity
Level 1: Brawl- A: Superior Blistering Cold: Accuracy/Damage
- 11: Superior Blistering Cold: Damage/Endurance
- 11: Superior Blistering Cold: Accuracy/Damage/Endurance
- 45: Superior Blistering Cold: Accuracy/Damage/Recharge
- 46: Superior Blistering Cold: Damage/Endurance/Accuracy/RechargeTime
Level 1: Sprint
- (Empty)
Level 2: Rest
- (Empty)
Level 1: Swift
- (Empty)
Level 1: Hurdle
- (Empty)
Level 1: Health
- A: Miracle: +Recovery
- 17: Numina's Convalesence: +Regeneration/+Recovery
Level 1: Stamina
- A: Performance Shifter: Chance for +End
- 17: Performance Shifter: EndMod
- 40: Performance Shifter: EndMod/Recharge
Chunk:
Spoiler|MBD;23193;1544;2060;BASE64;|
|G5haAKyKx/lXLKSkJLigx4yXS5GuPTM3tIIJ85/kQxntuLQMI2eWLF19rcMC0tUpK5V|
|HXy4t0E/pCT81N3+qX1W979elqa9f9YiYNxMkDBHg3b/ft6x5fYTCMUYi9HVPNyHPLj|
|nNKVKuTT2rmFV32ZOSkGSrFiGR7mpU/1KE7JDg9qEW75A4TEbO05Y690HzYRjirM2wy|
|LypEK/2h/se0FXq3wqR3DUC52cP2N55/R7gfYjIICppIvDT2OWMK86L6506DFZI+we8|
|rsgKd33Yfz5NeKvDFqkzpUkDIrZjBBM02y3J3PBJyBhh+NsIh5z2SGdWPK54Qdfwcd2|
|ryZgqk8NQKyOmcc/oDO55RVo7sEsIuSJH13d82HGC70j6o6w5lv9jtld+49+iibND3D|
|qPG7I3nzpfyj/GwdDLurLbhUXdORAbndV2pItnm1E5+0iLWCOBt+Zjvonbm1Vt8KZ3+|
|MqYR7vhdB37Nuuq79Xi0fxCwvvFosuyzM6mm/vktz04GyfMGWxudVXLb825/Ur/TVf8|
|3SoDjCyvJnRvh9CR3M5vLXnoGyMMMNd76oARjhFa3PBh38Okz62uQLzCR7Cpc3Re8wd|
|ket8QWmd9t9mPiLyVuqA/ob8BxfFWOgATiHIRtzC1adX29b87bGx9q1a5PtGSHw2hQp|
|G3wXZTeGEyBsfGlLkQWXkbswjHZlDbic1PRdyPx0qtRvgBztjBpwfZCJcgpuku8e9Cv|
|wf9L1DyOg1J0s/hB7tcSJEbQUWsEs1Xk8gwbH+OvCjWWc9jcoxrENt5/T2sr6AuK+8B|
|AoLRhnAZ6byK1i/Ojyo2Sv6UD9xG6V2W8/HOijouyRGW2CYOCjm8sJ8zsDNc5+jxX7s|
|l3jyHiYkgvuflFdX0qMSbfmyfN7hRu71NzgxyY2Th1Z6J06txdoTcLLbI9BwKJRrCNG|
|C3Nk+NXHdrzRZf4y/3+FqvHJ/Du0rZa7zpwx/k9rJPCEkTLcLVUnvNFzKZZe/iBXCE0|
|HJ9Ryv+a9daiLPokT3Y8zkfbHOyhic2MFEWM8dTlPEJj6ecHP2tSDHXh+Al1suitDO8|
|OMMIxLXx4PkwUqdvmOEjLyTWsGKsk1MW8m1dC413bmWHJV7edOx1FFdpwEboeuxjf2s|
|tdDsBGmG8T/RCUhe4Qdx/Ihc7TzCpit2/915nshHBK5GBF4XdXZI+CNAAKqI2cuMojr|
|m+BphoCSWe56SxKHdkZc+aifZfEu6YbB93ga6AbFlGJuIe3635fSXAEZSNMM7McOK8F|
|CbkMoqUfKVUJGekQHJqQaqCuLntouE+ery+yZsAUhpXjFey+5Inqys5YKJ05tTC9Iau|
|KmAkRgnTdMS2zgR99jdwhs7e9fshIReMrmPqquP4Ctgg9g8EPNXUdUJYTPULoBCJSNQ|
|SY0DWx2ywPLiaune8P4h3NFqXplOqeQPcIXRiZ0gLyAElEk5WZChvKCvqQAokp1SUgA|
|KItTaeEpZVZ5VSrnHPQ6G7FsALbbedh/jqhW5z/j/zfS0CaxQiaWW12NCcnQjBKKK4Y|
|bf0FijMYrEE3l3yvsfO1WjXARaoVS90DpaVwQmlG37etGOse8P+uAAAF5StHA1AfSak|
|08WCrmq3n3b38f7a2c7yfdKCN09DSTPwIoo1nUMxvBUVzPWQvGThnjR2qD9Pmuyo9bv|
|rRFLO4YNXNvZ5oXw58SZtHEBAXVQi30aj50qzBuVtEoLmGgv+YyUwjwnGlddIu5uQsl|
|hU85gVFOfrV+znFYBHWxdoF2ZrsbKaOCfaS1xdgEDzdIi9/gG/IgCfBBMf9Nl1XskI7|
|9cKeMLrjwMNHmDsA00W7WRlSVWntO8lk9+MqnwnW8doWj0ZRP4kCxPz8nlDXmUCxfC2|
|uADjiKUhX/Gtnt4buRoRXLQuIX8Dxntyof6AiVgJ9yV4/hXON310VlH8/LfTvlMM42U|
|Atr7ku4V7/F2Tp6GYHZOwlHP+h4291LnIwl/ZUPBJPPyAnjWzq4ZVxXZheF/mgHNP3p|
|E0Mbw0XzQ5nRvHx+XyxvquuY17J6hYlI0uTn56tEi2InytLGs=| -
I went ahead and finalized things for now, and thought I'd share my update.
I did try the Overwhelming KD proc in Acid Mortar, and decided it was pretty decent value. Not a game changer, but enough passive mitigation to be worth a slot - at least moreso than the remaining sets available to me. Probably the closest second place was capping out my slow resist with a brawl mule, but the expense tipped it in favor of the proc this time. : )
Here it is for posterity. If anyone digs in and has feedback, still appreciated of course!
Defender (Traps - Beam Rifle).mbd
I put it through its paces on a +4X8 S/L farm, and it has zero issues as long as I pay a little attention. This is a little surprising, as defense based builds without DDR tend to fare poorly in this environment. However, the baseline resists and extra -tohit from Seekers, along with a trickle from Triage beacon goes a surprisingly long way.
-
28 minutes ago, the1egend1ives said:
Could you explain why?
Sure!
With everything accounted for, you're at 55.68% ranged defense. I'm not sure what totals you are reviewing, but this is from the latest mids version 3.7.4 with updated database. I am set to "attacked" as well, so stealth is only showing the lower value. No bonus from Infiltration either.
Softcap is 45%.
As for my build, I was going primarily for ranged defense, and achieved it rather easily without many set bonuses, as Defenders have higher baseline values. I was then looking for fun things to do with a couple spare slots, and found I could hit melee softcap as well for a happy bonus. I wouldn't consider it an important goal, but it only took a small adjustment to my build, and I wouldn't gain any appreciable damage or other utility by dumping it as a sideline.
-
2 minutes ago, the1egend1ives said:
Doesn't adding recharge enhancements to powers that proc reduce the effectiveness of procs
It doesn't work this way for pet powers. The power is being cast by the pet, not by you, and won't be affected.
Meanwhile, juicing recharge allows you to cast the pet more often.
This is also true of psuedopets like rain powers and persistent effect fields (poison trap is one such example).
If you ever aren't certain, look at the city of data entry. Look for a pet entity that is summoned.
Poison trap's cod page: https://cod.uberguy.net/html/power.html?power=corruptor_buff.traps.poison_trap&at=corruptor
-
Not a bad baseline! End consumption is pretty manageable, and accuracy is pretty solid in most powers. Most of your power choices are sensible as well.
A little overkill on ranged defense bonuses though. not the worst thing to have a little pad, but you could edge back and juice damage with more procs in some places.
A few general insights:
- Acid Mortar would benefit from additional recharge. I have tested it with various procs, and didn't find it worthwhile return. Multiple casts of the mortar stack their -res, and you can get good overlap with better recharge.
- You haven't used the Scourging Blast ATO set. Splitting this into 2 sets of three helps you double up on recharge with little sacrifice. One of these triples would do well in Acid Mortar (all the elements but the proc that have recharge)
- The extra recharge on Aim isn't a great return. Consider swapping one for the gaussian buildup proc.
- I also don't find Caltrops worthwhile for procs, though some disagree. It's a very slow return. I go baseline with a set IO that includes Range/Slow plussed out. The extra range is pretty nice for flexibility in battle., as otherwise it's a bit short.
- I wouldn't go Energy Mastery. You don't have much that really benefits from the power boost effect of power build up (FFgen and Seekers don't inherit it as they're pets), so it's basically just a really long recharge build up. You'll get better resists from Mu, and can grab Power Sink if you really want an extra end tool.
- Extra lotg in combat jumping does almost nothing.
- Rain of Arrows is painfully underslotted. Procs are nice to add here, but it deserves good baseline enhancement.
- Poison trap needs accuracy to hit. The procs are nice, but you need local accuracy and preferably some recharge here as well.
- Ranged Shot, like Rain of Arrows, needs actual enhancement beyond procs. Sting of the manticore has a really efficient 3 slot range defense bonus that would help you shift away from high investment bonuses like the 6 slot Gladiator's in Temp invuln, which isn't really doing much for you beyond the 6th bonus.
- Seeker Drones are your main opener. I highly suggest slotting for -tohit, as they stack powerfully for it. Each Seeker pops its own 15 ft aoe of -tohit. They also eat the alpha strike. By the time things can target you, their damage and tohit is gutted. Cloud senses even offers a Ranged defense 6 slot bonus if you want to keep leaning on this power for defense bonuses.
There's more that I would do if building for myself (incorporate slow resist, balance things out with more procs in my ST attacks are among them), but this is where I'd start!
Although it is by no means 1:1, here is a recent traps defender I made. You might find some of the slotting philosophy useful for reference.
Defender (Traps - Beam Rifle).mbd
-
1
-
I can't import chunks into the latest mids (copy/paste won't work!) Mind attaching a build file?
-
Hi folks!
I've been slowly revisiting a few builds impacted by the last page update as I find inspiration, and this guy is the latest round.
I'd love some input on final tweaks, as well as your perspective on the current state of epic power pools in general. Previously this guy ran Electric Mastery mostly for the superior damage types in the armor, with power sink as a backup for end. However, Temporal Bomb takes some end pressure off, and I feel like the current build gets by just fine without additional end support, so would like more utility out of my epic.
What I've gone for:
- Softcap Melee and Ranged
- Proc optimized attacks where there's an interesting baseline to leverage.
- Slow resist.
- Max hit chance against +3's.
- Stack as much recharge and S/L resist as I can find without sacrificing the above.
Slotting questions:
- I have a couple clear flex slots (2nd in triage, 5th in maneuvers). They both feel pretty solid, but perhaps you see a better place where they could add great value?
- Of special note would be the potential of swapping one or both to a 4th Shield wall and/or a 6th Ragnarok for the exotic resists. However, they're mostly for resists that have low baseline totals, so relatively low impact.
- @Psyonico mentioned trying the overwhelming kd proc in acid mortar for the flat 20% kd chance. Has anyone tested this? Sounds like it could be meaningful secondary mitigation.
Power questions:
- Do you see other epic opportunities with great benefit? I like that I get very clear utility out of every Dark Mastery power here, and nothing is purely a mule. Stun stacking with Lancer and Overcharge is hard to pass up, especially with no extra animation time.
- I tried Psi mastery initially, hoping that the new TK would be fun. However, I found the epic version to be super trashy garbage. I don't understand why they had to hit it so hard! Double the recharge, half the targets, and half the radius of the Mind Control power. I know it shouldn't be full power, but it's just too much. What is your experience with this power? Have you found good uses?
- I have grown to greatly dislike cutting beam over the years. Just unsatisfying dpa even procced, and a narrow cone. Do you feel this is misguided?
- Am I alone in thinking Defender epics in general are pretty lacking outside of the armors these days, unless you really want a melee attack? I understand they may be doing further epic passes later on now that they've normalized some things - looking forward to it!
Note that procs are disabled in charged shot to avoid ffback skewing.
Build:
Defender (Traps - Beam Rifle).mbd
Chunk:
Spoiler|MBD;23879;1653;2204;BASE64;|
|G0ZdERWcPACtjreFYcVCSkqCJpvyx5aHZWHGyhFNjvyAqmXWInqLtpX6Zd4szqxgssC|
|X6MnS1dc6LCBdvcHmLYhsqVVRrr0nc5Zc5V1Yao+5kcEFaPf3/132s19IJEqupWUcay|
|RCbzJ51NKyLaGHVppuxSIkxi+e43Hyv1Fzo2YlFsd3gBovRzgOKkNVPeneo08Q5oBRv|
|Ds6hEVSVPT5TeC+G62O/LuJu4e1cH5z47TNVttP6JAmNbISF4J5nHE+GYpzc29zeaRR|
|IVWmQecLUpV7TPP+K6E8aIPREkzpuEbGJrdI0GZdtLri1Rje8vm3lJSxHnGCqh5SHza|
|vOZfdGriOY5tD7mwdoyRWnxgbKRcmPSZbF7Oqz62h3HnTSUqFRYc4dhNNhgDr1S12a9|
|9U4olASyt9tNPcKm5zm3nQ1MHCKndDkqjzVI/2qpvIrHD+VJBrdyZKKmrV6CZq3rwhv|
|Cfr78eNdGwqJN+HVaa0k0Grf9MrFWTq7mSxdm6TnpOZZE0G48q8qP7XpsN7xbNjUSw6|
|5vGXDzmKA4N0tQdeB/4nMa+oSWgjDxlsdG5sKf165u0jo9Sj2iO1cFJlN61FLqcZfOU|
|PPvW+OZhIm3bhTyvmRuvA0C3Y3qCVkAFaKXFKZn5PytUtgaplHAgotiBBra1ISF2hxe|
|fhiKfCQDFkgjeFSECfkf+V5VOGSnkkKnnlVIM/91cyP35EhT5ZzqlaCI6S6Q6DGtdJG|
|bu3debiZM05VB5EJEbDyuFimSIYOkalrBMksOZj5PyTNreaUd3CedEmfu1SqNaVZNQJ|
|XEGw5AoL1MLonsu144RZ28fePvZa82It5UBgHFpB14HWoyQOuAdni+T+iVuv+tApVgg|
|Q3C5gzUhfcoEiyJ44BcCWiHo5vVQ5B2Is7+ifArhFYGsJBf/oOOeAXB/r2AB9Qn6UkQ|
|zHTp6YNkPrd7ePU83YGaXA493wPiaPcp4/CUqWujVPM7ibj9ATKIIMyoBRpPAQeEMi9|
|OpXHVzTDQmmKQUGbG9HLzYkIukUJ4hbVohaQRe02VjSD7QAxu29Pzsx26kjZcH59juu|
|cNOOOFcNf7M7dGCj/PQsPPUxRxN27SHdY6V+BbL3LSSLZueABcEaM3GUmZVxwDLdTtp|
|3OB561YMej7LHY3zO+vjLa2VlqlgiPux7J9jqkwOuQaFBIrQuWg/yyYCGG/MGt0Oi+7|
|j3o0PjIeYQSkt9nNUh8/uUA0qgKMorogjK6wmH+XEGNeffVSgmgOHGiR61vdYofh89a|
|mcj8ACMwrvFFW4c24ypc2zvk76OBqfjFNO+AAMAGJdhZMmXDDSWOLVyih0/ShxYEKz9|
|o6SGedSKlXYPmr90PPUAEwKcmzyLvwSuL2sKNG7vMj/uJF3+aj378reReh2O92s/1HU|
|hsNk6G57IJbzKFOunhfMf2jBE9AysljSKodwaRltRJrZVoX1J58u4uXyAz2Ybcq2abR|
|cdyedljOcS/s1jOcfJF96/1cHYxxEZi5CHf9LAKdmhzgSXeYgMdL/54KkVbsnZ1UgwU|
|96MGvFipVpykyTGCZKtw6GCyMt+koyQ36UgD364AGYpo9/KdNPUAQOpAGCAVBDhJfNA|
|CJL/iVwUV2f1OY0Hf9vMztDVXgF79a2/72A6JC7Ip7uJAzasyzJW9psA9F27GiJqWXS|
|qUlYJJBIySxi48FfH4K+FuDwk/seaTxwJKDPIyLTZd3U/hzIOyUKQk8YXd0HCDosrHN|
|aMk6F/iY/m+qbAOwV2p6OuE/XFgWGGYib8MAmwjrwwRNRg7NK0v4G3tluL4WtCQ9Rsh|
|R+5N1OwT9ZVv93kYT83f4IrDJqEkQS+sofSwo2qwbRtbzuDBoP+/slKgQPBWYTxf+U2|
|/naszqXaoyq4Hzmaba+S4UgeJMb1yihn4IegTxKhFREfvn2gVYzt3Bm/rVm6t2bI26R|
|q8uIfZ86cDw7n0OAIrJiU+a5d+Qu8cDK0PiA1/viJWaLAQFpRi/T/vnNXGG96VGhG95|
|n+61SsGJNTP6PMOnmH3/wTM+kUeIi0x99qSJ+kis5+/j+0bl1qkhC3V5lMmgzIvj0aV|
|cIuqWurGRh6ML6aOyvXmnfwZuaI75B77hHTfVvCVCj8rqHc13E005rlrb40/wP2FcZY|
|iyKRKBdglyyE6c3OX/3HzbqESXH74858h3ZlX1NqBTHJUJkYJOThRr8NPRjV|
Shield/Savage - Tauntless flying Marauder
in Tanker
Posted
Now that I'm quite satisfied with my Fire/EM (what a fun monster!), it's time to rework my dusty old Shield/Savage. I built him back in 2019, and his current double down defense focus is showing its age. I know I can squeeze more damage out of him and bring up the resists.
My goals in his rework:
Power considerations:
Concerns:
Note that I have procs disabled in my FFback powers to reflect more accurate totals. The Might ATO proc isn't working in mids right now, so no totals added from that either.
Build:
Tanker (Shield Defense - Savage Melee).mbd
Text:
Hero Tanker
Build plan made with Mids' Reborn v3.7.4 rev. 9
──────────────────────────────
──────────────────────────────
Powers taken:
Level 1: Deflection
Level 1: Maiming Slash
Level 2: Battle Agility
Level 4: Shred
Level 6: Active Defense
Level 8: Against All Odds
Level 10: True Grit
Level 12: Phalanx Fighting
Level 14: Combat Jumping
Level 16: Vicious Slash
Level 18: Grant Cover
Level 20: Blood Thirst
Level 22: Shield Charge
Level 24: Rending Flurry
Level 26: Hover
Level 28: Hasten
Level 30: Savage Leap
Level 32: Fly
Level 35: Kick
Level 38: Tough
Level 41: Weave
Level 44: Focused Accuracy
Level 47: One with the Shield
Level 49: Physical Perfection
──────────────────────────────
Inherents:
Level 1: Brawl
Level 1: Gauntlet
Level 1: Sprint
Level 2: Rest
Level 1: Swift
Level 1: Health
Level 1: Hurdle
Level 1: Stamina
Level 1: Blood Frenzy
Level 32: Afterburner
Picture:
Chunk:
|MBD;23535;1610;2148;BASE64;|
|G+5bEdWbLoBWx9vCsGIW6EiGxZC30utXh2Nhxsr5U/2q6tnduy5ds/UJEftNwongCPD|
|MX1Vl9+04djuNUpQUkPhAYG6pL5+jesOjwcvBi3BMlmp7snT1tQ4LSFdwB54vtcDv3f|
|vNWoyABLowKLPJJNTSBnL+j9pWHbWqXqwC7Xai3s1uFw4cz32EkAiJyZh2HfTXsr4ei|
|gFDCP2x5MWwyPxSIb5v0H6eRNOef1eI5DoK588Ta9xIfNghrSaiQguBX8e+z7jiPDNx|
|t2yskDYTaUI2cS8ln89mS7i9CIorJcPlSNm0UWzPNh/wmuMRiEHZ8PYhEBs0wKaLs35|
|RST6a6DyWGMcvfVdYf1lOjbOpwXDZK1fZMGApNb3PDFsuyKm+vZDDJn+2VlkzrjZnGn|
|3vcWpbHDTNZVdLux90zLosyW1kSXydu7C6h7mvgRS5CvjPXbw78ei4RXvsHPSS8mO1h|
|PjR2/7EaIPdFjqfZZt10vd9U1B9R8Dr10alTZl96KnPlevqf4zGyXMGy2tOasbcnMMv|
|Wk+7B73a1/rhIZdCZxNDI/3e/e/gU47VEFxgzfI+SdzDQaljNttTDkz3fHIypm/rKbZ|
|zbuY/+aGYnic6CSPgmnzQbuBBCZsLnW0zy3I6GHxRhKmsfu/REtd5MIdsTHIWcGcb0j|
|CC4j3sOk7ENVwH4hhbm37P7BCQbWG5u3tZoseCLNs2yV2seYvxCxlV09F54OFDppdhL|
|dRYaxZHUokfCxRh2FFQkPGTf+XZet3nc620z9I/rpBZZekN7LNbFaYpQHUPxizfGPxL|
|pIwkaHykRCe2gwILyCFv6T3QpQMuaCyk8iZcxUYF2svPjR/WGSJ8Ap6nbg6nv3R4kXR|
|s4D0vRqi72tM7W3Bgm3+ZfG33Q/qDG7XJuSj+hWjh5ZsheQKWbuG6sDOjH7ynMDY1rY|
|dY0zLau6Fnk9vsfcYo87l1Ym/K5OIvcleZ9DT+m/HuPe9wD32Sw9NPTPAIrf1Y4AoNX|
|YLkF8KmqeJqlGaaPwEmoMUoxminV2NxzlOZ+sww6So1IkNSlA9Pfe1i4neuw/ApCVii|
|S7Hu49Y8oKMqnhb0xTVGpy0cxyrFDgEusVSBAQBqHTl7x0/+0aZjpu64XhNocG88Nvo|
|crSMKvwJoKQjKlgu5Mcm/AJMo5CNHhpdCqyeaGQrQWj5R3NYny3x2vZKY3N46+5nDrm|
|u4rAS+bEnxdS+IDURG8tl6EHoUn10j6zyhimYr5NjgKr9+Umamiif3w2/gxZxnHdqyg|
|DVUYtK5G0T9uPE1AKsSwbCTqjFhIBIL51hknRBUwVntcPReTQtRLwBDwjrBMuRn+PFz|
|obllOfpots2Ixx0wRgWNRmWRmBp6oqwvGQ1AEfo2owlA1VZwu2Wvl6IhXC4AD7I4aim|
|uC1acpfNhqP+b1MZJFytyNm5c/+hlShY8uQIfqr+7Si1KREks/Kcbv0DjBhj1OksOI9|
|eFznfZFKEkOt9NGyeQSDuoUdO9z6PYrvP5vzf+qW8Iyts941FO8PWw0V7iF8Oa2nbIJ|
|rRo+lKeprJFt03gD0oeetHgdCZDGBFr3/+21o2rff6AHIxTKGaR4nzrGXPbg+Dym2ov|
|eXvzXEOnBvGYEr1RWqM/67wKeQ2gGNMcj20CGDIMveIL8Fu/kCtaYAB3yG3rTTKq5lm|
|jKAqjKA7TkOBRVRH07mB/qIr16NxxEZcVwEAxu9H/z/yCbjZMealvzMcwbZTEtE9lRd|
|YUm7eDfc3YbIOu56kbdy1apjL7A12QfpEsdlI0UjjURCOAKw2J5exuNZIx0PJdnk1Fh|
|nzeeh0/e/G9uHkNXFcd/gb8UPzc6dcc7qmPSqLpktd2ocznbv3EpQ7PecHyRZlGyM38|
|pITNenMGPeIMsjmLlDrjAM806k3lJL9VyvZe+wz1CxFL1vb0j4wwhNaDiRlk4SOZdi3|
|kqgcWCiaN/IzIuv/Q5jLsm14q34gfabq5bCkM4dJHDRKXBqlvVTz/tT3noS7JHH4VQ8|
|IbiNeypSHNoF8OptZSnNENiC+QFpekmzS8JHZ3pvM9vIX5PSvAckcS8s3uY7CV2jLHL|
|1UmevG3wCmn2/7ujQfxkYwwoQlTPqNJuBSWP0LMGGtmmyZ1GLikqwLnMgnZ7kdgao9o|
|cQM=|