Warshades
-
Posts
410 -
Joined
-
Last visited
Content Type
Profiles
Forums
Events
Store
Articles
Patch Notes
Everything posted by Warshades
-
Overall good, but a few things to point out: Elec melee is getting significant changes that are currently being tested on the test server. Lightning Clap will be a strong ST damage attack and you'll want to slot for damage. Chain Induction is becoming a true chain and the power will only accept AoE damage sets. You have one to many of the 6% fire/cold resist bonuses and one of them isn't being counted (you're capped at 5x of any specific set bonus that has the same % value). Consider replacing one of the 3 Ragnarok pieces in either BoL or Fences to a different 3 piece set that will offer more value. You have really good resists and defenses, but your recharge is extremely low. Turn off all FF +rech procs when looking at cooldown rates (you have the one in Lightning Clap toggled on). The FF +rech proc is only active for 5 seconds and will be up infrequently during combat. Consider fitting in more LotG +rech IOs into the build. You could replace either SJ or SS for Maneuvers, even as a 1 slot power, you can still put in a LotG +rech IO. Rather than putting the Shield Wall unique into CJ as an extra slot, just replace one of the def/rech shield wall pieces in Weave for the unique and put the LotG +rech into CJ instead. Similarly, you can save a slot from Resist Physical Damage by moving the Unbreakable Guard +max HP into Resist Elements. The Unbreakable Guard end/rech IO does nothing in Resist Elements which is a passive power and always on, costing no endurance. Replace the end/rech Unbreakable Guard for the max HP in Resist Elements and you can move the extra slot to add another LotG +rech to help your global recharge. You don't really need the s/l resist bonus from Preventive Medicine as you're already over 90% or the extra max HP bonus since DP will cap your max HP. Consider doing 2x of the heal/rech HOs boosted to +3 and moving the Preventive Medicine unique into Health.
-
Elec armor can also achieve some insane level regen when built for high recharge with power sink slotted for healing. The regen amounts will depend a lot on mob size, ideally you want max 10 targets for power sink to maximize regen. With a high enough recharge, you can upkeep 3 stacks of power sink which offers some insane levels of regen in ideal conditions.
-
page 3 [FOCUSED FEEDBACK] Super Strength Adjustments
Warshades replied to The Curator's topic in [Open Beta] Focused Feedback
The code allows them to make mutually exclusive powers, I was only saying to offer a 3rd mutually exclusive option and not to make 1 power have 2 different effects based on which armor set was chosen. -
page 3 [FOCUSED FEEDBACK] Super Strength Adjustments
Warshades replied to The Curator's topic in [Open Beta] Focused Feedback
Resist sets do feel it, it's just not as impactful when soloing compared to how bad the -def is for defensive sets. Walking into an alpha strike from a mob hits a lot harder with -20% def even on a resist set. In team scenarios, a lot of that -def ends up being mitigated by team wide buff toggles like Maneuvers (at least end-game). But isn't this the point of the change that was made? To make rage crash more fair for defensive armor sets? It's not like the damage was adjusted and the set itself was essentially balanced around using Rage. It certainly wasn't over performing compared to other top melee sets. If the point is to make it more fair for defensive armor sets, why not offer a version of the rage crash specifically for them? Or if they think this new -10% def and -20% resist is fair, then add this option but keep the old one in place. If they want to add this new option, I'm totally fine with that, but offer us the option of sticking with the old one if we want to, particularly if we built chars specifically with the -20% defense crash in mind, and not a new -10% def and -20% res. Regardless if you're a defensive armor set suffering from -res or resist armor set suffering from -def, the effects are still felt. This change just severely impacts characters that I've built (and maybe others) keeping in mind only the -20% def. -
page 3 [FOCUSED FEEDBACK] Super Strength Adjustments
Warshades replied to The Curator's topic in [Open Beta] Focused Feedback
My point was to emphasize how ridiculous the -20% resist crash change is. No defensive armor set would ever want to take a Rage crash with -40% resist crash either as it would be even worse than -20% defense which is easier to mitigate by going over the soft cap or popping a purple insp. -
page 3 [FOCUSED FEEDBACK] Super Strength Adjustments
Warshades replied to The Curator's topic in [Open Beta] Focused Feedback
How about giving a 3rd mutually exclusive Rage power? Keep the original with the -20% defense, have the new one be -40% resist (since they seem to equate 1% def = 2% resist), and have the toggle. Now if defensive sets are worried about defense crash but still want Rage, they can take the resist crash one (although I suspect it won't work out well for them either when they're suffering -40% resist). I really dislike the current change though as a lot of the SS built tanks and brutes that I have chose SS/Rage because they were a resist based set and could help mitigate/not care as much about the defensive loss. Hell, keep the old Rage (-20% def), have the new version (-10% def and -20% resist), and have the toggle. Changing the existing rage to include -20% resist is such a sucker punch for those that specifically built SS chars with resist armor sets and there's really no freaking need to do so when you can just add more mutually exclusive options to fit other armor sets. -
It would be interesting, but then you'd get people complaining "hey, why do I have to take Scorpion patron to get the T9 that I want" or things along that line. Potentially a lot of issues for people that build around theme as well. A somewhat simple solution is just to keep the duration and recharge where they are but remove the crash. I just fail to see how having a T9 that lasts 180 seconds with a base recharge of 1000 seconds would break the game if it didn't crash when the timer expired, if someone can explain why the duration/recharge needs to be changed or the effects of the T9 need to be reduced because there's no crash anymore, I'd love to hear it. I am mostly referring to the long/hard crash T9s like Overload, Unstoppable, Elude, etc here.
-
Lack of slots mostly with the areas that I focused on. You're more than welcome to adjust and remove the slots from Defensive Sweep or Teleport to add the LotG. In addition to giving some f/c resist, the second end/range slot in Teleport was to help when relying on it as a travel power. The Winter's Gift slow resist unique wasn't there for reducing movement debuffs but to give 20% recharge debuff resist. I tend to prefer building for high recharge debuff resist so that any attacks that inflict -rech slows won't cripple the recharge of important powers. This is less of a factor for Invuln since the only clickable power is DP, but up to you in the end. TW is an endurance heavy set, the main concern here would be if you have enough recovery in the build to throw all those attacks in continuous combat. It's up to you. Personally I like Build Momentum as it will trigger the Gaussian proc more consistently. If you feel like you need Follow Through, by all means adjust the build as needed to fit it in. No major issues, only other small concern besides endurance might be the accuracy on Defensive Sweep since it's not slotted, but my mid's isn't factoring the tohit buff from Combat Teleport so maybe it will be fine if you plan to use CT -> Defensive Sweep as an opener.
-
Also realized after the fact that I forgot the Reactive Defense scaling resist unique (normally I put this in Combat Jumping but had to cut it to fit Fold Space). Adjusted the build to run 2 heal/rech HOs boosted to +3 in DP and moved the extra slot into Invincibility for the Reactive Defense scaling resist, higher overall resist totals. Tanker (Invulnerability - Titan Weapons)fold space2.mbd

-
I like to build invuln to try and reach soft cap with 1 foe in range of invincibility. I would do something along the lines of the build below if you want it with Fold Space. This doesn't quite reach 45% on e/n with 1 foe, but is close enough. With 10 foes in range, which is what your build was set to, this one gives considerable cushion on your defenses. Totals with 10 foes in range of invincibility. Most slot efficient set up are 2x Ectosome Exposure HO's boosted to +3. This power wants 2 things, accuracy and recharge enhancement. Ectosome Exposure HO boosts both which you already had in your build. Taunt requires no accuracy in PvE, I usually just slot Perfect Zinger chance for psi damage in it since it has short recharge anyway. You had some weird slotting in your build and a proc turned on that you should really detoggle so that you're seeing accurate numbers. Kick will rarely hit, and when it does, it has very low proc chances so you will rarely see the +100% recharge proc active (and even then, it's active for just 5 seconds). Keep this in mind when looking over recharge times as it doesn't reflect what you will normally be at. There's really no point in even putting anything in Kick as you really shouldn't be using it. Similarly, the 1 Blistering Cold in Brawl does nothing. You need at least 2 pieces to get the first set bonus for the recharge debuff resist. The way you slotted Dull Pain is also really bad. The only health IO proc that works like a unique and doesn't require that power to be used or a passive to proc is Preventive Medicine. All the other procs like Numina and Regenerating Tissue will only have a chance to activate when you use Dull Pain. If you want to slot those (or the others like Miracle and Panacea), you want to put them into Health. Slot DP for recharge/heal. Tanker (Invulnerability - Titan Weapons)fold space.mbd
-
A quick look at my potential new main - Regen/SS
Warshades replied to Spaghetti Betty's topic in Tanker
The biggest impact is going to be from the new rage crash mechanic. Before it did -20% defense which a resist (or resist/regen in the case of Regen) armor set didn't really care for. The new rage crash now does -10% defense and -20% resistance. The -20% resistance may potentially cause some problems since you will no longer be sitting at or near the resist cap to all damage types with either RoP or melee hybrid incarnate running. You do have the alternative of running the toggle version of rage that doesn't have a crash, but it will be a somewhat significant downgrade in your damage output compared to running double stacked rage and proccing out powers like Foot Stomp, KO Blow, and epic/patron powers. I think that much like PyroBeetle said, you may have to pay a bit more attention and perhaps use MoG or your heals a bit more often if you decide to stick with Rage over the toggle version. If you want to prioritize survival over damage output then you can build around the toggle and maintain the same level of tankiness as it currently has. -
I'm glad they aren't reverting Power Surge on electric armor at least.
-
Sounds like it might be time for some mutually exclusive T9 power options, that way players can choose if they want the long duration + crash or short duration and no crash. Just a thought. From a personal perspective, I do prefer the no crash change, but I do wish they kept the % uptime the same or relatively close. There are certainly cases where having a longer lasting T9 could be useful such as tanking LR while teammates deal with towers and such. 30-40 second duration are pretty low.
-
That's actually what your scaling resist from SR passives is for. With a focus on resist set bonuses and double stacked SMoT proc, you can typically reach 90% resit caps to all but psionic with ~30% HP left. Perfection of Body combination from Staff adds and additional 13% resist to all iirc, so if you keep that running with double stacked SMoT, you should be able to hit resist caps to all but psi with ~45% HP left. At that point you're bordering on immortal as you're positional soft capped to incarnate levels with capped resists.
-
When you quoted my section in your response, I thought you referencing my comment about making Attune into a aura toggle and that you "like it in theory", but were then saying it would make it top tier if that was done and that it would be a "bad" thing from the "big bad DPSing" section of the comment. Again, apologies for misinterpreting the comment, I think I just really need to go get some sleep at this point.
-
My main point was just about simplifying the process of how attuning is applied so that it's not such a tedious mechanic. It's a bit counter intuitive on how it's designed. You want to hit the target that you use it on to gain additional damage/effects, but that in turn kills the target faster which then requires recasting it and it becoming tedious to continually do so. If the amount it enhances the ST powers needs to be reduced a bit to account for the fact that we no longer need to click, cast, and apply it then that would be fine by me. If it only buffs a few ST powers and not all of them, that's fine also. It's not like Quills on spines is skipped despite not having any damage enhancing effects to the other powers in the sets, it's taken because the PBAoE aura damage is useful and adds up. In the end I know it's just my opinion and devs may have a different vision for the set and Attune power. Going back to your other point, let's say that changing it to an aura toggle does make Sonic a top tier ST melee set, why would that be a problem? Why can't a set that's being released be top tier for something? There are top tiers for whatever category you want to make a list on, like ST or AoE damage, etc. Being a new set shouldn't exclude it from becoming a top tier ST set, it gives the set a specialty much like EM is considered one of the top tier ST damage sets while having poor AoE damage (and EM might still edge out Sonic on top, at least on Stalkers). What right do any of the current sets have at being top tier at anything that others aren't allowed to ever surpass them, like Fire Blast for damage output on blasters? Attuning an AV is an ideal scenario, they are basically guaranteed to be the last remaining enemy in a fight so recasting Attune isn't an issue. But when you're fighting mob to mob, even if you go by the standard of only placing it on the boss in the group, the power just feels tedious to have to recast on each new group. Again, it's personal opinion in the end and I in no way want to imply that my impression of the Attune power is the only correct one, but I just feel like the set would flow much better by turning Attune into a damage aura toggle that would attune to any enemies nearby that are hit by it.
-
There was really no need to re-invent the wheel with this power which is what it feels like was done. Make it a PBAoE toggle that does trickle damage similar to what Radiation and Spines have. It can still have the effect of "attuning" with enemies, perhaps limit it so that it only buffs single target attacks in the set so that the AoE isn't over powered as a result (not sure if this was ever changed from beta, but I think it only buffed the T1/T2 powers on beta when I first tested it?). Then you can just keep it running, get it's benefits on any nearby targets in the PBAoE aura, and not have to worry about moving it from target to target and recasting it.
-
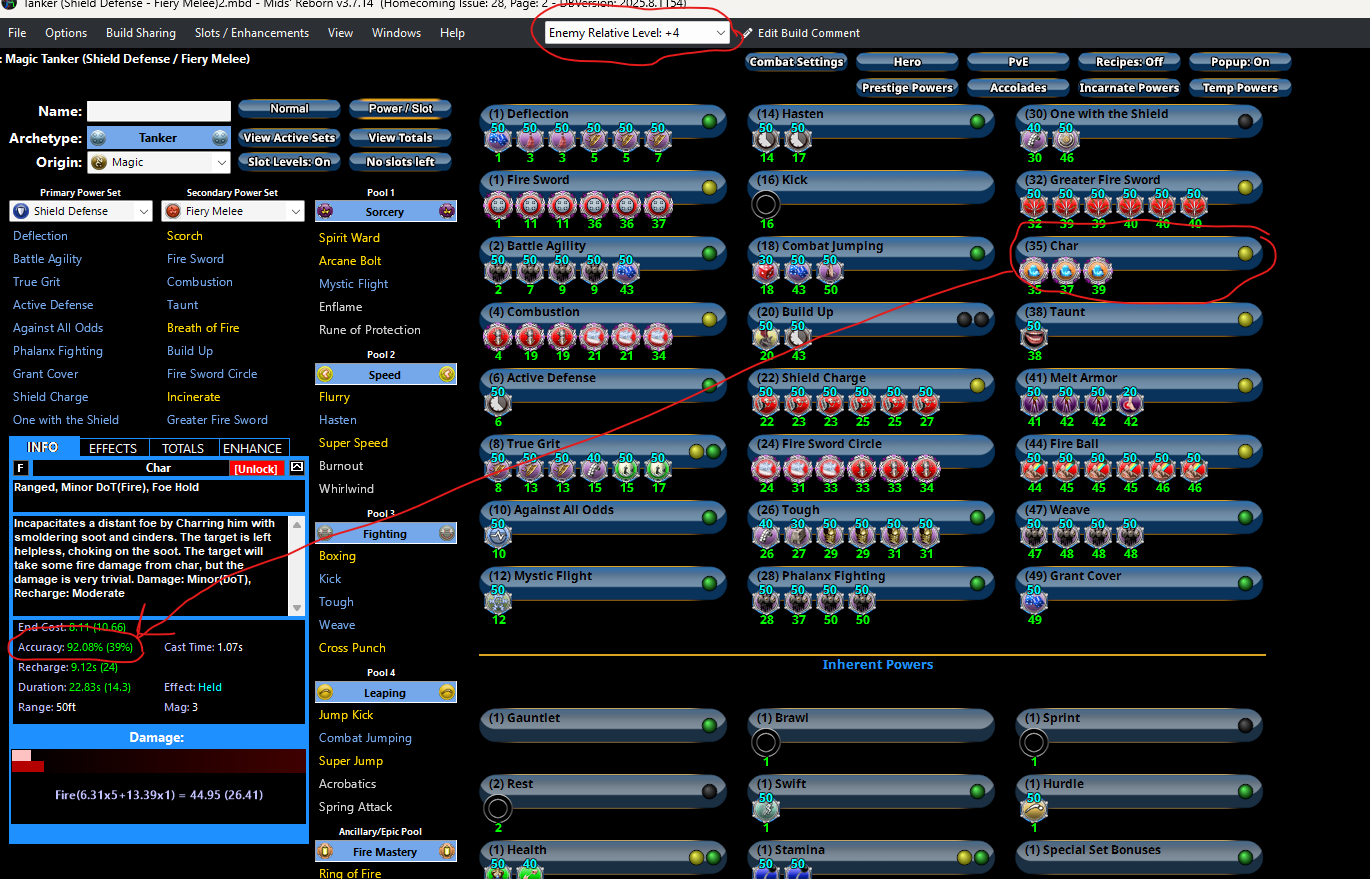
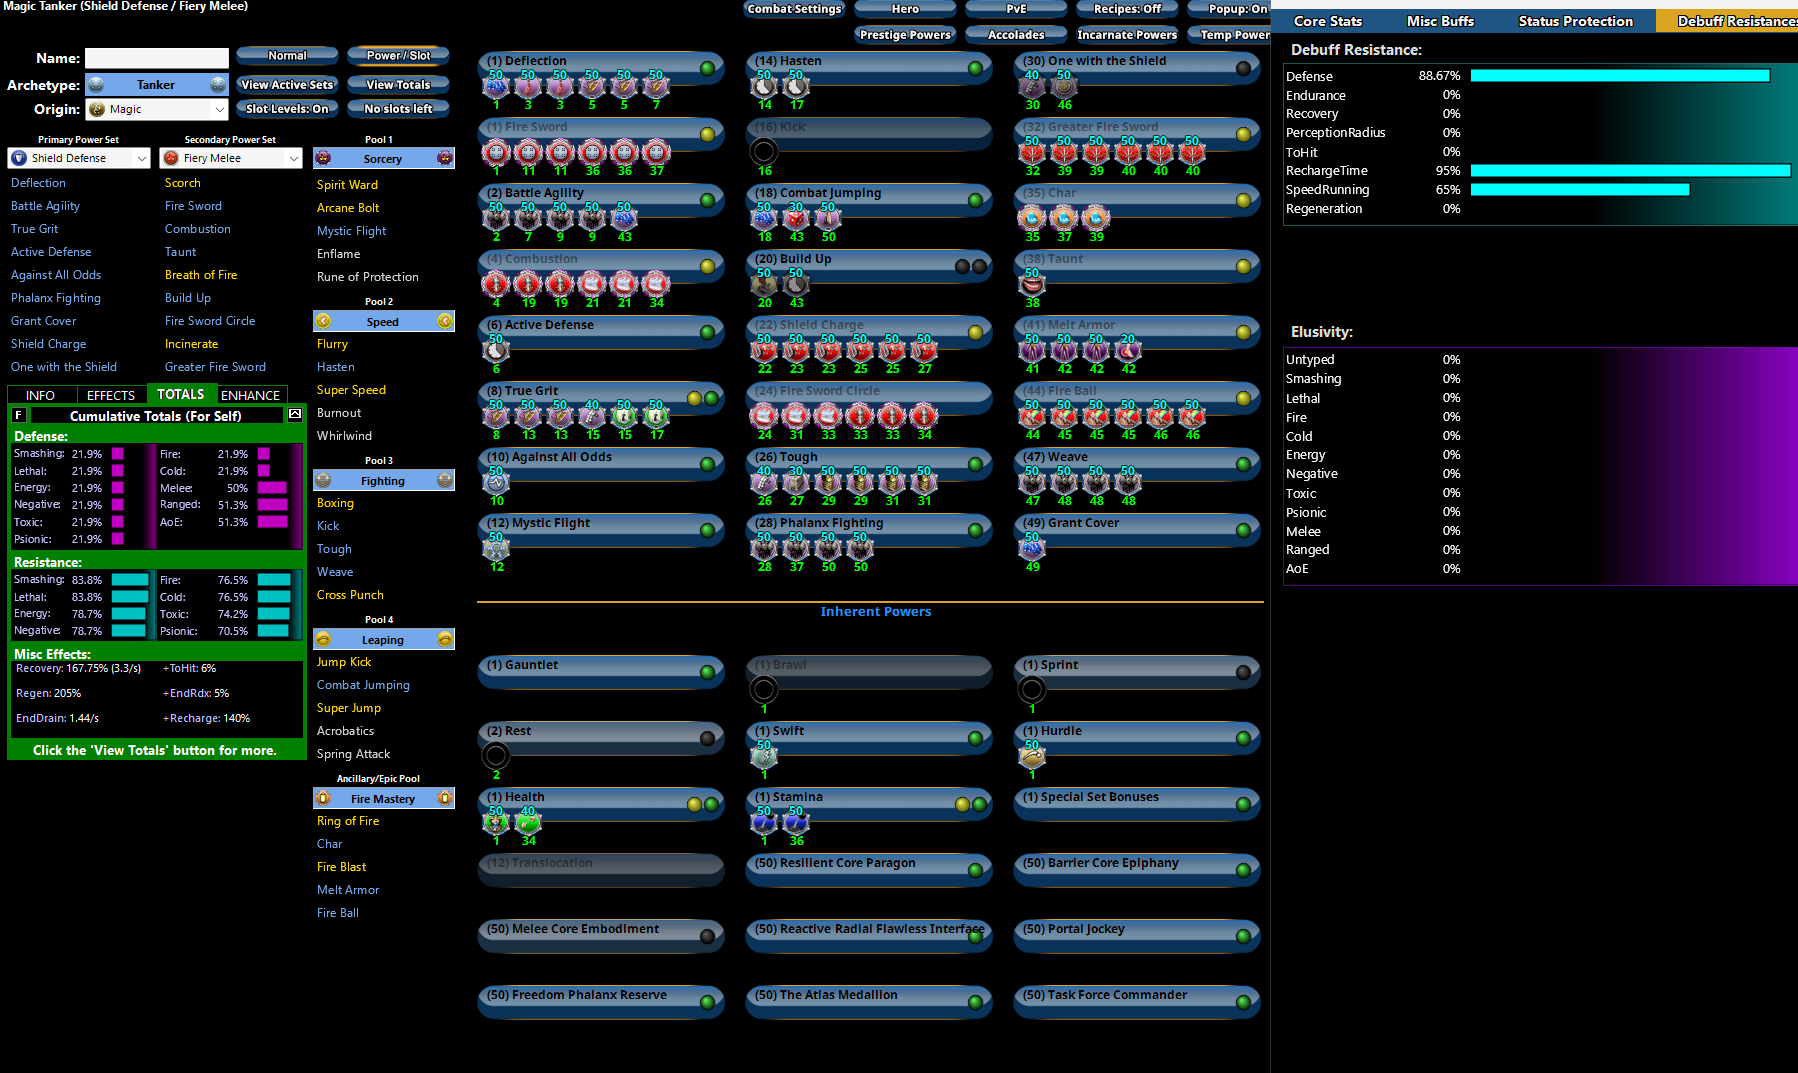
This would be a more damage leaning build. One of the other things that usually suffers is accuracy when going for damage procs. I would probably suggest staying at +4 (effectively +3 with level shift) when using this. Although if you team and your teammates have tactics and such, it won't be an issue. It should have enough survival for most content and you still have melee core or OwtS for more resistance when needed. You could change out GFS slotting to a full hecatomb set to get more recharge/accuracy and tox/psi resist bonuses if you want. With a tank, you're mostly best at doing AoE damage so your AoE attacks like Combustion, FSC, and epic AoE are the primary targets that you would want to damage proc. FSC slotting isn't ideal, there's no real way to 3 slot Superior Might of the Tanker without buffing recharge which hurts the proc chances on it. You could alter it a bit if you want higher damage. This is with acc/dmg, acc/dmg/end Scirocco piece boosted to +5 and Obliteration dmg +5 boosted along with the damage procs from those sets and Perfect Zinger proc. Doing this will result in higher proc chances and you can slot the Superior Gauntleted Fist proc into Fire Sword instead of the SMoT: dmg/rech. You lose a bit of s/l resist and e/n resist from 6 set SMoT and 3 set Superior Gauntleted Fist but make some of that back up with the 2 piece s/l bonus from Obliteration and 3 piece set bonus from Scirocco. This does put both the SMoT and Superior Gauntleted Fist procs into Fire Sword which is nice as you'll want to spam it to keep double stacked SMoT and can get the absorb shield at the same time. If you hold shift and right click on FSC and GFC, I already have the alternate slotting that I mentioned above built in on the build if you want to compare the differences. You will have to manually go in and change the dmg/rech SMoT to the Gauntleted Fist proc. Edit: One small additional note, I do have the decimation chance for build up proc in Char, so be careful if you toggle the procs on in the power as it will show much higher dmg/acc as it will count the brief build up proc from decimation set. Tanker (Shield Defense - Fiery Melee).mbd
-
Edited my previous post regarding damage vs survival if you want to read through it and see example. You can always open both your current build and my /fire epic one with 2 instances of mid's and compare the damage of the powers. Just make sure to compare evenly in terms of having procs/buffs toggled on or off like build up/gaussian/etc.
-
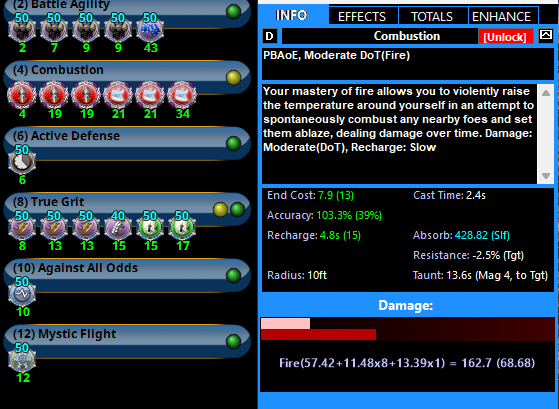
Enhancement tab is just the amount of enhancement value towards a particular stat, accuracy can vary depending on the base accuracy of the power. Just look under info tab and the "accuracy" stat. If you intend to play at +5, set the enemy relative level to +4 to account for the +1 level shift from incarnates. 95% is the max chance to hit, there's always at least a 5% chance you'll miss any attack. Having extra doesn't hurt as it does provide a layer of protection against -tohit debuffs, but these aren't particularly common outside certain specific enemy groups and powers. Edit: Really just depends on your play style, how you want to build, and your viewpoint on things. I only really take RoP on Regen as it needs the extra resistance and you can cycle between melee hybrid and RoP to reduce downtime. On armors that can sustain high resist permanently, I just prefer going for that instead of trying to pay attention to cycling between RoP and melee hybrid. You can make an argument that if you kill things fast enough, you can afford to sacrifice your resists or defenses since dead things can't hurt or kill you. Trying to maximize both the damage that you do and your defense/resist numbers is pretty much impossible. The former will use damage procs to increase damage output and sacrifice on set bonuses, the latter requires set bonuses to increase your defense/resist values and will sacrifice on procs. For comparison: Combustion without damage procs: Combustion with 4 damage procs (average damage based on proc chances of the power):
-
Interesting, did not know that was possible. Learn something new every day.
-
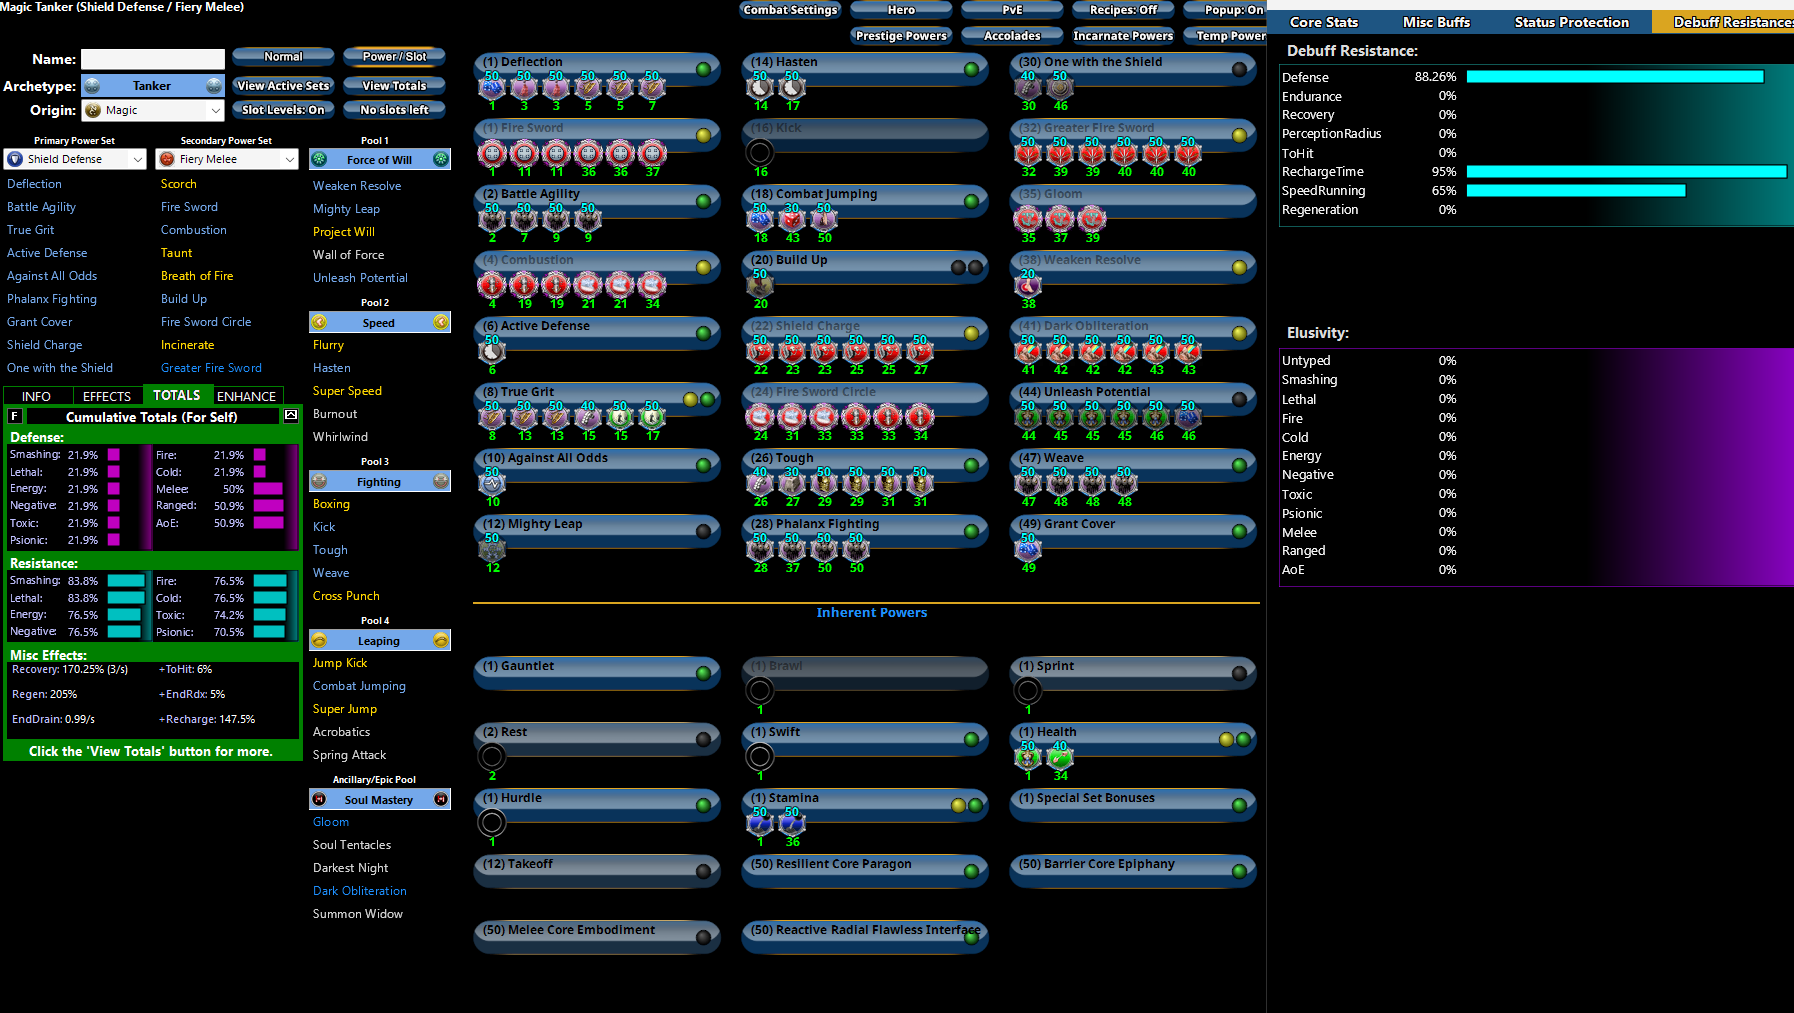
That build is impossible currently. You have Dark Obliteration at lvl 49, you only get 3 slots on lvling up from 49 to 50, so you can at most 4 slot it at that level. There's also no reason to take Enflame unless you just want it for concept reasons, it's not a useful power and has an incredibly long cast time. The main point with Spirit Ward is that you have to take at least 1 power in addition to the flight travel to unlock RoP and Spirit Ward has a limited use for slotting Preventive Medicine unique/global so you don't have to use a slot for it in something like Health. If you're going to take Enflame regardless, then you can drop Spirit Ward and take Grant Cover. I would do something more along these lines. I detoggle anything that isn't permanent or effectively permanent. Toggling melee core embodiment will get you to resist cap, but it's only active for 2 minutes with a 4 minute recharge. You also really don't need to go for RoP at all. One with the Shield fills a similar role with a similar uptime (1/3, double the active duration but double the recharge also), the one exception that it doesn't buff resists against Psionics. You still shouldn't need more than ~70% for anything in the game. Unleash Potential provides a decent regen buff since Shield lacks healing/regen, Mighty Leap also gives you a utility soft control in Take Off which while not doing damage, does knockdown surrounding foes. This build nearly caps recharge debuff resist at 95% (yours is only at 15%) and if you double stack SMoT and add another 6.7% resist to all, it will sit at 90% s/l, 83.2% e/n/f/c, 80% toxic, and 77% psionic resist without relying on RoP or OwtS. There's really no need to go into RoP at all. This does depend on the minimum 5% resist/def from T4 barrier core destiny slot and using resilience core alpha, but if you want unkillable, it does require some sacrifice on offense. Another build that leans more into the fire theme. Having an epic pool with a ST hold will let you slot Entomb unique which will provide an additional source of absorb shield. Melt Armor is nice to have both for the -res and a place to put the achilles -res proc. This build keeps Mystic Flight as a travel if you want it for theme and skips out on Force of Will. At +4 (in-game set to +5 and accounting for incarnate +1 level shift), both build should have 95% accuracy without relying on build up. The only exception being Char which sits at 92% in the second build. These builds do +5 boost some IOs, particularly PvP and some purple pieces. Also to @Major_Decoy point, you really want the Winter's Gift +20% slow resist unique in your travel. Active Defense provides 10,000% KB/repel status resistance with one stack, you'll be at 20,000 with 2 which is pretty easy to upkeep. Both Shield and SR require no -kb protection as they inherently just won't get knocked back from anything with their clickable status protection powers (and you also double up on the status and mez protection by stacking Active Defense, so you really don't need RoP for the mez protection but OwtS also provides you mez protection as well). This is with 2 stacks of Active Defense stacked. Tanker (Shield Defense - Fiery Melee)2.mbd Tanker (Shield Defense - Fiery Melee)1.mbd
-
I can take a look on mid's tomorrow, but a few things that jump out a bit: Swap Arcane Bolt for Spirit Ward if you want to stick with Sorcery pool. You can slot the Preventive Medicine unique/global in it and still gain its effects without having to use the power. You have the forced feedback proc activated from Arcane Bolt in your build which isn't permanent, won't proc often, and you likely don't have enough accuracy to reliably hit enemies with it outside of a short build up period (I also suggest turning off build up and the Gaussian build up proc when looking at your acc/dmg on powers). Spirit Ward is a better 1 slot power choice for the Preventive Medicine unique/global. Procs like Gaussian or FF +rech will show you highly inaccurate stats on your powers if you have them toggled on. If you want damage, consider leveraging damage procs in your best procing powers (particularly combustion which procs at a high rate). You will average higher dmg by slotting 2-3 winter sets pieces that provide acc/dmg, acc/dmg/end, and/or dmg/end enhancement and filling the remaining 3-4 slots with dmg procs. Using dmg procs is usually a balance of trying to get enough global recharge set bonuses from places in your build to have a decent attack chain while avoiding directly enhancing recharge of your attacks to maximize proc chances. Ideally, I'd aim for getting a total of 5 LotG uniques into your build somewhere if you do decide to proc out attacks and likely a kismet +acc unique. Personally, I consider using 5 slots on build up just for Gaussian set bonuses to be wasteful. I prefer to just 1 slot with chance for build up and distribute the other slots elsewhere. You honestly don't need to go for RoP at all. Shield can get extremely high resist without it and you'd benefit more from something like Unleashed Potential to boost your regen (since shield lacks heals or regen) than you would from a few extra points of resist. Furthermore, the Superior Might of the Tanker proc can be easily stacked twice and you'd have an additional +6.7% resist to all in your totals if you factor a 2nd stack in. I prefer to slot SMoT in the t1 or t2 attack for that reason as it has a short recharge and can be spammed often. Again, personally, I would fit Grant Cover into the build.
-
I don't have any immediate plans for sonic melee. Maybe if/when we get sonic armor I'll make a sonic/sonic melee char. Technically, a lot of the toggle animations for sonic armor could already be available if we can use the visual effects from sonic resonance ally buff powers (sonic barrier/haven and clarity for resists and mez protection toggles, even sonic dispersion could be included to make sonic armor set team friendly/support similar to shield providing nearby allies defense).
-
Here's a sample build, feel free to adjust it to your preferences however you want. This build focuses more so on survival than damage. Nearly hits resist caps with 1 SMoT proc and minimum 5% res/def from barrier core T4. You can swap barrier for ageless radial to get more debuff resist and rely on 2 stacks of SMoT proc to hit resist caps. Be sure to reset targets in range of Invincibility to 0 and then back to 1 to see accurate numbers whenever loading the build. Tanker (Invulnerability - Martial Arts)2.mbd