

Retroman
-
Posts
82 -
Joined
-
Last visited
Content Type
Profiles
Forums
Events
Store
Articles
Patch Notes
Posts posted by Retroman
-
-
On 8/21/2021 at 7:42 AM, Nemu said:
Here's a bind list of how I set up the surrounding keys
That's cool! I'm not sure how dexterous I am, though.
RB recently hit L50 (Whoo-Hoo!) but I haven't done the Respec yet to the 'Sets' Build that @DreadShinobi posted.
Is it possible to bind a numpad number (or any key for that matter) to activate all powers in one particular tray with one keystroke? Right now, in power tray 3, I have Maneuvers. Tactics, Combat Jumping, Dark Embrace, and Sprint (complete with a L50 Celerity Stealth IO 😁).
I'm doing Crimson's missions now, and those $%%## Sappers are a royal pain in the backside! They keep shutting everything off in the middle of combat.
I'm working on getting iXP for my Alpha Slot right now. I went to Mender Ramiel to do his arc to open up the Alpha slot but when I stepped into the very first mission, I almost fell out of my chair with all of the Echoes of Arch-Villains standing around. One of them had over 27,000 HP! I used a Jet Pack to fly around and found Ramiel on the ground at the back of the map with some gawd-awful monstrosity standing nearby. No thanks, Ramiel can just fend for himself. 😈
-
Sorry for all of the lame questions, but I just did Provost Marchand (Primal Earth)'s first arc (where you help form the New Praetorians).
- When do I use Transference?
- When do I use Fulcrum Shift?
- Like I mentioned in my previous post, I have 2 L35 IO Accuracy in Transfusion. Why do I keep missing?
- How should my Power Tray be set up to be the most efficient?
4 hours ago, DreadShinobi said:A good kinetics user, and any defender for that matter, makes use of their primary and secondary in equal harmony.
I guess what I'm saying is that I could really use a Tutorial on how to properly run this hero. During the arc, I picked up NPC team members. I tried to maintain a balance like @DreadShinobi mentioned, but I kept running out of Endurance. Thankfully, we no longer have to wait for Rest to recharge. 👍
The game definitely doesn't play fair. RB got 'Held' by a Galaxy or Galaxy Adjutant, and he attacked her until RB kissed the floor. She had a full Health Bar, and couldn't do a thing to defend herself. Nice. 😠
Silver Mantis was a beast at the end of this arc. Sheesh! 😱
RB is now L35. 😁
-
OK. This is getting ridiculous! I have 2 L35 IO Accuracy enhs in Transfusion, and it's STILL missing more than it hits. I'm going up against even con or +1 baddies.
It's very frustrating! 🤬
-
1 hour ago, Kyksie said:
Nitpick; the "Praetorian Office" set feels out of place.
Yeah I noticed the picture too . . . I just couldn't find a Tiny Office map that I liked in the CoH or CoV.
Heck, I even looked at the Kallisti Wharf Office Map. That Tiny map is HUGE!
Glad you enjoyed it! 👍
-
After some minor tweaking, I have published "Office Building Mayhem".
Please be kind. 😆
-
I might be about ready to (*gasp*) publish my first AE mission. I'll just run through it a couple more times to make sure.
-
I got my first two procs created and slotted in Irradiate. The L20 Achilles' Heel proc and the L30 Eradication proc. Cost me 100 Reward merits but I'm on my way.
RB is still working on L34.
-
 1
1
-
-
16 hours ago, MoonSheep said:
This is why I believe being a kin defender is a full time job and the secondary powerset is mostly irrelevant
SB and FS encourage teams to go wild, ensuring everyone is healed, buffed etc leaves little time to fire off many blasts in a meaningful way. I like to strategically let the occasional person die for a nice team vengeance buff too
To ensure that I'm understanding what you're saying, while on a Task Force, I should just focus on my Kinetics powers and not worry too much about my Rad Blast powers (other than Irradiate which could be useful in that it's a Debuff AoE).
While I'm thinking about it, did they nerf the Posi TF? In the last mission of Posi 1, you face a Shadow version of your team. I remember this being an absolute bear to get through but yesterday, we went through them like a hot knife through butter. We finished Posi 1 in 30 minutes 40 seconds.
Our Team Leader then got a bit cocky and on Posi 2 set a time limit of 30 minutes. Not even close. It took over 54 minutes to complete.
-
 1
1
-
-
I got RB leveled up to L32 and did the respec. I still have 1 left if I need it.
Posi 1 and Posi 2 are in the books. It was a good team if a bit undisciplined. Everybody ran every which way they could instead of staying together as a group so my Transfusion could heal them. Speaking of which:
I'm not happy at all with how many times Transfusion missed. It was insane. Maybe it hit 50% of the time. I added one of the 22 unassigned slots to Transfusion for another Accuracy.
RB is now L34.
-
@DreadShinobi, in the 'leveling' build that you posted, I noticed that L49 Power Slot is empty. I was thinking of putting Repel in there, but would like to have that power earlier in the build. Which power would be best to put at L49? I was thinking maybe Aim but am unsure.
-
On 8/12/2021 at 2:46 AM, Doomguide2005 said:
In addition to DreadShinobi's don't ignore (or forget) your inspirations you can buff yourself with SG Empowerment Buffs. There's several particularly useful ones. Knockback protection, Increase Recovery and Increase Attack Rate. And there's also p2w Amplifiers if you're open to using them.
At your recommendation, I have installed a Supercollider in my SG Base. I had Worktables but they don't appear to do anything any more. The Empowerment Buffs work fabulously. Thanks for the tip. 👍
On 8/12/2021 at 1:16 AM, DreadShinobi said:Make sure to get the p2w prestige power attacks. Sands of Mu, Nemesis Staff, Blackwand.
Silly me . . . I thought that I could only have one of those. I now have Blackwand, Nemesis Staff, and Sands of Whiff (I mean, Sands of Mu). It does make combat a heck of a lot easier. 😁
-
Check this out:
RB just hit L16 when I was invited to join an AE Farm. All I basically had to do is doorsit. The leader took care of the baddies all by himself. I hit him with a Speed Boost once in a while (like he needed it).
After running the mission 4 times, RB is now L32! 🤣
I haven't gone to the trainer yet because it's well past my bedtime. 😴
-
1
-
-
On 8/6/2021 at 12:57 PM, DreadShinobi said:
If you buy any one IO get the celerity stealth IO and put it in sprint for full invis.
I checked the Auction House. A L15 Celerity Stealth IO gives the exact same bonuses as a L50. Is that right? If that is the case, then why on Earth (or any other planet, for that matter) would there be a higher level than L15 for this IO?
------
RB keeps kissing the floor. She's being dropped by Minions (not those Minions, mind you!). But when she faced Misery in a Shauna Stockwell mission, RB had no problem beating her. (It wasn't a cakewalk by any stretch of the imagination, but RB was fine in that battle). I must be doing something very wrong.
RB is now L14 and has Super Speed.
- What should my attack chain be?
- Should I fire off Siphon Power and Siphon Speed with every mob?
- How much wood would a woodchuck chuck if a woodchuck could chuck wood?
I'd like to learn the proper way to 'run' this toon before getting on a Posi TF team and letting everybody down because I don't know what the heck I'm doing.
On 7/29/2021 at 2:37 AM, Doomguide2005 said:And neither of us have touched on attunement which I suspect is foreign ground for Retroman currently.
Those are the IOs that basically have no level, right? If I bought one now, it would level up as I level up, right? There's different Sets for each Class, right?
-
On 8/6/2021 at 11:28 PM, Take One said:
Edit: I just noticed that your hostage is set to spawn when Bonebreaker is defeated - did you make sure to defeat him and all his minions (if the boss is set to that - there's a dropdown for it) - before you went looking for the hostage?
That's what the problem was. It's now fixed, but Bonebreaker and Sophia (the hostage) aren't even in the same room. I want Bonebreaker to be threatening Sophia ("Give me the combination to the safe or else!"). I guess he could yell it down the hallway or something 😆
On 8/6/2021 at 11:28 PM, Take One said:I think any of the low level ones could work for a level 12 Defender, so maybe "A Taste For Evil"
I tried that one, but man, those Snakes hit hard! I got through the first mission (barely), and started the second, but the Vahzilok were merciless. 2 minions took me a couple of minutes (not to mention all of my Inspirations) to beat, and they almost dropped me. We were even-conned (both L12) so I quit. I gave you 5 stars though . . . It was fun! 👍
-
22 hours ago, Doomguide2005 said:
In general slot RchRdx only if you're not having endurance issues. Slot damage not defdebuff --> Acc, Dmg, Dmg, Dmg, then EndRdx, RchRdx, other (typically) in your attacks (NB, Irradiate.
I have been running out of End during combat so I re-did the enhs.
Thusly:
This Hero build was built using Mids Reborn 3.0.5.6
https://github.com/Reborn-Team/MidsRebornClick this DataLink to open the build!
Radiant Beauty: Level 49 Mutation Defender
Primary Power Set: Kinetics
Secondary Power Set: Radiation Blast
Power Pool: Leaping
Power Pool: SpeedHero Profile:
Level 1: Transfusion -- Acc(A), EndMod(3), EndRdx(5)
Level 1: Neutrino Bolt -- Acc(A), Dmg(3), EndRdx(7)
Level 2: Siphon Power -- Acc(A)
Level 4: Irradiate -- Acc(A), Dmg(5), EndRdx(7)
Level 6: Siphon Speed -- Acc(A)
Level 8: Combat Jumping -- DefBuff(A), DefBuff(9), DefBuff(9)
Level 10: Hasten -- RechRdx(A), RechRdx(11)
Level 12: Speed Boost -- EndRdx(A)
Level 14: [Empty]
Level 16: [Empty]
Level 18: [Empty]
Level 20: [Empty]
Level 22: [Empty]
Level 24: [Empty]
Level 26: [Empty]
Level 28: [Empty]
Level 30: [Empty]
Level 32: [Empty]
Level 35: [Empty]
Level 38: [Empty]
Level 41: [Empty]
Level 44: [Empty]
Level 47: [Empty]
Level 49: [Empty]
Level 1: Brawl -- Acc(A)
Level 1: Sprint -- Run(A)
Level 1: Vigilance
Level 2: Rest -- Empty(A)
Level 1: Swift -- Run(A)
Level 1: Health -- Heal(A), Heal(11)
Level 1: Hurdle -- Jump(A)
Level 1: Stamina -- EndMod(A)
------------| Copy & Paste this data into Mids Reborn : Hero Designer to view the build | |-------------------------------------------------------------------| |MxDz;659;308;616;HEX;| |78DAAD915D4E834010C797B22D2DD4268D49E383498D07E00A2688FA60314D3D00D| |994053792056149ECA317F22EC673F871031CD82992C64787C0CCFCE63FB3D92178| |F6A7AF372F17C4985DA6AC2C439FC75C46BC180795624A649280CD362C124CAA338| |FB34AED2C408BBD30F4AA38766F85E44A6CCB6587374C263C72DBCE664EE8C17C45| |A6EB2C4BDD1567B99089DD26F739E7D1511B5E8BE44141C1D159DAA4F3AB5C6C5D9| |F158F61001378B13B81F397F0CA0141AB75440D3218694F2DEDDFFED298DA8F5093| |41C5800734EDB761EFC04CEC3391D183BE27D00CB16F889A05D42CECB3A866E3037| |F0E8289D61893B96636FA12663ABA461C3CA7FE673BA5DD4EC87E27AB3E3BD6ECAE| |61ED42EA7A4D316C76D40C211F7657ED3ABE7E195C096F86FEB3AF9F69F6DD67F8E| |77E004905ACD5| |-------------------------------------------------------------------|
All enhs are L15 Training enhs. Next respec, I will probably move the two slots out of Combat Jumping and put them into my attacks. We'll see. 😁
-
18 hours ago, Take One said:
What map are you using?
Office Standard - City of Heroes Set - 3
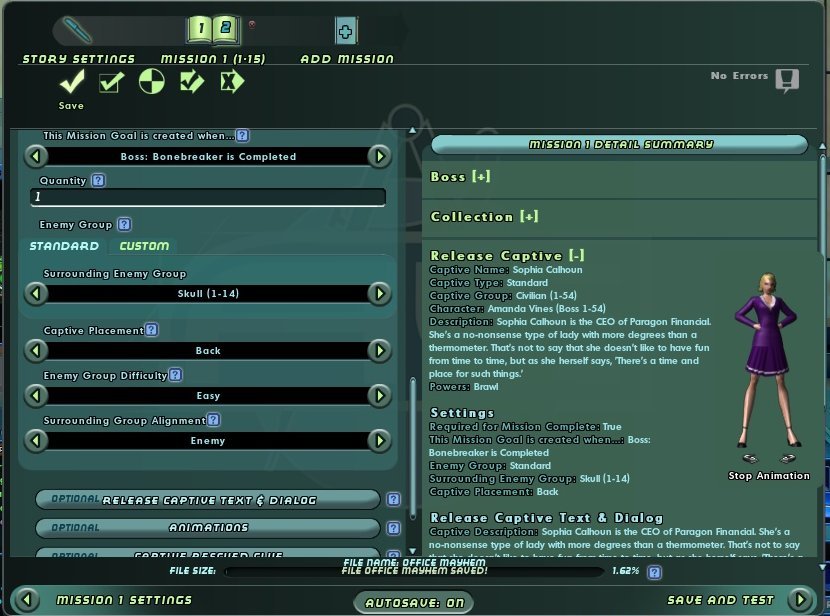
Here's a look at the Rescue Captive screen:

As you can see, the Surrounding Enemy Group is set to Skull (1-14) so she is being guarded. It must be the map.
Also, I noticed while playing the real game (not AE) that there IS a Skull Boss by the name of Bonebreaker. Is there a way to use him in my AE mission, or just go with what I have; some generic-looking Skull dude with the same name?
I looked through your AE missions, @Take One. Do you have any for a solo squishy (L12 Kin/Rad Defender)?
Please forgive my ignorance, but what does the acronym SFMA mean? 😕
-
10 hours ago, Doomguide2005 said:
Are those SO enhancements you've slotted or ?
They're mostly Training enh with a few dual enhs that I got from mob drops.
-
Sorry for the lack of responses but I had a heck of a busy weekend at work (and it's only gonna get worse before it gets better). 🤬
While playing RB, I have noticed that Transfusion seems to miss a lot more than I'd like it to so I will change it the Set to Preventive Medicine like you suggest for the Accuracy bonuses. 👍
So @DreadShinobi's build is for endgame content (45+). It's very cool and I will respec to that build when I hit L50. 😎
What I need is a 'leveling build' (if that's what it's called) so I can be an effective teammate at all levels on my way to L50.
I could try getting on a team for Posi 1 and Posi 2 but am unsure if RB's build is the most effective that it can be. RB just hit L12 and now has Speed Boost so that's a plus!
This is where she is right now (with the enhancements):
L1: Tranfusion - Acc, EndMod, RchRdx
L1: Neutrino Bolt - Acc, DefDebuff, RchRdx
L2: Siphon Power - Acc
L4: Irradiate - Acc, DefDebuff, RchRdx
L6: Siphon Speed - Acc
L8: Combat Jumping - Def, Def, Def
L10: Hasten - RchRdx, RchRdx
L12: Speed Boost - None (for the moment)
Brawl - Acc
Swift - RunSpd
Hurdle - Jump
Health - Heal, Heal
Stamina - EndMod
The question is: Is she ready for Posi? 🤷♂️
-
Well, now I'm totally confused . . . 😕
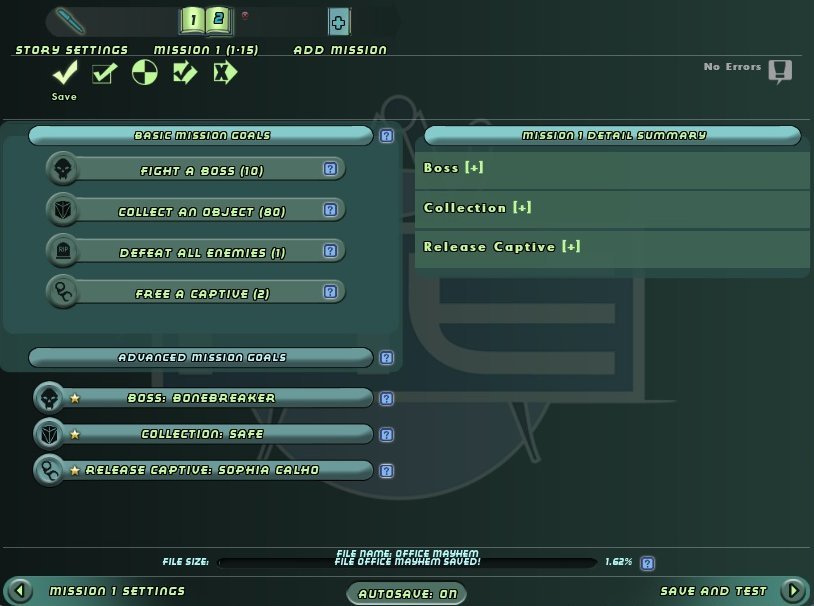
Here's a pic of the Mission Detail Screen:
As you can see, I eliminated the Defeat All. Also, notice the Rescue Captive in the Summary column. Also notice that I am using the correct file (not the autosave).
When I enter the mish, this is the Navbar:
Sophia Calhoun (the hostage) isn't even mentioned.
 Running to the back room shows that she isn't in the mission. 🤬
I've been reading the guide that you recommended (that's why I removed the Defeat All). The guide has given me an idea, but I want to get the hostage into the mission first before I proceed any further. 🤓
Any and all help is (as always) greatly appreciated. 😁
-
Sorry for the lack of responses but I had a heck of a busy weekend at work.
On 7/29/2021 at 12:05 AM, Doomguide2005 said:do you have enough global accuracy to make your final hit chance 95+%?
On the build that I posted, I have a Global Accuracy of +42%.
The thing that I love best about your build, @DreadShinobi, is the almost perma-Hasten. 120 sec duration, 121.9 sec recharge. Gotta love it!
On 7/29/2021 at 2:37 AM, Doomguide2005 said:And neither of us have touched on attunement which I suspect is foreign ground for Retroman currently.
It absolutely is foreign ground to me, @Doomguide2005 . . . I've never even heard the term before now. If you are so inclined to do so, please elaborate.
I'd like to print out my build when I get it finished but I don't have a printer to hook up to my computer. Is there a way to save the document that is going to print as a .txt or .doc file so I can take it to Kinko's and get it printed out? Or is there another way to do it?
-
I'm completely new to the Architect, but I wanted to try my hand at creating something simple.
Basically, I set it up as a Defeat All Skulls, Check the Safe, and Arrest BoneBreaker. After some thought, I decided to add a Rescue Hostage to the mix. I named the hostage, etc then saved and entered the mission.
The Nav window looks like this:
First off, the hostage isn't even mentioned. I turned on Invisibility and walked to the mission end room. No hostage at all. I looked everywhere on all 3 floors for the hostage . . . Nothing.
Secondly, look at the smaller print in the window. What the heck does 1 Safe, Bonebreaker, Defeat all enemies mean? Where did I go wrong? And how do I fix this?
Help! 😕
-
My OCD is gonna kill me at some point.
RB hit L10 tonight and so I was all set to use the Respec to put things in order. Looking at the build in the previous post, I just couldn't let it go with the slot levels being all over the place, so I rearranged them.
I noticed that some of the Sets that I was going to use were L30 and L40. It made sense to me to make sure that I have all the slots in that power ready to go (if possible) when I hit L27 (for a L30 Set) or L37 (for a L40 Set).
I changed only one of the Enhancements. In Weave, instead of the Shield Wall proc, I put another LotG Recharge proc instead.
I changed at least one of my Incarnate picks.
Here's (hopefully 🤞) the final build (pending feedback from you good people, of course) 😃
This Hero build was built using Mids Reborn 3.0.5.6
https://github.com/Reborn-Team/MidsRebornClick this DataLink to open the build!
Radiant Beauty v3: Level 50 Mutation Defender
Primary Power Set: Kinetics
Secondary Power Set: Radiation Blast
Power Pool: Leaping
Power Pool: Speed
Power Pool: Leadership
Power Pool: Fighting
Ancillary Pool: Dark MasteryHero Profile:
Level 1: Transfusion -- NmnCnv-Heal/EndRdx(A), NmnCnv-EndRdx/Rchg(3), NmnCnv-Heal/Rchg(5), NmnCnv-Heal/EndRdx/Rchg(15), NmnCnv-Heal(34), NmnCnv-Regen/Rcvry+(40)
Level 1: Neutrino Bolt -- TchofLadG-DefDeb(A), TchofLadG-DefDeb/Rchg(3), TchofLadG-DefDeb/Rchg/EndRdx(7), TchofLadG-Rchg/EndRdx(17), TchofLadG-DefDeb/EndRdx(34), TchofLadG-%Dam(40)
Level 2: Siphon Power -- RechRdx-I(A)
Level 4: Irradiate -- ShlBrk-DefDeb(A), ShlBrk-Acc/DefDeb(5), ShlBrk-Acc/Rchg(7), ShlBrk-DefDeb/EndRdx/Rchg(19), ShlBrk-Acc/EndRdx/Rchg(25), ShlBrk-%Dam(25)
Level 6: Siphon Speed -- RechRdx(A)
Level 8: Combat Jumping -- GifoftheA-Run+(A), LucoftheG-Def(9), LucoftheG-Def/Rchg+(9)
Level 10: Hasten -- RechRdx-I(A), RechRdx-I(11)
Level 12: Speed Boost -- PrfShf-EndMod(A), PrfShf-End%(13)
Level 14: Assault -- RechRdx-I(A)
Level 16: Proton Volley -- ExtMsr-Acc/Dmg(A), ExtMsr-Dmg/EndRdx(17), ExtMsr-Acc/ActRdx/Rng(19), ExtMsr-Dmg/ActRdx/Rchg(21), ExtMsr-Dmg/EndRdx/Rchg(33), ExtMsr-Acc/Rng/Rchg(36)
Level 18: Increase Density -- StdPrt-ResDam/Def+(A)
Level 20: Maneuvers -- LucoftheG-Def(A), LucoftheG-Def/Rchg+(21)
Level 22: Boxing -- TchofDth-Acc/Dmg(A), TchofDth-Dmg/EndRdx(23), TchofDth-Dmg/Rchg(33), TchofDth-Acc/Dmg/EndRdx(34), TchofDth-Dmg/EndRdx/Rchg(36), TchofDth-Dam%(39)
Level 24: Tough -- GldArm-3defTpProc(A)
Level 26: Transference -- PreOptmz-Acc/Rech(A), PreOptmz-EndMod/End(27), PreOptmz-EndMod/Rech(40), PreOptmz-EndMod/Acc/End(45), PreOptmz-EndMod/Acc/Rech(45), PreOptmz-EndMod/End/Rech(45)
Level 28: Cosmic Burst -- ShlBrk-DefDeb(A), ShlBrk-Acc/DefDeb(29), ShlBrk-Acc/Rchg(29), ShlBrk-DefDeb/EndRdx/Rchg(31), ShlBrk-Acc/EndRdx/Rchg(31), ShlBrk-%Dam(31)
Level 30: Weave -- Ksm-ToHit+(A), GifoftheA-Run+(37), LucoftheG-Def/Rchg+(37), Rct-ResDam%(37)
Level 32: Fulcrum Shift -- RechRdx-I(A)
Level 35: Neutron Bomb -- Artl-Acc/Dam(A), Artl-Dam/End(36), Artl-Dam/Rech(43), Artl-Acc/Dam/Rech(46), Artl-Acc/Rech/Rng(46), Artl-End/Rech/Rng(48)
Level 38: Atomic Blast -- Mlt-Acc/Dmg(A), Mlt-Dmg/EndRdx(39), Mlt-Dmg/Rchg(43), Mlt-Acc/EndRdx(46), Mlt-Acc/Dmg/EndRdx(48), Mlt-Dmg/EndRdx/Rchg(50)
Level 41: Oppressive Gloom -- RzzDzz-Acc/Rchg(A), RzzDzz-EndRdx/Stun(42), RzzDzz-Acc/EndRdx(42), RzzDzz-Stun/Rng(42), RzzDzz-Immob%(43)
Level 44: Tactics -- GssSynFr--Build%(A)
Level 47: Dark Embrace -- UnbGrd-ResDam(A), UnbGrd-ResDam/EndRdx(48), UnbGrd-ResDam/EndRdx/Rchg(50), UnbGrd-Max HP%(50)
Level 49: Vengeance -- LucoftheG-Def/Rchg+(A)
Level 1: Vigilance
Level 1: Brawl -- TchofDth-Acc/Dmg(A), TchofDth-Dmg/EndRdx(13), TchofDth-Dmg/Rchg(23), TchofDth-Acc/Dmg/EndRdx(27), TchofDth-Dmg/EndRdx/Rchg(33), TchofDth-Dam%(39)
Level 1: Sprint -- Empty(A)
Level 2: Rest -- Empty(A)
Level 1: Swift -- Run-I(A)
Level 1: Hurdle -- Jump-I(A)
Level 1: Health -- RgnTss-Regen+(A), Mrc-Rcvry+(11)
Level 1: Stamina -- SynSck-EndMod(A), SynSck-EndMod/+RunSpeed(15)
Level 49: Quick Form
Level 4: Athletic Run
Level 50: Vigor Core Paragon
Level 50: Void Radial Final Judgement
Level 50: Diamagnetic Core Flawless Interface
Level 50: Arachnos Radial Superior Ally
Level 50: Support Radial Embodiment
Level 50: Barrier Core Epiphany
Level 50: Freedom Phalanx Reserve
Level 50: Portal Jockey
Level 50: The Atlas Medallion
Level 50: Task Force Commander
------------| Copy & Paste this data into Mids Reborn : Hero Designer to view the build | |-------------------------------------------------------------------| |MxDz;1504;725;1450;HEX;| |78DA5D944B4F135114C7EF74664A29E551FAE24D298F628102BAD70451130183A02| |E546C463AC044322DED94C0CAF015DCB875EBC64FE0D21879991863D4AF60A298A8| |117C643C33FF433BB149FB3B73EEFD9FFBBFF7DCE9DCD674E8D9959D0B426ABAB8A| |E95CBB9697D4537F37A293057B134CB2898823EE1052D6F68A6959CD2B58AB59DDC| |3C5747D9F8E9DCDC546565253B6398BA652C977BABE905CD5CD5F35957EC94CA4DD| |1129608CD170AEBD9595D2B1AE66AD07D582CEA7ABEF9344FDAF29A516C749F2F1B| |AB6B164D0C5F2A1ACBD969ADF420374755F4D2761B7918A1AFE9A31FC9F169ABE23| |A05938AF02D80CA22D87403ECBB09A66F816FBCDA573E687741FF1ED8B20FF61D80| |E943B0E073A48ED816926384726F2927733D599285E8260F3ED02F83AD0AD8A632F| |DE0066955AEA786098A24E274D0CE5953CE57574F63694504A2F01E8881299A508F| |39523DFB0832CB54B3017EA48647F01D7A0CB692AE113AD1C8F3DFD15033726AF32| |E722D7B60EB3E183D00938760FF6BB044DA30D70B2724774F615A23C2DE22EC3BCA| |BE251A8BF159C56E0B776FF13B60F22ED8B704F6DF038772A04CDA04B422715676E| |B5568FD76F6DEFE5371731DC760FA041CFDC5FCCDFC03BE276D277BE9E4BE7571DF| |BAB86F3DDCB71EEE5B0FF74D212FDDD0CADD7F859B1BE05E0DF05E07BEC1E326ADD| |3CB3DEEE533FF40B914FB4EC92ACE5401332A38E667D681E301F0236907593B5844| |BDA10D305302C7CAE0B8054E56C087646918BE95E132FA75C66256989B60660B8CD| |05E47F8DC479EE21EED509D2CEF3FFB1DFB1CFF014E1E334FC028E927F88E4CF0D9| |5C53AAEFA0DDA578DE47BE1321BE1371BE131D7C2792FFDD895945F0C7764AD9B69| |857B898F386BA99CFC16A7D21C6700E5FBCB961E48E6A39499CC7DE8357D1D3AFDE| |B14FB83F4D47E04CA6BA3FFB65A6FA5F60C71234CCF168B4163F8FD4E2634FFE45A| |A163FF1CC990FD6E2254F7CDF136B9EF81FC991DE28| |-------------------------------------------------------------------|
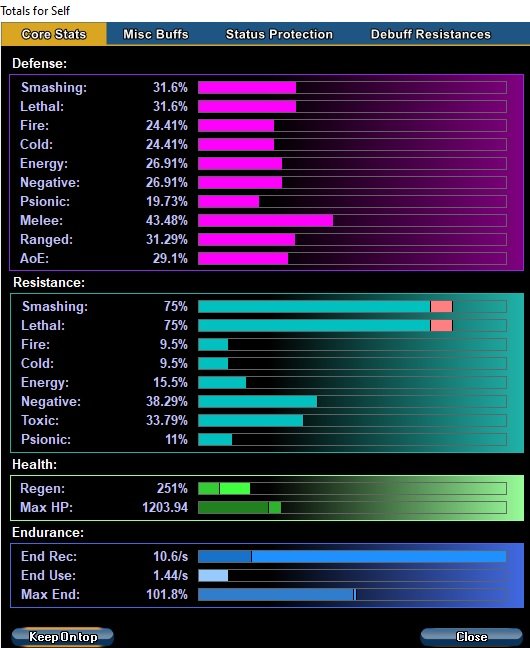
Just for shiggles, I looked at the Stats Window:
I was taken aback by this and thought that something had gone horribly wrong. It took about 10 minutes for me to realize that I had also clicked Portal Jockey, Task Force Commander, The Atlas Medallion, and the Freedom Phalanx Reserve Accolades not to mention my Incarnate choices.
Once I get RB up to Incarnate levels, she's gonna be a badass!
Any comments, critiques, and help are (as always) greatly appreciated! 👍
-
Alright . . .
Here's the proposed finished build:
This Hero build was built using Mids Reborn 3.0.5.6
https://github.com/Reborn-Team/MidsRebornClick this DataLink to open the build!
Radiant Beauty v2: Level 50 Mutation Defender
Primary Power Set: Kinetics
Secondary Power Set: Radiation Blast
Power Pool: Leaping
Power Pool: Speed
Power Pool: Leadership
Power Pool: Fighting
Ancillary Pool: Dark MasteryHero Profile:
Level 1: Transfusion -- NmnCnv-Heal/EndRdx(A), NmnCnv-EndRdx/Rchg(3), NmnCnv-Heal/Rchg(3), NmnCnv-Heal/EndRdx/Rchg(9), NmnCnv-Heal(15), NmnCnv-Regen/Rcvry+(17)
Level 1: Neutrino Bolt -- TchofLadG-DefDeb(A), TchofLadG-DefDeb/Rchg(25), TchofLadG-DefDeb/Rchg/EndRdx(27), TchofLadG-Rchg/EndRdx(33), TchofLadG-DefDeb/EndRdx(34), TchofLadG-%Dam(40)
Level 2: Siphon Power -- RechRdx-I(A)
Level 4: Irradiate -- ShlBrk-DefDeb(A), ShlBrk-Acc/DefDeb(5), ShlBrk-Acc/Rchg(5), ShlBrk-DefDeb/EndRdx/Rchg(7), ShlBrk-Acc/EndRdx/Rchg(7), ShlBrk-%Dam(9)
Level 6: Siphon Speed -- RechRdx(A)
Level 8: Combat Jumping -- GifoftheA-Run+(A), LucoftheG-Def(11), LucoftheG-Def/Rchg+(13)
Level 10: Hasten -- RechRdx-I(A), RechRdx-I(11)
Level 12: Speed Boost -- PrfShf-EndMod(A), PrfShf-End%(15)
Level 14: Assault -- RechRdx-I(A)
Level 16: Proton Volley -- ExtMsr-Acc/Dmg(A), ExtMsr-Dmg/EndRdx(17), ExtMsr-Acc/ActRdx/Rng(19), ExtMsr-Dmg/ActRdx/Rchg(19), ExtMsr-Dmg/EndRdx/Rchg(21), ExtMsr-Acc/Rng/Rchg(21)
Level 18: Increase Density -- StdPrt-ResDam/Def+(A)
Level 20: Maneuvers -- LucoftheG-Def(A), LucoftheG-Def/Rchg+(23)
Level 22: Boxing -- TchofDth-Acc/Dmg(A), TchofDth-Dmg/EndRdx(42), TchofDth-Dmg/Rchg(43), TchofDth-Acc/Dmg/EndRdx(45), TchofDth-Dmg/EndRdx/Rchg(46), TchofDth-Dam%(48)
Level 24: Tough -- GldArm-3defTpProc(A)
Level 26: Transference -- PreOptmz-Acc/Rech(A), PreOptmz-EndMod/End(27), PreOptmz-EndMod/Rech(29), PreOptmz-EndMod/Acc/End(34), PreOptmz-EndMod/Acc/Rech(39), PreOptmz-EndMod/End/Rech(40)
Level 28: Cosmic Burst -- ShlBrk-DefDeb(A), ShlBrk-Acc/DefDeb(29), ShlBrk-Acc/Rchg(33), ShlBrk-DefDeb/EndRdx/Rchg(37), ShlBrk-Acc/EndRdx/Rchg(42), ShlBrk-%Dam(43)
Level 30: Weave -- GifoftheA-Run+(A), Ksm-ToHit+(31), ShlWal-ResDam/Re TP(31), Rct-ResDam%(31)
Level 32: Fulcrum Shift -- RechRdx-I(A)
Level 35: Neutron Bomb -- Artl-Acc/Dam(A), Artl-Dam/End(36), Artl-Dam/Rech(36), Artl-Acc/Dam/Rech(36), Artl-Acc/Rech/Rng(37), Artl-End/Rech/Rng(37)
Level 38: Atomic Blast -- Mlt-Acc/Dmg(A), Mlt-Dmg/EndRdx(39), Mlt-Dmg/Rchg(39), Mlt-Acc/EndRdx(40), Mlt-Acc/Dmg/EndRdx(45), Mlt-Dmg/EndRdx/Rchg(50)
Level 41: Oppressive Gloom -- RzzDzz-Acc/Rchg(A), RzzDzz-EndRdx/Stun(42), RzzDzz-Acc/EndRdx(43), RzzDzz-Stun/Rng(45), RzzDzz-Immob%(50)
Level 44: Tactics -- GssSynFr--Build%(A)
Level 47: Dark Embrace -- UnbGrd-ResDam(A), UnbGrd-ResDam/EndRdx(48), UnbGrd-ResDam/EndRdx/Rchg(48), UnbGrd-Max HP%(50)
Level 49: Vengeance -- LucoftheG-Def/Rchg+(A)
Level 1: Vigilance
Level 1: Brawl -- TchofDth-Acc/Dmg(A), TchofDth-Dmg/EndRdx(13), TchofDth-Dmg/Rchg(23), TchofDth-Acc/Dmg/EndRdx(25), TchofDth-Dmg/EndRdx/Rchg(33), TchofDth-Dam%(34)
Level 1: Sprint -- Empty(A)
Level 2: Rest -- Empty(A)
Level 1: Swift -- Run-I(A)
Level 1: Hurdle -- Jump-I(A)
Level 1: Health -- RgnTss-Regen+(A), Mrc-Rcvry+(46)
Level 1: Stamina -- SynSck-EndMod(A), SynSck-EndMod/+RunSpeed(46)
Level 49: Quick Form
Level 4: Athletic Run
Level 50: Vigor Core Paragon
Level 50: Void Radial Final Judgement
Level 50: Diamagnetic Core Flawless Interface
Level 50: Arachnos Radial Superior Ally
Level 50: Ageless Core Epiphany
Level 50: Support Radial Embodiment
------------| Copy & Paste this data into Mids Reborn : Hero Designer to view the build | |-------------------------------------------------------------------| |MxDz;1456;713;1426;HEX;| |78DA4D94DB4E13511486F77466A09472283D819C4A050AA52D9407D00451130183A| |05E786A26748089645A3A5302578657F08667F0C627F0D21839991863D45730514C| |D4081E32AE997FD1B649FBEDF9F75E6BFF7BAF355DD89E0D3EBFBE7B5948ED57363| |4CB2ACCEAABBA59D42BFE85AAADD946C914F4092D69454333EDC48CAE55ED9DC4D6| |7433A9B1F3B58599EAEA6A6ECE3075DB58B1066BF29266AEE9C59C17ECA62ACCD01| |6B6082E964A1BB9795D2B1BE65AC07B582EEB7AB1E35CA7586BDD28B779CFD78CB5| |759B1686AE968D95DCAC56795C58A02C7A65A79B3CA4E86BFAE847727D3AAAB8458| |3BC227C4BCC65D07F1B6CBF0376DE05DF36C6BEF6795AF73E78E1004C1C82434760| |EA182CF9DC5037D811D284F0B477A4C99C4F966421FA15A1F89832D8A43055D0DF0| |46E52ACCAF9D4104191448C2EDABD6BD27CCD2D349752442002EFC12898A4052D58| |23B5B08F00D3A29CADF023B53E85EFF63DB08BE2DA1027DA78FD7B9AEA80A676EC4| |3EB3C00BB0E994760E498F906AC506C88F385E29277A610ED11666F61F61D63DF12| |CD45F9AEA2F78477B6F1FB60FA01987908661F81930550A6D83862457C5AF6F2556| |9FF1EF6DEF34B410D4FC1BE3370E83738FA074CFD053F506C2F7BE9E5BAF571DD12| |5CB761AEDB38D72DCD7553C84B3F62E57EAED1C03FE1CD0DCCC1DBC077708BF619E| |41A0FF29D7F242DC9BE93B2EA691715A6CA6C02879B997EF013C58E70EC4819F946| |379915306581191BCC57C12764690CBE95310BF51AB7C17415CC6C81F96D304C679| |DE07B9F78863EDAA53C393E7FEE07CE39F993790AE6CFC008C54F718F4C711FDC54| |6AEFA0D3A734BC8FDC1341EE8918F74437F744827B62887B625E11FC71DC548E231| |6154EE6BEA19EF22550CB2F4416F7F0B5511B837652D724710967CFDE406DBF35CE| |7D46FF644FC0B974ED7CCEAB74EDBFC089C6699AC799487DFC225C1F9F36E87B0DF| |ACB647DFC1FEC4FD3FA| |-------------------------------------------------------------------|
And here's the Stats Window:
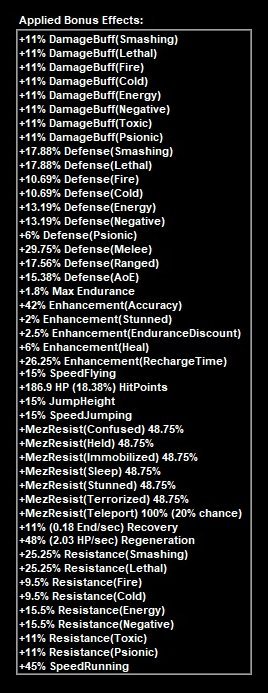
Here are the Active Set Bonuses:
I sure hope that the +45% SpeedRunning applies to Athletic Run. Otherwise, it's back to the drawing board.
Notice that there are no Purple Sets. This is on purpose. Those things are mega-expensive! 😱
RB uses the Blackwand (I think it's called). This way when she gets to the Incarnate Levels, she can dish out Negative Damage as she now knows how to use her Negative Energy powers without the Blackwand. The Lore Incarnate selection is open for debate. I really couldn't figure out which Ally would be best.
Any comments or suggestions on how to make this build better are greatly appreciated. 😃
-
14 hours ago, Nemu said:
if you choose to use the P2W travel powers
I've been using Athletic Run. There are a bunch of Sets which give bonuses to Run Spd so I can get a poor man's version of SuperSpeed using that.
When I take a screenshot, is there a special folder somewhere that it automatically saves to? Or do I need to paste the pic into WinPaint or something like that?


Kin / Rad Questions
in Defender
Posted
How do I attune it?