

Bopper
-
Posts
3839 -
Joined
-
Last visited
-
Days Won
7
Content Type
Profiles
Forums
Events
Store
Articles
Patch Notes
Posts posted by Bopper
-
-
7 hours ago, Luminara said:
Primary target, level 52, knocked down and takes damage, secondary targets knocked down. No knockback.
Reset mission to +0/x5. Primary target, level 51, knocked down and takes damage, secondary targets knocked down. No knockback.
Reset mission to -1/x5. Primary target, level 50, knocked back, secondary targets knocked down.
Sounds right.
The kb2kd IO that you're slotting is flooring your KB strength to 1%. So Propel's 4.15 KB is getting reduced to 0.0415 KB. However, the "splash" knockdown ignores strength, so the IO does nothing to it. This means your main target is getting hit with both 0.67 KB and 0.0415 KB, for a total of 0.7115 KB.
As long as your KB is less than 0.75, your target will experience knockdown. So you seeing knockdown at +0 and higher makes sense. But against a -1 target, your purple patch is going to increase your KB by 10%. So now your 0.7115 KB becomes 0.78265 KB which would do knockback.
-
 1
1
-
 3
3
-
-
3 hours ago, Yomo Kimyata said:
I'm not sure that I'm following, or exactly how the debuff works. Let me talk this out.
I'm playing around with Lightning Clap on a scrapper (+4.154 magnitude, so knock back). Naturally, I put a SA KB to KD in it, and it works like a charm (it doesn't take the OF proc, since there is no inherent damage in the power). Next, I add a Stupefy proc (3.5PPM, +6 magnitude). When it triggers, those opponents get knocked back while the rest get knocked down. That's a total of mag 10.154 from both the original power and the proc. I'm guessing that -1000% debuff doesn't give you an effective strength of 10.154 - (10 * 10.154) = -90+, but debuffs by 90% to give you an effective mag of 1.0154 and therefore knock back? The order of the slotted enhancements doesn't seem to matter.
The stupefy proc is flagged to ignore strength, so the -1000% KB strength does nothing to it.
What you'll experience is your KB strength getting floored to 1% (this is the lowest your strength can go for KB per the AT attributes table). So the 4.154 KB from Lightning Clap gets reduced to 0.04154 KB, which will do knockdown.
The 6 KB is unchanged. So when it procs you do a total of 6.04154 KB since the two effects will fire at the same time.
-
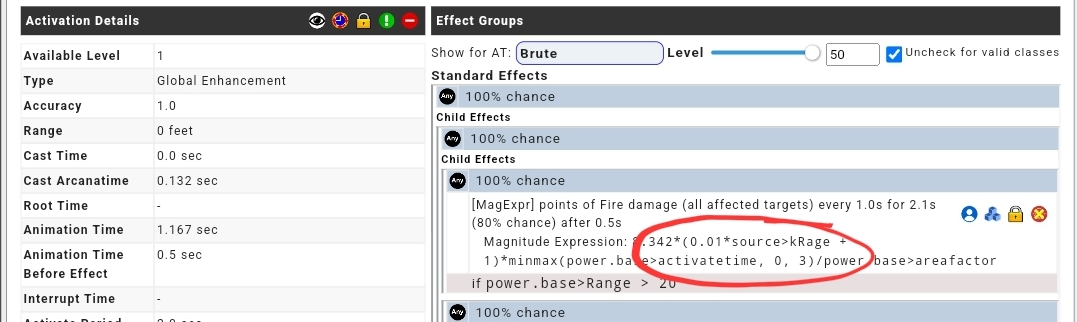
21 minutes ago, Bill Z Bubba said:
but I don't see anything in the brute section regarding Fury
Look at the magnitude expression.

-
 1
1
-
-
1 minute ago, Marshal_General said:
So logically if you resist at 100% that would mean the same as protection. I am sure that the Cryptic math doesn't work that way.
More specifically if you have 100% resistance it would mean the same as immunity.
-
1 hour ago, Marshal_General said:
Do any of the resistances actually work at 100% or are they all capped at 99%?
Some attributes do.
-
4 minutes ago, Onlyasandwich said:
Thank you for the explanation, @Bopper !
Anytime, I'll add one more thing if it helps. If you want a ballpark* of the recharge reduction you will see in game, just take that 1s and divide it by your total recharge. So in the example I provided where each power had 300% total recharge strength, you would divide the 1s by 3.
*The reason why I say ballpark is because your total recharge strength can fluctuate over time (like when FF proc goes off).
-
The mechanic works off of the Base Cooldown of the power, so global/enhanced recharge will make those "1 second" reductions less impactful in practice (which is good, otherwise this would be a completely overpowered mechanic otherwise). I'll try to explain what is going on with the mechanic without going into painfully mathy language, but if you are interested in the mathy side of recharge I have a link in my signature block to a Recharge Guide.
The powers of Seismic Blast all have the following cooldowns:
Encase - 4s
Shatter - 7s
Rock Shards - 8s
Entomb - 11s
Upthrust - 16s
Tombstone - 12s
Stalagmite - 8s (16s if affected by Seismic Shockwaves and does more damage)
Meteor - 170s
Let's say you do a 5-attack rotation of:
Upthrust > Tombstone > Stalagmite > Entomb > Rock Shards > Repeat
All of these attacks will effectively have new base cooldowns of
Upthrust - 12s (reduced by 4s)
Tombstone - 8s (reduced by 4s)
Stalagmite - 4s or 12s (reduced by 4s)
Entomb - 7s (reduced by 4s)
Rock Shards - 4s (reduced by 4s)
Now, let's assume you had 100% slotted recharge in all these attacks and you have another 100% global recharge. That means all these powers recharge in 1/3rd the time.
Upthrust - 12s/3 = 4s
Tombstone - 8s/3 = 2.67s
Stalagmite - 4s/3 = 1.33s
Entomb - 7s/3 = 2.33s
Rock Shards - 4s/3 = 1.33s
Keep in mind, you don't have to hit your target to get this reduction. It uses Activation Effect Groups to guarantee the benefit. Also keep in mind all the numbers I did above are for illustration purposes only. Obviously you only get the 1s reduction off of base cooldown if the power is on cooldown.
I hope that helps, let me know if you have other questions.
-
1
-
1
-
-
1 hour ago, Yomo Kimyata said:
Let me take a stab at this.
Knockback and knockdown are the same mechanic. If the magnitude of the KB (I use that term to describe both knockback and knockdown) is > 0.75, then it counts as knockback, and the higher the number the farther things get knocked back. If it is < 0.75 then it counts as knockdown, and the target doesn't move. Generally, most players prefer knockdown, since then they or their team don't have to chase stragglers.
The mechanics of both this proc and the SA proc is that when it calculates the KB magnitude, it modifies any existing KB so it is less than the 0.75 limit. I'm not entirely sure exactly how, since I can't define the variables in CoD, but it seems to work effectively enough that I've never seen knock back occur when either of these are slotted. (Note: some enemies, clockwork particularly, seem to use the reverse dynamic so that knock down increases in magnitude to over 0.75 and they get knocked back.) Contrast this to a situation where you have two sub-0.75 mag effects and they both trigger (like a Kinetic Combat proc in Kick). In that case the magnitude is additive and even though each individual effect is under 0.75, when they both trigger it is over 0.75.
Now, there is also an additional chance for knockdown with the OF proc, which I now know is 2.5PPM to activate, and not a flat 20% chance. Because of the first diminishing effect, you can have two knockdown procs trigger and it not additive. So the OF proc and the Avalanche proc can both trigger and result in a "double" knock down where they flop twice.
It's a wonderfully amusing proc, and now that I know how it works I'm going to have to change a lot of my slotting choices.
If I am incorrect on any of this, please correct me!
I just wanted to correct the part highlighted. The mechanic isn't an actual conversion, it is a self debuff. Overwhelming Force gives you a -1000% strength debuff to all your knock effects. However, the minimum your knock strength can be reduced to is 1%, so we can effectively assume your knock magnitude gets floored to this 1% strength.
So what does this mean with stacking of the 0.67 KB proc? Assuming 0.75 KB is the point where knockdown becomes knockback (I think this is true, but I don't recall), you are allowed up to 0.08 more knock before the proc causes you to knockback a target. This means as long as the original power does not do 8+ magnitude knock, you should be safe. This will vary with purple patch, so keep that in mind as well.
-
1
-
-
1 minute ago, Yomo Kimyata said:
Wow, that is disappointing (not trusting in CoD, but that the text description is so terribly wrong)! That changes everything!
Not the first time a description has been wrong. Check out Sentinel's Ward (says 5 PPM when it's really 2 PPM)
-
30 minutes ago, Yomo Kimyata said:
Hmm, the text says 20% chance of activation (and that's what I've always assumed), but in CoD it listes it as a 2.5 PPM proc. Summoning @Bopper, my patron saint!
In CoD We Trust
-
32 minutes ago, oedipus_tex said:
Do you know if Protection applies before Resistance or after?
After. So if you have 5 KB protection with 75% kb resistance and you get attacked with 10 KB, you will reduce the attack to 2.5 KB and you won't get knocked because you have enough protection (5>2.5).
-
2
-
1
-
-
2 hours ago, Plasmic Rage said:
Does Evasive Maneuvers' KB protection still apply in combat?
It's KB resistance, not protection. And yes, it applies in combat. You only lose the defense in combat
-
Small fun fact, KB resistance is capped at 99%. So the 10,000% KB resistance some armors give is superfluous. Still, with 99% KB resistance you effectively turn 1 KB protection into 100 KB protection.
Folks in here already explained theater pretty well, but I'll throw in my formula anyways.
KB received = KB x (100% - min(KB resistance %, 99%) )
-
2
-
-
7 hours ago, Anderoth said:
So it appears fault does two attack rolls for different things
Correct. Fault executes 2 powers, so 2 to-hit rolls is expected.
-
Here is a build I made last year after Energy Melee was revamped.
-
2
-
-
5 hours ago, Galactiman said:
I've noticed the average damage that Mid's calculates for a damage proc is quite a bit different than your spreadsheet. (Assuming average damage is simply ProcDamage*Probability). Am I doing something wrong in the spreadsheet or is Mid's just not accurate?
They should be the same. Can you screenshot what you've done in mids and in the tool?
-
10 hours ago, paximus said:
Good Day, All!
Beyond saying COH and the community being amazing, I was wondering if anyone would be so kind to paste an end-game balanced build? I'm not that great at Mids so would appreciate the help.
I farm a lot so currency is no issue.
Thanks!!
I built this for you. I think you might like it, softcap to S/L/E/N/P while resistance capped for F/C. Capped HP, decent net recovery (+2.53 end/sec), 389% regen (34 HPS), and a ton of global recharge (205%).
You'll have a lot of ST burst damage with AS > Seismic > Zapp > Stone Mallet. I chose Mallet over Fist because it gives 90% chance for Assassins Focus instead of 70%, but feel free to go with Stone Fist if you just want a filler. There's enough recharge where Stone Mallet doesn't have to be required.
SpoilerThis Villain build was built using Mids Reborn 3.2.17
https://github.com/LoadedCamel/MidsRebornClick this DataLink to open the build!
Rock Shock: Level 50 Magic Stalker
Primary Power Set: Stone Melee
Secondary Power Set: Stone Armor
Power Pool: Fighting
Power Pool: Leaping
Power Pool: Leadership
Power Pool: Speed
Ancillary Pool: Mu MasteryVillain Profile:
Level 1: Stone Mallet -- SprAssMar-Acc/Dmg(A), SprAssMar-Dmg/Rchg(3), SprAssMar-Acc/Dmg/Rchg(3), SprAssMar-Dmg/EndRdx/Rchg(5), SprAssMar-Acc/Dmg/EndRdx/Rchg(5), SprAssMar-Rchg/Rchg Build Up(7)
Level 1: Hide -- LucoftheG-Def/Rchg+(A), Ksm-ToHit+(7)
Level 2: Rock Armor -- LucoftheG-Def/Rchg+(A), RedFrt-Def(11), RedFrt-Def/EndRdx(11)
Level 4: Stone Skin -- ShlWal-Def(A), StdPrt-ResDam/Def+(13), ShlWal-Def/EndRdx(13), ShlWal-ResDam/Re TP(15), GldArm-3defTpProc(15), GldArm-ResDam(17)
Level 6: Assassin's Smash -- SprStlGl-Acc/Dmg(A), SprStlGl-Dmg/Rchg(17), SprStlGl-Acc/Dmg/Rchg(19), SprStlGl-Dmg/EndRdx/Rchg(19), SprStlGl-Acc/Dmg/EndRdx/Rchg(21), SprStlGl-Rchg/Hide%(21)
Level 8: Build Up -- GssSynFr--Build%(A)
Level 10: Earth's Embrace -- Prv-Absorb%(A), Prv-Heal(23), Prv-Heal/EndRdx(23), Prv-EndRdx/Rchg(25), Prv-Heal/Rchg(25), Prv-Heal/Rchg/EndRdx(27)
Level 12: Boxing -- SprBlsCol-Acc/Dmg/EndRdx(A)
Level 14: Tough -- TtnCtn-ResDam(A), TtnCtn-ResDam/EndRdx(27), TtnCtn-ResDam/Rchg(29), TtnCtn-ResDam/EndRdx/Rchg(29)
Level 16: Rooted -- Pnc-Heal/+End(A), Pnc-Heal/EndRedux(31), Pnc-EndRdx/Rchg(31), Pnc-Heal(31), Pnc-Heal/EndRedux/Rchg(33)
Level 18: Seismic Mallet -- Hct-Dam%(A), Hct-Dmg(33), Hct-Dmg/EndRdx(33), Hct-Acc/Dmg/Rchg(34), Hct-Acc/Rchg(34), UnbCns-Dam%(34)
Level 20: Crystal Armor -- PrfShf-End%(A), PrfShf-EndMod(36), LucoftheG-Def/Rchg+(36), RedFrt-Def(36), RedFrt-Def/EndRdx(37)
Level 22: Combat Jumping -- LucoftheG-Def/Rchg+(A)
Level 24: Weave -- Rct-Def(A), Rct-Def/EndRdx(37), Rct-EndRdx/Rchg(37), Rct-Def/Rchg(46), Rct-Def/EndRdx/Rchg(50), Rct-ResDam%(50)
Level 26: Maneuvers -- LucoftheG-Def/Rchg+(A), RedFrt-Def(39), RedFrt-Def/EndRdx(43)
Level 28: Brimstone Armor -- TtnCtn-ResDam(A), TtnCtn-ResDam/EndRdx(39), TtnCtn-ResDam/Rchg(39), TtnCtn-ResDam/EndRdx/Rchg(40)
Level 30: Hasten -- RechRdx-I(A), RechRdx-I(40)
Level 32: Tremor -- Arm-Dam%(A), Arm-Dmg(40), Arm-Dmg/EndRdx(42), Arm-Acc/Dmg/Rchg(42), Arm-Acc/Rchg(42), FuroftheG-ResDeb%(43)
Level 35: Minerals -- RedFrt-Def(A), RedFrt-Def/EndRdx(43)
Level 38: Zapp -- StnoftheM-Dam%(A), StnoftheM-Acc/Dmg(45), StnoftheM-Dmg/EndRdx(45), StnoftheM-Dmg/EndRdx/Rchg(45), StnoftheM-Dmg/ActRdx/Rchg(46), Apc-Dam%(46)
Level 41: Ball Lightning -- Rgn-Knock%(A), Rgn-Dmg/EndRdx(48), Rgn-Dmg/Rchg(48), Rgn-Acc/Dmg/Rchg(48), Rgn-Acc/Rchg(50)
Level 44: Tactics -- HO:Cyto(A)
Level 47: Super Jump -- WntGif-ResSlow(A)
Level 49: Geode -- RechRdx-I(A)
Level 1: Assassination
Level 1: Brawl -- SprBlsCol-Acc/Dmg/Rchg(A)
Level 1: Sprint -- Run-I(A)
Level 2: Rest -- Empty(A)
Level 1: Swift -- Run-I(A)
Level 1: Hurdle -- Jump-I(A)
Level 1: Health -- NmnCnv-Regen/Rcvry+(A), Mrc-Rcvry+(9)
Level 1: Stamina -- PrfShf-End%(A), PrfShf-EndMod(9)
Level 49: Quick Form
Level 44: Double Jump
Level 50: Musculature Radial Paragon
Level 50: Born In Battle
Level 50: High Pain Threshold
Level 50: Invader
Level 50: Marshal
-------------
2
-
-
1 hour ago, Bill Z Bubba said:
o Ageless. Barrier since Bio is squishy.
The heactombs, armageddons and apocalypses are all +5ed in game. Just not in Mids for either build.
From your two builds it looks like there wouldn't be much of a difference in performance. 6-slotting the ATO into ET (which I imagine you're doing for its 10% recharge) will give you about a 40-50% chance to proc, so you'll see some variance in performance. Plus, you trade two damage procs in one attack and shift it to an attack you use half as often (but with better probabilities). So yeah, mostly a wash.
There are a couple things you could do in your build to get some more recharge from other sources, but probably not enough to your liking of a gapless rotation (although very small gaps are probably not too noticeable).
-
40 minutes ago, SomeGuy said:
Brawl and Boxing as set mules all the time.
ditto
-
55 minutes ago, Bill Z Bubba said:
Here ya go, @Bopper
Are you using Ageless Destiny, or not using Destiny in your rotation?
Edit, also can you provide me your 2nd build with Kismet?
-
9 minutes ago, Bill Z Bubba said:
Before slot changing, I had 3 runs. 78 secs, 73 sec, 77 sec.
After swapping Sup Crit Strikes into ET, the Hecatombs and ToD proc into TF, and pulling the Def/End/Rec LotG from Weave and replacing it with the Kismet +6% chance to hit, I killed three more pylons: 75 sec, 78 secs, 82. This last run has an odd number of misses.
Tests were all identical. Hit barrier, hit hybrid assault, fly in, start timer as I click 1st ET. Buildup is used after TF in the hopes that it covers all of ET-MB-BS-ET.
Now, obviously I need to do about 50 more pylons with each config to get proper data, but I'm not seeing any gains here.
Without knowing your build, it's hard for me to say the straight swap was a correct decision. You have to find a balance between the amount of recharge you put into ET and the gaps in your rotation from doing so. Throw up your build and I'll take a quick look to see if I can find you a best option.
-
4 minutes ago, Bill Z Bubba said:
Ugh. Of course you're right... lemme guess, all the extra +Acc I currently have is doing absolutely nothing for the fast-snipe's damage, right?
Could have sworn I tested swapping ET/TFs enhancements and it made things worse but I can't trust my memory anymore.
I'm right about the ToHit, accuracy does not affect Snipe's damage. I can't speak to the performance you saw with ET/TF swapping.
-
11 hours ago, BrandX said:
Personally, I go...
ET (Long or Short if I get the critical on TF for 2 Energy Focuses) > Total Focus (+50% Crit IO here for me) > ET (slotted with Hecatomb +5ed with no DAM/END IO, w/ 6th slot another Damage Proc) > Bone Smasher > Gloom > Repeat
Scrappers don't get Gloom, do you mean Moonbeam/Zapp?
I'm mostly in agreement with yours and BZB's rotation:
Total Focus > ET (fast) > Snipe > Bonesmasher > ET > Repeat.
However I disagree with slotting. I would still use the Dam/End IO in ET because it doesn't hurt your proc chances. I usually remove either the Acc/Rch or Dmg/Rch. But if true optimal slotting is desired, folks should be looking at @SomeGuy slotting (but don't slot up Boxing like that, there's no need for a 6th 10% recharge bonus).
One of the detriments of having the +50% chance to crit in Total Focus is the fact TF can't benefit from it. You want TF to crit for its double focus, so having ET slotted with the ATO proc can be optimal despite the fact it is not nearly the guaranteed proc as it is in TF. But, you're using ET twice per rotation and BS and Snipe benefit more from the +Crit than ET anyways. Remember the crit damage for the attacks are as follows:
- Total Focus - 1.00 scale
- Energy Transfer - 1.2768 scale
- Bone Smasher - 1.64 scale
- Snipe - 1.75 to 2.30 scale, depending on the amount of +ToHit in your build (consider taking Tactics and Kismet to buff this)
-
1
-
Keep in mind there was another change for scrappers. Old version, if you attacked, the crit buff would suppress for 20s. Now, it will suppress for only 8s. The crit values changed a little (ST became +65%, AoE became +30%).
-
1
-

If Granite Armor is not active, what can you use it to mule?
in Tanker
Posted
All but Kismet.