The Beta Account Center is temporarily unavailable
×


Maelwys
-
Posts
2010 -
Joined
-
Last visited
-
Days Won
23
Content Type
Profiles
Forums
Events
Store
Articles
Patch Notes
Everything posted by Maelwys
-
“I DON'T KNOW ABOUT YOU, BUT I COULD MURDER A CURRY.”
-

Bane Spider - all mace, all day
Maelwys replied to Onlyasandwich's topic in Arachnos Soldier & Widow
I'll usually open from Stealth with CrowdControl+VenomGrenade+DarkObliteration, then Tab to a particularly chonky Boss and use Poisonous Ray; then finally activate Placate to set up either Shatter (followed by Gloom/PoisonousRay/Pulverize spam) or another CrowdControl (depending on mob density). Placate is now AoE so it can take a little bit of heat off you whilst you focus on tougher Single Targets one by one. (and yes, Pummel is only taken as a low-level filler and mule for the 4-piece ATO set bonus!) 😉 -
Bane Spider - all mace, all day
Maelwys replied to Onlyasandwich's topic in Arachnos Soldier & Widow
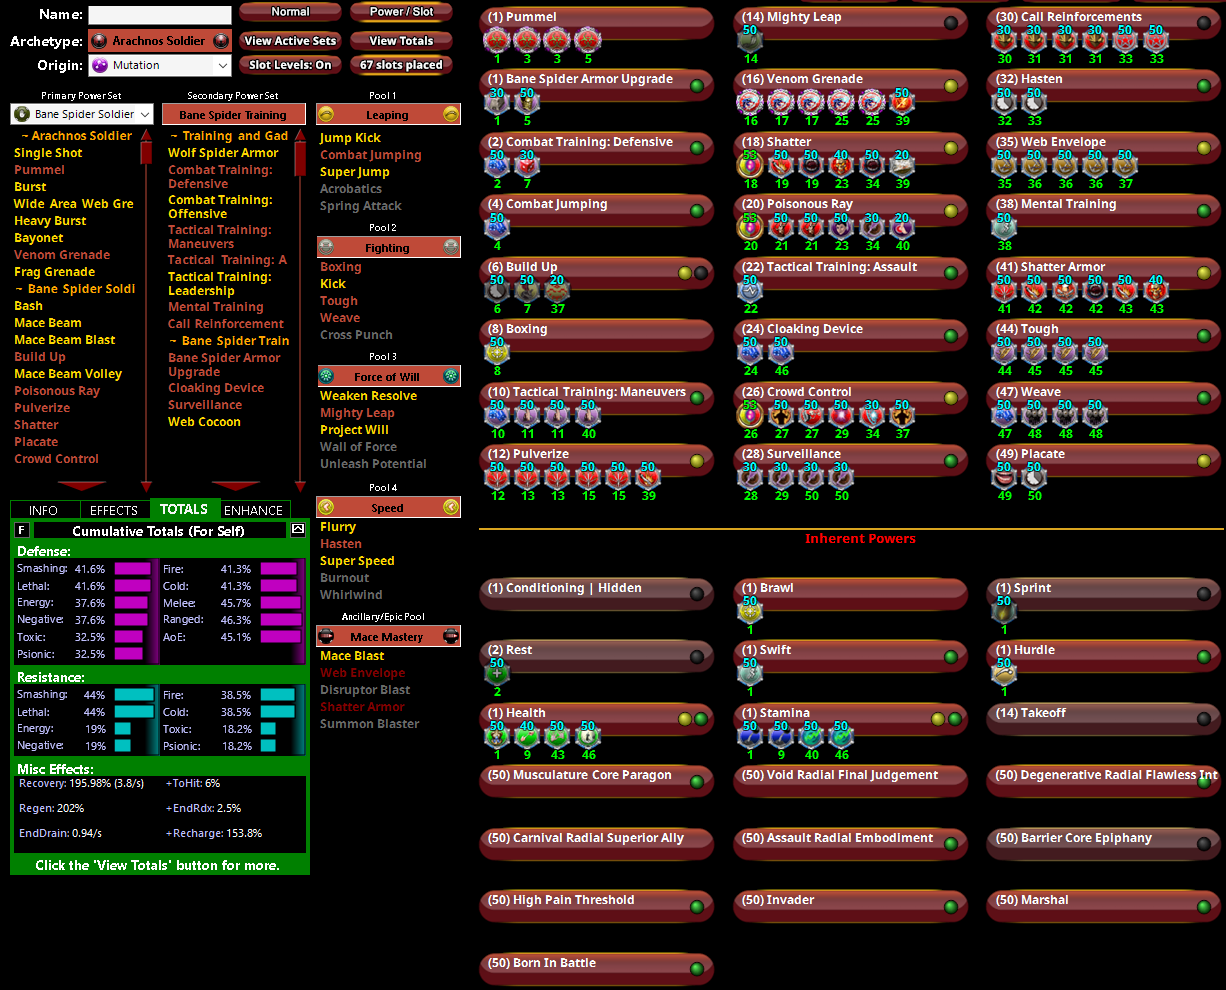
From what I can see you're still lacking a Kismet? Between that and a smidge more +ToHit in Tactical Training:Leadership you can likely drop a few +Acc bonuses. Personally my Bane-with-Mace-Mastery variant (currently unused in favour of /Soul) looks like this: There's technically a spare slot in Placate (the +Rech) but it's providing more benefit there than it would elsewhere. The Numina in Health is a bit less disposable because I'm leaning into +Recovery so that I can use a Destiny other than Ageless. Whilst I don't particularly like WAWG (although I can appreciate that it's a good AoE Immobilize; IMO outside of particular AV fights the time taken to cast it could be better spent braining things with Venom Grenade + Crowd Control + Dark Obliteration etc) dropping Pummel and Call Reinforcements for Bash/MaceBeam and Frag Grenade should be quite doable without disrupting very much. And you could even drop the Travel Power to fit WAWG in if you pick up your KB protection from elsewhere.
-
Bane Spider - all mace, all day
Maelwys replied to Onlyasandwich's topic in Arachnos Soldier & Widow
It's identical DPA to Shatter (albeit it won't benefit from Stealth Crits) but it procs much better and includes a guaranteed -20% res debuff for 20s. I guess that might not be a huge concern if you're only ever fighting single targets, but it makes a hefty difference to Pylon/AV times. (With ED-capped damage aspect and 3x 3.5PPM procs in each, I end up with ~265 DPA for Shatter vs ~315 DPA for Shatter Armor... and the latter can ED-cap recharge and maintain >90% activation rate for the procs. FWIW I still tend to go Soul on my Bane... but I remember heavily testing out the different Epics on my VEATs and Mace Mastery with Shatter Armor was the only other one that came anywhere close vs a tough single target; mainly due to the extra -res. Though that fact that I could basically substitute SA it for Shatter without disrupting my chain's timing was a plus too!) -
Issue 28: Page 1 Farming Microguide (Maps + Builds)
Maelwys replied to America's Angel's topic in Guides
For fleshing out your Incarnates, just spam the first DA arc and pick the salvage rewards at the end. Set it to -1x1 for speed, +0x8 to gather decent drops whilst you run through it, or +4x8 for both EXP and drops. There's currently still a thread about this on the very first page of the General Discussion forum. IMO farming AE missions is more about earning influence these days; with EXP gain being a secondary thing and Incarnate Salvage drops dead last. -
One more piece of hyper-advanced tech that Nemesis probably invented decades ago and has been silently destroying all traces of ever since.
-
Bane Spider - all mace, all day
Maelwys replied to Onlyasandwich's topic in Arachnos Soldier & Widow
Taking the Mace Mastery Patron Pool and not grabbing Shatter Armor‽‽ 🤯 Procbomb Poisonous Ray, but don't bother with sticking any in Surveillance unless you want it to start causing aggro (ordinarily you can use it whilst stealthed...) The rest looks largely OK, although personally I'd pull most of the slots out of the T1 Armor and Maneuvers/Weave and use them for a few more procs - a Power Transfer Proc in Stamina + a Preventive Medicine Global will likely give you better sustain than a smidge extra +res anyway. -
EM posseses a few very meaty attacks. But its damage output is a bit limited by animation time and nowhere to put -res procs. If you look at Ston's Pylon times list it doesn't quite break the top 5. That said, it's still pretty good damage even before you fully twink it out with IOs; and one of the set's big draws is that Energy Transfer doesn't cost any endurance. In answer to your other question... Scrapper and Brute Single Target damage output is roughly similar until you include ATO enhancements. Then the Scrapper leaves the Brute in the dust. What you really need to look at is Scrappers vs Stalkers... as the latter can attain a very high Crit rate plus almost constant uptime on Build Up.
-
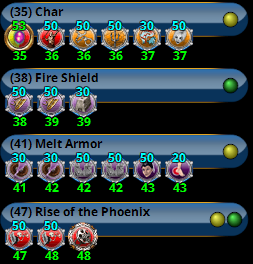
IMO Epic pool Bonfire with a KB>KD IO simply isn't worth it these days for mitigation purposes if you typically solo. It doesn't bounce enemies sufficiently regularly anymore to be anywhere close to reliable. (I've lost count of the times an enemy has simply just walked out of it, or even across it without being Knocked Down...) If you have a reliable means of SLOWING or otherwise keeping the mobs in place (like a teammate with taunt) then over the course of its 45s duration Bonfire will likely kick in several times on each enemy... so with sufficient mob density (AE Farming? ITF?) it can become a useful means of reducing incoming damage a little; and the DoT damage it deals can contribute a smidge too. But what it won't do is reliably keep a particular difficult foe (like a nasty +4 boss) on its back. There is one exception to this; and that's if you immobilize an enemy within Bonfire's effect radius. Immobilised enemies bypass the "ReduceIfKD" mechanic and get the full 100% chance for a Knockdown every second instead of 20% chance. Tenebrous Tentacles from Dark Blast and Vines from /Plant Manipulation are best at this, but lots of Blaster secondaries have a Single target Immobilise. FWIW my favourite "AoE mayhem" Blaster is a Fire/Ice/Fire; and they respecced out of Bonfire in favour of Melt Armor after the i27p7 changes. They're currently slotted like this: (I still take Bonfire with a KB>KD IO on my Bot/Kin/Fire MM; but they're using it more as an additional Fulcrum-Shift DoT and mule for the Superior Frozen Blast set; any Knockdown it inflicts is a happy bonus. Plus it opens the way to get Fireball...)
-
Might as well also link the Bane build whilst I'm here (screenshot here) It's more fragile than the Crabbermind (it'll struggle to solo many AVs without Barrier or Lore Pets up to heal it; whereas the Crab facetanks GMs for fun) but it's faster and more stealthy... and whilst its raw damage output isn't much higher it is far, far easier to focus that damage output on a particular chosen target in the middle of a crowded room.
-
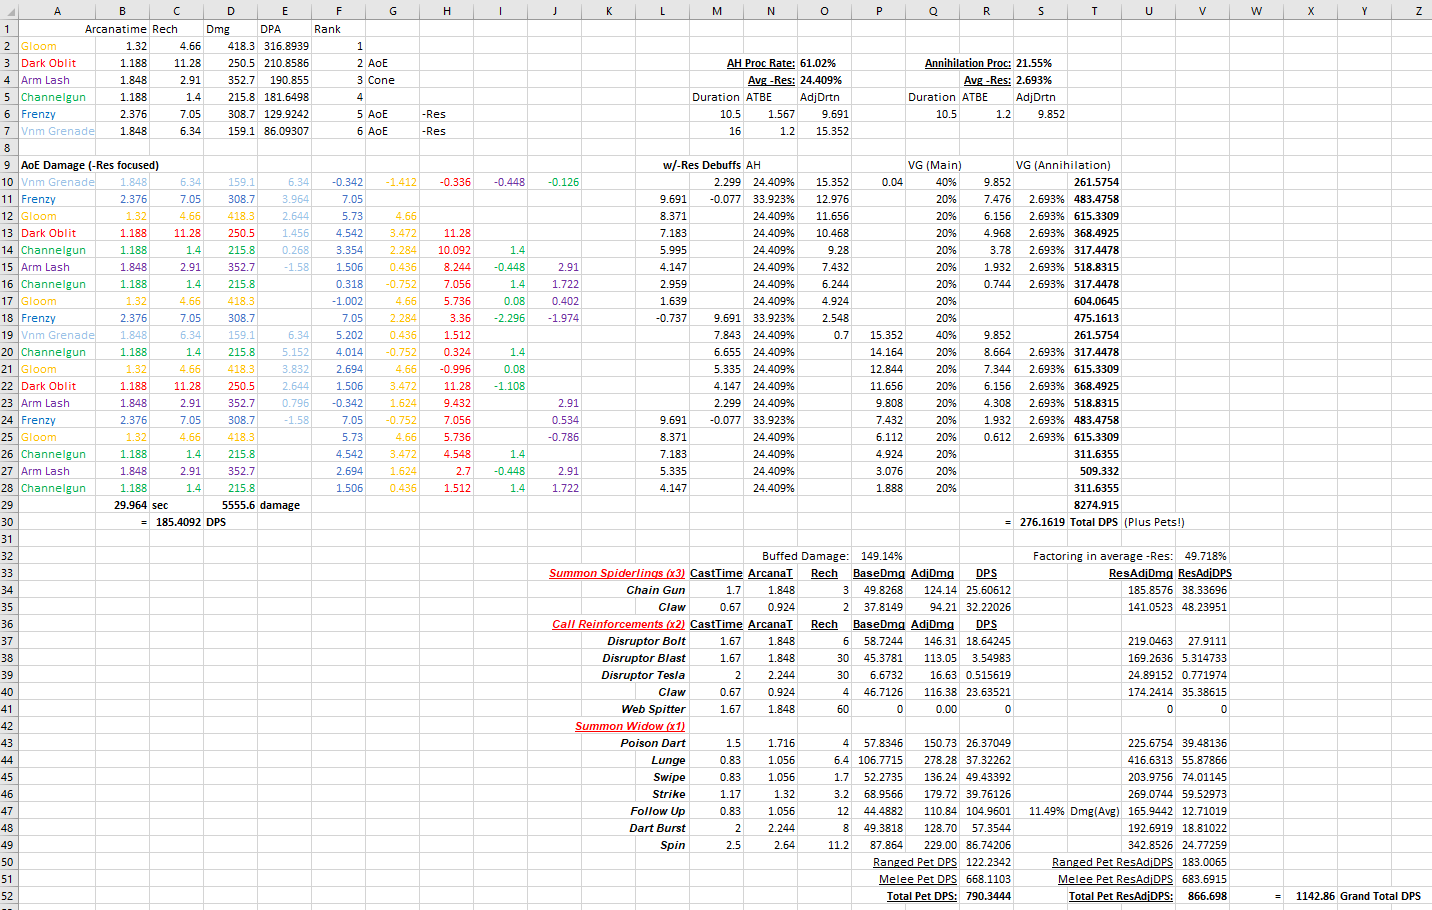
This (scroll down) and this should still be relevant. As above, leaning into the pets is 100% the way to go performancewise... so lots of Global Recharge (to get them perma) and allied +Def/+Damage/+ToHit buffs; plus plenty of -res debuffs (in my case Venom Grenade with its own -res plus an Annihilation Proc; and Frenzy with the FoTG and AH procs). Breakdown here (note the pet damage is a VERY ROUGH optimum ballpark; it assumes they're fighting even-level foes and activating attacks as soon as they recharge): The only issue is that (i) The pets aren't controllable like MM pets are and (ii) Because their recharge time is so long; you need to put a fair bit of effort into keeping them alive: as a Crabbermind without any pets is just a poor man's Brute (albeit one with plenty of Teammate buffs and -res). If you read through that first thread you'll notice that the Crab themselves can still have a decent attack chain and sufficient +MaxHP and Defense/Resistance to not only survive taking the Alpha Strike but also remain in the thick of things afterwards. I've played around with the different Epic choices and am firmly on team "Soul Mastery" these days - whilst Shatter Armor (from Mace) and Arctic Breath (from Leviathan) can provide a bit more -res... every Pylon test I've done suggests that the better DPA from Soul's attacks and Widow pet more than make up the difference. The additional -ToHit that Gloom and Dark Obliteration inflict also has a noticeable impact on your pet survivability (given they'll be sitting at ~31% Def to all before Barrier Destiny + Support Hybrid).
-
Step further away from your storage bin. The missing ones will have been deposited in it again (this happens all the time for me with enhancement boosters in base storage racks...)
-
Both are useful. Char probably gets more use since it's part of the regular attack chain; but Bonfire is powerful wide area CC (and if you're mostly ranged and mainly solo then you can forgoe slotting a KB>KD IO in it and instead simply cast it at your own feet to play keepaway indefinitely) That said... Fire Shield and Melt Armor are good too. And even RoTF has its place in certain "the best defence is a good offence/kamikaze" builds (ideally slotted for damage and recharge and with an Overwhelming Force KB>KD IO!)
-
https://homecoming.wiki/wiki/Prismatic_Aether_Salvage#Tier_3_-_Premium_Costumes
-
The closest to this in the AE would be the follow-the-NPC cave maps - sometimes labelled as "40min farms". In these AE missions you are supposed to enter and immediately run to the far side ("back") of the map to a friendly non-combat NPC; who you then "rescue" and then set your character to automatically follow. As that NPC subsequently slowly walks around the map (technically taking the scenic route back to the map's "entrance") they will encounter multiple spawns of enemies + the idea is that you taggling along behind them with your Damage Auras going and a PBAoE attack set to auto will whittle your way through the mobs and come back to some nice drops/exp. However in practice... (i) These missions give comparatively poor rewards - so 5-10mins AFK farming on an Asteroid map can often be better than 30-40mins AFK farming on a Cave map. (ii) You tend to come back to find your character stuck in geometry. Autofollowing in cave maps sucks.
-
Roughly as survivable as a Mid Tier Brute with lower personal damage output but a boatload of -res debuffs and allied +Def/+Dmg/ToHit buffs. Plus up to six pets (plus Lores) that output more raw damage than a MM's Henchmen. Their attacks all Proc extremely well too. You can roll your face over the keyboard and still get a <60s Pylon time.
-
Dual pistols snappy follow-up, what's up with that?
Maelwys replied to BazookaTwo's topic in Blaster
Weapon redraw works by adding the time it takes to animate drawing the weapon to the animation time of the triggering attack... however the delay before you can start activating any additional followup attacks is unaffected. The upshot of this is that if you start with your weapon holstered + then activate two weapon attacks one after the other... the animation of your second attack will cancel and "overwrite" part of the animation of your first attack. That second attack ends up activating at the same point in time that it would have activated if you'd started out with your weapon already drawn. -
I'm going to stop with the Memeposting for a minute. FWIW judging by his profile page ol' Snarks is still Lurking (with a capital "L") and visiting every few hours. Since posting this leaving thread he's also pipped the 10k "reactions received" reputation mark... and it's probably worth drawing attention to the fact that only 229 of those 10k reactions (less then 2.3%!) have been negative. @Snarky - If this is the first time in your >8.4k posts that you've been told by someone that you've "crossed a line" then I think that deserves some (blood)cake rather than a self imposed posting ban. You're far more likely to be mobbed by hugs here than by pitchforks. If you're enjoying the break from posting then great, but if not then dry your undead eyes and get your crusty posterior out of the coffin and back behind the keyboard already.
-
Agree with @tidge here. Defender larger buff/debuff values are not always overkill (especially +Res/-Res) and a lot of their damage leeway can be made up for by Procs. Some of the Blast sets also have useful secondary effects that are better on Defenders (Sonic, Elec, etc) There are definitely specific powerset combos which shine more on Defenders; just as there are certain powerset combos which shine more on Corruptors. Corrupters certainly have a hugely higher potential damage ceiling due to Scourge (particularly so on sets with "Rain" powers)... but whilst teaming that typically only has a major effect if you're fighting big bags of HP (e.g. AV-level foes). And without Scourge; once you factor in Procs there isn't a huge amount of difference between a Defender's damage output and a Corr's... and in some cases things can even begin to slant in favour of the Defender if the powersets contain significant levels of -res debuffery. That said; I'll fully admit that Vigilance is pants and the Defender ATOs are rather situational since they apply absorb/healing rather than damage output (but they can still be pretty handy for certain support powersets - FF, Sonic Resonance, Cold Domination, etc)
-
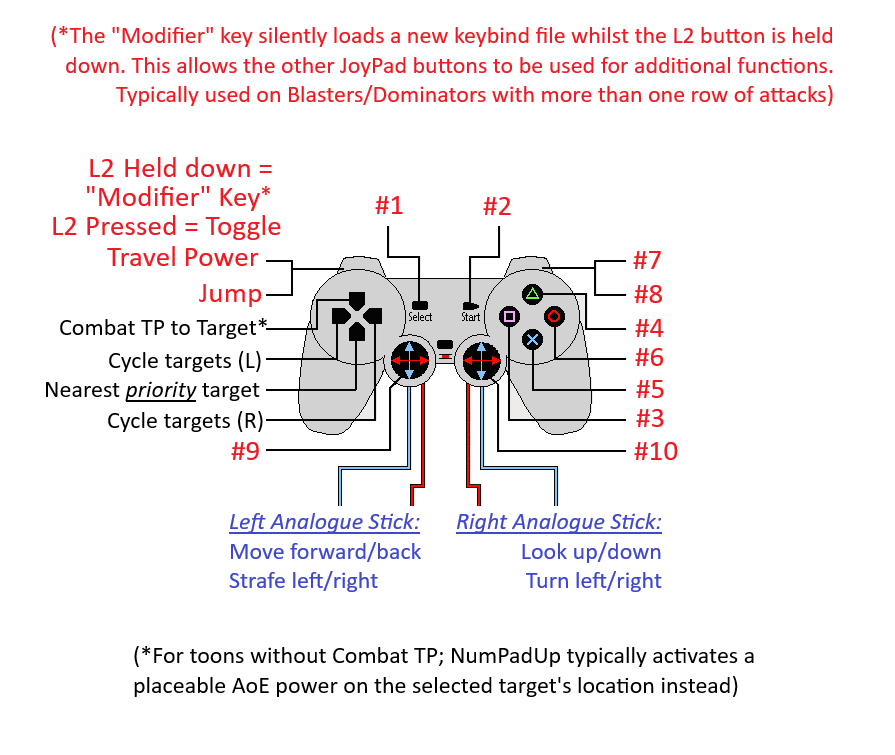
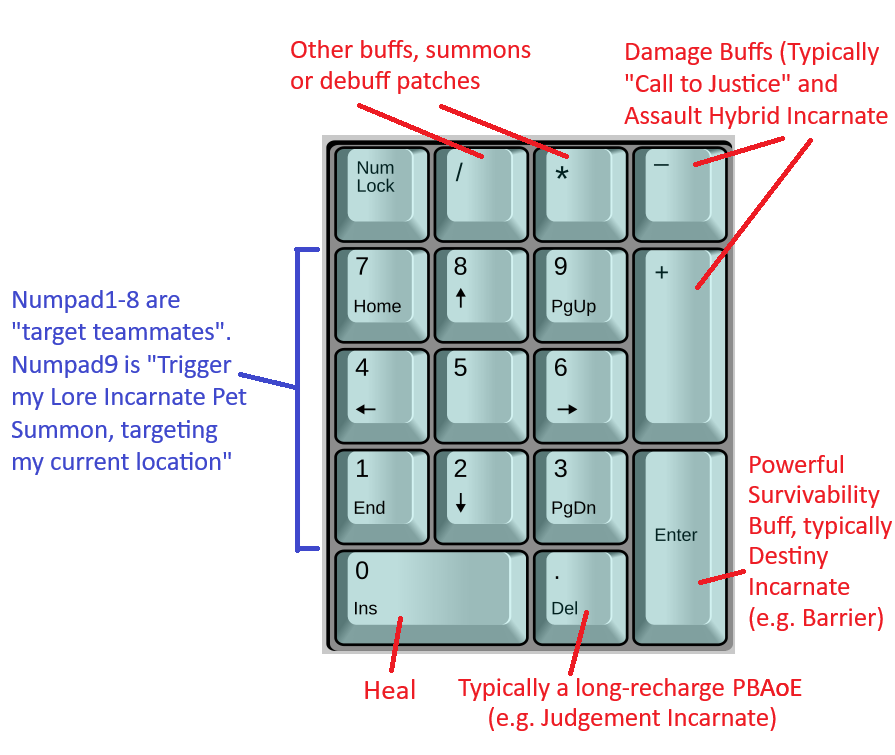
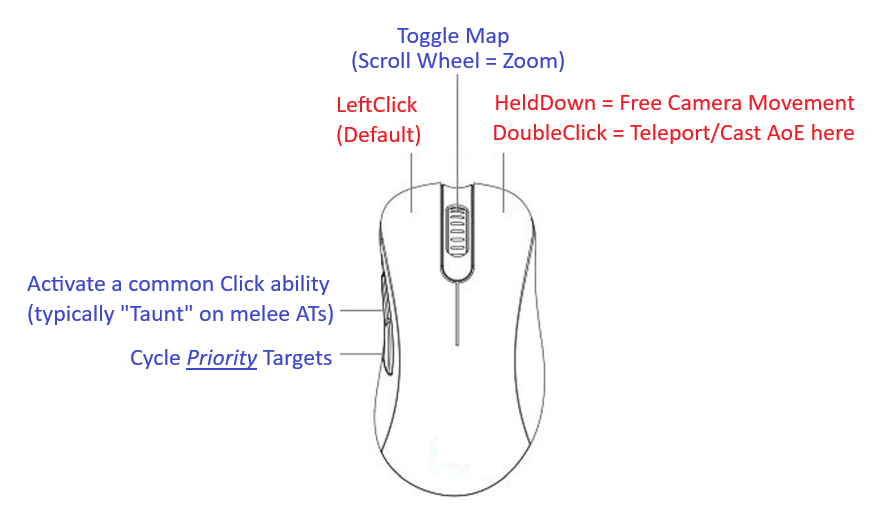
100% this. Everyone's going to have slightly different preferences as to how to tweak their control scheme; especially us users of unholy frankinsteinian combinations of Joypad/Mouse/Keyboard/KitchenSink. FWIW, a visual representation of my default kitbashed setup (the horror!) is below. However I normally tweak it a fair bit depending on the toon in question to implement some additional functionality (e.g. the DPad "Down" key typically also activates Hasten, and performing any movement will activate Clarion Destiny incarnate on toons that take it or start activating my Melee toon's armor toggles, with Mez Protection first!) My "Regular/Default" setup: Numpad tweaks for Masterminds: ...and my other MM controls (as mentioned previously, but copied here for completeness' sake): B "petcom_all defensive follow" [Bodyguard mode] G "petcom_all aggressive" [aGgressive] H "petcom_all passive follow" [Heel] and usually also a Variable key which sets most pets to Bodyguard mode and leaves one alone (to instantly give me some survivability but let one pet continue to attack etc) e.g. V "petcom_pow 'Battle Drones'follow defensive$$petcom_pow 'Protector Bots' follow defensive" PowerTray #1 is set to "Attack this target" ("petcom_all attack" mostly, sometimes altered so just one pet attacks) and PowerTray #2 is set to "Go here" ("petcom_all goto"). On most maps I can enter a mission, press G then V and then amble around instructing my little engines of destruction to "go here" quite a lot.
- 10 replies
-
- 1
-

-
- controller
- mastermind
- (and 3 more)
-
You can definitely just use a Controller to play most of the game. I do. Even on a MM. Throwing the mouse in too makes camera movement and mission objective interaction much easier... although having one Analogue thumb stick for movement and another for camera rotation plus an "Activate" bind can go a long way. Typically my left hand is always holding a Joypad whilst my right hand alternates between the joypad and the mouse. Occasionally that right hand might drift over towards the keyboard numpad, but it's not a regular occurrence (mainly for selecting individual teammates or henchmen without needing to click on them, or triggering long recharge time buffs like Incarnate and Alignment Clickies). Enemy target cycling is done via D-pad left/right with D-pad down bound to a "select nearest problematic enemy" bind that prioritises Sappers and DE eminators etc. Whilst the Numpad buttons are certainly helpful for handling targeting + fine control of individual MM henchmen... I get by 99% of the time with this setup (mainly just tapping one key at the start of each mission to set my "mode", followed by repeatedly using power tray macros to handle Goto and Attack commands)
-
https://homecoming.wiki/ seems down indeed. 404 errors everywhere. The old ParagonWiki archive page is still working and at least contains enough info to help guide you through the older TFs etc.
-
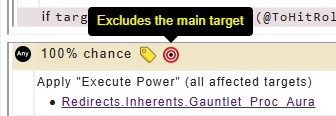
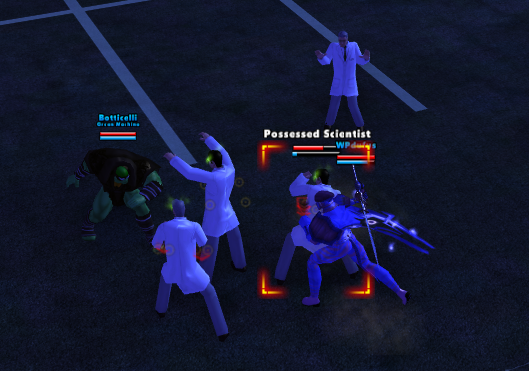
The Proc Aura gets a bit wonky in the auras IIRC... although admittedly it's been a whiles since I looked at it properly. It certainly used to be the case that if you took an INV running Invincibility (for example) and a WP running RTTC and stood them both next to the same mob then the INV always won without even trying. It's possible that may have changed in recent patches, but WP is such a sucky set that I can't quite muster up the desire to roll one up on the live servers to check. However a very quick and dirty brainstorm test suggests that 3/3 Possessed Scientists prefer to focus on a different Tanker (even when it just stands there like a lemon whilst the WP is actively wailing on them...)