MythsnWraiths
-
Posts
24 -
Joined
-
Last visited
-
So... you all have been busy, yeah?
-
Build Performance Overview The build effectively delivers an exhilarating and sometimes challenging experience that I found quite rewarding. It can perform exceptionally well at late and end game content with an attentive and mildly skilled player. It is an offensive powerhouse, whose ability to manage mob positioning (Axe Cyclone) and dynamic (exceptional single target and AoE) damage makes it especially helpful to teams. Since it is dependent on defensive cooldowns for heals, defense, and endurance consumption, teaming with players who can alleviate these requirements allowed me to focus on what this build does best: face melting mobs. Leveling I leveled from 1 to 25 solo. This was a true test of patience. For the first 20 levels, you are painfully dependent on temp powers and inspirations to fill in your attack chain and cover your survivability gaps. At around level 25, the build started to take form with a reliable though somewhat choppy (no pun intended) attack chain. Endurance consumption was the greatest weakness for this build while leveling, so landing on a PuG with a /Kinetic was a complete game changer for me. Overall, the leveling process was difficult enough, mainly due to endurance issues, that I intend to avoid Exemplaring and even switched to villain side to get the Task Force Commander badge rather than going back to run all the Hero TF's like I normally do. Pre-Incarnate During this period, I finished collecting my IO's, earned my accolade badges, and, of course, farmed Incarnate materials. Endurance consumption remained mildly problematic through this period (sensing a theme yet?) since Consume, even when the build is fully IO slotted, is of limited value due to its long recharge time. Despite that limitation, it was during this period that the build's offensive potential began to trivialize EB's and I was able to embrace the "best defense is a good offense" play style. Post-Incarnate With endurance no longer a significant concern and the final offensive buffs in place, this build is ruthless. It is both visually and mechanically satisfying for an engaged player. Summary Do I recommend this build? It depends. I have a large roster of unkillable tanks and near unkillable everything other AT. In a game that can be dominated with builds that simply require you to toggle on all your defenses and charge forth like Mr. Jenkins, it can be refreshing to play something that requires you to actively manage your survivability. I learned a great deal through the development and leveling process of this build and playing it is making me a better player. Scrapper (Axe - Fire).mbd
- 17 replies
-
- 2
-

-

-
- scrapper
- battle axe
- (and 2 more)
-
Page 7 Farming Microguide (Maps + Builds)
MythsnWraiths replied to America's Angel's topic in Guides
To answer an old question, power leveling a toon is no different than farming. Therefore, the maps and builds American Angel gave on this thread are one of your best bets. If you use an asteroid map be sure to get stealth or invisibility for the toon you are power leveling at level 4 so they can hide and not get killed every 5 seconds. You can respec out of it later. -
I main a Dark/Dark Brute (though I use the term 'main' very loosely) and run a build very similar to yours. I absolutely love it. While it was not the most fun to level up, once at 50 I became the terrifying destroyer of content that I always hoped to be. It's survivability is certainly not on par with my tanks but it is strong enough that I can be fearless when playing it. After years of playing, don't remember the last time I died. It is beyond excellent for team play since so much of is it's survivability directly benefits your allies. That said, I tend to solo more now than in the past. When I solo, I often (though not always) reduce difficulty to 0x1 so I can spend more time reading and digesting the story and less time smashing the faces of my enemies. I have a descent selection of blasters, scrappers, and stalkers built for this type of play but I have been pondering what a Dark/Dark brute that prioritizes damage and mobility at the expense of survivability might look like. It is a sloppy image that I haven't been able to satisfactorily develop. The AT and Power Sets lend themselves toward the type of play your build supports. I appreciate you sharing the build. I have imported it and might be making some adjustments to mine based on your work.
-
I can't thank you all enough. I am feeling very confident in the build now with all the adjustments from your recommendations and examples. I can't wait to get this next toon started. Thanks again!
-
That works! And it answered all of my question... and then some. I was stuck on the fact that I could only put valuable set bonuses into two of Axe, Cleave, and Burn while still preserving the Rech Debuff protection. I was about to hit analysis paralysis on deciding which one to Proc and which two to slot for bonus. You saved me! Based on Sancerre's comments I picked the same slotting for that you are using for Consume, but I wasn't confident in that choice until I saw this. Also, I like what you did with Shadow Meld. Consider that stolen. Sancerre's advice to slot Scrapper's Strike set into Blazing Aura led to the natural inclusion Hecatomb in Chop, yet another decision that your build validates. Could you elaborate on your choice to increase Max HP via the 3 piece Shield Wall and Reactive Defense? Is that a personal preference or is it a significant boost in survivability over using some of those slots to complete Scrapper's Strike (6% S/L Res) and three x 4 piece Unbreakable Guard (total 9.39% melee def)? Lastly, I hate to give up on having a teleport power in the build but your pool power selection does a good job of highlighting just how much I sacrifice by trying to include it on this character. I think the smart thing to do is level up using your pool selection and spend some time testing it to see what, if anything, I can sacrifice without compromising performance.
-
This is immensely helpful and I have started updating the build with your feedback. I do have a couple questions but I will hang on to them until after I figure out what the issue is with Nemu's data chunk/my ability to properly import since I suspect Nemu's example build may answer my questions.
-
@Nemu I really appreciate you helping me with this! When import your data chunk though it comes up as my original build. It could very well be user error on my part.
-
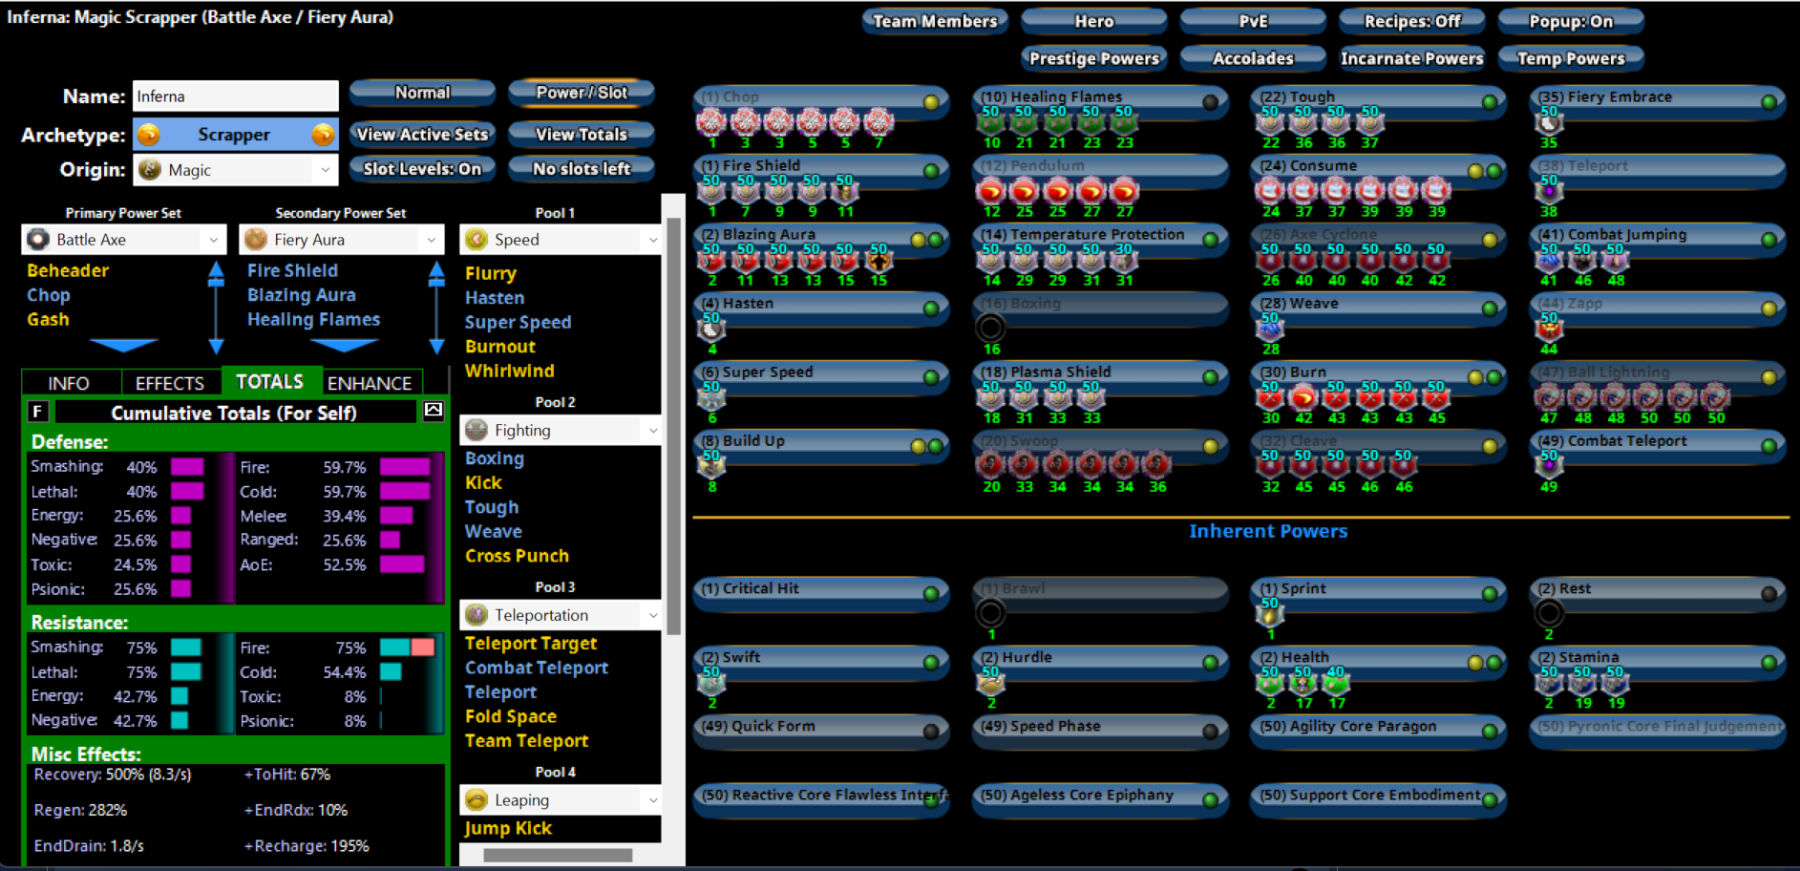
Another couple hours of reading through the forums and I have accomplished the following. - Answered my own question about agility core, learned about the importance of slotting for protection against recharge debuff, and found some incredibly helpful knowledge on general scrapper building on this thread Found an incredibly helpful example of good damage slotting for Battle Axe on this thread Uninstalled and reinstalled mids so I can do a proper export, and incorperated the above knowledge into a MAJOR overhall. Inferna - Hero Scrapper Build plan made with Mids' Reborn v3.6.6 rev. 3 ────────────────────────────── Primary powerset: Battle Axe Secondary powerset: Fiery Aura Pool powerset (#1): Experimentation Pool powerset (#2): Leaping Pool powerset (#3): Fighting Pool powerset (#4): Concealment Epic powerset: Soul Mastery ────────────────────────────── Powers taken: Level 1: Chop A: Superior Scrapper's Strike: Accuracy/Damage 3: Superior Scrapper's Strike: Damage/Recharge 3: Superior Scrapper's Strike: Accuracy/Damage/Recharge 5: Superior Scrapper's Strike: Accuracy/Damage/Endurance/Recharge 5: Superior Scrapper's Strike: Recharge/Critical Hit Bonus Level 1: Fire Shield A: Aegis: Psionic/Status Resistance 7: Aegis: Resistance/Endurance 7: Aegis: Resistance 9: Aegis: Resistance/Endurance/Recharge Level 2: Blazing Aura A: Superior Avalanche: Recharge/Chance for Knockdown 9: Superior Avalanche: Damage/Endurance 11: Fury of the Gladiator: Chance for Res Debuff 11: Obliteration: Chance for Smashing Damage 13: Eradication: Chance for Energy Damage 13: Superior Scrapper's Strike: Damage/Endurance/Recharge Level 4: Speed of Sound A: Blessing of the Zephyr: Knockback Reduction (4 points) 15: Winter's Gift: Slow Resistance (20%) Level 6: Combat Jumping A: Luck of the Gambler: Defense/Increased Global Recharge Speed 17: Kismet: Accuracy +6% 17: Reactive Defenses: Scaling Resist Damage Level 8: Build Up A: Gaussian's Synchronized Fire-Control: Chance for Build Up Level 10: Healing Flames A: Preventive Medicine: Heal 19: Preventive Medicine: Heal/RechargeTime/Endurance 19: Preventive Medicine: Heal/Endurance 21: Preventive Medicine: Endurance/RechargeTime 21: Preventive Medicine: Heal/RechargeTime 23: Preventive Medicine: Chance for +Absorb Level 12: Pendulum A: Scirocco's Dervish: Chance of Damage(Lethal) 23: Obliteration: Chance for Smashing Damage 25: Superior Critical Strikes: Accuracy/Damage/RechargeTime 25: Superior Critical Strikes: Damage/Endurance/RechargeTime 27: Superior Critical Strikes: Accuracy/Damage/Endurance/RechargeTime 27: Force Feedback: Chance for +Recharge Level 14: Temperature Protection A: Gladiator's Armor: TP Protection +3% Def (All) 29: Steadfast Protection: Resistance/+Def 3% Level 16: Plasma Shield A: Aegis: Resistance/Endurance 29: Aegis: Resistance/Recharge 31: Aegis: Endurance/Recharge 31: Aegis: Resistance/Endurance/Recharge Level 18: Swoop A: Superior Critical Strikes: RechargeTime/+50% Crit Proc 31: Touch of Death: Chance of Damage(Negative) 33: Mako's Bite: Chance of Damage(Lethal) 33: Hecatomb: Chance of Damage(Negative) 33: Superior Blistering Cold: Accuracy/Damage/Endurance 34: Superior Blistering Cold: Accuracy/Damage Level 20: Boxing (Empty) Level 22: Axe Cyclone A: Superior Avalanche: Accuracy/Damage 34: Superior Avalanche: Accuracy/Damage/Endurance 34: Force Feedback: Chance for +Recharge 36: Eradication: Chance for Energy Damage 36: Obliteration: Chance for Smashing Damage 36: Obliteration: Accuracy/Damage/Recharge Level 24: Consume A: Superior Avalanche: Accuracy/Damage/Recharge 37: Superior Avalanche: Accuracy/Damage/Endurance/Recharge 37: Synapse's Shock: EndMod/Increased Run Speed 37: Synapse's Shock: Damage/Recharge/Accuracy 39: Synapse's Shock: EndMod/Recharge Level 26: Cleave A: Scirocco's Dervish: Chance of Damage(Lethal) 39: Obliteration: Chance for Smashing Damage 39: Obliteration: Accuracy/Damage/Recharge 40: Eradication: Chance for Energy Damage 40: Explosive Strike: Chance for Smashing Damage 40: Force Feedback: Chance for +Recharge Level 28: Tough A: Aegis: Resistance/Endurance 42: Aegis: Resistance/Recharge 42: Aegis: Endurance/Recharge 42: Aegis: Resistance/Endurance/Recharge Level 30: Burn A: Armageddon: Damage/Endurance 43: Armageddon: Chance for Fire Damage 43: Armageddon: Damage/Recharge 43: Armageddon: Damage/Recharge/Accuracy 45: Armageddon: Recharge/Accuracy 50: Overwhelming Force: Damage/Chance for Knockdown/Knockback to Knockdown Level 32: Weave A: Luck of the Gambler: Defense/Increased Global Recharge Speed 45: Luck of the Gambler: Defense/Endurance Level 35: Fiery Embrace A: Invention: Recharge Reduction Level 38: Stealth A: Luck of the Gambler: Defense/Increased Global Recharge Speed Level 41: Infiltration A: Luck of the Gambler: Defense/Increased Global Recharge Speed Level 44: Moonbeam A: Apocalypse: Damage/Endurance 45: Apocalypse: Damage 46: Apocalypse: Damage/Recharge 46: Apocalypse: Damage/Recharge/Accuracy 46: Decimation: Chance of Build Up 48: Apocalypse: Chance of Damage(Negative) Level 47: Shadow Meld A: Luck of the Gambler: Defense/Increased Global Recharge Speed 48: Shield Wall: +Res (Teleportation), +5% Res (All) 48: Shield Wall: Defense/Recharge 50: Shield Wall: Defense/Endurance/Recharge 50: Shield Wall: Endurance/Recharge Level 49: Super Jump A: Blessing of the Zephyr: Knockback Reduction (4 points) ────────────────────────────── Inherents: Level 1: Critical Hit Level 1: Brawl (Empty) Level 1: Sprint A: Celerity: +Stealth Level 2: Rest (Empty) Level 2: Swift A: Invention: Run Speed Level 2: Hurdle A: Invention: Jumping Level 2: Health A: Miracle: +Recovery 15: Numina's Convalesence: +Regeneration/+Recovery Level 2: Stamina A: Performance Shifter: Chance for +End Level 4: Jaunt Level 49: Quick Form Level 49: Double Jump ────────────────────────────── Incarnates: Reactive Core Flawless InterfaceMusculature Core ParagonAssault Core EmbodimentAgeless Core Epiphany Scrapper (Axe - Fire).mbd
-
You could not be more right! Your response was super helpful. I think I was able to include pretty much all of your recommendations. Dumped a massive amount of Def and upped my recharge bonuses significantly (updated snapshot below). I am -20 seconds away from perma-haste though depending on the Force Feedback Proc. Can you elaborate on this point? Barney style... please.

-
I was on the fence about this choice. Leveling my tank, I was able to juggle mobs with KU (KD?) so much that I was leaning on the hope it would solve this problem. It is definitely something I will be watching closely once the toon is high enough for it to be a consideration and then dump it if it doesn't perform.
-
To see the final build and assessment... Original Post I recently reached level 50 with a Shield/Axe tank and really enjoy the Battle Axe power set. For my next project, I wanted something a bit more aggressive, so I transitioned to the scrapper class and swapped out the shield for Fiery Aura. After hours of searching the forums, I put together the attached build, and it... is... okay... ish. To be honest, I think there's a lot left to be desired, and I'm not well-versed in how procs work and when to sacrifice set bonuses to include them. GOAL: My top priority for the build is Damage > Speed (the ability to move to and through content quickly) > Survivability. All three are important to me, but I don't mind sacrificing some survivability if it pays off in damage. I am very fond of teleport and combat teleport. I know I sacrifice quite a bit by including them, but I would prefer not to ditch them unless the payoff in damage and/or survivability is significant. My sincere thanks to any of you smart people who can help me figure this mess out. Scrapper (Axe - Fire).mbd
-
Wow, this is incredibly helpful. Thank you @tidge and @carroto. Taking this info and heading back to Mids.
-
You are quite right. I think I will put one in Power blast and one in snipe. Power Blast can serve as a filler attack, and ranged attack when necessary. It likely wont be enough to keep the FF buff up most of the time but it should be worth the cost of an enhancement in Snipe.
-
Context: I am playing a melee focused Energy/Energy Blaster (Blapper). I have near perma hasten (4 seconds off) and minimal dead space on my attack chain (Energy Punch > Snipe > Bone Smasher) with just IO sets. Question: For my three primary attack powers, would it be better to put a single Nucleolus Exposure, 4 x damage procs, and a FF + Recharge Proc to improve recharge time on Nova, Buildup, and Aim or would the return on FF procs not be worth the loss in damage and accuracy from a second Nucleolus Exposure?