Groovy_Ghoul
-
Posts
109 -
Joined
-
Last visited
Content Type
Profiles
Forums
Events
Store
Articles
Patch Notes
Everything posted by Groovy_Ghoul
-
Great feedback. Thank you StrikerFox!
-
I mostly group, so should have caveated the Definitely drop Placate with a dependency on soloing or not soloing. Placate is very powerful when not on teams, however when in a group, there is not much of a need for it. The fights usually don't last long enough. Sure there are instances, when it could be used, however, the crit chance for Stalkers greatly increases with the number of team members. I don't have it on any of my Stalkers and I don't miss it. YMMV. If you have the Stalker ATOs, the Chance to Hide is NOT rare at all, it procs regularly during fights. (20%, 4ppm for the slotted power) Purple version is higher. (33%, 5ppm). Without the ATO proc, Hide suppresses for 8 seconds after an attack. I'm always willing to try out different combinations of powers and I'm sure all of us here in the forums would love to see a no Hide build with Placate that is superior to a no Placate with Hide.
-
I haven't played a MM much since live. Recent Necro buffs look good, so I put together a build with Pain Dom, I've never played it before. Looking for any and all feedback. Thanks! --- G2ZrACwKbCcvSYOjc1JW1qX80E7qWJWyS2DcsrRJ+il9nFKztqbyU59UDm17CL3H+FmmmBxp8wN68oTiCkTEV9WvqtbQhiz37reMd+gFWnrfJoYiDVKayVfLmnvhsckjJEINZCl6tneuau/jLiHFLVTsufohZEf2FCpHlRXOg+Os+27S9Knk3oF73IFQ7m2ITXzivq91k2sIeUpo1OXvybAIjIo+PfUCryuFxC0+Tcdurgl43i2F869PGwSwQ1qSApRkIdB55PfAE+e+9+soPNwKEeVwOYBwF6nvq8UpEcBelsCdEvBTpoNrAvuzNR06LrUEtwSJbzC8oepIJljZuM//GJH6wx9+VeHZu2nOqMI3WJ8CPQteKYCpcyXWIqssYEXyR5eaZAusdMKaCLow49tZTqUqnU5ukYnrg7q45stbn6jisOUpLRh8WdbXpzgo0JFYJT1V34kIedioPpIP6zujWPOGtMT3zm8eNNxb5anktWN1q5Nx4G6pwZv13ffm4tvpCYeO/8VGmJrZp4vx3Bld8g9no5xTDha4+FPu0tAPWBJ1x3kn9aH1FdqzLnzdli1aVOi9ul155qUJbrqLLSGb7uY7u8wNvm/zvlTkwDxuRQL7OuTkC99AC18XGgugBBe+wRDRUGrfqGsFE9HRBKXtLVqxVowFOoLj+9HsgCIDZbgefOg1ayetsmOFTGdAON2ZRLYKsdk2C1/EtpH5FU9zRxGJdViYmGknIq+d3Nq1pgn96BXelqBW7/KsbP0pzdHdrJEdbZV98JVxUP4xmPNvruHbU5kntT7Oq9+e8KkVc1fZWJAklFjEev+qu4QFQfVu0VFWhXIlFzCxVGx8W+DgJ17Tf/yspJsA7mG+q9Xw8i10sLhOIaEYJ70kw8zHWZ/DrU6yLRCeWwtAwjemAjn3tZc+Tb68JJ/WMbNc5s7Kz0TQ9ZoM+wASRLAeDk/uc+A6n3xTenNmDsV08V/QSL6onM9XWk/SUWZtoBjR22S46xo8SHn2RRgN1qPKw6ayE4/Yx1QrOBB+CnQeZ73E9Qt+zzZj9DPVbfgwPhrSMhlQ6+SVnKGv44VFel1M75LhtXZoqFWvm7mOGTkZqRxAyXQ967GW47hkzHESmEsqYkPiGjumNfHEbeAWUWpUEtyOV2r3G+FfloX1nUbxs0+iLS2KI5zmCGBti+JzgKG+C3xzdta/2o4mtihporADQ5IsB9mDT4a00TZlW2PxHss0IFjdZrOM8hcfuD5m/jYo8gWS4Sk61q6lMbQ1NlyTN+aJypYaneG9TuDoGDrqT7LA7cm8v57vIBgkZSV3No9UrphkmNa0vOsm0kaj/t8cTACScQ4eVKwFTxlFcDDlZswWegxi3+l+dWskGFadWE8WQXwaC0hBAlT+bZXY5+22iypxRDGxQdHYzhwtOF/NR74Jwn0yD5CM8+N4GRA2E22pyOUhvm1417UUAxoBijunMtzO8RNROKTJjk3pTMvxz658s9amFB9RyKF7VbxkeHeoxnUkWkBOngOtKmISzWvdHiSy/G1kgLW437rgdFL14BiOiz3FuXLY7KCttIsXJ4207MlgHQ4beIiKQdsR06jjDjRCEsJBs7IVaD/To02Jwtj5LGUzM+SssOheWpcR2jAjtHVXaDm3jQy/1Spn11PmFZMM893q8UJj6Fg6WG/mc8menWptNgkMZhoiv/Ky0aAvcZgYFL24YMLm7oByMgNUTC2oGRY8rO9e6DMGM+lOscmw81l7QAE7XWsxk7zZpyD/0798e1ChwfC2tGlOzrtXrhKtcLiFB6h1SibdKn1k3QYkbsv5aZcwvC8zQo1pmH+6Npbrmm/GX1hrFjg/Vb2A9b9sDY9z1XtSwgdVuYqbDPd78+ys9OkI03sSGHccA+ZbC1bwqc8mKzec3auSUgVVVOexxi1keLvm4Ii56Lmk43OlW+DrwPK4wbGIYhWmbaaEekyOh/OFPx0VLxled70uh54xuu3zFNFEHbgCNSrSGT8IrjIkPxbaWMAmHUeWwsS4VbnNKw0M4pFsBcUJf2UL06xHjrPg762roHmsSIYVM4AWVtvUdpKpBTC8WMc3OUfi4qnfFC5J9eBqI2Zd8BWTxO6Q2KYryAGQfzd8dzWvyVzNLzYtVt00ASguUlR2ZmwyhpganpMvyYDAxv560K3ZaYzQyER8+I9piCaTK+tTk0asMr8kd34EDgCMKifFS2duDRmdpJMXSXIFe+brFjKL0WldcQYtaT3KQLad0nA49XrfmdiZbvt1Ubgo4Uj0plU8ZHjeY2hGMOmnw0867ugDn9EWzY4f99L1GsOW1mpot2AgP0wwuXoOkS75YTKGpmVjj89b7Ecu2sR/EaN7F9XfWxbogT19U3yHjsZHKb7+/INzgkqiQl8eQ/kd0+T0ILyG+5+kEXEko8h6yf6Gwn1+R5wUk2Il4T8b9hR+4Bt3t6oj/fm/k53eBHvsySzirvb7k07sVAUbm6rprPAl+2/NgzorBbrZGDvWixzeVDZ6/LK22iec+9p+lfgXcqC0lZWBeJC3hmDap5IrDeR7/KeuhQ/zIsxRKjkdXalnU8GXbTtakP07dOTFuD3ZgYj0l7lSIXB3UtAKybQpGQRyiNCDIKKcT6qPJRIxtO3xVkLI2bR0akxS1MXXSfrE/fgW+7Q7t5wgQDFQ6ygPnt24XrIy542RsVYTaohczYfE/zWt3uGJeRhiTFa2TtBfBjojJ4ZxmCcKDqEoCY1E2PSIW0iDfGm7kD6WsQ3LAiN86zysq6eH086p5HSPEjYl5fPf0Biwn7LHuErS0D4= Mastermind (Necromancy - Pain Domination).mbd
-

honoroitisfantastic POLL: Stalker - best of AT 2023
Groovy_Ghoul replied to honoroit's topic in Stalker
Ice Melee - exotic damage type, frozen aura (ice melee's foot stomp, great aoe), frost (large cone), freezing touch (high dot hold) and ice patch Stone Armor - arguably the best armor for Stalkers type due to defense, resist, regen and a self-heal (it's really all that and a bag of chips) Weapon Mastery - Stalker has best version with physical perfection (only AT which two options of acquiring it) and exploding shuriken (a very underutilized attack) -
Good advice from Riot Siren. Drop either Charged Brawl or Havoc Punch. Definitely drop Placate. I would likely open with Build Up then either Thunder Strike or Chain Induction depending on multiple targets or single target but an attack that will crit from hide. Lightning Rod will not crit from hide but I would follow up as my 2nd attack. At this point I would use my AS and BU when they proc. Try out different combinations, you will find a good chain of attacks. I would also look at Mu Mastery for Zapp and Ball Lightning. Both provide more electricity goodness. Have fun. Electric Melee is a great primary.
-
Definitely a necro. This should be stickied: Croax's Tier List and Build Collection
-
Thanks for the info. I was thinking Hybrid- Melee Core for more resistance and regen. Judgment Void for damage reduction and thematic with your attacks. Try saving your build locally, attach the file and upload to your comment
-
I’ve been wanting to level a Necro MM since the update and was mostly fixated on a /FF until I read this post. Looks like a fun and strong build. Mids was just updated, is it possible for you to post your build. The screenshots do not show everything. Can you list your incarnates, types (core/radial) and reasons why? Vigor looks like a great choice. Thanks!
-
Adding more SS:

-
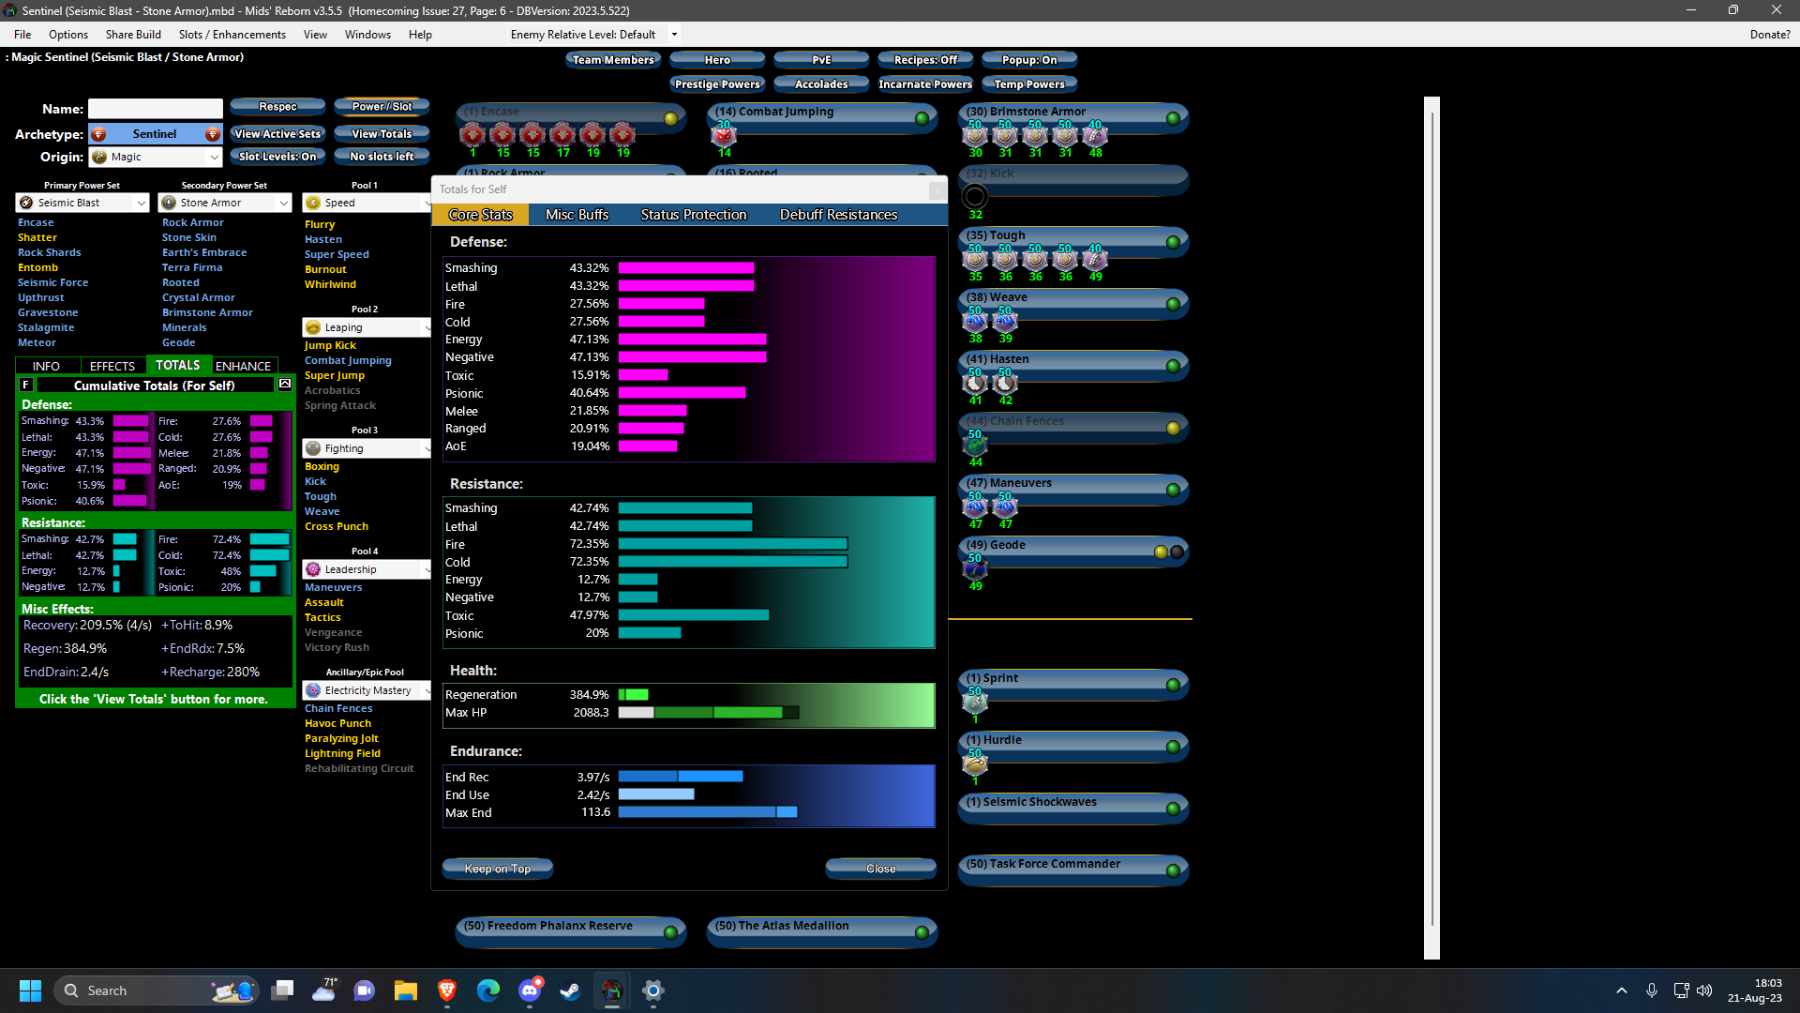
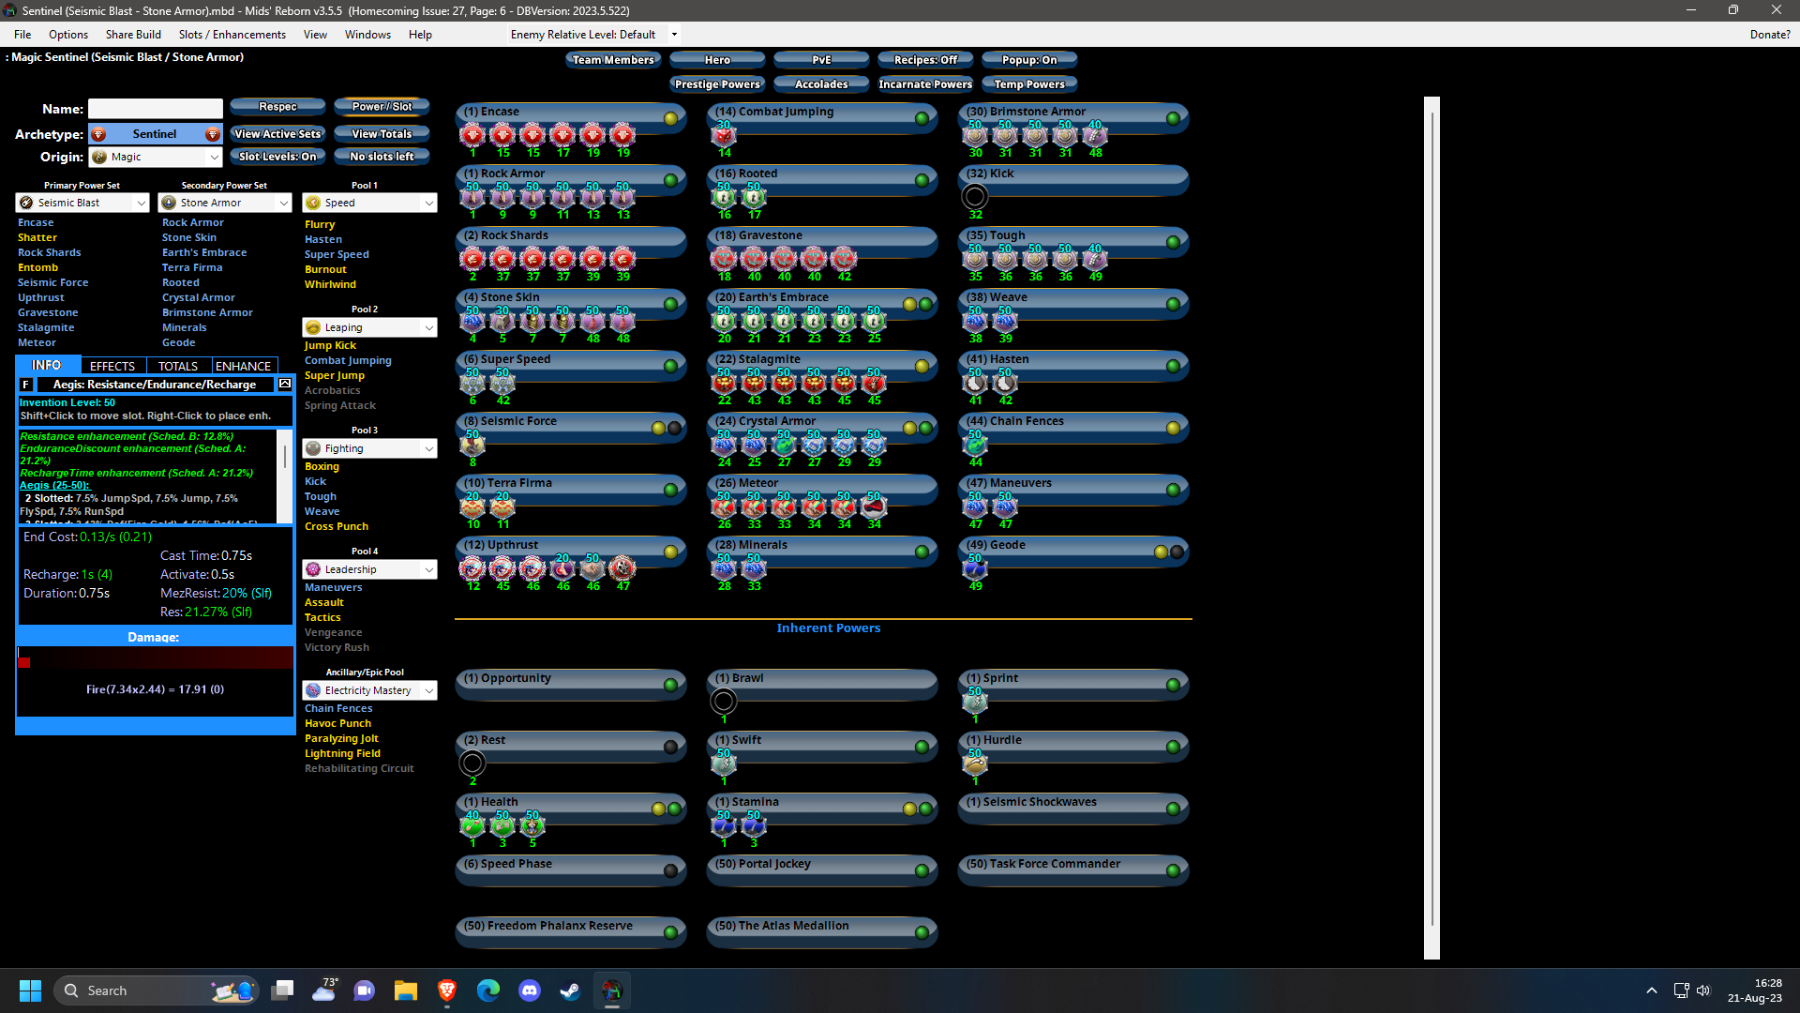
Not many out there. So I put one together. Seems like fun and great synergy. I've only ever played one Sentinel and was PL'd during the Halloween event and haven't played since. Not sure the best way to export/post builds so here is a screenshot. (Any advice on how to post builds now is also appreciated) TLDR; I'm new to Sentinels and any advice/critique would be greatly appreciated. Thanks! Sentinel (Seismic Blast - Stone Armor).mbd
- 1 reply
-
- 1
-

-
I would like to try out a SR tanker. Any recommendations for secondary and why? I'm currently leaning towards Claws or Savage Melee but open to your opinions. Thanks in advance.
-
For Primary: I would recommend Ice Melee for the exotic damage type that is not resisted much and Ice Patch - the one slot wonder that really helps with damage mitigation. For Secondary: Stone Armor or Invulnerability. Both armors have “heals” and are well rounded with defenses and resistances. I would skip the T-9 with Invulnerability but it is very tanky on Stalkers without it. Stone Armor is outrageously great but you already know that! 😁
-
When you are back in hide, go with your best available attack that will crit. Depending on the circumstances it could be AOE or single target. Not all AOEs can crit from hide.
-
Invulnerability on a Stalker is great. Very study. I have an Ice Melee/Inv Stalker and he’s so much fun to play. One suggestion, switch your ATOs (all 12) so that the chance to hide proc (and the other 5) is in your AS and your chance to build up (and the other 5) is in HP. This will allow you to perform more AS from hide while still maintaining your 6 piece bonuses from each set.
-
Stone Melee / Ice Armor Looking for Feedback
Groovy_Ghoul replied to Groovy_Ghoul's topic in Stalker
Currently 26 and having a great time leveling. I will likely swap out the FotG proc in Tremor for FF proc. Stone Melee is so much fun with the soft control knockdown, AOE crits from hide and the all the procs in the attacks. Highly recommended!! -
There are better power pool picks. I would find a spot for the Preventative Medicine Absorb Proc, build for high(er) levels of regeneration and carry green inspirations. When you have very high levels of defense, you won’t get hit much
-
I really enjoyed my Stone Melee / Stone Armor Stalker so much I wanted to try Stone Melee again but with Ice Armor. Build submitted for critique. Any feedback would be greatly welcomed. Thanks! View This Build In MRB Primary Power Set: Stone Melee Secondary Power Set: Ice Armor Power Pool: Speed Power Pool: Leaping Power Pool: Fighting Power Pool: Leadership Ancillary Pool: Blaze Mastery Hero Profile Level 1: Stone Mallet SprAssMar-Acc/Dmg:50(A), SprAssMar-Dmg/Rchg:50(3), SprAssMar-Acc/Dmg/Rchg:50(3)... ...SprAssMar-Dmg/EndRdx/Rchg:50(5), SprAssMar-Acc/Dmg/EndRdx/Rchg:50(5), SprAssMar-Rchg/Rchg Build Up:50(7) Level 1: Hide LucoftheG-Def/Rchg+:50(A), Ksm-ToHit+:30(21), ShlWal-ResDam/Re TP:50(45) Level 2: Fault Ann-ResDeb%:50(A), JvlVll-Dam%:50(11), PstBls-Dam%:50(11)... ...Bmbdmt-+FireDmg:50(13), ExpStr-Dam%:20(13), FrcFdb-Rechg%:50(15) Level 4: Frozen Armor LucoftheG-Def/Rchg+:50(A), LucoftheG-Def:50(15) Level 6: Assassin's Smash SprStlGl-Acc/Dmg:50(A), SprStlGl-Dmg/Rchg:50(17), SprStlGl-Acc/Dmg/Rchg:50(17)... ...SprStlGl-Dmg/EndRdx/Rchg:50(19), SprStlGl-Acc/Dmg/EndRdx/Rchg:50(19), SprStlGl-Rchg/Hide%:50(21) Level 8: Build Up GssSynFr--Build%:50(A) Level 10: Wet Ice EndRdx-I:50(A) Level 12: Super Speed Clr-EndRdx:50(A), Clr-RunSpd:50(43) Level 14: Combat Jumping LucoftheG-Def/Rchg+:50(A), LucoftheG-Def:50(29) Level 16: Hoarfrost Prv-Heal:50(A), Prv-Heal/EndRdx:50(23), Prv-EndRdx/Rchg:50(25)... ...Prv-Heal/Rchg:50(25), Prv-Heal/Rchg/EndRdx:50(27), Prv-Absorb%:50(27) Level 18: Seismic Mallet Mk'Bit-Acc/Dmg:50(A), Mk'Bit-Dmg/EndRdx:50(33), Mk'Bit-Dmg/Rchg:50(33)... ...Mk'Bit-Acc/EndRdx/Rchg:50(33), Mk'Bit-Dam%:50(34), FrcFdb-Rechg%:50(34) Level 20: Permafrost StdPrt-ResDam/Def+:30(A), GldArm-3defTpProc:50(23) Level 22: Kick Empty(A) Level 24: Glacial Armor LucoftheG-Def/Rchg+:50(A), LucoftheG-Def:50(29) Level 26: Tremor Obl-Dmg:50(A), Obl-Acc/Rchg:50(34), Obl-Dmg/Rchg:50(36)... ...Obl-Acc/Dmg/Rchg:50(36), Obl-%Dam:50(36), FuroftheG-ResDeb%:50(45) Level 28: Energy Absorption LucoftheG-Def/Rchg+:50(A), LucoftheG-Def/Rchg:50(31)... ...PwrTrns-EndMod:50(31), PwrTrns-+Heal:50(31) Level 30: Icy Bastion Ags-ResDam/Rchg:50(A), Ags-EndRdx/Rchg:50(37)... ...Ags-ResDam/EndRdx/Rchg:50(37), Ags-ResDam:50(37), Ags-Psi/Status:50(39) Level 32: Tough UnbGrd-ResDam:50(A), UnbGrd-ResDam/EndRdx:50(39)... ...UnbGrd-Rchg/ResDam:50(39), UnbGrd-ResDam/EndRdx/Rchg:50(40) Level 35: Char Empty(A) Level 38: Maneuvers Rct-Def:50(A), Rct-Def/EndRdx:50(45), Rct-EndRdx/Rchg:50(46)... ...Rct-Def/Rchg:50(46), Rct-Def/EndRdx/Rchg:50(49), Rct-ResDam%:50(50) Level 41: Weave RedFrt-Def/EndRdx:50(A), RedFrt-Def/Rchg:50(42), RedFrt-EndRdx/Rchg:50(42)... ...RedFrt-Def/EndRdx/Rchg:50(42), RedFrt-Def:50(43), RedFrt-EndRdx:50(43) Level 44: Melt Armor Acc-I:50(A), AchHee-ResDeb%:20(50) Level 47: Fire Ball PstBls-Acc/Dmg:50(A), PstBls-Dmg/EndRdx:50(47), PstBls-Dmg/Rchg:50(47)... ...PstBls-Dmg/Rng:50(48), PstBls-Dam%:50(48), Ann-ResDeb%:50(48) Level 49: Hasten RechRdx-I:50(A), RechRdx-I:50(49) ------------ Level 1: Assassination Level 1: Brawl Empty(A) Level 1: Sprint Empty(A) Level 2: Rest Empty(A) Level 1: Swift Run-I:50(A) Level 1: Hurdle Jump-I:50(A) Level 1: Health NmnCnv-Regen/Rcvry+:50(A), Mrc-Rcvry+:40(40), Pnc-Heal/+End:50(40) Level 1: Stamina PrfShf-EndMod:50(A), PrfShf-End%:50(46) Stalker - Stone Melee - Ice Armor.mxd
-
Why not drop Teleport for SS?
-
Ice melee or Stone Melee
-
Stone Melee provides two AOE attacks with Knockdown. KD = damage mitigation for the entire team. +1 for Shield Defense with Grant Cover
-
Energy Melee / Shield Defense Looking for Critique
Groovy_Ghoul replied to Groovy_Ghoul's topic in Stalker
Thanks for the advice and suggestions. I think I've finalized my build. Now to start playing and build. This Hero build was built using Mids Reborn 3.4.7 https://github.com/LoadedCamel/MidsReborn Click this DataLink to open the build! Level 50 Magic Stalker Primary Power Set: Energy Melee Secondary Power Set: Shield Defense Power Pool: Leadership Power Pool: Leaping Power Pool: Concealment Power Pool: Fighting Ancillary Pool: Body Mastery Hero Profile: Level 1: Barrage (A) Superior Assassin's Mark - Accuracy/Damage (7) Superior Assassin's Mark - Damage/RechargeTime (7) Superior Assassin's Mark - Accuracy/Damage/RechargeTime (9) Superior Assassin's Mark - Damage/Endurance/RechargeTime (9) Superior Assassin's Mark - Accuracy/Damage/Endurance/RechargeTime (11) Superior Assassin's Mark - RechargeTime/Rchg Build Up Level 1: Hide (A) Luck of the Gambler - Defense/Increased Global Recharge Speed (17) Shield Wall - +Res (Teleportation), +5% Res (All) Level 2: Bone Smasher (A) Mako's Bite - Damage/Endurance (11) Mako's Bite - Accuracy/Damage (13) Mako's Bite - Damage/Recharge (13) Mako's Bite - Accuracy/Endurance/Recharge (15) Mako's Bite - Accuracy/Damage/Endurance/Recharge (15) Mako's Bite - Chance of Damage(Lethal) Level 4: Deflection (A) Red Fortune - Defense/Endurance (17) Red Fortune - Defense/Recharge (19) Red Fortune - Endurance/Recharge (19) Red Fortune - Defense/Endurance/Recharge (21) Red Fortune - Defense (21) Red Fortune - Endurance Level 6: Assassin's Strike (A) Superior Stalker's Guile - Accuracy/Damage (23) Superior Stalker's Guile - Damage/Recharge (23) Superior Stalker's Guile - Accuracy/Damage/Recharge (25) Superior Stalker's Guile - Damage/Endurance/Recharge (25) Superior Stalker's Guile - Accuracy/Damage/Endurance/Recharge (27) Superior Stalker's Guile - Recharge/Chance to Hide Level 8: Build Up (A) Gaussian's Synchronized Fire-Control - Chance for Build Up Level 10: Maneuvers (A) Luck of the Gambler - Defense/Increased Global Recharge Speed Level 12: Battle Agility (A) Reactive Defenses - Defense (27) Reactive Defenses - Defense/Endurance (29) Reactive Defenses - Endurance/RechargeTime (29) Reactive Defenses - Defense/RechargeTime (31) Reactive Defenses - Defense/Endurance/RechargeTime (31) Reactive Defenses - Scaling Resist Damage Level 14: True Grit (A) Preventive Medicine - Heal (31) Preventive Medicine - Heal/Endurance (33) Preventive Medicine - Endurance/RechargeTime (33) Preventive Medicine - Heal/RechargeTime (33) Preventive Medicine - Heal/RechargeTime/Endurance (34) Preventive Medicine - Chance for +Absorb Level 16: Active Defense (A) Recharge Reduction IO Level 18: Power Crash (A) Scirocco's Dervish - Accuracy/Damage (34) Scirocco's Dervish - Damage/Endurance (34) Scirocco's Dervish - Damage/Recharge (36) Scirocco's Dervish - Accuracy/Damage/Endurance (36) Scirocco's Dervish - Chance of Damage(Lethal) Level 20: Combat Jumping (A) Luck of the Gambler - Defense/Increased Global Recharge Speed Level 22: Total Focus (A) Touch of Death - Damage/Endurance (36) Touch of Death - Damage/Recharge (37) Touch of Death - Accuracy/Damage (37) Touch of Death - Accuracy/Damage/Endurance (37) Touch of Death - Damage/Endurance/Recharge (39) Touch of Death - Chance of Damage(Negative) Level 24: Against All Odds (A) Endurance Reduction IO Level 26: Energy Transfer (A) Superior Blistering Cold - Accuracy/Damage (39) Superior Blistering Cold - Damage/Endurance (39) Superior Blistering Cold - Accuracy/Damage/Endurance (40) Superior Blistering Cold - Accuracy/Damage/Recharge (40) Superior Blistering Cold - Damage/Endurance/Accuracy/RechargeTime (40) Superior Blistering Cold - Recharge/Chance for Hold Level 28: Shield Charge (A) Superior Avalanche - Accuracy/Damage (42) Superior Avalanche - Damage/Endurance (42) Superior Avalanche - Accuracy/Damage/Endurance (42) Superior Avalanche - Accuracy/Damage/Recharge (43) Superior Avalanche - Accuracy/Damage/Endurance/Recharge (43) Superior Avalanche - Recharge/Chance for Knockdown Level 30: Grant Cover (A) Luck of the Gambler - Defense/Increased Global Recharge Speed Level 32: Infiltration (A) Blessing of the Zephyr - Run Speed, Jump, Flight Speed, Range (43) Blessing of the Zephyr - Run Speed, Jump, Flight Speed, Range/Endurance Level 35: Superior Conditioning (A) Synapse's Shock - EndMod (45) Synapse's Shock - EndMod/Increased Run Speed Level 38: Kick (A) Empty Level 41: Physical Perfection (A) Power Transfer - EndMod (45) Power Transfer - Chance to Heal Self Level 44: Tough (A) Unbreakable Guard - Resistance/Endurance (45) Unbreakable Guard - Resistance (46) Unbreakable Guard - RechargeTime/Resistance (46) Unbreakable Guard - +Max HP (46) Steadfast Protection - Resistance/+Def 3% (47) Gladiator's Armor - TP Protection +3% Def (All) Level 47: Weave (A) Red Fortune - Defense/Endurance (47) Red Fortune - Defense/Recharge (48) Red Fortune - Endurance/Recharge (48) Red Fortune - Defense/Endurance/Recharge (48) Red Fortune - Defense (49) Red Fortune - Endurance Level 49: Stealth (A) Luck of the Gambler - Defense/Increased Global Recharge Speed Level 1: Assassination Level 1: Brawl -
Energy Melee / Shield Defense Looking for Critique
Groovy_Ghoul replied to Groovy_Ghoul's topic in Stalker
Thank you for your help. Steadfast +3 def! I thought I was missing something. I might have to drop Regenerative Tissue: Regen. The PT procs are an interesting concept worth discussing. -
I would recommend Ice Melee, Fire Melee or Stone Melee.
-
Appreciate any input. Thanks in advance! This Hero build was built using Mids Reborn 3.4.7 https://github.com/LoadedCamel/MidsReborn Click this DataLink to open the build! Level 50 Magic Stalker Primary Power Set: Energy Melee Secondary Power Set: Shield Defense Power Pool: Concealment Power Pool: Leaping Power Pool: Speed Power Pool: Fighting Ancillary Pool: Body Mastery Hero Profile: Level 1: Barrage (A) Superior Assassin's Mark - Accuracy/Damage (3) Superior Assassin's Mark - Damage/RechargeTime (5) Superior Assassin's Mark - Accuracy/Damage/RechargeTime (5) Superior Assassin's Mark - Damage/Endurance/RechargeTime (7) Superior Assassin's Mark - Accuracy/Damage/Endurance/RechargeTime (7) Superior Assassin's Mark - RechargeTime/Rchg Build Up Level 1: Hide (A) Luck of the Gambler - Defense/Increased Global Recharge Speed (3) Shield Wall - +Res (Teleportation), +5% Res (All) Level 2: Bone Smasher (A) Mako's Bite - Damage/Endurance (27) Mako's Bite - Accuracy/Damage (29) Mako's Bite - Damage/Recharge (29) Mako's Bite - Accuracy/Endurance/Recharge (31) Mako's Bite - Accuracy/Damage/Endurance/Recharge (31) Mako's Bite - Chance of Damage(Lethal) Level 4: Deflection (A) Red Fortune - Defense/Endurance (13) Red Fortune - Defense/Recharge (23) Red Fortune - Endurance/Recharge (25) Red Fortune - Defense/Endurance/Recharge (25) Red Fortune - Defense (27) Red Fortune - Endurance Level 6: Assassin's Strike (A) Superior Stalker's Guile - Accuracy/Damage (9) Superior Stalker's Guile - Damage/Recharge (9) Superior Stalker's Guile - Accuracy/Damage/Recharge (11) Superior Stalker's Guile - Damage/Endurance/Recharge (11) Superior Stalker's Guile - Accuracy/Damage/Endurance/Recharge (13) Superior Stalker's Guile - Recharge/Chance to Hide Level 8: Build Up (A) Gaussian's Synchronized Fire-Control - Chance for Build Up Level 10: Infiltration (A) Luck of the Gambler - Defense/Increased Global Recharge Speed (31) Winter's Gift - Run Speed, Jump, Flight Speed, Range Level 12: Battle Agility (A) Reactive Defenses - Defense (33) Reactive Defenses - Defense/Endurance (33) Reactive Defenses - Endurance/RechargeTime (34) Reactive Defenses - Defense/RechargeTime (34) Reactive Defenses - Defense/Endurance/RechargeTime (34) Reactive Defenses - Scaling Resist Damage Level 14: True Grit (A) Preventive Medicine - Heal (15) Preventive Medicine - Heal/Endurance (15) Preventive Medicine - Endurance/RechargeTime (17) Preventive Medicine - Heal/RechargeTime (17) Preventive Medicine - Heal/RechargeTime/Endurance (19) Preventive Medicine - Chance for +Absorb Level 16: Active Defense (A) Recharge Reduction IO Level 18: Power Crash (A) Scirocco's Dervish - Accuracy/Damage (19) Scirocco's Dervish - Damage/Endurance (21) Scirocco's Dervish - Damage/Recharge (21) Scirocco's Dervish - Accuracy/Damage/Endurance (23) Scirocco's Dervish - Chance of Damage(Lethal) Level 20: Combat Jumping (A) Luck of the Gambler - Defense/Increased Global Recharge Speed Level 22: Total Focus (A) Touch of Death - Accuracy/Damage (40) Touch of Death - Damage/Endurance (40) Touch of Death - Damage/Recharge (42) Touch of Death - Accuracy/Damage/Endurance (42) Touch of Death - Damage/Endurance/Recharge (42) Touch of Death - Chance of Damage(Negative) Level 24: Against All Odds (A) Endurance Reduction IO Level 26: Energy Transfer (A) Superior Blistering Cold - Accuracy/Damage (37) Superior Blistering Cold - Damage/Endurance (39) Superior Blistering Cold - Accuracy/Damage/Endurance (39) Superior Blistering Cold - Accuracy/Damage/Recharge (39) Superior Blistering Cold - Damage/Endurance/Accuracy/RechargeTime (40) Superior Blistering Cold - Recharge/Chance for Hold Level 28: Shield Charge (A) Superior Avalanche - Accuracy/Damage (36) Superior Avalanche - Damage/Endurance (36) Superior Avalanche - Accuracy/Damage/Endurance (36) Superior Avalanche - Accuracy/Damage/Recharge (37) Superior Avalanche - Accuracy/Damage/Endurance/Recharge (37) Superior Avalanche - Recharge/Chance for Knockdown Level 30: Grant Cover (A) Luck of the Gambler - Defense/Increased Global Recharge Speed Level 32: Hasten (A) Recharge Reduction IO (33) Recharge Reduction IO Level 35: Superior Conditioning (A) Synapse's Shock - EndMod (43) Synapse's Shock - EndMod/Increased Run Speed Level 38: Kick (A) Empty Level 41: Physical Perfection (A) Power Transfer - EndMod (43) Power Transfer - Chance to Heal Self Level 44: Tough (A) Unbreakable Guard - Resistance/Endurance (45) Unbreakable Guard - Resistance (45) Unbreakable Guard - RechargeTime/Resistance (45) Unbreakable Guard - +Max HP (46) Gladiator's Armor - TP Protection +3% Def (All) Level 47: Weave (A) Red Fortune - Defense/Endurance (47) Red Fortune - Defense/Recharge (47) Red Fortune - Endurance/Recharge (48) Red Fortune - Defense/Endurance/Recharge (48) Red Fortune - Defense (48) Red Fortune - Endurance Level 49: Stealth (A) Luck of the Gambler - Defense/Increased Global Recharge Speed Level 1: Assassination Level 1: Brawl
-
Just hit 50 last night. Really enjoying this combo. Still working on getting all the IOs in place and very impressed even though he’s not optimized. Thanks for the build advice. Any recommendations for incarnates?