Flat Line
-
Posts
102 -
Joined
-
Last visited
Content Type
Profiles
Forums
Events
Store
Articles
Patch Notes
Everything posted by Flat Line
-
That’s a very fair point. I’ve been back and forth on it. I find I like Contagious on Mass Confusion at higher levels. But, it’s definitely better on Confuse at lower levels. Thinking about it, I might switch it back… it’s nice to have a build that also exemplars well..
-
Thanks! Those numbers help a lot. I’m going to play around with a new build based around what you’ve got. Sounds fun to play! My plan with the above build was to get near caped ranged defence and blast/control from hover.
-
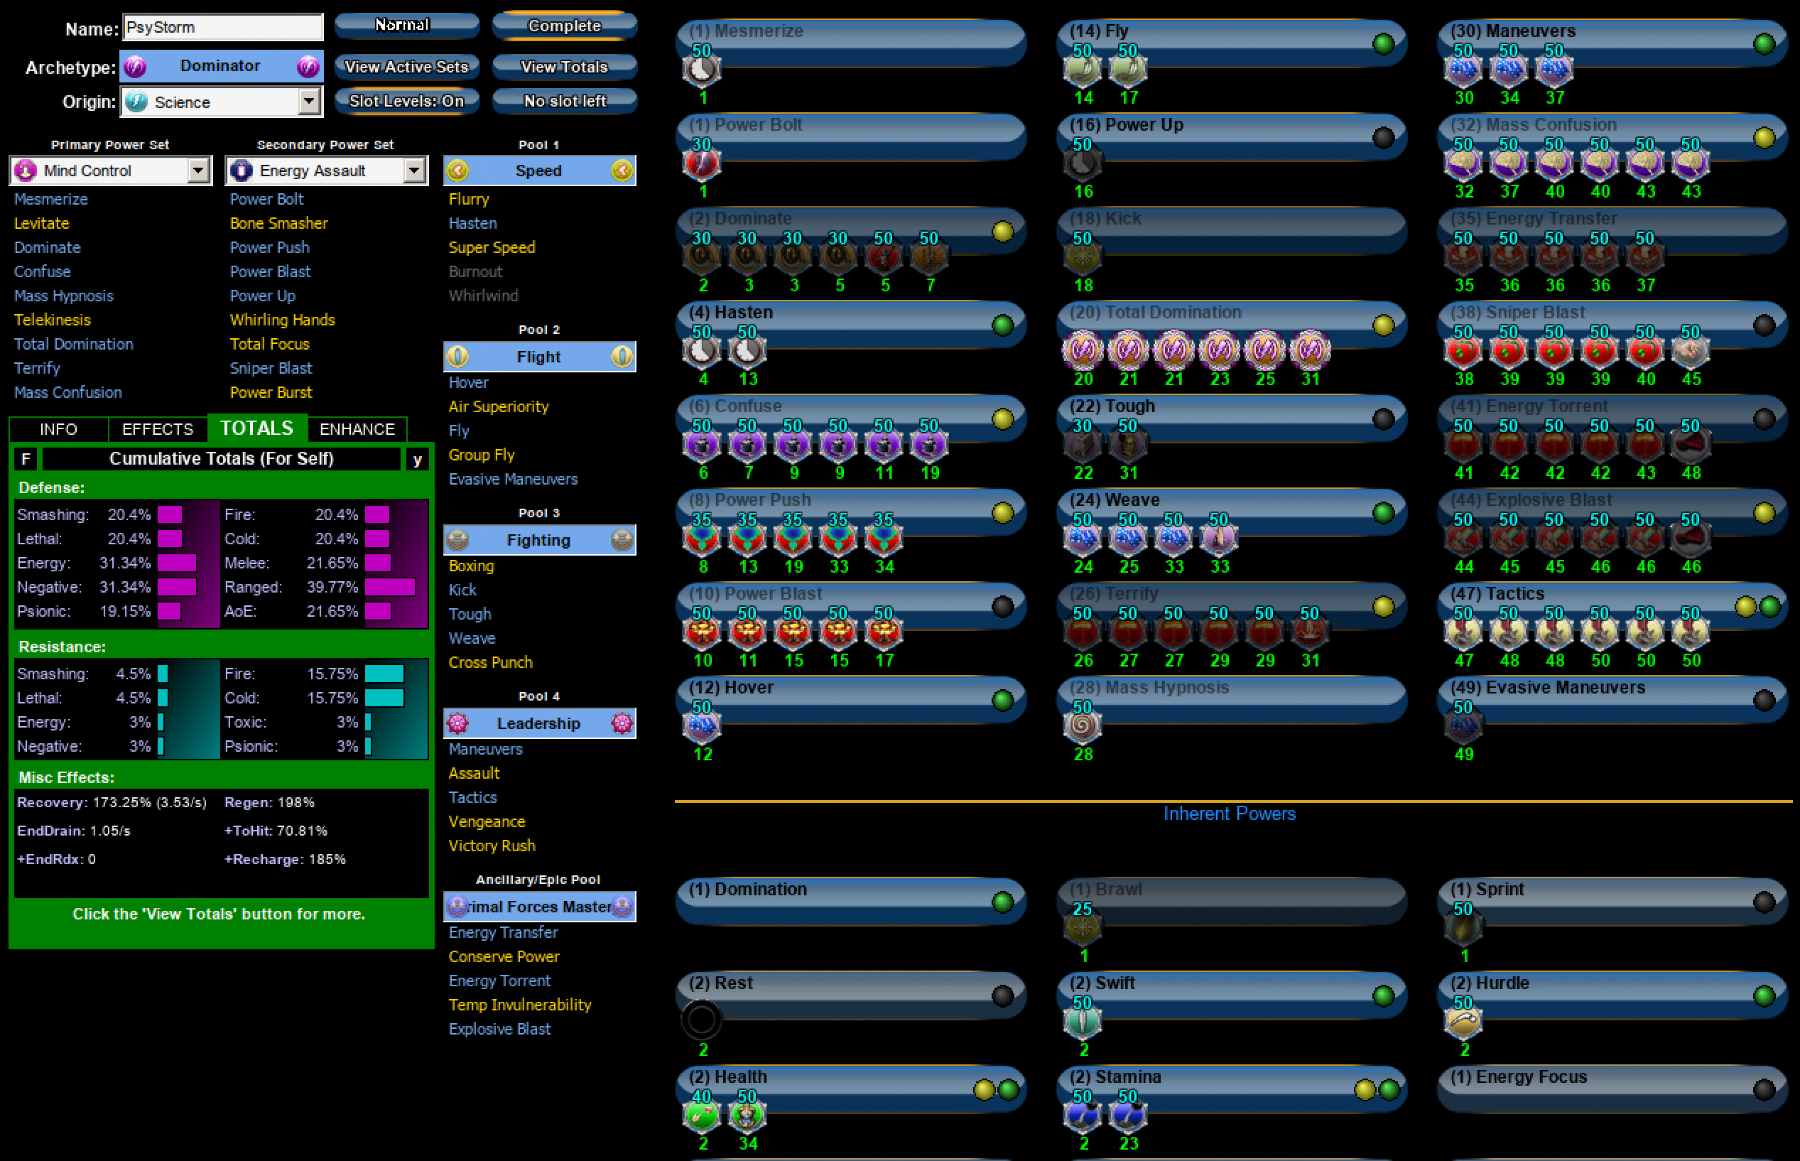
This sounds great! I’ve been using Mind/Energy/Primal - Mostly for the AoE attacks. Slotted for knockdown, Energy Torrent and Energy Blast also add more control. I was planning on Mind/Energy/Soul - To try for better defences (but haven’t tried it yet) But Mind/Energy/Psi with a lot of recharge sounds great for concept! I also really like the idea of casual hasten, but not needed for perm dom. How are your defences without boosting from powers? I like to keep ranged at 35-45.

-
Yes, that’s the one! You definitely notice when they go off. But, they don’t stack with each other (Mids makes it seam like they do). They also create their own frantic playstyle where you feel like you need to constantly attack and fish for the proc. At that point it defeats the purpose, and I may as well just use hasten…
-
I tried with a Mind/Energy. For the same reason above, I didn’t want to have to watch the hasten timer. My plan was to use Sudden Acceleration in the ranged Energy attacks. That way I wouldn’t be loosing out to much on set bonuses. Turns out it just didn’t proc enough to work. So, I’m back to using hasten.
-
Any change of seeing your Mind/Energy farm build and how you go about farming with it? I main a Mind/Energy and would mind dedicating a build slot to farming.
-

[How2] Basic Installation Guide [MacOS - Apple M1]
Flat Line replied to WanderingAries's topic in Homecoming Launcher
You nailed it, this was it! As soon as I relaunched with my headphones plugged in, there was no problem. Thank you! -
[How2] Basic Installation Guide [MacOS - Apple M1]
Flat Line replied to WanderingAries's topic in Homecoming Launcher
Yeah, everything works fine outside of CoH... I am new to using Apple devices. So it could be something basic that I'm missing. -
[How2] Basic Installation Guide [MacOS - Apple M1]
Flat Line replied to WanderingAries's topic in Homecoming Launcher
I've got CoH running on my M1 MacBook Air! I got it running by following this guide (thank you!) One issue though: The audio seems to be locked to my MacBook speakers. I can't get Bluetooth AirPods or the standard audio jack to work with headphones... Anyone else have this issue or a possible fix? -
It’s in the Knockback set. I’m drawing a blank on the name… There are a few builds on this forum where they really abuse those procs for crazy recharge numbers. Personally, I’ve found it doesn’t proc often enough to stack much. But getting it to be up once fairly often does make a big difference!
-
Devices can be fun solo. Especially if you like a slower play style, setting up trip mines and traps. Blasters are my favourite at the moment. They offer a challenge in that they aren’t as invincible as most of the other classes. They can also be made very strong for end game content.
-
Yeah... it’s not terrible, put it’s not the glorious idea I hoped for. Thanks for the numbers! It definitely helps to understand whats going on.
-
I’m currently running with 4 in my attack chain. (Snipe, Burst, Explosive Blast, Torrent). It doesn’t seem to proc nearly enough. It also makes you want to rush. Because if you aren’t fighting, it’s not proc-ing.
-
I hadn’t really considered repulsion bomb! I could slot it instead of a melee attack at the end of the build. I like the idea of using it when Nova is down. I played the last version of the build last night. It feels a little sluggish compared to my normal build. I don’t think I ever noticed the +rech proc stacking. And it didn’t seem to proc all that often. Pretty disappointing really. I think I might have to go back to the drawing board. Maybe even have to pick up Hasten which I was trying to avoid...
-
I don’t have an entry. But this contest has been fun to follow! Thanks for putting it on 🙂
-
Yeah, I was just playing around some more with it. I think keeping the extra Mako is better. I'm thinking of Power Push instead of Power Boost or Boost Range. Using Intuition instead of Musculature, I could still get a 20% range boost. But 33% damage instead of 45%. Though it seems if I'm using Aim and Build up I'm capping damage anyways.
-
Thanks Nemu! I really like what you've done with it! Any reason for Power Bolt over Power Blast? I figure with a high recharge build it's better to go for the higher damage? Are you looking at the short cast time? Putting the melee powers at the end also makes a lot more sense. You're also right that I neglected the Accuracy. I was a little too focused on only Damage, resistance, and Defense! I made a switch between Power Bolt and Power Burst and added Winters Bite to maintain the defense bonus and pick up another Force Feedback Proc. I also wanted to keep Power Push in there. It's not a deal breaker to loose it, but swapping with one of the melee attack was the only place I saw. Maintaining the deffense, but loosing 5% resistance and 3% damage buff... Not sure if it was worth that.. This Hero build was built using Mids Reborn 3.0.4.7 https://github.com/Reborn-Team/MidsReborn Click this DataLink to open the build! Flatline: Level 50 Science Blaster Primary Power Set: Energy Blast Secondary Power Set: Energy Manipulation Power Pool: Speed Power Pool: Flight Power Pool: Fighting Power Pool: Leadership Ancillary Pool: Force Mastery Hero Profile: Level 1: Power Bolt -- SprBlsWrt-Acc/Dmg(A), SprBlsWrt-Dmg/Rchg(3), SprBlsWrt-Acc/Dmg/Rchg(3), SprBlsWrt-Acc/Dmg/EndRdx(5), SprBlsWrt-Acc/Dmg/EndRdx/Rchg(5), SprBlsWrt-Rchg/Dmg%(7) Level 1: Power Thrust -- Mk'Bit-Acc/Dmg(A), Mk'Bit-Dmg/EndRdx(7), Mk'Bit-Dmg/Rchg(9), Mk'Bit-Acc/EndRdx/Rchg(9), Mk'Bit-Acc/Dmg/EndRdx/Rchg(11), Mk'Bit-Dam%(11) Level 2: Energy Torrent -- SprFrzBls-Acc/Dmg(A), SprFrzBls-Acc/Dmg/EndRdx(13), Bmbdmt-Dam(13), Bmbdmt-+FireDmg(15), ExpStr-Dam%(15), FrcFdb-Rechg%(17) Level 4: Super Speed -- WntGif-ResSlow(A), Clr-Stlth(49) Level 6: Power Burst -- SprWntBit-Acc/Dmg(A), SprWntBit-Dmg/Rchg(23), SprWntBit-Acc/Dmg/EndRdx(23), SprWntBit-Acc/Dmg/Rchg(25), SprWntBit-Dmg/EndRdx/Acc/Rchg(25), FrcFdb-Rechg%(27) Level 8: Sniper Blast -- StnoftheM-Acc/Dmg(A), StnoftheM-Dmg/EndRdx(17), StnoftheM-Dam%(19), Dmg-I(19), Dcm-Build%(21), FrcFdb-Rechg%(21) Level 10: Build Up -- RctRtc-Pcptn(A) Level 12: Aim -- GssSynFr--Build%(A) Level 14: Hover -- LucoftheG-Def/Rchg+(A), BlsoftheZ-Travel/EndRdx(40), BlsoftheZ-ResKB(40), Ksm-ToHit+(42) Level 16: Energize -- NmnCnv-Heal/EndRdx(A), NmnCnv-EndRdx/Rchg(27), NmnCnv-Heal/Rchg(29), NmnCnv-Heal/EndRdx/Rchg(29), NmnCnv-Heal(31), NmnCnv-Regen/Rcvry+(31) Level 18: Fly -- BlsoftheZ-Travel/EndRdx(A), BlsoftheZ-ResKB(40) Level 20: Afterburner -- LucoftheG-Def/Rchg+(A) Level 22: Boxing -- Acc-I(A) Level 24: Tough -- GldArm-3defTpProc(A), HO:Ribo(42), ResDam-I(46) Level 26: Explosive Blast -- SprFrzBls-Acc/Dmg/Rchg(A), SprFrzBls-Dmg/EndRdx/Acc/Rchg(34), Ann-Acc/Dmg/EndRdx(36), Ann-ResDeb%(36), OvrFrc-Dam/KB(36), FrcFdb-Rechg%(37) Level 28: Weave -- LucoftheG-Def/Rchg+(A), ShlWal-Def/EndRdx(33), ShlWal-Def(34), ShlWal-ResDam/Re TP(34) Level 30: Maneuvers -- LucoftheG-Def/Rchg+(A), Rct-Def(31), Rct-Def/EndRdx(33), Rct-ResDam%(33) Level 32: Nova -- Arm-Dmg/Rchg(A), Arm-Acc/Dmg/Rchg(37), Arm-Acc/Rchg(37), Arm-Dmg/EndRdx(39), Arm-Dam%(39), SuddAcc--KB/+KD(39) Level 35: Personal Force Field -- LucoftheG-Def/Rchg+(A) Level 38: Tactics -- AdjTrg-ToHit/EndRdx(A) Level 41: Temp Invulnerability -- StdPrt-ResDam/Def+(A), RctArm-ResDam/EndRdx(42), RctArm-ResDam/EndRdx/Rchg(43), RctArm-ResDam(43), UnbGrd-Max HP%(43) Level 44: Power Push -- Thn-Acc/Dmg(A), Thn-Dmg/EndRdx(45), Thn-Dmg/Rchg(45), Thn-Acc/Dmg/Rchg(45), Thn-Acc/Dmg/EndRdx(46), Thn-Dmg/EndRdx/Rchg(46) Level 47: Bone Smasher -- Mk'Bit-Acc/Dmg(A), Mk'Bit-Dmg/EndRdx(47), Mk'Bit-Dmg/Rchg(47), Mk'Bit-Acc/EndRdx/Rchg(48), Mk'Bit-Acc/Dmg/EndRdx/Rchg(48), Mk'Bit-Dam%(48) Level 49: Boost Range -- RechRdx-I(A) Level 1: Defiance Level 1: Brawl -- Acc-I(A) Level 1: Sprint -- Empty(A) Level 2: Rest -- Empty(A) Level 2: Swift -- Flight-I(A) Level 2: Hurdle -- Jump-I(A) Level 2: Health -- Pnc-Heal/+End(A) Level 2: Stamina -- PrfShf-End%(A) Level 49: Quick Form Level 50: Freedom Phalanx Reserve Level 50: Portal Jockey Level 50: Task Force Commander Level 50: The Atlas Medallion Level 50: Intuition Radial Paragon Level 50: Ion Core Final Judgement Level 50: Diamagnetic Radial Flawless Interface Level 50: Robotic Drones Core Superior Ally Level 50: Clarion Core Epiphany Level 50: Assault Core Embodiment ------------
-
I really like Personal Force Field. It’s a nice ‘Oh Shit’ power. I use it to tank. Or gather mobs for a Nova. I also like to ‘Stealth’ to the end of missions. Being able to be as invulnerable as possible for as long as you want is just really nice to have. Also a luck of the gambler slot (so I don’t need something like Vengeance, because I’m trying to minimize clicks). Temp Invulnerability is also a nice resistance shield. It’s also costume friendly. I liked the powers in both Ice and Fire. There are some nice controls in there. But I dislike the look of them. And while Bonfire is really good, it takes a little to long to set up. And just going through my regular attack cycle seems to be better. I think if I were in melee more, scorpion shield would be good. I haven’t tried Soul. Though it seems very popular. I think the main reason being I’d have to go into melee more often. And it would be more clicks before an attack. With Aim and Build up, I’m already at 1 or 2.
-
Thanks nebber, You were right about the damage cap! I just verified it. I also agree with what you're saying: Having control to front load Aim and Build Up or divide them over multiple spawns. I was trying to minimize clicks. But, I think in this case it could be worth it. I started shying away from clicks when I had Hasten on Auto. And then trying to constantly click: Energize, Aim, Build Up, Boost Range, and Power Boost. I was also clicking those powers more often than I needed to because of such high recharge... All in all, I think 2 clicks for Aim and/or Build up should be manageable. Boost Range is for a pretty rare situation (I'm wondering if Assault would be a better choice?). Here's where I'm at right now: This Hero build was built using Mids Reborn 3.0.4.7 https://github.com/Reborn-Team/MidsReborn Click this DataLink to open the build! Flatline: Level 50 Science Blaster Primary Power Set: Energy Blast Secondary Power Set: Energy Manipulation Power Pool: Speed Power Pool: Flight Power Pool: Fighting Power Pool: Leadership Ancillary Pool: Force Mastery Hero Profile: Level 1: Power Blast -- SprDfnBrr-Acc/Dmg(A), SprDfnBrr-Dmg/Rchg(3), SprDfnBrr-Acc/Dmg/Rchg(3), SprDfnBrr-Acc/Dmg/EndRdx(5), SprDfnBrr-Acc/Dmg/EndRdx/Rchg(5), SprDfnBrr-Rchg/+Status Protect(7) Level 1: Power Thrust -- Mk'Bit-Acc/Dmg(A), Mk'Bit-Acc/Dmg/EndRdx/Rchg(13), Mk'Bit-Dam%(15), Mk'Bit-Dmg/EndRdx(40), Mk'Bit-Dmg/Rchg(42), Mk'Bit-Acc/EndRdx/Rchg(42) Level 2: Energy Torrent -- ExpStr-Dmg/KB(A), ExpStr-Acc/KB(7), ExpStr-Dam%(9), Bmbdmt-+FireDmg(9), PstBls-Dam%(11), FrcFdb-Rechg%(11) Level 4: Super Speed -- Clr-Stlth(A), Clr-RunSpd(25) Level 6: Power Burst -- SprWntBit-Acc/Dmg(A), SprWntBit-Dmg/Rchg(13), SprWntBit-Acc/Dmg/EndRdx(21), SprWntBit-Acc/Dmg/Rchg(21), SprWntBit-Dmg/EndRdx/Acc/Rchg(23), FrcFdb-Rechg%(23) Level 8: Sniper Blast -- StnoftheM-Acc/Dmg(A), StnoftheM-Dmg/EndRdx/Rchg(25), StnoftheM-Dam%(27), Apc-Dam%(27), Dcm-Build%(29), FrcFdb-Rechg%(29) Level 10: Energy Punch -- SprBlsWrt-Acc/Dmg(A), SprBlsWrt-Dmg/Rchg(31), SprBlsWrt-Acc/Dmg/Rchg(33), SprBlsWrt-Acc/Dmg/EndRdx(43), SprBlsWrt-Acc/Dmg/EndRdx/Rchg(46), SprBlsWrt-Rchg/Dmg%(46) Level 12: Hover -- LucoftheG-Def/Rchg+(A), ShlWal-ResDam/Re TP(19) Level 14: Fly -- BlsoftheZ-Travel(A), BlsoftheZ-ResKB(15), WntGif-ResSlow(43) Level 16: Energize -- NmnCnv-Heal/EndRdx(A), NmnCnv-Heal/EndRdx/Rchg(17), NmnCnv-Heal(17), NmnCnv-Regen/Rcvry+(19), NmnCnv-EndRdx/Rchg(33), NmnCnv-Heal/Rchg(34) Level 18: Afterburner -- LucoftheG-Def/Rchg+(A) Level 20: Kick -- Acc-I(A) Level 22: Tough -- StdPrt-ResDam/Def+(A), UnbGrd-ResDam(33), UnbGrd-ResDam/EndRdx(36) Level 24: Weave -- LucoftheG-Def/Rchg+(A), LucoftheG-Def(39), LucoftheG-Def/EndRdx(39), LucoftheG-Def/EndRdx/Rchg(45), LucoftheG-Def/Rchg(48) Level 26: Explosive Blast -- Bmbdmt-Dam(A), Bmbdmt-+FireDmg(34), Ann-ResDeb%(34), Bmbdmt-Acc/Dam/Rech(36), SuddAcc--KB/+KD(40), FrcFdb-Rechg%(40) Level 28: Maneuvers -- LucoftheG-Def/Rchg+(A), Rct-ResDam%(31), Rct-Def(45) Level 30: Build Up -- GssSynFr--ToHit(A), GssSynFr--ToHit/Rchg(31), GssSynFr--ToHit/Rchg/EndRdx(48), GssSynFr--Rchg/EndRdx(50), GssSynFr--ToHit/EndRdx(50), GssSynFr--Build%(50) Level 32: Nova -- Arm-Dam%(A), Arm-Dmg/Rchg(36), Arm-Dmg(37), Arm-Acc/Dmg/Rchg(37), Arm-Dmg/EndRdx(37), SuddAcc--KB/+KD(39) Level 35: Personal Force Field -- LucoftheG-Def/Rchg+(A) Level 38: Power Push -- VllofVlc-Acc/KB(A) Level 41: Temp Invulnerability -- GldArm-End/Res(A), GldArm-RechRes(42), GldArm-RechEnd(43), GldArm-Res/Rech/End(45), GldArm-ResDam(46), GldArm-3defTpProc(48) Level 44: Aim -- AdjTrg-ToHit/Rchg(A) Level 47: Tactics -- RctRtc-Pcptn(A) Level 49: Boost Range -- RechRdx-I(A) Level 1: Defiance Level 1: Brawl -- Acc-I(A) Level 1: Sprint -- Run-I(A) Level 2: Rest -- RechRdx-I(A) Level 2: Swift -- Flight-I(A) Level 2: Hurdle -- Jump-I(A) Level 2: Health -- Pnc-Heal/+End(A) Level 2: Stamina -- PrfShf-End%(A) Level 49: Quick Form Level 1: Prestige Power Dash -- Empty(A) Level 1: Prestige Power Slide -- Empty(A) Level 1: Prestige Power Quick -- Empty(A) Level 1: Prestige Power Rush -- Empty(A) Level 1: Prestige Power Surge -- Empty(A) Level 4: Ninja Run Level 50: Ion Core Final Judgement Level 50: Assault Core Embodiment Level 50: Clarion Core Epiphany Level 50: Diamagnetic Radial Flawless Interface Level 50: Intuition Radial Paragon Level 50: Robotic Drones Core Superior Ally ------------
-
Thanks, those numbers make more sense. Also, makes the argument for Build up easy. Something is still off with my mids. I was looking on the damage output of Nova. It increased by the same amount wether I had Aim or Build up on... But, I know mids can be buggy.
-
Looking at MIDs Aim and Build up are giving the same damage increase. But it looks like Aim gives a bigger To Hit bonus. Am I missing something here? Or is MIDs incorrect?
-
Thanks! I didn’t know they take the same sets. With set bonuses and Tactic, I’m not too worried about accuracy. That’s a simple swap on this build 🙂
-
Thanks, that's a nice build! I like the 'chance for build up' in snipe. And the '- resist' in Explosive Blast also seems like a really good idea! Good point about the slow resist, so I added some in with 'Winter's Gift' in Fly. I dropped the +Max HP from Tough to do it. But I think that might be a better tradeoff. Adding the procs lost me 0.7 in Smashing/Lethal Resistance, but upped my defense slightly. Here's where I'm at: This Hero build was built using Mids Reborn 3.0.4.7 https://github.com/Reborn-Team/MidsReborn Click this DataLink to open the build! Flatline: Level 50 Science Blaster Primary Power Set: Energy Blast Secondary Power Set: Energy Manipulation Power Pool: Speed Power Pool: Flight Power Pool: Fighting Power Pool: Leadership Ancillary Pool: Force Mastery Hero Profile: Level 1: Power Blast -- SprDfnBrr-Acc/Dmg(A), SprDfnBrr-Dmg/Rchg(3), SprDfnBrr-Acc/Dmg/Rchg(3), SprDfnBrr-Acc/Dmg/EndRdx(5), SprDfnBrr-Acc/Dmg/EndRdx/Rchg(5), SprDfnBrr-Rchg/+Status Protect(7) Level 1: Power Thrust -- Mk'Bit-Acc/Dmg(A), Mk'Bit-Acc/Dmg/EndRdx/Rchg(13), Mk'Bit-Dam%(15), Mk'Bit-Dmg/EndRdx(40), Mk'Bit-Dmg/Rchg(42), Mk'Bit-Acc/EndRdx/Rchg(42) Level 2: Energy Torrent -- ExpStr-Dmg/KB(A), ExpStr-Acc/KB(7), ExpStr-Dam%(9), Bmbdmt-+FireDmg(9), PstBls-Dam%(11), FrcFdb-Rechg%(11) Level 4: Super Speed -- Clr-Stlth(A), Clr-RunSpd(25) Level 6: Power Burst -- SprWntBit-Acc/Dmg(A), SprWntBit-Dmg/Rchg(13), SprWntBit-Acc/Dmg/EndRdx(21), SprWntBit-Acc/Dmg/Rchg(21), SprWntBit-Dmg/EndRdx/Acc/Rchg(23), FrcFdb-Rechg%(23) Level 8: Sniper Blast -- StnoftheM-Acc/Dmg(A), StnoftheM-Dmg/EndRdx/Rchg(25), StnoftheM-Dam%(27), Apc-Dam%(27), Dcm-Build%(29), FrcFdb-Rechg%(29) Level 10: Energy Punch -- SprBlsWrt-Acc/Dmg(A), SprBlsWrt-Dmg/Rchg(31), SprBlsWrt-Acc/Dmg/Rchg(33), SprBlsWrt-Acc/Dmg/EndRdx(43), SprBlsWrt-Acc/Dmg/EndRdx/Rchg(46), SprBlsWrt-Rchg/Dmg%(46) Level 12: Hover -- LucoftheG-Def/Rchg+(A), ShlWal-ResDam/Re TP(19) Level 14: Fly -- BlsoftheZ-Travel(A), BlsoftheZ-ResKB(15), WntGif-ResSlow(43) Level 16: Energize -- NmnCnv-Heal/EndRdx(A), NmnCnv-Heal/EndRdx/Rchg(17), NmnCnv-Heal(17), NmnCnv-Regen/Rcvry+(19), NmnCnv-EndRdx/Rchg(33), NmnCnv-Heal/Rchg(34) Level 18: Afterburner -- LucoftheG-Def/Rchg+(A) Level 20: Kick -- Acc-I(A) Level 22: Tough -- StdPrt-ResDam/Def+(A), UnbGrd-ResDam(33), UnbGrd-ResDam/EndRdx(36) Level 24: Weave -- LucoftheG-Def/Rchg+(A), LucoftheG-Def(39), LucoftheG-Def/EndRdx(39), LucoftheG-Def/EndRdx/Rchg(45), LucoftheG-Def/Rchg(48) Level 26: Explosive Blast -- Bmbdmt-Dam(A), Bmbdmt-+FireDmg(34), Ann-ResDeb%(34), Bmbdmt-Acc/Dam/Rech(36), SuddAcc--KB/+KD(40), FrcFdb-Rechg%(40) Level 28: Maneuvers -- LucoftheG-Def/Rchg+(A), Rct-ResDam%(31), Rct-Def(45) Level 30: Tactics -- GssSynFr--ToHit(A), GssSynFr--ToHit/Rchg(31), GssSynFr--ToHit/Rchg/EndRdx(48), GssSynFr--Rchg/EndRdx(50), GssSynFr--ToHit/EndRdx(50), GssSynFr--Build%(50) Level 32: Nova -- Arm-Dam%(A), Arm-Dmg/Rchg(36), Arm-Dmg(37), Arm-Acc/Dmg/Rchg(37), Arm-Dmg/EndRdx(37), SuddAcc--KB/+KD(39) Level 35: Personal Force Field -- LucoftheG-Def/Rchg+(A) Level 38: Power Push -- VllofVlc-Acc/KB(A) Level 41: Temp Invulnerability -- GldArm-End/Res(A), GldArm-RechRes(42), GldArm-RechEnd(43), GldArm-Res/Rech/End(45), GldArm-ResDam(46), GldArm-3defTpProc(48) Level 44: Aim -- RctRtc-Pcptn(A) Level 47: Assault -- EndRdx-I(A) Level 49: Boost Range -- RechRdx-I(A) Level 1: Defiance Level 1: Brawl -- Acc-I(A) Level 1: Sprint -- Run-I(A) Level 2: Rest -- RechRdx-I(A) Level 2: Swift -- Flight-I(A) Level 2: Hurdle -- Jump-I(A) Level 2: Health -- Pnc-Heal/+End(A) Level 2: Stamina -- PrfShf-End%(A) Level 49: Quick Form Level 1: Prestige Power Dash -- Empty(A) Level 1: Prestige Power Slide -- Empty(A) Level 1: Prestige Power Quick -- Empty(A) Level 1: Prestige Power Rush -- Empty(A) Level 1: Prestige Power Surge -- Empty(A) Level 4: Ninja Run Level 50: Ion Core Final Judgement Level 50: Assault Core Embodiment Level 50: Clarion Core Epiphany Level 50: Diamagnetic Radial Flawless Interface Level 50: Intuition Radial Paragon Level 50: Robotic Drones Core Superior Ally ------------
-
I'm mostly hover blasting. Though, the defense values are high enough that I don't really need to. Especially because Diamagnetic gives the -5% to hit. Super Speed is there with the Stealth IO. That gives perfect Stealth. I wanted this build to be Exemplar friendly. So I can stealth missions at level 4. Power Boots definitely isn't necessary. I'm not sure what else to put there, Maybe Assault? I use it for the defense bonus mainly. The reason I went Aim instead of Build up was for the perception increase. Good point on Energize! I didn't know if it would be enough. Maybe I can use those 2 slots in Power Push and get another 2% ranged defense. I sure have looked at devices! It wasn't an easy choice between the two. I just though Energize is too good to pass on... The occasion Power Thrust also feels so good and super heroic!
-
Hello Everyone, Through long searching and playing various ATs/builds (since the early days or this game), I've finally settled on a main (maybe only) toon. I've been working on this build for a while. Learning a lot from these forums. My Goals were to take advantage of high recharge (A la Mad King), without sacrificing defense. I opted not to take Hasten, instead relying on set recharges and procs. I also didn't take build up, instead using Aim on a high recharge and having the build up proc in Tactics. I only took the melee attacks for set bonuses. I'm not a big fan for melee in this game. Though the occasional Power Thrust is hilarious/awesome! I tried opting for Toggles over Clicks. Energize is on Auto taking care of any endurance issues. I prefer to have a less busy playstyle. As is I'm still having to often click Aim and Power Boost. I'm looking for feedback from build experts out there. I've also seen a few people ask for an up to date Eng/Eng build. So this can be there for others too. This Hero build was built using Mids Reborn 3.0.4.7 https://github.com/Reborn-Team/MidsReborn Click this DataLink to open the build! Flatline: Level 50 Science Blaster Primary Power Set: Energy Blast Secondary Power Set: Energy Manipulation Power Pool: Speed Power Pool: Flight Power Pool: Fighting Power Pool: Leadership Ancillary Pool: Force Mastery Hero Profile: Level 1: Power Blast -- SprDfnBrr-Acc/Dmg(A), SprDfnBrr-Dmg/Rchg(3), SprDfnBrr-Acc/Dmg/Rchg(3), SprDfnBrr-Acc/Dmg/EndRdx(5), SprDfnBrr-Acc/Dmg/EndRdx/Rchg(5), SprDfnBrr-Rchg/+Status Protect(7) Level 1: Power Thrust -- Mk'Bit-Acc/Dmg(A), Mk'Bit-Dmg/EndRdx(40), Mk'Bit-Dmg/Rchg(42), Mk'Bit-Acc/EndRdx/Rchg(42), Mk'Bit-Acc/Dmg/EndRdx/Rchg(45), Mk'Bit-Dam%(48) Level 2: Energy Torrent -- ExpStr-Dmg/KB(A), ExpStr-Acc/KB(7), ExpStr-Dam%(9), Bmbdmt-+FireDmg(9), PstBls-Dam%(11), FrcFdb-Rechg%(11) Level 4: Super Speed -- Clr-Stlth(A), Clr-RunSpd(25) Level 6: Power Burst -- SprWntBit-Acc/Dmg(A), SprWntBit-Dmg/Rchg(13), SprWntBit-Acc/Dmg/EndRdx(21), SprWntBit-Acc/Dmg/Rchg(21), SprWntBit-Dmg/EndRdx/Acc/Rchg(23), FrcFdb-Rechg%(23) Level 8: Sniper Blast -- ExcCnt-Acc/Dmg(A), ExcCnt-Dmg/EndRdx(25), ExcCnt-Dmg/ActRdx(27), ExcCnt-Dmg/Rng(27), ExcCnt-Dmg/Rchg(29), FrcFdb-Rechg%(29) Level 10: Energy Punch -- SprBlsWrt-Acc/Dmg(A), SprBlsWrt-Dmg/Rchg(31), SprBlsWrt-Acc/Dmg/Rchg(33), SprBlsWrt-Acc/Dmg/EndRdx(43), SprBlsWrt-Acc/Dmg/EndRdx/Rchg(46), SprBlsWrt-Rchg/Dmg%(46) Level 12: Hover -- LucoftheG-Def/Rchg+(A), ShlWal-ResDam/Re TP(19) Level 14: Fly -- BlsoftheZ-Travel(A), BlsoftheZ-ResKB(15) Level 16: Energize -- NmnCnv-Heal/EndRdx(A), NmnCnv-Heal/EndRdx/Rchg(17), NmnCnv-Heal(17), NmnCnv-Regen/Rcvry+(19), NmnCnv-EndRdx/Rchg(33), NmnCnv-Heal/Rchg(34) Level 18: Afterburner -- LucoftheG-Def/Rchg+(A) Level 20: Kick -- Acc-I(A) Level 22: Tough -- StdPrt-ResDam/Def+(A), UnbGrd-ResDam(33), UnbGrd-ResDam/EndRdx(36), UnbGrd-Max HP%(43) Level 24: Weave -- LucoftheG-Def/Rchg+(A), Rct-Def(39), Rct-Def/EndRdx(39) Level 26: Explosive Blast -- Bmbdmt-Dam(A), Bmbdmt-+FireDmg(34), Bmbdmt-Dam/Rech(34), Bmbdmt-Acc/Dam/Rech(36), SuddAcc--KB/+KD(40), FrcFdb-Rechg%(40) Level 28: Maneuvers -- LucoftheG-Def/Rchg+(A), Rct-ResDam%(31), Rct-Def(45) Level 30: Tactics -- GssSynFr--ToHit(A), GssSynFr--ToHit/Rchg(31), GssSynFr--ToHit/Rchg/EndRdx(48), GssSynFr--Rchg/EndRdx(50), GssSynFr--ToHit/EndRdx(50), GssSynFr--Build%(50) Level 32: Nova -- Arm-Dam%(A), Arm-Dmg/Rchg(36), Arm-Dmg(37), Arm-Acc/Dmg/Rchg(37), Arm-Dmg/EndRdx(37), SuddAcc--KB/+KD(39) Level 35: Personal Force Field -- LucoftheG-Def/Rchg+(A) Level 38: Power Push -- VllofVlc-Acc/KB(A) Level 41: Temp Invulnerability -- GldArm-End/Res(A), GldArm-RechRes(42), GldArm-RechEnd(43), GldArm-Res/Rech/End(45), GldArm-ResDam(46), GldArm-3defTpProc(48) Level 44: Aim -- RctRtc-Pcptn(A) Level 47: Power Boost -- RechRdx-I(A) Level 49: Boost Range -- RechRdx-I(A) Level 1: Defiance Level 1: Brawl -- Acc-I(A) Level 1: Sprint -- Run-I(A) Level 2: Rest -- RechRdx-I(A) Level 2: Swift -- Flight-I(A) Level 2: Hurdle -- Jump-I(A) Level 2: Health -- Mrc-Rcvry+(A), Pnc-Heal/+End(13) Level 2: Stamina -- PrfShf-End%(A), PrfShf-EndMod(15) Level 49: Quick Form Level 1: Prestige Power Dash -- Empty(A) Level 1: Prestige Power Slide -- Empty(A) Level 1: Prestige Power Quick -- Empty(A) Level 1: Prestige Power Rush -- Empty(A) Level 1: Prestige Power Surge -- Empty(A) Level 4: Ninja Run Level 50: Ion Core Final Judgement Level 50: Assault Core Embodiment Level 50: Clarion Core Epiphany Level 50: Diamagnetic Radial Flawless Interface Level 50: Intuition Radial Paragon Level 50: Robotic Drones Core Superior Ally ------------