Incursion
-
Posts
198 -
Joined
-
Last visited
Content Type
Profiles
Forums
Events
Store
Articles
Patch Notes
Everything posted by Incursion
-

Pool Powers / hasten / epics / thoughts
Incursion replied to Incursion's topic in Suggestions & Feedback
I think most people online do play how I do, and by making it a choice in every travel pool, it diversifies choice, which benefits everyone and harms nobody., especially since there are more travel pools available than every before. not for nothing, if it were a choice in each pool, why would you care and how would that negatively affect your thematic choice? -
Pool Powers / hasten / epics / thoughts
Incursion replied to Incursion's topic in Suggestions & Feedback
I can tell by the likes and reactions that this section is clearly trolled by know it all’s . The 3 stooges -
Pool Powers / hasten / epics / thoughts
Incursion replied to Incursion's topic in Suggestions & Feedback
Yea you do actually if you want to be the most effective version of whatever you are building, but let’s go ahead and dismiss the other 3 or 4 suggestions of the topic because of one power suggestion that you disagree with. I’d love to know how many characters have vs don’t have amongst the playerbase. Or if you make it part of each travel it would actually diversify peoples choices which would be a benefit to anyone and it’s not forced -
Pool Powers / hasten / epics / thoughts
Incursion replied to Incursion's topic in Suggestions & Feedback
Clearly if it’s not the first time, maybe the dismissive attitudes are part of the problem. I’ve been back a few months, noticed some really interesting pool options yet hasten is always taken but literally 90% of the playerbase. All the beta changes to travel revolve around stacking of powers and speed, why not just make a hasten option for all of them so it’s still a power choice. Makes sense to me. -
Since back in the game, there are many more powers set options, including access to all patrons and epics. Couple things I notice. hasten is still practically mandatory as it has been since launch. Some will disagree but maybe it’s time it’s made inherent, or part of every travel pool and can be chosen once, or simply make recharge bonus is just built in. It forces the speed pool on every single character, it’s annoying and I feel like it prevents my from diving into the new ones. Epics for scrappers, tanks and I think stalkers require an extra pick before accessing the aoe attack. It’s another annoying thing in this game, brutes get it in two, which I think is the way to go throughout melee sets. Shadow meld need something done about it’s 3 second animation considering it lasts only 15 seconds which is like 3 attacks. It’s abysmal. Such a cool power, but lasts only 15 seconds. Maybe make it 30 seconds and increase the recharge? As of now with a lot of recharge in a build it’s up for 15 down foe 12-15 if in a position of needing it. Be a lot more useful if it were up 30, down 30. melee EM - love the changes and fast ET/energy focus. Love the scrapper version but the cone power is lame, way too narrow and needing energy focus just to become mediocre makes it just as skippable as stun. Whirling hands is still plain awful, radius is too small and the dmg is poor. new idea - generic pool set. A pool of random powers that anyone can chose and it doesn’t take up a pool choice. Be cool to get some thematic stuff here, would love a vahzilok buzz saw for example. Nothing overpowered but some decent dmg/utility that could supplant some of the tier one choices of pool powers or basics some attacks. for the love of god do something about regen. Make it worth playing again.
-
OK I definitely am enjoying this build, I have now fully slotted per my version with iOS. Using agility and ageless (tier 2 atm, need some more emp threads for the tier 3 lore. After plus 5ing a couple of the resistance powers, I am capped on smash, lethal, toxic, fire, and around 71% on psi resistance, 66% on negative energy, and around 45% on cold. My defense of numbers are hovering around 32% for smashing lethal, fire and cold, Energy and negative energy. I am definitely getting hit quite often by boss levels at 54, and in small groups, they are hitting me pretty hard. This was testing and a fire farm mission, as I was just trying to get my incarnate XP capped and some threads. I still have to get my third level shift, so I’m sure that will help. Defense definitely is more important than resistance in terms of survivability with groups mobs. The heal power is recharging relatively quick, but I am definitely needing to use it often. Particle barrier The only giving me about 400 HP slotted the way it is now. I’m not sure what the difference would be with heavier investment in that power. It seems very easy to perma it, thus resetting the bar each time it’s pressed. I went toward ageless core paragon on the left side of the tree, but now I am sort of regretting it, as I certainly don’t need endurance recovery. On most of my other characters I’m very reliant on ageless, and this one I feel like I have to work really hard to move my endurance bar. So, maybe barrer might be better. I’m not going to make any changes until I get my third level shift. As it stands now, I feel like the build needs shadow meld. I’d like to break away from it if I can because between that, the heal, and the particle barrier, it’s a lot of clicks that interrupt the attack chain.
-
OK, that’s what I thought. I was putting it in bone smasher and then following up with TF. I feel like I wasn’t getting the critical out of TF. I have to do some real testing,
-
Is it affecting the power That it is slotted in, or the next power or powers within a 3.25 second span? With having it in bones masher, I do roughly half the time see it say superior critical strikes, I don’t recall actually seeing a critical hit until I hit the next power.
-
That’s correct, I forgot you have it slotted that way. I put the Proc in bone smasher like you did, I can see it triggering critical strikes on screen, but when I follow up with ET or TF I often don’t see it actually criting. Maybe it’s just my imagination, or the animations are too long to get it in that window of time. It does seemingly work with whirling hands being activated right after Bonesmasher. I do have to agree with you about whirling hands, it is crappy The cone on power crash when non-energy mode is abysmal and maybe worse. I had thought about maybe dumping Saul mastery and going with blaze instead, taking out whirling hands. In doing so, could probably six slot fireball, And move slot from shadow meld and moonbeam into meltdown and something else. On my version, that’s a lot of recharge lost unless I pick it up somewhere else. There isn’t very good AOE options for EM, but it’s kind of a single target set. It rips EB’a and AVa apart. I got my EM rad scrapper slotted about 1/2 so far. Can definitely see the potential, and I really am using meltdown more than I thought I would. But because I’m so under slotted at the moment I was actually using it for a recovery.
-
Would it make sense to flip the sets between energy punch and ET?
-
I left 2 dmg procs and the absorb proc in radiation therapy, and 2 debuffing procs in ground zero. you could take the scirocco's proc from radiation and put in proc from eradication, then remove the 3 analyze weakness in ground zero and put 3 Scirocco's in there (lethal being the dmg proc) so you keep the same resistance in. I get the point of keeping procs in to try and boost your core dmg powers, but you could use some more recharge so the clicks are up more often and the defensive bonuses on the winter sets especially are huge. Meltdown being your biggest dmg boost as you had mentioned could use more recharge as well, your down time was really long. I'd take 45% buff across the board up double the amount of time over a roll/chance from a click power proc in my opinion (i could be wrong) You'll figure it out, and i'm happy to help and learn along the way too. I was so fascinated by this combo, i kinda pled one last night and this morning and now i'm 50 and starting to slot haha. Your builds had given me some things i hadn't though about too. win/win.
-
wack-o-mole 3.0 This Hero build was built using Mids Reborn 3.0.4.7 https://github.com/Reborn-Team/MidsReborn Click this DataLink to open the build! Project 3: Level 50 Magic Scrapper Primary Power Set: Energy Melee Secondary Power Set: Radiation Armor Power Pool: Leadership Power Pool: Speed Power Pool: Fighting Power Pool: Leaping Ancillary Pool: Soul Mastery Hero Profile: Level 1: Energy Punch -- SprScrStr-Acc/Dmg(A), SprScrStr-Dmg/Rchg(3), SprScrStr-Acc/Dmg/Rchg(3), SprScrStr-Dmg/EndRdx/Rchg(5), SprScrStr-Acc/Dmg/EndRdx/Rchg(5), SprScrStr-Rchg/+Crit(7) Level 1: Alpha Barrier -- Ags-ResDam/EndRdx(A), Ags-ResDam/Rchg(7), Ags-ResDam(9), Ags-Psi/Status(9), ImpArm-ResPsi(21) Level 2: Bone Smasher -- Mk'Bit-Acc/Dmg/EndRdx/Rchg(A), Mk'Bit-Dmg/EndRdx(11), Mk'Bit-Dmg/Rchg(13), Mk'Bit-Acc/Dmg(13), Mk'Bit-Dam%(15), SprCrtStr-Rchg/+50% Crit(15) Level 4: Proton Armor -- UnbGrd-ResDam(A), UnbGrd-ResDam/EndRdx(17), UnbGrd-Rchg/ResDam(17), UnbGrd-ResDam/EndRdx/Rchg(19), ImpArm-ResPsi(19) Level 6: Maneuvers -- LucoftheG-Def/Rchg+(A), Rct-ResDam%(11) Level 8: Hasten -- RechRdx-I(A), RechRdx-I(23) Level 10: Fallout Shelter -- UnbGrd-ResDam(A), UnbGrd-Max HP%(21), UnbGrd-ResDam/EndRdx(23), UnbGrd-EndRdx/Rchg(25), UnbGrd-ResDam/EndRdx/Rchg(25) Level 12: Gamma Boost -- PrfShf-End%(A), Mrc-Rcvry+(27) Level 14: Build Up -- RechRdx-I(A) Level 16: Radiation Therapy -- Prv-Heal(A), Prv-Absorb%(29), ScrDrv-Dam%(31), Erd-Acc/Dmg/Rchg(31), Erd-Dmg/Rchg(31), Erd-%Dam(33) Level 18: Whirling Hands -- Arm-Dmg(A), Arm-Dmg/Rchg(27), Arm-Acc/Dmg/Rchg(33), Arm-Acc/Rchg(33), Arm-Dmg/EndRdx(34), Arm-Dam%(34) Level 20: Beta Decay -- AchHee-ResDeb%(A) Level 22: Boxing -- Dmg-I(A) Level 24: Tough -- GldArm-3defTpProc(A), StdPrt-ResDam/Def+(29), GldArm-End/Res(34), ImpArm-ResPsi(36) Level 26: Total Focus -- SprBlsCol-Dmg/EndRdx(A), SprBlsCol-Acc/Dmg/EndRdx(36), SprBlsCol-Acc/Dmg/Rchg(36), SprBlsCol-Rchg/HoldProc(37), SprBlsCol-Acc/Dmg(37), SprBlsCol-Dmg/EndRdx/Acc/Rchg(37) Level 28: Particle Shielding -- Prv-Heal(A), Prv-Heal/Rchg(39) Level 30: Weave -- ShlWal-Def(A), ShlWal-Def/EndRdx(39), ShlWal-Def/EndRdx/Rchg(40), ShlWal-Def/Rchg(40), LucoftheG-Def/Rchg+(40) Level 32: Energy Transfer -- Hct-Dmg/EndRdx(A), Hct-Dmg(42), Hct-Dam%(42), Hct-Dmg/Rchg(42), Hct-Acc/Dmg/Rchg(43), TchofDth-Dam%(43) Level 35: Ground Zero -- FuroftheG-ResDeb%(A), FuroftheG-Acc/Dmg(43), AnlWkn-%ToHit(45), AnlWkn-DefDeb(45), AnlWkn-Acc/Rchg/EndRdx(45) Level 38: Super Speed -- WntGif-ResSlow(A) Level 41: Moonbeam -- SprWntBit-Acc/Dmg(A), SprWntBit-Dmg/Rchg(47), SprWntBit-Acc/Dmg/EndRdx(47), SprWntBit-Acc/Dmg/Rchg(48), SprWntBit-Rchg/SlowProc(48), SprWntBit-Dmg/EndRdx/Acc/Rchg(50) Level 44: Shadow Meld -- LucoftheG-Def/Rchg+(A), ShlWal-Def/Rchg(46), ShlWal-Def/EndRdx/Rchg(46), ShlWal-EndRdx/Rchg(48), ShlWal-ResDam/Re TP(50) Level 47: Meltdown -- ImpArm-ResPsi(A), ImpArm-ResDam/EndRdx/Rchg(49) Level 49: Combat Jumping -- LucoftheG-Def/Rchg+(A) Level 1: Critical Hit Level 1: Brawl -- Empty(A) Level 1: Sprint -- Empty(A) Level 2: Rest -- Empty(A) Level 2: Swift -- Run-I(A) Level 2: Hurdle -- Jump-I(A) Level 2: Health -- Pnc-Heal/+End(A) Level 2: Stamina -- PrfShf-End%(A) Level 49: Quick Form Level 1: Energy Focus Level 1: Prestige Power Dash -- Empty(A) Level 1: Prestige Power Slide -- Run-I(A) Level 1: Prestige Power Quick -- Empty(A) Level 1: Prestige Power Rush -- Empty(A) Level 1: Prestige Power Surge -- Empty(A) Level 4: Ninja Run Level 50: Assault Core Embodiment Level 50: Rikti Radial Superior Ally Level 50: Agility Core Paragon Level 50: Reactive Total Core Conversion Level 50: Freedom Phalanx Reserve Level 50: Portal Jockey Level 50: Task Force Commander Level 50: The Atlas Medallion Level 50: Ageless Core Epiphany ------------ ------------ Set Bonus Totals: 7% DamageBuff(Smashing) 7% DamageBuff(Lethal) 7% DamageBuff(Fire) 7% DamageBuff(Cold) 7% DamageBuff(Energy) 7% DamageBuff(Negative) 7% DamageBuff(Toxic) 7% DamageBuff(Psionic) 19.13% Defense(Smashing) 19.13% Defense(Lethal) 19.13% Defense(Fire) 19.13% Defense(Cold) 14.13% Defense(Energy) 14.13% Defense(Negative) 6% Defense(Psionic) 17.25% Defense(Melee) 10.06% Defense(Ranged) 12.56% Defense(AoE) 1.8% Max End 60% Enhancement(RechargeTime) 30% Enhancement(Accuracy) 5% Enhancement(Max EnduranceDiscount) 7.5% SpeedFlying GrantPower Preventive Medicine (0% chance, if Scourge) 220.9 HP (16.5%) HitPoints 7.5% JumpHeight 7.5% SpeedJumping MezResist(Confused) 120% MezResist(Held) 120% MezResist(Immobilized) 120% MezResist(Sleep) 120% MezResist(Stunned) 120% MezResist(Terrorized) 120% MezResist(Teleport) 100% (20% chance) 21% (0.35 End/sec) Recovery 30% (1.67 HP/sec) Regeneration 50% ResEffect(SpeedFlying) 50% ResEffect(RechargeTime) 50% ResEffect(SpeedRunning) 25.25% Resistance(Smashing) 25.25% Resistance(Lethal) 23.75% Resistance(Energy) 23.75% Resistance(Negative) 19.25% Resistance(Toxic) 48.25% Resistance(Psionic) 35.75% Resistance(Fire) 35.75% Resistance(Cold) 7.5% SpeedRunning 36% GlobalChanceMod PlayerCrit | Copy & Paste this data into Mids Reborn : Hero Designer to view the build | |-------------------------------------------------------------------| |MxDz;1597;751;1502;HEX;| |78DA6594594F534114C7E7D25BB1A56C160A580AA508DDA0B4825151438C2CCA923| |4F6D934D73294426D9BDB9A487CF21BB88617A3894BC4F53BF8EA82897C0913044D| |DCD0977A7ACF9FB6499B34BF336766CEFF3F337766E1DAA4EDCDCC8D09A1349D4B6| |BF97C3C96D0B55C4EEAE6052D994A08FA59A27A7645260AEED17A6A39F707C41764| |5ACAD05446EAC9356EB8CB7D93724966F23274515B4C69855436133FAB5FC9EAA23| |99ACDA643F3525B947A7E3995B31AED584ECAC546239C4E25970BA94CD2B63F3047| |8DAEA95C2A118A15B4F42AD58E65AFA6E30B5ABE20F5B54E7214A6FFFD80C0AF681| |6EF4C42442CA2EE3DF881A97E043799073E313D5E9AA61873551156B82FC23C3806| |1E2B51156D7EA2D7221E043085F49415618CB12699B6657089D9B40A4AD5E011D23| |341CFF4933DB4FC02FF300FED81D06BA5AD37F31CC5DCCE9EAC3FE09FFAEAD1571F| |642D0738405A166859A0D5F697E98066E76FB0A4495ACFFC4234A05EC37A9DD1777| |8967D3CA47537729F6884C62069342B8AB117CD5FB856F78EC9D8AF9EEB3CA6E72B| |D57111B799EE5DE623AAD7CAF5CCAD27A07592E91E074F31FB4E8367985ED2B5B3A| |EB0BFA59CDD2214DA8B763E17D1EE626D13E53A58C3D47114FE4A09972AFA22DCEE| |C73E3F263F5D38D7AE5B7C5EFDB7C13B38BF7BE04DF02ED3477E9CD83727F661701| |BDF1C7970E11C5CB3E89B667A2F803320CEF70979E98597DE00AFD93F0806412F33| |E003E3C258879FBC78A0E799E0BA8171E6D0168F1DDA043F33FBC9E300CE76C0C96| |34BCBF0C1836F83D7197A0EBE608EBC045F3323AF987B3621823C570D624DC358E3| |30D63C729E19998347F21DE2394AC83813BA925EA683FC85E12F8C7ABD6AF9DE17B| |B2B71A9592C8AF99A4C542DDF5BA118991D2B65505519E62F66B73AE7E3DCB7EA5C| |1FBBFD5E9DC34D990BF08B54127C5A79958A811A2F61B5FCEE0801E548CDA8D19AC| |C584DC6D2422F0A74363C5408F171BA0A115628FE7354E22D7B258E5A2BE32F55C5| |5A557CB92A5EAF9AFB1F1B13034F| |-------------------------------------------------------------------|
-
I’ll check this out later, I didn’t realize meltdown was used offensively, good to know. I was able to cap most of your resistance an nearly double so of your D in some areas, em hits like a truck, I’d rather the surviveability. Do the scrapper profs effect all powers? Thought they did. I have mine in ET and TF on my em/ice Meltdown lasts 60 seconds according to mids, but because you have only 1 slot there, and no recharge, you have 293 seconds rechage with 60 seconds of it running. I just flipped that back in instead of tactics 1 with proc only in there, and i have it at 179 seconds recharge and 60 running, so up 1 minute, down two. I also use ageless for incarnates which help recharge a little more. I use the other core though for the endurance recovery.
-
Ok, i changed some things around and kept some things in i didnt have from your last build. Overall, resistances and defenses are higher, at the cost of losing some procs and some shifting around on slots. You will have less psionic resistance but much more stout in other areas where i'ts more likely to play a factor in game. Im going to level up mine to try it out as well. I got rid of the tier 9 in favor or tactics, might not be the most popular move but the gain you are getting from the tier 9 is really not much with these active numbers. In doing so, i moved the chance of buildup proc into the toggle instead of in build up. I've never done a build up from within a build up before so maybe that's worth trying out. Crazy that metdown is really just a mule power but at the same time that goes to show you how strong the rest of the set is. This Hero build was built using Mids Reborn 3.0.4.7 https://github.com/Reborn-Team/MidsReborn Click this DataLink to open the build! Level 50 Magic Scrapper Primary Power Set: Energy Melee Secondary Power Set: Radiation Armor Power Pool: Speed Power Pool: Fighting Power Pool: Leadership Power Pool: Leaping Ancillary Pool: Soul Mastery Hero Profile: Level 1: Energy Punch -- SprScrStr-Acc/Dmg(A), SprScrStr-Dmg/Rchg(3), SprScrStr-Acc/Dmg/Rchg(3), SprScrStr-Dmg/EndRdx/Rchg(5), SprScrStr-Acc/Dmg/EndRdx/Rchg(5), SprScrStr-Rchg/+Crit(7) Level 1: Alpha Barrier -- Ags-ResDam/EndRdx(A), Ags-ResDam/Rchg(7), Ags-ResDam(9), Ags-Psi/Status(9), Ags-ResDam/EndRdx/Rchg(11), Ags-EndRdx/Rchg(21) Level 2: Bone Smasher -- Mk'Bit-Acc/Dmg/EndRdx/Rchg(A), Mk'Bit-Dmg/EndRdx(11), Mk'Bit-Dmg/Rchg(13), Mk'Bit-Acc/Dmg(13), Mk'Bit-Dam%(15), SprCrtStr-Rchg/+50% Crit(15) Level 4: Proton Armor -- UnbGrd-ResDam(A), UnbGrd-ResDam/EndRdx(17), UnbGrd-Rchg/ResDam(17), UnbGrd-ResDam/EndRdx/Rchg(19), ImpArm-ResPsi(19) Level 6: Super Speed -- WntGif-ResSlow(A) Level 8: Hasten -- RechRdx-I(A), RechRdx-I(23) Level 10: Fallout Shelter -- UnbGrd-ResDam(A), UnbGrd-Max HP%(21), UnbGrd-ResDam/EndRdx(23), UnbGrd-Rchg/ResDam(25), UnbGrd-ResDam/EndRdx/Rchg(25) Level 12: Gamma Boost -- PrfShf-End%(A), Mrc-Rcvry+(27) Level 14: Build Up -- RechRdx-I(A) Level 16: Radiation Therapy -- Prv-Heal/Rchg(A), Prv-Heal(29), ScrDrv-Dam%(31), Erd-Acc/Dmg/Rchg(31), Erd-Dmg/Rchg(31), Erd-%Dam(33) Level 18: Whirling Hands -- Arm-Dmg(A), Arm-Dmg/Rchg(27), Arm-Acc/Dmg/Rchg(33), Arm-Acc/Rchg(33), Arm-Dmg/EndRdx(34), Arm-Dam%(34) Level 20: Beta Decay -- AchHee-ResDeb%(A) Level 22: Boxing -- Dmg-I(A) Level 24: Tough -- GldArm-3defTpProc(A), GldArm-End/Res(34), ImpArm-ResPsi(36), StdPrt-ResDam/Def+(50) Level 26: Total Focus -- SprBlsCol-Dmg/EndRdx(A), SprBlsCol-Acc/Dmg/EndRdx(36), SprBlsCol-Acc/Dmg/Rchg(36), SprBlsCol-Rchg/HoldProc(37), SprBlsCol-Acc/Dmg(37), SprBlsCol-Dmg/EndRdx/Acc/Rchg(37) Level 28: Particle Shielding -- Prv-Heal(A), Prv-Heal/Rchg(39), Prv-Absorb%(39) Level 30: Weave -- ShlWal-Def(A), ShlWal-Def/EndRdx(39), ShlWal-Def/EndRdx/Rchg(40), ShlWal-Def/Rchg(40), Rct-ResDam%(40) Level 32: Energy Transfer -- Hct-Dmg/EndRdx(A), Hct-Dmg(42), Hct-Dam%(42), Hct-Dmg/Rchg(42), Hct-Acc/Dmg/Rchg(43), TchofDth-Dam%(43) Level 35: Ground Zero -- FuroftheG-ResDeb%(A), FuroftheG-Acc/Dmg(43), AnlWkn-%ToHit(45), AnlWkn-DefDeb(45), AnlWkn-Acc/Rchg/EndRdx(45) Level 38: Maneuvers -- LucoftheG-Def/Rchg+(A) Level 41: Moonbeam -- SprWntBit-Acc/Dmg(A), SprWntBit-Dmg/Rchg(47), SprWntBit-Acc/Dmg/EndRdx(47), SprWntBit-Acc/Dmg/Rchg(48), SprWntBit-Rchg/SlowProc(48), SprWntBit-Dmg/EndRdx/Acc/Rchg(50) Level 44: Shadow Meld -- LucoftheG-Def/Rchg+(A), ShlWal-Def/Rchg(46), ShlWal-Def/EndRdx/Rchg(46), ShlWal-EndRdx/Rchg(48), ShlWal-ResDam/Re TP(50) Level 47: Tactics -- GssSynFr--Build%(A) Level 49: Combat Jumping -- LucoftheG-Def/Rchg+(A) Level 1: Critical Hit Level 1: Brawl -- Empty(A) Level 1: Sprint -- Empty(A) Level 2: Rest -- Empty(A) Level 2: Swift -- Run-I(A) Level 2: Hurdle -- Jump-I(A) Level 2: Health -- Pnc-Heal/+End(A) Level 2: Stamina -- PrfShf-End%(A) Level 49: Quick Form Level 1: Energy Focus Level 1: Prestige Power Dash -- Empty(A) Level 1: Prestige Power Slide -- Run-I(A) Level 1: Prestige Power Quick -- Empty(A) Level 1: Prestige Power Rush -- Empty(A) Level 1: Prestige Power Surge -- Empty(A) Level 4: Ninja Run Level 50: Musculature Core Paragon Level 50: Degenerative Core Flawless Interface Level 50: Assault Core Embodiment Level 50: Ageless Radial Epiphany Level 50: Rikti Radial Superior Ally Level 50: Freedom Phalanx Reserve Level 50: Portal Jockey Level 50: Task Force Commander Level 50: The Atlas Medallion ------------ ------------ Set Bonus Totals: 7% DamageBuff(Smashing) 7% DamageBuff(Lethal) 7% DamageBuff(Fire) 7% DamageBuff(Cold) 7% DamageBuff(Energy) 7% DamageBuff(Negative) 7% DamageBuff(Toxic) 7% DamageBuff(Psionic) 19.13% Defense(Smashing) 19.13% Defense(Lethal) 20.69% Defense(Fire) 20.69% Defense(Cold) 14.13% Defense(Energy) 14.13% Defense(Negative) 6% Defense(Psionic) 17.25% Defense(Melee) 10.06% Defense(Ranged) 15.69% Defense(AoE) 1.8% Max End 52.5% Enhancement(RechargeTime) 30% Enhancement(Accuracy) 5% Enhancement(Max EnduranceDiscount) 7.5% SpeedFlying GrantPower Preventive Medicine (0% chance, if Scourge) 246 HP (18.37%) HitPoints 7.5% JumpHeight 7.5% SpeedJumping MezResist(Confused) 127.5% MezResist(Held) 127.5% MezResist(Immobilized) 127.5% MezResist(Sleep) 127.5% MezResist(Stunned) 127.5% MezResist(Terrorized) 127.5% MezResist(Teleport) 100% (20% chance) 18.5% (0.31 End/sec) Recovery 30% (1.67 HP/sec) Regeneration 50% ResEffect(SpeedFlying) 50% ResEffect(RechargeTime) 50% ResEffect(SpeedRunning) 25.25% Resistance(Smashing) 25.25% Resistance(Lethal) 35.75% Resistance(Fire) 35.75% Resistance(Cold) 23.75% Resistance(Energy) 23.75% Resistance(Negative) 23.75% Resistance(Toxic) 40.75% Resistance(Psionic) 7.5% SpeedRunning 36% GlobalChanceMod PlayerCrit | Copy & Paste this data into Mids Reborn : Hero Designer to view the build | |-------------------------------------------------------------------| |MxDz;1593;746;1492;HEX;| |78DA65945B4F13511485CFB4536B4BB959AE964229D22B940E6054D4102317059A1| |0FB6C9A118652A96DD3D644E293FFC06BF4C168E22582B7FFE0AB174CF44F982068| |A2467C1AF7CCDAB44DDAA4F9CEAC3967AF75CE9E99C4B529D7DBD91B93426A3A9B5| |54BA55472A9A8160A5AD19650D3992561FCECF4F7ECEBA98496D5B4D8744E2BA6D7| |71E1ABDC9BD256B45C498B5D5097336A3993CFA5CE14AFE48BC2B998CF6763C982A| |62D379AC3994C7AB59CC9A59BCDAB054D5DD68AA5D54CC1B57F5DA09BDDD385CC52| |2C5956B36B543B99BF9A4D25D452592BAE77512285FE0F23827FBA4DBCB792280BC| |B07E64750FEC4DC020F7C06FD415A26F1DAB8847B0A78709C7914748E816DA3E0A3| |082FA5B5D265813969D0B5CA5C019BD6989A6CF208F95AE12B5B7F234BCB1FE65FF| |0D01E334C1383B218A016D8B046D83C9C9F343B34C91E353C1CA28339481E0EF670| |B047DB3FB083BDBAD8AB8BBD5E848568E07A0DF72DA676780EFE8F69BF8DECDF18C| |57E02E4D16C9E826E6BDEB69ABE3DDF50ABF73AE6F47EA73A5EE236E8DB059F50BD| |563EFBD6E3EC7502F44D304F82FDA798A7C120F9BA25D357B8DF91E6B60B89CEA21| |DFD10ED5E785B49EB8487B57314B9FA157080CF553126509EA794A79BFBD97D0B7D| |1AB8CDBCC37DBBC7BCC9BC0B86288F073E160FEF3FC0E711D8E1678FB278B91FDE3| |99E330306CF336799BFC06794A98F33F5452C66BD708019C55984836024C44C0973| |5F61CAE4673FFF24EA4526C0A1AF983BB4C5FC02B652C641EEF1603B9E73633B21C| |E10DAC07E639BCC97E0C82BE61B50790DEEB9848862AD1CE57AC3BCC761DEF3C839| |509907A99522C619629BC8D5415A9CB5B859C721FAE4CA7BAFF754C7C6A5AE8B853| |A6551AEBCAF4232951D27295C551AC613B35BAB85A0FDA8D5FA91F267ADC66F8A51| |549FA796C539D6F3EAA7498FD4058ACB958F8F106CAFD4CD1AAB53C6EB14470B7D4| |ED867DE8DCFA2319EE9AC8E37FCD5F1839A39C7E89D5190425F7456F58B3563B566| |7CA966FC1F0A6003A5| |-------------------------------------------------------------------|
-
i wouldn't slot ET like that, you are shoving so many procs in there but not slotting for full regular damage. i would put 5 hecatombs in there, get that 10% recharge as you don't have that many LotG procs in there. Maybe leave negative energy or lethal in there with the 5. The biggest hole is the defensive numbers, you can't softcap D on /rad so if you could get a little more balance across the board it will make your non capped resistances do more. you took slots from stamina and health, i did also. the more i look at /rad the more i realize every power is needed. be nice to get shield wall in shadow meld so you get more natural recharge in it and also get those energy and negative energy defense along with the lotg proc. you'd need to scrape 2 slots though. wip This Hero build was built using Mids Reborn 3.0.4.7 https://github.com/Reborn-Team/MidsReborn Click this DataLink to open the build! Level 50 Magic Scrapper Primary Power Set: Energy Melee Secondary Power Set: Radiation Armor Power Pool: Speed Power Pool: Fighting Power Pool: Leadership Power Pool: Leaping Ancillary Pool: Soul Mastery Hero Profile: Level 1: Energy Punch -- SprScrStr-Acc/Dmg(A), SprScrStr-Dmg/Rchg(3), SprScrStr-Acc/Dmg/Rchg(3), SprScrStr-Dmg/EndRdx/Rchg(5), SprScrStr-Acc/Dmg/EndRdx/Rchg(5), SprScrStr-Rchg/+Crit(7) Level 1: Alpha Barrier -- Ags-ResDam/EndRdx(A), Ags-ResDam/Rchg(7), Ags-ResDam(9), Ags-Psi/Status(9), Ags-ResDam/EndRdx/Rchg(11), Ags-EndRdx/Rchg(21) Level 2: Bone Smasher -- Mk'Bit-Acc/Dmg/EndRdx/Rchg(A), Mk'Bit-Dmg/EndRdx(11), Mk'Bit-Dmg/Rchg(13), Mk'Bit-Acc/Dmg(13), Mk'Bit-Dam%(15), SprCrtStr-Rchg/+50% Crit(15) Level 4: Proton Armor -- UnbGrd-ResDam(A), UnbGrd-ResDam/EndRdx(17), UnbGrd-Rchg/ResDam(17), UnbGrd-ResDam/EndRdx/Rchg(19), ImpArm-ResPsi(19) Level 6: Super Speed -- WntGif-ResSlow(A) Level 8: Hasten -- RechRdx-I(A), RechRdx-I(23) Level 10: Fallout Shelter -- UnbGrd-ResDam(A), UnbGrd-ResDam/EndRdx(23), UnbGrd-Rchg/ResDam(25), UnbGrd-ResDam/EndRdx/Rchg(25), UnbGrd-Max HP%(27) Level 12: Gamma Boost -- PrfShf-End%(A), Mrc-Rcvry+(27) Level 14: Build Up -- GssSynFr--Build%(A), RechRdx-I(29) Level 16: Radiation Therapy -- Prv-Heal/Rchg(A), Prv-Heal(29), ScrDrv-Dam%(31), TchoftheN-%Dam(31), Obl-%Dam(31), Erd-%Dam(33) Level 18: Whirling Hands -- FuroftheG-Acc/Dmg(A), FuroftheG-Dam/Rech(33), FuroftheG-Dam/End/Rech(33), FuroftheG-Acc/Dmg/End/Rech(34), FuroftheG-ResDeb%(34) Level 20: Beta Decay -- AchHee-ResDeb%(A) Level 22: Boxing -- Dmg-I(A) Level 24: Tough -- GldArm-3defTpProc(A), GldArm-End/Res(34), ImpArm-ResPsi(36), StdPrt-ResDam/Def+(50) Level 26: Total Focus -- SprBlsCol-Dmg/EndRdx(A), SprBlsCol-Acc/Dmg/EndRdx(36), SprBlsCol-Acc/Dmg/Rchg(36), SprBlsCol-Dmg/EndRdx/Acc/Rchg(37), SprBlsCol-Acc/Dmg(37), TchofDth-Dam%(37) Level 28: Particle Shielding -- Prv-Heal(A), Prv-Heal/Rchg(39), Prv-Absorb%(39) Level 30: Weave -- ShlWal-Def(A), ShlWal-Def/EndRdx(39), ShlWal-Def/EndRdx/Rchg(40), ShlWal-Def/Rchg(40), Rct-ResDam%(40) Level 32: Energy Transfer -- Hct-Dmg/EndRdx(A), Hct-Dmg(42), Hct-Dam%(42), Hct-Dmg/Rchg(42), Hct-Acc/Dmg/Rchg(43), TchofDth-Dam%(43) Level 35: Ground Zero -- Arm-Dam%(A), Arm-Dmg(43), Arm-Acc/Dmg/Rchg(45), TchofLadG-%Dam(45), Obl-%Dam(45), Erd-%Dam(46) Level 38: Meltdown -- ImpArm-ResPsi(A) Level 41: Moonbeam -- SprWntBit-Acc/Dmg(A), SprWntBit-Dmg/Rchg(47), SprWntBit-Acc/Dmg/EndRdx(47), SprWntBit-Acc/Dmg/Rchg(48), SprWntBit-Rchg/SlowProc(48) Level 44: Shadow Meld -- LucoftheG-Def/Rchg+(A), ShlWal-Def/Rchg(46), ShlWal-Def/EndRdx/Rchg(46), ShlWal-EndRdx/Rchg(48), ShlWal-ResDam/Re TP(50) Level 47: Maneuvers -- LucoftheG-Def/Rchg+(A) Level 49: Combat Jumping -- LucoftheG-Def/Rchg+(A) Level 1: Critical Hit Level 1: Brawl -- Empty(A) Level 1: Sprint -- Empty(A) Level 2: Rest -- Empty(A) Level 2: Swift -- Run-I(A) Level 2: Hurdle -- Jump-I(A) Level 2: Health -- Pnc-Heal/+End(A) Level 2: Stamina -- PrfShf-End%(A) Level 49: Quick Form Level 1: Energy Focus Level 1: Prestige Power Dash -- Empty(A) Level 1: Prestige Power Slide -- Run-I(A) Level 1: Prestige Power Quick -- Empty(A) Level 1: Prestige Power Rush -- Empty(A) Level 1: Prestige Power Surge -- Empty(A) Level 4: Ninja Run Level 50: Musculature Core Paragon Level 50: Degenerative Core Flawless Interface Level 50: Assault Core Embodiment Level 50: Ageless Radial Epiphany Level 50: Rikti Radial Superior Ally Level 50: Freedom Phalanx Reserve Level 50: Portal Jockey Level 50: Task Force Commander Level 50: The Atlas Medallion ------------ ------------ Set Bonus Totals: 9.5% DamageBuff(Smashing) 9.5% DamageBuff(Lethal) 9.5% DamageBuff(Fire) 9.5% DamageBuff(Cold) 9.5% DamageBuff(Energy) 9.5% DamageBuff(Negative) 9.5% DamageBuff(Toxic) 9.5% DamageBuff(Psionic) 19.13% Defense(Smashing) 19.13% Defense(Lethal) 10.69% Defense(Fire) 10.69% Defense(Cold) 11% Defense(Energy) 11% Defense(Negative) 6% Defense(Psionic) 17.25% Defense(Melee) 8.5% Defense(Ranged) 10.69% Defense(AoE) 42.5% Enhancement(RechargeTime) 5% Enhancement(Max EnduranceDiscount) 15% Enhancement(Accuracy) 7.5% SpeedFlying GrantPower Preventive Medicine (0% chance, if Scourge) 246 HP (18.37%) HitPoints 7.5% JumpHeight 7.5% SpeedJumping Knockback (Mag -3) Knockup (Mag -3) MezResist(Confused) 120% MezResist(Held) 120% MezResist(Immobilized) 120% MezResist(Sleep) 120% MezResist(Stunned) 120% MezResist(Terrorized) 120% MezResist(Teleport) 100% (20% chance) 18.5% (0.31 End/sec) Recovery 20% (1.12 HP/sec) Regeneration 50% ResEffect(SpeedFlying) 50% ResEffect(RechargeTime) 50% ResEffect(SpeedRunning) 25.25% Resistance(Smashing) 25.25% Resistance(Lethal) 35.75% Resistance(Fire) 35.75% Resistance(Cold) 21.5% Resistance(Energy) 21.5% Resistance(Negative) 21.5% Resistance(Toxic) 44.5% Resistance(Psionic) 7.5% SpeedRunning 36% GlobalChanceMod PlayerCrit | Copy & Paste this data into Mids Reborn : Hero Designer to view the build | |-------------------------------------------------------------------| |MxDz;1593;745;1490;HEX;| |78DA65945B4F134114C767DBADB5A5DCAC40B1944B915E696901A3C10B317251A00| |9B1CFA659612995DA36DB9A487CF21B784BF4C168E2258246BF83AF0AFA354C0C68| |A2467C5ACFEEF9D36ED24D36BF99FFCC9CF33F333B9BB93DE3F9307F775A486D978| |A4AB59ACBAE684AA5A26A8E8C922FAC08E371D2EB3FD47319B5A8AAC9D992AAE537| |B933581F9B51D7D452554D5E55560B4AAD502EE52E6A37CB9A702F97CBC564B6A2A| |AABAD6673AE905FAF154AF976B3B7A42AABAA565D2F543C87FD0A0DF6CE560A2BC9| |6C4D296E50EC6CF956319751AA3555DBF491A334BD4F63028FEE109FEC24CAC2F61| |9DC61CABBE017E691AFCC60989649589B92782CCD3C3A099E62BA2798C7C799CF62| |584A6BA51B82E7E4999E75708DD9B601AAB2C99394D7CE7965FB6FF6D2F107FCCB3| |C76004669625816C374040E5E231C7EF827CDC99AE48C1B395CA21B1CA11C2EE470| |21473772F890C3871C27FE31DF44856841BC96C7361E5BE0FCCFA9DE56AE576ADDE| |6B1BE38D715A25CEDE66EE88EF6EF76337FDF378ED97F87E7F4FBD017CCC17D8A11| |90C50B8ADB099F9D53183B0B9E630E5D00A79961CAE795CC7CC2FB91E2789D42A2B| |DE8627FA22BC039EDA4F5706C7BCF3862A4D9DF30F6356D4C201F2FC9472FCEB3F7| |3E9FD3F003F021CEED11780FCC09334684FCF8398FCD8FBA43D887D01EBE3DF2124| |09D8105CC99433D57C079F017F315791A80A78198CD8C170D81713E836898198B80| |F014254F41AC0D9EC7D8195E3B3A05EEB23E8A3349E04C62B476047B39827D32CA8| |AC07F648BEB4F6E836F9963EFC0F7CC038F10718E23C7BBF8DE24506302358F5D66| |A617999DB44F497CE749ACE9262D052D656A2E3120D7EFBDDED7681B5D5D174B4DC| |AB25CBFAF4232953D3729882A25F88BD9B76A11D67E58B52176F9D3AAE1A61841F5| |453AB2146CBD6EFC9AF45893A1945CFFF90881F4E9A659134DCA6493E2EA10C6019| |A7916BDFC5B34DA733D8DF656B0D17E6299739AEE4C9A5DE8CBEE867ECDD2562CED| |EB96F67F031500C1| |-------------------------------------------------------------------|
-
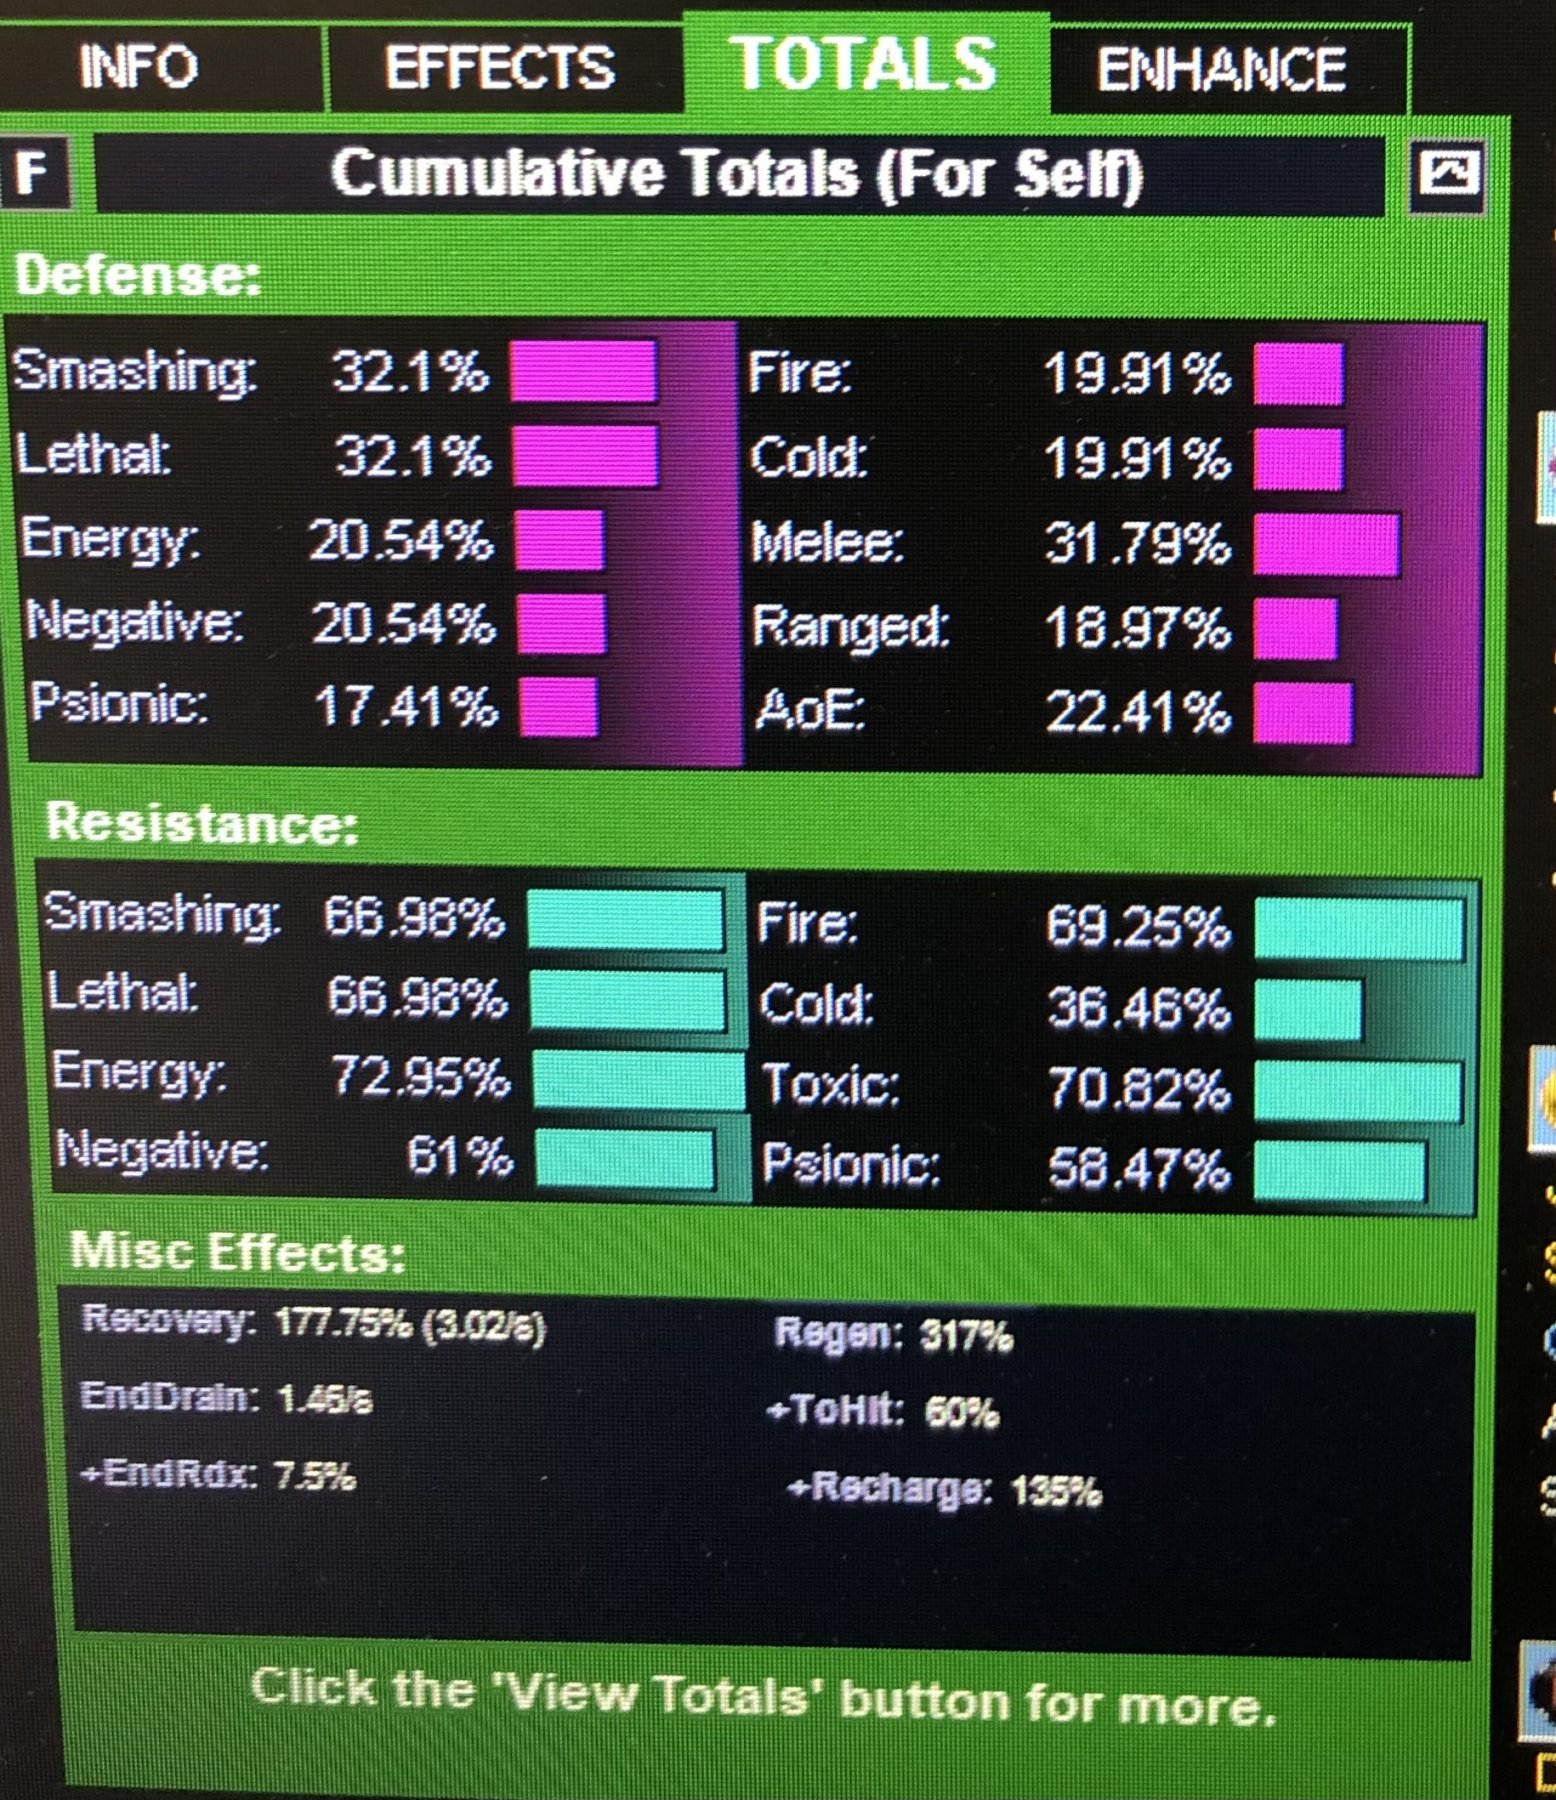
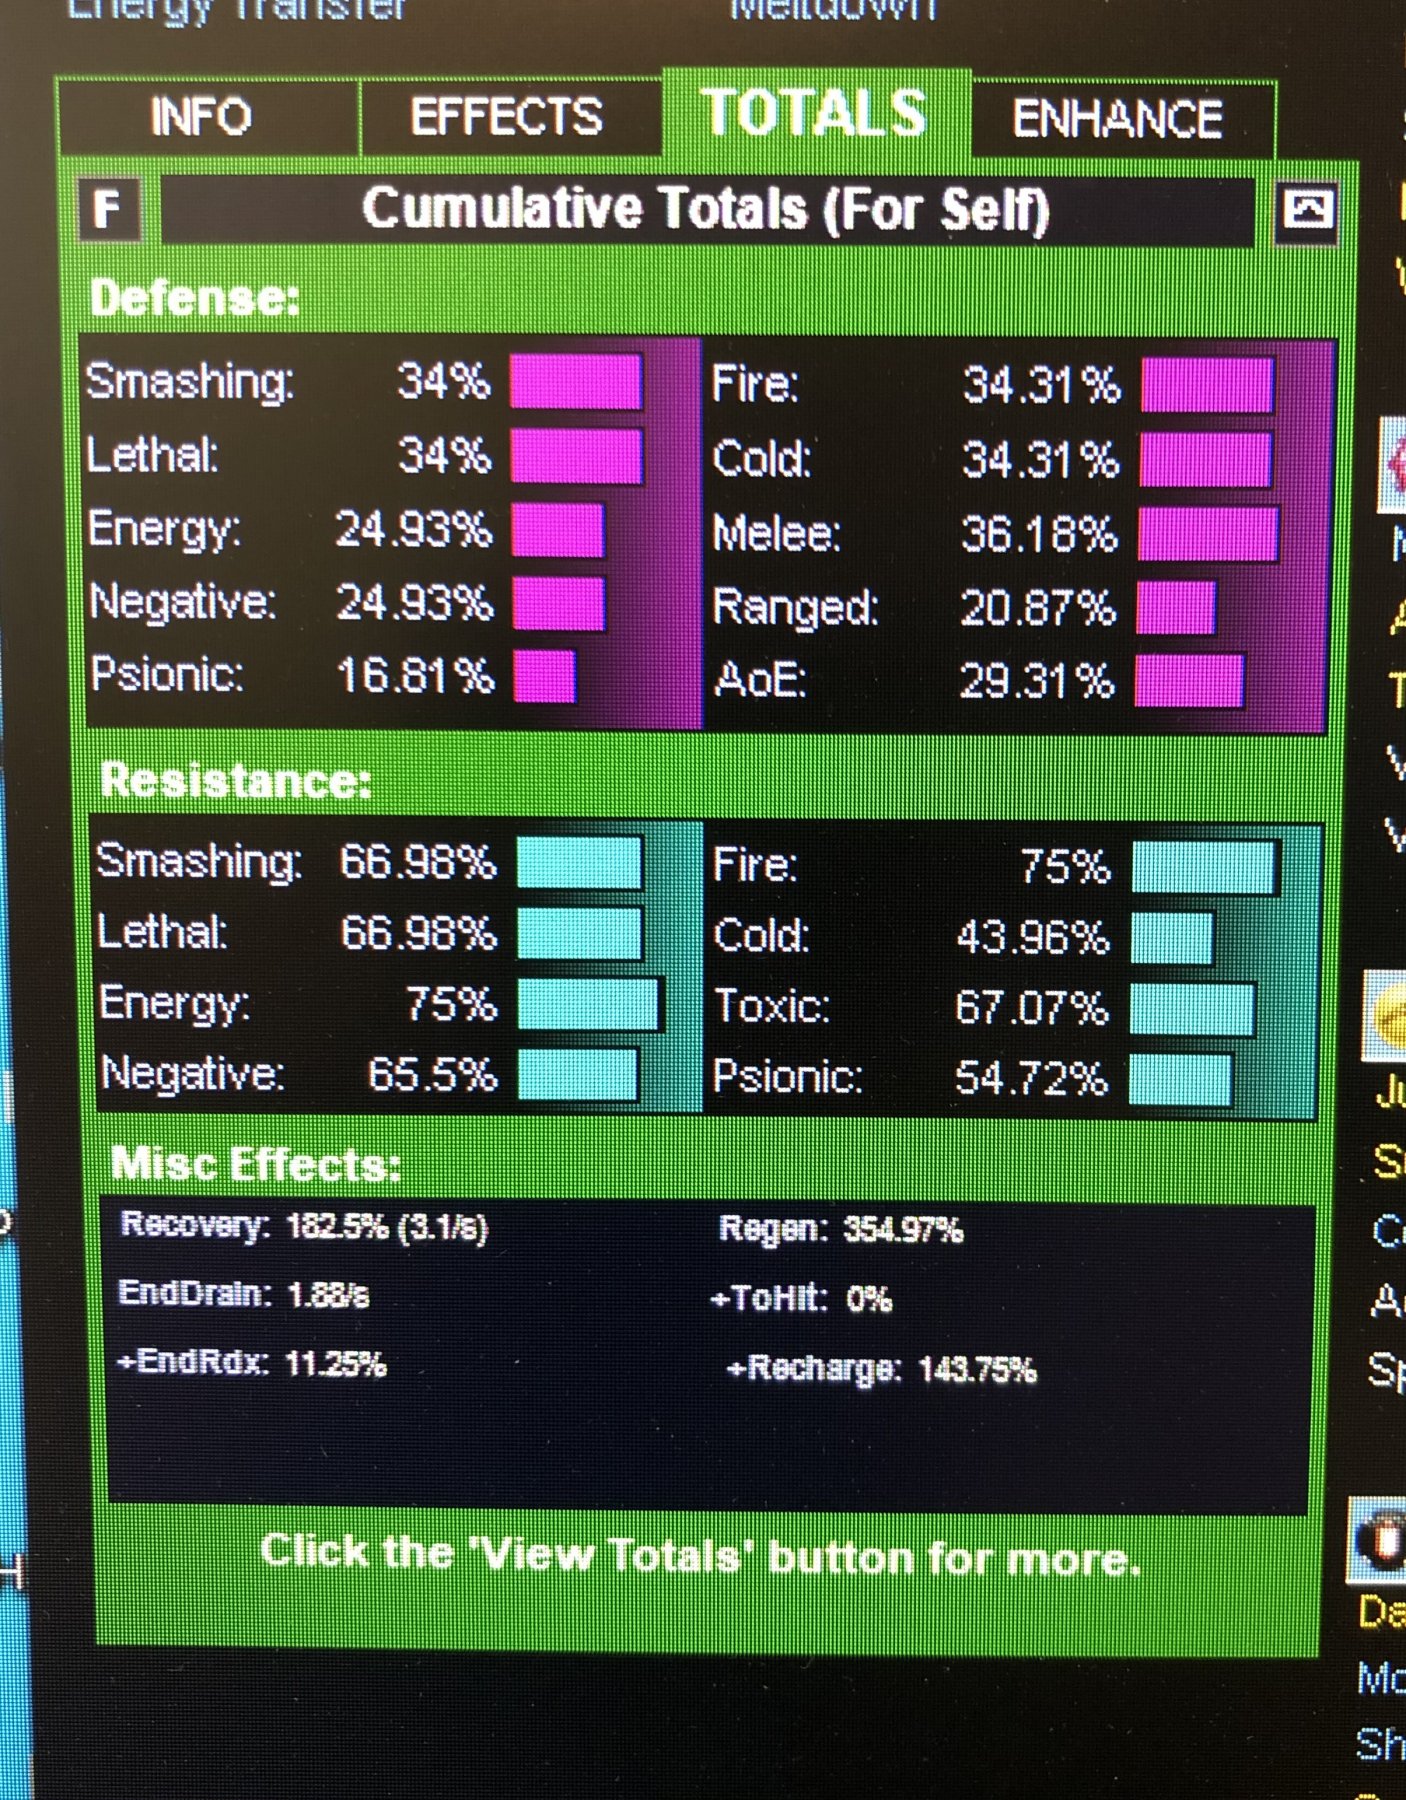
I had done it in mids but closed without saving as I was at work. I’ll redo and upload the build. Here are the numbers I got out of it. First pic was yours as is. Next was the changes.

-
I usually don't break up the procs from the scrapper sets, I put one in ET, and the other in TF, Hecacomb in bonesmasher, superior blistering cold in energy punch, and i use whirling hands with the avalanche set over power crash. Moonbeam i go winter's bite or you can go with the purple set for more reacharge. I haven't tried /rad yet on a scrapper so not sure where the biggest holes are, but for my /ice scrapper i needed more balanced defense and was easily soft capping smash and lethal, so i put shield walls in with the LotG proc to get the recharge bonus and have better energy defense. I don't know how that applies here. I'll play around in mids and see what i can stretch out if this is a money is no object build :).
-
i go agility for alpha (gets you defense), and ageless pumps up your endurace and recharge if you go with core paragon. Best to try different combo's to see what fits your playstyle. I think whirling hands is better than power crash, as P/C requires you to line up your targets and you basically have no AOE. I did the same thing at first on my em scrapper, i killed bosses very efficiently then found myself click click click click taking out the mobs 1 X 1.
-
You’re welcome, it will be endurance heavy leveling up. It does rely on a lot of IOS endurance reduction, and ageless tier 3/4 for recovery. Ice bastion will also give you recovery when you use it. You may consider dropping a primary power for energy absorption also. I only dropped it as I lacked aoe on mine. I found with ice armor I really need to patch up some of defensive holes. That’s why I went with both shadow meld and unleashed potential. Alternating or combining during sticky situations with ice bastion, it can pretty much tank anything when needed. If you were looking for more of an AOE type build, you might want to try to squeeze in icicles also if you can, but obviously that comes at a sacrifice of giving up something else.
-
Here is my em/ice build translated for fire. This Hero build was built using Mids Reborn 3.0.4.7 https://github.com/Reborn-Team/MidsReborn Click this DataLink to open the build! Project 2: Level 50 Magic Scrapper Primary Power Set: Fiery Melee Secondary Power Set: Ice Armor Power Pool: Speed Power Pool: Force of Will Power Pool: Fighting Power Pool: Leadership Ancillary Pool: Soul Mastery Hero Profile: Level 1: Fire Sword -- SprBlsCol-Acc/Dmg(A), SprBlsCol-Dmg/EndRdx(3), SprBlsCol-Acc/Dmg/EndRdx(3), SprBlsCol-Acc/Dmg/Rchg(5), SprBlsCol-Dmg/EndRdx/Acc/Rchg(5), SprBlsCol-Rchg/HoldProc(7) Level 1: Frozen Armor -- ShlWal-Def/EndRdx(A), ShlWal-Def(19), ShlWal-Def/Rchg(27), ShlWal-Def/EndRdx/Rchg(40), LucoftheG-Def/Rchg+(43) Level 2: Cremate -- SprScrStr-Rchg/+Crit(A), SprScrStr-Acc/Dmg/EndRdx/Rchg(13), SprScrStr-Dmg/EndRdx/Rchg(15), SprScrStr-Acc/Dmg/Rchg(15), SprScrStr-Dmg/Rchg(43), SprScrStr-Acc/Dmg(43) Level 4: Hoarfrost -- Prv-Heal(A), Prv-Heal/EndRdx(7), Prv-EndRdx/Rchg(9), Prv-Heal/Rchg(9), Prv-Heal/Rchg/EndRdx(11), Prv-Absorb%(11) Level 6: Hasten -- RechRdx-I(A), RechRdx-I(13) Level 8: Mighty Leap -- BlsoftheZ-ResKB(A) Level 10: Kick -- Acc-I(A) Level 12: Wet Ice -- EndRdx-I(A) Level 14: Maneuvers -- LucoftheG-Def/Rchg+(A) Level 16: Tough -- Ags-Psi/Status(A), Ags-ResDam/EndRdx(17), Ags-ResDam(17), Ags-ResDam/Rchg(19) Level 18: Glacial Armor -- ShlWal-EndRdx/Rchg(A), ShlWal-Def/Rchg(25), LucoftheG-Def/Rchg+(36), ShlWal-Def/EndRdx(40), ShlWal-Def(42) Level 20: Fire Sword Circle -- SprAvl-Acc/Dmg(A), SprAvl-Dmg/EndRdx(21), SprAvl-Acc/Dmg/EndRdx(21), SprAvl-Acc/Dmg/Rchg(23), SprAvl-Acc/Dmg/EndRdx/Rchg(23), SprAvl-Rchg/KDProc(25) Level 22: Weaken Resolve -- CldSns-ToHitDeb(A), CldSns-%Dam(45) Level 24: Weave -- Rct-ResDam%(A), Rct-Def/EndRdx(42), Rct-Def(42), LucoftheG-Def/Rchg+(50) Level 26: Unleash Potential -- ShlWal-Def/EndRdx/Rchg(A), ShlWal-Def(27), ShlWal-Def/Rchg(34), ShlWal-Def/EndRdx(36) Level 28: Incinerate -- Hct-Dmg(A), Hct-Dmg/Rchg(29), Hct-Acc/Dmg/Rchg(29), Hct-Acc/Rchg(31), Hct-Dam%(31), Hct-Dmg/EndRdx(31) Level 30: Tactics -- GssSynFr--Build%(A) Level 32: Greater Fire Sword -- SprCrtStr-Acc/Dmg(A), SprCrtStr-Dmg/Rchg(33), SprCrtStr-Acc/Dmg/Rchg(33), SprCrtStr-Dmg/EndRdx/Rchg(33), SprCrtStr-Rchg/+50% Crit(34), SprCrtStr-Acc/Dmg/EndRdx/Rchg(34) Level 35: Moonbeam -- SprWntBit-Acc/Dmg(A), SprWntBit-Dmg/Rchg(36), SprWntBit-Acc/Dmg/EndRdx(37), SprWntBit-Acc/Dmg/Rchg(37), SprWntBit-Rchg/SlowProc(37), SprWntBit-Dmg/EndRdx/Acc/Rchg(40) Level 38: Icy Bastion -- UnbGrd-ResDam/EndRdx/Rchg(A), UnbGrd-ResDam/EndRdx(39), UnbGrd-EndRdx/Rchg(39), UnbGrd-ResDam(39), UnbGrd-Max HP%(47) Level 41: Chilling Embrace -- ImpSwf-Rng/Slow(A), ImpSwf-Acc/EndRdx(46), ImpSwf-EndRdx/Rchg/Slow(48), ImpSwf-Dam%(48) Level 44: Shadow Meld -- ShlWal-Def/Rchg(A), ShlWal-ResDam/Re TP(45), ShlWal-EndRdx/Rchg(45), ShlWal-Def/EndRdx/Rchg(46), LucoftheG-Def/Rchg+(46) Level 47: Permafrost -- GldArm-3defTpProc(A), ImpArm-ResPsi(50), StdPrt-ResDam/Def+(50) Level 49: Build Up -- RechRdx-I(A) Level 1: Critical Hit Level 1: Brawl -- Dmg-I(A) Level 1: Sprint -- Clr-Stlth(A) Level 2: Rest -- RechRdx-I(A) Level 2: Swift -- Run-I(A) Level 2: Hurdle -- Jump-I(A) Level 2: Health -- NmnCnv-Regen/Rcvry+(A) Level 2: Stamina -- PrfShf-End%(A) Level 49: Quick Form Level 50: Ageless Core Epiphany Level 50: Agility Core Paragon Level 50: Carnival Core Superior Ally Level 50: Assault Core Embodiment Level 50: Pyronic Core Final Judgement ------------ | Copy & Paste this data into Mids Reborn : Hero Designer to view the build | |-------------------------------------------------------------------| |MxDz;1448;692;1384;HEX;| |78DA4D93CB4F934114C5E76BBF82BC85F22CD44211DA525A81E8DA1811446842D24| |497B59601AA95365FABD1A5899AA81B9F61E3338A015F7F88F8F807DCB9C10760E2| |23E8A6DEF61C5A26697ED33373CFBD7367BEC885D1DA37E3970E2AA3FE702A9ECDC| |6A2092B9EC968CB1189CF25134A46D5B4953EAD13B9EE914AF9E7DADE108BE894D6| |E1B1A4B62E625E5E1AD5B37A21ABC313091D3B649D4D5BAA7A3A9D4E85A319AD679| |A8AD3B1B4258BE9D9D889642A55072939379F4B2ECC3514FF4DE9F88CB6B2F3C94C| |C7914C32118EE6E2A933E21D4D9F4BC522F16C4EF2B64B413EF95D2E5466148ACD3| |BD44D53A96153D96E91B741F30E7917ACB8072E054AB1A61AB317B5A663A06B1CF4| |4D80032D469157249FC17CC647ACD57E00EBDF93EF18B34ABEA5A7146C67AC7D0D5| |AC51770D757F21B58FD9D5C07BD92D78158C31154C84BE6FC4A15DA206BAAF2930D| |6717A18A5A950BFBBA247F0D3C544D0FB446D95747AD8E67B48BD600CDDE7000DAE| |E21723FD8340CBAC5B3913D6C3C8A5ADBD9BB5EFAF9D8DB007B7B4DFC9DEC83F33E| |EEA2F901F9106C7D443E06DB9F8059396B0BCE65B47C96B3BA4D35B8069AE2DBC6B| |ADB7E32E726B9010EB3A6F3E2D3011F7B07EFD8C5FA7AB6EB67DDD7C5B793F576F6| |DBD84BD20FEE0990417200744AAC9BFD75AF40BB219A07B91D9E933857779C3C452| |6C01E4DCE808567E365AC77195AEF0AB8F705F9927C0DFA5ED143EEAA0FB166DF16| |CED6FF9BFC43FE02C37FC14E89F1B3A7FE6746B1CFA1A7E0BE25F239B855AB5490F| |E41F6707092E4DB08B1D721DE8347FCC3F0B78547784701117CC236F85E957E0DF1| |2D0FF1CD7BCCD2B79BEF3215475EF6637DAABC2E1F02FA3E6D5212CDA0CF7A75E97| |B564608DAC64ECD0F6D73A7761CB5FFD8A92D2247BE3026074A05E7179DA273FEAF| |55E62CBA380A4F795B58F696E7DEE6F2FC3F414ADAAB| |-------------------------------------------------------------------|
-
Well, decided to re-invent the wheel after playing with this build about 2 weeks. I found i don't use energy absorption and while I can decimate EB's AV's and Bosses faster than most AOE builds, the sorrounding mobs are taking way too many button presses and time. I re-worked for more defense and a little more of a balanced amount of resistance, at the cost of some recharge and psionic resistance (but have better psionic defense as a trade off). Still very reliant on the triple threat of Ice Bastion, unleashed potential and shadow meld when things get thick with big mobs of 54's. I also took more of a frankenslotted approach to balance the defense numbers. I would love to see if I can improve it more, but it's turning into a game of wack-o-mole in mids. This Hero build was built using Mids Reborn 3.0.4.7 https://github.com/Reborn-Team/MidsReborn Click this DataLink to open the build! Project 2: Level 50 Magic Scrapper Primary Power Set: Energy Melee Secondary Power Set: Ice Armor Power Pool: Speed Power Pool: Force of Will Power Pool: Fighting Power Pool: Leadership Ancillary Pool: Soul Mastery Hero Profile: Level 1: Energy Punch -- SprBlsCol-Acc/Dmg(A), SprBlsCol-Dmg/EndRdx(3), SprBlsCol-Acc/Dmg/EndRdx(3), SprBlsCol-Rchg/HoldProc(5), SprBlsCol-Dmg/EndRdx/Acc/Rchg(5), SprBlsCol-Acc/Dmg/Rchg(7) Level 1: Frozen Armor -- ShlWal-Def/EndRdx(A), ShlWal-Def(19), ShlWal-Def/Rchg(27), ShlWal-Def/EndRdx/Rchg(40), LucoftheG-Def/Rchg+(43) Level 2: Bone Smasher -- Hct-Dmg(A), Hct-Dmg/Rchg(13), Hct-Acc/Dmg/Rchg(15), Hct-Acc/Rchg(15), Hct-Dam%(43), Hct-Dmg/EndRdx(43) Level 4: Hoarfrost -- Prv-Heal(A), Prv-Heal/EndRdx(7), Prv-EndRdx/Rchg(9), Prv-Heal/Rchg(9), Prv-Heal/Rchg/EndRdx(11), Prv-Absorb%(11) Level 6: Hasten -- RechRdx-I(A), RechRdx-I(13) Level 8: Mighty Leap -- BlsoftheZ-ResKB(A) Level 10: Kick -- Acc-I(A) Level 12: Wet Ice -- EndRdx-I(A) Level 14: Maneuvers -- LucoftheG-Def/Rchg+(A) Level 16: Tough -- Ags-Psi/Status(A), Ags-ResDam/EndRdx(17), Ags-ResDam(17), Ags-ResDam/Rchg(19) Level 18: Glacial Armor -- ShlWal-EndRdx/Rchg(A), ShlWal-Def/Rchg(25), LucoftheG-Def/Rchg+(36), ShlWal-Def/EndRdx(40), ShlWal-Def(42) Level 20: Whirling Hands -- SprAvl-Acc/Dmg(A), SprAvl-Dmg/EndRdx(21), SprAvl-Acc/Dmg/EndRdx(21), SprAvl-Acc/Dmg/Rchg(23), SprAvl-Acc/Dmg/EndRdx/Rchg(23), SprAvl-Rchg/KDProc(25) Level 22: Weaken Resolve -- CldSns-ToHitDeb(A), CldSns-%Dam(45) Level 24: Weave -- Rct-ResDam%(A), Rct-Def/EndRdx(42), Rct-Def(42), LucoftheG-Def/Rchg+(50) Level 26: Unleash Potential -- ShlWal-Def/EndRdx/Rchg(A), ShlWal-Def(27), ShlWal-Def/Rchg(34), ShlWal-Def/EndRdx(36) Level 28: Total Focus -- SprScrStr-Acc/Dmg(A), SprScrStr-Dmg/Rchg(29), SprScrStr-Acc/Dmg/Rchg(29), SprScrStr-Dmg/EndRdx/Rchg(31), SprScrStr-Acc/Dmg/EndRdx/Rchg(31), SprScrStr-Rchg/+Crit(31) Level 30: Tactics -- GssSynFr--Build%(A) Level 32: Energy Transfer -- SprCrtStr-Acc/Dmg(A), SprCrtStr-Dmg/Rchg(33), SprCrtStr-Dmg/EndRdx/Rchg(33), SprCrtStr-Acc/Dmg/Rchg(33), SprCrtStr-Rchg/+50% Crit(34), SprCrtStr-Acc/Dmg/EndRdx/Rchg(34) Level 35: Moonbeam -- SprWntBit-Acc/Dmg(A), SprWntBit-Dmg/Rchg(36), SprWntBit-Acc/Dmg/EndRdx(37), SprWntBit-Acc/Dmg/Rchg(37), SprWntBit-Rchg/SlowProc(37), SprWntBit-Dmg/EndRdx/Acc/Rchg(40) Level 38: Icy Bastion -- UnbGrd-ResDam/EndRdx/Rchg(A), UnbGrd-ResDam/EndRdx(39), UnbGrd-EndRdx/Rchg(39), UnbGrd-ResDam(39), UnbGrd-Max HP%(47) Level 41: Chilling Embrace -- ImpSwf-Rng/Slow(A), ImpSwf-Acc/EndRdx(46), ImpSwf-EndRdx/Rchg/Slow(48), ImpSwf-Dam%(48) Level 44: Shadow Meld -- ShlWal-Def/Rchg(A), ShlWal-ResDam/Re TP(45), ShlWal-EndRdx/Rchg(45), ShlWal-Def/EndRdx/Rchg(46), LucoftheG-Def/Rchg+(46) Level 47: Permafrost -- GldArm-3defTpProc(A), ImpArm-ResPsi(50), StdPrt-ResDam/Def+(50) Level 49: Build Up -- RctRtc-ToHit/Rchg(A) Level 1: Critical Hit Level 1: Brawl -- Dmg-I(A) Level 1: Sprint -- Clr-Stlth(A) Level 2: Rest -- RechRdx-I(A) Level 2: Swift -- Run-I(A) Level 2: Hurdle -- Jump-I(A) Level 2: Health -- NmnCnv-Regen/Rcvry+(A) Level 2: Stamina -- PrfShf-End%(A) Level 1: Energy Focus Level 49: Quick Form Level 50: Ageless Core Epiphany Level 50: Agility Core Paragon Level 50: Cryonic Radial Final Judgement Level 50: Carnival Core Superior Ally Level 50: Assault Core Embodiment ------------ | Copy & Paste this data into Mids Reborn : Hero Designer to view the build | |-------------------------------------------------------------------| |MxDz;1451;701;1402;HEX;| |78DA4D94594F53511485CF6D6F4126B194B105812274A215883E1B2383084D489AE| |863ADE550AA9536B7D5C8A3FFC031BC20A88001A71FE2F8077CF30507C0C421E80B| |6EBA162D3769BE73D73D7BEF75F639A7D15BC3B5AFC76E9F51C6D17399443E1F8F2| |5AD442EA72D4734914A27953C555356F6AA4E16BA862AE5CD7330211ED519AD2323| |73DA4ACDE3C55DFA36AC67F45C5E47C6933A7ED6BA9EB554F554369B89C4725A4F3| |71487A3594B3E6667E297D2994C1DA4746AB6909E4BD517DF2675625A5BF9D974AE| |6D24974E46628544E69AE48E656F64E2D144BEA0ADF95671D427BFC5A0E2B3E7507| |74CA5064D65BB4BDE03CD87E403B0E23EB8169030A3186BAA517B516BB800BAC740| |DF38186C328A5C0A3244EA197DB6A256EB038FFAC900180C9141D0ED53CA8E7A0EF| |B26F2567C018F7C25BF81D5DFC92DD02B5BE040ACE10829D4250B7EA52AE149557E| |422D9B0855D4AADC98D72EF56B9043D5744373CABC3A6A755CA35DB47A68F6FAD3D| |08E0D90A7C08641B043723AD943E779786D65EF7A98CFC7DE06D8DBA7D24317FBE0| |5AC45E343E2297C0E665F231D8FA04CCCB5A9BB02EA3E9B3ACB5C354FD9BA029BE5| |BE8BBE5276BEE90DBE0203DDD943C6DC8636FE31EBBE9AFFBC03F7DAF885F0FFD7A| |DE406B7F4BBE038FBF273F901F419778EA607F3B36B037AB92AF9367A8F332D6D59| |52093E415B05B93D3E0FEB1F132D6BB0EAD67033CF19C7C41BE027D2F9943F6AA17| |B166EF2EFCF5FD26FF90BFC0C85FD023317EF6D4BF6A14FB1C5E014FAE91CFC0DD5| |AA542CC1F620FFB27489E8D307B1DE63E744AFE08F2DB2243DCA380083E610BF22E| |4BBF06D8C38145E9A14BE2CCD2DDDD6B374BFF01321FE77AB2FC5D2E02FA3E6596E| |EAE327877B6AA45E33C230C6DFBB0E687B67358BB08EF3F0E6B0BA8B1162CFB9AD8| |F78D7A7B0B2EF9CCF1BF6619738EB3B13CDE3FD807E3756F79FC1F6516D598| |-------------------------------------------------------------------|
-
Ice Armor's Wet Ice (and Ninjitsu's Kuji-In Rin)
Incursion replied to RenInferno's topic in Suggestions & Feedback
I've been playing a em/ice scrapper the last few weeks. I hate that this power has no ability to be slotted, even if it were just for procs. I mean, we have permafrost which is such a waste of a power except being able to chuck in some franken slotting procs in there. Wet Ice shouldn't outpace a big defensive armor like frozen/glacial, but a few percent would be nice, Even if it was just for cold defense. Right now to get my 5 LotG procs in, 1 goes in Frozen armor, Glacial Armor, Weave, maneuvers (pretty common pool choices as tough i needed) and the last one in one of the other pool selections (stealth, vengeance, unleashed potential, shadow meld etc depending if you want to go in any of those directions). This set really suffers without Tough and Weave and i have it fully IO'd. If it weren't for Tier 9 bastion and mixing in unleashed potential and shadow meld (yup i took both because dull pain just doesn't cut it). The good news is if you chug a lot of recharge in bastion and unleashed can be either combined or alternated for nice stints of protection, shadow meld is really only good for true oh crap moments, as 3 seconds activation and 12 seconds of up time, then another 12-15 seconds down again it can be a drag to use. -
What powers should I give to the enemies?
Incursion replied to Possumcatcher's topic in Mission Architect
i like the tip about ST perception, never thought of that. I've been using blasters fire manipulation to just stack up on more fire only powers, seems to do the trick. In some instances they may have the same power in the primary and secondary, nothing wrong with that. Most important thing though is melee primary so the mobs want to get in close and not just pew pew. Also, if you just make 1 of each type (minion, lt, boss) doesn't the AE automatically populate the mobs? -
I’m working on a re-creation of the positron task force. I’m ramping it up so it’s suitable for 50+ so players can use their entire arsenal. What I’m noticing right at the start with the character creator is the inability to modify the level of standard characters. Vahzilok for example only will go to level 20. So my solution is to just recreate the characters but the costume options aren’t quite available. However I know for example the eidolons have a holloween costume. It be nice to be able to keep/use the appearance of these standard characters even if it required us to choose some slightly different power sets. An example would be reapers having powers like buzzsaw that aren’t offered to players. It would have been cool if they added enemy group pool powers that were designed dor the npcs. Anyways, it would be cool if we had the ability to maintain the look of a standard character as an options when creating one.
-
That's a fair point, but it does make an io'd scrapper basically untouchable. I wish it had more uptime but it gap fills the down time of other tier 9 scrapper powers and it only costs 1 power choice before it (moonbeam is pretty nice for those runners). Dark has a lot of tools at it's disposal to mitigate, but i really think Force of will pool is worth mentioning again. that power is up for 1 minute and gives more defense than weave when it's active.