hakurr
-
Posts
232 -
Joined
-
Last visited
Content Type
Profiles
Forums
Events
Store
Articles
Patch Notes
Everything posted by hakurr
-
This is an excellent guide for Bio it would be nice if people with your knowledge of a primary of secondary power made more guides like this.
-
Has anyone tried a Savage/Fire Farmer if so how does it perform
-
i apologize i thought you was looking for Ice Melee / Shield. Here is an Ice Melee / Bio build that you can look at. Brute - Ice Melee - Bio Armor.mxd
-
here is a good starting point Brute - Electric Melee - Shield Defense.mxd
-
here is how i would go with Ice/Bio Brute - Ice Melee - Bio Armor.mxd
-
So i am looking at a few different ideas for my next brute and was interested how it would perform in end game content would appreciate some feed back on this build. This Villain build was built using Mids Reborn 3.4.7 https://github.com/LoadedCamel/MidsReborn Click this DataLink to open the build! Toxic Ice: Level 50 Mutation Brute Primary Power Set: Spines Secondary Power Set: Ice Armor Power Pool: Speed Power Pool: Leaping Power Pool: Fighting Power Pool: Concealment Ancillary Pool: Energy Mastery Villain Profile: Level 1: Lunge (A) Superior Blistering Cold - Recharge/Chance for Hold (3) Superior Blistering Cold - Damage/Endurance/Accuracy/RechargeTime (3) Superior Blistering Cold - Accuracy/Damage (5) Superior Blistering Cold - Damage/Endurance (5) Superior Blistering Cold - Accuracy/Damage/Endurance (7) Superior Blistering Cold - Accuracy/Damage/Recharge Level 1: Frozen Armor (A) Shield Wall - +Res (Teleportation), +5% Res (All) (7) Shield Wall - Defense (9) Shield Wall - Defense/Endurance (9) Shield Wall - Defense/Recharge (11) Shield Wall - Endurance/Recharge (11) Shield Wall - Defense/Endurance/Recharge Level 2: Spine Burst (A) Superior Avalanche - Recharge/Chance for Knockdown (13) Superior Avalanche - Accuracy/Damage/Endurance/Recharge (13) Superior Avalanche - Accuracy/Damage (15) Superior Avalanche - Damage/Endurance (15) Superior Avalanche - Accuracy/Damage/Endurance (17) Superior Avalanche - Accuracy/Damage/Recharge Level 4: Hoarfrost (A) Preventive Medicine - Chance for +Absorb (17) Preventive Medicine - Heal/RechargeTime/Endurance (19) Preventive Medicine - Heal (19) Preventive Medicine - Heal/Endurance (21) Preventive Medicine - Heal/RechargeTime (21) Impervium Armor - Psionic Resistance Level 6: Chilling Embrace (A) Pacing of the Turtle - Chance of -Recharge (23) Pacing of the Turtle - Endurance/Recharge/Slow (23) Pacing of the Turtle - Accuracy/Slow (25) Pacing of the Turtle - Damage/Slow (25) Pacing of the Turtle - Accuracy/Endurance (27) Pacing of the Turtle - Range/Slow Level 8: Super Speed (A) Quickfoot - Endurance Level 10: Wet Ice (A) Endurance Reduction IO Level 12: Combat Jumping (A) Reactive Defenses - Scaling Resist Damage (27) Reactive Defenses - Defense Level 14: Kick (A) Empty Level 16: Glacial Armor (A) Shield Wall - Defense (29) Shield Wall - Defense/Endurance (29) Shield Wall - Defense/Recharge (31) Shield Wall - Defense/Endurance/Recharge Level 18: Quills (A) Superior Brute's Fury - Recharge/Fury Bonus (31) Superior Brute's Fury - Accuracy/Damage/Endurance/Recharge (31) Superior Brute's Fury - Accuracy/Damage (33) Superior Brute's Fury - Damage/Recharge (33) Superior Brute's Fury - Accuracy/Damage/Recharge (33) Superior Brute's Fury - Damage/Endurance/RechargeTime Level 20: Hasten (A) Recharge Reduction IO (34) Recharge Reduction IO Level 22: Tough (A) Gladiator's Armor - TP Protection +3% Def (All) (34) Steadfast Protection - Resistance/+Def 3% (34) Impervium Armor - Psionic Resistance Level 24: Energy Absorption (A) Shield Wall - Defense (36) Shield Wall - Defense/Endurance (36) Shield Wall - Defense/Recharge (36) Shield Wall - Defense/Endurance/Recharge Level 26: Weave (A) Shield Wall - Defense (37) Shield Wall - Defense/Endurance (37) Shield Wall - Defense/Recharge (37) Shield Wall - Defense/Endurance/Recharge Level 28: Ripper (A) Armageddon - Chance for Fire Damage (39) Armageddon - Damage/Endurance (39) Armageddon - Damage (39) Armageddon - Damage/Recharge (40) Armageddon - Recharge/Accuracy (40) Sudden Acceleration - Knockback to Knockdown Level 30: Permafrost (A) Unbreakable Guard - +Max HP (40) Unbreakable Guard - Resistance/Endurance/RechargeTime (42) Unbreakable Guard - Resistance (42) Unbreakable Guard - Resistance/Endurance (42) Unbreakable Guard - RechargeTime/Resistance (43) Impervium Armor - Psionic Resistance Level 32: Throw Spines (A) Superior Frozen Blast - Recharge/Chance for Immobilize (43) Superior Frozen Blast - Damage/Endurance/Accuracy/RechargeTime (43) Superior Frozen Blast - Accuracy/Damage (45) Superior Frozen Blast - Damage/Endurance (45) Superior Frozen Blast - Accuracy/Damage/Endurance (45) Superior Frozen Blast - Accuracy/Damage/Recharge Level 35: Icicles (A) Superior Unrelenting Fury - RechargeTime/+Regen/+End (46) Superior Unrelenting Fury - Accuracy/Damage/Endurance/RechargeTime (46) Superior Unrelenting Fury - Accuracy/Damage (46) Superior Unrelenting Fury - Damage/RechargeTime (48) Superior Unrelenting Fury - Accuracy/Damage/RechargeTime (48) Superior Unrelenting Fury - Damage/Endurance/RechargeTime Level 38: Super Jump (A) Springfoot - Endurance Level 41: Stealth (A) Shield Wall - Defense (50) Shield Wall - Defense/Endurance (50) Shield Wall - Defense/Recharge (50) Shield Wall - Defense/Endurance/Recharge Level 44: Superior Conditioning (A) Performance Shifter - Chance for +End Level 47: Physical Perfection (A) Numina's Convalesence - +Regeneration/+Recovery Level 49: Build Up (A) Gaussian's Synchronized Fire-Control - To Hit Buff/Recharge Level 1: Brawl (A) Empty Level 1: Fury Level 1: Sprint Toxic Ice - Brute (Spines).mxd
-
thank you this was very informative
-
Sorry for my lack of knowledge but is there a list of the Secondary power sets that have built in damage bonuses and i don't mean damage auras.
-
Alpha = Cardiac Partial Core Revamp Interface = Diamagnetic Partial Radial Destiny = Clarion Partial Radial Hybrid = Mell Partial Core Graft Lore & Judgment i feel are both players preference
-
i want to thank everyone for there input i am going to try the claws and going to pair it with Ice as something different and always wanted to try ice armor anyway
-
some real good suggestions here and yes i did double up on Fire Aura but the brute is a farmer and the tank is not he is for all content. a lot of people seem to be pushing claws how is the damage out put i always thought claws was lacking in damage out put but i have never played it. is claws something that you can take out an AV with does it do enough DPS?
-
thank you everyone and i will take all the information i really did not know anything about stone armor prior to this so i have learned alot again thank you very much for the info
-
so i would like to work on a scrapper i have mostly played tankers and brutes at the moment i have a stone/rad brute / titan/bio brute / fire/ss tanker / ice/spines tanker and rad/fire brute farmer. i play solo a lot and once i hit 50 i would like to be able to solo at at least +2 x8. i don't want a repeat of power sets so no primaries or secondary power sets that i currently run on other characters. cost is no problem i have plenty of inf to build anything. thanks ahead of time for the recommendations.
-
if you want a lot of AOE try looking at Titan weapon and look at putting it with Energy Aura you can slot Entropic Aura with taunt enhancements to help keep thing on you.
-
been working on this build and would like some feed back it has not been tested yet. This Hero build was built using Mids Reborn 3.0.4.7 https://github.com/Reborn-Team/MidsReborn Click this DataLink to open the build! Mother Lode: Level 50 Technology Tanker Primary Power Set: Stone Armor Secondary Power Set: Fiery Melee Power Pool: Leaping Power Pool: Speed Power Pool: Fighting Power Pool: Leadership Ancillary Pool: Energy Mastery Hero Profile: Level 1: Rock Armor (A) Luck of the Gambler - Defense/Increased Global Recharge Speed (13) Shield Wall - +Res (Teleportation), +5% Res (All) (13) Shield Wall - Defense (15) Shield Wall - Defense/Endurance (50) Shield Wall - Defense/Endurance/Recharge Level 1: Scorch (A) Touch of Death - Chance of Damage(Negative) (15) Touch of Death - Damage/Endurance/Recharge (17) Touch of Death - Accuracy/Damage (17) Touch of Death - Damage/Endurance (19) Touch of Death - Damage/Recharge (19) Touch of Death - Accuracy/Damage/Endurance Level 2: Fire Sword (A) Superior Blistering Cold - Recharge/Chance for Hold (3) Superior Blistering Cold - Damage/Endurance/Accuracy/RechargeTime (3) Superior Blistering Cold - Accuracy/Damage (9) Superior Blistering Cold - Damage/Endurance (11) Superior Blistering Cold - Accuracy/Damage/Endurance (11) Superior Blistering Cold - Accuracy/Damage/Recharge Level 4: Combustion (A) Superior Gauntleted Fist - RechargeTime/+Absorb (5) Superior Gauntleted Fist - Accuracy/Damage/Endurance/RechargeTime (5) Superior Gauntleted Fist - Accuracy/Damage (7) Superior Gauntleted Fist - Damage/RechargeTime (7) Superior Gauntleted Fist - Accuracy/Damage/RechargeTime (9) Superior Gauntleted Fist - Damage/Endurance/RechargeTime Level 6: Combat Jumping (A) Karma - Defense/Endurance (48) Karma - Defense/Recharge (48) Karma - Knockback Protection Level 8: Stone Skin (A) Gladiator's Armor - TP Protection +3% Def (All) (37) Reactive Armor - Resistance/Endurance (37) Reactive Armor - Resistance/Recharge (43) Reactive Armor - Resistance Level 10: Earth's Embrace (A) Preventive Medicine - Chance for +Absorb (21) Preventive Medicine - Heal/RechargeTime (23) Preventive Medicine - Heal/RechargeTime/Endurance (36) Preventive Medicine - Endurance/RechargeTime (48) Preventive Medicine - Heal (50) Preventive Medicine - Heal/Endurance Level 12: Super Speed (A) Blessing of the Zephyr - Knockback Reduction (4 points) Level 14: Brimstone Armor (A) Reactive Armor - Resistance/Endurance (23) Reactive Armor - Resistance (25) Reactive Armor - Resistance/Recharge (25) Reactive Armor - Resistance/Endurance/Recharge Level 16: Taunt (A) Perfect Zinger - Taunt/Range Level 18: Crystal Armor (A) Luck of the Gambler - Defense/Increased Global Recharge Speed (21) Karma - Knockback Protection (27) Luck of the Gambler - Defense (43) Luck of the Gambler - Defense/Endurance Level 20: Build Up (A) Rectified Reticle - Increased Perception Level 22: Hasten (A) Recharge Reduction IO (34) Recharge Reduction IO Level 24: Kick (A) Empty Level 26: Minerals (A) Luck of the Gambler - Defense/Increased Global Recharge Speed (27) Luck of the Gambler - Defense Level 28: Breath of Fire (A) Overwhelming Force - Damage/Chance for Knockdown/Knockback to Knockdown (29) Overwhelming Force - Accuracy/Damage/Endurance/Recharge (29) Overwhelming Force - Accuracy/Damage (31) Overwhelming Force - Endurance/Recharge (31) Overwhelming Force - Accuracy/Damage/Endurance (31) Overwhelming Force - Damage/Endurance/Recharge Level 30: Tough (A) Steadfast Protection - Resistance/+Def 3% (34) Reactive Armor - Resistance (34) Reactive Armor - Resistance/Endurance (37) Reactive Armor - Resistance/Endurance/Recharge (40) Reactive Armor - Endurance Level 32: Weave (A) Luck of the Gambler - Defense/Increased Global Recharge Speed (33) Luck of the Gambler - Defense/Endurance (33) Reactive Defenses - Defense (33) Reactive Defenses - Scaling Resist Damage Level 35: Conserve Power (A) Recharge Reduction IO Level 38: Greater Fire Sword (A) Hecatomb - Chance of Damage(Negative) (39) Hecatomb - Damage/Endurance (39) Hecatomb - Damage (39) Hecatomb - Damage/Recharge (40) Hecatomb - Accuracy/Recharge (40) Hecatomb - Accuracy/Damage/Recharge Level 41: Physical Perfection (A) Preemptive Optimization - EndMod/Endurance/Recharge (42) Preemptive Optimization - EndMod/Accuracy/Recharge (42) Preemptive Optimization - Accuracy/Recharge (42) Preemptive Optimization - EndMod/Recharge (43) Preemptive Optimization - EndMod/Endurance (46) Preemptive Optimization - EndMod/Accuracy/Endurance Level 44: Fire Sword Circle (A) Superior Might of the Tanker - Recharge/Chance for +Res(All) (45) Superior Might of the Tanker - Accuracy/Damage/Endurance/Recharge (45) Superior Might of the Tanker - Accuracy/Damage (45) Superior Might of the Tanker - Damage/Recharge (46) Superior Might of the Tanker - Accuracy/Damage/Recharge (46) Superior Might of the Tanker - Damage/Endurance/Recharge Level 47: Maneuvers (A) Luck of the Gambler - Defense/Increased Global Recharge Speed Level 49: Tactics (A) Adjusted Targeting - To Hit Buff/Endurance/Recharge (50) Adjusted Targeting - To Hit Buff/Endurance Level 1: Gauntlet Level 1: Brawl

-
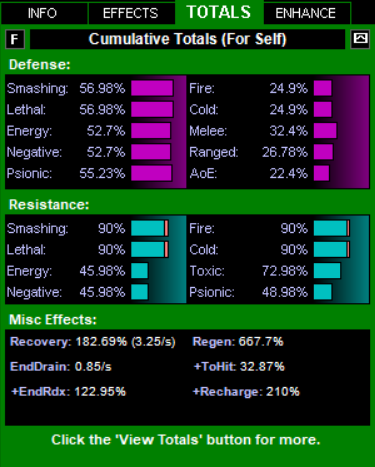
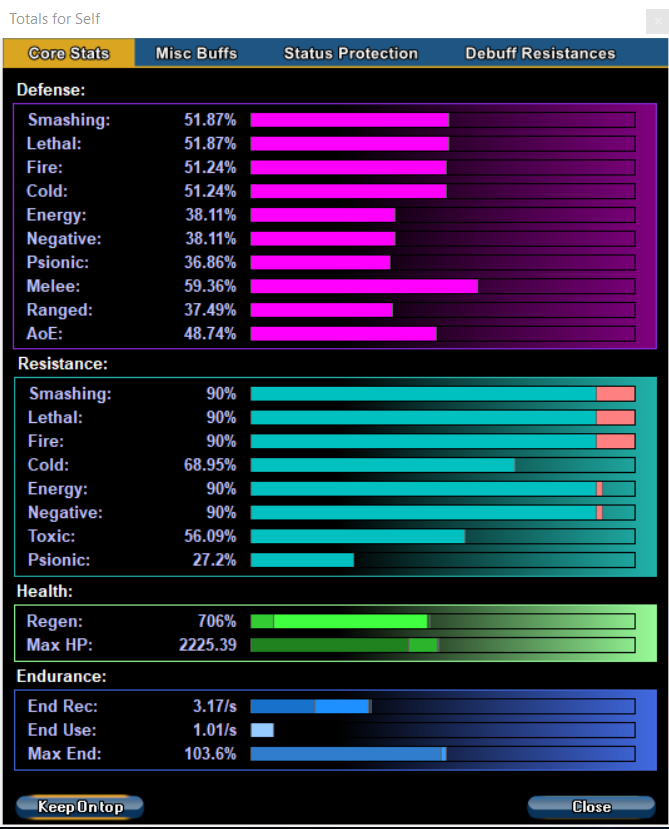
here is my tanker build currently he is still working on his accolades and incarnates but he is out performing my expectations all the way to 50 and up i have ran the 801.0 incarnate AE mission and completed it solo at +4 x8 in 45 min and had no real issues in ant TF's i have joined. Powers = Fire/SS/Energy Stats below with Incarnates also took Ageless Radial for the Debuff Resistance & Recharge This Hero build was built using Mids Reborn 3.0.4.7 https://github.com/Reborn-Team/MidsReborn Click this DataLink to open the build! Ultra Plus: Level 50 Mutation Tanker Primary Power Set: Fiery Aura Secondary Power Set: Super Strength Power Pool: Speed Power Pool: Leaping Power Pool: Fighting Power Pool: Leadership Ancillary Pool: Energy Mastery Hero Profile: Level 1: Blazing Aura (A) Superior Might of the Tanker - Recharge/Chance for +Res(All) (3) Superior Might of the Tanker - Accuracy/Damage/Endurance/Recharge (3) Superior Might of the Tanker - Accuracy/Damage (5) Superior Might of the Tanker - Damage/Recharge (5) Superior Might of the Tanker - Accuracy/Damage/Recharge (7) Superior Might of the Tanker - Damage/Endurance/Recharge Level 1: Jab (A) Superior Blistering Cold - Recharge/Chance for Hold (48) Superior Blistering Cold - Damage/Endurance/Accuracy/RechargeTime (48) Superior Blistering Cold - Accuracy/Damage (48) Superior Blistering Cold - Damage/Endurance (50) Superior Blistering Cold - Accuracy/Damage/Endurance (50) Superior Blistering Cold - Accuracy/Damage/Recharge Level 2: Fire Shield (A) Aegis - Psionic/Status Resistance (7) Aegis - Resistance (9) Aegis - Resistance/Endurance (9) Aegis - Resistance/Endurance/Recharge (11) Aegis - Endurance/Recharge Level 4: Healing Flames (A) Unbreakable Guard - +Max HP (11) Unbreakable Guard - Resistance (13) Unbreakable Guard - Resistance/Endurance (13) Unbreakable Guard - Resistance/Endurance/RechargeTime Level 6: Hasten (A) Recharge Reduction IO (15) Recharge Reduction IO Level 8: Temperature Protection (A) Gladiator's Armor - TP Protection +3% Def (All) (15) Steadfast Protection - Resistance/+Def 3% (17) Steadfast Protection - Knockback Protection Level 10: Taunt (A) Perfect Zinger - Taunt/Range Level 12: Consume (A) Superior Avalanche - Accuracy/Damage/Endurance/Recharge (17) Superior Avalanche - Accuracy/Damage (19) Superior Avalanche - Damage/Endurance (19) Superior Avalanche - Accuracy/Damage/Endurance (21) Superior Avalanche - Accuracy/Damage/Recharge Level 14: Plasma Shield (A) Unbreakable Guard - Resistance/Endurance/RechargeTime (21) Unbreakable Guard - Resistance (23) Unbreakable Guard - Resistance/Endurance (23) Unbreakable Guard - RechargeTime/Resistance Level 16: Combat Jumping (A) Luck of the Gambler - Defense/Increased Global Recharge Speed (25) Reactive Defenses - Scaling Resist Damage (25) Shield Wall - +Res (Teleportation), +5% Res (All) (27) Shield Wall - Defense (27) Shield Wall - Defense/Endurance (29) Shield Wall - Endurance/Recharge Level 18: Burn (A) Superior Gauntleted Fist - RechargeTime/+Absorb (29) Superior Gauntleted Fist - Accuracy/Damage/Endurance/RechargeTime (31) Superior Gauntleted Fist - Accuracy/Damage (31) Superior Gauntleted Fist - Damage/RechargeTime (31) Superior Gauntleted Fist - Accuracy/Damage/RechargeTime (33) Superior Gauntleted Fist - Damage/Endurance/RechargeTime Level 20: Knockout Blow (A) Touch of Death - Chance of Damage(Negative) (33) Touch of Death - Damage/Endurance/Recharge (33) Touch of Death - Accuracy/Damage (34) Touch of Death - Damage/Endurance (34) Touch of Death - Damage/Recharge (34) Touch of Death - Accuracy/Damage/Endurance Level 22: Kick (A) Empty Level 24: Tough (A) Aegis - Resistance (36) Aegis - Resistance/Endurance (36) Aegis - Resistance/Recharge (36) Aegis - Endurance/Recharge (37) Aegis - Resistance/Endurance/Recharge Level 26: Weave (A) Luck of the Gambler - Defense/Increased Global Recharge Speed (37) Shield Wall - Defense (37) Shield Wall - Defense/Endurance (39) Shield Wall - Defense/Endurance/Recharge (39) Shield Wall - Endurance/Recharge Level 28: Fiery Embrace (A) Recharge Reduction IO Level 30: Rage (A) Gaussian's Synchronized Fire-Control - Chance for Build Up Level 32: Maneuvers (A) Luck of the Gambler - Defense/Increased Global Recharge Speed (39) Shield Wall - Defense (40) Shield Wall - Defense/Endurance (40) Shield Wall - Endurance/Recharge (40) Shield Wall - Defense/Endurance/Recharge Level 35: Haymaker (A) Pulverizing Fisticuffs - Accuracy/Damage (42) Pulverizing Fisticuffs - Accuracy/Damage/Recharge (43) Pulverizing Fisticuffs - Accuracy/Damage/Endurance/Recharge (43) Gladiator's Strike - Chance for Smashing Damage (43) Gladiator's Strike - Damage/Endurance/Recharge (46) Sudden Acceleration - Knockback to Knockdown Level 38: Foot Stomp (A) Armageddon - Chance for Fire Damage (45) Armageddon - Damage/Endurance (45) Armageddon - Damage (45) Armageddon - Damage/Recharge (46) Armageddon - Accuracy/Damage/Recharge (46) Sudden Acceleration - Knockback to Knockdown Level 41: Conserve Power (A) Recharge Reduction IO Level 44: Physical Perfection (A) Performance Shifter - Chance for +End (50) Performance Shifter - EndMod Level 47: Super Jump (A) Blessing of the Zephyr - Knockback Reduction (4 points) Level 49: Super Speed (A) Blessing of the Zephyr - Knockback Reduction (4 points) Level 1: Gauntlet Level 1: Brawl
-
ok thank you i got my son to come over and he helped me set it up
-
i have ran many of brutes of all kinds i would say out of your choices i would go either Ice /Rad or Ice/Bio both have a lot of survivability built in damage/healing/regen/to-hit/endurance recovery/ recharge lol i could go on and on but in my mind Radiation and Bio are the most well rounded sets with propyl willpower and invulnerability just behind them. don't get me wrong ever secondary power for a brute can be built to be almost indestructible but these 2 tend to stand out to me personally. at work now but tomorrow morning i can post a couple of builds that you can look over.
-
lol i will use anything i did like the way the popmenu + bind worked better seems simpler
-
i have tried many times to get the binds to work for combining inspirations to no avail. i am not the most computer savvy so i am sure that is the problem. is there a step by step instructions on how to do this. i have looked over the guides. Advanced Binds - Combining Inspirations in to Reds (Automatically) - for Brutes/Farmers and Zen and the art of farming but i have no idea what i am doing when it comes to making these work can anyone help me with this.
-
ok i looked it up whirling smash increased from 10 targets to 16 and arc of destruction increased from 5 targets to 10 but there was no radius increases for Titan weapons'
-
I don't ever see tankers taking Titan Weapons' is it not a good fit for tanks or is there another reason i would think with all the aoe/pbaoe that it has that it would be good for tanking.
-
i never said anything about slowing down DPS i said the scattered mobs make it to were melee players have to run all over the place. and as a tank i do move on to the next group but only after the Bosses are down and i know the team can handle what i leave them. i also am not saying that everyone plays that way just seems like more recently there has been more times than not i am seeing this happen and i may be keeping a couple bosses on me and 10 other things and people are running ahead and pulling stuff then complaining that the tank could not hold agro. lol i guess i am just venting a little here i still love the game and even at this moment can't wait to get off work to be able to get on and play.
-
So how many of you have got on to a team and as the fighting begins you are having to run around like crazy to get to your targets because the ranged and controller types have either locked everything down all spread apart or his the area with an attack that has the enemies scattering around like crazy. i love playing tanks not saying i am the greatest at it i for sure could use some improvement. but some times i think that non melee characters don't understand that melee do there best when everything is in a close group. it helps with the tanker getting and keeping agro, it allows the brute to increase his fury easier and i don't know if it is true but it seems like on a scrapper and stalker when they don't have to run all over the place and the more steady there attack chain is the more critical hit you see. i know it seems wrong to just stand there but i have found that in the groups i have played with that allow the the tank to group things up and melee begin there attacks then controllers lock the group down and or ranged attacks begin things seem to go a lot better and a lot less chance of deaths. i know that there are ambushes that jump in but that is when you tank should grab there agro and leave the rest of the melee to deal with the group that is locked down or being dealt with . Everyone in COH now a days seems to be in a huge rush to get through everything i find my self at times wanting to rush through content as well i wonder how many people playing today know the story behind the missions that they are running and how many just click to get to the next mission.
-
ok don't get me wrong this build is doing very well i can run normal content witch is what it is for with no issues but just wondering if it can be better. This Hero build was built using Mids Reborn 3.0.4.7 https://github.com/Reborn-Team/MidsReborn Click this DataLink to open the build! Level 50 Magic Tanker Primary Power Set: Fiery Aura Secondary Power Set: Super Strength Power Pool: Speed Power Pool: Leaping Power Pool: Fighting Power Pool: Leadership Ancillary Pool: Energy Mastery Hero Profile: Level 1: Blazing Aura (A) Superior Might of the Tanker - Recharge/Chance for +Res(All) (3) Superior Might of the Tanker - Accuracy/Damage/Endurance/Recharge (3) Superior Might of the Tanker - Accuracy/Damage (5) Superior Might of the Tanker - Damage/Recharge (5) Superior Might of the Tanker - Accuracy/Damage/Recharge (7) Superior Might of the Tanker - Damage/Endurance/Recharge Level 1: Jab (A) Superior Blistering Cold - Recharge/Chance for Hold (48) Superior Blistering Cold - Damage/Endurance/Accuracy/RechargeTime (48) Superior Blistering Cold - Accuracy/Damage (48) Superior Blistering Cold - Damage/Endurance (50) Superior Blistering Cold - Accuracy/Damage/Endurance (50) Superior Blistering Cold - Accuracy/Damage/Recharge Level 2: Fire Shield (A) Aegis - Psionic/Status Resistance (7) Aegis - Resistance (9) Aegis - Resistance/Endurance (9) Aegis - Resistance/Endurance/Recharge (11) Aegis - Endurance/Recharge Level 4: Healing Flames (A) Unbreakable Guard - +Max HP (11) Unbreakable Guard - Resistance (13) Unbreakable Guard - Resistance/Endurance (13) Unbreakable Guard - Resistance/Endurance/RechargeTime Level 6: Hasten (A) Recharge Reduction IO (15) Recharge Reduction IO Level 8: Temperature Protection (A) Gladiator's Armor - TP Protection +3% Def (All) (15) Steadfast Protection - Resistance/+Def 3% (17) Steadfast Protection - Knockback Protection Level 10: Taunt (A) Perfect Zinger - Taunt/Range Level 12: Consume (A) Superior Avalanche - Accuracy/Damage/Endurance/Recharge (17) Superior Avalanche - Accuracy/Damage (19) Superior Avalanche - Damage/Endurance (19) Superior Avalanche - Accuracy/Damage/Endurance (21) Superior Avalanche - Accuracy/Damage/Recharge Level 14: Plasma Shield (A) Unbreakable Guard - Resistance/Endurance/RechargeTime (21) Unbreakable Guard - Resistance (23) Unbreakable Guard - Resistance/Endurance (23) Unbreakable Guard - RechargeTime/Resistance Level 16: Combat Jumping (A) Luck of the Gambler - Defense/Increased Global Recharge Speed (25) Reactive Defenses - Scaling Resist Damage (25) Shield Wall - +Res (Teleportation), +5% Res (All) (27) Shield Wall - Defense (27) Shield Wall - Defense/Endurance (29) Shield Wall - Endurance/Recharge Level 18: Burn (A) Superior Gauntleted Fist - RechargeTime/+Absorb (29) Superior Gauntleted Fist - Accuracy/Damage/Endurance/RechargeTime (31) Superior Gauntleted Fist - Accuracy/Damage (31) Superior Gauntleted Fist - Damage/RechargeTime (31) Superior Gauntleted Fist - Accuracy/Damage/RechargeTime (33) Superior Gauntleted Fist - Damage/Endurance/RechargeTime Level 20: Knockout Blow (A) Touch of Death - Chance of Damage(Negative) (33) Touch of Death - Damage/Endurance/Recharge (33) Touch of Death - Accuracy/Damage (34) Touch of Death - Damage/Endurance (34) Touch of Death - Damage/Recharge (34) Touch of Death - Accuracy/Damage/Endurance Level 22: Kick (A) Empty Level 24: Tough (A) Aegis - Resistance (36) Aegis - Resistance/Endurance (36) Aegis - Resistance/Recharge (36) Aegis - Endurance/Recharge (37) Aegis - Resistance/Endurance/Recharge Level 26: Weave (A) Luck of the Gambler - Defense/Increased Global Recharge Speed (37) Shield Wall - Defense (37) Shield Wall - Defense/Endurance (39) Shield Wall - Defense/Endurance/Recharge (39) Shield Wall - Endurance/Recharge Level 28: Fiery Embrace (A) Recharge Reduction IO Level 30: Rage (A) Gaussian's Synchronized Fire-Control - Chance for Build Up Level 32: Maneuvers (A) Luck of the Gambler - Defense/Increased Global Recharge Speed (39) Shield Wall - Defense (40) Shield Wall - Defense/Endurance (40) Shield Wall - Endurance/Recharge (40) Shield Wall - Defense/Endurance/Recharge Level 35: Haymaker (A) Pulverizing Fisticuffs - Accuracy/Damage (42) Pulverizing Fisticuffs - Accuracy/Damage/Recharge (43) Pulverizing Fisticuffs - Accuracy/Damage/Endurance/Recharge (43) Gladiator's Strike - Chance for Smashing Damage (43) Gladiator's Strike - Damage/Endurance/Recharge (46) Sudden Acceleration - Knockback to Knockdown Level 38: Foot Stomp (A) Armageddon - Chance for Fire Damage (45) Armageddon - Damage/Endurance (45) Armageddon - Damage (45) Armageddon - Damage/Recharge (46) Armageddon - Accuracy/Damage/Recharge (46) Sudden Acceleration - Knockback to Knockdown Level 41: Conserve Power (A) Recharge Reduction IO Level 44: Physical Perfection (A) Performance Shifter - Chance for +End (50) Performance Shifter - EndMod Level 47: Super Jump (A) Blessing of the Zephyr - Knockback Reduction (4 points) Level 49: Super Speed (A) Blessing of the Zephyr - Knockback Reduction (4 points) Level 1: Gauntlet Level 1: Brawl