hakurr
-
Posts
232 -
Joined
-
Last visited
Content Type
Profiles
Forums
Events
Store
Articles
Patch Notes
Everything posted by hakurr
-
I stand corrected it has been a couple years since i played my War Mace toon i just don't remember it doing that.
-
really the biggest differences between Battle Axe and War mace are 1. Battle Axe is Knockdown and War Mace is Knockback and 2. Battle Axe has Axe Cyclone for it's PBAOE that pulls enemies toward you when you use it and War Mace has Whirling Mace that is a PBAOE but does not pull enemies toward you. 3. Battle Axe has Cleave that is a ranged attack and even though it does not say it, it is kind of a small cone as well if 2 enemies are standing next to each other you will do damage to both of them. War Mace has Shatter that is not ranged and does only ST damage
-
i have ran just about every set on a brute at some point and i really like Radiation Armor the best i am not saying it is the best but i have enjoyed it the most on a brute and as far as Primary offensive power i lean toward Battle Axe myself it is hard hitting good combination of ST attacks and AOE attacks and it does knockdown not knockback i really do not like knockback on my melee toons. Radiation has good resist ability and plenty of healing and endurance and it's Tier 9 power meltdown you never notice the crash.
-
i run a Battle Axe / Super Reflex Brute and he has no issues and is extremely fun to play i converted it over to Martial Arts take a look it may help you on direction to go. Melee Defence is a little higher than i was going for but was hard to get it to stay closer to the 57% also i don't take Elude i personally don't like the crash on it. Brute - Martial Arts - Super Reflexes.mbd
-
i have really enjoyed playing Battle Axe ever since they revamped it and was wonder if anyone has tried it on a farmer and if so how did it perform i am not looking for it to be the fastest or best farmer but does it perform well is it fun to play? My thought is you would open with Axe Cyclone and pull stuff in the hit them with Pendulum and knock a bunch down followed with Ball Lightening the Electric Fence and for the EB's you would have Cleave as your single target to beet them down.
-
Battle Axe / Stone that is all you need!!!
-
i play a little different than most i never build with T9 power to be used nor due i build with the idea that my incarnate will get me to were i want to be. that being said i would recommend out of the secondary's you have listed to go with Stone. Stone can reach survivability with good damage and recharge on its own. That being said i would say take a look at Bio before you make a decision i know not everyone likes Bio but it has everything needed built in to be able to survive solo or run with a team.
-
just 1 i found on internet
-
-
i would go with Dark Armor / Electric Melee but i guess depends on how you like to play fully built out Dark armor can have 90%+ Resist to S/L/F/C/N/P/T and be in the 80%range on Cold, it can also have close to soft cap of S/L/M Defense. and if something does get threw and do damage to you you can fully heal in about 7 sec. i personally like the aesthetics of Electric Melee better
-

Looking for help to recreate a character based on Weapon Hex
hakurr replied to NecroLord27's topic in Scrapper
Claws / Willpower and use aura's in costume design -
thank you that helps
-
i have been trying to look up and see what Energy Focus actually does for you in Energy Melee and on now?
-
So I was just wondering how well does Energy Malee perform on a scrapper?
-
Jedi master cool concept i would do Duel Blades / Energy Aura i feel that the energy aura is more like the force that you are using to protect your self.
-
when i am at full health i sit 50% S&L 48% F&C and 49% E&NE but when i get over whelmed in a fight and my health drops to about 30% they are all at 90%. and normally my health then stops dropping. i solo 90% of the time and normally run all missions at +2X8
-
i thought you use to be able to change the name of a supergroup does anyone know how to do that?
-
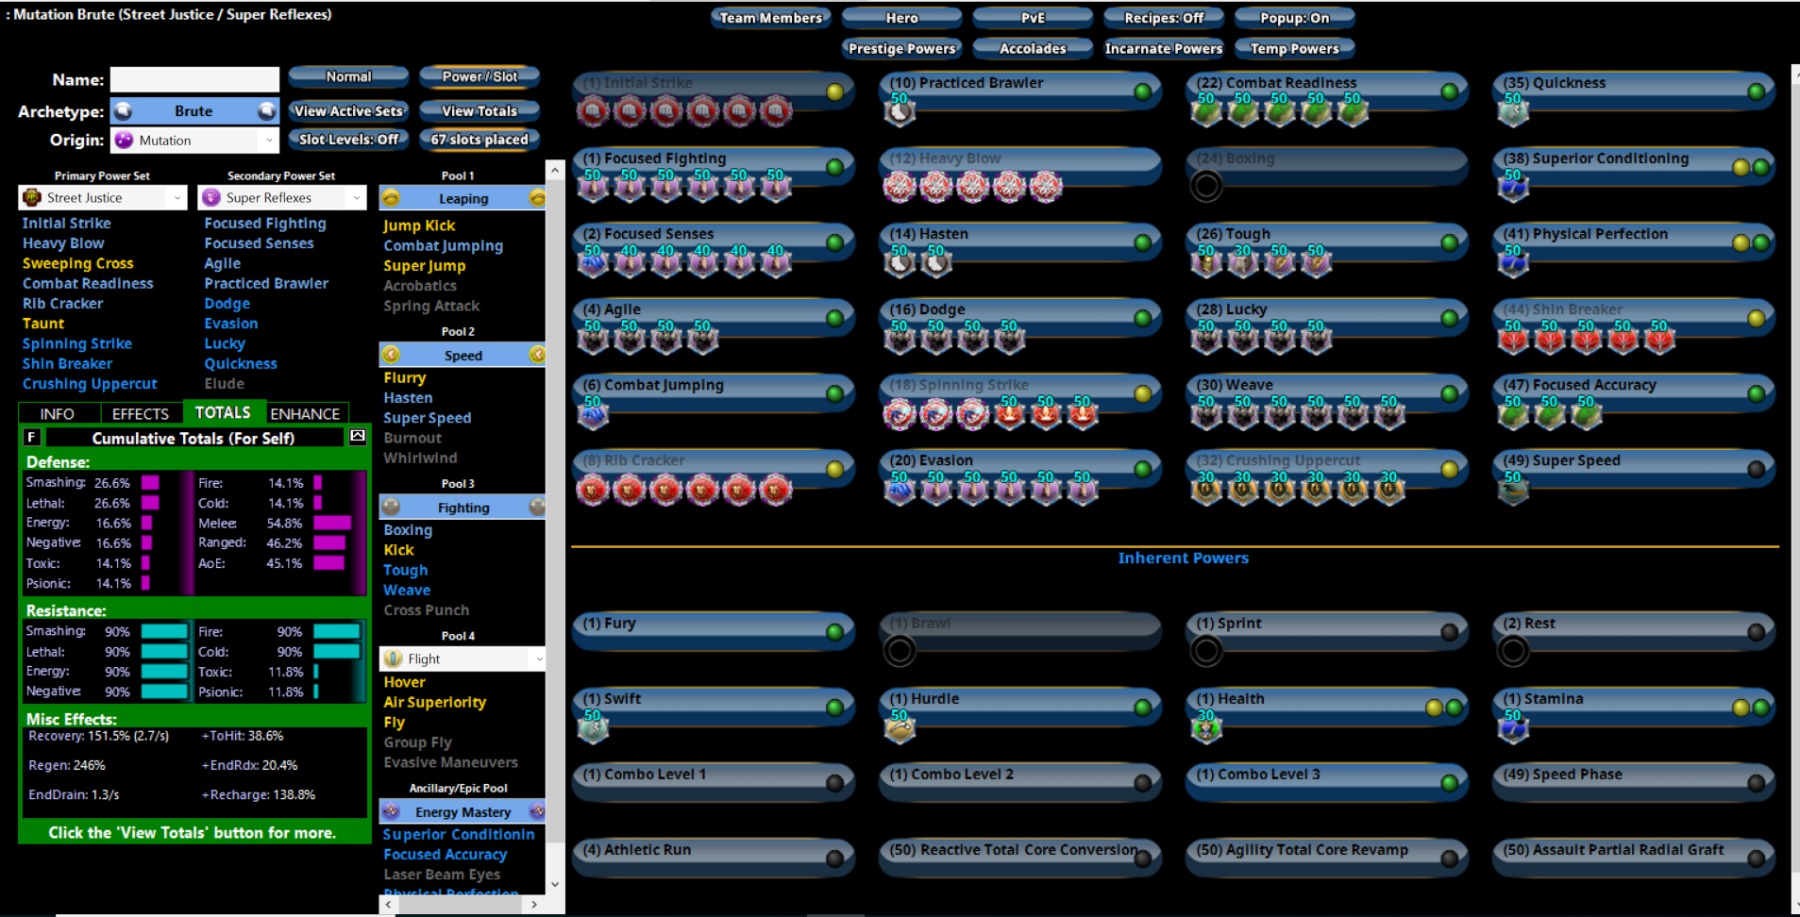
Here is another option or take on the build but it may be a little more expensive. and these numbers are before incarnates Brute - Street Justice - Super Reflexes.mbd

-
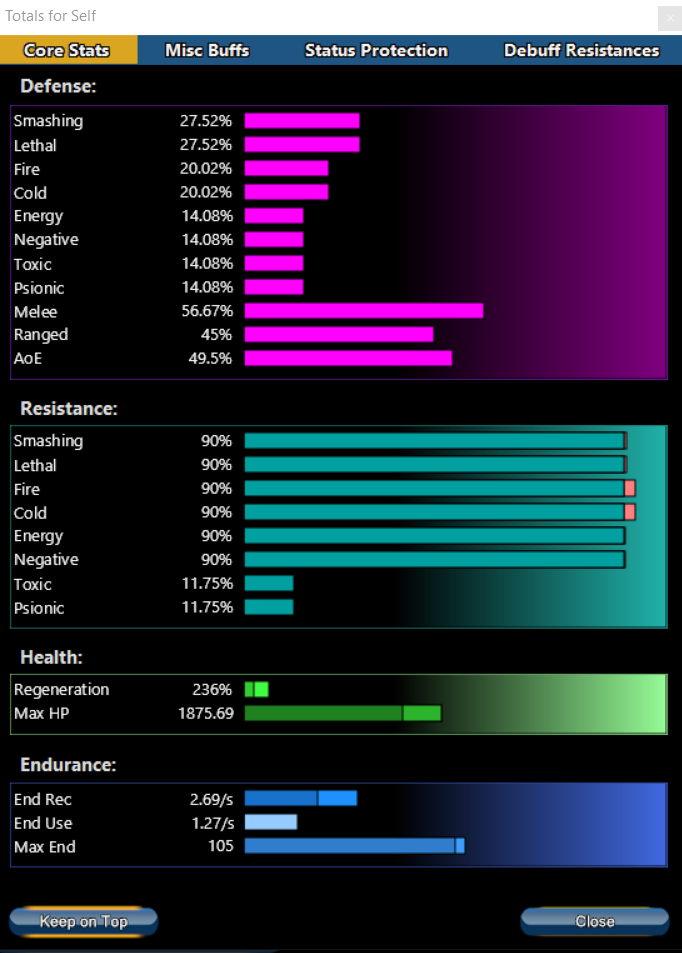
Looking for Feedback i have tried to optimize yet get as much as i can out of this build am i missing anything or should i look at more recharge and damage and less resist? Hero Brute Build plan made with Mids' Reborn v3.6.6 rev. 3 ────────────────────────────── Primary powerset: Battle AxeSecondary powerset: Super ReflexesPool powerset (#1): LeapingPool powerset (#2): SpeedPool powerset (#3): FightingPool powerset (#4): FlightEpic powerset: Energy Mastery ────────────────────────────── Powers taken: Level 1: Beheader A: Superior Brute's Fury: Recharge/Fury Bonus3: Superior Brute's Fury: Accuracy/Damage/Endurance/Recharge3: Superior Brute's Fury: Accuracy/Damage5: Superior Brute's Fury: Damage/Recharge5: Superior Brute's Fury: Accuracy/Damage/Recharge7: Superior Brute's Fury: Damage/Endurance/RechargeTime Level 1: Focused Fighting A: Reactive Defenses: Scaling Resist Damage7: Reactive Defenses: Defense/Endurance/RechargeTime9: Reactive Defenses: Defense9: Reactive Defenses: Defense/Endurance11: Reactive Defenses: Endurance/RechargeTime11: Reactive Defenses: Defense/RechargeTime Level 2: Focused Senses A: Luck of the Gambler: Defense/Endurance13: Reactive Defenses: Defense/Endurance/RechargeTime13: Reactive Defenses: Defense15: Reactive Defenses: Defense/Endurance15: Reactive Defenses: Endurance/RechargeTime17: Reactive Defenses: Defense/RechargeTime Level 4: Agile A: Shield Wall: Defense/Endurance17: Shield Wall: Defense/Recharge19: Shield Wall: Defense19: Shield Wall: Defense/Endurance/Recharge Level 6: Combat Jumping A: Luck of the Gambler: Defense/Increased Global Recharge Speed Level 8: Pendulum A: Superior Unrelenting Fury: RechargeTime/+Regen/+End21: Superior Unrelenting Fury: Accuracy/Damage/Endurance/RechargeTime25: Superior Unrelenting Fury: Accuracy/Damage27: Superior Unrelenting Fury: Damage/RechargeTime27: Superior Unrelenting Fury: Accuracy/Damage/RechargeTime42: Superior Unrelenting Fury: Damage/Endurance/RechargeTime Level 10: Practiced Brawler A: Invention: Recharge Reduction Level 12: Gash A: Superior Blistering Cold: Recharge/Chance for Hold33: Superior Blistering Cold: Damage/Endurance/Accuracy/RechargeTime43: Superior Blistering Cold: Accuracy/Damage43: Superior Blistering Cold: Damage/Endurance43: Superior Blistering Cold: Accuracy/Damage/Endurance48: Superior Blistering Cold: Accuracy/Damage/Recharge Level 14: Hasten A: Invention: Recharge Reduction21: Invention: Recharge Reduction Level 16: Dodge A: Shield Wall: Defense/Endurance31: Shield Wall: Defense/Recharge31: Shield Wall: Defense31: Shield Wall: Defense/Endurance/Recharge Level 18: Swoop A: Hecatomb: Chance of Damage(Negative)29: Hecatomb: Damage/Endurance40: Hecatomb: Damage45: Hecatomb: Damage/Recharge46: Hecatomb: Damage/Recharge/Accuracy Level 20: Evasion A: Luck of the Gambler: Defense/Endurance23: Reactive Defenses: Defense/Endurance/RechargeTime23: Reactive Defenses: Defense33: Reactive Defenses: Defense/Endurance46: Reactive Defenses: Endurance/RechargeTime50: Reactive Defenses: Defense/RechargeTime Level 22: Build Up A: Adjusted Targeting: Recharge25: Adjusted Targeting: To Hit Buff/Endurance40: Adjusted Targeting: To Hit Buff42: Adjusted Targeting: To Hit Buff/Recharge48: Adjusted Targeting: To Hit Buff/Endurance/Recharge Level 24: Boxing (Empty) Level 26: Tough A: Gladiator's Armor: TP Protection +3% Def (All)29: Steadfast Protection: Resistance/+Def 3%40: Unbreakable Guard: +Max HP42: Unbreakable Guard: Resistance/Endurance Level 28: Lucky A: Shield Wall: Defense/Endurance39: Shield Wall: Defense/Recharge39: Shield Wall: Defense39: Shield Wall: Defense/Endurance/Recharge Level 30: Weave A: Shield Wall: Defense/Endurance33: Shield Wall: Defense/Recharge34: Shield Wall: Endurance/Recharge34: Shield Wall: Defense/Endurance/Recharge34: Shield Wall: Defense37: Shield Wall: +Res (Teleportation), +5% Res (All) Level 32: Cleave A: Multi-Strike: Damage/Endurance/Recharge36: Multi-Strike: Accuracy/Damage/Endurance36: Multi-Strike: Accuracy/Damage37: Multi-Strike: Damage/Endurance37: Multi-Strike: Damage/Recharge36: Multi-Strike: Accuracy/Endurance Level 35: Quickness A: Invention: Run Speed Level 38: Superior Conditioning A: Performance Shifter: Chance for +End Level 41: Physical Perfection A: Performance Shifter: Chance for +End Level 44: Axe Cyclone A: Armageddon: Chance for Fire Damage45: Armageddon: Damage/Endurance46: Armageddon: Damage48: Armageddon: Damage/Recharge45: Armageddon: Damage/Recharge/Accuracy Level 47: Focused Accuracy A: Adjusted Targeting: To Hit Buff/Endurance50: Adjusted Targeting: Endurance/Recharge50: Adjusted Targeting: To Hit Buff Level 49: Super Speed A: Thrust: Endurance/Running ────────────────────────────── Inherents: Level 1: Fury Level 1: Brawl (Empty) Level 1: Sprint (Empty) Level 2: Rest (Empty) Level 1: Swift A: Invention: Run Speed Level 1: Hurdle A: Invention: Jumping Level 1: Health A: Panacea: +Hit Points/Endurance Level 1: Stamina A: Performance Shifter: Chance for +End Level 49: Speed Phase Level 4: Athletic Run ────────────────────────────── Incarnates: Reactive Total Core ConversionAgility Total Core RevampAssault Partial Radial Graft ────────────────────────────── Stats Breakdown: - Defense - Smashing: 27.52%Lethal: 27.52%Fire: 20.02%Cold: 20.02%Energy: 14.08%Negative: 14.08%Toxic: 14.08%Psionic: 14.08%Melee: 56.67%Ranged: 45%AoE: 49.5% - Resistance - Smashing: 90%Lethal: 90%Fire: 90%Cold: 90%Energy: 90%Negative: 90%Toxic: 11.75%Psionic: 11.75% - HP & Endurance - Regeneration: 236%Max HP: 1875.69 | End Recovery: 2.69/sEnd Use: 1.27/s End. (Net gain: 1.42/s)Max End: 105 - Movement - Run Speed: 28.59 mphJump Speed: 39.85 mphJump Height: 21.5 ftFly Speed: 0 mph - Stealth & Perception - Stealth (PvE): 0 ftStealth (PvP): 0 ftPerception: 1100 ft - Misc - Haste: 241.25%ToHit: 38.57%Accuracy: 59%Damage: 334.5%End Rdx: 20.4%Threat: 400 - Status Protection - Held: 10.38Stunned: 10.38Sleep: 10.38Immobilized: 20.76Knockback: 10Repel: 0Confused: 10.38Terrorized: 0Taunt: 4Placate: 0Teleport: 0 - Status Resistance - Held: 147.5%Stunned: 147.5%Sleep: 208.05%Immobilized: 208.05%Knockback: 10000%Repel: 0%Confused: 147.5%Terrorized: 147.5%Taunt: 0%Placate: 0%Teleport: 200% - Debuff Resistance - Defense: 95%Endurance: 0%Recovery: 0%PerceptionRadius: 100%ToHit: 69.2%RechargeTime: 55%SpeedRunning: 55%Regeneration: 0% ────────────────────────────── Set Effects Breakdown Superior Brute's Fury (Beheader) 44.98 HP (3%) HitPoints5% Defense(Smashing,Lethal), 2.5% Defense(Melee)4% DamageBuff(All)+10% Enhancement(RechargeTime)6% Resistance(Smashing,Lethal), 10% Status Resistance Reactive Defenses (Focused Fighting) 1.5% Resistance(Smashing,Lethal), 2.5% Status Resistance28.11 HP (1.88%) HitPoints3% Resistance(Fire,Cold), 5% Status Resistance3.75% Enhancement(EnduranceDiscount)+8.75% Enhancement(RechargeTime)3% Resistance(All) Reactive Defenses (Focused Senses) 1.5% Resistance(Smashing,Lethal), 2.5% Status Resistance28.11 HP (1.88%) HitPoints3% Resistance(Fire,Cold), 5% Status Resistance3.75% Enhancement(EnduranceDiscount) Shield Wall (Agile) 10% (0.62 HP/sec) Regeneration33.73 HP (2.25%) HitPoints4.5% Resistance(Energy,Negative), 7.5% Status Resistance Luck of the Gambler (Combat Jumping) +7.5% Enhancement(RechargeTime) Superior Unrelenting Fury (Pendulum) 4% DamageBuff(All)16% (1 HP/sec) Regeneration4% (0.07 End/sec) Recovery5% Defense(Melee), 2.5% Defense(Lethal), 2.5% Defense(Smashing)6% Resistance(Energy,Negative), 10% Status Resistance, 6% Resistance(Smashing,Lethal), 6% Resistance(Fire,Cold) Superior Blistering Cold (Gash) 15% ResEffect(SpeedRunning), 15% ResEffect(RechargeTime), 15% ResEffect(SpeedFlying)4% (0.07 End/sec) Recovery6% Resistance(Fire,Cold), 10% Status Resistance5% Defense(Smashing,Lethal), 2.5% Defense(Melee)5% Defense(Fire,Cold), 2.5% Defense(AoE) Shield Wall (Dodge) 10% (0.62 HP/sec) Regeneration33.73 HP (2.25%) HitPoints4.5% Resistance(Energy,Negative), 7.5% Status Resistance Hecatomb (Swoop) 4% (0.07 End/sec) Recovery6% Resistance(Fire,Cold), 10% Status Resistance+15% Enhancement(Accuracy)+10% Enhancement(RechargeTime) Reactive Defenses (Evasion) 1.5% Resistance(Smashing,Lethal), 2.5% Status Resistance28.11 HP (1.88%) HitPoints3% Resistance(Fire,Cold), 5% Status Resistance3.75% Enhancement(EnduranceDiscount) Adjusted Targeting (Build Up) 2% DamageBuff(All)3% Resistance(Energy,Negative), 5% Status Resistance+9% Enhancement(Accuracy)+5% Enhancement(RechargeTime) Gladiator's Armor (Tough) 3% Defense(All), 100% MezResist(Teleport) (20% chance) Steadfast Protection (Tough) 3% Defense(All) Unbreakable Guard (Tough) 2.5% Enhancement(EnduranceDiscount)112.4 HP (7.5%) HitPoints Shield Wall (Lucky) 10% (0.62 HP/sec) Regeneration33.73 HP (2.25%) HitPoints4.5% Resistance(Energy,Negative), 7.5% Status Resistance Shield Wall (Weave) 10% (0.62 HP/sec) Regeneration33.73 HP (2.25%) HitPoints4.5% Resistance(Energy,Negative), 7.5% Status Resistance2.5% DamageBuff(All)3.75% Resistance(Toxic,Psionic), 6.25% Status Resistance5% Resistance(All), 100% MezResist(Teleport) (20% chance) Multi-Strike (Cleave) 1.5% Resistance(Smashing,Lethal), 2.5% Status Resistance1.5% Resistance(Fire,Cold), 2.5% Status Resistance2.25% Resistance(Energy,Negative), 3.75% Status Resistance1.88% Defense(AoE), 0.94% Defense(Fire), 0.94% Defense(Cold)1.88% Defense(Melee), 0.94% Defense(Lethal), 0.94% Defense(Smashing) Armageddon (Axe Cyclone) 4% (0.07 End/sec) Recovery6% Resistance(Fire,Cold), 10% Status Resistance+15% Enhancement(Accuracy)+10% Enhancement(RechargeTime) Adjusted Targeting (Focused Accuracy) 2% DamageBuff(All)3% Resistance(Energy,Negative), 5% Status Resistance ────────────────────────────── Set Buffs Totals Damage(All) (14.5% Total)+4% Damage(All) (From Superior Brute's Fury in Beheader)+4% Damage(All) (From Superior Unrelenting Fury in Pendulum)+2.5% Damage(All) (From Shield Wall in Weave)+2% Damage(All) (From Adjusted Targeting in Build Up)+2% Damage(All) (From Adjusted Targeting in Focused Accuracy) S/L Defense (19.44% Total)+5% S/L Defense (From Superior Brute's Fury in Beheader)+5% S/L Defense (From Superior Blistering Cold in Gash)+3% S/L Defense (From Gladiator's Armor: TP Protection +3% Def (All) in Tough)+3% S/L Defense (From Steadfast Protection: Resistance/+Def 3% in Tough)+2.5% S/L Defense (From Superior Unrelenting Fury in Pendulum)+0.94% S/L Defense (From Multi-Strike in Cleave) Fire/Cold Defense (11.94% Total)+5% Fire/Cold Defense (From Superior Blistering Cold in Gash)+3% Fire/Cold Defense (From Gladiator's Armor: TP Protection +3% Def (All) in Tough)+3% Fire/Cold Defense (From Steadfast Protection: Resistance/+Def 3% in Tough)+0.94% Fire/Cold Defense (From Multi-Strike in Cleave) Energy/Negative Defense (6% Total)+3% Energy/Negative Defense (From Gladiator's Armor: TP Protection +3% Def (All) in Tough)+3% Energy/Negative Defense (From Steadfast Protection: Resistance/+Def 3% in Tough) Defense (Toxic) (6% Total)+3% Defense(Toxic) (From Gladiator's Armor: TP Protection +3% Def (All) in Tough)+3% Defense(Toxic) (From Steadfast Protection: Resistance/+Def 3% in Tough) Defense (Psionic) (6% Total)+3% Defense(Psionic) (From Gladiator's Armor: TP Protection +3% Def (All) in Tough)+3% Defense(Psionic) (From Steadfast Protection: Resistance/+Def 3% in Tough) Defense (Melee) (17.88% Total)+5% Defense(Melee) (From Superior Unrelenting Fury in Pendulum)+3% Defense(Melee) (From Gladiator's Armor: TP Protection +3% Def (All) in Tough)+3% Defense(Melee) (From Steadfast Protection: Resistance/+Def 3% in Tough)+2.5% Defense(Melee) (From Superior Brute's Fury in Beheader)+2.5% Defense(Melee) (From Superior Blistering Cold in Gash)+1.88% Defense(Melee) (From Multi-Strike in Cleave) Defense (Ranged) (6% Total)+3% Defense(Ranged) (From Gladiator's Armor: TP Protection +3% Def (All) in Tough)+3% Defense(Ranged) (From Steadfast Protection: Resistance/+Def 3% in Tough) Defense (AoE) (10.38% Total)+3% Defense(AoE) (From Gladiator's Armor: TP Protection +3% Def (All) in Tough)+3% Defense(AoE) (From Steadfast Protection: Resistance/+Def 3% in Tough)+2.5% Defense(AoE) (From Superior Blistering Cold in Gash)+1.88% Defense(AoE) (From Multi-Strike in Cleave) Enhancement (Accuracy) (39% Total)+15% Enhancement(Accuracy) (From Hecatomb in Swoop)+15% Enhancement(Accuracy) (From Armageddon in Axe Cyclone)+9% Enhancement(Accuracy) (From Adjusted Targeting in Build Up) Enhancement (EnduranceDiscount) (13.75% Total)+3.75% Enhancement(EnduranceDiscount) (From Reactive Defenses in Focused Fighting)+3.75% Enhancement(EnduranceDiscount) (From Reactive Defenses in Focused Senses)+3.75% Enhancement(EnduranceDiscount) (From Reactive Defenses in Evasion)+2.5% Enhancement(EnduranceDiscount) (From Unbreakable Guard in Tough) Enhancement (RechargeTime) (51.25% Total)+10% Enhancement(RechargeTime) (From Superior Brute's Fury in Beheader)+10% Enhancement(RechargeTime) (From Hecatomb in Swoop)+10% Enhancement(RechargeTime) (From Armageddon in Axe Cyclone)+8.75% Enhancement(RechargeTime) (From Reactive Defenses in Focused Fighting)+7.5% Enhancement(RechargeTime) (From Luck of the Gambler: Defense/Increased Global Recharge Speed in Combat Jumping)+5% Enhancement(RechargeTime) (From Adjusted Targeting in Build Up) HitPoints (376.69 HP Total / 25.13% of Base HP)+112.4 HP (7.5%) HitPoints (From Unbreakable Guard: +Max HP in Tough)+44.98 HP (3%) HitPoints (From Superior Brute's Fury in Beheader)+33.73 HP (2.25%) HitPoints (From Shield Wall in Agile)+33.73 HP (2.25%) HitPoints (From Shield Wall in Dodge)+33.73 HP (2.25%) HitPoints (From Shield Wall in Lucky)+33.73 HP (2.25%) HitPoints (From Shield Wall in Weave)+28.11 HP (1.88%) HitPoints (From Reactive Defenses in Focused Fighting)+28.11 HP (1.88%) HitPoints (From Reactive Defenses in Focused Senses)+28.11 HP (1.88%) HitPoints (From Reactive Defenses in Evasion) MezResist(All) (147.5% Total)+10% MezResist(All) (From Superior Brute's Fury in Beheader)+10% MezResist(All) (From Armageddon in Axe Cyclone)+10% MezResist(All) (From Superior Blistering Cold in Gash)+10% MezResist(All) (From Superior Unrelenting Fury in Pendulum)+10% MezResist(All) (From Superior Unrelenting Fury in Pendulum)+10% MezResist(All) (From Superior Unrelenting Fury in Pendulum)+10% MezResist(All) (From Hecatomb in Swoop)+7.5% MezResist(All) (From Shield Wall in Dodge)+7.5% MezResist(All) (From Shield Wall in Lucky)+7.5% MezResist(All) (From Shield Wall in Weave)+7.5% MezResist(All) (From Shield Wall in Agile)+6.25% MezResist(All) (From Shield Wall in Weave)+5% MezResist(All) (From Reactive Defenses in Focused Senses)+5% MezResist(All) (From Reactive Defenses in Focused Fighting)+5% MezResist(All) (From Reactive Defenses in Evasion)+5% MezResist(All) (From Adjusted Targeting in Build Up)+5% MezResist(All) (From Adjusted Targeting in Focused Accuracy)+3.75% MezResist(All) (From Multi-Strike in Cleave)+2.5% MezResist(All) (From Reactive Defenses in Focused Senses)+2.5% MezResist(All) (From Reactive Defenses in Focused Fighting)+2.5% MezResist(All) (From Reactive Defenses in Evasion)+2.5% MezResist(All) (From Multi-Strike in Cleave)+2.5% MezResist(All) (From Multi-Strike in Cleave) MezResist (Teleport) (200% Total)+100% MezResist(Teleport) (20% chance) (From Gladiator's Armor: TP Protection +3% Def (All) in Tough)+100% MezResist(Teleport) (20% chance) (From Shield Wall: +Res (Teleportation), +5% Res (All) in Weave) Recovery (16% Total)+4% (0.07 End/sec) Recovery (From Superior Unrelenting Fury in Pendulum)+4% (0.07 End/sec) Recovery (From Superior Blistering Cold in Gash)+4% (0.07 End/sec) Recovery (From Hecatomb in Swoop)+4% (0.07 End/sec) Recovery (From Armageddon in Axe Cyclone) Regeneration (56% Total / 18.44 HP/s)+16% (1 HP/sec) Regeneration (From Superior Unrelenting Fury in Pendulum)+10% (0.62 HP/sec) Regeneration (From Shield Wall in Agile)+10% (0.62 HP/sec) Regeneration (From Shield Wall in Dodge)+10% (0.62 HP/sec) Regeneration (From Shield Wall in Lucky)+10% (0.62 HP/sec) Regeneration (From Shield Wall in Weave) ResEffect (SpeedFlying) (15% Total)+15% ResEffect(SpeedFlying) (From Superior Blistering Cold in Gash) ResEffect (RechargeTime) (15% Total)+15% ResEffect(RechargeTime) (From Superior Blistering Cold in Gash) ResEffect (SpeedRunning) (15% Total)+15% ResEffect(SpeedRunning) (From Superior Blistering Cold in Gash) S/L Resistance (26% Total)+6% S/L Resistance (From Superior Brute's Fury in Beheader)+6% S/L Resistance (From Superior Unrelenting Fury in Pendulum)+5% S/L Resistance (From Shield Wall: +Res (Teleportation), +5% Res (All) in Weave)+3% S/L Resistance (From Reactive Defenses: Scaling Resist Damage in Focused Fighting)+1.5% S/L Resistance (From Reactive Defenses in Focused Fighting)+1.5% S/L Resistance (From Reactive Defenses in Focused Senses)+1.5% S/L Resistance (From Reactive Defenses in Evasion)+1.5% S/L Resistance (From Multi-Strike in Cleave) Fire/Cold Resistance (42.5% Total)+6% Fire/Cold Resistance (From Superior Unrelenting Fury in Pendulum)+6% Fire/Cold Resistance (From Superior Blistering Cold in Gash)+6% Fire/Cold Resistance (From Hecatomb in Swoop)+6% Fire/Cold Resistance (From Armageddon in Axe Cyclone)+5% Fire/Cold Resistance (From Shield Wall: +Res (Teleportation), +5% Res (All) in Weave)+3% Fire/Cold Resistance (From Reactive Defenses in Focused Fighting)+3% Fire/Cold Resistance (From Reactive Defenses: Scaling Resist Damage in Focused Fighting)+3% Fire/Cold Resistance (From Reactive Defenses in Focused Senses)+3% Fire/Cold Resistance (From Reactive Defenses in Evasion)+1.5% Fire/Cold Resistance (From Multi-Strike in Cleave) Energy/Negative Resistance (40.25% Total)+6% Energy/Negative Resistance (From Superior Unrelenting Fury in Pendulum)+5% Energy/Negative Resistance (From Shield Wall: +Res (Teleportation), +5% Res (All) in Weave)+4.5% Energy/Negative Resistance (From Shield Wall in Agile)+4.5% Energy/Negative Resistance (From Shield Wall in Dodge)+4.5% Energy/Negative Resistance (From Shield Wall in Lucky)+4.5% Energy/Negative Resistance (From Shield Wall in Weave)+3% Energy/Negative Resistance (From Reactive Defenses: Scaling Resist Damage in Focused Fighting)+3% Energy/Negative Resistance (From Adjusted Targeting in Build Up)+3% Energy/Negative Resistance (From Adjusted Targeting in Focused Accuracy)+2.25% Energy/Negative Resistance (From Multi-Strike in Cleave) Resistance (Toxic) (11.75% Total)+5% Resistance(Toxic) (From Shield Wall: +Res (Teleportation), +5% Res (All) in Weave)+3.75% Resistance(Toxic) (From Shield Wall in Weave)+3% Resistance(Toxic) (From Reactive Defenses: Scaling Resist Damage in Focused Fighting) Resistance (Psionic) (11.75% Total)+5% Resistance(Psionic) (From Shield Wall: +Res (Teleportation), +5% Res (All) in Weave)+3.75% Resistance(Psionic) (From Shield Wall in Weave)+3% Resistance(Psionic) (From Reactive Defenses: Scaling Resist Damage in Focused Fighting) Brute - Battle Axe - Super Reflexes.mbd
-
for what you are wanting the best i can think is Titan Weapon / Fire Armor in Titan Weapon you get 3 cone attacks 1 AOE and 1 PBAOE and with Fire Armor you get 3 PBAOE's you could also use Electric Melee with 1 Cone and 3 PBAOE's (Lightening Clap if you proc it out can do damage Power Level Effect Defensive Sweep 1 Melee(Cone), Light DMG(Smash), Self +DEF(Melee, Smash) Crushing Blow 1 Melee, High DMG(Smash), -DEF Titan Sweep 2 Melee (Cone), High DMG(Smash), Foe Knockdown Build Momentum 6 Self +DMG, +To Hit, +Momentum Follow Through 8 Melee, Superior DMG(Smash), Foe Knockdown, Stun, Requires Momentum Taunt 12 Ranged (Targeted AoE), Foe Taunt Rend Armor 18 Melee, Extreme DMG(Smash), Foe -Def(All), -Res(All) Whirling Smash 22 PBAoE Melee, Moderate DMG(Smash), Knockdown, Requires Momentum Arc of Destruction 26 Melee (Cone), Superior DMG(Smash), Foe Knockback Power Level Effect Fire Shield 1 Toggle: Self +Res(Smash, Lethal, Fire, Cold, Disorient) Blazing Aura 1 Toggle: PBAoE, Minor DoT(Fire) Healing Flames 4 Self Heal, +Res(Toxic) Temperature Protection 10 Auto: Self +Res(Fire, Cold, Slow, Knockback), +Regen Plasma Shield 16 Toggle: Self +Res(Fire, Energy, Neg, Hold, Sleep) Consume 20 PBAoE, Minor DMG(Fire), Self +End Burn 24 Location (PBAoE), Moderate DoT(Fire), Self +Res(Immob) Fiery Embrace 28 Self +DMG Phoenix Rising 30 Self Rez, Special Power Level Effect Charged Brawl 1 Melee, Minor DMG(Smash/Energy), Foe Sleep, -End Havoc Punch 1 Melee, Moderate DMG(Smash/Energy), Foe Sleep, -End Jacobs Ladder 2 Melee (Cone), High DMG(Energy), Foe Sleep, -End Build Up 6 Self +DMG, +To-Hit Thunder Strike 8 PBAoE, High DMG(Smash/Energy), Foe Disorient, Knockback, -End Taunt 12 Ranged (Targeted AoE), Foe Taunt Chain Induction 18 Melee, Moderate DMG(Smash/Energy), Foe -End, +Special Lightning Clap 22 PBAoE, Foe Disorient, Knockback Lightning Rod 26 PBAoE, Superior DMG(Energy), Foe Knockback, Self Teleport
-
i could be wrong but scrappers do not generate agro like brutes and tanks you will have a lot of mobs running around. not say it can't be done but farming with a brute would be faster due to mobs would be centered on the brute instead of running off and returning. not sure if i am wording this correctly or not. but hopefully you can understand what i am trying to say.
-
thank you all for the suggestions i think i will try Ice/Savage
-
i mainly play Brutes, Scrappers, and Tanks i have never tried a Dominator but was thinking of trying 1 what power combo do you think might be good for me to start off with being i am used to playing melee toons.
-
are you saying it wont prevent the knock back? the only reason i ask is i have used it in game and it defiantly made a difference