

Yomo Kimyata
-
Posts
4378 -
Joined
-
Last visited
-
Days Won
24
Content Type
Profiles
Forums
Store
Articles
Patch Notes
Posts posted by Yomo Kimyata
-
-
13 minutes ago, arcane said:
(2) Sometimes you aren’t slotting for set bonuses so the raw value of HO’s is better. A +5 Uncommon/Rare Acc/Dam IO is 33.1% enhancement vs 38.3% for a 53 Nucleolus. So anytime you are frankenslotting or 1-slotting or not caring about bonuses for whatever other reason, you should consider if you’ll get more enhancement value out of HO’s. Examples include 1-2 slotting Microfilaments instead of Travel/Ends in your travel powers, slotting powers with 1-2 Nucs and 4-5 procs, etc.
Also, you can only slot one +5 A/D from a given set, but you can slot as many lvl 53 Nucleoses as you are willing to buy from me!
-
 2
2
-
-
12 hours ago, Snarky said:
This is about as simple to solve as it gets
Rage boosts damage for two minutes with 10 second down time and and an end crash
Make it a toggle with the same effective end cost ( by averaging) and average the damage (almost same but slightly less to account for crash downtime)
pretty much anyone who disagrees with this simple solution is a cry baby pvper who wants to double stack it.
I've got a simpler one: replace Rage with Build Up.
-
 1
1
-
1
-
 2
2
-
-
13 hours ago, Rudra said:
If they are so much better that there needs to be something to discourage people from only using them, then maybe they need a nerf? I know that is going to be a very unpopular option, but if those sets are the go-to sets, then they probably need to be reigned in some.
Also, yes to minimal FX options.
Well, I find them great, because they work really well with how I like to play. If, for example, you are looking to max out defense debuff resistance and laugh at debuffers, then there are better alternatives.
-
7 hours ago, Spaghetti Betty said:
So I opened this up and laughed, because it actually looks pretty damn strong considering the context. What an amazing defender to support our superteam.
I love crafting (and often playing) these kinds of builds, ones with serious constraints. If you asked me to make the most powerful and enjoyable melee alt, I'd freeze. But if you ask me to make one that can only use ranged attacks, I'd be happy as a clam and make one that can solo +4/x8 content.
-
1
-
-
9 hours ago, Erratic1 said:
So normally my SS/Bio brute has no problems cruising through Carnival of Shadows. But tonight he kept finding himself in trouble and I finally noticed they were detoggling his Mez protection toggle. Not because he was out of endurance--he generates plenty of that. They were somehow overwhelming it and shutting down his toggles.
It was not a Carnival Cruise to Happyland.
If its a matter of stacking enough debuffs to override his Mez resist it seems odd to not have run into it before.
I see this happen with Malta occasionally, and I attribute it to mez stacking. I'm about to embark on a tremendous anti-Carnival campaign with my Battle Axe/Energy Aura scrapper named The Coulrophobic Avenger, so I'll report back if I see the same thing.
-
1
-
-
As much as I consider the annoying visuals of Radiation Armor and Bio Armor as "annoyance taxes" because those two sets are just so good there has to be *some* way to discourage people from using them exclusively, I'd be pretty happy with a true minimal fx option on both of them.
-
1
-
-
6 hours ago, Spaghetti Betty said:
I think it's crazy that your Tank looks like it could really take some blows, even with no substantial armor. Now if we had a pools-only Defender or Controller, we could really get something going here. Look out, Lord Recluse...
For a defender, my first thought is something like this:
SpoilerThis Hero build was built using Mids Reborn 3.1.2.5
https://github.com/LoadedCamel/MidsRebornLevel 50 Magic Defender
Primary Power Set: Dark Miasma
Secondary Power Set: Sonic Attack
Power Pool: Fighting
Power Pool: Sorcery
Power Pool: Leadership
Power Pool: Medicine
Ancillary Pool: Dark MasteryHero Profile:
------------
Level 1: Tar Patch
(A) Pacing of the Turtle - Accuracy/Slow: Level 50
(3) Pacing of the Turtle - Damage/Slow: Level 50
(5) Pacing of the Turtle - Accuracy/Endurance: Level 50
(7) Pacing of the Turtle - Range/Slow: Level 50
(7) Pacing of the Turtle - Endurance/Recharge/Slow: Level 50
(9) Pacing of the Turtle - Chance of -Recharge: Level 50
Level 1: Shriek
(A) Superior Winter's Bite - Accuracy/Damage: Level 50
(45) Superior Winter's Bite - Damage/RechargeTime: Level 50
(46) Superior Winter's Bite - Accuracy/Damage/Endurance: Level 50
(46) Superior Winter's Bite - Accuracy/Damage/Recharge: Level 50
(46) Superior Winter's Bite - Damage/Endurance/Accuracy/RechargeTime: Level 50
Level 2: Darkest Night
(A) HamiO:Enzyme Exposure
(45) HamiO:Enzyme Exposure
(45) HamiO:Enzyme Exposure
Level 4: Kick
(A) Superior Blistering Cold - Accuracy/Damage: Level 50
(5) Superior Blistering Cold - Damage/Endurance/Accuracy/RechargeTime: Level 50
Level 6: Arcane Bolt
(A) Apocalypse - Damage/Recharge: Level 50
(9) Apocalypse - Accuracy/Damage/Recharge: Level 50
(11) Apocalypse - Accuracy/Recharge: Level 50
(37) Apocalypse - Damage/Endurance: Level 50
(43) Apocalypse - Chance of Damage(Negative): Level 50
Level 8: Mystic Flight
(A) Blessing of the Zephyr - Knockback Reduction (4 points): Level 50
Level 10: Boxing
(A) Superior Blistering Cold - Accuracy/Damage/Endurance: Level 50
(11) Superior Blistering Cold - Accuracy/Damage/Recharge: Level 50
Level 12: Maneuvers
(A) Luck of the Gambler - Defense/Increased Global Recharge Speed: Level 50
(13) HamiO:Cytoskeleton Exposure
(13) HamiO:Cytoskeleton Exposure
Level 14: Tough
(A) Steadfast Protection - Resistance/+Def 3%: Level 30
(15) Gladiator's Armor - TP Protection +3% Def (All): Level 50
(15) Unbreakable Guard - Resistance: Level 50
(19) Unbreakable Guard - Resistance/Endurance: Level 50
(19) Unbreakable Guard - RechargeTime/Resistance: Level 50
(21) Unbreakable Guard - Resistance/Endurance/RechargeTime: Level 50
Level 16: Weave
(A) Luck of the Gambler - Defense/Increased Global Recharge Speed: Level 50
(17) HamiO:Cytoskeleton Exposure
(17) HamiO:Cytoskeleton Exposure
(40) Karma - Knockback Protection: Level 30
Level 18: Cross Punch
(A) Superior Avalanche - Accuracy/Damage: Level 50
(23) Superior Avalanche - Damage/Endurance: Level 50
(23) Superior Avalanche - Accuracy/Damage/Endurance: Level 50
(40) Superior Avalanche - Accuracy/Damage/Recharge: Level 50
(43) Superior Avalanche - Accuracy/Damage/Endurance/Recharge: Level 50
Level 20: Rune of Protection
(A) Unbreakable Guard - Resistance: Level 50
(21) Unbreakable Guard - +Max HP: Level 50
Level 22: Enflame
(A) Overwhelming Force - Damage/Chance for Knockdown/Knockback to Knockdown: Level 50
(50) Overwhelming Force - Accuracy/Damage: Level 50
Level 24: Tactics
(A) Gaussian's Synchronized Fire-Control - To Hit Buff: Level 50
(25) Gaussian's Synchronized Fire-Control - To Hit Buff/Recharge: Level 50
(25) Gaussian's Synchronized Fire-Control - To Hit Buff/Recharge/Endurance: Level 50
(34) Gaussian's Synchronized Fire-Control - Recharge/Endurance: Level 50
(34) Gaussian's Synchronized Fire-Control - To Hit Buff/Endurance: Level 50
(37) Gaussian's Synchronized Fire-Control - Chance for Build Up: Level 50
Level 26: Aid Other
(A) Panacea - Heal/Endurance: Level 50
(27) Panacea - Endurance/Recharge: Level 50
(27) Panacea - Heal/Recharge: Level 50
(31) Panacea - Heal/Endurance/Recharge: Level 50
(33) Panacea - Heal: Level 50
Level 28: Aid Self
(A) Preventive Medicine - Heal: Level 50
(29) Preventive Medicine - Heal/Endurance: Level 50
(29) Preventive Medicine - Endurance/RechargeTime: Level 50
(31) Preventive Medicine - Heal/RechargeTime: Level 50
(31) Preventive Medicine - Heal/RechargeTime/Endurance: Level 50
(34) Preventive Medicine - Chance for +Absorb: Level 50
Level 30: Field Medic
(A) Recharge Reduction IO: Level 50
Level 32: Victory Rush
(A) Synapse's Shock - EndMod/Increased Run Speed: Level 50
(33) Synapse's Shock - EndMod: Level 50
(33) Synapse's Shock - EndMod/Recharge: Level 50
Level 35: Oppressive Gloom
(A) Absolute Amazement - Stun: Level 50
(36) Absolute Amazement - Accuracy/Stun/Recharge: Level 50
(36) Absolute Amazement - Accuracy/Recharge: Level 50
(36) Absolute Amazement - Endurance/Stun: Level 50
(37) Absolute Amazement - Chance for ToHit Debuff: Level 50
Level 38: Dark Consumption
(A) Armageddon - Damage: Level 50
(39) Armageddon - Damage/Recharge: Level 50
(39) Armageddon - Accuracy/Damage/Recharge: Level 50
(39) Armageddon - Accuracy/Recharge: Level 50
(40) Armageddon - Damage/Endurance: Level 50
Level 41: Dark Embrace
(A) Unbreakable Guard - Resistance: Level 50
(42) Unbreakable Guard - Resistance/Endurance: Level 50
(42) Unbreakable Guard - RechargeTime/Resistance: Level 50
(42) Unbreakable Guard - Resistance/Endurance/RechargeTime: Level 50
(43) Impervious Skin - Status Resistance: Level 30
Level 44: Soul Transfer
(A) Stupefy - Chance of Knockback: Level 50
Level 47: Soul Drain
(A) Superior Avalanche - Recharge/Chance for Knockdown: Level 50
(48) Fury of the Gladiator - Chance for Res Debuff: Level 50
(48) Armageddon - Chance for Fire Damage: Level 50
(48) Rectified Reticle - To Hit Buff: Level 20
(50) Rectified Reticle - To Hit Buff/Recharge: Level 20
(50) Rectified Reticle - Increased Perception: Level 20
Level 49: Vengeance
(A) Luck of the Gambler - Defense/Increased Global Recharge Speed: Level 50
Level 1: Vigilance
Level 1: Brawl
(A) Superior Blistering Cold - Damage/Endurance: Level 50
(3) Superior Blistering Cold - Recharge/Chance for Hold: Level 50
Level 1: Sprint
(A) Empty
Level 2: Rest
(A) Empty
Level 1: Swift
(A) Empty
Level 1: Hurdle
(A) Empty
Level 1: Health
(A) Panacea - +Hit Points/Endurance: Level 50
Level 1: Stamina
(A) Performance Shifter - Chance for +End: Level 50
Level 6: Arcane Power
------------| Copy & Paste this data into Mids Reborn : Hero Designer to view the build |
|-------------------------------------------------------------------|
|MxDz;1384;675;1350;HEX;|
|78DA65944B4F13611486BF994E45A0A5D616016969412BB4400B26C67BBC210B439|
|188AE9B493B2D13B0256D4D74E5252E5D20882E042F8922285EFF84FFC1B071A708|
|E24223AEC6D379CF27A24DA6CFCC99F39EDB77DAE4E53E5736DB7F5C2875A7C6F45|
|229D567648D7CC6283A937ACE4C8BCAA78AAE26694F9DBC94CDC6FBF4E2682A69EA|
|A58B7AE0CF9B737A3E6764E2C385BC994E9D2897F5F4A8700F150A63F17E3337523|
|6F33997FD345C28A68DE2158FFD3060E8A42D8D98E3704D1A19336DE60DEFE97133|
|CD79F45299FC1BA98C305DE755FA52ECCA2CA7784977BD9A505F81DA6B70CB1BE65|
|B70EB3BF0832AE4C7D2C4BC661BBB16C0EEE7CC17CC45F0028914CEA82AFB2B2371|
|88AE7FA8D2981C1C59714C40A9DD01272342383982E6EC5651531CAC4980BB7BC05|
|82F3815C1EC2B2251B504A342966A99A67A12E16BA6402FBDAC9585D6D6A365D73E|
|1428E92027B79C9FBB81EE829AA8DBEBB09DEBBE83DB7F307F82FE755023B187C50|
|E0F67D8C69125DBD7851DF41635E095C3F6CEA0C61DB3CC0760FB4330F608BC4B22|
|9F6CD0C7E5F87F81D3F4B29ED32BF51F61EC5D027D545B836CACE109E6D5F894390|
|7B63E63CEF3D017C020899B64AD4D0144DC1964B6802D21301C0643246A96199B3F|
|C118F8CC5C66D117E60AD8BA0A4E502F4179BCC14E611BE7624284147BBD2D35B48|
|6918497992BE0550AD026B7A9ED0C1AD835C04C3207B9C1B3E035124538B2163900|
|E39E83CC43CCC360FB11F03A893A64A60E3E8C28EF46947723CABB110B6297E6DD4|
|274B24874DEC48EDC209F38A777C61FA391C431281347912E719FE8A3139D61CE82|
|7E9A738F1C550F6FDDA0B6F13F6005FE7A50C46D8457A7C1016DE3475F71B62C31A|
|449773229B669B56623047B7DFDDFB4B6C9D48AFABF6D32DE4333EFE9289D9CC2FA|
|0D59EDCCAD|
|-------------------------------------------------------------------| -
I'll bite.
I'm assuming the restriction is only pool powers when you can take them, so only your first three powers come from your primary/secondary? I'm focusing on a build that should be able to solo 1-50 through "normal" content. Maybe not +4, but probably +3/x8.
The hard part is finding four pools (and one ancillary) that you can take enough powers from! I went Fighting (for pretty obvious reasons), Leaping (for Combat Jumping and Acrobatics. It's been a dog's age since I took the latter but you need *some* mez mitigation. Spring Attack for an AoE -res debuff!), Medicine (self-heal, Injection as a single target debuffer), and Force of Will (mainly for Unleash Potential, but Weaken Resolve also as a single target debuffer). Soul Mastery for Gloom and -to hit debuff.
The power selection order can certainly be optimized over this quick build, but I think it will get us where we are going. Slowly, of course.
SpoilerThis Hero build was built using Mids Reborn 3.1.2.5
https://github.com/LoadedCamel/MidsRebornLevel 50 Magic Tanker
Primary Power Set: Electric Armor
Secondary Power Set: Titan Weapons
Power Pool: Leaping
Power Pool: Force of Will
Power Pool: Fighting
Power Pool: Medicine
Ancillary Pool: Soul MasteryHero Profile:
------------
Level 1: Charged Armor
(A) Unbreakable Guard - Resistance: Level 50
(3) Unbreakable Guard - Resistance/Endurance: Level 50
(3) Unbreakable Guard - RechargeTime/Resistance: Level 50
(5) Unbreakable Guard - Resistance/Endurance/RechargeTime: Level 50
(36) Impervious Skin - Status Resistance: Level 30
Level 1: Defensive Sweep
(A) Luck of the Gambler - Defense/Increased Global Recharge Speed: Level 50
(5) Superior Might of the Tanker - Recharge/Chance for +Res(All): Level 50
(7) Superior Might of the Tanker - Accuracy/Damage: Level 50
(7) Superior Might of the Tanker - Accuracy/Damage/Recharge: Level 50
(9) Superior Might of the Tanker - Damage/Recharge: Level 50
(9) Armageddon - Chance for Fire Damage: Level 50
Level 2: Lightning Field
(A) Energy Manipulator - Chance to Stun: Level 20
(11) Superior Avalanche - Recharge/Chance for Knockdown: Level 50
(11) DSync:D-Sync Efficiency
(13) Superior Gauntleted Fist - RechargeTime/+Absorb: Level 50
(13) HamiO:Nucleolus Exposure
(15) DSync:D-Sync Efficiency
Level 4: Combat Jumping
(A) Kismet - Accuracy +6%: Level 30
(15) Luck of the Gambler - Defense/Increased Global Recharge Speed: Level 50
(27) Shield Wall - +Res (Teleportation), +5% Res (All): Level 50
(27) Reactive Defenses - Scaling Resist Damage: Level 50
Level 6: Super Jump
(A) Winter's Gift - Slow Resistance (20%): Level 50
Level 8: Weaken Resolve
(A) HamiO:Lysosome Exposure
(29) Achilles' Heel - Chance for Res Debuff: Level 20
(48) Dark Watcher's Despair - Chance for Recharge Slow: Level 50
Level 10: Boxing
(A) Superior Blistering Cold - Accuracy/Damage/Endurance: Level 50
(29) Superior Blistering Cold - Accuracy/Damage/Recharge: Level 50
Level 12: Kick
(A) Superior Blistering Cold - Accuracy/Damage: Level 50
(25) Superior Blistering Cold - Damage/Endurance/Accuracy/RechargeTime: Level 50
Level 14: Acrobatics
(A) Knockback Distance IO: Level 50
Level 16: Tough
(A) Steadfast Protection - Resistance/+Def 3%: Level 30
(17) Gladiator's Armor - TP Protection +3% Def (All): Level 50
(17) Unbreakable Guard - Resistance: Level 50
(19) Unbreakable Guard - Resistance/Endurance: Level 50
(19) Unbreakable Guard - RechargeTime/Resistance: Level 50
(21) Unbreakable Guard - +Max HP: Level 50
Level 18: Weave
(A) Luck of the Gambler - Defense/Increased Global Recharge Speed: Level 50
(21) HamiO:Cytoskeleton Exposure
(23) HamiO:Cytoskeleton Exposure
Level 20: Cross Punch
(A) Superior Avalanche - Accuracy/Damage: Level 50
(31) Superior Avalanche - Damage/Endurance: Level 50
(31) Superior Avalanche - Accuracy/Damage/Endurance: Level 50
(31) Superior Avalanche - Accuracy/Damage/Recharge: Level 50
(33) Superior Avalanche - Accuracy/Damage/Endurance/Recharge: Level 50
(33) Absolute Amazement - Chance for ToHit Debuff: Level 50
Level 22: Injection
(A) HamiO:Lysosome Exposure
(23) Dark Watcher's Despair - Chance for Recharge Slow: Level 50
(25) Pacing of the Turtle - Chance of -Recharge: Level 50
Level 24: Aid Self
(A) Panacea - Heal/Endurance: Level 50
(33) Panacea - Endurance/Recharge: Level 50
(34) Panacea - Heal/Recharge: Level 50
(34) Panacea - Heal/Endurance/Recharge: Level 50
(34) Panacea - Heal: Level 50
Level 26: Field Medic
(A) Recharge Reduction IO: Level 50
Level 28: Project Will
(A) Thunderstrike - Accuracy/Damage: Level 50
(45) Thunderstrike - Damage/Endurance: Level 50
(46) Thunderstrike - Accuracy/Damage/Recharge: Level 50
(46) Thunderstrike - Damage/Endurance/Recharge: Level 50
Level 30: Wall of Force
(A) Ragnarok - Chance for Knockdown: Level 50
(42) Ragnarok - Damage/Recharge: Level 50
(43) Ragnarok - Accuracy/Damage/Recharge: Level 50
(43) Ragnarok - Accuracy/Recharge: Level 50
(43) Ragnarok - Damage/Endurance: Level 50
Level 32: Unleash Potential
(A) Synapse's Shock - EndMod/Recharge: Level 50
(39) Synapse's Shock - Damage/Rechage: Level 50
(39) Synapse's Shock - Damage/Recharge/Accuracy: Level 50
Level 35: Gloom
(A) Apocalypse - Damage/Recharge: Level 50
(36) Apocalypse - Accuracy/Damage/Recharge: Level 50
(37) Apocalypse - Accuracy/Recharge: Level 50
(37) Apocalypse - Damage/Endurance: Level 50
(37) Apocalypse - Chance of Damage(Negative): Level 50
Level 38: Soul Tentacles
(A) Artillery - Accuracy/Damage: Level 50
(39) Artillery - Damage/Endurance: Level 50
(40) Artillery - Damage/Recharge: Level 50
(40) Artillery - Accuracy/Damage/Recharge: Level 50
(40) Artillery - Accuracy/Recharge/Range: Level 50
(46) Artillery - Endurance/Recharge/Range: Level 50
Level 41: Darkest Night
(A) HamiO:Enzyme Exposure
(42) HamiO:Enzyme Exposure
(42) HamiO:Enzyme Exposure
Level 44: Dark Obliteration
(A) Superior Frozen Blast - Accuracy/Damage: Level 50
(45) Superior Frozen Blast - Recharge/Chance for Immobilize: Level 50
(45) HamiO:Nucleolus Exposure
(50) DSync:D-Sync Optimization
Level 47: Spring Attack
(A) Fury of the Gladiator - Chance for Res Debuff: Level 50
(50) Fury of the Gladiator - Accuracy/Damage: Level 50
Level 49: Mighty Leap
(A) Blessing of the Zephyr - Knockback Reduction (4 points): Level 50
Level 1: Brawl
(A) Superior Blistering Cold - Damage/Endurance: Level 50
(48) Superior Blistering Cold - Recharge/Chance for Hold: Level 50
Level 1: Gauntlet
Level 1: Sprint
(A) Empty
Level 2: Rest
(A) Empty
Level 1: Swift
(A) Empty
Level 1: Health
(A) Panacea - +Hit Points/Endurance: Level 50
(36) Miracle - +Recovery: Level 40
(48) Numina's Convalesence - +Regeneration/+Recovery: Level 50
Level 1: Hurdle
(A) Empty
Level 1: Stamina
(A) Performance Shifter - Chance for +End: Level 50
(50) Performance Shifter - EndMod: Level 50
Level 1: Momentum
Level 6: Double Jump
Level 49: Takeoff
------------| Copy & Paste this data into Mids Reborn : Hero Designer to view the build |
|-------------------------------------------------------------------|
|MxDz;1419;713;1426;HEX;|
|78DA65945B4F134114C767BBBB5C4AB943CBA5A55C4428D085AA48341A6FC083D24|
|82291C74D53A6B8B1B6A42D5E3E82D10744892F82E84730BE189F4CF02BA889267C|
|00454DD4A80F663DECFF4CDAE826BBBFCC9973E6FCCF99994DDE9C0E6432B3A7851|
|638974D158BF6422A775516CC646AD9498BFDA79ADE08ACF6B4CCC85C515A335999|
|2E159CB47DA6702D5FE8E2D9A4CC4A692D38A554CE5E94A9957CAE2802F3F97CD69|
|AA391935B6EF106B3F9425ADAF98CBDE864B3F53039CB574AE48051522E39692727|
|43332B4EDA3A5B582D49FB527E356B2753C5922CDCEA2045FDF4EE34D247F344BA8|
|6F8AE0B913084EF07F32768FC020722E41931C44648A8C73545BB06A7F770AA7AC3|
|7C07D6BC659EF4797C4D1935CE686A77C8D86A08FF13C39BF45B26754B1781DB180|
|74E086FDCC0F6207552E7605DFF233C390DACA0EB0232757D0343E46CB24C6176C3|
|581CA68578055FF5312C1F7E0519E32FA151A3C85A8ED46AD7A1257C1FF4D1649D9|
|AAC5B83B1E3019326EB7979511F139E512763A32AB9318426361D82A0266E7A0B37|
|BD859BDEF69B9B4FC1CD4A703397DA3609E141E6DD41D2AF32B43E82969E4DE616F|
|331D8BBCDBC886A7B28433B17E46BE79604B9151DCF90314A4EBCEDAE110A435B6F|
|04ECEB614699BDE01AC9EA543BD0398A6EACD20E74B351EFDE84716C0B8C6F339F8|
|237C839A2CE67640A9A6287F7592B468E30279947C1EB14145505453FA1DA831F99|
|7B609A24F6AB95FBE3881CB0C003E3CC09660299972868509DFC41DDC48A0638643|
|2AB98D560BC06DC0D0831AC7672780A7D8EFD434919465577469F43EBD80B265F87|
|441CD7410B0A61A9A3689D42D313C7C112756142357FE2030A081BE5FBAE897B587|
|67C038C554CBA7346F992EF8F5D57CC1B6A9A4C9A67DAF39743D8EB4B85C927FAF8|
|D7719E2C4394EA328ED3E7FFE3BEFA2BA53D84DEC43AB85BF1CB717746CA17DBDD8|
|A95CB74FF02CF0FCCC3|
|-------------------------------------------------------------------|-
1
-
-
2 hours ago, Solarverse said:
One weakness you can expose is his regen toggle. It drops extremely easy upon any stun/hold/sleep. It becomes a pain in the rear to keep that toggle up, in which the WP Brute is constantly having to retoggle it.
Unless he is building specifically for PvP, his mez resist will be 10.something.
Now I know absolutely nothing about PvP, but one thing I've been playing around with on scrappers is the single target hold in some of the epic pools. If you slot Soul Storm, for example, with 2x lvl 50 Endoplasms, a lvl 50 recharge IO, Devastation proc, Lockdown proc, and a Superior Winter's Bite proc, you've got a mag 3 hold that basically has a 81% chance to add an additional +4 mag for 6 seconds in PvP and a 90% to slow him down a bit. With a lot of global recharge (or other sources of hold) you should be able to stack the mag over 11.
It's crazy overkill for PvE, but it could be a nasty surprise for your hubby!
-
1
-
1
-
-
Be (passive) aggressive! B-E (passive) aggressive!
-
1
-
-
4 hours ago, TheWhiteLady said:
In either case, he will be teaming with my toon all the way up to 50, so he will be aware of her potential (we don't believe in PL aside from XP boosters). He's actually relishing the challenge so he wants me to bring everything I can muster.
If you want to be sneaky, and why in the world wouldn't you want to be sneaky?, as you level up have two builds. Build 1 is the one you use to team with him. Build 2 is the one you have ready to gank him. Some really sneaky things to do might involve slipping in some procs that he might not expect (like Absolute Amazement -to hit) or debuffing power pools that you may not have on your main build.
-
2
-
2
-
2
-
-
2 minutes ago, UltraAlt said:
/e facepalm
If it makes you feel any better, I pretty much have them committed to memory!
But yeah, I learn new stuff all the time. It's great!
-
With respect to the title question, I'd say yes. We form a society of some sort, where we are undoubtedly very diverse in shape, form, and thought, but we all have one thing in common: we enjoy playing this game. For me, it's a very good thing to belong to a group like this. On a slight tangent, I'd like to express my opinion that there is *far* less dickery on HC than there was on Live. Maybe that's just my perspective, but I'm grateful for that.
As far as all this about how to play on a team or whatever, I find it to be so much less important that what I discussed in the first paragraph that I personally find it practically irrelevant.
Happy hunting!
-
2
-
-
11 hours ago, Major_Decoy said:
I wouldn't consider Psionic damage one of Willpower's weaknesses. What willpower lacks is debuff resistances. Super Strength is kind of weak to slows (get knock-out blow to a crawl), Willpower doesn't really care about slows though, it does care about -regeneration debuffs, -recovery debuffs, -maximum health.
Maybe something like Beam Rifle/Thermal?
I also recommend the debuff route. Although slows won't really affect Willpower's toggles, it will devastate attack chains and he won't be able to close with you while you destroy him from range.
-
1
-
1
-
-
On 6/1/2022 at 12:39 PM, Ukase said:
I've been playing with the market for some time.
And, I'm not too proud to admit I don't know everything. But, I really felt like I knew just about anything having to do with the AH.Then, re-watching @Dahle's video, after re-visiting the Iron Man thread, I came across this little tip that I never, ever noticed before.

See that bit on the bottom in white letters? "Search for Salvage used in this recipe"....I never, ever noticed these words before. Had no idea they'd portray the salvage used in the recipe. All this time I was using the tool tip from the mouse cursor over the recipe icon.
Ya just click on it, and it shows you.
I'm sure many of you already knew about this - but me being the obtuse person I am...I never noticed!
So, for the one or two of you who may also be a bit obtuse, or simply unobservant - here's your pro-tip for the day.I also never knew this.
-
3 hours ago, AboveTheChemist said:
There was a good deal of discussion on this subject on a recent Babbage bug report thread, including the results of a lot of testing that I performed on the Beta server to try to verify or debunk some theories I had read regarding why Babbage does not spawn.
I'll start off with a few observations that, while not 100% ironclad facts, I feel confident are true.
- Babbage spawns based on where the team leader exits the Clockwork Lord mission. So if the team leader portals to another zone from inside that mission, then Babbage will spawn in that other zone. It's important for the team leader (and perhaps the whole team, just to be safe) to exit that mission back into Skyway City to make sure he spawns in Skyway City.
- Babbage spawns about 300 feet from the Clockwork Lord mission door, at any of the common spawn points shared by enemy NPCs.
My working theory is that he often fails to spawn because there are player characters too close to his spawn point when he spawns, which suppresses his spawn. I couldn't prove that beyond the theory stage, because I was testing solo and would have needed more help. But, it makes sense because as the call goes out to the server that a Babbage spawn is imminent, players arrive and loiter around the general area of the mission door (especially if they are provided coordinates). The more people that gather, the more likely one of them might be too close to Babbage's spawn point, causing him to fail to spawn. So, it might be helpful to ask folks to muster some distance (500+ ft) from the mission door when announcing an imminent Babbage spawn in chat. The north tram station might make a good muster point, for example.
There also may be rare occasions when Babbage paths too close to a police drone as he travels to attack the TF members, but that's not a scenario I could reliably test. In one of my 40+ tests, he spawned fairly close to the south tram station. While he didn't get zapped by a drone in that instance, given the proximity of the spawn to the tram station it's not unreasonable to imagine that he might path too close to a drone.
A few theories that I was able to prove FALSE are:
- Babbage won't spawn if the Superadine Raid (AKA the Troll Rave) is in progress (I was able to spawn him numerous times during the Troll Rave)
- Babbage won't spawn if there is already a Babbage present in the zone from a different Synapse TF (I was able to spawn two concurrent Babbages without issue)
I'm certain that there is more testing that could be done, and there may be someone else out there with additional info that could help prove or disprove some of the above. But those are my conclusions based on the fairly extensive testing I performed. The thread I linked above has more details of my testing, should that be of interest.
Great work here!
One thing I have learned about spawning Kronos over the years (after the Project Wildflower mission, portal to base or nowadays just use any other portal power to a zone. I usually choose Talos.) is that the amount of time it takes for it to spawn seems to vary tremendously from seconds to minutes, but I have never had it not spawn at all in dozens of attempts. I idly speculate if there is some sort of a random timer baked in, or if that is merely because someone was standing on or near the spawn site.
-
On 5/24/2022 at 10:24 AM, Bionic_Flea said:
I blame Yomo and Ukase!
*Runs and hides in a bank vault*
Why is there a flea in my vault?
-
On 5/24/2022 at 10:11 AM, Telephone said:
I just wanted to follow up and note that we're aware of the recent database/email/temporary server hang issues (largely affecting Excelsior but also affecting the other shards).
The shards each have what is called an SQL Queue which contains pending database operations. Under normal operations, the queue is minimal - our servers are more than adequately provisioned to handle load. Some things can cause a large amount of database load (Hami raids, bulk email claims, and bulk superpack openings are among these). Thanks to some work Six did early on in Homecoming, we can normally handle these as well without significant issue.
Recently we've been noticing SQL Queue spikes, which cause issues like the recent multi-minute hangs of Excelsior, and which are likely related to email claiming and superpack opening issues. We're adding additional instrumentation to find out what is causing these, and once we find the cause we'll fix it as quickly as possible.
With luck, the full shard restart today will help ameliorate the issue for some of the people who have been suffering it. We know from past experience that some people may still be affected; please be assured we're working on the issue and will resolve it.
Edit: This issue also can affect transfers between shards; we're working to resolve that as well.
I just saw this and wanted to say (belatedly) thank you so much for the post. I'm very grateful for constructive communication!
There are clearly still issues, but I feel validated!!
-
1
-
-
War Mace and Battle Axe are very similar. The 9 powers are for the most part ports of smashing damage (War Mace) versus lethal damage (Battle Axe).
As mentioned Battle Axe is all knockdown/knockup, while War Mace has some kd and stun in there as well. On the plus side, there are a lot of places to pop in FF +recharge procs.
On the minus side, all that +recharge emphasizes that they are both pretty endurance hungry sets.
And finally, and most important, you should choose a weapon skin that you like. If you like shovels, you're in luck, since you can have one either as Battle Axe or as War Mace!
-
Huh, just checked and it wasn't me after all. My cap is still intact!
-
On 8/20/2021 at 10:14 PM, Yomo Kimyata said:
So...
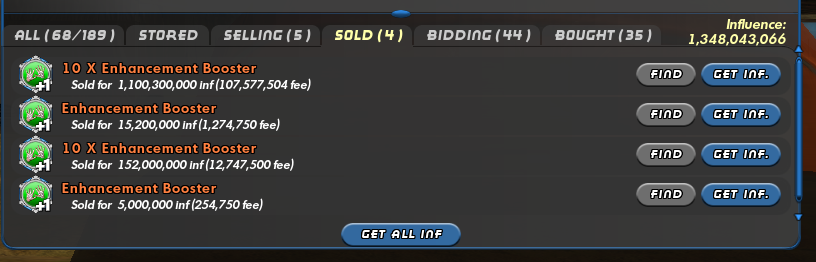
thanks in part to this thread I took a deeper look into this market. Now, since boosters come from merits or super packs, we should look at comparables for a value play. Since 5 converters would buy you either one booster or 15 converters, you might expect that boosters would trade for roughly 15x the amount that converters do. If they traded at 20x, then everyone would stop printing converters and start printing boosters, and if they traded at 10x no rational actor would convert merits to boosters when they would get a better haul from selling converters. And lo and behold, that's about right. You can probably sell oodles of boosters at 1mm, which translates to selling 15x oodles of converters at 66,666. I believe that the converter market is probably deeper and more liquid, but the basic math works out ok.
But I realized that very few were actually listed for sale, and when I bid crept I got over 5mm with no success. That's madness! But just like yellow salvage, people aren't interested enough in the market to offer product at "market" levels. And that's fine. Why in the world would anyone pay 5mm for something they could buy with 5 merits? Why indeed?
So a few days ago I put in bids for a few hundred boosters at 1.2mm, just to see how long it would take to fill. When I checked in a few hours later, I had bought them all, and I was feeling a little foolish for overpaying by almost 20%, but that part of the experiment was done. Then I put some of them up for offer at around 5mm, just to put some liquidity in the system. I was bemoaning my wasting of AH slots, because, again, why in the world would anyone pay 5mm for one of these?
I just logged in to find this:
And the only reason I noticed was that I was clicking each Get Inf button and after the first 5-10 it hung up because it wouldn't let me over the cap.
So, yeah, I don't know why people do what they do, but ain't nobody getting this back!
Sounds like someone worked their way up to the cap I set last August. No apologies. -
2 hours ago, Spaghetti Betty said:
I thought about doing this, but decided with Impale so that my proc chance didn't flounder against a single target.
Would the 2 procs equal more of a chance to land a hit than slotting it for defense debuff? That's how I have it slotted now, for about -20% def on affected targets. I guess I could replace the lone -tohit IO.
The global recharge bonus wasn't integral to the functionality of the build. I ended up needing that slot somewhere else more. Couldn't tell you where exactly at the moment.
1. I think you have a better chance of proc even with one target in Radiation Therapy, but Impale is up a lot more often. I can see both ways, although Critical Strikes activating at the same time Fury of the Gladiator proc activating is a good thing.
2. I've seen the two procs get me +60 to hit, but that's not all the time, obviously! I think that defense debuff would work well on a team (I mainly solo) but that +to hit would work better solo (since your +to hit will stay active as you jump to the next spawn or use a ranged attack on someone out of radius). Again, I can see both ways.
3. Nods, yup. I chase global recharge like it owes me money, so I would probably use Panacea for 5 slots and Preventative Medicine for 6 slots. Bonuses slightly better for the latter (and the proc of course).
I've tried to like Spines and it's very difficult for me. I've got a Spines/Ice scrapper that I am pretty neutral on. I skipped Ripper entirely because I can't stand the flipping animation.
Keep up the good work!
-
1
-
-
Love it! This is pretty much how I've been looking at my builds lately.
Good placement of the Avalanche proc and the Overwhelming Force proc -- you'll get a group flop every time you use Radiation Therapy or Ground Zero.
I'm a huge proponent of the AoE powers in Radiation Armor. I think I would look at moving the Superior Critical Strikes proc from Impale to Radiation Therapy -- you go from having about a 50% chance to proc on a single target in Impale every (?6-8 seconds) to an essentially guaranteed proc (with multiple targets) every 20-25 seconds. I've a big fan of near guarantee activations.
My goto in Beta Decay nowadays is Achilles Heel proc, Siphon Insight proc and/or Analyze Weakness proc, and endurance reduction if necessary. I know you have the AH proc in Ground Zero, but you'd be adding additional chances for it to go off it it were also in Beta Decay. And the +to hit procs stack and help solve some of your -to hit debuff woes.
Any reason to not 6-slot Particle Shielding with the last Preventative Medicine?
-
1
-
-
2 hours ago, TungstenShark said:
Really the difference is Shadow Maul in your build, which is far better on a Tanker.
My distaste for the changes that were made to Shadow Maul is legendary, but that being said, you can easily have a very effective build either with or without it.
My most recent DM/regen scrapper build did have it, but mainly used it as a proc delivery mechanism.
-
1
-

What's the advantage of Hami-O's?
in General Discussion
Posted
if there is one or more for offer and you haven’t bought it yet, you’re not bidding high enough!