Maelwys
-
Posts
2161 -
Joined
-
Last visited
-
Days Won
30
Content Type
Profiles
Forums
Events
Store
Articles
Patch Notes
Everything posted by Maelwys
-
 On Live it's unchanged. On Beta the T1 henchmen are currently dealing more damage than before against enemies that con +3 or higher. So if you're regularly fighting +3s or higher, I'd stick it in the Drones.
 -
Issue 28: Page 1 Farming Microguide (Maps + Builds)
Maelwys replied to America's Angel's topic in Guides
I actually have a variant of my RadM/Stone Brute build ready to go. Although holding off on finalizing it until the changes hit Live. IMO the additional regeneration requirements aren't too bad, but the additional Accuracy requirements definitely need you to put in a little more effort. 2x Acc/Dam HOs + 4x Procs is likely going to be the basic guideline now rather than 1x Acc/Dam + 5x Procs etc. unless you're double stacking Rage. -
page 3 [FOCUSED FEEDBACK] Mastermind Archetype Adjustments
Maelwys replied to The Curator's topic in [Open Beta] Focused Feedback
@Captain Powerhouse said as much earlier in the thread. "as a baseline, we are trying to handle this conversion without high buffs. We will likely adjust things further during the beta window, but major buffs beyond these are likely to come in a follow-up Panel release." Also note the wording there: future Panel release, not future Issue or even future Page. A "panel" is the CoH term for an incremental followup "same-page" patch, so it's going to be soon rather than SOONTM 😉 My advice is to do tests and post some performance metrics times/parses/logs/etc showing clearly what state MMs are now in as a result of these changes. The more useful performance data there is, the better the Devs can tailor these future tweaks. -
page 3 [FOCUSED FEEDBACK] Mastermind Archetype Adjustments
Maelwys replied to The Curator's topic in [Open Beta] Focused Feedback
New Patch out! 🥳 -
page 3 [FOCUSED FEEDBACK] Mastermind Archetype Adjustments
Maelwys replied to The Curator's topic in [Open Beta] Focused Feedback
https://forums.homecomingservers.com/beta/ (hit "Copy Character" and pick which one; then wait 2-3 mins and it should be there) -
page 3 [FOCUSED FEEDBACK] Mastermind Archetype Adjustments
Maelwys replied to The Curator's topic in [Open Beta] Focused Feedback
In a word: "No". From what I can gather, the overall intention for all the MM AT tweaks this patch is to simply make MM pets even level whilst causing minimal performance changes. Proper buffs/nerfs/whatever will likely happen later on; after these changes bed in and the Devs have amassed enough data to justify those buffs/nerfs/whatever. However the T1s/T2s will at least be dealing more damage than before whenever they're fighting level 55 mobs from the new increased difficulty settings... (Perfectly happy to be proven wrong here though if a dev wants to weigh in! 🙂) -
page 3 [FOCUSED FEEDBACK] Mastermind Archetype Adjustments
Maelwys replied to The Curator's topic in [Open Beta] Focused Feedback
Fair enough. IIRC you tend to not slot damage procs into Single Target abilities... but since Reactive (or Degenerative) Radial Flawless Interface plus Assault Radial Embodiment Hybrid typically add a very decent chunk of damage versus a single target for the duration of the Hybrid buff window; I figured a "GM Hunter" build might be making use of them... My bad! 😉 I'll try and put something halfway sensible together as an illustration after I do my own tests; as IIRC Incarnate proc damage being buffed too much by making the T1s/T2s even-level was one of the big concerns on the Dev's radar + I'm sure they'd appreciate some more data points on it. (Even if the percentage of MMs using Assault Hybrid over Support Hybrid is very likely tiny; especially given that it only kicks in on pets [like Henchmen and Phantom Army etc etc] if you summon them AFTER activating it...) -
page 3 [FOCUSED FEEDBACK] Mastermind Archetype Adjustments
Maelwys replied to The Curator's topic in [Open Beta] Focused Feedback
Yeah... essentially damage from Incarnate Interface DoTs and Assault Radial Hybrid "Doublehit" procs is only about 35% of what it should be. TEST: LIVE: Note that the basic hit damage is roughly the same, as is the damage from regular IO Set damage procs kicking in (the Explosive Strike)... however the DoubleHit and Reactive Interface damage figures are both being greatly reduced. Powerhouse confirmed it was indeed broken here. (the screenshots are taken from my first reply in this very thread, which also covered the issue!) IMO the only real benefit is to use 'em as somewhere to mule the Aura IOs. The 6 slots for each regular henchmen are often well "overbooked".
-
page 3 [FOCUSED FEEDBACK] Mastermind Archetype Adjustments
Maelwys replied to The Curator's topic in [Open Beta] Focused Feedback
FWIW the next minor patch should hopefully be fixing the T3's proc damage issue; and Faultline mentioned they were going to try to push it to Brainstorm later on today... so it might be worth doing another test after that lands (especially if you're running DoT-heavy Interfaces and/or Assault Radial Hybrid). I'm planning on trying to do some comparative Pylon Times and AE runs once I can free up a few hours of solid playtime; which will likely be the weekend at this rate! -
page 3 [FOCUSED FEEDBACK] Mastermind Archetype Adjustments
Maelwys replied to The Curator's topic in [Open Beta] Focused Feedback
I can see them taking a little longer. But it'll hopefully not be HUGELY different after the T3 proc damage fix is in place. Honestly the difference in my T3's damage on Beta right now is bigger than the difference in the damage of all my T1s combined... and in theory it shouldn't be budging. Definitely worth testing again once the dust settles though! -
page 3 [FOCUSED FEEDBACK] Mastermind Archetype Adjustments
Maelwys replied to The Curator's topic in [Open Beta] Focused Feedback
To be honest this is my main complaint with the Set Bonus inheritance thing. Since MM pets don't benefit from recharge boosts; I'd like to see any Global Recharge they inherit be repurposed into something else like +Accuracy or +Damage instead. Sure, going up to 50% instead of 40% would be nice too, but I'd much rather have all those superfluous recharge bonuses be useful for something. -
page 3 [FOCUSED FEEDBACK] Demon Summoning Adjustments
Maelwys replied to The Curator's topic in [Open Beta] Focused Feedback
IIRC the T1 Upgrade powers should allow the inherent pet resistances to be enhanceable. The T2 is giving the Ember Demon a separate buff power ('Ember Shield'; along with its counterpart 'Ember Shield Owner'). Try checking the stats of Ember Shield Owner whenever your toon is actually being buffed by it - it wouldn't be the first time the preview info was using the wrong scalars. -
page 3 [FOCUSED FEEDBACK] Mastermind Archetype Adjustments
Maelwys replied to The Curator's topic in [Open Beta] Focused Feedback
NPC Caltrops has a Mag 50 Afraid effect with a duration of 1s. So after if you're out of the Caltrops; its debuff drops off fast. Monkey Gas is a Mag 50 Afraid effect with a duration of 2s. So in theory the "run away" component of it is only lingering for an extra 1 sec (although it does "ignore resistance") However due to how pet AI changes work it can take them a few extra seconds to shift from one behaviour to another (such as from "Panic Mode" back to "Normal"!) and henchmen also seem to quite enjoy continuing to run around (albeit perhaps changing direction a bit) after they've already started running. There is a "leash" on MM henchmen that should pull them back to you beyond a certain distance; but it's a little too large for indoor maps (and IIRC the code in question is also located very deep in the Spaghetti; so it doesn't really lend itself to being tweaked!). Personally I'll often try to work around the issue a bit by running Group Fly; but that's only really viable for Ranged or mostly-ranged pets like Bots/Mercs/Thugs. In any case, I suspect this particular tangent is getting decidedly off topic now for a Focused Feedback thread, so I'll shush 😛 -
Issue 28: Page 1 Farming Microguide (Maps + Builds)
Maelwys replied to America's Angel's topic in Guides
In theory Crabberminds can mow through things VERY, VERY fast, but keeping the pets alive on farming runs is a stretch. My (pretty optimized) Crabbermind has no trouble soloing at +4x8; but they struggle on asteroid maps because they surround you with dozens of targets but VEATS lack any fine control over what their pets are attacking. Non-Crabbermind Crab builds tend to be more Tanky than Spike-Damage orientated; but you could look here (bottom of the post) and here for some ideas. -
page 3 [FOCUSED FEEDBACK] Mastermind Archetype Adjustments
Maelwys replied to The Curator's topic in [Open Beta] Focused Feedback
The devs are definitely aware of that particular headache. I imagine however that simply granting the Henchmen a major speed buff isn't the bestest ever idea. Anyone who has speed boosted a "prefer melee" pet can probably imagine the bedlam that might ensue: all it takes is a single instance of monkey gas/caltrops and they'll happilly superspeed off and aggro half the map... and since each pet has its own aggro limit; that's up to 17x6=102 new enemies that suddenly know about the MM. Which reminds me: making pets within Supremacy range functionally immune to the "Afraid" condition (OH NOES A 1 DAMAGE-PER-TICK AOE! RUN AWAY!!) would be a very beneficial QOL change. Another one to add to the wishlist pile... 😇 🎅 🎁 -
page 3 [FOCUSED FEEDBACK] Mastermind Archetype Adjustments
Maelwys replied to The Curator's topic in [Open Beta] Focused Feedback
Agreed, which is why i said "Personally I'd prefer they'd set the break even point lower". With the currently proposed setup (once the proc fix makes it onto the servers) the damage output of the T3 pet in theory shouldn't be getting changed at all; and the damage output of the T1 and T2 pets should "break even" at +2 mobs (raw damage) and +3 mobs (procs). This means the T1/T2 henchmen will be dealing about 25.0%/9.7% (T1/T2) less damage versus +0s; and 16.9%/8.6% less versus +1s. But they'll be the same as before vs +2s... and they'll be dealing 30.1%/10.0% more damage vs +3s; 92.2%/30.0% more vs +4s and 125.1%/62.4% more vs +5s. So whilst it's small comfort to anyone that never fights more than +1s... that's a major ramp up in proportional damage (albeit perhaps not in absolute damage) at the higher end. Factoring in Proc damage muddies the waters a bit; especially if you're packing 3 procs per henchmen and have a "DoT" Radial Interface and Assault Radial Hybrid active. But at most it should be shifting things less than one tier to the right (so MMs might end up a little worse off vs +2s but they should still be noticeably better off vs +3s). I strongly suspect that if non-optimized MMs end up struggling then there may be an upwards tweak to damage output; at least at lower levels. However my own experience is that MMs are extremely strong soloists whilst levelling up compared to the other ATs - second only to Brutes in fact. Therefore having a minor damage decrease versus +0s/+1s until level 26 might not be a hugely impactful for anyone who isn't a /Poison. And they'll benefit once they start teaming up and/or turning up the difficulty slider. IMO if subsequent updates increase T1/T2 henchmen survivability (which is a distinct possibility - although as a disclaimer I'm not currently aware of any specific future MM changes beyond the above bugfix!) and help alleviate the T1/T2 Accuracy slotting requirement issues then all the better... and IMO that might be a wiser way to start going about retuning them rather than Blanket buffing their damage. (and FWIW my other wishlist items would include increasing the henchmen damage limit from 400% to 500%; and allowing ATOs to be slotted within all the MM's personal attacks; and finally tweaking the Aggressive/Defensive/Passive AI stances to give some kind of minor useful buff; at least on teams...) -
page 3 [FOCUSED FEEDBACK] Mastermind Archetype Adjustments
Maelwys replied to The Curator's topic in [Open Beta] Focused Feedback
AFAIK the point of this round of changes is simply to make the pets be even level without overly impacting their current performance. Performance tweaks can then come later. Currently the T1/T2 pets in test are actually a smidge more survivable than on Live (yes, even with the HP reduction) because by no longer being lower level they're taking less damage and being hit less often, and the same amount of allied healing will recover proportionally more of their total HP. And the difference gets bigger the higher the enemy level is. Offensively it's trickier, as making the aforementioned pets even level drastically changes their damage curve. Currently the Devs have set the "break even" point at +2 enemies so the intent is that they'll deal less damage versus even level enemies, and a smidge less damage vs +1s... in order to deal a smidge more vs +3s and more vs +4s and higher. (Personally I'd prefer they'd set the break even point lower, especially given how Proc damage is getting affected - however currently it's mainly Incarnate Interface DOTs and Assault Radial Hybrid DoubleHits that are taking the brunt of the nerfs) Hit Rate is currently almost unchanged (annoyingly) with the T1s and T2s having only a very slight increase vs higher level foes... and AFAIK that's purely due to them "rounding up" to ensure all these changes are never resulting in an accuracy nerf, rather than them intentionally trying to buff it. .......... I only started participating in Closed Beta testing recently (June) and haven't combed through all the older stuff that never made it through... but I highly suspect that the T1/T2 Pets spawning at lower levels was playing merry hell with any previous Developer attempts to rebalance MM performance, not least because any upward changes are greatly magnified in Incarnate Content. So I'm hoping that this level reshuffle, whilst not a buff in itself, at least clears the board and allows the Devs to properly buff MMs in an appropriately balanced manner later on (and not have to worry about those buffs potentially resulting in runaway performance increases in specific content/scenarios!) -
page 3 [FOCUSED FEEDBACK] Mastermind Archetype Adjustments
Maelwys replied to The Curator's topic in [Open Beta] Focused Feedback
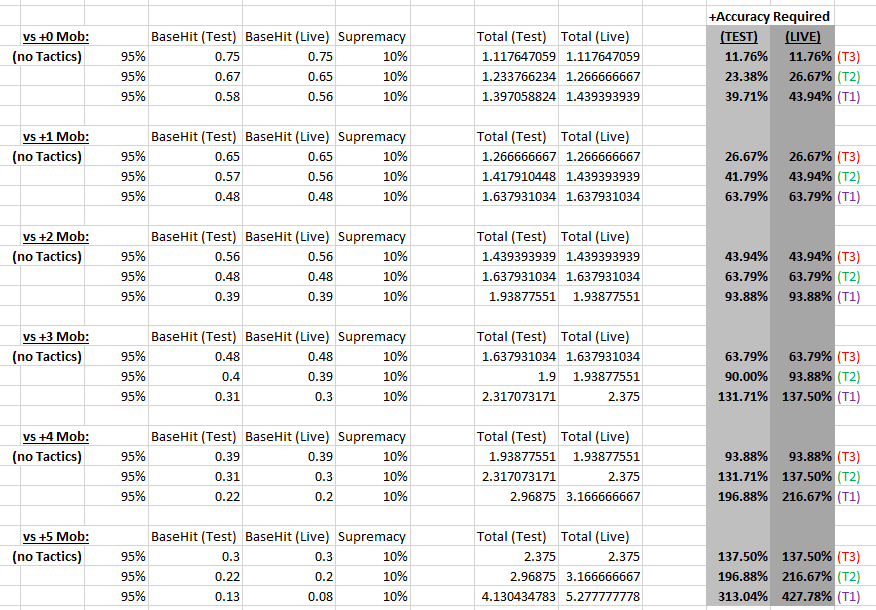
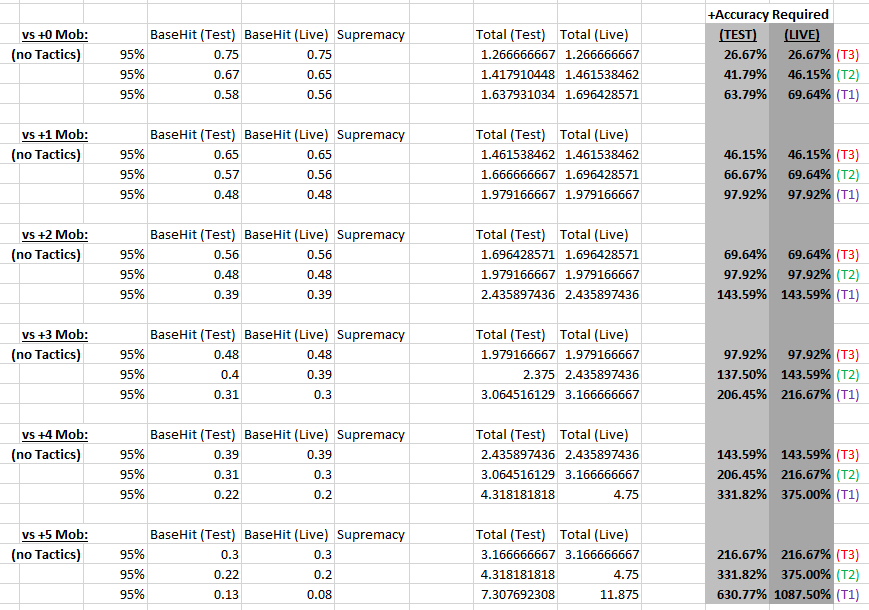
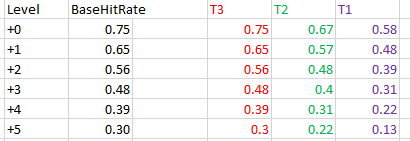
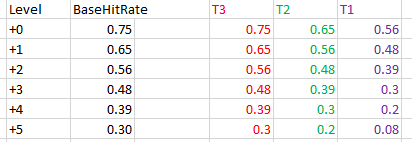
Minor nitpick, but is the data in those definitely correct? The context here seems to suggest that in the above two tables; the first six numbers in each row is supposed to show the "additional accuracy slotting" required for each of the Henchmen tiers in order for that henchmen to reach a "softcapped Hit Rate" (e.g. 95%). However I can't quite seem to match these +Acc requirement numbers. I'd put it down to typos or poor rounding in the Hit Rate figures I'm using; but there's a pretty major difference even on the "Live" figures. HitChance = Clamp( AccMods × Clamp( BaseHitChance + ToHitMods – DefMods ) ) If we're aiming for 95% Hit Rate versus the foe in question; then that should reduce to: 0.95 = AccMods x (BaseHitRate+ToHitBuffs) AccMods = 0.95/(BaseHitRate+ToHitBuffs) These are the TEST vs LIVE henchmen BaseHitRate modifiers I'm currently seeing/using: vs So as an example... for a T3 henchmen with Supremacy versus a target that is +0 to them; it should be: AccMods = 0.95/(0.75+0.10) = 1.117647 on both Test and Live. Therefore providing the attack has an Acc modifier of 1.0, it should require ~112% total accuracy: 100% base; plus an extra +11.76% from slotting (rather than an extra +13%) Likewise the T2s should require (0.95/(0.67+0.10))-1.0 = +23.38% extra accuracy [on Test] and (0.95/(0.65+0.10))-1.0 = +26.67% [on Live] (rather than +27% and +31%) And the T1s should require (0.95/(0.58+0.10))-1.0 = +39.71% extra accuracy [on Test] and (0.95/(0.56+0.10))-1.0 = +43.94% [on Live] (rather than +47% and +52%) And as a result; these are the equivalent Tables that I'm getting: [WITH SUPREMACY] [WITHOUT SUPREMACY] Whilst it's getting late here and I'm a smidge sleep deprived... I seem to be able to corroborate the above values in Mids (after a bit of poking with BaseHitRate) and in the game; so I'm hoping I'm either reading your tables wrong or there're a few typos somewhere and I'm not going totally crazy... 😛
-
page 3 [FOCUSED FEEDBACK] Mastermind Archetype Adjustments
Maelwys replied to The Curator's topic in [Open Beta] Focused Feedback
Thanks for confirming the T3 proc damage issue. I'll hold off on doing too many DPS tests until the fix for this gets pushed. Regarding the Accuracy issues (and I know I've already said this in PMs, but I think it's worth stating to a wider audience!) Compared to what's on Live, the Hit Rates of T1/T2 henchmen have NOT BEEN NERFED... at least in regular non-incarnate content. In fact, they've been very slightly increased. But whilst the numbers are never worse off compared to before; they're still VERY BAD. Meaning that Masterminds continue to suffer from a major Hit Rate disadvantage compared to other ATs... which is being highlighted by the introduction of level 55 mobs this patch. And the (possibly naive) playerbase expectation that "making pets all even level will do away with this accuracy problem; right?" makes this state of affairs extra disappointing. All that said; if the goal here is effectively to "make pets even level without buffing anything, then consider buffs later on" then fair enough. I just really hope that the (long standing) MM T1/T2 henchmen Hit Rate problem will be addressed sooner than SOON(tm) 😉 👍 -
page 3 [FOCUSED FEEDBACK] Mastermind Archetype Adjustments
Maelwys replied to The Curator's topic in [Open Beta] Focused Feedback
Yeah +2-conning foes are what they're apparently aiming at as the "breakeven point" for non-proc damage; so it's good your data reflects that. As mentioned previously, I think the raw damage is in a reasonably balanced place right now for that "breakeven vs +2s" aim... but I'm not so sure about Incarnate proc damage. I strongly suspect that Interface Abilities which are weighted "75% DoT/25% Debuff" and Assault Radial Hybrid "Doublehit" procs are going to be seeing a much bigger drop in effectiveness; so that's something that I specifically would like to test once I get the chance later on in the week (pesky RL commitment time sinks...) 😝 -
page 3 [FOCUSED FEEDBACK] Mastermind Archetype Adjustments
Maelwys replied to The Curator's topic in [Open Beta] Focused Feedback
Is that vs a "levelless" Pylon (three freestanding pylons, out the portal of the base in RWZ and turn left) or versus one of the level specific ones (out the same portal and turn right, several different conning pylons lined up in a row inside the little "shooting gallery") I'd advise testing against the latter, as the former treats everything attacking it as "even level" so the T1s and T2s have inflated DPS against it on live. -
page 3 [FOCUSED FEEDBACK] Ninjas Adjustments
Maelwys replied to The Curator's topic in [Open Beta] Focused Feedback
Copying part of my response from the main feedback thread here, since it's particularly applicable to Ninjas "Smoke Flash" changes: MASTERMIND ATO SLOTTING: Problem: Mastermind ATOs can only currently be slotted into the Pet summon abilities and specific Tier 7 abilities. On Live, specific Mastermind Primary powersets have more opportunity than the rest to slot ATOs - Thugs and Demons and Necromancy have Tier 7 powers (Gang War/Hell on Earth/Soul Extraction) which can take the ATOs. But Beasts, Mercs, Ninjas and Robotics do not. On Test there has been an attempt to resolve this by giving the Tier 7 powers of those latter four powersets (Fortify Pack, Serum, Smoke Flash and Maintenance Drone) the ability to slot ATOs. However none of those abilities benefit from Damage aspect slotting; and many of them do not benefit from Accuracy aspect slotting. Therefore much of the benefit of these ATOs is getting wasted (and Serum has some other potential issues with how +Damage enhancement interacts with +DamageResistance enhancement under the hood!) Ideal Solution: Let all damaging Mastermind Primary Attacks have the ability to slot ATOs. This would mean Personal Attacks from Mastermind Primary Powersets such as Call Swarm, Burst, Snap Shot and Pulse Rifle Blast would become able to take and benefit from the ATO sets and all of their various enhancement aspects - accuracy, damage, endurance and recharge. Having 3 extra powers per set which can potentially take ATOs would also open up a lot of build variety for Masterminds and drastically ease the pressure on sets like Mercs (which simply cannot cram every beneficial IO into its three summon abilities!) Potential Compromise Solution: Let the T1 and/or T2 Mastermind Primary Personal Attacks have the ability to slot ATOs. Similar to the above, but it'd limit the scope of MM ATO slotting to only one or two personal attacks; in case the Devs are concerned about opening it up too wide. -
page 3 [FOCUSED FEEDBACK] Mercenaries Adjustments
Maelwys replied to The Curator's topic in [Open Beta] Focused Feedback
Copying part of my response from the main feedback thread here, since it's particularly applicable to Mercs "Serum" changes: MASTERMIND ATO SLOTTING: Problem: Mastermind ATOs can only currently be slotted into the Pet summon abilities and specific Tier 7 abilities. On Live, specific Mastermind Primary powersets have more opportunity than the rest to slot ATOs - Thugs and Demons and Necromancy have Tier 7 powers (Gang War/Hell on Earth/Soul Extraction) which can take the ATOs. But Beasts, Mercs, Ninjas and Robotics do not. On Test there has been an attempt to resolve this by giving the Tier 7 powers of those latter four powersets (Fortify Pack, Serum, Smoke Flash and Maintenance Drone) the ability to slot ATOs. However none of those abilities benefit from Damage aspect slotting; and many of them do not benefit from Accuracy aspect slotting. Therefore much of the benefit of these ATOs is getting wasted (and Serum has some other potential issues with how +Damage enhancement interacts with +DamageResistance enhancement under the hood!) Ideal Solution: Let all damaging Mastermind Primary Attacks have the ability to slot ATOs. This would mean Personal Attacks from Mastermind Primary Powersets such as Call Swarm, Burst, Snap Shot and Pulse Rifle Blast would become able to take and benefit from the ATO sets and all of their various enhancement aspects - accuracy, damage, endurance and recharge. Having 3 extra powers per set which can potentially take ATOs would also open up a lot of build variety for Masterminds and drastically ease the pressure on sets like Mercs (which simply cannot cram every beneficial IO into its three summon abilities!) Potential Compromise Solution: Let the T1 and/or T2 Mastermind Primary Personal Attacks have the ability to slot ATOs. Similar to the above, but it'd limit the scope of MM ATO slotting to only one or two personal attacks; in case the Devs are concerned about opening it up too wide. -
page 3 [FOCUSED FEEDBACK] Robotics Adjustments
Maelwys replied to The Curator's topic in [Open Beta] Focused Feedback
Copying part of my response from the main feedback thread here, since it's particularly applicable to Robotics "Maintenance Drone" changes: MASTERMIND ATO SLOTTING: Problem: Mastermind ATOs can only currently be slotted into the Pet summon abilities and specific Tier 7 abilities. On Live, specific Mastermind Primary powersets have more opportunity than the rest to slot ATOs - Thugs and Demons and Necromancy have Tier 7 powers (Gang War/Hell on Earth/Soul Extraction) which can take the ATOs. But Beasts, Mercs, Ninjas and Robotics do not. On Test there has been an attempt to resolve this by giving the Tier 7 powers of those latter four powersets (Fortify Pack, Serum, Smoke Flash and Maintenance Drone) the ability to slot ATOs. However none of those abilities benefit from Damage aspect slotting; and many of them do not benefit from Accuracy aspect slotting. Therefore much of the benefit of these ATOs is getting wasted (and Serum has some other potential issues with how +Damage enhancement interacts with +DamageResistance enhancement under the hood!) Ideal Solution: Let all damaging Mastermind Primary Attacks have the ability to slot ATOs. This would mean Personal Attacks from Mastermind Primary Powersets such as Call Swarm, Burst, Snap Shot and Pulse Rifle Blast would become able to take and benefit from the ATO sets and all of their various enhancement aspects - accuracy, damage, endurance and recharge. Having 3 extra powers per set which can potentially take ATOs would also open up a lot of build variety for Masterminds and drastically ease the pressure on sets like Mercs (which simply cannot cram every beneficial IO into its three summon abilities!) Potential Compromise Solution: Let the T1 and/or T2 Mastermind Primary Personal Attacks have the ability to slot ATOs. Similar to the above, but it'd limit the scope of MM ATO slotting to only one or two personal attacks; in case the Devs are concerned about opening it up too wide. -
page 3 [FOCUSED FEEDBACK] Mastermind Archetype Adjustments
Maelwys replied to The Curator's topic in [Open Beta] Focused Feedback
As I understand it... in the process of raising the T1s and T2s to "even level" the whole aspect of MM damage balance got shaken up. Because if they just made Pets even level and left everything else as-is... then our T1 and T2 pets would be more survivable, more accurate, and deal more damage. There was an easy way to eliminate all the accuracy differences (which they did by applying artificial -ToHit debuffs once those pets get over a certain level). However there wasn't an easy way to address the damage or survivability differences. They did however attempt to hack at both on Closed Beta. The survivability differences have more-or-less been sorted out. Before the Devs settled on HP reductions; they tried reducing other things instead. Repeatedly. And specific primary and secondary powersets were being DRASTICALLY negatively impacted. We kicked up stink about it; and to be fair the Devs abandoned that very imbalanced approach. HP reductions are by far the most even-handed way to reduce survivability of the now-even-level pets to roughly match what they are on Live (and IMO they've gotten the balance just about right. Although I'd still prefer a 50% inheritance of Set Bonuses rather than 40%) The damage differences are still in flux. I know what the devs are apparently aiming for (+2s being the "break even" point for when damage output roughly equals what we're used to seeing... +3s and above taking more damage; +1s and below taking less damage). And I think that is probably a reasonable compromise since MMs tended to not overly struggle versus lower-conning foes in the first place. But I'm not convinced that we've actually REACHED that aim yet currently. Admittedly most of my issues are with Interface/Hybrid damage Procs - these were VERY SPECIFICALLY targeted by the devs (to the point where incarnate damage procs are now being treated differently than other regular damage procs) because they were apparently extremely concerned about runaway damage increases versus higher-conning foes. So I genuinely think that we need to provide a lot of empirical testing here to show the Devs what the average (no incarnate procs) and peak (with incarnate damage procs) MM damage output currently looks like... and try to get them to be comfortable to adjust their new performance upwards (assuming of course that the data shows it's a good idea!). And of course, also argue the case for T1/T2 henchmen hit rate being adjusted upwards... 😜