Ghost907
-
Posts
15 -
Joined
-
Last visited
Content Type
Profiles
Forums
Events
Store
Articles
Patch Notes
Everything posted by Ghost907
-
Edited 8/16/2019 - Wanted to correct myself after playing my /Regen character and remove the unnecessary ramble. I would reconsider this statement. Sentinel Regeneration does have the chutzpah to receive an initial retaliation and strengths to handle battles of attrition. However, there's a catch. The key note power in the Sentinel's Regeneration arsenal is Instant Regeneration that provides a heal/absorb damage shield/sponge. Those unfamiliar with the power, it creates an impressive ablative absorb/buffer that overlays on top of the character's health. However, there are some mechanical in nuances on how this power functions and remains beneficial. For example, incoming damage is subtracted from the current heal/absorb pool (i.e. hit point damage = absorb - incoming damage). If damage to health is <= zero than no damage is applied to the character's health. The slotted power with at least two (2) IOs or thereof equivalent in +%Heal/Absorb provides a strong buffer zone between incoming damage and taking hit point damage. However, here comes the in nuances about the power. As mentioned, Instant Regeneration is an ablative heal/absorb shield that overlays the character's health meter. Therefore, the power is only active when the character's health meter is 100%. The power is still running in the background, so once the meter is full again than the heal/absorb begins soaking damage again. The ablative heal/absorb shield begins ticks to heal/restore it's strength level after the character's health meter is 100%. Correcting myself here: The shield has it's own recursive regeneration rate that cycles (roughly) every three seconds. The amount restored on each tick cycle restores a percentage of the maximum heal/absorb rating. Out of combat the heal/absorb shield does renew itself within a few seconds on the condition the character's health meter is 100%. Lastly, but what makes Instant Regeneration awesome come the awesomeness that it absorbs all types of damage. This makes the power very reliable on performance expectations. The most common dependency of the power can be identified that the power is only active when the character's health meter is full. The constraint is a double-edged sword for /Regen users. @oldskoolyou commented earlier about Reconstruction and Second Wind not being jokes. I agree. They are our gap-closure powers for quick heals and having -Recharge slotted becomes our friend than. Therefore, Sentinel Regeneration characters does have various direct heals, a heal/absorb buffer, and other powers to help manage initial Alpha Strikes, whereas our set advantage is the stay power in arbitration battles. I have taken huge Alpha Strike damage from signature villains when they do their big umppa attacks and survived them.
-
I've been discussing /Regen in another thread. I would be glad to collaborate and contribute on writing up /Regen since I've go so far as to crunch numbers there. Could the lead on the topic, please send me PM with what info you're researching/testing out; and I'll return my findings for the /Regen section.
-
I appreciate @oldskool and your clarification.
-
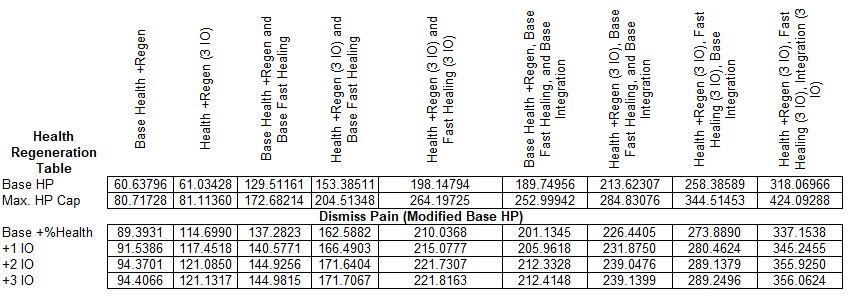
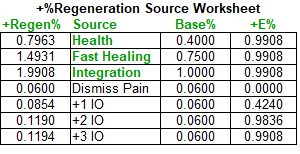
No problem. Back to your question about increasing health along with +regeneration. Increasing your health does improve your health regeneration rate noticeably when you slot at least 2 IO (Schedule A). The third IO only made a marginal difference on health regeneration from Dismiss Pain base +6%. I worked up a spreadsheet using 3x L:50 IO (Schedule A) and crunched some numbers. Disclaimer: This chart assumes the 5% of the character's health is enhanced by the +%Regen. These health regeneration amount are based on the Global Timer 12 Seconds (i.e. the health amount restored after 12 seconds) and without IO set bonuses that offer +%Regen. In theory, these numbers would be improved, therein, proportionately to the +%Regen the set offers. Also, the Base HP values was calculated on the Blaster's Base HP and Max HP Cap variables using the method here. Any mathematicians here are welcome to correct me, please. In conclusion for myself, it would be worth considering at least 2 IOs slots for Dismiss Pain and other +Max Health benefits from IO sets. Edited: Without going in-depth about slotting +%Regen besides the three (3) slots per Fast Healing, Integration, and Health, the rough numbers in my table are fairly low in context to the following formula, on how quickly you can rebound once sustaining hit point damage: Time = ( Hit Point Damage / Regeneration Healed); whereas Time is than multiplied by 12 to calculate how long the character is vulnerable before healing damage taken. For instance, Character sustains 1000 HP damage to their health (past their Instant Regeneration) and using the chart above (3 IOs in Health, Fast Healing, and Integration), it would take... Hit Point Damage = 1000 Regeneration Healed/12 Seconds = 356.0624 Than it's take roughly 33.7 seconds to heal the damage taken. That's without considering additional damage taken during the interim. This example returns me to "How much +%Regen is possible" since /Regen has poor resistance and defense values, so you're taking 90%+ of the damage inflicted. My goal then would be to lower the number of global cool downs before I'm back in the fight again, at least recovered enough to sustain more burst damage. And for thoroughness...

-
I appreciate the scrutiny and review. I do like puzzles and working them through to find/learn plausible solutions. I will reopen Pine and apply your feedback, it'd be a tomorrow project. Edited: For clarification for my understanding, as well as those who didn't know. In regards to, IO sets. It means the character only gains the benefits from 5 IO sets, correct? Such as, +%Regeneration in our discussion but the rule also extending to other IO set bonuses. Another question for clarity, multiple sets (6+) that have the same "type" category bonus (e.g. +x.xx% Resist to Smashing) than the game engine only accepts the highest IO set bonus value out of all the IO sets, offering the same "type" category bonus? Our discussion here has given me much to consider, in terms on how to IO set bonuses are beneficial, or not, or when set bonuses are ignored while other set bonuses are gained with the 5 IO set rule.
-
Since we're discussing everything. Dismiss Pain is our +Hit Point passive power and the character slotting 3 Heal IOs gains marginal benefits i.e. +71.95 (+36.14) Hit Points. Hit Points is a variable variance in the health regeneration calculation when you consider +hit points over the archetype's hit points per level range. At base 5%/12 seconds (according to Paragon wiki) it's a marginal benefit. This is where we need to understand how the +Regen is applied to the 5% (of Hit Points) variable to understand how the sources of the accumulating 720% +Regen is applied. I apologize for the technical delve into /Regen but it's also necessary to weigh in when slotting our /Regen powers. IF, and I say IF, the +Regen% is variable modifier i.e. ((Hit Points * 0.05) * (Regen%/100))/12 than we can tool up an accurate assessment on what the character's health regeneration per second would be or there about. While we could reach some impressive regeneration numbers, /Regen remains attached to the global 12 second timer. I will need to do some testing to better answer your question more informed about using +Hit Points as an alternative or additive as a viable factor. On my initial look, slotting more than three IOs moy have more diminishing value in the overall calculation. Again, sorry for the technical delve into a math lesson. Disclaimer: The posted formula is unconfirmed.
-
I appreciate the kind words. I revised my build's attack sequence from the collaborated project's thread. After being damage sponge to everything except smashing or lethal, my mind began to turn on how to passively mitigate the incoming damage. This was the rationale behind Devastation. In short teams (2-3) the set offers good synergy with others who are not controllers. At the same time, the Hold builds up against tougher opponents, and causes interrupts/Holds. The set's Hold IO can be replaced with something else without losing the +Regeneration from the set. This offers some choice flexibility for the player. After reviewing Pine's again. It seems 3 Heal IOs and 2 Numinas is more optimal slotting for Integration and Fast Healing. I removed 2 slots from Health (down to 3 Heal IOs) and reallocated them to Integration since I neglected to put five slots into the original post. This netted 725% overall +Regeneration on the totals page of the builder. It seems this IO/set allocation is more optimal with less diminishing effects for the overall slots invested to bolster the character's health regeneration - considering, this is route synergies with /Regen better than trying to cap resists or defense values. Edited: Also, I should have about 17.5% against Psionics after all sets considered since we critically lack in defense against those attacks.
-
True. There are diminishing returns in the mock workup. To push the +Regen towards cap, it seems the extreme is necessary. Maybe not to the nth degree on some powers. The main +Regen powers of the framework are Integration (toggle, +Regen) and Fast Healing (+Regen) while Health (+Regen) roughly contributes 10% of the overall Health Regeneration - According to Pine's Hero builder. /Regen is slot heavy in those three +Regen sources to boost the numbers. Regenerative Tissue set has the 25% +Regeneration IO, however, slotting this set in Reconstruction and/or Second Wind may still encounter diminishing returns where the character doesn't actually benefit from the set's full 25% +Regen boost. Other /defense won't see this shortage unless their also building for +Regen. I have read through Paragon's wiki about Health Regeneration and the different Health Regeneration Limits. The 721-766% +Regeneration is quite short of the noted 2,000% on their site, presuming the cap includes Sentinels. So the puzzle stands on how much slot/IO investment (optimal or extreme) is necessary for the defensive power to counter the "damage sponge" side effect of /Regen? The thin line between optimal IO slotting and diminishing returns across the three main sources of +Regen for /Regen. Edited: I wouldn't say full counter to the "damage sponge" side effect but soften it up since we're under a 12 second loop between health regeneration to rebound from burst damage. Sorry to the OP, for any derailment. I hope the side discussion/post helps you with your own build.
-
/Regen to date is my most reliable for predicting its performance. And sometimes, knowing what to expect on the receiving end can change how the fight ends. It has always on and low costing powers, IF sustain is also a factor in the "toughest" Sentinel contest. I have.... Face tanked minions and lieutenants, no problem. Kited and dropped +2-3 Bosses and Elite Bosses (including end-of-story arc bosses). Group play (i.e. someone else is tanking) and /Regen is enough to absorb away unexpected damage. I feel the "toughest" Sentinel contests depends on what the user is trying to accomplish. I have tried /WP and prefer /Regen in context that the power is more reliable on how it keeps my character alive.
-
I was on Pine's Hero Builder and the tooled up 721% regeneration. The highest regen percentage that I've tweaked and manipulated sets slots for +Regeneration has been 766% that slotted Boxing, Kick, and Cross Punch with Pounding Slugfist to squeeze extra +Regen. Regeneration is fairly "paper-thin" on most resistances, SO... I was trying to reach the +Regen soft-cap to compensate when soaking burst damage that punches through our Instant Regeneration (Absorb). The sets shown were chosen to boost +Regeneration and offer some soft-CC to slow down incoming damage. The Cyro and Chemical ammo offers some synergy with Regeneration, at least when you're solo playing. In group play, Regeneration is fairly good at keeping your health up and handling aggro when adds spawn, and need some attention removing them from the fray. Hero Plan by Mids' Hero Designer 1.962 http://www.cohplanner.com/ Level 50 Natural Sentinel Primary Power Set: Dual Pistols Secondary Power Set: Regeneration Power Pool: Flight Power Pool: Fighting Power Pool: Speed Power Pool: Leadership Hero Profile: Level 1: Pistols -- Apc-Dmg(A), Apc-Dmg/Rchg(3), Apc-Acc/Dmg/Rchg(5), Apc-Acc/Rchg(9), Apc-Dmg/EndRdx(33), Apc-Dam%(40) Level 1: Fast Healing -- Heal-I(A), Heal-I(3), Heal-I(15), NmnCnv-Heal(29), NmnCnv-Heal/EndRdx(37) Level 2: Reconstruction -- NmnCnv-Heal/EndRdx(A), NmnCnv-Heal(5), NmnCnv-Heal/Rchg(17), NmnCnv-Heal/EndRdx/Rchg(45) Level 4: Hover -- LucoftheG-Def/EndRdx(A), LucoftheG-Def(46), LucoftheG-Def/EndRdx/Rchg(48) Level 6: Suppressive Fire -- Dvs-Acc/Dmg(A), Dvs-Dmg/EndRdx(7), Dvs-Dmg/Rchg(7), Dvs-Acc/Dmg/Rchg(9), Dvs-Acc/Dmg/EndRdx/Rchg(33), Dvs-Hold%(40) Level 8: Quick Recovery -- EnrMnp-EndMod(A), EnrMnp-EndMod/Rchg(11), EnrMnp-Stun%(25) Level 10: Instant Regeneration -- Heal-I(A), Heal-I(11), Heal-I(15), Heal-I(29), Heal-I(37) Level 12: Bullet Rain -- Ann-Acc/Dmg(A), Ann-Dmg/Rchg(13), Ann-Acc/Dmg/Rchg(13), Ann-Acc/Dmg/EndRdx(17), Ann-Acc/Dmg/EndRdx/Rchg(36), Ann-ResDeb%(48) Level 14: Swap Ammo Level 16: Dismiss Pain -- Heal-I(A), Heal-I(23), Heal-I(36) Level 18: Executioner's Shot -- Dvs-Acc/Dmg(A), Dvs-Dmg/EndRdx(19), Dvs-Dmg/Rchg(19), Dvs-Acc/Dmg/Rchg(21), Dvs-Acc/Dmg/EndRdx/Rchg(33), Dvs-Hold%(40) Level 20: Integration -- NmnCnv-Heal(A), NmnCnv-Heal/EndRdx(23), NmnCnv-Heal/Rchg(42) Level 22: Boxing -- Empty(A) Level 24: Tough -- TtnCtn-ResDam(A), TtnCtn-ResDam/EndRdx(31), TtnCtn-ResDam/Rchg(43), TtnCtn-ResDam/EndRdx/Rchg(45), TtnCtn-EndRdx(50) Level 26: Piercing Rounds -- Ann-Acc/Dmg(A), Ann-Dmg/Rchg(27), Ann-Acc/Dmg/Rchg(27), Ann-Acc/Dmg/EndRdx(34), Ann-Acc/Dmg/EndRdx/Rchg(34), Ann-ResDeb%(42) Level 28: Resilience -- TtnCtn-ResDam(A), TtnCtn-ResDam/EndRdx(31), TtnCtn-ResDam/Rchg(43), TtnCtn-ResDam/EndRdx/Rchg(50), TtnCtn-EndRdx/Rchg(50) Level 30: Weave -- LucoftheG-Def(A), LucoftheG-Def/EndRdx(31), LucoftheG-Def/EndRdx/Rchg(43) Level 32: Hasten -- RechRdx-I(A), RechRdx-I(34) Level 35: Second Wind -- NmnCnv-Heal(A), NmnCnv-Heal/EndRdx(36), NmnCnv-Heal/Rchg(45) Level 38: Moment of Glory -- LucoftheG-Def(A), LucoftheG-Def/EndRdx(39), LucoftheG-Def/EndRdx/Rchg(46) Level 41: Assault -- EndRdx-I(A) Level 44: Maneuvers -- LucoftheG-Def/EndRdx(A), LucoftheG-Def(46), LucoftheG-Def/EndRdx/Rchg(48) Level 47: Tactics -- EndRdx-I(A) Level 49: Fly -- Frb-Stlth(A) Level 1: Brawl -- Empty(A) Level 1: Prestige Power Dash -- Empty(A) Level 1: Prestige Power Slide -- Empty(A) Level 1: Prestige Power Quick -- Empty(A) Level 1: Prestige Power Rush -- Empty(A) Level 1: Prestige Power Surge -- Empty(A) Level 1: Sprint -- Empty(A) Level 2: Rest -- Empty(A) Level 4: Ninja Run Level 2: Swift -- Empty(A) Level 2: Health -- Heal-I(A), Heal-I(37), Heal-I(39), NmnCnv-Heal(39), NmnCnv-Heal/EndRdx(42) Level 2: Hurdle -- Empty(A) Level 2: Stamina -- EnrMnp-EndMod(A), EnrMnp-EndMod/Rchg(21), EnrMnp-Stun%(25) Level 14: Chemical Ammunition Level 14: Cryo Ammunition Level 14: Incendiary Ammunition ------------ ------------ Set Bonus Totals: 10% DamageBuff(Smashing) 10% DamageBuff(Lethal) 10% DamageBuff(Fire) 10% DamageBuff(Cold) 10% DamageBuff(Energy) 10% DamageBuff(Negative) 10% DamageBuff(Toxic) 10% DamageBuff(Psionic) 3.75% Defense(Fire) 3.75% Defense(Cold) 12.5% Defense(Psionic) 7.5% Defense(AoE) 2.7% Max End 6% Enhancement(Heal) 6% Enhancement(Max EnduranceDiscount) 10% Enhancement(RechargeTime) 248.5 HP (20.62%) HitPoints MezResist(Confused) 35% MezResist(Held) 35% MezResist(Immobilized) 35% MezResist(Sleep) 35% MezResist(Stunned) 35% MezResist(Terrorized) 35% 3% (0.05 End/sec) Recovery 138% (6.93 HP/sec) Regeneration (Edited: You're actual Regen is 721% all-in with Regeneration powers) 6% Resistance(Smashing) 6% Resistance(Lethal) 7.5% Resistance(Fire) 7.5% Resistance(Cold) 7.5% Resistance(Energy) 7.5% Resistance(Negative)
-
Thanks for the insight on stacking potency of the holds.
-
The uptime on the Build Up proc is questionable on whether it's worth the set for DP. For instance, you will see more mileage on Devastation on the Hold proc. But he is right, it's the poor man's Build Up. I have fought (+2-3) Bosses and Elite Bosses (haven't done AVs yet) and my character hasn't felt the need to rely on Build Up to land damage on them. Inspiration is the other poor man's Build Up.
-
I am leveling a DP/Regen Sentinel, so I can share some about DP. You do not want to pass up your DW, SF or ES. These are your main ST attacks, and served me well doing (+2 mission difficulty) and tackling (+2) Bosses and Elite Bosses. The AOE attacks have awkward shaped area effects and require good positional placement to optimize the "hit zone" with them. They do have target caps. As for sets, I am running Devastation on my ST attack chains with Opportunity to Hold. Surprisingly, you will see the set proc it's hold more often than you'd expect since the ST attack chain recharges fast. My defensive secondary was Regeneration, I focused on mitigating incoming damage by minimizing enemy opportunity to attack. This allows me to "face tank" situational incidents against minions and lieutenants; but apply the DP ammo benefits also allows my character to handle (+2) Bosses and Elite Bosses without high-threat because Instant Regeneration is awesome! As for ES, I decided to use this skill, as my go-to defense de-buff attack, so I slotted Analyze Weakness here. It has a fast animation, and facing (+2 or more) Bosses and Elite Bosses, getting their defenses down helps me significantly land other more damaging attacks. Still, I have not decided how to slot Piercing Rounds, it's an ST/AOE attack, and it will further boost my effectiveness against (+2 or higher) Bosses, Elite Bosses, and hopefully, AVs. Edited: Not sure whether ES standard ammo defense de-buff has an error or the Decimation hold proc is overly strong; because, I have successfully landed holds on (+2) Bosses and Elite Bosses after de-buffing them. Same with DW/EC knockback and SF hold on them. The set's hold doesn't last long (1-2 seconds) but it interrupts them. You shouldn't have a problem with endurance because I can consistently cast my ST attack chain, and more, but as others said: you only have to worry about sappers. I found SO enhancements work better than IO sets in Quick Recovery and Stamina. The Endurance Modification sets have properties unrelated to those two skills i.e. End reduction or recharge. I feel that you lose slotting those set on the endurance +recovery rate potential by using SO here. So far, I have not found the need to munch down End insp. fighting Sappers. Electrical attacks sap but their manageable and doesn't interfere executing the ST attack chain. I agree with others that you shouldn't need Tactics. The DP have a built-in accuracy that scales up with enhancements, so you're actually getting more than normal. Standard ammo with ES will still give you some defense de-buff on the target, and by association, improving your accuracy.