vibal
-
Posts
86 -
Joined
-
Last visited
Content Type
Profiles
Forums
Events
Store
Articles
Patch Notes
Everything posted by vibal
-
Not sure who's not allowed to respond, but I figured I'd try to clarify with actual intent at civility. Take (for example) Citadel. Baseline it's a pretty boring TF. It's a lot of council, in a lot of the same maps, and with a hefty helping of "kill all". That's not the most engaging gameplay. Why do I speed it? Not to hurt anyone's feelings or put a crimp in anyone else's fun hose, but because it's fun. Gonzo pulls with splits and races to the last room are engaging for the kind of characters I enjoy playing. It's perfectly okay to say that's not your wheelhouse. It doesn't make you wrong, stupid, ignorant, or even a dumbshite -- all adjectives used in this thread to describe that* type of player. I don't need a rez, don't need buffs, just need a bit of space to have... fun. Why invite others? Because believe it or not, other people have fun too. It's chatty, engaging, zippy gameplay. We also all get a nice shiny reward at the end. It's the same argument, just pointed in the other direction. Not sure if that clarifies it though. My fun <> your fun and that's a-ok.
-
Except literally everyone in the thread. Also, if anyone touches any of my stuff, and i'll kill ya' 😄
-
"Bad Habits" "Stupid" "Ignorant" "Grandstanding" "Guilty" I mean... are you guys reading your own thread? Could someone link the inverse of this thread where the speed community is calling you stupid, ignorant, and incapable? I run fast teams and always clearly advertise them as such. My anecdotal experience is that I rarely see a fast player lambasting someone for not keeping up. The reverse is not true. Too often I've had players join my advertised speed teams and get bent out of shape that I'm playing wrong. That's obviously biased by confirmation. I run fast so that's the conflict I'll see most often, but the bad juju isn't generated by people implying that someone is too slow. 54 KM ITF's are fine by the community and being overtuned there never seems to cause static. It's just a farm with a pretty AV at the end, but okay. Maybe ease up on the tension a bit yeah? If someone joins your sweep and is ruining the feng shui -- clarify or boot. If you join a team that's a surprise speed you can quit. Apparently you weren't required anyhow >shrug<. The difference between the attitudes is I haven't seen a fast player in the thread, or frankly game, come around to imply that you're playing "wrong" if you prefer to spawn -> spawn sweep. Fun is subjective. Nobody is breaking any rules. Nor is anyone here (myself included) an arbiter of those nonexistent rules. Maybe have your fun and don't associate with people having a different version of fun. Maybe they aren't stupid, ignorant, or guilty of anything.
-
A control set that opens with two sleeps.... eeesh.
-
Literally compared them to VEATs, and only the ranged versions (crab/fort), not blasters as the similarities are relevent (range + mitigation). Also not sure if that's a lingering issue but I personally have never spoken in forum about sentinels for good or bad. But I'm happy to walk away from the convo.
-
Defender -> Corrupter would only be a valid comparison if corrupter's did more damage, had higher support numbers, and also had a third element defenders 100% do not have in their toolkit. That's the comparison being made with VEATs to Sentinels. If that were true, as it is in the case of VEATs:Sent, I would certainly recommend that you roll a corrupter instead of a defender. You'll prioritize support or damage currently to decide between corrupter and defender. Your initial case was for ranged damage + mitigation. VEATs offer that, offer more of both, in addition get team buffs, and a pick'em of pets or control. Flavor trumps everything and if you loathe crab legs or can't stand psi blasts Sent is an awesome spot to land. Personally, I love rad blast. I couldn't care less that it's a lower mid set in terms of numbers. When I nuke, I want an actual nuclear bomb animation. That's not the question in the thread though. You started by saying that range > melee. Okay, I'm game, but why would you choose less damage, less mitigation, and zero utility when there's another range + mitigation AT right over here doing that better? I'm not 100% sure where you're going with the rest of the statement. If you personally are setting the bar at sentinel performance being the baseline then I suppose almost every set in each AT is overperforming and becomes an outlier. But if everything is an outlier except the one little AT - is it maybe possible that sentinels are underperforming? Or maybe that the role they fill is niche at best?
-
I'm not sure what the disagreement is? But sure, sentinels are hella simple as well. Range > Taunt aura or Taunt aura < Range seems like a flavor pick assuming that's the only deciding factor. I also made a specific call to a character that fit the bill outside of the general statement. Sent range + mitigation combo comes at a price that's a bit too steep imo (range + mitigation - damage - utility = fun??). Brute, Tanker, Scrap (situationally) are going to do more damage and have more mitigation giving a new player a much wider target to land on. TBH if I were going put that much weight on range I'd still recommend a VEAT over a sentinel. A VEAT is still going to quietly buff the team and give at least the same levels of mitigation. The question also wasn't "what's a good introduction" as I would point squarely to a utility character -> particularly one with a force multiplier in that case. The question was "easy". Brutes are going to be the easiest you get with the lowest downside (again -- in my opinion). Also, sentinels really do not make it up in other ways late game or in teams. Your dealing dominator levels of damage without a control primary. You'll outdamage a non-procced defender, but you know.... support primary. Everyone should play what they enjoy. If you love the sets and combo's have at it. I don't see the utility in looking at sentinel numbers being a community issue though.
-
Melee tend to be much simpler toggle up and go, and also more forgiving as you can take a punch. Positional awareness boils down to "is it close enough to punch?" To the OP I would strongly suggest a brute. You get a taunt aura to keep baddies from deciding "nah, no thanks" and just walking away along with survivability and a smooth early damage curve. Dark melee/Electric Armor would be a solid pick. Siphon Life hits like a truck and gives you sustain in your rotation and electric starts okay and gets better with investment. Notably you get access to conditional resists that are near unique in the resist to -recov AND -end. Electric also has a damage aura which are consistently underrated damage boosts. Energize works fine for what it is and you can freely skip the tier 9. Dark melee suffers a bit in the AoE department, but this can be supplements late game through patrons/APP picks. Scrappers have a lower hp pool, but get to roll the crit dice if you like the RNG. They do have a couple sets w/a taunt aura as well (willpower/shield/and....?).
-
Nice. I don't doubt you see proc #'s on your AoE's. HT in particular is still on a 60s recharge I suspect you'd see more procs over 60s in the immob. >shrug< fun is fun though.
-
Imps do benefit from maneuvers. They're also targetable and affected by Cold's shields. Bonfire quietly became one of the best soft controls with the addition of the kb -> kd IO's. Grab one and enjoy it. Cold levels well as early on the shield are great. Around the time the utility falls off you'll get access to sleet/heat loss which are late game powerhouses. On the downside: fire really wants a self heal. Hot feel is going to put you in the mix and Cold doesn't offer much in the way of getting back what you lose.
-
Looks like a fun build. There's some stuff I'd move around, but I'm sure you get good mileage out of it. 1.) Is a 6 slotted proc base in howling twilight worth it on a 60s c/d? Would this be better suited in living shadows given this is going to be your base for containment and has a consistent uptime? As of now LS is set bonus slotted. It seems like these could be swapped. Similar thought on HoD as this is more of a spawn to spawn actual hard control, but a 30s recharge seems much more tenable for proc slotting than 60. HT is a great power, but I'd rather use that for control and -Regen is critical to keep up when you need it: YMMV. 2.) Soul absorption seems like a corner pick for utility, and PM is an awesome set, but this feels like a stretch for what you get. Are you getting good mileage here? 3.) Hover/Fly/EM -> preferential, but not a fan of flying in a set that requires as much positioning as dark/ 4.) 6 slotted possess: took me a second, but you're using the 6th slot to get over the range softcap? 5.) Ice storm as your principal AoE attack feels lackluster. You get okay(ish) containment, but a 30s recharge hurts. You're already positioning cones, would Frozen Breath not be preferable? I made a similar build with less focus on procs, but maintaining most of the feel. Agility in particular stings for proc rate. Attached build has a bit more in survivability at the sacrifice of proc/procrate. S/L/M defense softcap and S/L resist hard cap. More consistent AoE damage with fireball/fireblast. Fearsome stare and Shadow Field lose out a bit for control, but AoE holds are notoriously inconsistent and with stare coming up every 10s mobs will be plenty spooked. Controller (Darkness Control - Darkness Affinity).mbd
-
The original dev team flat out stated that PA wouldn't exist if it was released after launch. This was also why it wasn't proliferated to dominators (which turned out to be unfounded as debuffs are why PA smokes the show). Dark is pretty clearly what illusion would've been if the later dev team had built it and haunt feels every bit the stepchild. PA has unique mechanics that are, pretty frankly, not in line with what controllers (or any AT) do. They're invincible, mobile, do damage, are targetable, immune to CC/debuff, no travel time to initial target, and taunt. Take away any of those and it's probably a fine power. It's not damage that pushes Illusion. It's safety. Plant and Fire do more damage and have exponentially more hard and soft control and don't solo at the same scale because every mob will be targeting the controller.
-
Agreed. PA isn't the reason illusion is primo for ghosting missions from 1-50. The broken mechanics on PA tend to overshadow how good the rest of the set really is.
-
Just a hat in the ring, but the early levels on illusion are broken good. You have access to superior invis, deceive, and spectral wounds. You have the baseline toolkit at level 10.
-
The reward system was, as stated by Castle, designed to reward time vs. reward explicitly in place of risk vs. reward. That's not a change from the original dev design. Nor is it subjective. You will gain more in every measurable reward by running 5 12 minute Yin's in an hour as opposed to 1 +4 Yin where you comb every map. You may get less fun, but that is a subjective measure. My fun <> Your fun isn't a broken game design. I agree with the design principal still. The intent was to create an inclusive system as opposed to the EQ/WoW exclusive system. Paladin's were a blast in vanilla wow. They also had no role in the original end game. I love playing with people's weird, out there, builds. The current design lets me do that AND let's me complete content. The builds I run are almost exclusively exactly the same as I ran on live. It took less time to get there and I'm much more likely to hit people at those same levels here as on live, but juiced up builds are not a new thing either. Again maybe not your fun -- mine <> yours. Give me a complex system and let me toy with and get everything I can out. That's fun! Maybe that sounds like spreadsheet McGaming to you, i dunno. That's fine too, we can still punch Countess Crey in the face. Nor did I claim a superiority. I was making a hyperbolic point to highlight that this is a player issue. This is not a type* of player issue. I want to team with the Clave's and Solar's and I want everyone to have fun. I don't go fast to ruin your fun, I do it for my fun. If I clearly state that's what's going down when the invite goes out, why bark after we start is as valid a point as why go fast if we want to kill. Both happen and neither is good behavior in a co-op setting.
-
Pretty sure this is a reciprocal issue. I play fast and always advertise such. Also clarify before locking in what's happening. The amount of players who get sticker shock once the mayhem starts is pretty discouraging. I don't form up to ruin anyone's fun. The reward system for the majority of game content disproportionately incentivizes fast play. While I play for fun, I also enjoy maximizing my rewards for doing so. >shrug< Make the team you want. Play the game how you like, but a better title might be "Lets please focus on communicating team intent". As I could just as easily thread up with "We didn't all agree to PL you slowpokes". I'll happily hop on a sweep through Cit for a chuckle. I'm less inclined to presume that's what's cooking without some input from the team/lead. Nor do I think it's reasonable to presume there's a "correct" baseline play. You can say pace is set by the slowest, but it's just as easy to justify saying the pace is set by the fastest player on the team.
-
Interesting to see how other people are building. I went with more resist/sustain than either of those builds: This Villain build was built using Mids Reborn 3.4.6 https://github.com/LoadedCamel/MidsReborn Click this DataLink to open the build! Level 50 Magic Brute Primary Power Set: Savage Melee Secondary Power Set: Electric Armor Power Pool: Speed Power Pool: Leaping Power Pool: Fighting Power Pool: Leadership Ancillary Pool: Energy Mastery Villain Profile: Level 1: Savage Strike (A) Superior Brute's Fury - Accuracy/Damage (3) Superior Brute's Fury - Accuracy/Damage/Recharge (3) Superior Brute's Fury - Damage/Recharge (42) Hecatomb - Chance of Damage(Negative) Level 1: Charged Armor (A) Steadfast Protection - Resistance/+Def 3% (5) Gladiator's Armor - TP Protection +3% Def (All) (5) Unbreakable Guard - Resistance (7) Unbreakable Guard - Resistance/Endurance (7) Unbreakable Guard - Resistance/Endurance/RechargeTime (9) Unbreakable Guard - RechargeTime/Resistance Level 2: Shred (A) Superior Unrelenting Fury - RechargeTime/+Regen/+End (15) Superior Unrelenting Fury - Accuracy/Damage/Endurance/RechargeTime (17) Superior Unrelenting Fury - Damage/Endurance/RechargeTime (17) Superior Unrelenting Fury - Accuracy/Damage/RechargeTime (19) Superior Unrelenting Fury - Damage/RechargeTime (19) Superior Unrelenting Fury - Accuracy/Damage Level 4: Lightning Field (A) Superior Brute's Fury - Recharge/Fury Bonus (21) Superior Brute's Fury - Accuracy/Damage/Endurance/Recharge (21) Superior Brute's Fury - Damage/Endurance/RechargeTime (23) Power Transfer - Chance to Heal Self (23) Performance Shifter - Chance for +End (25) Armageddon - Damage Level 6: Conductive Shield (A) Unbreakable Guard - Resistance (25) Unbreakable Guard - Resistance/Endurance (27) Unbreakable Guard - Resistance/Endurance/RechargeTime (27) Unbreakable Guard - RechargeTime/Resistance Level 8: Vicious Slash (A) Superior Blistering Cold - Recharge/Chance for Hold (31) Superior Blistering Cold - Damage/Endurance/Accuracy/RechargeTime (31) Superior Blistering Cold - Accuracy/Damage/Recharge (31) Superior Blistering Cold - Accuracy/Damage/Endurance (50) Superior Blistering Cold - Damage/Endurance (50) Superior Blistering Cold - Accuracy/Damage Level 10: Static Shield (A) Unbreakable Guard - +Max HP (33) Unbreakable Guard - Resistance (33) Unbreakable Guard - Resistance/Endurance (33) Unbreakable Guard - Resistance/Endurance/RechargeTime Level 12: Taunt (A) Range IO Level 14: Super Speed (A) Celerity - +Stealth Level 16: Grounded (A) Aegis - Psionic/Status Resistance Level 18: Rending Flurry (A) Superior Avalanche - Recharge/Chance for Knockdown (34) Superior Avalanche - Accuracy/Damage/Endurance/Recharge (34) Superior Avalanche - Accuracy/Damage/Recharge (36) Superior Avalanche - Accuracy/Damage/Endurance (36) Superior Avalanche - Damage/Endurance (36) Superior Avalanche - Accuracy/Damage Level 20: Hasten (A) Recharge Reduction IO (37) Recharge Reduction IO Level 22: Combat Jumping (A) Luck of the Gambler - Defense/Increased Global Recharge Speed (34) Kismet - Accuracy +6% (37) Shield Wall - +Res (Teleportation), +5% Res (All) (37) Reactive Defenses - Scaling Resist Damage Level 24: Lightning Reflexes (A) Run Speed IO Level 26: Boxing (A) Kinetic Combat - Accuracy/Damage (39) Kinetic Combat - Damage/Endurance (39) Kinetic Combat - Damage/Recharge (39) Kinetic Combat - Damage/Endurance/Recharge Level 28: Energize (A) Panacea - Heal (29) Panacea - Heal/Endurance/Recharge (29) Panacea - Heal/Recharge (40) Panacea - Endurance/Recharge (40) Panacea - Heal/Endurance Level 30: Tough (A) Aegis - Resistance/Endurance (40) Aegis - Resistance (42) Aegis - Resistance/Endurance/Recharge Level 32: Savage Leap (A) Armageddon - Chance for Fire Damage (42) Armageddon - Damage/Endurance (43) Armageddon - Recharge/Accuracy (43) Armageddon - Damage/Recharge/Accuracy (43) Armageddon - Damage/Recharge Level 35: Weave (A) Luck of the Gambler - Defense/Increased Global Recharge Speed (45) Luck of the Gambler - Defense/Endurance (45) Luck of the Gambler - Defense/Endurance/Recharge Level 38: Superior Conditioning (A) Performance Shifter - Chance for +End (45) Power Transfer - Chance to Heal Self Level 41: Physical Perfection (A) Performance Shifter - Chance for +End (46) Power Transfer - Chance to Heal Self Level 44: Energy Torrent (A) Overwhelming Force - Damage/Chance for Knockdown/Knockback to Knockdown (46) Superior Frozen Blast - Recharge/Chance for Immobilize (46) Superior Frozen Blast - Damage/Endurance/Accuracy/RechargeTime (48) Superior Frozen Blast - Accuracy/Damage/Recharge (48) Superior Frozen Blast - Accuracy/Damage/Endurance (48) Superior Frozen Blast - Damage/Endurance Level 47: Maneuvers (A) Luck of the Gambler - Defense/Increased Global Recharge Speed (50) Luck of the Gambler - Defense/Endurance Level 49: Blood Thirst (A) Recharge Reduction IO Level 1: Brawl (A) Empty Level 1: Fury Level 1: Sprint That gets me to 45% s/l/m along with healthy exotic resists across the board. Only up to 72% for s/l resist which stings, but not too bad. No real critique to offer, but thought it might be worth a peek at another angle. Leaning less heavily of offensive procs opens up the option to grab agility in my alpha. I'm also aggressively disinterested in babysitting my blue bar and don't like active click maintenance for it. So far (solo to 36) the ride's been smooth. Nice quick cycling attacks and no real crunch for filling any gaps.

-
Slot Machine's Random Challenge (the limited edition 2023)
vibal replied to Troo's topic in General Discussion
Fun! I ended up with a staff/bio tank. I've played bio, but only the brute version and didn't love it. Maybe tanks have a bit more leeway in the clicks. Never played and rarely see staff. Looks okay on paper.
-
Played i1-i3 and came back for villains (i6) to sunset. Early on the game had a great skeleton, but was in a limbo state in terms of play. i1 still carried the some of the trappings of early MMOs like EQ and DaoC. Hard CC/AoE CC was supported and allowed. A earth controller could turn every spawn into statues. The pull was instanced missions. AO had done the same and it's a great system (when comparing out of date games). Early MMOs you'd likely be in a team sitting in the same 1-3 rooms in a public dungeon cleaning spawns and waiting. Team in the next room? More waiting for you. You'll likely be pulling 1-3 mobs, cc'ing the rest, burning single targets, and repeating. A mistimed pull or CC could lead to a wipe or wasted time/resources. The game was designed with a *much* slower pace than a game would allow for now. Rest used to be on a lifelong timer (60s?). Teams were supposed to be curated and trimmed. Too much control would mean not enough damage. Too much damage would mean not enough mitigation. Those systems died out b/c we want to play.... what we want to play. Fine for the time, but not one I'd clamor to have back. Unlimited tank aggro was a thing. For the folks lamenting ED: every attack had the same recommended slotting - 1 accuracy, 5 damage. Playing a device blaster? 6 damage then. No need for recharge you'll have perma hasten. No need for end reduction. You'll have 6 slotted stamina. Most choices were flat and builds were bland. Balance between sets even inside the same AT were hilarious. Regen sucked. Then you got IH and the game was over. You had a minimum of 5 mandatory picks pre-20: travel power pre-req, travel power, hurdle, health, stamina. Stamina was so good it warranted 2 literal dead picks in your build. Completed builds on live were prohibitively expensive so partial built toons were common & 50's in SO's still existed. This is much more apparent on homecoming as building is relatively cheap. The game rewarded investment with incremental power increases. When a single ragnarok IO is going to set you back 500 million you're less likely to see them crop up. A min level gladiators armor proc set me back 3 billion. Now I drop one in every toon. IO's brought a lot of numeric increases and rewarded time investment, but they failed to really do what they should've. Optimally set bonuses would've made characters better at the thing they should be doing. Since bonuses are by set regardless of AT they just allow players to fill in gaps instead of accentuating strengths. It's probably an unsolvable problem ATM given the volume of sets * the volume of ATs. Instead of a "build an armor set-bonus" we end up with a system that turns everyone into armor plated bazooka's.
-
Is irradiated ground still worth proc slotting after the change? I know it got moved to the same proc check as other toggles and wasn't sure how effective it is vs. just standard slotting. Anyone have experience?
-
Using energy absorption as a ghetto heal is a great idea. I'm probably going to swap cold for gloom/oblit. Rune of protection is nice, but I'll forget to fire it off. I suppose it could fill the t9 spot, but we'll see how she flies without. Also picked up hasten. Kick as a feedback proc slot is a solid thought. Do you find you have time to fire it off? Hopped up to 40 and 0/x8 longbow are a comfortable challenge. Going to solo ride up to 50 to see how it handles.
-
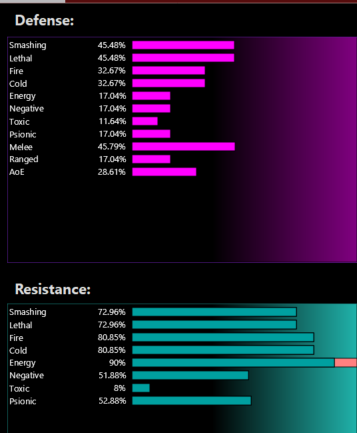
Thinking about something different and settled on ice/ice brute. Figgered I'd grab Arctic just for the theme and wanted to see if I could cook up something decent: This Villain build was built using Mids Reborn 3.0.4.7 https://github.com/Reborn-Team/MidsReborn Level 50 Magic Brute Primary Power Set: Ice Melee Secondary Power Set: Ice Armor Power Pool: Leaping Power Pool: Fighting Power Pool: Leadership Ancillary Pool: Arctic Mastery Villain Profile: ------------ Level 1: Frozen Fists SprBlsCol-Rchg/HoldProc(A), SprBlsCol-Acc/Dmg(11), SprBlsCol-Dmg/EndRdx(11), SprBlsCol-Acc/Dmg/EndRdx(21), SprBlsCol-Dmg/EndRdx/Acc/Rchg(40), SprBlsCol-Acc/Dmg/Rchg(43) Level 1: Frozen Armor LucoftheG-Def/Rchg+(A), LucoftheG-Def/EndRdx(48), LucoftheG-Def(50), LucoftheG-Def/EndRdx/Rchg(50) Level 2: Frost SprBrtFur-Rech/Fury%(A), SprBrtFur-Acc/Dmg/EndRdx/Rchg(9), SprBrtFur-Dmg/EndRdx/Rchg(17), SprBrtFur-Acc/Dmg/Rchg(23), SprBrtFur-Dmg/Rchg(23), SprBrtFur-Acc/Dmg(40) Level 4: Chilling Embrace TmpRdn-Acc/EndRdx(A), TmpRdn-EndRdx/Rchg/Slow(9) Level 6: Hoarfrost Prv-EndRdx/Rchg(A), Prv-Heal/Rchg(7), Prv-Heal/Rchg/EndRdx(7) Level 8: Ice Patch EndRdx-I(A) Level 10: Wet Ice EndRdx-I(A) Level 12: Combat Jumping LucoftheG-Def/Rchg+(A), ShlWal-ResDam/Re TP(13), Rct-ResDam%(13), Ksm-ToHit+(15) Level 14: Super Jump WntGif-ResSlow(A), WntGif-RunSpd/Jump/Fly/Rng(15) Level 16: Taunt Empty(A) Level 18: Glacial Armor LucoftheG-Def/Rchg+(A), LucoftheG-Def/EndRdx(19), LucoftheG-Def(19), LucoftheG-Def/EndRdx/Rchg(21) Level 20: Energy Absorption Empty(A) Level 22: Boxing Empty(A) Level 24: Tough UnbGrd-ResDam(A), UnbGrd-ResDam/EndRdx/Rchg(25), UnbGrd-ResDam/EndRdx(25), UnbGrd-Rchg/ResDam(40) Level 26: Freezing Touch Hct-Dam%(A), Hct-Dmg/EndRdx(27), Hct-Acc/Rchg(27), Hct-Acc/Dmg/Rchg(31), Hct-Dmg/Rchg(34), Hct-Dmg(37) Level 28: Weave LucoftheG-Def/Rchg+(A), LucoftheG-Def/EndRdx(29), LucoftheG-Def/EndRdx/Rchg(29) Level 30: Permafrost GldArm-3defTpProc(A), StdPrt-ResDam/Def+(31), UnbGrd-Max HP%(31) Level 32: Frozen Aura SprAvl-Rchg/KDProc(A), SprAvl-Acc/Dmg/EndRdx/Rchg(33), SprAvl-Acc/Dmg/Rchg(33), SprAvl-Acc/Dmg/EndRdx(33), SprAvl-Dmg/EndRdx(34), SprAvl-Acc/Dmg(34) Level 35: Icicles SprUnrFur-Rchg/+Regen/+End(A), SprUnrFur-Acc/Dmg/EndRdx/Rchg(36), SprUnrFur-Dmg/EndRdx/Rchg(36), SprUnrFur-Acc/Dmg/Rchg(36), SprUnrFur-Dmg/Rchg(37), SprUnrFur-Acc/Dmg(37) Level 38: Block of Ice SprEnt-Rchg/AbsorbProc(A), SprEnt-Acc/Hold/End/Rchg(39), SprEnt-Acc/Hold/End(39), SprEnt-End/Rchg(39), SprEnt-Hold/Rchg(43), SprEnt-Acc/Hold(46) Level 41: Ice Blast SprWntBit-Rchg/SlowProc(A), SprWntBit-Dmg/EndRdx/Acc/Rchg(42), SprWntBit-Acc/Dmg/Rchg(42), SprWntBit-Acc/Dmg/EndRdx(42), SprWntBit-Dmg/Rchg(43), SprWntBit-Acc/Dmg(48) Level 44: Ice Storm SprFrzBls-Rchg/ImmobProc(A), SprFrzBls-Dmg/EndRdx/Acc/Rchg(45), SprFrzBls-Acc/Dmg/Rchg(45), SprFrzBls-Acc/Dmg/EndRdx(45), SprFrzBls-Dmg/EndRdx(46), SprFrzBls-Acc/Dmg(46) Level 47: Maneuvers LucoftheG-Def/Rchg+(A), LucoftheG-Def/EndRdx(48) Level 49: Tactics AdjTrg-ToHit/EndRdx(A), AdjTrg-EndRdx/Rchg(50) Level 1: Fury Level 1: Brawl Empty(A) Level 1: Sprint Empty(A) Level 2: Rest Empty(A) Level 2: Swift Empty(A) Level 2: Hurdle Empty(A) Level 2: Health Pnc-Heal/+End(A), NmnCnv-Regen/Rcvry+(5), Mrc-Rcvry+(5), Prv-Absorb%(17) Level 2: Stamina PrfShf-End%(A), PrfShf-EndMod(3), EndMod-I(3) Level 50: Agility Core Paragon ------------ ------------ Set Bonus Totals: 10% DamageBuff(Smashing) 10% DamageBuff(Lethal) 10% DamageBuff(Fire) 10% DamageBuff(Cold) 10% DamageBuff(Energy) 10% DamageBuff(Negative) 10% DamageBuff(Toxic) 10% DamageBuff(Psionic) 22.56% Defense(Smashing) 22.56% Defense(Lethal) 33.5% Defense(Fire) 33.5% Defense(Cold) 16% Defense(Energy) 16% Defense(Negative) 6% Defense(Psionic) 24.13% Defense(Melee) 11% Defense(Ranged) 23.5% Defense(AoE) 33% Enhancement(Accuracy) 2.5% Enhancement(Max EnduranceDiscount) 57.5% Enhancement(RechargeTime) 7.5% SpeedFlying GrantPower Preventive Medicine (0% chance, if Scourge) 236.1 HP (15.75%) HitPoints 7.5% JumpHeight 7.5% SpeedJumping MezResist(Confused) 103.8% MezResist(Held) 103.8% MezResist(Immobilized) 103.8% MezResist(Sleep) 103.8% MezResist(Stunned) 103.8% MezResist(Terrorized) 103.8% MezResist(Teleport) 100% (20% chance) 21.5% (0.36 End/sec) Recovery 56% (3.5 HP/sec) Regeneration 95% ResEffect(SpeedFlying) 95% ResEffect(RechargeTime) 95% ResEffect(SpeedRunning) 22.25% Resistance(Smashing) 22.25% Resistance(Lethal) 41.75% Resistance(Fire) 41.75% Resistance(Cold) 16.25% Resistance(Energy) 16.25% Resistance(Negative) 14% Resistance(Toxic) 14% Resistance(Psionic) 7.5% SpeedRunning 1 Null How was this set supposed to work? I had to go miles out of my way to get to any sort of usable numbers. I hit the s/l/e/n/f/c soft caps, but *man* this isn't a gimme. Block of ice ended up being a critical mule with the last 5% for e/n/f/c. Thoughts on anything I missed? I know storm isn't the best on brutes since it's a pseudo pet, but >shrug< figured it's worth a shot.
-
This Villain build was built using Mids Reborn 3.0.4.7 https://github.com/Reborn-Team/MidsReborn Click this DataLink to open the build! Level 50 Science Brute Primary Power Set: Radiation Melee Secondary Power Set: Electric Armor Power Pool: Speed Power Pool: Leaping Power Pool: Fighting Power Pool: Leadership Ancillary Pool: Energy Mastery Villain Profile: Level 1: Contaminated Strike -- SprBlsCol-Rchg/HoldProc(A), SprBlsCol-Dmg/EndRdx/Acc/Rchg(40), SprBlsCol-Acc/Dmg/Rchg(40), SprBlsCol-Acc/Dmg/EndRdx(42), SprBlsCol-Dmg/EndRdx(42), SprBlsCol-Acc/Dmg(43) Level 1: Charged Armor -- UnbGrd-ResDam(A), UnbGrd-ResDam/EndRdx(39), UnbGrd-ResDam/EndRdx/Rchg(39), UnbGrd-Rchg/ResDam(40) Level 2: Radioactive Smash -- SprBrtFur-Rech/Fury%(A), SprBrtFur-Acc/Dmg/EndRdx/Rchg(3), SprBrtFur-Dmg/EndRdx/Rchg(3), SprBrtFur-Acc/Dmg/Rchg(37), SprBrtFur-Dmg/Rchg(37), SprBrtFur-Acc/Dmg(37) Level 4: Lightning Field -- SprAvl-Rchg/KDProc(A), SprAvl-Acc/Dmg/EndRdx/Rchg(5), SprAvl-Acc/Dmg/Rchg(5), SprAvl-Acc/Dmg/EndRdx(27), SprAvl-Dmg/EndRdx(34), SprAvl-Acc/Dmg(36) Level 6: Conductive Shield -- UnbGrd-ResDam(A), UnbGrd-ResDam/EndRdx(7), UnbGrd-ResDam/EndRdx/Rchg(7), UnbGrd-Rchg/ResDam(27) Level 8: Radiation Siphon -- KntCmb-Acc/Dmg(A), KntCmb-Dmg/EndRdx(9), KntCmb-Dmg/Rchg(9), KntCmb-Dmg/EndRdx/Rchg(15), CrsImp-Acc/Dmg/EndRdx(15), CrsImp-Acc/Dmg/Rchg(23) Level 10: Static Shield -- UnbGrd-ResDam(A), UnbGrd-ResDam/EndRdx(11), UnbGrd-ResDam/EndRdx/Rchg(11), UnbGrd-Max HP%(13) Level 12: Hasten -- RechRdx-I(A), RechRdx-I(13) Level 14: Super Speed -- BlsoftheZ-ResKB(A) Level 16: Grounded -- GldArm-3defTpProc(A), StdPrt-ResDam/Def+(17), StdPrt-ResKB(17) Level 18: Irradiated Ground -- Arm-Dam%(A), Obl-%Dam(19), ScrDrv-Dam%(19), TchofLadG-%Dam(21), ShlBrk-%Dam(21), EndRdx-I(23) Level 20: Taunt -- PrfZng-Taunt/Rchg/Rng(A) Level 22: Lightning Reflexes -- Run-I(A) Level 24: Combat Jumping -- LucoftheG-Def/Rchg+(A), ShlWal-ResDam/Re TP(25), Rct-ResDam%(25), Ksm-ToHit+(50) Level 26: Boxing -- Empty(A) Level 28: Energize -- Prv-Absorb%(A), Prv-Heal/Rchg/EndRdx(29), Prv-Heal(29), Prv-Heal/EndRdx(48), Prv-EndRdx/Rchg(50), Prv-Heal/Rchg(50) Level 30: Tough -- UnbGrd-ResDam(A), UnbGrd-ResDam/EndRdx(31), UnbGrd-ResDam/EndRdx/Rchg(31), UnbGrd-Rchg/ResDam(31) Level 32: Atom Smasher -- SprUnrFur-Rchg/+Regen/+End(A), SprUnrFur-Acc/Dmg/EndRdx/Rchg(33), SprUnrFur-Dmg/EndRdx/Rchg(33), SprUnrFur-Acc/Dmg/Rchg(33), SprUnrFur-Dmg/Rchg(34), SprUnrFur-Acc/Dmg(34) Level 35: Weave -- LucoftheG-Def/Rchg+(A), LucoftheG-Def/EndRdx(36), LucoftheG-Def/EndRdx/Rchg(36) Level 38: Superior Conditioning -- PrfShf-End%(A), PwrTrns-+Heal(39) Level 41: Physical Perfection -- PrfShf-End%(A), PwrTrns-+Heal(42) Level 44: Energy Torrent -- OvrFrc-Dam/KB(A), SprFrzBls-Rchg/ImmobProc(45), SprFrzBls-Acc/Dmg(45), SprFrzBls-Dmg/EndRdx/Acc/Rchg(45), SprFrzBls-Acc/Dmg/Rchg(46), SprFrzBls-Dmg/EndRdx(46) Level 47: Maneuvers -- LucoftheG-Def/Rchg+(A), LucoftheG-Def/EndRdx(48) Level 49: Fusion -- Empty(A) Level 1: Fury Level 1: Brawl -- Empty(A) Level 1: Sprint -- Empty(A) Level 2: Rest -- Empty(A) Level 2: Swift -- Empty(A) Level 2: Hurdle -- Empty(A) Level 2: Health -- NmnCnv-Regen/Rcvry+(A), Mrc-Rcvry+(46), Pnc-Heal/+End(48) Level 2: Stamina -- PrfShf-End%(A), PrfShf-EndMod(43), EndMod-I(43) ------------ That's the build I run. It sails smooth right up until the point it doesn't. Softcapped melee defense, but just a tick under s/l at 42%. You could just as easily pull the -kb from grounded along with the +heals in SC/PP to get the slots to drop kinetic combat's in boxing. I like the sustain on the heal procs. If anything i'd probably grab a slot from grounded to add another heal proc in stamina. 82% s/l resist, capped energy (easy), 77% fire/cold and even 47% psi. The end is overkill, but I really loathe looking at my blue. And energy gives me plenty of leg room to grab agility (still under s/l softcap at T4 tho). And as noted, the heal procs are a big part of the builds sustain. Heal procs + siphon/contam will generally keep your green topped off. By the time energize is needed it's too late in a lot of cases - you're about to get 100 to 0'd. I also am not a fan of the devastating blow animation. Solid power and you can rejigger the ST attacks to pick it up if it's to your fancy. Too often it feels like either I'm dead or the target is before the 3 lifetimes of that animation pass. The kismet is actually pretty important as the build lacks any +accuracy set bonuses. Odd side effect of winter sets I spose. Never a bonus I shot for, but definitely one I miss with the newer sets. Also, if you didn't know, irradiated ground fires every 5s and does a proc check for each. So it'll fire procs at 2x the rate of a normal damage aura. Makes it go from one of the worst places for a proc to easily the best. It's a fun build. -ToHit really stings and is pretty common late game with vamps, carnies, and CoT all tossing it around. It seems like late game you're plugging one hole and leaving another with melee. Immunity to saps and -recov is great. Then 14 illusionists all drop flash at the same time with 3 dark servants leg humping you so it doesn't matter anyhow. Giggling at sappers is nice until 12 stun grenades pop off :/. And of course every fight is a race with a defense build without defense debuff resist. Every pokey thing in the game is a debuff and when you're pulling 20 at a time 5% comes up pretty often.
-
What do you think is the most even power set?
vibal replied to Kung Fu Cow's topic in General Discussion
I think VEATs would be my pick for general "good" balance. Much like willpower they start good and can easily slot to great. They're great on a team and solo content well. Solid AoE damage, great utility, and reasonable control on the fort side. -
Ah, I had forgotten about the cone - yeah. I'll stand by the flavor's being similar though & you can pick where you want that silly slo-mo jump animation. Either set is going to put the clamp on single targets. Also, actually applying damage in a 15' PBAoE is also much more reliable than whirling hands' 8'. Haven't played with the updated EM but I'm really learning to love even a 10' PB over the rinky dink 8 footers.