The Beta Account Center is temporarily unavailable
×

LKN-351
-
Posts
398 -
Joined
-
Last visited
Content Type
Profiles
Forums
Events
Store
Articles
Patch Notes
Everything posted by LKN-351
-
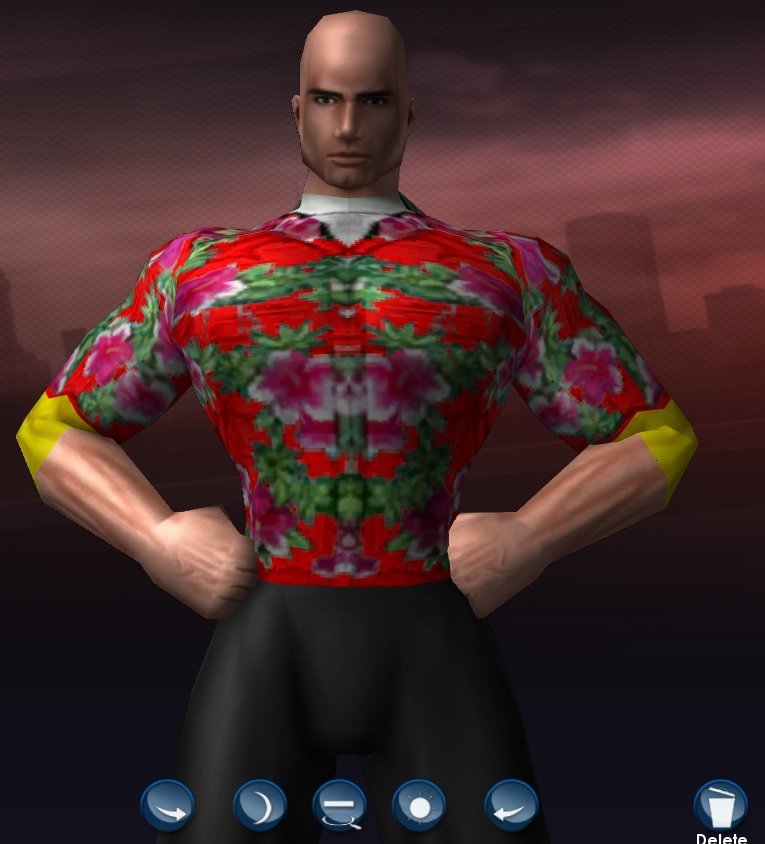
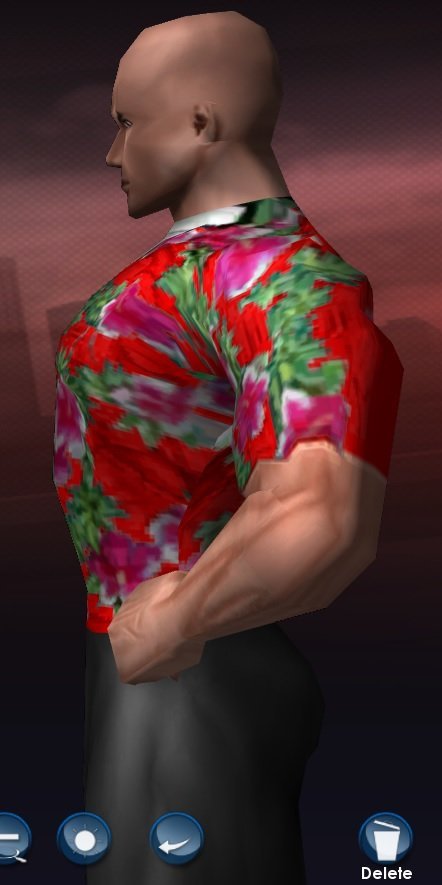
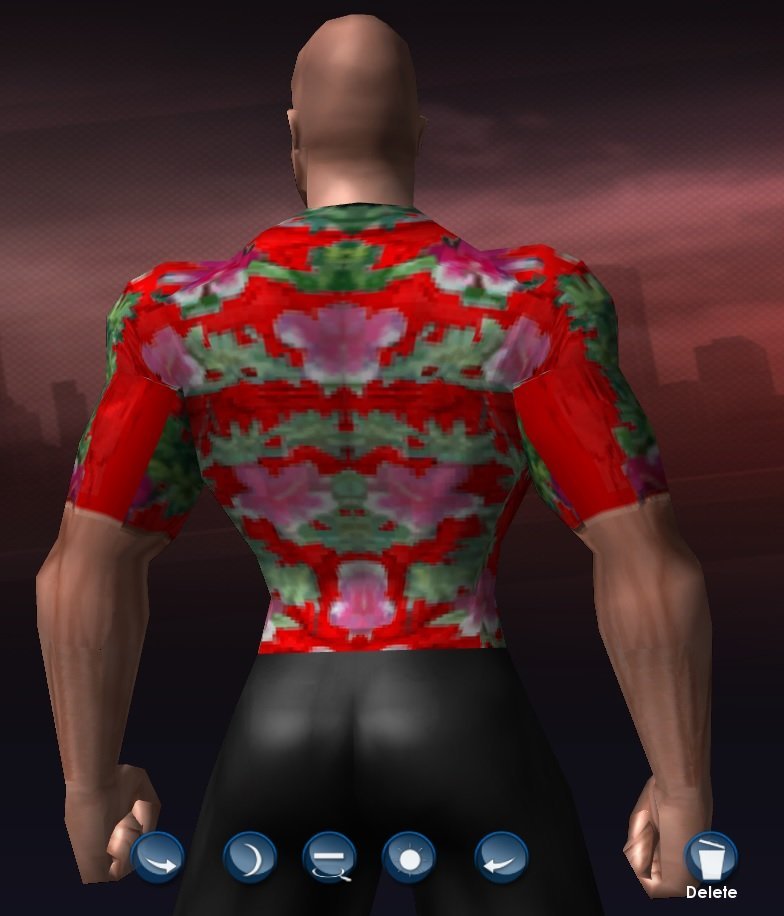
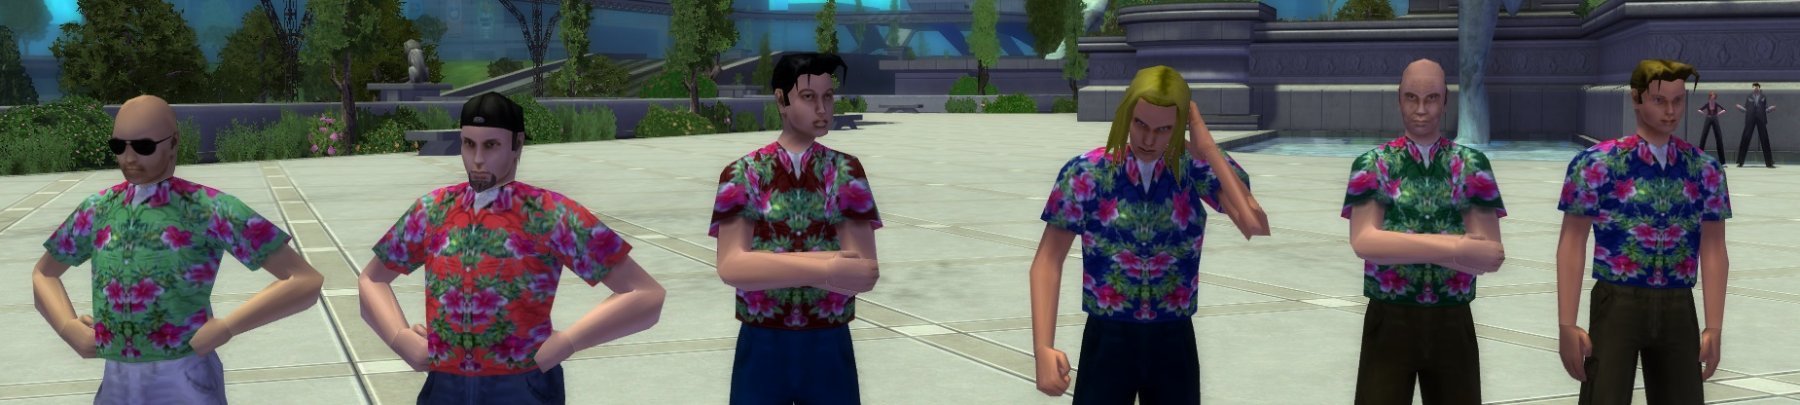
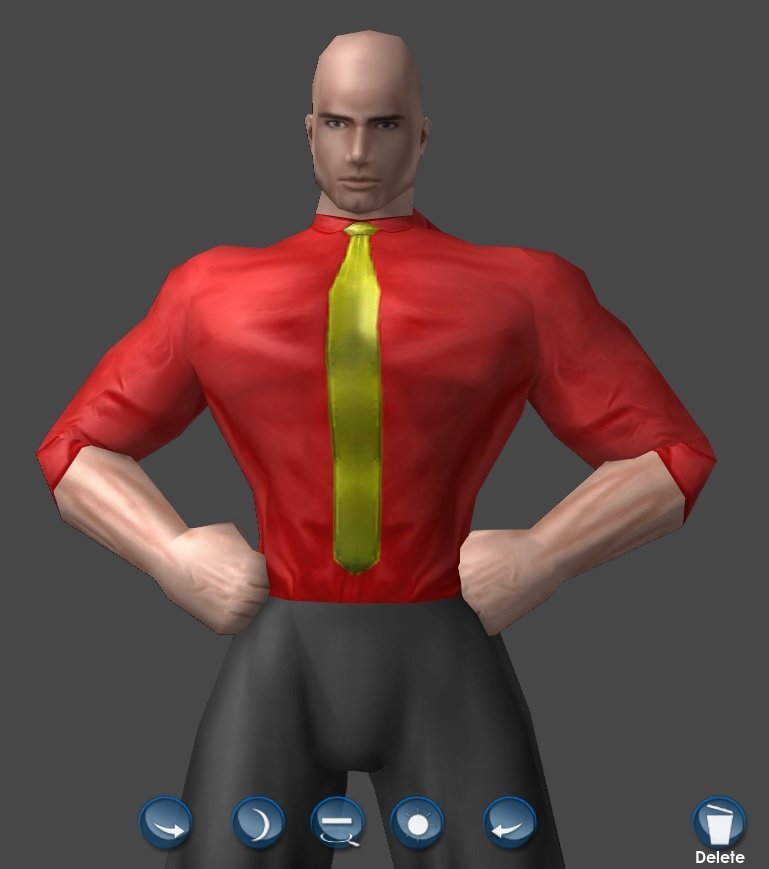
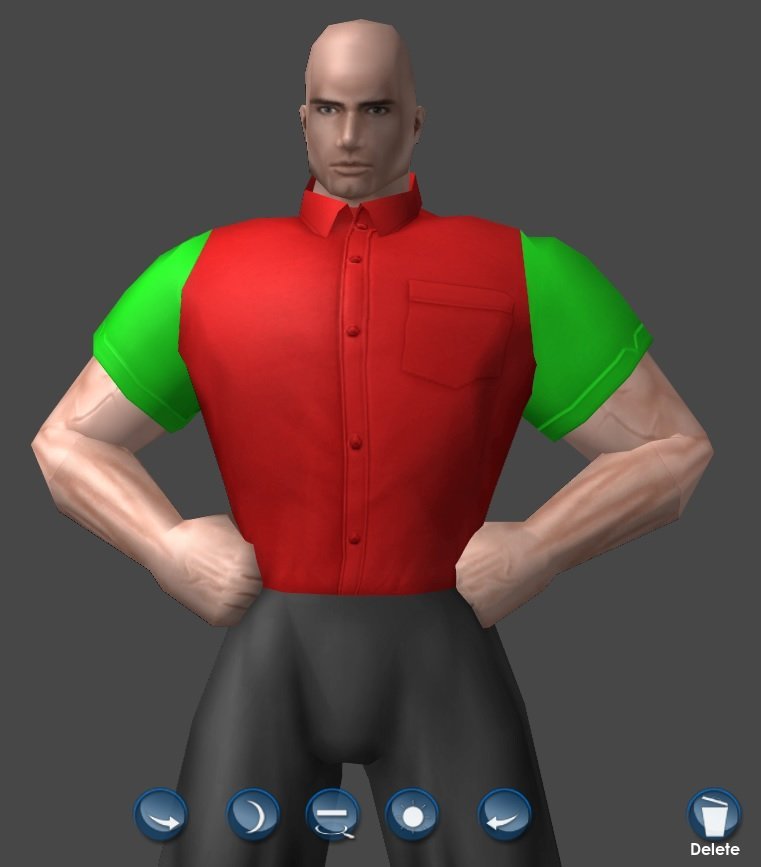
The Hawaiian ended up having the issues I expected lol it distorts the baked in image as well as the BUMP cause I had to scale them both up. Not to mention it's highly noticeable that this was made for a different GEO. The upper arms are bigger on the players so the back of them need completely recreated and the neck area is in a totally different location lol I tried it at first with the dress shirt and I expected to run into issues due to the fact that there's no skin showing. You can't make it add skin tone in, it just adds the secondary color from the CC. In the pic, red is primary color and yellow is secondary. In attempt number two I used the Tshirt GEO cause there's not a lot of options with skin. I also used a different proccessing method for scaling, which came out better than the first time but still not great. It retained more detail but it's not the best. Here you can see how badly the collar is off lol It can probably be fixed but it doesn't change the distortion of the patterns. ...then theres this lol I made the section on the back of the arms take color but it's still barren lol But... last night I had a thought and it seems totally doable. You can get royalty free digital Hawaiian shirt patterns all over the internet lol so I may have to play around with adding that pattern to the 'Clubwear shirt' Unfortunately I go back to work tomorrow so I wont be able to do much with it till next week.

-
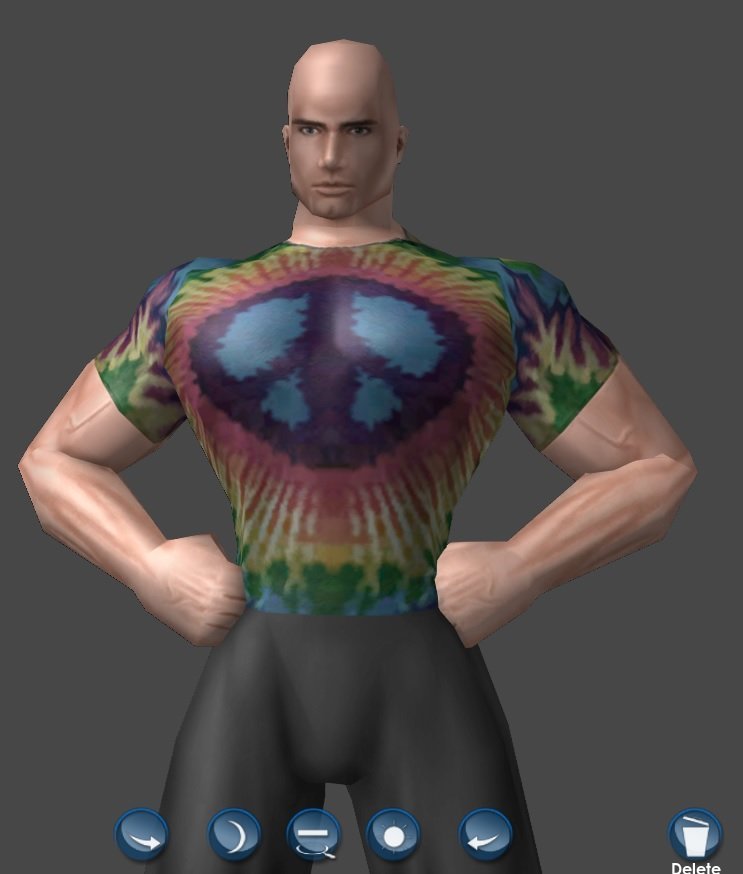
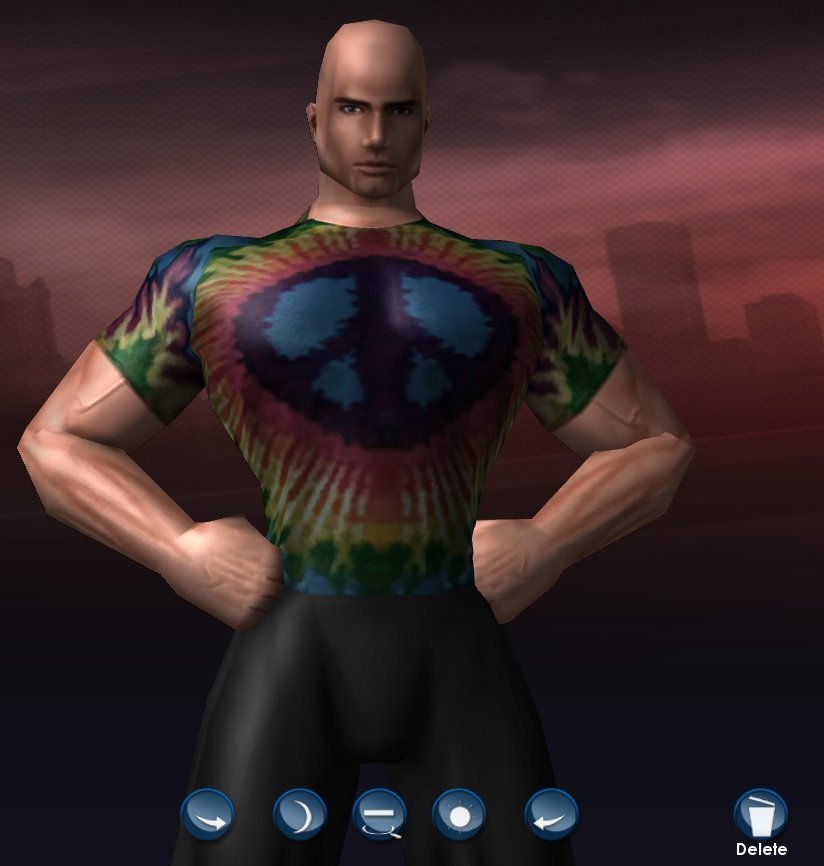
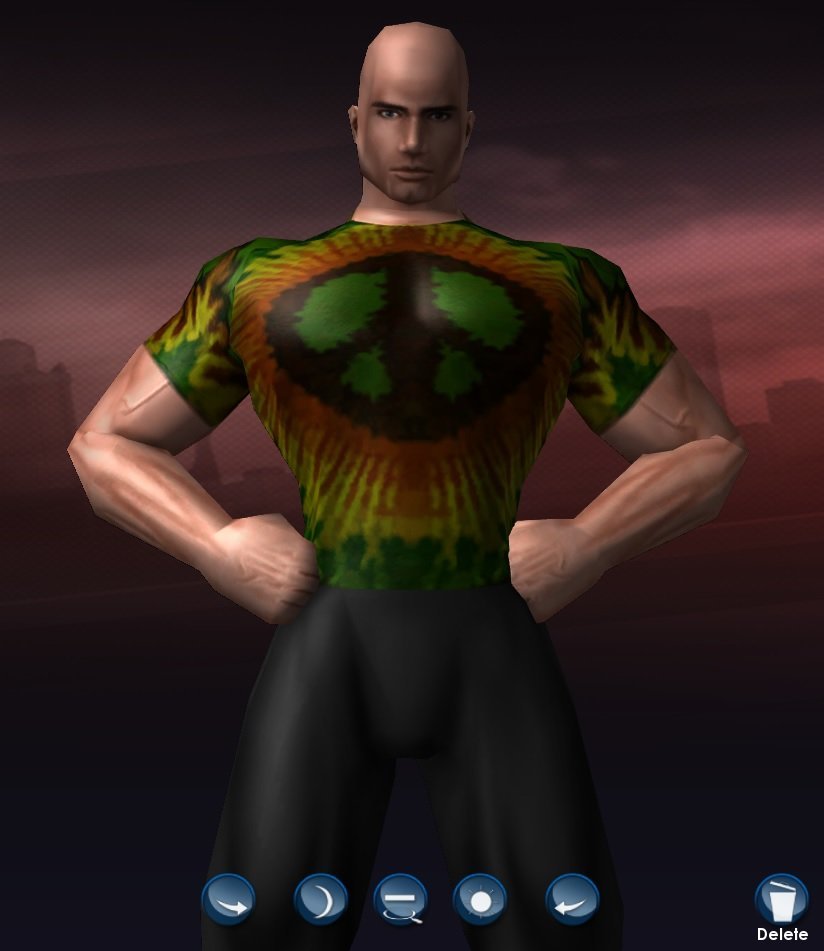
Tie dye is done. Theres some oddness with the back of the sleeves and the collar... but those are inhereted from the Tshirt. I tried to remedy that but I didn't have any luck, which makes sense cause the OG DEVs made it that way lol It accepts color and you can get some interesting results but there's no way to fix that and also have the baked in tie dyed colors. When I finish messing with the Hawaiian shirt I'll put both of them up on the Citymod installer and post here.
-
I ended up working on the tie dyed shirt first cause its a T shirt and it doesn't distort near as much as opposed to the Hawaiian shirt distorting as well as being a button down... unfortunately I fought with GIMP for over an hour cause it wasn't doing something right and the texture wouldn't update. Still needs more work matching the end of the sleeves to the bump file and theres some weirdness on the back of the sleeve and in the armpits that need some attention. It does take colors now, but it's not how you'd want it to lol (the first pic is in the whitest white and the second is in yellow)
-
These are the NPC shirts This is what I've found to put them onto. I think this is the best option, but it's not in the player version of the CC right now... and it clips with things horribly bad lol Those pockets aren't part of the GEO so the Hawaiian pattern would go onto it really well. lol Ok, I'm done file spelunking now it's time to get down to business lol
-
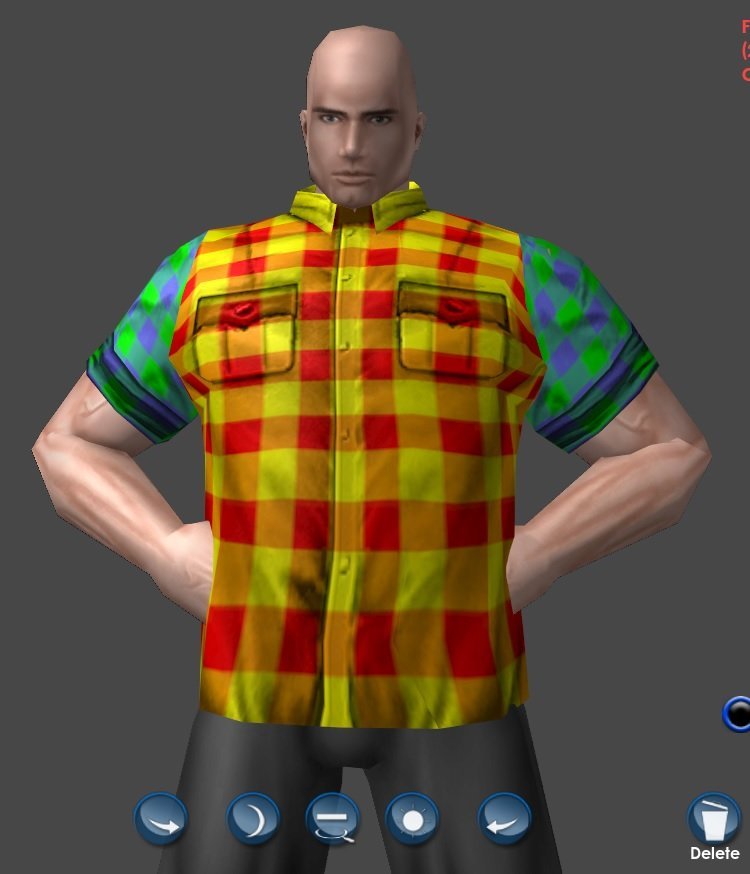
So I found out that the 'Hawaiian shirt' that the PPD and some NPCs wear is actually textured to use a "button down shirt" GEO that is a different GEO than what we have availible in the CC but on the bright side it is able to take custom coloring. I'm gunna make a few efforts with it, one to use the Tshirt we have under tights, another is the tights dress shirt using the sleeve portion of the Tshirt, and then the toughest one will be using the "dress shirt" from the Jackets option and short sleeves. The bigest thing that sucks about this is the Hawaiian shirt is 128x256 and the Tshirt and tights Dress Shirt are both 512x256 so that means the pattern will have a bit of fuzziness from scaling it up in resolution. I'm also going to take the tie dyed NPC shirt and convert it as well, but again its 128x256 that'll have to be scaled up. I didn't see near as much distortion on it as I did with the other pattern in my initial scaling test though so thats good... granted who knows how visible all that'll be once it goes into the game engine. I'll take some pics once one of them is done to a satisfactory level.
-
soul extraction not producing enough spirits
LKN-351 replied to Ridiculous Girl's topic in Bug Reports
Don't be ridiculous, they can't all be top 40 hits 😄😄😄 -
soul extraction not producing enough spirits
LKN-351 replied to Ridiculous Girl's topic in Bug Reports
You know you can just hit the prnt scrn button and go to any image editing program, hit edit and then paste and it'll paste the entire screenshot with the UI right? I could see this being a pain in the middle of a bunch of action but that screenshot will stay in memory until you copy/cut with something else. Sorry if it seems rude but I'm always confused that it seems like people don't know this. -
Respec Glitch or Undiscovered Glorious Loophole?
LKN-351 replied to WuTang's topic in General Discussion
If you respec and only change slotting, with the powers taken in the same order like WuTang did and then zone or log off the powers in the tray will go back to exactly how they were before the respec. Rest and the prestige runs will just plop themselves in places, I haven't figured out/don't remember the pattern. If you change the level you take a power or pick something you didn't have before those will be placed logically but you may have to arrange them to your preference. I zone every single time I do a respec and that fixes my power trays. -
Oddly enough, until last night the paypal donations link has shown every time I've loaded up the main page lol
-
It's on the main page of the wiki on the right hand side. It didn't load up when I visited just now but it normally does and the 'Donation' box is still there. https://homecoming.wiki/wiki/Main_Page
-
As this texture sits right now, it needs the ability to be 'custom colored' so it'll take a bit of effort to get it implemented. I might be working on doing this for a few different costume pieces and I may be getting ready to post a thread up about suggesting the pieces as well as possibly presenting the files for it to be done soon™ in hopes that I'm not just reskinning things for client side mods.... Soon ™
-
Oh, geez that sucks. I'm surprised I just now noticed cause I've been on there a fair bit lately and this is the first time I've had any issues. Thanks for the heads up though.
-
I've been trying to go there since Monday and I keep getting an error message. I did some checking and it looks like the site is actually down. Anyone know whats going on?
-
I inverted the alpha from the bump file and then the reflection file but no change. I can see a bit of reflection in a specific place on the gloves but I can't figure out why in just that spot.
-
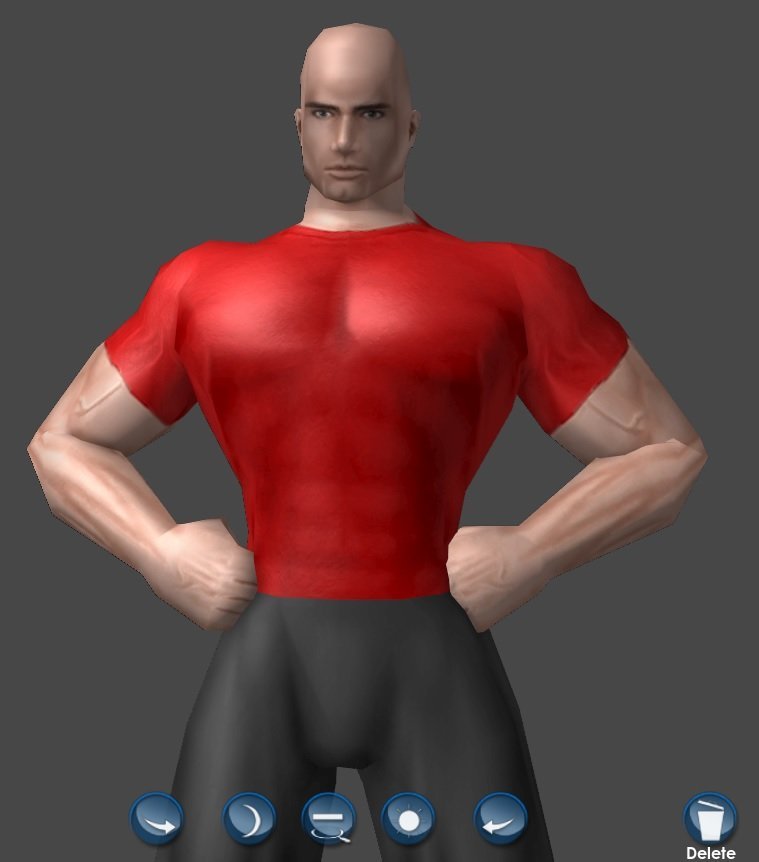
I'm not really sure where to put this, so if it needs moved then have at it lol Costume textures; first file is the base texture, alpha determines what can and can't be coloured. the Bump files determines details, the alpha deals with light scattering or lack thereof (white=shiney, black=dull). Mask file determines what will be coloured using primary and secondary, alpha effects transparency of the piece being textured. Reflect texture determines reflection or lack of (black=reflect, white=no reflect), if the alpha channel has an effect on anything I am not aware of it. The light scattering effect from the alpha of the bump file is present on every costume piece, the reflect file is only on pieces like Plate Armor, Valkyrie, Metallic, and the Knight pieces (just to name a few)... The part I'm modding should have a reflection, for some reason it stopped reflecting. I've blocked out the reflect file in just black and white and also inverted just as a test. No reflect, it didnt even seem like it made a difference. I hadn't messed with the bump file a whole lot like i did with the reflect file but from the bit I have done with it I can see the changes from what I've tried but I still don't get a reflection. Recently I removed each file individually and put back in the unmodded file and when I go back to the OG bump file the reflection returns but as soon as I put the modded file back in for that file the reflect is gone again. So that lowers it down to some odd issue with the bump file, on top of the fact that GIMP 'inverts' the alpha on the bump.... but it does that for the OG file and the modded file so... yeah lol there is that. I'm gunna re-invert the bump alpha here in a bit when I get done with my errands for the day. What I'm trying to figure out is, if anyone knows, is whether its something I've doing wrong or if it may have to do with the way reflections were implemented using 'trick' files that some of the previous devs had created to get some new effects out of things.
-
I am extremely amused by that. Kudos to whichever dev gave it that name. This is up there with the dedication plaque for Señor Omnomnom in my top ten most amusing things found ingame.
-
@phooey182 If you can't find a specific one you're looking for, quote this post and I'll dig through the files at my earliest convenience and find the name.
-
Fix't Also, why not non-robotic claw hands... I mean instead of almost claw hands that we currently have 😄😄😄
-
If whoever added them to the wiki followed the same rules as all the other powersets, the file names for the icons should be the same name the game uses. https://homecoming.wiki/wiki/Marine_Affinity It's worth a try at least.
-
Captain America: Brave New World
LKN-351 replied to Excraft's topic in Comic, Hero & Villain Culture
Just like in the comics when Sam became Cap, Joaquin Torres is the new Falcon and hes actually in the trailor in a few scenes. He was in Falcon and the Winter Soldier too and its been a while since that came out but there was talk in that series about him being the new Falcon. -
As I've been kind of skimming this thread the thought in the back of my mind that I heard many many years ago is to always go to the manufacturers website and find the exact model of whichever hardware you're using (whether its built in or expansion hardware) and download the drivers from that source. Windows update will install a driver, but it will install a generic one that works 'good enough' but not optimally. I don't personally know enough about openGL to say that'll work for sure in this situation, but after what Captain Fabulous said it makes the most sense.
-
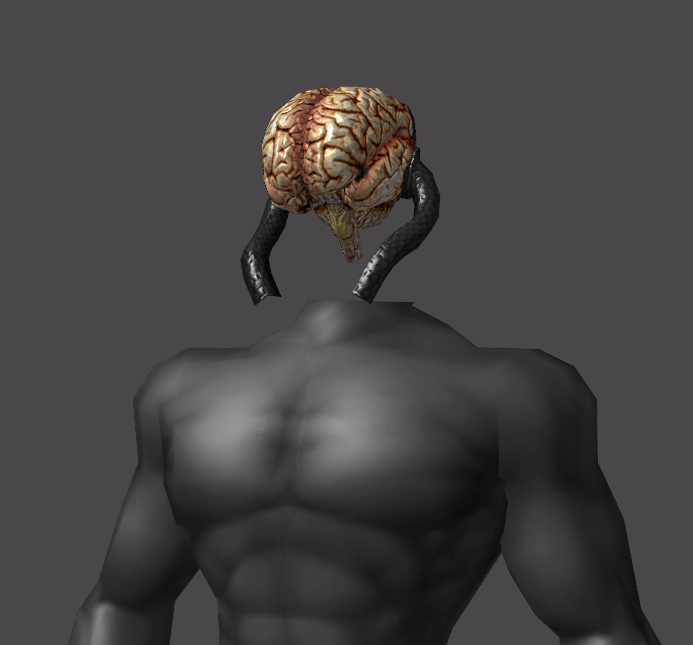
I'd guess the spinning idea is possible, but thats beyond my knowledge. I do think the eyeballs and skulls and whatnot that HC added could have the same sort of thing applied to have them animate like I'm suggesting for the brain. About the brain suspension though, that's down to the amgination of the player I'd say. If its a mental/magic powered toon those powers could keep it suspended, or a tech/gadget toon they could use an artificial gravity generator or hardlight. People are creative and this is a Superbeing game lol
-
If you're talking about the brain with no base idea, then if the spinal column was extended down just a bit as well as the whole brain being moved down then the spine would be attached in the neck. I can't imagine what you mean really but I'll take a stab... HC added a sphere and a single eyeball in there, are you talking like having one of those spinning around like a gear?
-
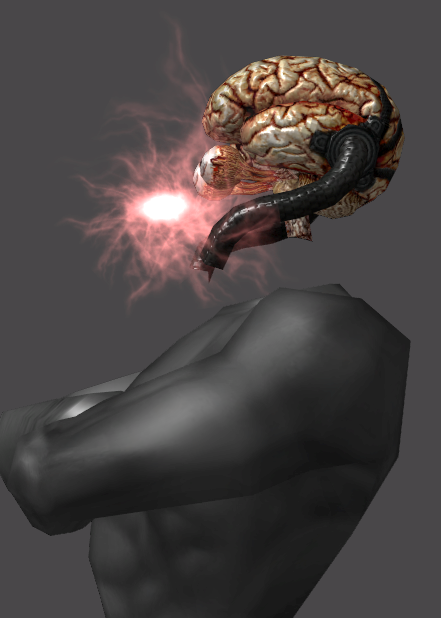
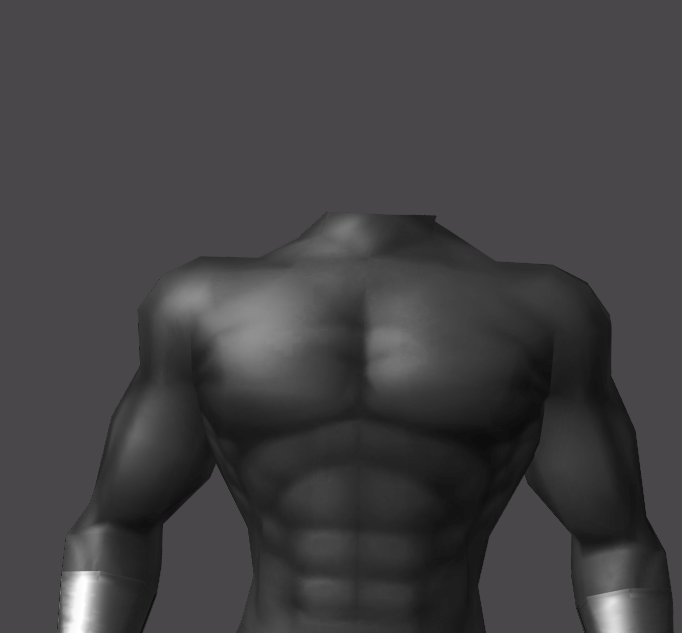
Since I had absolutely zero traction with this, I'd like to revisit this post with some visualizations of what's already going on in the game. I don't know if there was actually no interest or if I just couldn't organize my thoughts well enough to transfer them into a post that made sense to anyone but me. I also found some more information that leads me to believe it really wouldn't take a whole lot of development time. This isn't photoshop or image editing or texture editing, these are costumes I created in NPC mode in Titan Icon and then copied the costume files into the folder for HC and then screenshotted. There is a way to make the head invisible. It's still there, you just can't see it which is how you end up with something like this working In that pic, the head is still there... you just can't see it. I think that's how they went about making the Think Tank in the first place. They took the TT base and brain and attached it to the 'skeleton' of the shoulders. "Should I just take you at your word that the head is still there?! Who are you and wheres some proof??" Proof: (unfortunately I don't know how to make a video of this) The Eye aura in that image is still attached to the head 'skeleton' and moves around just as the head would if you could see it, you can also see whats left of the neck moving around with the head as well. Heres the costume files I used for both of those pictures: TT nothing.costume TT aura.costume They'll show errors in the CC, but you can view the file in HC where you would load costumes. Look at the eye aura and the neck, the head movement is still there just invisible. Heres something else I figured out that backs my theory that this wouldn't take too much effort. The brain itself, whether with eyes or not, is a seperate piece from the base. For an animated brain to work, the only mod to the existing part would be to extend those hoses... and in all actuality if you've really payed attention to how it currently is, the spine already needs extended cause you can see inside of it due to the fact there wasn't an end cap on the GEO. Heres the costume file for that image: TT no base.costume "But but but but that pic is only of an eye aura and not with the brain, I'm still not a believer!" ...Au contraire... Thats where the eye aura attaches to the OG head, and if you load up those two costume files you can again see them moving independently. TT brain aura.costume TT no base 2.costume Again, the head is there and the aura is attached to it and if the brain were also attached to it as well as the cables extended the brain would animate with the OG head. Hell, I think the brain could be made to be a seperate head without the Tank and base if it where aligned with the standard eyeline and also animate properly... although I don't think it would work with the animations for the Beast Stance. On a related side note, these are available options in Titan Icon that'd be cool to have and are already technically in the CC It looks like the live devs toyed with having the Bubble helmet globe as an option... or just no globe at all. I can think of a few people that would be into that. TT no globe.costume ^^ that one doesnt show a costume error but if you load it into the CC it puts the globe back in place TT round globe.costume
-
Animal Textures Update – Mange Be Gone
LKN-351 replied to TorrentYed's topic in Tools, Utilities & Downloads
Very nice work. Why not add it to the City MOD installer? Michiyo gives pretty good instruction on how to do so in this post.