The Beta Account Center is temporarily unavailable
×


wRECk69
-
Posts
46 -
Joined
-
Last visited
Content Type
Profiles
Forums
Events
Store
Articles
Patch Notes
Everything posted by wRECk69
-
That's an interesting idea! Thank you, Bionic_Flea! I haven't played an epic AT since live! Would you happen to have a build handy that I could look over? I will gladly admit that my VEAT building experience is...um...very lacking! Thank you for the idea!
-
Thanks for your thoughts, carroto! I appreciate your comment (quoted above), as that's on my mind. Yes, I can take almost any toon to 50, slot out all the incarnates, and then solo almost anything in the game (maybe using two builds, depending on the content). I'm trying to think of something that opens up earlier. My tanks, while very survivable, couldn't out damage an AV when exempted down to the lower levels. My solo attempts at them always ended in a stalemate...and I didn't bring P2W powers to bear. I've read some about Stalkers, but I've never played one very far (even on live). I assume that they overcome the mighty obstacles by damage, vice debuffing. How do they fare against challenging content as they work their way up into the 20's and 30's?
-
Hello, everyone! I have been running my traditional toons on Homecoming--Defender, Tank, and Controller. This last TF run today made me stop and sigh, as we blew through the TF so fast that I didn't have time to stop and smell the flowers. As an Elec/Elec defender, I almost felt unneeded when the blasters/corrupters jumped into mob after mob and just nuked them away. Even the tank seemed more useless than helpful, though he did a good job gathering where possible. I know that changes, depending on the circumstances, but it left me deflated. And, on Homecoming--especially lately, every TF and arc that I've been on a team with has been a steamrolling ride. I'm looking for something that I can solo up through the game at a leisurely pace. However, I'd like it to stand up to whatever challenges await--AVs in arcs and TFs, mobs (though I don't care about soloing +4/x8 at level 2), and perhaps even GMs once I am able build-wise. I have a few 50's on Homecoming (a farming tank, a regular tank, a 'troller (Illusion), a few defenders), since I gravitate toward them, but I'm willing to try anything. Money isn't an object, given my farmer. I'll team when I am able, but I'd like to solo a lot to reread some of the great arcs in CoH. I'll likely start blue-side, as I have a few gold-side toons and I really don't care for red-side. TL;DR Something that can solo CoH content, harder challenges (AV/GM), and can still take time to smell the flowers! Any AT suggestions are welcome, especially if you think it will be a nice change from the tank/'fender/'troller playstyle that I am inclined to play. Thank you in advance for your pontifications!
-
Thank you, JJ! You read my mind! 😄
-
I took on the Gold-side arcs with an Elec/Elec defender, pausing XP and running every arc through 20. Honestly, anything works. However, I do recommend (as was mentioned earlier) that you take hover and possibly stealth if you have ranged attacks. The ghouls can be rough, so stealthing and staying out of melee is very helpful for a low HP defender. I'm thinking about going Gold-side again with another toon.
-
Thanks, Psyonico! That answers my question. I was considering a secondary to pair with Mind Control, and was thinking about a set where I could sleep a mob and then SP/SS/FS myself (or a team) before blasting away. And that helps me to understand that field in CoD!
-
Thanks, Uun! I have never noticed that field in CoD before! That helps me tremendously!
-
Do the powers in Kinetics (siphon speed, FS, transfusion, etc.) cause sleeping mobs to awaken? They don't do damage, but they are "attacks." Thanks!
-
Thanks for the insight, mistagoat! It's a real balancing act when chasing +Rchg to get the +Ranged Defense values up. And this is a very tight build. I'll keep tweaking it, per your ideas, and see what happens! Thanks again!
-

Does the Energy Font Proc still work on Dimension Shift?
wRECk69 replied to JulioThom33_2's topic in Controller
While I haven't confirmed this on my 'troller, I believe it no longer procs off of Dimension Shift. -
Ok, here's the build (with two minor tweaks) from an older version of Mids. Thank you all in advance for your constructive feedback! This Hero build was built using Mids Reborn 3.4.7 https://github.com/LoadedCamel/MidsReborn Click this DataLink to open the build! Monochromy v2: Level 50 Magic Controller Primary Power Set: Gravity Control Secondary Power Set: Darkness Affinity Power Pool: Sorcery Power Pool: Leadership Power Pool: Flight Power Pool: Speed Ancillary Pool: Mace Mastery Hero Profile: Level 1: Crush (A) Entropic Chaos - Accuracy/Damage (3) Entropic Chaos - Damage/Endurance (7) Entropic Chaos - Damage/Recharge (13) Entropic Chaos - Damage/Endurance/Recharge (15) Entropic Chaos - Chance of Heal Self Level 1: Twilight Grasp (A) Theft of Essence - Accuracy/Healing (5) Theft of Essence - Healing/Recharge (13) Theft of Essence - Accuracy/Endurance/Healing (15) Theft of Essence - Chance for +Endurance Level 2: Gravity Distortion (A) Superior Will of the Controller - Accuracy/Control Duration (3) Superior Will of the Controller - Control Duration/Recharge (11) Superior Will of the Controller - Endurance/Recharge (33) Superior Will of the Controller - Accuracy/Control Duration/Endurance (33) Superior Will of the Controller - Accuracy/Control Duration/Endurance/Recharge (34) Superior Will of the Controller - Recharge/Chance for Psionic Damage Level 4: Lift (A) Apocalypse - Damage/Recharge (5) Apocalypse - Damage/Recharge/Accuracy (7) Apocalypse - Recharge/Accuracy (11) Apocalypse - Damage/Endurance (36) Apocalypse - Chance of Damage(Negative) (37) Force Feedback - Chance for +Recharge Level 6: Tar Patch (A) Recharge Reduction IO Level 8: Crushing Field (A) Superior Overpowering Presence - RechargeTime/Energy Font (9) Gravitational Anchor - Immobilize/Recharge (9) Gravitational Anchor - Immobilize/Recharge/Accuracy (37) Gravitational Anchor - Recharge/Accuracy (37) Gravitational Anchor - Immobilize/Endurance (39) Gravitational Anchor - Chance for Hold Level 10: Darkest Night (A) Dampened Spirits - To Hit Debuff/Endurance Level 12: Dimension Shift (A) Superior Overpowering Presence - Endurance/RechargeTime Level 14: Mystic Flight (A) Blessing of the Zephyr - Knockback Reduction (4 points) Level 16: Shadow Fall (A) Luck of the Gambler - Defense/Increased Global Recharge Speed (17) Reactive Defenses - Scaling Resist Damage (17) Gladiator's Armor - TP Protection +3% Def (All) (19) Steadfast Protection - Resistance/+Def 3% (21) Kismet - Accuracy +6% (23) Reactive Defenses - Defense/Endurance Level 18: Gravity Distortion Field (A) Basilisk's Gaze - Accuracy/Hold (19) Basilisk's Gaze - Accuracy/Recharge (42) Basilisk's Gaze - Endurance/Recharge/Hold (42) Basilisk's Gaze - Accuracy/Endurance/Recharge/Hold Level 20: Fade (A) Luck of the Gambler - Defense/Increased Global Recharge Speed (21) Luck of the Gambler - Endurance/Recharge (34) Luck of the Gambler - Defense/Recharge (34) Luck of the Gambler - Defense/Endurance/Recharge (36) Luck of the Gambler - Defense/Endurance Level 22: Wormhole (A) Sudden Acceleration - Knockback to Knockdown (23) Absolute Amazement - Stun/Recharge (43) Absolute Amazement - Stun/Recharge/Accuracy (45) Absolute Amazement - Recharge/Accuracy (45) Absolute Amazement - Stun/Endurance (45) Absolute Amazement - Chance for ToHit Debuff Level 24: Soul Absorption (A) Efficacy Adaptor - EndMod/Recharge (25) Preemptive Optimization - EndMod/Recharge (25) Power Transfer - Chance to Heal Self Level 26: Singularity (A) Sudden Acceleration - Knockback to Knockdown (27) Soulbound Allegiance - Chance for Build Up (27) Expedient Reinforcement - Accuracy/Damage (29) Expedient Reinforcement - Damage/Endurance (29) Expedient Reinforcement - Accuracy/Damage/Recharge (31) Expedient Reinforcement - Resist Bonus Aura for Pets Level 28: Howling Twilight (A) Annihilation - Chance for Res Debuff Level 30: Dark Servant (A) Cloud Senses - ToHit Debuff (31) Cloud Senses - Accuracy/ToHitDebuff (31) Cloud Senses - Accuracy/Endurance/Recharge (33) Cloud Senses - ToHit Debuff/Endurance/Recharge Level 32: Maneuvers (A) Luck of the Gambler - Defense/Increased Global Recharge Speed (42) Luck of the Gambler - Defense/Endurance Level 35: Spirit Ward (A) Panacea - Heal/Endurance (36) Panacea - Endurance/Recharge (48) Panacea - Heal/Recharge (50) Panacea - Heal/Endurance/Recharge (50) Panacea - +Hit Points/Endurance Level 38: Enflame (A) Superior Frozen Blast - Accuracy/Damage (39) Superior Frozen Blast - Damage/Endurance (39) Superior Frozen Blast - Accuracy/Damage/Endurance (40) Superior Frozen Blast - Accuracy/Damage/Recharge (40) Superior Frozen Blast - Damage/Endurance/Accuracy/RechargeTime (40) Superior Frozen Blast - Recharge/Chance for Immobilize Level 41: Scorpion Shield (A) Luck of the Gambler - Defense/Increased Global Recharge Speed (43) Luck of the Gambler - Defense/Endurance Level 44: Arcane Bolt (A) Force Feedback - Chance for +Recharge (46) Superior Winter's Bite - Accuracy/Damage (46) Superior Winter's Bite - Accuracy/Damage/Endurance Level 47: Hover (A) Luck of the Gambler - Defense/Increased Global Recharge Speed (48) Shield Wall - +Res (Teleportation), +5% Res (All) Level 49: Hasten (A) Recharge Reduction IO (50) Recharge Reduction IO Level 1: Brawl (A) Accuracy IO Level 1: Containment Level 1: Sprint | Copy & Paste this data into Mids Reborn : Hero Designer to view the build | |-------------------------------------------------------------------| |MxDz;1657;739;1478;HEX;| |78DA65944B53134110C7FFBBD98081401EBC21812488BC24103E810A6A95248AA25| |EAD54D840CA98509B48C907F0080848F90D14F18AAF4FE0456F5A7AF0A080E005C1| |4759E5C18ABDDB3BE504B66A92DF4C77FFBBA76776137746DD6F5EC74F41F18E649| |385C28D917CAE68E4B359DD702692539914E8A949E473F9D4B491BF35179A1DAEA4| |95C87F3711113D6F246733C539310F4B2E676EA7D3D1D1A47133A7538AD3E974264| |79E708FE7296E226FA47463CE634DE27A7252370AD399996A6B7E2E9B999A2E56B1| |E38CAE4F06CECE645251493B914CE9F453289246339516A231AFD08F39F82969B46| |456AD41C50243051619DCB8C7508B25864F4DE5D10EC04323A8819C18DCF032D4C2| |CFB048018A14E454F0902C3133E523862AAC3184F058C03A43184F181648C221CB3| |830A05A160D51860A0CAAB6DE104327620CC77197E1336DC129C9C0897E5896255A| |AD9413549AD59B9663B8ACDA7045C84D08B8CA7002D7183629814B4EE0C2065B966| |9B55AB654A39513AC74D155922D35F8C831DBA4E6918BF2A041B12C5EFC74D830CC| |E047936275BC1E7F614123F6D9B442069F7C703EBC552D173FDE31F4E2BD800F0C5| |F28779D7C57EA44EE7AF83953D852B58EA94EB13BEE65B84F7F0D72E50DD8E2DD36| |628C37D78738C34924045C14708961878AA06D09A192DA8479B634E38F66C36F865| |5F26A8194B245A46CC5886AC3014300DF05FC6068C72F862D4AD9269F461B76B98D| |5FC91294DB18C416F7AA1DDB02761942D861F0D167A1430A523A441B7B45AF96E8F| |C2372A7230838EC76061906D1CE1043878030C32A4577C99DEEC286665FCAA7029E| |3174E3B98017025EDADDF3013D729D3DA2CE3E51E73265EA971AACF68BD76A006B9| |A0DEB0C2EDA7654968B0AB9418C71E1117219925D86C4BB181310D0CABF38345AD9| |62BE9BD2532AC58FBABAB8B871ADFC0B445E6D2CB2577524A6932DFB872CA47481A| |6DDE60EAF8B7DECF13EBE1D55E96195834316C207E2EE2F33BCEA2BEF69E91FD737| |CE2C| |-------------------------------------------------------------------|
-
Thank you for the build and response, mistagoat. Unfortunately, the latest version of Mids no longer has the Forum Export feature. I'm going to try and get a previous version up-and-running so that I can rebuild my character in it and then export the build. I'm guessing the new .mbd format doesn't work in the older Mids (which used the .mxd format). I am a little amazed that they removed the Forum Export feature. The new Share Build feature, which I believe will replace the old Forum Export feature, is currently disabled.
-
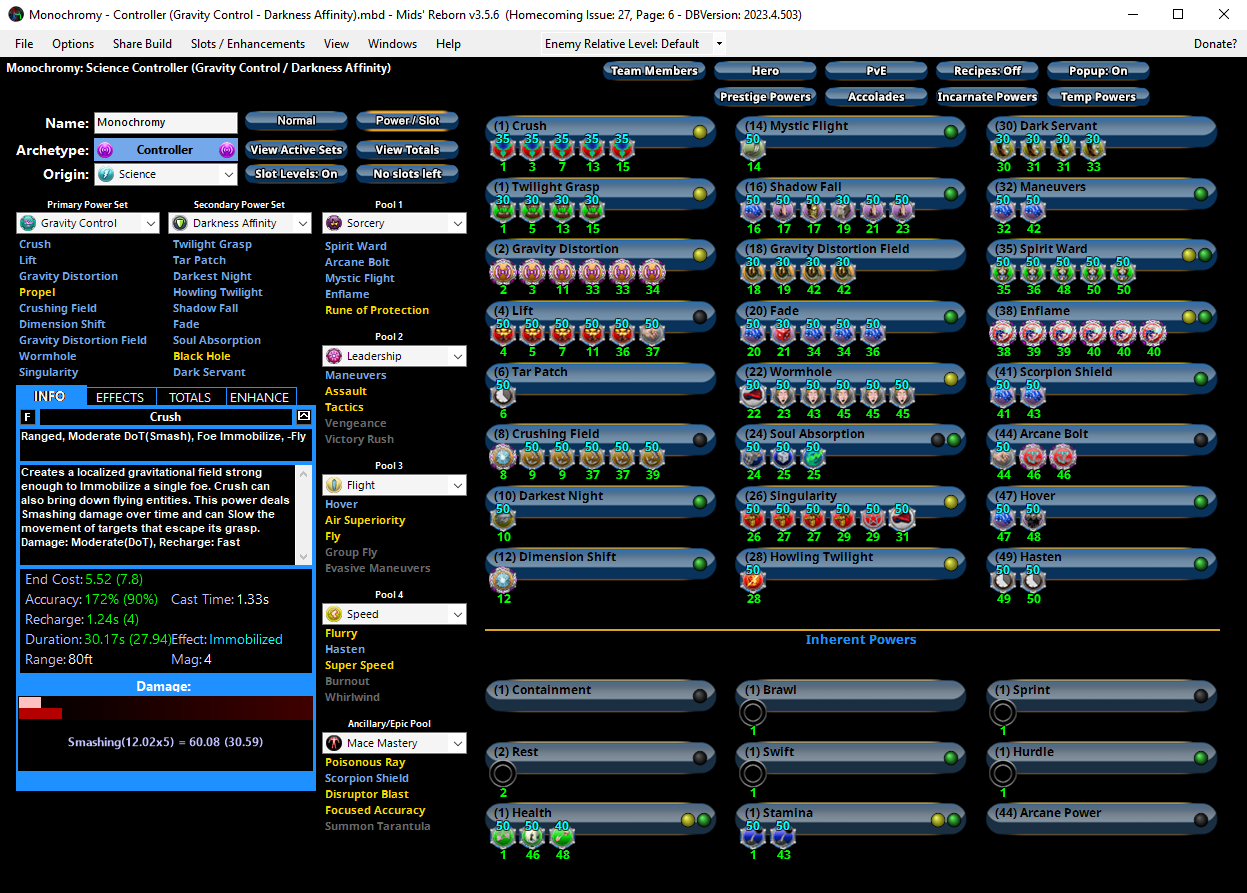
Hello, everyone! I'm a forum lurker, and have been reading a lot of great comments on gravity 'trollers and the darkness affinity (DA) secondary. I'm currently leveling up my Grav/Dark, mostly solo, as I intend to make him my main (badge hunter, do it all, etc.). My build focus was to be solo capable, team friendly, recharge focused (and, by extension, defense oriented), and capable of locking down targets and arresting them fairly quickly. I went with the DA secondary so that I could eventually take on AVs and, possibly, GMs. I grabbed the Sorcery power pool to help with Singy and, since I invested in it, picked up arcane bolt. Anyway, with that all said and without further ado, here's the current build iteration (using the very latest Mids): NOTE: I reverted and used an older version of Mids to post the build--see a few posts down for the complete build! | Copy & Paste this data into Mids Reborn : Hero Designer to view the build | |-------------------------------------------------------------------| |MxDz;1657;739;1478;HEX;| |78DA65944B53134110C7FFBBD98081401EBC21812488BC24103E810A6A95248AA25| |EAD54D840CA98509B48C907F0080848F90D14F18AAF4FE0456F5A7AF0A080E005C1| |4759E5C18ABDDB3BE504B66A92DF4C77FFBBA76776137746DD6F5EC74F41F18E649| |385C28D917CAE68E4B359DD702692539914E8A949E473F9D4B491BF35179A1DAEA4| |95C87F3711113D6F246733C539310F4B2E676EA7D3D1D1A47133A7538AD3E974264| |79E708FE7296E226FA47463CE634DE27A7252370AD399996A6B7E2E9B999A2E56B1| |E38CAE4F06CECE645251493B914CE9F453289246339516A231AFD08F39F82969B46| |456AD41C50243051619DCB8C7508B25864F4DE5D10EC04323A8819C18DCF032D4C2| |CFB048018A14E454F0902C3133E523862AAC3184F058C03A43184F181648C221CB3| |830A05A160D51860A0CAAB6DE104327620CC77197E1336DC129C9C0897E5896255A| |AD9413549AD59B9663B8ACDA7045C84D08B8CA7002D7183629814B4EE0C2065B966| |9B55AB654A39513AC74D155922D35F8C831DBA4E6918BF2A041B12C5EFC74D830CC| |E047936275BC1E7F614123F6D9B442069F7C703EBC552D173FDE31F4E2BD800F0C5| |F28779D7C57EA44EE7AF83953D852B58EA94EB13BEE65B84F7F0D72E50DD8E2DD36| |628C37D78738C34924045C14708961878AA06D09A192DA8479B634E38F66C36F865| |5F26A8194B245A46CC5886AC3014300DF05FC6068C72F862D4AD9269F461B76B98D| |5FC91294DB18C416F7AA1DDB02761942D861F0D167A1430A523A441B7B45AF96E8F| |C2372A7230838EC76061906D1CE1043878030C32A4577C99DEEC286665FCAA7029E| |3174E3B98017025EDADDF3013D729D3DA2CE3E51E73265EA971AACF68BD76A006B9| |A0DEB0C2EDA7654968B0AB9418C71E1117219925D86C4BB181310D0CABF38345AD9| |62BE9BD2532AC58FBABAB8B871ADFC0B445E6D2CB2577524A6932DFB872CA47481A| |6DDE60EAF8B7DECF13EBE1D55E96195834316C207E2EE2F33BCEA2BEF69E91FD737| |CE2C| |-------------------------------------------------------------------| I'm trying to figure out how to export the build using the new Mids...sorry! Monochromy - Controller (Gravity Control - Darkness Affinity).mbd

-
It's funny that I was thinking about doing something similar to this (save the vampire aspect). I have never really done the red-side missions (even when live), so I thought I'd give it a whirl. With the changes to AR (which I have been playing with on my blue-side Time/AR defender), I wanted to use AR as my primary. I also don't usually play blasters, so my thought was to run an AR blaster red side. How is it going thus far? I was going to focus on AoE with some ST thrown in (bosses, etc.). Also, running Devices sounds like it would be fun! I didn't want to use Tactical Arrow as a secondary since I never like the concept of having to constantly switch between the rifle and the bow. Also, any thoughts about your build/power preferences?
-
I'm glad I have finally been able to offer a small gift for all the fun you've given me over the past few months! Thank you!!!
-
My first toon to solo through Praetoria on Homecoming (all solo, all arcs) was an Electric/Electric defender. After playing way too many Defenders on live, I found this toon to be very smooth and successful, though slow at times. I'm also not a power gamer by any stretch. Of course, last week, I saw an Elec/Elec corrupter and wondered how that compares to the defender. I might need to roll one and see. Have you also considered Traps?
-
Here you go, shades9595: This Hero build was built using Mids Reborn 3.2.17 https://github.com/LoadedCamel/MidsReborn Level 50 Magic Controller Primary Power Set: Electric Control Secondary Power Set: Poison Power Pool: Concealment Power Pool: Leadership Power Pool: Leaping Power Pool: Teleportation Ancillary Pool: Mace Mastery Hero Profile: ------------ Level 1: Tesla Cage Apc-Acc/Rchg(A), Apc-Acc/Dmg/Rchg(3), Apc-Dmg/Rchg(3), Apc-Dmg(5), Apc-Dmg/EndRdx(5), Apc-Dam%(7) Level 1: Alkaloid DctWnd-Heal/EndRdx/Rchg(A) Level 2: Envenom ShlBrk-Acc/Rchg(A), ShlBrk-Acc/DefDeb(9), ShlBrk-Acc/EndRdx/Rchg(11), ShlBrk-DefDeb/EndRdx/Rchg(11), ShlBrk-DefDeb(13), ShlBrk-%Dam(13) Level 4: Weaken SphIns-Acc/Rchg(A), SphIns-Acc/ToHitDeb(15), SphIns-Acc/EndRdx/Rchg(15), SphIns-ToHitDeb/EndRdx/Rchg(17), SphIns-ToHitDeb(17), SphIns-%ToHit(19) Level 6: Infiltration GifoftheA-Def(A), GifoftheA-Def/EndRdx(19), GifoftheA-Run+(21) Level 8: Conductive Aura PreOptmz-Acc/Rech(A), PreOptmz-EndMod/Acc/Rech(21), PreOptmz-EndMod/Acc/End(23), PreOptmz-EndMod/End(23), PreOptmz-EndMod/Rech(25), PreOptmz-EndMod/End/Rech(25) Level 10: Chain Fences EnfOpr-Acc/Rchg(A), EnfOpr-Acc/Immob/Rchg(27), EnfOpr-Acc/Immob(27), EnfOpr-Acc/EndRdx(29), EnfOpr-EndRdx/Immob(29), EnfOpr-Immob/Rng(31) Level 12: Jolting Chain SprWntBit-Acc/Dmg(A), SprWntBit-Acc/Dmg/EndRdx(31), SprWntBit-Acc/Dmg/Rchg(31), SprWntBit-Dmg/EndRdx/Acc/Rchg(33), SprWntBit-Dmg/Rchg(33), SprWntBit-Rchg/SlowProc(33) Level 14: Maneuvers LucoftheG-Def/EndRdx(A), LucoftheG-Def(34), LucoftheG-Def/Rchg+(34) Level 16: Tactics AdjTrg-ToHit(A), AdjTrg-ToHit/EndRdx(34), AdjTrg-ToHit/EndRdx/Rchg(36) Level 18: Paralyzing Blast SprOvrPrs-Acc/Conf/Hold/Immob/Sleep/Stun/Fear(A), SprOvrPrs-Acc/Conf/Hold/Immob/Sleep/Stun/Fear/EndRdx/Rchg(36), SprOvrPrs-Acc/Conf/Hold/Immob/Sleep/Stun/Fear/EndRdx(36), SprOvrPrs-EndRdx/Rchg(37), SprOvrPrs-Conf/Hold/Immob/Sleep/Stun/Fear/Rchg(37), SprOvrPrs-Rchg/Energy Font(37) Level 20: Antidote GldArm-3defTpProc(A), StdPrt-ResDam/Def+(39) Level 22: Elixir of Life EffAdp-EndMod/Rchg(A) Level 24: Assault EndRdx-I(A) Level 26: Synaptic Overload SprWiloft-Acc/Conf/Hold/Immob/Sleep/Stun/Fear(A), SprWiloft-Acc/Conf/Hold/Immob/Sleep/Stun/Fear/EndRdx/Rchg(39), SprWiloft-Acc/Conf/Hold/Immob/Sleep/Stun/Fear/EndRdx(39), SprWiloft-Conf/Hold/Immob/Sleep/Stun/Fear/Rchg(40), SprWiloft-EndRdx/Rchg(40), SprWiloft-Rchg/Dmg%(40) Level 28: Combat Jumping LucoftheG-Def/Rchg+(A) Level 30: Teleport Target Acc-I(A) Level 32: Gremlins SvrRgh-Acc(A), SvrRgh-Acc/EndRdx(42), SvrRgh-Acc/Dmg(42), SvrRgh-Acc/Dmg/EndRdx(42), SvrRgh-Dmg/EndRdx(43), SvrRgh-PetResDam(43) Level 35: Poison Trap Obl-Dmg(A), Obl-Dmg/Rchg(43), Obl-%Dam(45) Level 38: Scorpion Shield Rct-Def(A), Rct-Def/EndRdx(45), Rct-Def/EndRdx/Rchg(45), Rct-Def/Rchg(46), Rct-EndRdx/Rchg(46), Rct-ResDam%(46) Level 41: Venomous Gas DarWtcDsp-ToHitDeb(A), DarWtcDsp-ToHitDeb/Rchg(48), DarWtcDsp-ToHitdeb/Rchg/EndRdx(48), DarWtcDsp-ToHitDeb/EndRdx(48), DarWtcDsp-Rchg/EndRdx(50), DarWtcDsp-Slow%(50) Level 44: Grant Invisibility LucoftheG-Def/Rchg+(A) Level 47: Misdirection Acc-I(A) Level 49: Vengeance LucoftheG-Def/Rchg+(A) Level 1: Containment Level 1: Brawl Empty(A) Level 1: Sprint Qck-EndRdx/RunSpd(A) Level 2: Rest Empty(A) Level 1: Swift Run-I(A) Level 1: Hurdle Jump-I(A) Level 1: Health NmnCnv-Regen/Rcvry+(A), Mrc-Rcvry+(50) Level 1: Stamina EffAdp-EndMod(A), EffAdp-EndMod/Rchg(7), EffAdp-EndMod/EndRdx(9) ------------
-
Truly, any defender primary can solo content. Some will be faster than others. You just need to consider how you want to approach things. Will you ever team up? If not, you can skip powers that don't directly buff you (like heal others, shield others, etc.). Of course, some story arcs have NPC partners on the missions that can take advantage of your buffs (e.g., Faultline arcs). Think about what you want your character's end-game life to look like, too. You can always respec (or use multi-builds) to make your solo defender life easier. I recently soloed all the Praetoria arcs (levels 1-20) on my Elec/Elec defender without any problems using only DOs and SOs that I acquired in the missions. I left Praetoria after just starting DW because I wanted to team some.
-
Thank you for sharing both your build and all your wisdom! It is truly appreciated!
-
Thank you, JJ! And, yeah, Mids needs to be updated first. I truly appreciate your help!!!
-
JJ, Thank you very much for your builds so far! I find them helpful in comparing my thoughts to yours (and others), and learning from them! Is there any chance you can put together a Thermal/Beam, Thermal/DP, Thermal/Sonic, and a Thermal/Rad defender build? Sorry, but I favor defenders! 🙂 Thank you again!