Scrapulous
-
Posts
62 -
Joined
-
Last visited
Content Type
Profiles
Forums
Events
Store
Articles
Patch Notes
Everything posted by Scrapulous
-
What would be the ideal recharge time for AoE Hold powers?
Scrapulous replied to oedipus_tex's topic in Controller
I agree that giving intangibles sets would be nice and might give them a bit of life as mules, but I don't think the lack of sets for the powers is what kills them dead. They were dead before IOs ever arrived. I think it's rather that when an opportunity for a weak sort of resurrection (maybe the lowest tier of rez insp) arrived, it was not seized by the design team and so intang powers remained dead. Scrap -
What would be the ideal recharge time for AoE Hold powers?
Scrapulous replied to oedipus_tex's topic in Controller
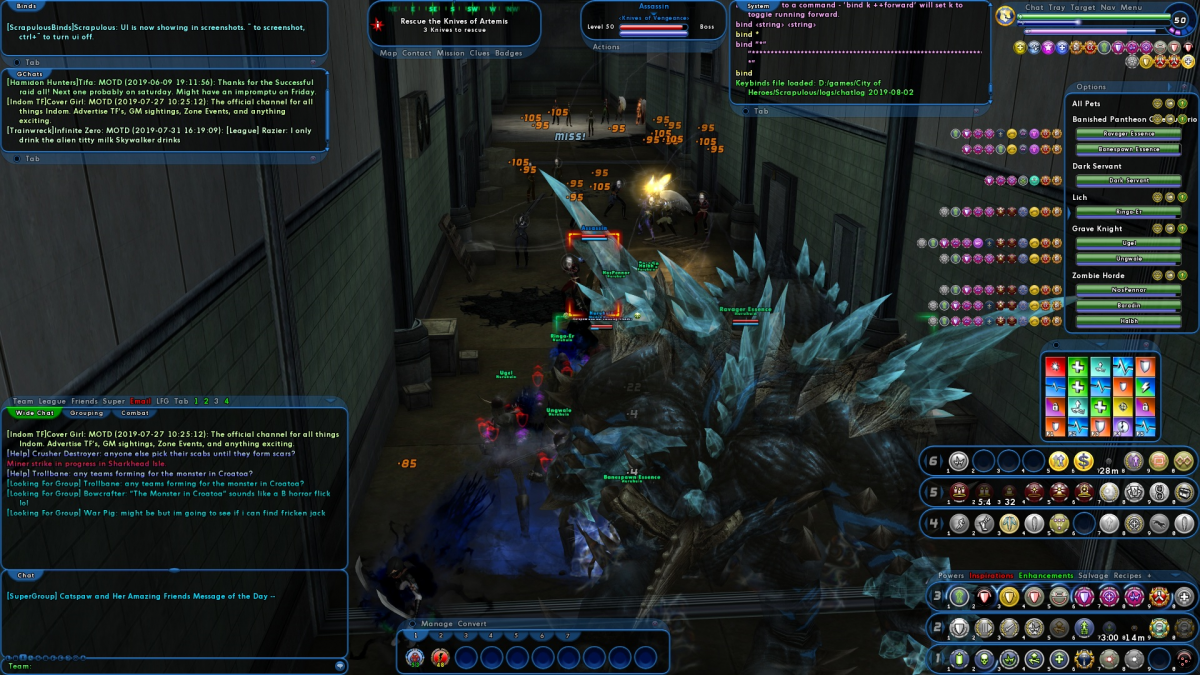
Procing aoe holds out is an interesting way to try to rehabilitate them as they stand, but that's also doable for the more repeatable control powers. These screenshots represent Fearsome Stare with two damage procs in it. Keep in mind that it's up for use every 17 seconds on a 40s base recharge. Every orange number you see is from a single application of Fearsome Stare (edit: except the little 85 in the foreground, but the 105s and 95s are all Fearsome Stare procs). It's an interesting way to get more utility out of the aoe holds, but I still think they need a balance pass regardless of their proc potential, because that potential exists independent of their atrocious fundamental stats and is available to competing control powers that aren't subject to the same crippling nerfs. As I recall, when aoe holds were nerfed because controllers were "trivializing content", the recharges were doubled and durations halved. I don't remember if the accuracies were set to .6 as part of that nerf or if they were always that way. Scrap
-
Here's what I built. I haven't tested this yet, so I am still uncertain on the value of some of my slotting decisions, namely: Six slotting the ATO in Volcanic Gases. I think the Lockdown proc may be a better choice here, but I wanted the six piece bonus and this is where it ended up Same story for Stone Cages. I like the use of it for energy font, but I also want the six piece bonus. This leaves me unable to proc it for damage, which I think I can live with. Arcane Bolt - I think this is more useful leveling up than it would be in this final build, and that Fossilize and Stone Prison can probably take care of my ST needs, but it's easier to remove than to add so I put it in and if I decide I don't need it I'll have some room in the build to play with later on. Animate Stone - I wanted to get some of the pet auras to make it tankier, but slots are very tight in the build. Thunder Clap - I picked this up for stacking with Stalagmites to lock bosses down, but I'm not sure how valuable it will be in practice. Quicksand - I'm not sure how valuable this power with this slotting will be. Freezing Rain - I haven't tested yet how well the procs do here. Epic pool: Scorpion Shield is great, but I would love to be able to pick up Water Spout instead for the maximum of cataclysmic destruction. But it does hit some of my goals, including decent defense and recharge, and realizing some of the proc potential of the sets. Hero Plan by Mids' Reborn : Hero Designer 2.6.0.3 https://github.com/ImaginaryDevelopment/imaginary-hero-designer Click this DataLink to open the build! Level 50 Mutation Controller Primary Power Set: Earth Control Secondary Power Set: Storm Summoning Power Pool: Leadership Power Pool: Sorcery Power Pool: Fighting Power Pool: Speed Ancillary Pool: Mace Mastery Hero Profile: Level 1: Fossilize -- GhsWdwEmb-Acc/EndRdx(A), NrnSht-Acc/EndRdx(5), GhsWdwEmb-Dam%(7), NrnSht-Dam%(7), UnbCns-Dam%(9), GldNet-Dam%(11) Level 1: Gale -- Acc-I(A), FrcFdb-Rechg%(9), Range-I(11) Level 2: Stone Prison -- Dcm-Acc/Dmg(A), Dcm-Dmg/EndRdx(13), Dcm-Dmg/Rchg(13), Dcm-Acc/EndRdx/Rchg(15), Dcm-Acc/Dmg/Rchg(15) Level 4: Stone Cages -- SprOvrPrs-Acc/Conf/Hold/Immob/Sleep/Stun/Fear(A), SprOvrPrs-Conf/Hold/Immob/Sleep/Stun/Fear/Rchg(17), SprOvrPrs-EndRdx/Rchg(17), SprOvrPrs-Acc/Conf/Hold/Immob/Sleep/Stun/Fear/EndRdx(19), SprOvrPrs-Acc/Conf/Hold/Immob/Sleep/Stun/Fear/EndRdx/Rchg(48), SprOvrPrs-Rchg/Energy Font(50) Level 6: Quicksand -- ImpSwf-Dam%(A) Level 8: Maneuvers -- LucoftheG-Def/Rchg+(A), Rct-Def(19), Rct-Def/EndRdx(21), Rct-ResDam%(50) Level 10: Steamy Mist -- LucoftheG-Def/Rchg+(A), ShlWal-ResDam/Re TP(21), LucoftheG-Def(23), UnbGrd-Max HP%(23), StdPrt-ResDam/Def+(25), GldArm-3defTpProc(25) Level 12: Arcane Bolt -- Apc-Dmg/Rchg(A), Apc-Acc/Dmg/Rchg(27), Apc-Acc/Rchg(27), Apc-Dmg/EndRdx(29), Apc-Dam%(29) Level 14: Stalagmites -- AbsAmz-Stun/Rchg(A), AbsAmz-Acc/Stun/Rchg(31), AbsAmz-Acc/Rchg(31), AbsAmz-EndRdx/Stun(33), AbsAmz-ToHitDeb%(37) Level 16: Freezing Rain -- Ann-ResDeb%(A), AchHee-ResDeb%(31), TchofLadG-%Dam(33) Level 18: Earthquake -- AchHee-ResDeb%(A) Level 20: Hurricane -- HO:Enzym(A) Level 22: Tactics -- HO:Cyto(A) Level 24: Boxing -- Empty(A) Level 26: Volcanic Gasses -- SprWiloft-Acc/Conf/Hold/Immob/Sleep/Stun/Fear(A), SprWiloft-Conf/Hold/Immob/Sleep/Stun/Fear/Rchg(34), SprWiloft-EndRdx/Rchg(34), SprWiloft-Acc/Conf/Hold/Immob/Sleep/Stun/Fear/EndRdx(36), SprWiloft-Acc/Conf/Hold/Immob/Sleep/Stun/Fear/EndRdx/Rchg(36), SprWiloft-Rchg/Dmg%(50) Level 28: Thunder Clap -- Stp-Acc/Rchg(A), Stp-EndRdx/Stun(33), Stp-Acc/EndRdx(36), Stp-Stun/Rng(37), Stp-Acc/Stun/Rchg(37) Level 30: Tough -- RctArm-ResDam/EndRdx(A), RctArm-ResDam/Rchg(39), RctArm-ResDam/EndRdx/Rchg(39), RctArm-ResDam(39), StdPrt-ResKB(42) Level 32: Animate Stone -- OvrFrc-Dam/KB(A), SlbAll-Acc/Rchg(34), SlbAll-Dmg(40), SlbAll-Build%(40) Level 35: Tornado -- SlbAll-Dmg/Rchg(A), SlbAll-Dmg/EndRdx(42), SlbAll-Acc/Dmg/Rchg(42), SuddAcc--KB/+KD(43), FrcFdb-Rechg%(43) Level 38: Lightning Storm -- SprWntBit-Dmg/EndRdx/Acc/Rchg(A), GldJvl-Dam%(40), SprWntBit-Acc/Dmg/Rchg(43), SprWntBit-Acc/Dmg/EndRdx(45), SuddAcc--KB/+KD(45), FrcFdb-Rechg%(45) Level 41: Scorpion Shield -- LucoftheG-Def/Rchg+(A), RedFrt-Def(46), RedFrt-Def/EndRdx(46) Level 44: Weave -- LucoftheG-Def/Rchg+(A), RedFrt-Def(46), RedFrt-Def/EndRdx(48) Level 47: Hasten -- RechRdx-I(A), RechRdx-I(48) Level 49: Vengeance -- LucoftheG-Def/Rchg+(A) Level 1: Brawl -- Empty(A) Level 1: Containment Level 1: Prestige Power Dash -- Empty(A) Level 1: Prestige Power Slide -- Empty(A) Level 1: Prestige Power Quick -- Empty(A) Level 1: Prestige Power Rush -- Empty(A) Level 1: Prestige Power Surge -- Empty(A) Level 1: Sprint -- Empty(A) Level 2: Rest -- Empty(A) Level 4: Ninja Run Level 2: Swift -- Empty(A) Level 2: Health -- Pnc-Heal/+End(A), NmnCnv-Regen/Rcvry+(3), Mrc-Rcvry+(3) Level 2: Hurdle -- Empty(A) Level 2: Stamina -- PrfShf-End%(A), PrfShf-EndMod(5) ------------ Scrap
-
But this is true of all three of the sets the OP asked about, so it may not be very useful as a way to help differentiate among them. Scrap
-
I'd be interested to hear how it plays!
-
Yeah, Cloak of Fear definitely wants investment if you're going to take it. It costs the same as Death Shroud and I wanted the slots elsewhere so I didn't take it. Oh, I don't wait until 50 to start slotting critical pieces. The Steadfast Protection knockback protection IO (or Karma or whichever I have handy) goes in very early. I also don't usually level with my endgame builds. When leveling I take powers as I need them, in part because attack chains often need more attacks while leveling than later on, and in part because it gives me the opportunity to try out powers I don't have much experience with or don't like much to make sure I am making informed decisions about them. I took Acrobatics on my fire tanker while leveling to handle knockback, for example. I won't do that for this character, because she already has the kb protection IO slotted. One reason I was interested in this combo was the endurance discount buff that savage melee gives. So far it seems to help a lot - I run the three armors, and Death Shroud and don't have end problems yet running TFs in teams. I'm worried about my Dark Regeneration slotting - the set I'm using only brings it down to 22.54 end cost, but the chance for +Endurance proc in it can help with that. It just means I'll need ~20 end to use the ability, depending on how many stacks of savage melee buff I have at the time. Anyway, it's fun and effective so far. Scrap
-
I am skeptical of this old wisdom, especially given the current fury mechanics and the fury ATO. I don't yet know but suspect that if you put the fury generation ATO in Death Shroud that you will have no problems with fury management or stealth. Even if you don't buy my argument, Cloak of Fear provides a tohit debuff to enemies it hits, so at worst it gives you a choice - you can keep it off to keep your fury high and stay in damage mode, or toggle it on if you find yourself taking more damage than you expected from the content you're running. I'm also a proponent of Cloak of Darkness: it provides defense equal to Weave, and so enables dark to build up to softcaps much more easily than other sets. You're ignoring Dark Regeneration, which is a very strong heal. Here's the build I sketeched out for my sav/dark brute: Villain Plan by Mids' Reborn : Hero Designer 2.6.0.2 https://github.com/ImaginaryDevelopment/imaginary-hero-designer Click this DataLink to open the build! Level 50 Magic Brute Primary Power Set: Savage Melee Secondary Power Set: Dark Armor Power Pool: Leaping Power Pool: Fighting Power Pool: Leadership Power Pool: Speed Ancillary Pool: Energy Mastery Villain Profile: Level 1: Maiming Slash -- KntCmb-Acc/Dmg(A), KntCmb-Dmg/EndRdx(3), KntCmb-Dmg/Rchg(3), KntCmb-Dmg/EndRdx/Rchg(5), CrsImp-Acc/Dmg(5) Level 1: Dark Embrace -- UnbGrd-ResDam(A), UnbGrd-ResDam/EndRdx(7), UnbGrd-ResDam/EndRdx/Rchg(7), UnbGrd-Max HP%(9), StdPrt-ResDam/Def+(48), StdPrt-ResKB(50) Level 2: Shred -- SprAvl-Dmg/EndRdx(A), SprAvl-Acc/Dmg/EndRdx(9), SprAvl-Acc/Dmg/Rchg(11), SprAvl-Acc/Dmg/EndRdx/Rchg(11), SprAvl-Rchg/KDProc(13) Level 4: Death Shroud -- SprBrtFur-Acc/Dmg(A), SprBrtFur-Dmg/Rchg(13), SprBrtFur-Acc/Dmg/Rchg(15), SprBrtFur-Dmg/EndRdx/Rchg(15), SprBrtFur-Acc/Dmg/EndRdx/Rchg(48), SprBrtFur-Rech/Fury(50) Level 6: Blood Thirst -- GssSynFr--Build%(A), RechRdx-I(19) Level 8: Vicious Slash -- Hct-Dmg/Rchg(A), Hct-Acc/Dmg/Rchg(21), Hct-Acc/Rchg(21), Hct-Dmg/EndRdx(23), Hct-Dam%(23) Level 10: Obsidian Shield -- GldArm-ResDam(A), GldArm-End/Res(25), GldArm-Res/Rech/End(25), GldArm-3defTpProc(27) Level 12: Combat Jumping -- LucoftheG-Def/Rchg+(A), Rct-ResDam%(27), ShlWal-ResDam/Re TP(29) Level 14: Murky Cloud -- Ags-ResDam/EndRdx(A), Ags-ResDam/Rchg(29), Ags-ResDam/EndRdx/Rchg(31), Ags-ResDam(31) Level 16: Dark Regeneration -- ThfofEss-Heal(A), ThfofEss-Heal/Rchg(31), ThfofEss-Acc/Heal(33), ThfofEss-Acc/EndRdx/Heal(33), ThfofEss-Acc/EndRdx/Rchg(33), ThfofEss-+End%(34) Level 18: Rending Flurry -- Obl-Dmg(A), Obl-Acc/Rchg(34), Obl-Dmg/Rchg(34), Obl-Acc/Dmg/Rchg(36), Obl-Acc/Dmg/EndRdx/Rchg(36), Obl-%Dam(48) Level 20: Cloak of Darkness -- LucoftheG-Def/Rchg+(A), RedFrt-Def(36), RedFrt-Def/EndRdx(37) Level 22: Boxing -- Empty(A) Level 24: Tough -- Ags-ResDam/EndRdx(A), Ags-ResDam/Rchg(37), Ags-ResDam/EndRdx/Rchg(37), Ags-ResDam(39) Level 26: Hemorrhage -- SprBlsCol-Dmg/EndRdx(A), SprBlsCol-Acc/Dmg/EndRdx(39), SprBlsCol-Acc/Dmg/Rchg(39), SprBlsCol-Dmg/EndRdx/Acc/Rchg(40), SprBlsCol-Rchg/HoldProc(40) Level 28: Weave -- LucoftheG-Def/Rchg+(A), RedFrt-Def(40), RedFrt-Def/EndRdx(42) Level 30: Maneuvers -- LucoftheG-Def/Rchg+(A), RedFrt-Def(42), RedFrt-Def/EndRdx(42) Level 32: Savage Leap -- SprUnrFur-Acc/Dmg(A), SprUnrFur-Dmg/Rchg(43), SprUnrFur-Acc/Dmg/Rchg(43), SprUnrFur-Dmg/EndRdx/Rchg(43), SprUnrFur-Acc/Dmg/EndRdx/Rchg(45), SprUnrFur-Rchg/+Regen/+End(45) Level 35: Superior Conditioning -- PrfShf-End%(A) Level 38: Tactics -- EndRdx-I(A) Level 41: Physical Perfection -- PrfShf-End%(A) Level 44: Energy Torrent -- SprFrzBls-Dmg/EndRdx(A), SprFrzBls-Acc/Dmg/EndRdx(45), SprFrzBls-Acc/Dmg/Rchg(46), SprFrzBls-Dmg/EndRdx/Acc/Rchg(46), SprFrzBls-Rchg/ImmobProc(46) Level 47: Vengeance -- LucoftheG-Def/Rchg+(A) Level 49: Hasten -- RechRdx-I(A), RechRdx-I(50) Level 1: Brawl -- Empty(A) Level 1: Prestige Power Dash -- Empty(A) Level 1: Prestige Power Slide -- Empty(A) Level 1: Prestige Power Quick -- Empty(A) Level 1: Prestige Power Rush -- Empty(A) Level 1: Prestige Power Surge -- Empty(A) Level 1: Fury Level 1: Sprint -- Empty(A) Level 2: Rest -- Empty(A) Level 4: Ninja Run Level 2: Swift -- Empty(A) Level 2: Health -- Pnc-Heal/+End(A), NmnCnv-Regen/Rcvry+(17), Mrc-Rcvry+(17) Level 2: Hurdle -- Empty(A) Level 2: Stamina -- PrfShf-End%(A), PrfShf-EndMod(19) Level 1: Blood Frenzy ------------ Scrap
-
Helen is right. Here's the ParagonWiki link: https://paragonwiki.com/wiki/Exemplar_Effects_on_Enhancements Under the Set Bonuses header: This aspect of the game is commonly misunderstood. I read this article a lot and I still forget some of the wrinkles because it's stupidly complicated what you lose when, and what the exceptions are. But set bonuses are remarkably durable if you use attuned sets and purples. It's a hidden advantage to building up to the defense softcap from nothing - the parts of your defense that come from set bonuses are yours to keep, even if the parts that come from powers aren't available any more. Having 30% defense at low level is really strong, especially if that's not your only layer of defense. Scrap
-
That's how I use Rage on my Rad/SS tanker - something for when I'm fighting normal spawns, and something to avoid when I know an AV encounter is coming up. That way I can choose between high defense, low offense, or moderate offense with a defense crash coming up. But as a tanker there's plenty to do during the crash, too - taunt, hand clap - that still feels productive. So I want to try it out on this brute for the sake of seeing how it plays.
-
Yeah, positions are hard to build for if your native defenses don't offer them. Types are much easier, and I agree - SLFC are easy, and E/NE are noticeably harder. The big exception to rare positional bonuses I think is melee, so I sometimes try to softcap it alongside S/L because it feels like a way to encapsulate the vast majority of threats a brute faces without tackling the impossible task of softcapping all positions or S/L/E/NE/F from scratch. Anyway, you'll see that my build below comes out very similar in defense holes to what you're describing: strong to SL, melee defense picking up a lot of the other types, and weak to ranged E/NE/C and supine before psi. Here's where my first pass landed. As I predicted, my current rut has me at defense softcap to SL and melee, and 79.5% SL res, and a pretty haggard 61.3% global recharge before Hasten. I do have four force feedback procs in there, though, so ... maybe it'd be okay on recharge? I think I'll need to test on Justin before tweaking. Notable build quirks in my version: I take hand clap because I love it with a knockback converter in it. I get a ton of mileage out of this on my tankers, and probably it's not as useful on a brute, but I plan to find out, at least. Plus this slotting provides some kb protection and a force feedback proc. Those who disagree with my priorities could easily replace this with an attack and get another purple set in here. I took Rage, mainly to figure out once and for all if I can ditch it. I know I can live without it, but I want to see how rough the crash is on this build before abandoning it entirely. My FC def, at 21%, could probably only handle +2 fire farms at best. No noticeable tox or psi def, fairly weak to E and NE. I broke up the Brute's Fury set and made sure the proc was in Blazing Aura because it takes fury management completely out of my hands, which is where I prefer it these days. I took Darkest Night as a way of extending my EHP when called for. Scrap Villain Plan by Mids' Reborn : Hero Designer 2.6.0.2 https://github.com/ImaginaryDevelopment/imaginary-hero-designer Click this DataLink to open the build! Level 50 Magic Brute Primary Power Set: Super Strength Secondary Power Set: Fiery Aura Power Pool: Fighting Power Pool: Leaping Power Pool: Leadership Power Pool: Speed Ancillary Pool: Soul Mastery Villain Profile: Level 1: Punch -- KntCmb-Acc/Dmg(A), KntCmb-Dmg/EndRdx(3), KntCmb-Dmg/Rchg(5), KntCmb-Dmg/EndRdx/Rchg(5), CrsImp-Acc/Dmg/EndRdx(7) Level 1: Fire Shield -- UnbGrd-ResDam(A), UnbGrd-ResDam/EndRdx(7), UnbGrd-Rchg/ResDam(9), UnbGrd-ResDam/EndRdx/Rchg(9) Level 2: Haymaker -- SprBrtFur-Dmg/Rchg(A), SprBrtFur-Acc/Dmg/Rchg(11), SprBrtFur-Dmg/EndRdx/Rchg(11), TchofDth-Acc/Dmg/EndRdx(13), TchofDth-Dam%(13), FrcFdb-Rechg%(36) Level 4: Blazing Aura -- SprBrtFur-Acc/Dmg(A), SprBrtFur-Acc/Dmg/EndRdx/Rchg(15), SprBrtFur-Rech/Fury(15), Mlt-Dmg/EndRdx(17), Mlt-Acc/Dmg/EndRdx(17), Mlt-Dmg/EndRdx/Rchg(19) Level 6: Hand Clap -- KntCrs-Acc/KB(A), KntCrs-Rchg/KB(19), KntCrs-Rechg/EndRdx(21), KntCrs-Acc/Dmg/KB(21), SuddAcc--KB/+KD(23), FrcFdb-Rechg%(23) Level 8: Knockout Blow -- SprBlsCol-Dmg/EndRdx(A), SprBlsCol-Acc/Dmg/EndRdx(25), SprBlsCol-Acc/Dmg/Rchg(25), SprBlsCol-Dmg/EndRdx/Acc/Rchg(27), SprBlsCol-Rchg/HoldProc(27), FrcFdb-Rechg%(29) Level 10: Healing Flames -- Prv-Heal(A), Prv-Heal/EndRdx(29), Prv-EndRdx/Rchg(31), Prv-Heal/Rchg(31), Prv-Heal/Rchg/EndRdx(31), Prv-Absorb%(33) Level 12: Boxing -- Empty(A) Level 14: Tough -- UnbGrd-ResDam(A), UnbGrd-ResDam/EndRdx(33), UnbGrd-Rchg/ResDam(33), UnbGrd-Max HP%(34) Level 16: Plasma Shield -- UnbGrd-ResDam(A), UnbGrd-ResDam/EndRdx(34), UnbGrd-Rchg/ResDam(34), UnbGrd-ResDam/EndRdx/Rchg(36) Level 18: Rage -- RechRdx-I(A) Level 20: Consume -- MckBrt-Taunt(A), MckBrt-Taunt/Rchg(36), MckBrt-Taunt/Rchg/Rng(37), MckBrt-Acc/Rchg(37), MckBrt-Taunt/Rng(37), MckBrt-Rchg(39) Level 22: Weave -- LucoftheG-Def/Rchg+(A), RedFrt-Def(39), RedFrt-Def/EndRdx(39) Level 24: Combat Jumping -- LucoftheG-Def/Rchg+(A), ShlWal-ResDam/Re TP(40), Rct-ResDam%(40) Level 26: Temperature Protection -- StdPrt-ResDam/Def+(A), StdPrt-ResKB(40), GldArm-3defTpProc(42) Level 28: Burn -- SprUnrFur-Acc/Dmg(A), SprUnrFur-Dmg/Rchg(42), SprUnrFur-Acc/Dmg/Rchg(42), SprUnrFur-Dmg/EndRdx/Rchg(43), SprUnrFur-Acc/Dmg/EndRdx/Rchg(43), SprUnrFur-Rchg/+Regen/+End(43) Level 30: Maneuvers -- LucoftheG-Def/Rchg+(A), RedFrt-Def(45), RedFrt-Def/EndRdx(45) Level 32: Foot Stomp -- SprAvl-Dmg/EndRdx(A), SprAvl-Acc/Dmg/EndRdx(45), SprAvl-Acc/Dmg/Rchg(46), SprAvl-Acc/Dmg/EndRdx/Rchg(46), SprAvl-Rchg/KDProc(46), FrcFdb-Rechg%(48) Level 35: Fiery Embrace -- RechRdx-I(A) Level 38: Gloom -- Apc-Dmg/Rchg(A), Apc-Acc/Dmg/Rchg(48), Apc-Acc/Rchg(48), Apc-Dmg/EndRdx(50), Apc-Dam%(50) Level 41: Darkest Night -- EndRdx-I(A) Level 44: Assault -- EndRdx-I(A) Level 47: Vengeance -- LucoftheG-Def/Rchg+(A) Level 49: Hasten -- RechRdx-I(A), RechRdx-I(50) Level 1: Brawl -- Empty(A) Level 1: Prestige Power Dash -- Empty(A) Level 1: Prestige Power Slide -- Empty(A) Level 1: Prestige Power Quick -- Empty(A) Level 1: Prestige Power Rush -- Empty(A) Level 1: Prestige Power Surge -- Empty(A) Level 1: Fury Level 1: Sprint -- Empty(A) Level 2: Rest -- Empty(A) Level 4: Ninja Run Level 2: Swift -- Empty(A) Level 2: Health -- Pnc-Heal/+End(A), NmnCnv-Regen/Rcvry+(3) Level 2: Hurdle -- Empty(A) Level 2: Stamina -- PrfShf-End%(A) Level 50: Agility Radial Paragon ------------
-
Thanks for posting. I need to revise my own SS/fire plan because I'm having a lot of fun playing mine, so this is the kick in the butt I needed. Here are my thoughts on your build based on my own experiences: You don't have any force feedback procs in your attacks. The ability to proc it reliably is a big strength of SS and I'd work hard to find a way to get it in there. You're six slotting two of the purple sets, but I don't know how much value the sixth slots are because of the low final amounts of toxic and psi res that you wound up with. Did you consider splitting up Superior Brute's Fury into two separate powers so you can double up on the 3 piece bonus? I mention it just because, given where your SL defense is right now, you could cap it by doing so. It would cost, of course, but 10% SL def from 6 slots is a lot of bang for buck and I usually try to find a way to do it on my brutes. Those are my immediate thoughts. I think what you have so far will be very playable as-is and my suggestions are just tweaks around the margins. I'll spend a little time working on my own build from scratch this afternoon, and if any massive insights hit me, I'll post here. My builds typically go higher in def and res than you have at the expense of recharge, though, so I'm not confident that I'll get any meaningful improvements over what you have, just tradeoffs. Scrap
-
I think, given the constraints supplied (no building for defense), that your remaining options are: Build for regen: this is the option you have taken with the build you just posted. I always have a hard time with this approach since sets like WP and Bio do it better. I sometimes make decisions out of bitterness and am glad smarter people don't. Build for global recharge: basically the idea is to maximize the value of your click powers on lower level content. Build for resistance: potentially violates the "don't want to build an armored scrapper" sentiment you expressed early in the thread, and has lower EHP returns than building for defense, so I think it's a weak option. Given those potential approaches, I think fighting pool only makes sense if it mules sets you want or if you decide to go for option 3 and want Tough and maybe Weave as an SL res mule to help. I'm very interested in how 1 vs. 2 would play out, but the only regen project I've managed to even plan adequately is a DM/regen at the SL softcap, and even that was a pretty depressing exercise for me, so take me with a grain of salt 😉 Scrap
-
Same here. Slotted in Healing Flames, but acts exactly the way the proc description says: i.e. small chance to fire periodically until you get to very low health, then guaranteed chance to fire. I have never seen it fire when I activated Healing Flames. This is convenient because the six piece bonus of the set is very nice and can give you a big recharge bonus when you're saturated with 10%, 5%, and 7.5% bonuses. Scrap
-
Vee also asked a significant question the other night: How long does the proc period last after you use the power it's slotted in? It's a really good question, and I have been trying to figure out a way to test without much success. It's definitely long enough that I can skip using the power it's in for a few rotations if I'm on an iTrial and have a ton of recharge and get lucky with procs (which means I'm doing BU > Moonbeam a lot more than usual and so can drop an attack out of my rotation) and still see the proc triggering. I feel like it's at least 10 seconds, and maybe closer to 15, but I don't know for sure, and it's really hard to measure when an invisible effect like this expires. Are you screwing yourself over? I guess you'll know better than we will. There will be times when BU fires non-advantageously, and you'll probably notice it. How often is that? Does it keep you from using it when you want it? If so, I guess the answer is "yes." For me, on my kinetic stalker, the ideal is to build up into an assassin strike which triggers the hide proc and then mash Concentrated Strike while the BU is still in effect so that it recharges BU, then hit BU again and fire moonbeam and then drop back into my normal T3 > T2 > AS > hope for hide rotation. If I had BU on autofire, it would mess with that. But I also agree with Vee: if what you're doing is working for you, then you're not screwing yourself. Play the game in a way that's fun for you. Is there a better use of autofire? It depends. For me, my priorities for autofire are: Hasten if I have it permanent or near-permanent, my status protection click power if I'm running Super Reflexes or Shield Defense, and then in really rare situations an autofire attack when I'm dual boxing. But that's because those uses have more impact than maximal build up uptime does for how I play. Scrap
-
I am fairly certain that you need to use the power it's slotted in periodically. I tested by killing 30 grey Warriors in Talos Island normally and seeing a bunch of build up resets. Then I waited a while, removed the power the ATO was slotted in from my power tray, and killed 30 more grey Warriors. There were four build up resets in the first test, and none in the second test. It's probably not conclusive, but it suggests that the slotted power at least needs to be used for the rest of them to proc the ATO. Also, despite the ATO's description, it's not just attacks from your primary that can proc it. It can proc off my snipe and my judgement as well. Scrap
-
It sounds like I've offended you. Sorry if I have.
-
I think mezzes are probably the best argument for focusing on ranged defense instead of the easier path of S/L/E enabled by Scorpion shield. The build I planned out (linked below) takes the SLE approach and I suspect that I'll encounter mez problems once I have leveled up. I haven't decided on Incarnates yet, but I suppose Clarion will be in my future. For solo AV/GM slaying, I think Storm should probably at all times carry Envenomed Blades from the P2W vendor. Scrap Villain Plan by Mids' Villain Designer 1.962 http://www.cohplanner.com/ Click this DataLink to open the build! Chilling: Level 50 Magic Corruptor Primary Power Set: Ice Blast Secondary Power Set: Storm Summoning Power Pool: Leaping Power Pool: Leadership Power Pool: Fighting Power Pool: Speed Ancillary Pool: Mace Mastery Villain Profile: Level 1: Ice Blast -- Thn-Acc/Dmg(A) Level 1: Gale -- Acc-I(A), Range-I(3), Range-I(3), SuddAcc--KB/+KD(5), FrcFdb-Rechg%(5) Level 2: Frost Breath -- Rgn-Dmg/Rchg(A), ImpSwf-Dam%(7), Rgn-Acc/Dmg/Rchg(7), Rgn-Acc/Rchg(9), Rgn-Dmg/EndRdx(9), Rgn-Knock%(11) Level 4: Snow Storm -- EndRdx-I(A) Level 6: Aim -- GssSynFr--Build%(A), RechRdx-I(11) Level 8: Freeze Ray -- Dcm-Acc/Dmg(A), Dcm-Dmg/EndRdx(13), Dcm-Dmg/Rchg(13), Dcm-Acc/EndRdx/Rchg(15), Dcm-Acc/Dmg/Rchg(15) Level 10: Steamy Mist -- LucoftheG-Def/Rchg+(A), RedFrt-Def(17), RedFrt-Def/EndRdx(17), GldArm-3defTpProc(19), StdPrt-ResDam/Def+(19), StdPrt-ResKB(21) Level 12: Ice Storm -- SprScrBls-Acc/Dmg(A), SprScrBls-Dmg/Rchg(21), SprScrBls-Acc/Dmg/EndRdx/Rchg(23), OvrFrc-Acc/Dmg(23), OvrFrc-End/Rech(25), OvrFrc-Dmg/End/Rech(25) Level 14: Combat Jumping -- LucoftheG-Def/Rchg+(A), Rct-ResDam%(27), ShlWal-ResDam/Re TP(27) Level 16: Freezing Rain -- SprScrBls-Acc/Dmg/Rchg(A), SprScrBls-Dmg/EndRdx/Rchg(29), SprScrBls-Rchg/+End(29), OvrFrc-Acc/Dmg/End(31), OvrFrc-Acc/Dmg/End/Rech(31), OvrFrc-Dam/KB(31) Level 18: Bitter Ice Blast -- Apc-Dmg/Rchg(A), Apc-Acc/Dmg/Rchg(33), Apc-Acc/Rchg(33), Apc-Dmg/EndRdx(33), Apc-Dam%(34) Level 20: Hurricane -- EndRdx-I(A), SuddAcc--KB/+KD(34) Level 22: Maneuvers -- LucoftheG-Def/Rchg+(A), RedFrt-Def(34), RedFrt-Def/EndRdx(36) Level 24: Tactics -- EndRdx-I(A) Level 26: Bitter Freeze Ray -- SprWntBit-Dmg/Rchg(A), SprWntBit-Acc/Dmg/EndRdx(36), SprWntBit-Acc/Dmg/Rchg(36), SprWntBit-Dmg/EndRdx/Acc/Rchg(37), SprWntBit-Rchg/SlowProc(37) Level 28: Assault -- EndRdx-I(A) Level 30: Boxing -- CrsImp-Acc/Dmg(A) Level 32: Blizzard -- SprMlcoft-Acc/Dmg(A), SprMlcoft-Dmg/Rchg(37), SprMlcoft-Acc/Dmg/Rchg(39), SprMlcoft-Dmg/EndRdx/Rchg(39), SprMlcoft-Acc/Dmg/EndRdx/Rchg(39), SprMlcoft-Rchg/Dmg%(40) Level 35: Tornado -- SlbAll-Dmg(A), SlbAll-Dmg/EndRdx(40), SlbAll-Acc/Rchg(40), SlbAll-Acc/Dmg/Rchg(42), SuddAcc--KB/+KD(42), FrcFdb-Rechg%(42) Level 38: Lightning Storm -- Thn-Dmg/EndRdx(A), Thn-Acc/Dmg/Rchg(43), Thn-Acc/Dmg/EndRdx(43), Thn-Dmg/EndRdx/Rchg(43), SuddAcc--KB/+KD(45), FrcFdb-Rechg%(45) Level 41: Scorpion Shield -- LucoftheG-Def/Rchg+(A), RedFrt-Def(45), RedFrt-Def/EndRdx(46) Level 44: Tough -- UnbGrd-ResDam(A), UnbGrd-ResDam/EndRdx(46), UnbGrd-Rchg/ResDam(46), UnbGrd-Max HP%(48) Level 47: Weave -- LucoftheG-Def/Rchg+(A), LucoftheG-Def(48) Level 49: Hasten -- RechRdx-I(A), RechRdx-I(50) Level 1: Brawl -- Empty(A) Level 1: Prestige Power Dash -- Empty(A) Level 1: Prestige Power Slide -- Empty(A) Level 1: Prestige Power Quick -- Empty(A) Level 1: Prestige Power Rush -- Empty(A) Level 1: Prestige Power Surge -- Empty(A) Level 1: Scourge Level 1: Sprint -- Clr-Stlth(A) Level 2: Rest -- Empty(A) Level 4: Ninja Run Level 2: Swift -- Run-I(A) Level 2: Health -- Pnc-Heal/+End(A), NmnCnv-Regen/Rcvry+(48), Mrc-Rcvry+(50) Level 2: Hurdle -- Jump-I(A) Level 2: Stamina -- PrfShf-End%(A), PrfShf-EndMod(50) ------------
-
Interesting. Do you not use Tar Patch or Freezing Rain, then? That res debuff is a 20% damage buff to any source of damage that is applied while it's up, including every other damaging power you use, and every power your team uses. I would much rather my team's defender apply that resist debuff to an AV we're fighting than a damage proc or a control proc, because the effective damage of the -res proc is going to be much higher than that of the damage proc. If the damage proc does 79 damage (unlikely against an AV, but the best case scenario), then the team would need to do only 395 damage over the lifetime of the -res proc to beat it. That's a very low bar on the level 50 teams I find myself in. Scrap
-
For what it's worth, I agree with Helen about Burn. Fiery Aura sacrifices a lot of elements of an armor set when you compare it to its peers. What it gains in return is offense, in the form of Blazing Aura, Burn, and Fiery Embrace. Taking Fiery Aura but not taking any of those three powers feels a bit to me like buying a fast car and refusing to drive it fast. I don't think anybody is saying you're wrong, Bjornalf, just that you're walking away from a potential advantage. I also think it's worthwhile to look at the builds Helen posted. I think Helen is a better builder than I am, and I personally learn a lot by seeing how different minds approach the same problem. A big part of getting good at making builds is learning different "tricks" or approaches to the problems posed by specific power sets. It's valuable to see how other people, especially accomplished builders, solve some of these problems because you can learn those tricks and adopt them for your own. Also, Helen's farming build is very similar to mine, which makes me feel good 🙂 That's a fair point. In that case, take the other ATO set out of Blazing Aura, put it into Throw Spines, and fill Blazing Aura with Obliteration. Focused Accuracy costs more than twice the endurance of Tactics and provides just under 2/3 of the tohit buff. It's a very bad deal and my guess is that it's a big part of your endurance issues. You would be much better off taking Tactics instead if you feel like you need the tohit buff. My experience suggests that you probably don't need it at all. Physical Perfection is not a great answer to endurance problems. As Helen mentioned, it provides half the regen value that the Health power does, and half the recovery value that the Stamina power does. That's why Helen says slots are worth more in those powers. A 33% heal enhancement to Health gives you more regen than a 33% heal enhancement to Physical Perfection. The exceptions to this are globals, which have the same effect no matter where they're slotted, and set bonuses, which also don't care where they're slotted. Because of that, using Physical Perfection's one free slot to get another Performance Shifter proc will do more for you than anything else you could put into it. Given that Fiery Aura has Consume, I'd say you should rely on that for your endurance issues. I do on all my Fiery Aura characters, and it works well. Consume is yet another PBAoE damage power on top of being a total solution to endurance issues every minute or so (depending on your global recharge and how the power is slotted). My only endurance management on both my 50 fire/fire tanker and my 50 spines/fire brute are Stamina, the global endurance IOs, and Consume. No, Kismet is good value for a single slot and the set can provide good bonuses for certain builds. Here's a way to consider it: Kismet provides more value than Focused Accuracy but costs no endurance. Focused Accuracy costs a pool pick, a power pick, and nearly as much endurance as all of your defensive toggles put together. If that's not a bad deal, I don't know what is. That's a big question. I'd probably start from scratch if I was to include those, because their set bonuses are so big that they really can shift around entire clusters of other sets. I usually slot those first because they have so much effective density in a build that their presence or absence alters many other decisions made about the build. I'd like to take a swing at doing that, but I'm not sure when I'll have time before next week. I'd definitely replace Ripper with Burn, but I'm not a Ripper fan generally and my build uses Burn, Throw Spines, and the two Mu powers as the AoE chain, so I have no need for Ripper. Scrap
-
Welcome back! A few resources for you: The Reconnect board is where people find old friends from way back. The Getting Started forum has posts describing how to install the game and how to create an account. The quick and dirty is that your old CDs aren't useful any more. You will download a launcher ("Tequila," assuming you're using a PC) which will download and install the game client files on your machine and will connect that client with the Homecoming game servers. There is no subscription price - the servers are maintained through donation drives that are run each month and limited according to the cost of running the servers for that month. The game requirements are quite lenient - the game can be run on what by todays standards are quite obsolete machines, mainly because... well, the machines we used back on the retail servers are quite obsolete today 😉 Again, welcome back! Scrap
-
OK, I took a quick pass at your build. I set some rules for myself based on what I infer from looking at your build: Your power picks are sacrosanct and shouldn't be altered. I broke this rule once. Slotting density reflects playstyle preferences, and so should be altered only where it serves the goal of making this brute tougher. Your build is relatively inexpensive (only one winter set as a Big Spender and two ATOs as Moderate Expenses), so I won't take the easy path of rounding out your defenses with expensive sets. These are my observations and changes: I noticed right off the bat that your defense power slotting wasn't optimal. For instance, Weave, your single best defensive power, had only two slots dedicated to making it better, while Combat Jumping, your single worst defensive power, had four. Those two could have had their slots and enhancements traded to give you no change in set bonuses but a big improvement in all your defenses. Both your ATOs were 5-slotted, which meant you were leaving 12% Smashing and Lethal resistance behind. That alone would take you from 58% and change in both to 70%, a massive change in effective hp against that type of damage. You had Throw Spines slotted with one of the many garbage Targeted AoE sets. I think you did the best you could without splurging on a purple or a winter set, but one of the strengths of ATO sets is that they go into any damage ability. Since you already knew you wanted ATOs, I moved one of the ATO sets out of Quills and into this power. That opened up Quills to host another 6-piece of the amazing Obliteration set. Your "Epic" powers were heavily slotted. I think Focused Accuracy is a trap and I think Physical Perfection is rarely worth slots. I cannibalized these slots heavily to round out some of your other powers and nab a lot of six-piece bonuses to make you tougher. You didn't have either of the global IOs that give you resist all by themselves. I took the Luck of the Gambler pieces out of Combat Jumping and instead put those two pieces into CJ and the Reactive Defenses: Defense piece in there, costing you a fraction of one percent in all your defenses but earning you 8% resist to every type with another 1.5% to S/L resistance from the Reactive Defenses 2 piece set. I put Performance Shifter procs in both Physical Perfection and Stamina, and I replaced the Regenerative Tissue proc that was in Health with the Numina's Convalescence proc. I put three of the slots I stole from your epic powers into Consume and replaced its endmod slotting with a complete collection of the amazing Mocking Beratement set. Consume generally doesn't need endmod slotting but desperately wants recharge slotting. The new version is up every 54 seconds compared to the 107 seconds in the original. I six slotted Healing Flames with Preventive Medicine - its bonuses are similar to and superior to the bonuses you were getting from Doctored Wounds and it now recharges in 12.8 seconds instead of 18.48. This is probably the single most significant improvement I made: Healing Flames is the crown jewel of Fiery Aura's mitigation scheme and having it up in roughly 2/3 the time is an enormous change. I put a slot in Kick, assuming you're going to use it as part of your attack chain. It wants more accuracy and damage with just the four Kinetic Combats in there. If it's just a mule and you don't ever use Kick, that's a slot you can have back to put in Health or Stamina or proc an attack or something. Much more could be done either by spending more money and splurging on purple sets and winter sets, and also by making some power choice changes. Speaking of power choices: no Burn??? It's one of the reasons to take Firey Aura. I'd probably take it instead of Ripper, tbh. I'm less astonished by the lack of Build Up, but even on a Brute I like having a way to spike my toHit when some irritating enemy drops a big defense buff or a tohit debuff. Edit: oh, and I removed Mystic Flight and put Hasten in there. It's not great because the build doesn't have enough recharge to make it permanent, but you already had Super Jump and two travel powers feels like a very expensive luxury you can't really afford, given your stated goals. Hasten isn't a lot better, but if you do decide to tweak the build to be more expensive, you could make it both more durable AND with a lot of recharge, when Hasten would (with another slot) become close to permanent and would enable you to do something like leaving Kick out of your attack chain and so on. And I haven't looked at all at what kind of attack chain this build will leave you with, assuming that you are content with the chain you have. Here is what I came up with: Villain Plan by Mids' Villain Designer 1.962 http://www.cohplanner.com/ Click this DataLink to open the build! Hellfire Razorback: Level 50 Magic Brute Primary Power Set: Spines Secondary Power Set: Fiery Aura Power Pool: Leaping Power Pool: Leadership Power Pool: Fighting Power Pool: Speed Ancillary Pool: Energy Mastery Villain Profile: Level 1: Lunge -- KntCmb-Acc/Dmg(A), KntCmb-Dmg/EndRdx(3), KntCmb-Dmg/Rchg(3), KntCmb-Dmg/EndRdx/Rchg(5) Level 1: Fire Shield -- Ags-Psi/Status(A), Ags-ResDam/EndRdx(5), Ags-EndRdx/Rchg(7), Ags-ResDam/EndRdx/Rchg(7), Ags-ResDam(9) Level 2: Blazing Aura -- SprUnrFur-Rchg/+Regen/+End(A), SprUnrFur-Acc/Dmg/EndRdx/Rchg(9), SprUnrFur-Dmg/EndRdx/Rchg(11), SprUnrFur-Acc/Dmg/Rchg(11), SprUnrFur-Acc/Dmg(13), SprUnrFur-Dmg/Rchg(13) Level 4: Combat Jumping -- LucoftheG-Def/Rchg+(A), Rct-ResDam%(15), ShlWal-ResDam/Re TP(17), Rct-Def(17) Level 6: Spine Burst -- SprAvl-Rchg/KDProc(A), SprAvl-Acc/Dmg/EndRdx/Rchg(19), SprAvl-Acc/Dmg/Rchg(19), SprAvl-Acc/Dmg/EndRdx(21), SprAvl-Acc/Dmg(21) Level 8: Healing Flames -- Prv-Heal(A), Prv-Heal/EndRdx(23), Prv-EndRdx/Rchg(23), Prv-Heal/Rchg(25), Prv-Heal/Rchg/EndRdx(25), Prv-Absorb%(27) Level 10: Maneuvers -- LucoftheG-Def/Rchg+(A), LucoftheG-Def(27), LucoftheG-Def/EndRdx(29) Level 12: Temperature Protection -- GldArm-3defTpProc(A), StdPrt-ResDam/Def+(29), UnbGrd-Max HP%(31), UnbGrd-ResDam(31), UnbGrd-Rchg/ResDam(31) Level 14: Impale -- Apc-Dam%(A), Apc-Acc/Dmg/Rchg(33), Apc-Acc/Rchg(33), Apc-Dmg/Rchg(33), Apc-Dmg/EndRdx(34) Level 16: Plasma Shield -- UnbGrd-ResDam/EndRdx/Rchg(A), UnbGrd-EndRdx/Rchg(34), UnbGrd-ResDam/EndRdx(34), UnbGrd-ResDam(36) Level 18: Quills -- Obl-Dmg(A), Obl-Acc/Rchg(36), Obl-Dmg/Rchg(36), Obl-Acc/Dmg/Rchg(37), Obl-Acc/Dmg/EndRdx/Rchg(37), Obl-%Dam(37) Level 20: Consume -- MckBrt-Taunt(A), MckBrt-Taunt/Rchg(39), MckBrt-Taunt/Rchg/Rng(39), MckBrt-Acc/Rchg(48), MckBrt-Taunt/Rng(50), MckBrt-Rchg(50) Level 22: Kick -- KntCmb-Acc/Dmg(A), KntCmb-Dmg/EndRdx/Rchg(39), KntCmb-Dmg/EndRdx(40), KntCmb-Dmg/Rchg(40), CrsImp-Acc/Dmg(50) Level 24: Tough -- RctArm-ResDam(A), RctArm-EndRdx(40), RctArm-ResDam/EndRdx(42), RctArm-ResDam/EndRdx/Rchg(42) Level 26: Weave -- LucoftheG-Def/Rchg+(A), LucoftheG-Def/EndRdx(42), LucoftheG-Def(43) Level 28: Ripper -- Obl-Acc/Dmg/EndRdx/Rchg(A), Obl-%Dam(43), Obl-Dmg(43), Obl-Acc/Rchg(45), Obl-Acc/Dmg/Rchg(45), Obl-Dmg/Rchg(45) Level 30: Super Jump -- BlsoftheZ-ResKB(A) Level 32: Throw Spines -- SprBrtFur-Acc/Dmg(A), SprBrtFur-Dmg/Rchg(46), SprBrtFur-Acc/Dmg/Rchg(46), SprBrtFur-Dmg/EndRdx/Rchg(46), SprBrtFur-Acc/Dmg/EndRdx/Rchg(48), SprBrtFur-Rech/Fury(48) Level 35: Fiery Embrace -- RechRdx-I(A) Level 38: Rise of the Phoenix -- RechRdx-I(A) Level 41: Assault -- EndRdx-I(A) Level 44: Focused Accuracy -- AdjTrg-ToHit/EndRdx(A) Level 47: Physical Perfection -- PrfShf-End%(A) Level 49: Hasten -- RechRdx-I(A) Level 1: Brawl -- Empty(A) Level 1: Prestige Power Dash -- Empty(A) Level 1: Prestige Power Slide -- Empty(A) Level 1: Prestige Power Quick -- Empty(A) Level 1: Prestige Power Rush -- Empty(A) Level 1: Prestige Power Surge -- Empty(A) Level 1: Fury Level 1: Sprint -- Empty(A) Level 2: Rest -- Empty(A) Level 4: Ninja Run Level 2: Swift -- Run-I(A) Level 2: Health -- Pnc-Heal/+End(A), Mrc-Rcvry+(15) Level 2: Hurdle -- Jump-I(A) Level 2: Stamina -- PrfShf-End%(A) ------------ ------------ Set Bonus Totals: 18% DamageBuff(Smashing) 18% DamageBuff(Lethal) 18% DamageBuff(Fire) 18% DamageBuff(Cold) 18% DamageBuff(Energy) 18% DamageBuff(Negative) 18% DamageBuff(Toxic) 18% DamageBuff(Psionic) 32.56% Defense(Smashing) 32.56% Defense(Lethal) 13.81% Defense(Fire) 13.81% Defense(Cold) 7.25% Defense(Energy) 7.25% Defense(Negative) 6% Defense(Psionic) 34.75% Defense(Melee) 6.63% Defense(Ranged) 12.25% Defense(AoE) 1.8% Max End 18% Enhancement(Accuracy) 8.75% Enhancement(Max EnduranceDiscount) 68.75% Enhancement(RechargeTime) 7.5% SpeedFlying GrantPower Preventive Medicine (10% chance, if Scourge) 309.2 HP (20.63%) HitPoints 7.5% JumpHeight 7.5% SpeedJumping Knockback (Mag -4) Knockup (Mag -4) MezResist(Confused) 92.5% MezResist(Held) 92.5% MezResist(Immobilized) 92.5% MezResist(Sleep) 92.5% MezResist(Stunned) 92.5% MezResist(Terrorized) 92.5% 8% (0.13 End/sec) Recovery 52% (3.25 HP/sec) Regeneration 15% ResEffect(SpeedFlying) 15% ResEffect(RechargeTime) 15% ResEffect(SpeedRunning) 32% Resistance(Smashing) 32% Resistance(Lethal) 23% Resistance(Fire) 23% Resistance(Cold) 15.5% Resistance(Energy) 15.5% Resistance(Negative) 5% Resistance(Toxic) 0% Resistance(Smashing) 0% Resistance(Lethal) 0% Resistance(Fire) 0% Resistance(Cold) 0% Resistance(Energy) 0% Resistance(Negative) 0% Resistance(Toxic) 0% Resistance(Psionic) 10% Resistance(Psionic) 7.5% SpeedRunning 1 Null | Copy & Paste this data into Mids' Reborn to view the build | |-------------------------------------------------------------------| |MxDz;1452;680;1360;HEX;| |78DA6594DB4E5341148667B7BB20A5A52DA77286163915282DE0B551010DD204E10| |16A85A16CA9D0B49088773E85374601F5D63B8FD107D018F5017C004FA089E778A8| |6BEFFF1749BAD3E6DBF3AFC3CC5A33B35317277CB74F5E3EAA8CEA13B94CB1983E5| |ED858D79E54266B2DB89552B5A7742EB7641574D75CE6D25AE15C6661A5D2961DB7| |744AE7B48ECFE7AD555D6C8234A197F46A51C7A72C5DD84C1FDB2864946F766D2D1| |79FD119F1CB06FE0D1675A1B86CE5FDCE78CACA2EAF8BD5EB8CE6F35A2F364FE6AD| |85F8E4AA2E6437D3A94C71DDCEE7CCD1240BE891FF935EC5A7E456B382A8A95C67C| |839D09C07EFD86E86E36BAA23F292145B42D86EAA8A518C2BC6C043E3E05D3B0431| |1E2364C21604BD01B206F4F9483FD8285D7223D6ED6E40BE9A4F6E87C1D3E41EF85| |4EAF0A00ED3B38DF8DA2DF23A587F8DBC0ADE13EF4AC4782A5F234FE31BF22DD8F4| |8E7C0FB6EC822109ACC2DA5C555C5B4B3DD81604EF8BB59AFDAA1E455C5B18FDEAF| |88171C767F21BF84CEAF0B30E7FD2E5685D7172841C062309F0817807D8A7C077E4| |897C25BF80DD9CE7B9E40F713F423F11DFFD8BFC0D1EFE43964885D8871255E71C8| |092A76E19B65E8B3C0F8EAC80C91C79017449BF1A585703CF592FCF551FCF5B1FCF| |5BF2AC7262DC1213665DE1A8BCF4894F3738D0414640537C9BB91FCDDC8F01EE438| |CFBF2426A6FE57EB7B2B6186B8BB11743ECC5107B30C49E84257F3BF2ABF657D05E| |4ABE4EF6B2730B7986B7C91DF206387293BC053EB24BC55A547410F53EE69DB4B51| |E6AB5326F3FE7ED8F40F386941AA436B883B5F8448B538B5F811695D804B504F3B5| |99FBF75D7EF2A858999228539265CA5899325EA64C99FBDF8BD24C9975D6A45114C| |351AA82CADE0DC77FD7BBFFDD50C630D6FEE1BF661811F4B1661AF769EFA07F3FFC| |3F1ED4D893BF76FAE38E| |-------------------------------------------------------------------| Please let me know if you have questions or comments. I am definitely not an elite builder, but I'm slowly getting a handle on some of the common problems and ways to address them. HelenCarnate or some of the other, more sophisticated minds around here might have bettter ideas. Scrap
-
Fire's status holes are against knock* effects and, depending on what you consider to be a hole, against immobilizes. Holds, Stun/Disorients, and Sleeps are not a problem for Fiery Aura. I don't know why you think the set has no protection to those effects, but it does. OP: I made compromises with my spines/fire brute so that it could afk farm but also handle itself on teams in standard content - I mainly run TFs and iTrials. I haven't finished purpling my winter sets yet, but the build already meets both of my goals to my standards. For the sake of comparison, I have attached the mitigation totals, which Pines under-reports - I'll grab an in-game screenshot for you once I am back home which show the actual totals for a point of reference. I do just fine when I get separated from my allies in speed ITFs or Lambda runs or whatever. It's also a team-friendly build in the sense that any buff, even a small one, is a big help, so nearly any team makes the character quite durable, and in those circumstances I can main tank just fine against big threats. Against your average spawn, no buffs are required to absorb the alpha. If I were building it over again, I'd probably accept somewhat lower F/C defense if it meant an equivalent increase S/L or E/N defense, but the character performs its main job well and is fun and very playable at its secondary function, so I'm not pursuing tweaks right now. If I were building it explicitly not to farm, it would be a different story, and I'd probably set the following goals: capped S/L resist and softcapped S/L def and as much E/NE def as I could get, probably ignoring psi and F/C. I hope this is helpful. I can take a closer look at your posted build later. Scrap
-
Are you sure? I thought the Cold Domination shields didn't get any benefits from Power Boost because they also carry a resistance component and allowing buffing of one would also apply that buff to the other. I have seen both claims and haven't had a chance to test myself yet.
-
That makes sense to me, especially on a build made for soloing. I do the same: pieces 2-5 of Basilisk and Pieces 2 and 6 of Cloud Senses on my MM, although I replaced piece 2 of Cloud Senses on my DDD defender. Basilisk is definitely hard to say no to - recharge bonuses that big for so few pieces are precious. It's a good point. A defender has quite a few more options available when it comes to chaining damage cones than a MM does. Then again, the long cooldown is exactly why it procs at such a high rate. Nearly everything I hit with it takes some damage, and most things I hit with it take both procs in the face. I recommend trying it on Justin before dismissing it. I mentioned both options because it depends on your priorities. If you're teaming, the -res proc will be superior, but if you're solo, I agree with your reasoning. Tar Patch and the -res proc will stack, btw. I like that idea! I hope you let us know how it works out. Scrap
-
Fearsome Stare is a "power that you wouldn't otherwise take?" I can't imagine a Dark Miasma build that leaves Fearsome Stare behind. Fearsome Stare is already in the posted build, so the builder seems to agree. My recommendation was not to add a power, just to find a way to add two slots to an existing power selection. The end result is exactly what I want: a fast-recharging aoe control and debuff that also does damage. It can be applied on every spawn, and if I'm soloing large groups, twice per spawn. It's the workhorse of endgame Dark Miasma builds and sits alongside Darkest Night as the way Dark Miasma shuts down enemy spawns. I haven't "slotted the entire power for a pair of procs." I five slotted it with Glimpse of the Abyss for the five piece set bonus, and put the Cloud Senses proc into the sixth slot because the Glimpse proc was so reliable. I'm surprised that you think putting two procs into a power requires abandoning all other slotting priorities for that power. You can often have your cake and eat it, too.