Underfyre
-
Posts
796 -
Joined
-
Last visited
Content Type
Profiles
Forums
Events
Store
Articles
Patch Notes
Everything posted by Underfyre
-
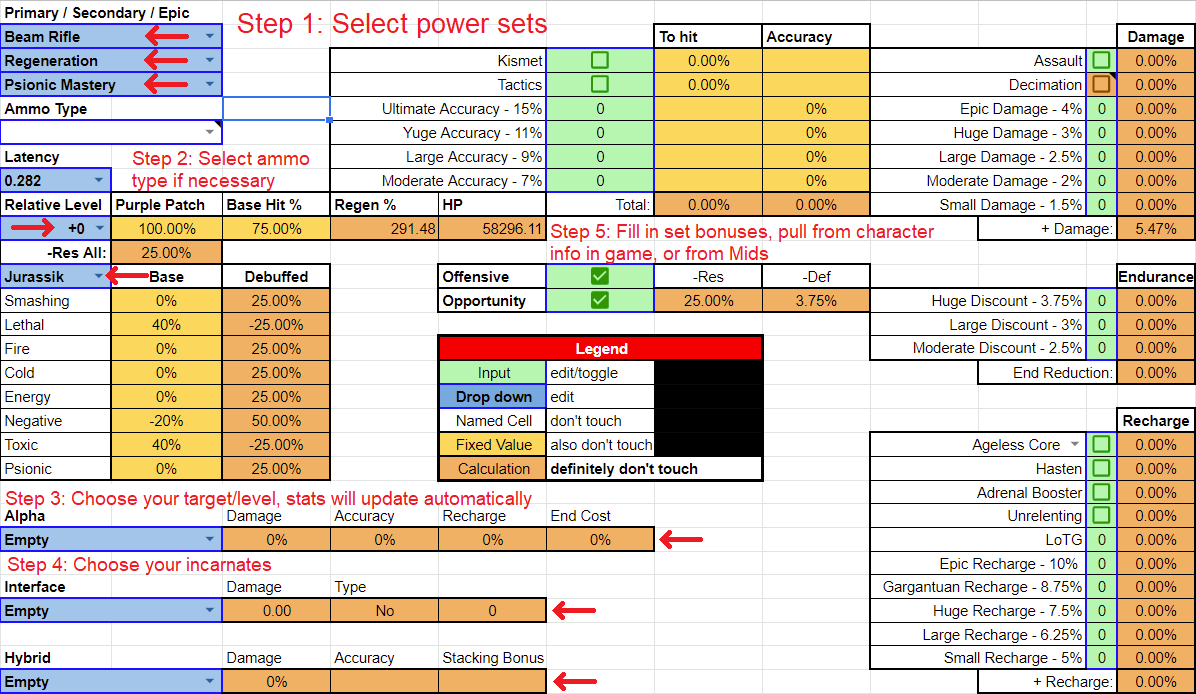
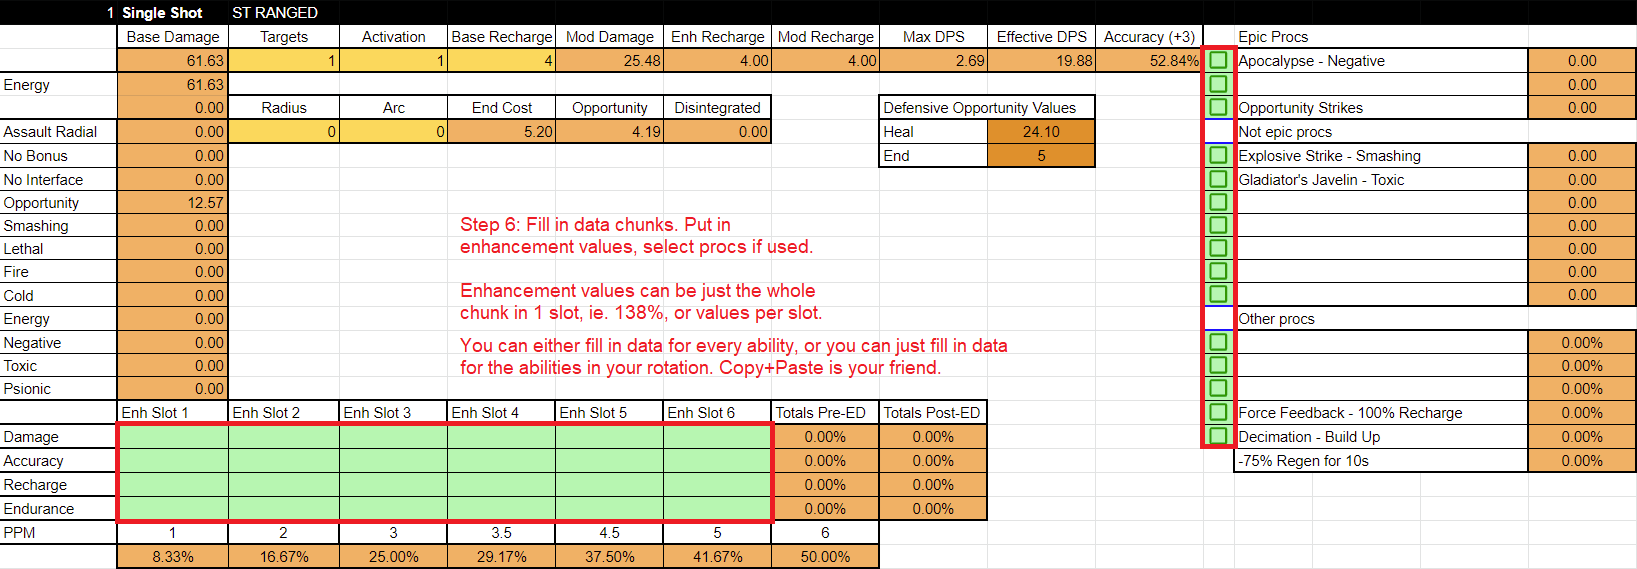
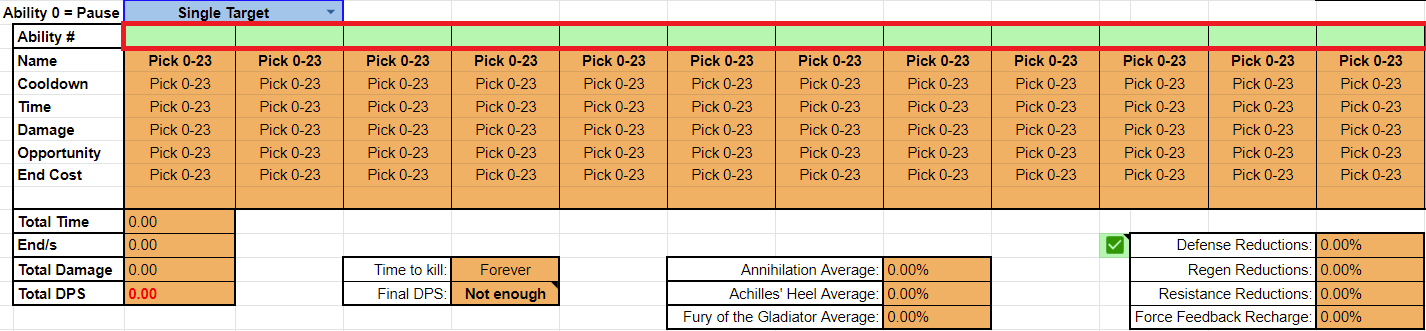
Welcome to the Sentinel DPS Spreadsheet v3.0.2, Issue 28, Page 2. This Issue comes with a new defense secondary for the Sentinel (and everyone else with defense sets). They made a change to increase the single target damage of Water Blast and simplified the resistance debuff of Sonic Attack. Those are the changes game-wise since the last sheet. Formula-wise, the sheet has seen sweeping changes. A whole new function has entered the fray with LET, which cuts down how often calculations are done in he sheet dramatically, giving an increase in speed. IF statements that were in place to cap the values of calculations have been replaced with MIN. Theoretically this should increase speed in instances where the calculation wouldn't exceed its limit and then would perform the calculation again. I implemented a script to limit Decimation to only being able to be selected once (with the option to allow multiple instances), then found that it would frequently bug out and end up with Decimation procs getting removed completely, so I scrapped the idea. Apparently it wasn't going to work how I wanted it to. As if now I have been deployed to the Middle East. To the AOR if you will. Given the sheer amount of changes, there's a pretty good chance I missed some instances where copying and pasting the data chunks around might have messed up which cells are being grabbed for data in that chunk. I think I found most of them, but be wary and let me know if you find any. Rack and Stack is updated from the last sheet. Water's buffs have shot it straight up to the top. Implementing changes that were made to Storm shuffled it up some. Sonic's changes did increase its damage, but with the movement of other sets, apparently it didn't mean much with regards to its position in the Rack and Stack. Psionic Armor's -regen debuff is a substantial dps increase and has dethroned many sets. The top 3 sets are all Psi Armor. It was even powerful enough to bring Energy Blast into the top 30. Water/Psi is the new king. Beam Rifle, as always, didn't respond substantially to its secondary pairing because it just sends out so much raw damage that a secondary doesn't do much to augment it. It responded even less well to this new set in particular because Beam already had a -regen component. Overall most sets saw 25%+ increase in dps over the base. Anyway, have fun. How to use this sheet: Make a copy on your Google Drive, drop in your own enhancement values and procs, twist all the knobs you want and see what yields an increase in damage. Will this set work better with this power or that power? Find out. Is it worth it to make your enhancements +5? Find out. Note: Don't bother trying to export it to Excel, Excel won't be able to handle much of anything correctly because of the types of formulas used and the use of check boxes don't play well. Version 3.0.2 up. https://docs.google.com/spreadsheets/d/1fTY3SOQ3nm6XwuVi31Pl_sDroYhy8t2oe69ZKAB8M3U/edit?usp=sharing Patch Notes: Sheet Tutorial: First things first, choose your sets. If you use Dual Pistols, the ammo type drop down will populate with the different ammo types. Next, update your target. I usually use Global Average at +3 because of Incarnate level shift. Set it to +4 if you plan on exemping down. Next, select your Incarnates and put in your set bonuses. You can get these out of Mids if you're familiar enough with your sets, or if you have the character built in game already, it's easier to get them from there. You can also choose whether Opportunity is active, and whether it's Offense mode or not. You can also choose your latency, but 0.282s is my observed average. Next you're going to have to fill in the data chunks for your abilities. There's no particularly fast way to do this. Finally you can start putting in your rotation. Because of how Opportunity is calced in the sheet, it's best if you fill in your full rotation at least twice, especially since this will reveal whether any pauses are needed. You can select whether you're doing Multi-Target or single Target from the drop down, and you can enable whether defense debuffs are active or not.

- 147 replies
-
- 12
-

-

-

-

-
Making room for Fire Blast is almost never worth it, its DPA is just the worst. It's the most skippable power in the set.
-
So are you talking about the Toxic bonus damage component? I haven't done any testing on Bio yet, but I've read that it does a flat 25% boost and a Toxic damage bonus on top of that. Which part is inconsistent?
-
Well, everything but Dominate and Blaze are hit capped then. Adjust accordingly?
-
Let me assure you that just Kismet is enough to keep all of your abilities at maxed out hit % (at +3) and having Tactics running is a waste of an ability slot and a waste of endurance. Hell, even Kismet is over kill with your slotting. Including Dominate. I'm concerned about your lack of Rain of Fire, but if your aim is single target DPS it's fine.
-
I have two different cooldowns in the sheet, 1 for PPM calcs: Ability_Base_Recharge / (1 + Enhancements) Then for this calc It'd be the full cooldown that includes global recharge. In this case since it's a spreadsheet and not a sim I think that just going with 5.25 should be sufficient. But are you saying that the recharge of an ability doesn't start until it's arcanatime cast has completed? Because that'll play hell with a few calcs I'm sure.
-
Good point. I'm not sure if it's 100% necessary, 80% * 5.25 / if (Ability_Cooldown < 5.25 , 5.25 , Ability_Cooldown) * Ability_Hit% * Ability_PPM% is what I'll go with.
-
Yeah, I'm working on a Sentinel sheet, so I'm working off of 80%. Sot it'd be more of a 80% * 5.25 / Ability_Cooldown * Ability_Hit% * Ability_PPM%?
-
So I searched this thread for Decimation proc mentions to see if the internal cooldown is 10 sec or just the flat PPM chance. I saw one that showed you got basically back to back Decimation procs. Is it safe to say that the average for Decimation is: 80% * 5.25 / Ability_Cooldown * Ability_PPM%? edit: this is vs: 80% * 5.25 / IO_Cooldown(10) * Ability_PPM%
-
What's an org recipe? You can literally put the Sudden Impacts into the powers and see the effects for yourself. You'd lose 5% C/F/E/N defense and drop to 40-41% defense. You'll be fine. If you want to strive for the build I posted, run the Smoke and Mirrors arc out of Ouro. I think it gives 12 merits per run, and when you get good at it you can clear it in around 8 minutes. Turn those merits into Enhancement Converters and sell those for ~90k a piece. That will net you 3.2M influence per run. Just the purples, ATOs and winter IOs will be roughly 742M influence. That's going to be 231 runs. About 8 minutes per run, 1800 minutes total, 31ish hours. OR get good at the auction house and you can make 50M a day without any significant time investment or your part. Convert some IOs and put them up, they'll sell when you're not playing and you'll have cash waiting for you when you get back. Whatever you do, don't hoard merits to buy recipes outright for 100 merits, that's taking a loss. Psychic Shockwave was chosen to supplement your PBAE damage with Nova. It's a pretty solid power. Taking Link Minds is optional. The build I made is already defensively softcapped, I'm not sure if the To Hit is necessary either, but it's a team buff.
-
My turn! Alright, so first thing I noticed was that you had Rectified Reticle in Tidal Forces. Like Switch said, you want more recharge in it for 1, but for 2, you slotted for the defense bonus you didn't need. You're already at 49% S/L, 4% over softcap. I mean if you're not going to put Gaussian's in there, at least just double slot it for recharge. Eek out 2% damage from Adjusted Targeting. Just... something else. An IO recharge and a Guassian's would nearly sync it up with Geyser's recharge. None of your powers are PBAE. If you were already going to be in the thick of it to justify Power Drain, go for it, but otherwise it's not really worth it. Energize is a pretty nice endurance discount, so you won't really be end starved. It's been said, but slot Whirlpool/Geyser for damage. If you're looking for budget, go ahead and slot Annihilation again, you'll probably never have so much uptime on the debuff that it'll be wasted. Geyser would have a 71% chance to proc on a 27 second recharge, which ain't bad. Realistically your opener will be Tidal Forces into Geyser, even on a single target, so that's almost a guarantee for a moderate damage boost. I understand you're chasing defense with Shield Breaker in Whirlpool, but once again it's completely superfluous. Losing that will still keep you over softcap and put some teeth into one of your highest DPA abilities. Personally I'd 5 slot Positron in there and tack an Achilles Heel for the 6th slot, but you can slot whatever you want in there, proc wise. If you're not going to slot Aqua Bolt, then don't waste a proc on it. That's needless money spent. Rather than 6 slotting Devastation, 5 slot it and tack a damage proc on it. The hold isn't stellar and the Psionic defense is putting a bandaid on a gaping wound anyway. Same goes for putting that Aegis Psionic resist into Tough. Is 5% resistance going to be saving any lives? Take that out and 6 slot Preventative Medicine into Energize. If you take out Power Drain, maybe drop in Assault and put your freed up slots into Dehydrate. You already have a heal, but if you really want to slot Dehydrate for healing, go for it. It's DPA isn't much to write home about compared to your main attack abilities anyway. There is a whole array of procs you can slot it with, so you can frankenslot it a bit, but even that barely brings it in line with your current slotting of Hydro Blast. Anyway, that's all I see for running a budget build. Edit: all of my recommended changes will keep you over softcap for S/L/F/C/E.
-
So I'm putting together a spreadsheet, and I'd like some clarification on this. Is it 4 / (1 +1.12 / 100) or 4 / (1 + 112 / 100) which is 3.95 and 1.8867 respectively. Or was the /100 there to bring the 112 down to being 1.12?
-
You didn't specify a budget build or not, so I assumed big kid sets were in play. All off the AOE sets are slotted of KB>KD. There's nothing more infuriating than having a cluster of mobs going in every direction. If you feel so inclined, Focused Power Bolt is your best option for slotting Decimation Build Up at 17.7%. If you don't mind dropping to 40% negative def, you can lose the 6th Opportunity Strikes piece out of Power Burst and slot a proc in instead, or another KB>KD. I don't feel super pressed to put those into single target powers. I trust people are clever enough to not throw the tanks target every which way. Anyway, it maxed to all the primary typed defenses and perma-hasten. I fit in +dmg where I could. If you find a home for it, you can put the other 3 pieces of Sentinel's Ward for another 10% range. Technically this set has an empty slot for whatever you want, so you could take Power Push and mule it there. Dunno where you'll pull the slots from though. Hero Plan by Mids' Reborn : Hero Designer 2.6.0.7 https://github.com/ImaginaryDevelopment/imaginary-hero-designer Level 50 Technology Sentinel Primary Power Set: Energy Blast Secondary Power Set: Energy Aura Power Pool: Flight Power Pool: Fighting Power Pool: Speed Ancillary Pool: Psionic Mastery Hero Profile: ------------ Level 1: Power Blast SprWntBit-Acc/Dmg(A), SprWntBit-Dmg/Rchg(3), SprWntBit-Acc/Dmg/EndRdx(3), SprWntBit-Acc/Dmg/Rchg(5), SprWntBit-Dmg/EndRdx/Acc/Rchg(5), SprWntBit-Rchg/SlowProc(7) Level 1: Kinetic Shield RedFrt-Def/EndRdx(A), RedFrt-Def/EndRdx/Rchg(17), LucoftheG-Def/Rchg+(19), ShlWal-ResDam/Re TP(19) Level 2: Energy Torrent Rgn-Dmg(A), Rgn-Acc/Dmg/Rchg(7), Rgn-Acc/Rchg(9), Rgn-Dmg/EndRdx(9), Rgn-Knock%(11), SuddAcc--KB/+KD(11) Level 4: Kinetic Dampening UnbGrd-ResDam(A), UnbGrd-ResDam/EndRdx(21), UnbGrd-Rchg/ResDam(21), UnbGrd-Max HP%(36) Level 6: Power Burst SprOppStr-Acc/Dmg(A), SprOppStr-Dmg/Rchg(13), SprOppStr-Acc/Dmg/Rchg(13), SprOppStr-Acc/Dmg/EndRdx(15), SprOppStr-Acc/Dmg/EndRdx/Rchg(15), SprOppStr-Rchg/+Opportunity(17) Level 8: Aim AdjTrg-ToHit/Rchg(A), AdjTrg-ToHit/EndRdx/Rchg(36), GssSynFr--Build%(36) Level 10: Power Shield RedFrt-Def/EndRdx(A), LucoftheG-Def/Rchg+(37), Ksm-ToHit+(37) Level 12: Hover RedFrt-Def/EndRdx(A), RedFrt-Def/EndRdx/Rchg(39), LucoftheG-Def/Rchg+(39) Level 14: Energize Prv-Heal(A), Prv-Heal/EndRdx(46), Prv-EndRdx/Rchg(48), Prv-Heal/Rchg(48), Prv-Heal/Rchg/EndRdx(48), Prv-Absorb%(50) Level 16: Entropy Shield EndRdx-I(A) Level 18: Explosive Blast SprSntWar-Acc/Dmg(A), SprSntWar-Dmg/Rchg(23), SprSntWar-Acc/Dmg/Rchg(23), OvrFrc-Dmg/End/Rech(25), OvrFrc-Acc/Dmg/End/Rech(25), OvrFrc-Dam/KB(27) Level 20: Power Armor UnbGrd-ResDam(A), UnbGrd-ResDam/EndRdx(40), UnbGrd-ResDam/EndRdx/Rchg(40) Level 22: Boxing Empty(A) Level 24: Tough StdPrt-ResDam/Def+(A), GldArm-3defTpProc(27) Level 26: Focused Power Bolt Apc-Dmg(A), Apc-Dmg/Rchg(29), Apc-Acc/Dmg/Rchg(29), Apc-Dmg/EndRdx(31), Apc-Dam%(31), SuddAcc--KB/+KD(31) Level 28: Repelling Force Rct-Def(A), Rct-ResDam%(39), Rct-Def/EndRdx(42), Rct-EndRdx/Rchg(42), Rct-Def/Rchg(42), Rct-Def/EndRdx/Rchg(43) Level 30: Weave RedFrt-Def/EndRdx(A), RedFrt-Def/EndRdx/Rchg(33), LucoftheG-Def/Rchg+(37) Level 32: Nova Arm-Dmg(A), Arm-Dmg/Rchg(33), Arm-Acc/Dmg/Rchg(33), Arm-Dmg/EndRdx(34), Arm-Dam%(34), SuddAcc--KB/+KD(34) Level 35: Fly Empty(A) Level 38: Hasten RechRdx-I(A) Level 41: Mind Probe SprBlsCol-Acc/Dmg(A), SprBlsCol-Dmg/EndRdx(43), SprBlsCol-Rchg/HoldProc(43), SprBlsCol-Acc/Dmg/EndRdx(50), SprBlsCol-Acc/Dmg/Rchg(50) Level 44: Psychic Shockwave FuroftheG-ResDeb%(A), Obl-Dmg(45), Obl-Acc/Rchg(45), Obl-Dmg/Rchg(45), Erd-%Dam(46), ScrDrv-Dam%(46) Level 47: Link Minds LucoftheG-Def/Rchg+(A) Level 49: [Empty] Level 1: Brawl Empty(A) Level 1: Opportunity Level 1: Prestige Power Dash Empty(A) Level 1: Prestige Power Slide Empty(A) Level 1: Prestige Power Quick Empty(A) Level 1: Prestige Power Rush Empty(A) Level 1: Prestige Power Surge Empty(A) Level 1: Sprint Empty(A) Level 2: Rest Empty(A) Level 4: Ninja Run Level 2: Swift Empty(A) Level 2: Health Mrc-Rcvry+(A), NmnCnv-Regen/Rcvry+(40) Level 2: Hurdle Empty(A) Level 2: Stamina PrfShf-End%(A) ------------
-
My personal shortcoming is not knowing how I would slot every single set, so a lot of sets are slotted with dummy numbers from other sets if I haven't actually played the set. Actually nm, I'm finally modeling resist debuffs and procs into Beam Rifle and it just shot so far ahead it's ridiculous. Like Blaster levels of DPS ridiculous. So apparently I've spent the last 2 weeks confirming what everyone already knew?
-
I mean, I still need to look at my spreadsheet and see if something is up, but I may have a major theoretical upset for top single target DPS. Who knows who it'll play out in practice, but the if the numbers are right it'll be a doozy.
-
Now that you bring it up, I'm looking through screencaps of resistance sheets and you're right, I can't see a single instance of duplicated Achilles/Annihilation/Fury procs. So yeah, completely reasonable to only slot 1. As to proc chances, I messed up my sheet and had it reference the wrong cell for the base cool down time. At least someone caught it. Thankfully I used the same wrong sheet as the base for most every sheet I made, so I get to fix that across the board.
-
So this might should be in the stickied Collab Guide, but I'm not going to do that. This is going to have a lot of numbers and math. So buckle up is that stuff makes your head hurt. First considerations are in PPM and the typical suggestions of skipping the DMG/RCH enhancement in purple sets. Most purple sets have an ACC/RCH and a DMG/RCH piece to work with. In that event, feel free to skip that ACC/RCH piece because Radiation will be dropping mob defense by a minimum average of 9%, and a realistic average of around 39%. You also have Opportunity giving you another 5%, so 44% defense debuff. Most single target rotations will be using Proton Stream and Cosmic Burst, both lower defense by 21% each for 12 seconds, so your only misses will come from the baked in 5% miss chance. So not only do you not need to use that ACC/RCH enhancement, you won't need to slot the Kismet 6% To Hit either. A side note, the 10% To Hit in the Invulnerabilities' Invincible provides a pretty solid DPS boost, almost comparable to the 25% damage boost of Bio, simply because if you're not hitting anything, your damage boost is irrelevant. But this only comes into play after +3 and your hit chance is 48%. In fact, all of my calculations assume +3. So yeah, pairing with Invulnerability for something beyond a fairly easy set to cap won't be optimal with Radiation. Go ahead and skip grabbing Tactics as well. So on to the more in-depth stuff. First concern. Normally you want to take the highest DPA attack when choosing between your first two powers. Neutrino Bolt has the higher DPA, by a hair, but assuming a slotting of Achilles' Heel X-Ray is a better choice. And who isn't going to slot for additional damage resistance. The chance for X-Ray to trigger a 3.5 PPM proc is 36.55%, versus Neutrino Bolt's less amazing 19.24%. That averages out to 7.31% reduction in resistance instead of 3.85%. (Debuff_Duration * (1 + Debuff_Amount) + (Rotation_Length - Debuff_Duration) * 1) / Rotation_Length) * Proc_Chance (10 * 120% + (9ish seconds - 10) * 1 / 9) * 19.24% = 3.85% (10 * 120% + (9ish seconds - 10) * 1 / 9) * 36.55% = 7.31% If this math is wrong, let me know. I'm usually busy chasing down defense caps with the Winter IO sets and the Archetype IOs, so I generally only have 1 or 2 powers that are either only 5 slotted or are free to frankenslot. So if you're trying to optimize Achilles' up time, slot Proton Stream over Cosmic Burst. It's the difference between 41.93% and 48.95% proc chance. 1 in 2 sounds better than 2 in 5, right? In the end it equates to an average of 2% more up time, so do you. Obviously the Achilles' Heel debuff doesn't stack, but it will re-apply, so we're never going to go over 20%. The combined up time of Proton Stream and X-Ray beam comes out to 17.1%, which is a pretty nice increase in damage. For the entire group. If you add in your Opportunity you're doing 22.1% -Res to the target. So depending on how many are in the group, you are responsible for a dramatic amount of damage beyond your own damage output. I mean, that's not every Sentinel set, but still something to keep in mind when people talk about the ATs low damage output. So yeah, slot for more damage over accuracy, not a lot after ED (~6%), but more, and slot for -Res procs to increase damage further. Literally every power can take Achilles' Heel, but don't go overboard because your average up time will eventually be 100%, and you can't get anymore than 20% resistance debuff out of it. Electron Haze and Neutron Bomb can each take Annihilation for another 12.5%, but they're not worth trying to shoehorn into your ST rotation. Their proc chances at 3PPM are each 39.51% and 27.71% respectively. Assuming similar slotting. That comes out to about 2-3% up time for each of them, which isn't much to sing about. Irradiate and Atomic Blast can take Fury of the Gladiator, but it's a unique and would be best served being slotted into Irradiate with its higher 30.73% proc rate. On the other hand, using Atomic Blast as an opener, even in your single target rotation, will yield a higher DPS than without, and adding in the potential 8.28% resistance debuff could yield a nominal DPS increase. However, that involves getting into melee range. A built Sentinel can handle that without much issue, but that involves more movement than just standing back and blasting away. If you're moving you're not attacking, which means less DPS. So that's your call. I haven't done any modeling on AoE attack cycles yet so I can't say where it's better served. Probably Irradiation since it can be used 3 times more often than Atomic Blast, and it has a higher proc rate. You may be thinking that all this praise on -Res procs is leading towards the stacking nature of Sonic attack, but it isn't. That's a disheartening talk for another day.
-
There's a command to grant patron pools through the associated badge, I imagine there must be a way to grant the incarnate badges as well.
-
I'm currently finishing my Fire/Invuln build. This is a money is no object build though. Depending on what you want out of the character, a Fire/Energy Aura set can get similar defenses, slightly lower resists but perma-hasten. This set is 22.5% off of perma, but I'm sure it'll be fine. http://www.cohplanner.com/mids/download.php?uc=1449&c=676&a=1352&f=HEX&dc=78DA6594494F136118C7DFE94CC5529696C5424B65B37B292D821A97A0AC512121F201486D5FCB9866C016508E1EBDB9C6A31EC52D7E10D79BEBD995C52DEAC1D467E6F9DB90CCA493DFF4FFECF3CCCCF485B1BA8793178785D2305ACC96CB73B3D258D20D59AC99CDE9D2C849611E3574FAFF5BE64E658D82CCA726F4929C1BA1A0A5AEAA694C9E914659A68E1B2BCB454396B2A7F5A2BEB42AEA6716168A14519827BF42ADF56F7651CABC9B0D45D3D2685D4FC96C5E96CAF3FAA27F7C51CFA5AAB9AD7AD3544E9656DBA8A1109D0B6181A3E214773421329A70AC817799DA3DF03E73C703E6D128852956AC2A7EA8A4B944EC27F88B19FFCD3C17862BD5515E21CF4BE6CED7E01B66ED5BF01DF318D551B98E50FFA89656A27C4EE4733E66BFBA27E05366C333F039D3F382B91CE68550ACA3E696C3D232B7C135E608D574A1A6AB42871825C58D8AEE0FDC85E723B3E913F899D9F2055C672A54AE1EB1F597B98BE41566DF55F01AB3FF3A7883F92826442377E2686CA78BA04BF477303341939A58A189BCC8EF4DF204BB52603FB32D0D6698FE24F7364E7335638BCDD8621C5B8C638B7DD8A24A73B4B2AFD2EAE3DAFE01CEA391CD873C3E8F62F977B4806610F9C44EB2EF79EAB71DFDB60F703FBB07C121701FB36B3FF89E6327A8DF00D7710636B8AFAE4D66F716F815FCC6ECFDCEB13DD46310FD0713826DE025EAA9133D751EE09ABD07997B0E8187C123CCF030E79DA49E7AB0A31ECC1EC6EC61CCEEA2DA21DC9F107C22F089C027F25758F7D44DBE51EE4544035CC34B5A023512884F223E89F826F249E1A94D75F35CCDA4A5A1A587CC6F912A3AB4EA5B4F3FF3E93E1B33DF65F38DAA54E2366BDAA6646CCA5E9B326853A66CCA8C56FD2E08C5525C1E7ADB59A9ACD79255D96EDDDCAE9CA08B8826366C5E5BDB959BBCAB7F27E9F207
-
So I'm not entirely sure how typed defenses work, I just heard that I should aim for maxing out S/L. After that I wasn't sure where to go. Pushing for PermaHasten seemed like a futile endeavor, maxing all the other typed defenses was also fairly troublesome, so I took that route of trying to cram in as much resistances as I could. I took the build for a whirl on the test server, and it can stand up fairly well to +4/x8 map, but it does have the potential to fall over if it's unlucky. Endurance can be a bit of a problem if you're not saturating Energy Absorption. Does anyone have a better idea of where to take the build? It's kind of a general purpose tank build with a little leaning towards the ability to farm a map when I'm strapped for time and can't commit to anything. Hero Plan by Mids' Hero Designer 2.22 http://www.cohplanner.com/ Click this DataLink to open the build! Level 50 Science Brute Primary Power Set: Spines Secondary Power Set: Ice Armor Power Pool: Fighting Power Pool: Speed Power Pool: Leaping Power Pool: Flight Ancillary Pool: Energy Mastery Hero Profile: Level 1: Barb Swipe -- Mk'Bit-Acc/Dmg(A), Mk'Bit-Dmg/EndRdx(11), Mk'Bit-Dmg/Rchg(13), Mk'Bit-Acc/EndRdx/Rchg(13), Mk'Bit-Dam%(15) Level 1: Frozen Armor -- LucoftheG-Def/EndRdx(A), LucoftheG-Def(5), LucoftheG-Rchg+(7), ShlWal-ResDam/Re TP(7), Ksm-ToHit+(9) Level 2: Spine Burst -- ScrDrv-Acc/Dmg(A), ScrDrv-Dmg/EndRdx(27), ScrDrv-Dmg/Rchg(31), ScrDrv-Acc/Rchg(33), ScrDrv-Dam%(33) Level 4: Hoarfrost -- Prv-Absorb%(A), Prv-Heal(19), Prv-EndRdx/Rchg(21), Prv-Heal/Rchg(25), Prv-Heal/Rchg/EndRdx(27), Ags-Psi/Status(50) Level 6: Build Up -- GssSynFr--Build%(A), AdjTrg-ToHit(9), AdjTrg-ToHit/Rchg(11), AdjTrg-ToHit/EndRdx/Rchg(48) Level 8: Chilling Embrace -- EndRdx-I(A), Taunt-I(45) Level 10: Wet Ice -- EndRdx-I(A) Level 12: Boxing -- KntCmb-Acc/Dmg(A), KntCmb-Dmg/EndRdx(40), KntCmb-Dmg/Rchg(42), KntCmb-Dmg/EndRdx/Rchg(43) Level 14: Tough -- StdPrt-ResDam/Def+(A), GldArm-3defTpProc(15) Level 16: Glacial Armor -- LucoftheG-Def/EndRdx(A), LucoftheG-Def(17), LucoftheG-Rchg+(17), Rct-ResDam%(19) Level 18: Quills -- FuroftheG-ResDeb%(A), Mlt-Acc/Dmg(33), Mlt-Dmg/EndRdx(34), Mlt-Acc/Dmg/EndRdx(34), Mlt-Dmg/EndRdx/Rchg(34) Level 20: Energy Absorption -- LucoftheG-Def/Rchg(A), LucoftheG-Rchg+(21) Level 22: Weave -- LucoftheG-Def/EndRdx(A), LucoftheG-Def(23), LucoftheG-Rchg+(23) Level 24: Hasten -- RechRdx-I(A), RechRdx-I(25) Level 26: Ripper -- Mlt-Acc/Dmg(A), Mlt-Dmg/Rchg(36), Mlt-Acc/Dmg/EndRdx(36), Mlt-Dmg/EndRdx/Rchg(36), Obl-Dmg(37), Obl-Acc/Dmg/Rchg(37) Level 28: Permafrost -- UnbGrd-Max HP%(A), UnbGrd-ResDam(29), UnbGrd-ResDam/EndRdx(29) Level 30: Combat Jumping -- LucoftheG-Def/EndRdx(A), LucoftheG-Def(31), LucoftheG-Rchg+(31) Level 32: Throw Spines -- Dtn-Acc/Dmg/EndRdx(A), Dtn-Acc/Dmg(37), Dtn-Dmg/Rchg(39), Ann-Acc/Dmg(39), Ann-Acc/Dmg/Rchg(39), Ann-ResDeb%(40) Level 35: Icicles -- Mlt-Acc/Dmg(A), Mlt-Dmg/EndRdx(40), Mlt-Acc/EndRdx(42), Mlt-Acc/Dmg/EndRdx(42), Obl-Acc/Dmg/EndRdx/Rchg(46), Obl-Dmg(48) Level 38: Fly -- BlsoftheZ-ResKB(A) Level 41: Taunt -- MckBrt-Taunt(A), MckBrt-Taunt/Rchg(43), MckBrt-Taunt/Rchg/Rng(43), MckBrt-Acc/Rchg(45), MckBrt-Rchg(45) Level 44: Superior Conditioning -- EndMod-I(A) Level 47: Focused Accuracy -- AdjTrg-ToHit(A), AdjTrg-ToHit/EndRdx/Rchg(48), AdjTrg-ToHit/EndRdx(50) Level 49: Physical Perfection -- EnrMnp-EndMod(A), EnrMnp-EndMod/Rchg(50) Level 1: Brawl -- KntCmb-Acc/Dmg(A), KntCmb-Dmg/EndRdx(3), KntCmb-Dmg/Rchg(46), KntCmb-Dmg/EndRdx/Rchg(46) Level 1: Prestige Power Dash -- Empty(A) Level 1: Prestige Power Slide -- Empty(A) Level 1: Prestige Power Quick -- Empty(A) Level 1: Prestige Power Rush -- Empty(A) Level 1: Prestige Power Surge -- Empty(A) Level 1: Fury Level 1: Sprint -- Empty(A) Level 2: Rest -- Empty(A) Level 4: Ninja Run Level 2: Swift -- Flight-I(A) Level 2: Health -- Mrc-Rcvry+(A), NmnCnv-Regen/Rcvry+(3) Level 2: Hurdle -- Empty(A) Level 2: Stamina -- PrfShf-EndMod(A), PrfShf-End%(5) ------------