Bopper
-
Posts
3843 -
Joined
-
Last visited
-
Days Won
7
Content Type
Profiles
Forums
Events
Store
Articles
Patch Notes
Everything posted by Bopper
-
In my signature. But if you're looking on a phone, it might not show a signature (unless you use desktop view). You can find it in the guides forum as well.
-
If you know what your numbers are, you can use my Survival Tool to get an idea what impact each scenario gives you.
-
Yup, been a tester for almost 12 years now. It's funny, I started playing this game when I was an intern, now I'm a seasoned journeyman. Time flies.
-
It shows the source of the damage came from Fire. Pretty sure that's the proc in oil slick
-
I think you're correct and I'm working on a rewrite. I also notice that I am using terms inconsistent with other sources. For example, when I say recharge, I really mean recharge rate. So that is my mistake as I'm sure it will confuse some. Maybe in a couple weeks I'll have a new version posted.
-
 Does it, though? I feel like if something isn't broke, dont fix it. I have not felt like tankers are unable to be effective in their role, so introducing major mechanical changes would seem unnecessary. I agree Tankers and Brutes can be treated as Defenders and Corruptors. Similar, with different flavor.
 -
This is true, however Jolting Chain is not classified as a Chain attack (i.e. it is not flagged with the kChain tag). I think I tested Jolting Chain previously with interesting results. It's probably buried in the comments of the PPM guide. If I recall correctly, I think the first attack acts as a single target (for formula purposes), then the chains act as pseudopets with an area and 10 second activate period. Sorry, just going off memory. I'll update if i find those old numbers. Edit, it seems I'm right. The initial cast acts as a single target, then summons pseudopets that have their own AoE calculations.
-
Likely no interface. It was a simple tool I made in excel and ported over to google docs. But the local copy you generate has everything in the tool, so if somebody wishes to incorporate that capability and share it, that would be nice.
-
I'm glad it helps 🙂
-
My fear is that perhaps formulas are what's complicating the matter. Algebra isn't for everyone. I remember the first time I saw letters in a math problem and thought, "WTH?". Not much I can do if that's the case. I did examples first with only numbers in hopes that it would be clear to the layman. The iterative additive process is a good way for first understanding how recharge works, which is why I started with it. My hope is that for anyone who takes the time to work through the text, the formulas, and the examples will see that there is a MUCH faster and easier way to solve the problem than to iterate. That's where Chapter 3 comes in. But if folks can't make it through the first 2 chapters without feeling lost, then they'll miss on that. I think perhaps I should treat this as the older study groups I ran in college. I should let folks come to me with questions and I can provide a step by step solution using these techniques. Perhaps having a problem someone cares about would make it easier to understand.
-
First off...where the hell have you been? I haven't seen you post in like a month. Either way, I'm honored to be crit'd by your wall of text response. From your steps, you are literally doing everything I showed in the Chapter 1 examples (I used the additive approach until the last time interval, but I worked in decimal as opposed to you working in percents/points). The formula version of your steps are Formulas 2.2.-2.4, and that formula is further simplified with Formulas 3.1-3.2. You actually showed that I took the right approach of working backwards, as I did the additive method up front then introduced formulas. I may need to revisit how I'm explaining the additive method, as I thought it was clear.
-
Yeah, I've seen the audience in the general discussion section. My hope is having it in the guide section helps others who understand the math better explain it to others. I saw the growth in PPM knowledge across the community and I hope something similar can happen with recharge. Certainly. The reason I reserved extra spots was for incorporating ideas like that. I'll see about producing a simple summary, and if folks still struggle in understanding, they can read the full guide
-
Absolutely, and I tried to show the effects in some examples. I showed that if you were 5% from achieving perma-hasten, one FF proc won't get you to perma, but 2 procs would. That is something tangible you can use when designing your build.
-
I totally understand where you're coming from. I'm an electrical engineer working for the Air Force and NASA, so the numbers are clearly what I love.
-
I also dont do it by hand per se, but there have been times I was able to reply to a forum post and provide an answer using just my basic calculator app on my phone. The formulas are that simple, once you're used to it.
-
It's not for everyone, I understand. I am unaware of Mids doing any accurate calculations of recharge when your recharge changes over the course of time. For example, if you click Hasten while not perma-Hasten, your numbers will show as if you are perma-Hasten. So that's wrong. Au contraire. You can make this very reliable if you design for it (my PPM Information Guide can give you some ideas). But in the example of Hasten, which has a 2 minute duration, is it not reasonable to assume it will proc one or two times during the course of the duration? My knockout blow can proc 90% of the time. My footstomp will proc similarly, assuming I'm hitting enough targets. My Hail of Bullets is practically 100%. You can make it reliable, if you want. I also beg to differ on that one. I showed in one of my examples that a single proc acted as a 3.65% recharge boost. We chase recharge like its gold, and something as simple as 1 proc achieved half a LotG. With my Knockout Blow (25 second recharge), 90% of the time I effectively turn it into a 20 second recharge. That's what each FF proc does, takes away 5 seconds from the base recharge. For innovative build concepts. Thanks for the reply. I do like feedback on this stuff. It helps me try to write better.
-
Reserved
-
Reserved
-
Reserved
-
Chapter 5: Additional Examples Solutions to Problems Submitted on the Forums I've got nothing...so far. Actually there are a few interesting problems that I will write up in the near future. Stay tuned.
-
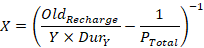
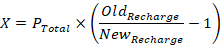
Chapter 4: Additional Useful Formulas So far, I’ve taken you through an exhaustive journey in understanding how to do one calculation: Time to Recharge. Now I want to go through some of the formulas you can use to answer some of the more common questions that come up relating to recharge. For this chapter, I will format it more like a FAQ section. How much will an extra 10% recharge give me? Answer: Ok, this can be any percentage really, so we will just say an “extra X recharge”, where X is in decimal form (like the decimals I’ve been using in my examples). Anyways, this is pretty simple to apply. Formula 4.1: Proof (using Formula 3.2) Pretty simple. You actually don’t even need to know your base recharge or the temporary boosts in the power. As long as you know what your current (“old”) recharge is, and you know your total permanent boosts (including any temporary boosts that are active the entire duration, Formula 3.1a), then you can directly calculate the effects of adding more recharge simply by using Formula 4.1. There is one potential gotcha, though. If your added recharge would turn a previously temporary boost into an effective permanent boost, then you’re out of luck. You’ll have to go ahead an incorporate the base recharge and temporary boosts and calculate the new recharge directly as shown in the above proof. Example #4.1: How much will a Force Feedback Proc give me? Answer: Again, this can be any temporary recharge boost for any duration. So, we’ll assume the amount of boost is ( for FF proc) and the duration is ( for FF proc). Formula 4.2: Proof (from Formula 3.2) Once again, this is a very simple formula as you only need to know your current (“old”) recharge and your total permanent recharge boosts. However, once again, if the new boost winds up making a temporary boost effectively a permanent boost, then you will have to calculate the new recharge directly as shown in this proof and properly applying the Formula 3.1a caveat. Example #4.2: How much equivalent recharge does a Force Feedback Proc provide me? Answer: Often I’ve seen the question come up of how helpful is a temporary recharge boost, compared to simply adding more global (permanent) recharge. Often you might see someone respond to this question with something like “a single Force Feedback Proc is equivalent to adding 6% global recharge”. Now, that response is not universal; it is specific only to power in question and the build it is applied to. But wouldn’t you like to know how people come up with those types of responses? Well, there’s a formula for that too… Formula 4.3: Proof (from Formula 3.2) The proof is probably uglier than doing the actual brute force calculations themselves. In fact, once you calculate your new recharge from the temporary buff, you should simply solve directly: Formula 4.3a: Proof (from Formula 3.2😞 Example #4.3:

-
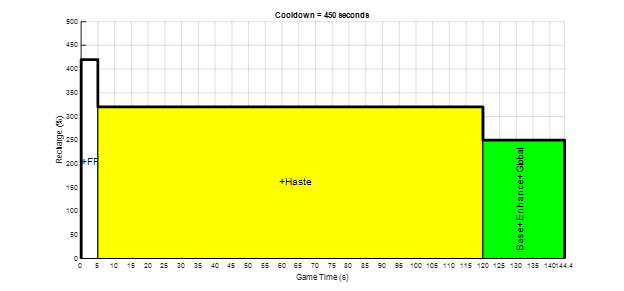
Chapter 3: Formulas for Calculating a Power’s Recharge Time using Recharge Boost Duration Analysis In Chapter 1, I used step-by-step examples to show how we can calculate the time it takes for a power to fully recharge by breaking up the analysis into time intervals where the total recharge in each time interval is constant. In Chapter 2, I showed the formulas we would use to do the type of analysis performed in those examples. Now I want to change course by breaking up the analysis by recharge boost as opposed to breaking up the analysis by time intervals. Below I use graphs to illustrate what I mean by this: Figure 3.1: Time Interval Analysis Figure 3.1 is the same as the analysis we did in Example #1.3, instead the total permanent boost was 300% in Example #1.3 whereas this figure shows it as 250%. Nonetheless, it illustrates how we analyzed the problem: For the first 5 seconds we calculated the cooldown time for when the Force Feedback Proc and Hasten were active at the same time (white), then the next 115 seconds was evaluated for when only Hasten was active (yellow), then an additional amount of time was evaluated for when only the permanent boosts were active (green). That additional amount of time was what we solved for. Figure 3.2: Recharge Boost Duration Analysis In Figure 3.2, we highlight how we can instead analyze for each individual recharge boost and its duration. The temporary boosts are evaluated for just amount and duration, while the permanent boosts are evaluated until the time the power becomes fully recharged (which is what we’ll solve for). The benefit of this method is that it is time agnostic. We don’t need to worry about calculating time intervals for when each recharge boost is active/inactive, which makes for easier and faster calculations. The downside of this method, by ignoring when boosts are active (thus not knowing how much recharge is stacked up) we could go over the 500% recharge cap, resulting in inaccurate calculations. So, keep this in mind when considering using the following formulas as they will only be accurate if your boosts never go over the 500% recharge cap. Lucky for most of us, this will typically be the case…and even if we were to temporarily go over the recharge cap, it likely won’t be sustained long enough to change our final results by a whole lot (Examples #1.6a and #1.6b in Chapter 1 shows this). Once again, recall our first formula In Chapters 1 and 2, we used this principal formula to add up all the cooldown times from different time intervals and its respective total recharge amounts. By adding up all the cooldown times by recharge boost amounts with its respective boost durations does not change this math at all. We are just calculating area with different lengths and widths, essentially, but we will come to the same end result. Formula 3.1: Recall from Chapter 2, the is the amount of the m-th temporary recharge boost and is the amount of the l-th permanent recharge boost. For each of the temporary recharge boosts it has a duration which is represented as . For all permanent recharge boosts, they are evaluated until the power is recharged. Note: there is one caveat I should make to Formula 3.1, which is each duration of a temporary boost can’t be greater than the recharge time (similar to Example #1.4). If that is the case, then we must treat the temporary boost as a permanent boost and only evaluate it for the time until the power recharges. Formula 3.1a: Since we are solving for , we unfortunately won’t know if the duration of a temporary recharge boost will be greater (perma’d) until we run the numbers. So, like the Example #1.4, if we find our solution to be in error, i.e. , then we must iterate through our analysis by changing the longest temporary boost duration to , recalculate, then check the remaining temporary boost durations to see if any of those are still in error. That sounds like a painful process, and it certainly can be, but you can save yourself some of the hassle if you know ahead of time which temporary recharge boosts will definitely be active for the entirety of your power’s recharge and treat those boosts as permanent right away (turn a into a , basically). This could be done by identifying temporary powers that are already perma’d (if we know Hasten or ChronoShift are already perma’d, then treat them as permanent), or it could be your power has a base recharge less than the duration of a temporary boost. By handling those situations ahead of time, you can save yourself from a lot of the potential iterations you might need. Let’s not dwell on Formula 3.1a. I will show how it works in a later example, but for now let’s use Formula 3.1 to define some other useful functions. Since each permanent boost is being multiplied by the same time duration (), we can actually add up all the permanent boosts together first, then multiply. This tweaks our formula slightly: Formula 3.1b: This now makes it simple to solve for the time it takes a power to recharge. Formula 3.2: This is as simple as it comes with solving for a power’s recharge time. We merely take the base recharge of the power, subtract the product of each temporary recharge boost and its duration, then divide by the total permanent recharge boost. Let’s revisit some of the examples we did before, now using the Formula 3.2. Example #3.1: Recall in Example #1.3, we had a , and a single Force Feedback Proc. How long would it take for Hasten to recharge? Same answer as before. Now let’s look at an Ageless Destiny example. If you recall from before, I said Ageless works as a 70% recharge for 10 seconds, then 30% for the next 20 seconds, 20% for the next 30 seconds, then 10% for the final 60 seconds. If you read the description of Ageless, that is not what it says. It actually says it provides a 40% recharge boost for 10 seconds, a 10% recharge boost for 30 seconds, a 10% recharge boost for 60 seconds, and a 10% recharge boost for 120 seconds. My original description simply added the stacks of recharge together, here we will use the actual description as four separate recharge boosts. Example #3.2: Recall from Example #1.5, we have a and we cast Ageless and Hasten back-to-back. How long will it take for Hasten to recharge? Oops, we have a that is less than the duration of two of our temporary boosts (see Formula 3.1a). Since both boosts have a 120 second duration and we now know the recharge is less than 120 seconds, we must re-do our calculation with these temporary boosts treated as permanent boosts. Once again, this is the same answer as before. From these examples we can see that using Recharge Boost Duration analysis is viable, if not ultimately more convenient. The nice thing with this method is that you can see a temporary boost and instantly know what its impact on a power will be. For example, the Force Feedback Proc’s 5 seconds of 100% recharge effectively takes off 5 seconds of a power’s base recharge. Hasten’s 120 seconds of 70% recharge effectively takes off 84 seconds. Those are numbers you can quickly calculate and apply whenever you need.
-
Chapter 2: Formulas for Calculating a Power’s Recharge Time by using Time Interval Analysis I know that was a lot of math and a lot of examples I just threw at you. I didn’t do that for the purpose of triggering your math class PTSD, I did it because it is my goal to make you an expert in understanding how recharge works and how to calculate a power’s recharge for ANY situation. These examples covered everything ranging from static recharge, fluctuating recharge, and cap-saturated recharge; so, if you were able to follow the math in those examples, you will have an easier time following the formulas I’m about to introduce. All these formulas were used in the examples, but now I will call them out explicitly. Recall our first formula, Formula 2.1: We tweaked this first formula by accommodating for times when the recharge changes: Formula 2.2: This simply shows that we are calculating the total cooldown time by summing the products of each (n-th) recharge amount with its respective real-world time duration. We used this formula in almost every example by plugging in the Base Recharge of the power as our , then adding up the total recharge amount for each known time interval and multiplying them together, then solving for the last unknown time interval (where is the in this formula). To show this explicitly, let’s recall Example #1.3 and apply it to Formula 2.2. We have the following: We can rearrange the above formula to solve for directly. Formula 2.3: From this, we can calculate the total time it takes for a power to recharge by simply adding up all the time intervals together. This formula can go without saying, but I provide it for completeness. Formula 2.4: Finally, the total recharge of the power for each time interval is simply the summation of each source of recharge that is present for the entirety of its time interval. Formula 2.5: Where we add up all permanent recharge boosts (, which represents the l-th permanent boost out of a total of L permanent boosts) and we add up all temporary boosts (, which represents the m-th temporary boost out of a total of M temporary boosts) that are active for the entirety of the n-th time interval. If the total recharge boosts exceed 500%, then it is capped to 500%. That’s admittedly a confusing statement and a confusing formula for something so simple. I’m sorry. So, let me put this in layman’s terms… the total recharge is calculated by adding up all the recharge sources for the power. You know how to do this, as I showed how to do it in each of the examples. Permanent boosts include your 100% base recharge, the power’s recharge enhancements (after enhancement diversification), global set IO bonuses (e.g. slotting a Luck of the Gambler: Defense/Increased Recharge Speed, or 5-slotting an Apocalypse set), or possibly auto powers (e.g. Quickness, or Lightning Reflexes). Temporary boosts include powers with a finite duration (e.g. Hasten, Ageless Destiny) and temporary buffs (e.g. Force Feedback Proc). Recall from Example #6a: What we had in this example was the following: In this example, had its summation of boosts exceed the 500% cap, so the min-function capped the total boost to 500%. All the other values did not exceed the cap. Also, in this example, I had spelled out what all the temporary boosts were, so I was able to break them out here by their etc. As for the 300% permanent boosts coming from other sources, I never did say where all those boosts came from. In actuality, we know our base is . Then we may have enhancements that make of . We might have 4 Luck of the Gamblers in our build giving us . We might have global set IO bonuses that give us a total of . Finally, we might have an auto power such as Quickness that gives us . Thus, we achieve a total permanent recharge boost of Overall, this is overkill for understanding how to calculate the total permanent recharge in a power. Honestly, you only need to check 2 things and you can do this in the game or in Mids’ Reborn: Look up the amount of recharge slotted in the power (the Enhancement Diversification amount), and look up your Global Recharge when no temporary boosts are active (so turn off Hasten and similar powers). If using Mids’ Reborn, you will see this as “+Recharge” in the Totals tab, or as “Haste” in the View Totals/Misc. Buffs panel. Once you have those 2 numbers, add them together with your base recharge and you will get your
-
Chapter 1: Understanding How to Calculate the Time to Recharge a Power by a series of examples The first thing to understand about recharge is that we are working with two time domains: the real-world time domain (which is what you experience), and the cooldown time domain (which is what your power experiences). The recharge in the power is the rate at which the cooldown time domain experiences for every second that passes in the real-world time domain. This leads us to our first formula, which is the amount of cooldown time experienced. To understand how to apply this formula, let’s start with the most common example recharge question: How much recharge do I need to make Hasten permanent? Example #1.1: Hasten has a base recharge of 450 seconds and a duration of 120 seconds. Thus, to make Hasten permanent, we need our power to experience 450s of cooldown within 120s of real-world time. To know the amount of recharge required to achieve that, we use algebra to tweak our above formula: 375% recharge may seem like a lot, however 100% comes from our base recharge and another 70% comes from Hasten, so that leaves us with needing an additional 205% recharge from other sources (enhancements, set IO bonuses, other powers). Example #1.2: Now let’s say we only have 370% recharge (70% from Hasten, 300% from base and other sources). How long will it take for Hasten to recharge? This requires us to analyze the problem in two parts. First part, we analyze when Hasten is active (370% recharge for 120 seconds) and the second part we analyze when Hasten wears off (300% recharge for some additional amount of time). Our power will still need to experience 450s of cooldown, so: This tells us Hasten will recharge in 120 + 2 = 122 seconds. Example #1.3: Now let’s do the same example, but this time a Force Feedback Proc (+100% recharge for 5 seconds) goes off once while Hasten is active. How long would it take for Hasten to recharge? This adds some additional complexity as we don’t know if Hasten will become permanent or not, so we may have to analyze this in up to three parts: Hasten+FF active (for 5 seconds), Hasten active (120 seconds minus the 5 secs for FF proc), and nothing active (for possibly some additional amount of time). To make this simple, we will start from highest recharge then work our way down to calculate the amount of cooldown experienced for each time interval of differing recharge values: It turns out we still do not achieve permanent Hasten as it would take 120 + 0.33 = 120.33 seconds to recharge. If was equal to or less than zero, then we would have achieved permanent Hasten as this would tell us we achieved full recharge prior to 120 seconds. Example #1.4: Now let’s assume we had two Force Feedback Procs occur (a total of 10 seconds worth of +100% recharge boost). What would become the final recharge for Hasten? We do the same steps as above. Now we have a negative number in the additional time calculation. This tells us that Hasten actually finished recharging prior to the expiration of Hasten’s 120 second duration (yay, we achieved perma-Hasten). However, how long did it actually take to recharge? We need to tweak the numbers in the above formula by removing the 120 seconds from the Hasten duration, as we know we will never reach that time, and substitute it with our : It turns out that the total time for Hasten to recharge in this example is 10 + 108.92 = 118.92 seconds. Let’s do a few more examples by incorporating a Tier 4 Ageless Destiny incarnate power (Core Epiphany or Radial Epiphany). This power has a 120 second cooldown duration that is unaffected by recharge; and when it is cast, it will provide a recharge bonus that cascades from strongest boost to weakest boost. It provides a 70% recharge boost for the first 10 seconds, then 30% for the next 20 seconds, then 20% for the next 30 seconds, then 10% for the final 60 seconds (120 seconds in total). Example #1.5: Let’s assume once again that we have 300% recharge in the Hasten power from outside sources. How long will it take for Hasten to recharge if we cast Ageless and Hasten back-to-back? Once again, we break this down by time intervals of where the recharge in Hasten is different. This tells us Hasten will recharge in 10 + 20 + 30 + 55 = 115 seconds, thus achieving perma-Hasten. Example #1.6a: Finally, let’s look at incorporating the Force Feedback Proc into this Ageless example. Now we care about when the Force Feedback Proc fires because if it fires within the first 10 seconds, then we will achieve a total recharge of 300%+70%+70%+100% = 540% which is over the maximum allowed recharge cap of 500%. So, let’s look at the impact of Hasten’s recharge if the FF Proc fires in the first 10 seconds and if it fires after 10 seconds. For first 10 seconds we get the following recharge-capped result Thus, Hasten would recharge in 60 + 54.2105 = 114.2105 seconds. Example #1.6b: Now let’s look at FF Proc firing after 10 seconds (thus, never surpassing recharge cap). It won’t matter where it fires as the math will not change the result, so let’s assume it happens in the subsequent 20 second window. Thus, Hasten recharges in 60 + 53.6842 = 113.6842 seconds, which is slightly faster than the recharge capped scenario as we don’t waste any of our boosts.
-
Recharge Guide Everything you need to know about Recharge…and then some By Bopper Written: 17 Nov 2019 Updated: N/A The purpose of this guide is to teach you everything you need to know about recharge. I have broken up this guide into chapters in an effort build up your understanding on how recharge works. My methods for building up your knowledge will be a bit backwards. Normally in a textbook, you will be given a formula, the formula will be derived, then you will see examples on how to use the formula. Instead, Chapter 1 will show you examples with step-by-step solutions in hopes of learning and observing all the details that goes into solving the Recharge Problem. In Chapter 2, I will introduce formulas that could be used for solving the examples from Chapter 1 in hopes that you can apply those formulas for your own needs. In Chapter 3, I introduce a new technique for solving the Recharge Problem that is faster and easier to implement, although it has its limitations. At that point, you will have all the knowledge you need to know. But if you would like to read on, Chapter 4 provides additional formulas that apply to the Recharge Problem that could be useful to you. Finally, Chapter 5 (not complete), will be additional examples that I will solve by request. If you have a specific problem and are having trouble, you can mention it in the comments and I will attempt to solve it and provide the solution in this chapter. If you prefer the PDF version or Word document version (they are much more readable than the forum's formatting), they are attached below. RechargeGuide.pdf RechargeGuide.docx Background information: I have discussed this topic previously, which you can check out here.