Bopper
-
Posts
3843 -
Joined
-
Last visited
-
Days Won
7
Content Type
Profiles
Forums
Events
Store
Articles
Patch Notes
Everything posted by Bopper
-
I believe he is referring to the scaling resistance that SR has. It kicks in at 60% HP, then scales up in resistance linearly, maximizing at 60% resistance when at 0 HP. So 30% HP is a useful middle ground for assuming 30% resistance. Btw, travels were safe. 5 hour flight, 3 movies watched. Not bad.
-
Flight delayed, so I'll fit this in while I can. There is a drop down menu for selecting type of attack (change range to melee, or smash to fire). Remember, only change fields that are green and read the manual/guide for clarification of the field inputs. Additionally, change the tohit on the enemy from 50% to 63.75%
-
45% is softcap, so if you have 46% or 53%, it doesn't matter. As for having higher resistance, that's good. But the invuln has higher HP amd higher regen to combat it. If you want to use 58.75% incarnate softcap, then yes. SD will be more survivable. I dont have time to check it as I'm sitting on a runway waiting to take off. I recommend using the tool, though, if you want to see how changes to numbers impact survivability.
-
Your Survivability Score for your Shield vs. the Invulnerability build S/L: 141.46 vs. 393.62 (Invuln x2.78 more survival) F/C: 92.02 vs. 105.53 (Invuln x1.15 more survival) E/N: 83.37 vs 75.26 (SD x1.11 more survival) P: 50.85 vs 9.03 (SD x5.63 more survival)
-
I can try, but I don't know what your HP is at. If you'd like, you can use the tool by going to my signature block (or find in the guide forums). I have not incorporated DDR or absorb yet, though. If you can, send me the Mids build for download (soon, as I'm getting on a flight in a couple hours)
-
Using my survivability tool, it appears your Invul is 4.9x more survivable for S/L damage, 2.2x more for F/C, 2.0x more for E/N, whereas SD is 3.4x more survivable for ranged psionic. This assumes surviving for 10 minutes against a +4 AV and OWTS not being used (which I assume your screenshot isn't including).
-
Build it on test and see how well you farm. Sadly last I tried to do the comic con farm on test, it didn't work (copyright issues). It'd be nice if that could open back up, even if they use generic costumes.
-
The thing I could see is less reliance on building for survivability which could allow for more enhancement slots to plug procs in that brutes might not have. Combined with max target caps, tanks should be close to brutes. Like you said, it will being more options.
-
I think Radiation Emission is a good way to go. Choking Cloud gives you what you're looking for and there are some other good powers that are thematic (lingering radiation) and powers that synergize with choking cloud for full lockdown (EM Pulse). For extra effectiveness, you can use the Lockdown Proc in hopes of holding a boss with CC alone. It will only proc 15% of the time every 5 seconds, but when it does, it's nice. You can throw other procs in there if you want to slow the enemy or do damage, but I would probably slot hold duration just to ensure minions and lieutenants stay stuck. Sticking with theme, I think you have to go with Controller so you can get Bile Spray from the Leviathan Mastery. You literally throw up on your enemy. As for selecting a primary, hard to say. It depends on how you want to play and what works best for your theme.
-
 You need to tweak your math a little. Since a Brute applies more damage on each target it hits, it will have a kill rate faster than a tank, thus it will bring in enemies into its target cap more quickly than a tank. You should adjust the AoE math as follows with the faster kill rate: Brute AoE = .75×7×10×(5.25/4.5) = 61.25. So we closed the gap a bit there. Also, there is a big assumption you're making which is you will have an entire attack chain made up of target saturated AoE attacks. You should factor in your single target attacks and AoE attacks that are less than 10 (16) while also factoring in when you are no longer target saturated (when you have 10 enemies or less left in a mob).
 -
Feel free to read my PPM Information Guide (in my signature block, also in Guides forum). It'll help you understand the rules.
-
Should work. But the proc will only last for approximately 5 seconds.
-
I agree with the devs. The crash should be spread across both res and defense as a means to even the crash for all sets. Also keep on mind, they removed the crash if you dont stack. So treat this as a deterrent from using double rage to avoid a significant crash as opposed to an automatic 20% defense crash.
-
Are you under the impression a defense debuff only hurts defense sets? It hurts everybody. So does the resistance debuff. Even if you have 0% defense, or 0% resistance, you can have negative values, making it much easier to hit you, and hit you harder.
-
I'm glad you're testing it. I'm actually somewhat surprised the 55 IOs compare so closely with just replacing it with another proc.
-
I wouldn't be surprised if they remove the increase to max targets on tanker attacks.
-
True, the extra boost is nice, unfortunately PBU has a 240 second recharge versus PB having 120 second recharge. So depending on how often you use Blackstar, you might only have it boosted half the time with PBU as opposed to everytime with PB.
-
@Infinitum @Call Me Awesome, your discussion has inspired me to share something I built awhile back but forgot to post it. It's a survivability tool that allows you to input your character's information and your enemy's information to then calculate how long it would take for your character to die (if ever). I also threw in a Survivability Score that combines your Resistance, Defense, HP, and Regeneration (sorry, no absorb yet) to give it a rating (it's a hack effort, but good enough). Anyways, feel free to use. I posted information on it in this guide
-
Reserved
-
Revision History: 13 Dec 2020(v3.0): Note: Content of the guide does not reflect recent changes to the Tool. That will come later Added the Conditioning Inherent for Arachnos. Previously it was using the base regeneration of 1 tick every 12s, it should have been 1 tick every 10s Added Bodyguard Mode for Masterminds. You can choose your number of pets (0-6) to divide your damage across. The tool will assume the pets won't die, so temper expectations. Incorporated Purple Patch for Enemy Relative Level selections. Previously, the Attack Damage Per Second, Damage Debuff, and To Hit Debuff fields were assumed to have the Purple Patch included. I have now broken that out so that those three fields will be pre-purple patch (e.g. If you enter a Damage Debuff of 40%, but select the Enemy Relative Level to be +3, the purple patch modifier of 0.65 will be applied, making the actual damage debuff to be 26%). 17 Jun 2020(v2.0): Updated the content in the guide to accurately reflect the features of the v2.0 Survivability Tool Added a Description for the Immortality Score Added additional Formulas for clarity as well as for the new calculations 5 Feb 2020 (v2.0): Changed Regeneration Bonus to just Regeneration (so now you include the 100% base value, which is how Mids Reborn shows it) Added Immortality Score (this calculates the maximum Enemy DPS your character can take before the net DPS exceeds your HP/sec, thus you start losing life on average) Added new computational blocks that now allows you to see all of your Survivability Calculations for every positional/type damage pairing. This is a quality of life improvement as you no longer have to select between every single permutation just to see each score. Included in the new Survivability Calculations is "No Position". This is rare, but I believe there are some psychic attacks that are positionless, which would render the use of Psionic defense only, and no Melee/AoE/Range defense checks. Made a new sheet for notes on the program (I need to update the notes, however) 9 Nov 2019 (v1.03): Added a New User Input for Health Bonuses, "Additional Heal over Time" 3 Nov 2019 (v1.02): Updated the Survivability Tool to correct an error in the "Probability to Hit" formula (forgot a minmax function) Added a New User Input for Enemy's Attack Info, "Survival Duration". Added a New Survivability Calculation "Max DPS for Survival Duration" Changed the "Survivability Score" to be a ratio of the "Max DPS for Survival Duration" result with its Base result
-
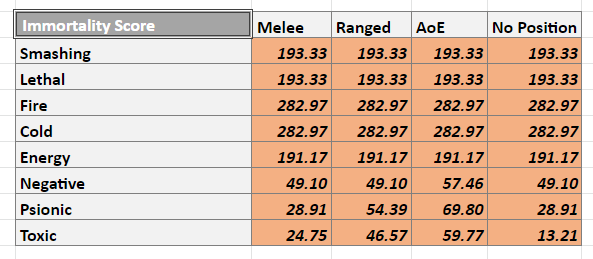
The Survivability Tool by Bopper Written: 2 November 2019 Last Updated: 17 June 2020 (How long will it take until you're dead?) Author's Note: Have you ever wondered how strong am I, really? Well, I have a simple test for that. I have written a program that allows the user to enter characteristics of their hero/villain; such as Archetype, Defenses, Resistances, Max Health Bonuses, and Regeneration. You can then input an amount of damage per second you are attacked with (you select the type of damage, specifically) and the tool will calculate how long it would take for you to go from 100% health to death. I call this the "Time until Death" calculation: which is one of four Survivability Calculations I showcase in this tool. The others: Max DPS for Survival Duation, Survivability Score, and Immortality Score will all be described in detail below. Now, you might be asking, why would I want to know this? Answer, you might not; but if you have ever asked the question, “should I add more defense or resistance (or more HP, or more regeneration)?” then this is the tool for you. In real time, you can tweak any parameter and see how it will impact your survivability. Without further ado, here is a link to the Survivability Tool (It is a Google Doc that you will make a local copy of). How do I use the tool? First off, you can only edit the fields marked with a Green background. Also, there are two types of editable fields: ones you enter a value (e.g. changing Max HP Boost from 50% to 15%), and ones you select from a drop-down menu (e.g. changing Archetype from Brute to Defender). The fields marked with an Orange background are calculated fields, which takes the user-input information to determine their values. You can’t edit these fields, otherwise you would break the formulas in the field. The fields marked with a Black background are fixed tables, which are used for look-up purposes. Again, you can’t edit these fields. Now that we know the rules, let’s step through each field: User Inputs Select Your Archetype Archetype: The user can select their archetype using the drop-down menu. Based on the selection, the appropriate archetype information is loaded into the “Max Values for your AT” field (HP base, HP max, Regeneration max, and Resistance max). Those values are used as limits checks for calculations later on. Enter Your Health Bonuses Max HP Boost (%): The user enters the amount of Max HP boosts in the build. This could include boosts from Set IO Bonuses, or it could be a power that increases the Max HP. Ultimately, add up all the bonuses and do not include the 100% from base. Max HP Boosts do 2 things for the character: more Max HP means more damage needs to be done to kill you, also more Max HP means more HP is recovered every time a regeneration tick is triggered (5% of max HP is recovered on each tick). Regeneration Total (%): The user enters the total amount of Regeneration in the build (100% from base, regeneration from set IO bonuses and powers). Add up all of them (or use Mid’s Reborn and look at the totals…do include the 100% base). Regeneration determines how frequently the 5% HP recovery triggers. Additional Heal over Time (HPS): The user enters the average amount of additional Healing the character receives in units of Hit Points per Second. For example, if every 90 seconds the character Heals them self for 450 HP, then the user will input 5 (450 HP/90s = 5 HPS). Enter Your Debuffs Damage Debuff: The user enters the amount of damage debuff their character applies to the enemy. In the game the enemy can resist this debuff, so it is important to know that the user must enter the post-resisted debuff value into this field. For example, if the character applies a 50% damage debuff and the enemy resists 25% of the debuff, the user must input 37.5% into this field: To Hit Debuff: The user enters the amount of to-hit debuff their character applies to the enemy. In the game the enemy can resist this debuff, so the user must enter the post-resisted debuff value into this field. For example, if the character applies a 30% to-hit debuff and the enemy resists 25% of the debuff, the user must input 22.5% into this field: Enter Your Enemy’s Attack Info Attack Damage Per Second: The user enters the amount of DPS is coming from an enemy’s attack (remember, this is a value that is prior to looking at defense, resistance, etc. Just the raw damage). Survival Duration: The user enters the duration (in seconds) that they want to be capable of surviving. This value is used later for the "Max DPS for Survival Duration" and "Survivability Score" calculations. Attack Type: The user selects the type of attack being used for the Survivability Calculation. Damage Type: The user selects the type of damage being used for the Survivability Calculation. Enemy To Hit: The user enters the To-Hit Modifier. By default, this value is 50% (63.75% if you want to use Incarnate Trials’ To-Hit mods). The user can make this any value they want though, so if they want to buff it (or debuff it), tweak this value appropriately. Enemy Accuracy Modifier: The user enters the Accuracy Modifier. By default, this value is 1.0x, but the user has the freedom to apply an accuracy bonus if desired. Enemy Type: The user can select the rank of the enemy, which will introduce additional accuracy modifiers for the calculations. Enemy Relative Level: The user can select the relative level of the enemy which could introduce additional To-Hit modifiers and accuracy modifiers. Enter Your Defense/Resistance Values Defense: The user enters the defense for each position and type. Note that there is no such thing as toxic defense (at least according to Mids) so keep that set to 0%. Resistance: The user enters the resistance for each damage type. Note that there is no such thing as positional resistances so keep those set to 0%. Outputs Max Values for your AT HP (base): This is the base Hit Points for the user-selected Archetype. HP (max): This is the maximum Hit Points for the user-selected Archetype. Regeneration (max): This is the maximum regeneration for the user-selected Archetype. Resistance (max): This is the maximum resistance for the user-selected Archetype. Your Health Calculations Resistance: This is the resistance value to the user-selected damage type. This value is used in calculating the amount of damage taken for each successful attack. Defense: This is the defense value to the user-selected attack and damage type. This value is always the highest between the user-selected options. Max Health: This is the maximum HP for the character after factoring in the Archetype, Max HP Boost, and HP (max). Regen Period: This is how frequently 5% of max HP is returned to the character. When there is 0% Regeneration Bonus, this value is 12 seconds. As regeneration boosts are increased, the interval period reduces: HP per Regen Tick: This is simply 5% of the Max Health you recover on each regeneration tick. HP/sec: This is the average amount of HP recovery each second. Simply, this is: Using some algebra, we can simplify this formula to be: Your Damage Taken Calculations Damage Taken (after Resistance): This is the damage you take when an attack hits you. It is reduced by the amount of your resistance and the amount of damage debuffs. Total Accuracy Mods (product): This is the combined Accuracy Modifier used by the enemy. It is the product of the enemy’s general accuracy mod, rank accuracy mod, and relative level accuracy mod. Total ToHit Mods (sum): This is the combined To-Hit Modifier used by the enemy. It is the summation of the enemy’s general to-hit mod, relative level to-hit mod, and to-hit debuffs. Probability to Hit: This is the final probability of an attack hitting you, combining the effects of all accuracy mods, to-hit mods, and defense. Note, this is an oversimplification of the formula. The to-hit mod portion and final result are actually clamped to where the result can go no less than 5% and no more than 95%. This tweaks the formula to be: Average Damage Taken Per Second: This is the expected amount of damage per second your character will take, which is the product of the Damage Taken (after Resistance) and the Probability to Hit. Your Survivability Calculation Each of the Survivability Calculations will display their scores for every permutation of Positional and Type attacks. This was a quality-of-life feature added in v2.0 to quickly allow users to view all of their scores instead of having to manually change the Attack and Damage type for every permutation. The table will look like this: For the table we can see for this build, when facing a Smashing-Melee attack, it has an Immortality Score of 193.33 (same score for Ranged, AoE, and No Position which implies the Smashing Defense is higher than all of the positional Defenses). When facing Psionic-Range attacks, it has an Immortality Score of 54.39. The No Position (or "positionless") attack is rare, but there are a few enemies who do Psionic Attacks that are not tagged with a position, in which case the positional defenses are ignored and only the type defense is used in the analysis. Time until Death: This is the amount of time it takes to go from 100% health to death. This calculation uses the inputs from the user and incorporates them into the following formula: Max DPS for Survival Duration: This is the maximum amount of Attack Damage per Second you are able to take in order to survive for the user-defined Survival Duration. Survivability Score: This is the survivability factor above your Archetype's base values. This simply calculates the ratio of your "Max DPS for Survival Duration" rating versus what that rating would be if all of your attributes were set to their base values (e.g. no defense, no resistance, no HP boost, no additional regeneration). This score is not intended to compare across other Archetypes as other ATs will have different Base HP Immortality Score: This is perhaps the definitive metric one can use to measure how well they can survive. It simply calculates how much the DPS of the enemy needs to be for it to overtake your build's HP/sec. Anything more, and your health bar will trend downward over time; thus this is the maximum amount of DPS your character can withstand while still surviving forever.

-
Do you mean Power Boost (Power Buildup)? I will say this about Blackstar. If you use Power Boost and have the T3+ alpha (Intuition Radial or Musculature Radial), you will have 118.34% tohit debuff enhancement added in, making your BlackStar achieve -136.5% ToHit debuff without slotting. Throw in Clarion Radial destiny, and you hit 186.5% tohit debuff (in theory, but combining CR+PB actually is probably much more than this, like 235-245%)
-
On tanks, 3534. So roughly 88% above base, iirc
-
Mid's Reborn: Hero Designer
Bopper replied to Metalios's topic in Mids' Reborn Hero Designer's Forum
When you go to select the enhancement, press the + button once for each level up -
The +dam is just one aspect that factors into optimizing the dps of an attack chain. You will want to look at powers that offer up high DPA; and in the case of procs, you want to find attacks with low cast times, long (but not too long) base recharge, and you want good options for procs. One power that stands out to me in the SS set is knockout blow. It hits like a truck with a not terrible case time (3.56 damage over 2.23s cast time). It has a base recharge of 25 seconds which makes it the 2nd most efficient single target attack power for using the FF proc. With no recharge in knockout blow, you will have a 90% probability to proc FF for a 100% recharge bonus for 5 seconds. Combine that with another 150% global recharge and you will have KoB up every 8 seconds (which is conservative if we're being honest). The 2nd thing about KoB that stands out is that it can take the purple Hold damage proc, which is not common for melee attacks. That adds an extra 36 damage over a basic proc. So again, when looking for what makes a good proc attack chain, you have to factor all of these things in: DPA, +dam, cast time, base recharge. Not to mention, finding enough good powers to make the attack chain seamless. That's where picking epics like Gloom come in, as it hits all the above checkmarks. Keep in mind, the purpose of this thread isn't so much about finding the best proc build, but to test many combinations for the analysis of the utility of procs. From the test results you can determine for yourself what works best for you.