qwy
-
Posts
34 -
Joined
-
Last visited
Content Type
Profiles
Forums
Events
Store
Articles
Patch Notes
Everything posted by qwy
-
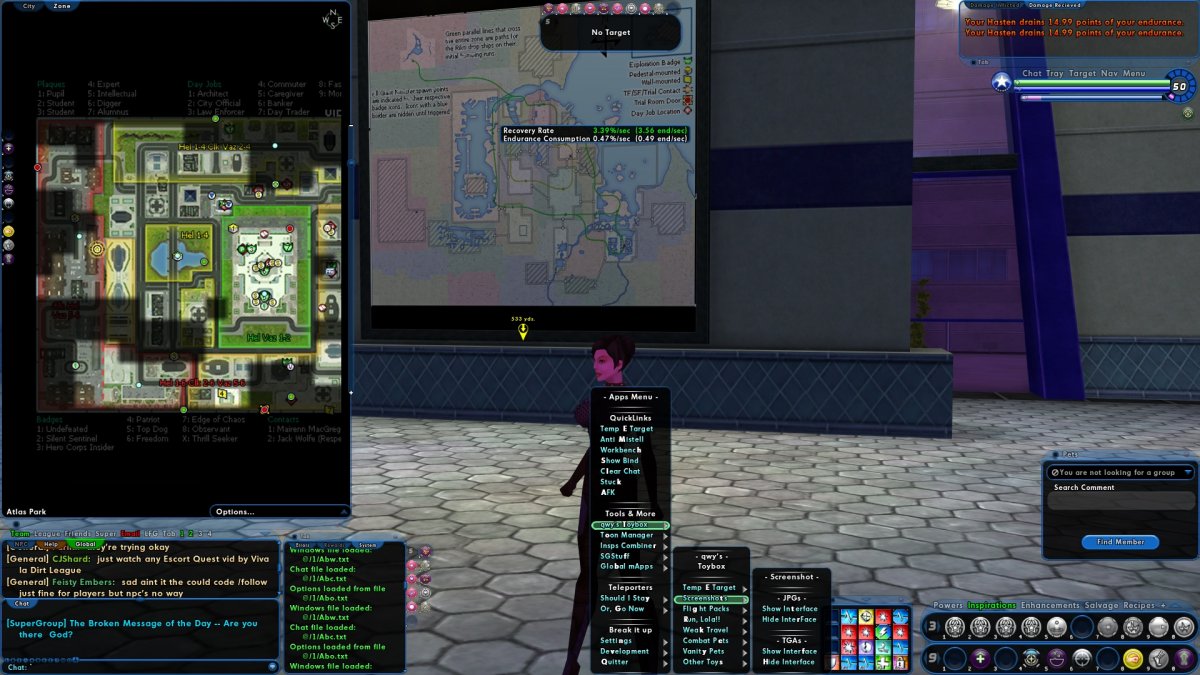
i26 and beyond: The 5Chain Attack Assistant by qwy Preamble This is an ultra-basic rotator, common to a lot of applications. The only difference, It works with a floating tray for arranging attack chains and maintaining a visible reference of their progression. A single key, advances through each step. I feel a little foolish writing this, it's really just a rotator. With the tie in to a tray though, I started to notice I was using it all the time. I thought other people might get something out of this application as well. For anyone not familiar, I'll still walk through the steps. 1. Getting Started 1. Dedicated Floating Tray We need a dedicated, floating tray, for this. They're essentially power trays, just independant of your main tray. This can get a little confusing, in that, floating trays have an ID number and are capable of scrolling to other, "Tray numbers". Tray's layer with higher ID number towards the front. SInce I have this on all my characters, I use floating tray7 as the highest available. "Available", is really the only detail that matters. To choose by number, you can edit and run this; /windowshow tray# Or, on the top right of your main power tray, there's a, "+"symbol, just right of the, "Recipes" toggle. A click generates the lowest tray ID number available, which, couldn't be easier to change later, if a reason to, pops up. 2. Setting the Orientation Right click the new tray and set the orientation to 2x6 (2 wide, 6 high) so, that it resembles the large one, just right of the character, in the image below. 3. Power Icons and Binds The binds take this orientation to heart. The column on the left is triggered by the 1 key, it will fire each power in that column, from top to bottom. The column on the right, follows this same idea, using the 3 key. Each bind file was named to reflect, The Key | The Tray | It's Number in the Sequence. Only the icons you want to use in a chain should go in the tray. Arranging the order of power icons, is the only step in altering the chain. 4. Placement I don't usually click powers. I tend to keep the mouse in front and use binds to trigger. For that reason, it's really tiny and somewhere in the peripheral. I only care about keeping an eye on activation and cooldowns. The binds are pretty dumb so, pressing a trigger too soon, can throw the whole order off. The urge to spam the 1 & 3 key is very real. For that reason, characters tend to outgrow it, as they get more powerful, and I get more familiar. 5. Installing If you're using the .zip, the file structure for placing the files, starts in the, "data" folder inside your CoX installation folder. Unless you've already generated a data folder, you won't have one. Adding one, is the only way to get one. Once the folder is there, you can either drop the entire contents from extracted .zip or, manually generate the remaining folders until, it mirrors it. Installing it to other folders on your hard drive is fine. The file paths of the macros and commands in the files just need to be edited to match. If you have a real text editor like Notepad++, it's basically a single, elaborate, cut and paste, to get them all. 6. Loading the FIles I have the initial step on a global file in the install root's data folder. The, "@" is my subfolder. The following 10 files, are kept in a global catch all named, "!". There's a zip file, at the bottom, with individual files and this folder structure. Edit accordingly. Load Global.txt /macroimage "v_archetypeicon_stalker" "5Chain" "bindloadfilesilent @/Global.txt" @/Global.txt ---------------- 1 "powexectray 2 5$$bindloadfilesilent @/!/152.txt" 3 "powexectray 1 5$$bindloadfilesilent @/!/352.txt" ---- Use Macros Instead of Global.txt /macroimage "Brawling_ComboLevel1" "Melee" "powexectray 2 5$$bindloadfilesilent @/!/152.txt" /macroimage "Brawling_ComboLevel3" "Range" "powexectray 1 5$$bindloadfilesilent @/!/352.txt" @/!/151.txt ---------------- 1 "powexectray 2 5$$powexectoggleoff Ninja Run$$powexectoggleoff Beast Run$$powexectoggleoff Sprint$$powexectoggleoff Prestige Power Slide$$bindloadfilesilent @/!/152.txt" @/!/152.txt ---------------- 1 "powexectray 4 5$$powexectoggleoff Ninja Run$$powexectoggleoff Beast Run$$powexectoggleoff Sprint$$powexectoggleoff Prestige Power Slide$$bindloadfilesilent @/!/153.txt" @/!/153.txt ---------------- 1 "powexectray 6 5$$powexectoggleoff Ninja Run$$powexectoggleoff Beast Run$$powexectoggleoff Sprint$$powexectoggleoff Prestige Power Slide$$bindloadfilesilent @/!/154.txt" @/!/154.txt ---------------- 1 "powexectray 8 5$$powexectoggleoff Ninja Run$$powexectoggleoff Beast Run$$powexectoggleoff Sprint$$powexectoggleoff Prestige Power Slide$$bindloadfilesilent @/!/155.txt" @/!/155.txt ---------------- 1 "powexectray 10 5$$powexectoggleoff Ninja Run$$powexectoggleoff Beast Run$$powexectoggleoff Sprint$$powexectoggleoff Prestige Power Slide$$bindloadfilesilent @/!/151.txt" ---- @/!/351.txt ---------------- 3 "powexectray 1 5$$powexectoggleoff Ninja Run$$powexectoggleoff Beast Run$$powexectoggleoff Sprint$$powexectoggleoff Prestige Power Slide$$bindloadfilesilent @/!/352.txt" @/!/352.txt ---------------- 3 "powexectray 3 5$$powexectoggleoff Ninja Run$$powexectoggleoff Beast Run$$powexectoggleoff Sprint$$powexectoggleoff Prestige Power Slide$$bindloadfilesilent @/!/353.txt" @/!/353.txt ---------------- 3 "powexectray 5 5$$powexectoggleoff Ninja Run$$powexectoggleoff Beast Run$$powexectoggleoff Sprint$$powexectoggleoff Prestige Power Slide$$bindloadfilesilent @/!/354.txt" @/!/354.txt ---------------- 3 "powexectray 7 5$$powexectoggleoff Ninja Run$$powexectoggleoff Beast Run$$powexectoggleoff Sprint$$powexectoggleoff Prestige Power Slide$$bindloadfilesilent @/!/355.txt" @/!/355.txt ---------------- 3 "powexectray 9 5$$powexectoggleoff Ninja Run$$powexectoggleoff Beast Run$$powexectoggleoff Sprint$$powexectoggleoff Prestige Power Slide$$bindloadfilesilent @/!/351.txt" The toggleoff nonsense, is just something I tend to do. All my files have, seemingly irrelevant, commands peppered throughout. These were already there. I figure, if I'm pressing attack keys, a little resource conservation couldn't hurt. Absolutely irrelevant, here. 7. End of Life There's some value at higher levels, it makes an awesome little cruise control melee/range spammer. So yea, it' embarrassingly simple. The application, combined with the tray, has had enough impact, I'm willing to embarrass myself. Thanks for looking! Feel free to hit me up with any questions. @.zip

-
- 4
-

-
i26 Guide: LeftDoubleClick Toggle, Another Twist on Global Teleport+Warshades Travel Binds | Binds | Binds for Specific Purposes i26 Unbindall (Keybindreset) I use it like it's an attack in the chain. A How to Recover Guide. How To Bind & Macro | Binds & Macros i26 Guide: BuildSaveFile; Navigating Relative Paths How To Bind & Macro | Binds & Macros i26 and beyond: The 5Chain Attack Assistant Binds for Specific Purposes | Introduction to Combat | Other Combat Mechanics i26 Expanded Mastermind NumPad Controls+ Binds for Specific Purposes | Binds & Macros | Remapping i26 The Mastermind's PetMouse Binds for Specific Purposes | Binds & Macros | Remapping
-
i26 Unbindall (Keybindreset) I use it like it's an attack in the chain. A How to Recover Guide. by qwy Preamble Personally, I've found using them often means never really needing them. If you're unfamiliar they wipe your active (Client managed) bind file clean. It's all gone. No more binds you had a hand in. No option for recovering them. They have ceased to be. It probably sounds like I was being facetious with the title and first sentence. I wasn't. Commands adside, the result of a glitch, a hiccup loading a bind or even certain input errors can result in the same end effect. I used to use a popular movement based bind set that is constantly loading files. Often, as things started heating up, BOOM! Bindload misfire! Heavily modded keys, all make with the bye bye. Around the 112thteen time, is when I first met unbindall, our eye caught each other across a busy cmdlist. I knew right away, I was on a road to recovery. Of healing. We got pretty serious, right away. I learned some hard lessons in the beginning but, I kept looking for excuses to get together. Peppering bind files with it like a love struck middleschooler, defacing a textbook with the name of their first crush. The most meaningful of which is a reset on every alt, I hit constantly. The more I'd hit it the fewer problems I'd have. This is typically how I turn off ninja sprint or, beast surge, I can't even remember the last time I even had a problem. Unbindall is the wind that gives my alts wings, their license to soar. Example CTRL+R "up 0$$down 0$$forward 0$$backward 0$$left 0$$right 0$$camreset$$unbindall$$bindloadfilesilent @/Global.txt$$bindloadfilesilent @/Rojas/General.txt$$bindloadfilesilent @/1/A.txt$$bindloadfile @/Rojas/1/A/1.txt" 1. The First Step Without a few ducks lined up, ahead of time, this command is a bad day, waiting to happen. There's a lot of heads on this hydra. It's a little hard sticking to a single step and have it provide an actual value, on its own. I'm going to bounce around two key points with this and, recovery methods are going to get the most stage time. The second especially if, like me, you've got mad altoholism, is ongoing to be an evolution. It's certainly, the most daunting step, cultivating a global bind profile. If you just have a couple of characters and playing at lower levels, it's not important yet although, the concepts here will help you save and recover just as well. In all scenarios, knowing what's on the active file, what you actually want on it, what should be accessible to all alts, what the current character needs are, where the hell are all these files and how you're going to get them where they need to be, is a long road but it starts with knowing what you already have. That's where bindsave comes in. 2. Active, original and default files AKA Keybind.txt and the spectors. Even if you just have one main, getting familiar with some of the inner workings isn't a bad idea, if you've got a lot of advanced level alts, a global bind profile is a really good idea. A hot of the presses copy of the original bind file is a great start. That puts backing up your current active files on the table and of course, methods to back up and load. so, let's start by getting the client interface tools involved. Part way through, we're jumping on the fast track for a comparative argument on the value of this guide. We need to backup the active file and to get a fresh copy of the original file. We can't actually see either, only copies that are first, parsed in an order that's based on numerical values of key ID. More on that later. The one file we can see, is Keybind.txt, aka the default file. There seems to be an artifact of a default version of this file we can't see. It occasionally loads, onselect, of the big dropdown. It might not happen here however, check the work, along the way. It's not a problem these steps won't overcome, incidentally. Keybinds.txt is a long-term committed. love triangle with /bindsave and /bindload. Those commands are almost short enough to be a viable recovery plan using a slashcommand. For one alt, anyway. Navigate to the root of your installation folder. If you're having trouble, search for cityofheroes.exe, it's in the folder we want. Once you find it, copy and paste it right in the root, there. It might not be important, I actually don't even care what's on it. You might later, so, if that happens, there it is. If you're feeling confident, login an established alt, with lots of work done, or, for the less confident, there should be some of your influence on a new characters bind file if you want to roll a new one. If you're not sure, enter the following bind in to chat. Change CTRL+' , if you already have something on that it. 2.1 Test bind /bind CTRL+' "t $name, I'm a copy of the active file" In all cases, we have our copy of the root, we're logged in on a character, known to have an altered bind, let's save over the keybind.txt. Within the client, navigate to the option menu's, keymapping tab, and hit the top-right, blue button, "save to default". Go back to the game folder and copy and paste it again. Open up the copy, make sure you're seeing what you expected to see. The bind above should be on the second line, if you used it. So, "save to default", and, "load from default" are keybinds.txt's side pieces. Renaming the file between saves, you could backup all your toons this way. I wouldn't but, you get the idea. On left side of the keymapping tab, is the big dropdown, I mentioned, you could set it to original, hit save to default, go back to the folder, change the name of keybind.txt to global.txt, (this is that thing I keep talking about.) change the name of the copy we made before this one, back to keybinds.txt, navigate back to the options Keymapping tab and hit the second from top blue buttons or, just run this. 2.2 Back on the fast track /bindsave$$unbindall$$bindsavefile KeybindsNEW.txt$$bindload In fact, we could of skipped this whole thing with; 2.3 The step skipper /bindsavefile c:/CoH/UnbindBackup/Active.txt$$unbindall$$bindsavefile c:/CoH/UnbindBackup/OG-Fresh.txt$$bindload$$bindsavefile c:/CoH/UnbindBackup/OG-Root.txt$$bindloadfile c:/CoH/UnbindBackup/Active.txt The point was, to put in to perspective the difference between commands ready to trigger vs, relying on the interface alone. The keymapping tab's dropdown should probably stay on default however, the deeper down this rabbit hole, the less important the entire tab becomes. The command finished all the heavy lifting. The original copy was made and your active binds have been restored. Let's take a quick look at the new file. It should be in a folder named data with keybind.txt. Although, If you haven't already made a data folder, you don't have one. Make one now, it's good. Unnecessary here but, I'll have more on that in future guides. After you generated the data folder, before opening it, go to the piggs folder. Inside is KeybindsNEW.txt. Move it to the data folder and get familiar with it, before adding to it. Ideally, it grows into something useful for all your toons but, in those catastrophic moments, your binds are going to be down anyway, and this guide is about getting them back. Getting back on track, it's a catastrophe, your binds are down, this file, as it is now, those are the binds in play. Having had that bird's eye view, adds a bit of calm to the situation. Opposed to having your team watch you autorun, full frontal leeerroooyy style, in to the AV, while you're navigating to the blue buttons, let's take a look at some other options. 3. Back to the catastrophe The first thing we need is some backups. However, we're going to skip that for the time being. Ideally, they're created with commands, that can easily exceed the chat character limit. This brings popmenu's and custom.windows in to play. So, keep that in mind as we cover the restore options, below and, grab the commands for save and load, that suit you. With that, partly, out of the way, here are the choices; the big blue buttons, slashcommands, macros, popmenus and custom.windows. 3.1 Macros If they're already in your tray, it's fixed, game on! Otherwise, you'll have to get them there. Relative Path /macroimage "TalonsOfVengeance_MorbidCut" "SuperflySnuka" "camreset$$unbindall$$bindloadfilesilent Binds/global.txt$$bindloadfilesilent Binds/AT/general.txt$$bindloadfilesilent Backups/XXXX/binds.txt" Absolute Path /macroimage "TalonsOfVengeance_MorbidCut" "SuperflySnuka" "camreset$$unbindall$$bindloadfilesilent c:/CoX/Binds/global.txt$$bindloadfilesilent c:/CoX/Binds/AT/general.txt$$bindloadfilesilent c:/CoX/XXXX/general.txt$$bindloadfile c:/CoX/XXXX/build2binds.txt" /macroimage "TalonsOfVengeance_MorbidCut" "Custom Window" "customwindowtoggle ." /macroimage "TalonsOfVengeance_MorbidCut" "my pop" "popmenu NameOfWindow" The first one works for a basic global environment. It grabs the global bind file, a bind file, unique to that AT and another one unique to the active environment (build, interface or play style) Edited for your situation, it's like nothing even happened. The other two, just move the situation to step 2. Without the legwork upfront, none of them excel. 3.2 Popmenu - and, why not? 2.1 True, the bindload option requires a reboot. But, if you command the command to command chat to write the command... Relative Path: Option "Recover" <&show chat$$beginchat /"chatloadfile Backups/XXXX/chat.txt$$optionloadfile Backups/XXXX/options.txt$$wdwloadfile Backups/XXXX/wdw.txt$$bindloadfile Binds/global.txt$$bindloadfile Binds/AT/general.txt$$bindloadfile Backups/XXXX/binds.txt"&> Option "Bu&tton Machine" "show chat$$beginchat /bindloadfile binds/Macros.txt" --- Absolute Path: Option "Recover" <&show chat$$beginchat /"chatloadfile c:/CoX/XXXX/chat.txt$$optionloadfile c:/CoX/XXXX/options.txt$$wdwloadfile c:/CoX/XXXX/wdw.txt$$bindloadfile c:/CoX/Binds/global.txt$$bindloadfile c:/CoX/Binds/AT/general.txt$$bindloadfile c:/CoX/XXXX/binds.txt"&> Option "Bu&tton Machine" "show chat$$beginchat /bindloadfile c:/CoX/binds/Macros.txt" ...and, press enter. Voila! The first option loads the window preferences, chat setup, options settings and the 3 bind files for the global scenario I mentioned above. With the character limit raised, we're far from having to worry about command lengths. The second, a macro button machine file (patent pending). WIth this idea, once this file is loaded, the keys will generate macros that perform whatever variety of commands you can think of. Here's an example. 1 macroimage Brawling_ComboLevel1 Melee "powexectray 2 5$$gototray 9$$bindloadfilesilent @/!/152.txt" 3 macroimage Brawling_ComboLevel3 Range "powexectray 1 5$$gototray 9$$bindloadfilesilent @/!/352.txt" Q "macroimage TalonsOfVengeance_MorbidCut Q targetcustomnext enemy Quantum" E "macroimage v_archetypeicon_stalker E beginchat /bind E targetcustomnext notteammate notmypet base " Example macros were readily available for cut and paste. they're kind of useless here 2.2 Popmenu/sub menu Here's an example submenu with a reset macro to restore individual alts? Menu "Oh yes" { Divider Title "- There Here-" Title "The Dream Team is Here" Divider Divider Option "Super Fly Snuka" <¯oimage TalonsOfVengeance_MorbidCut "Super fly" "bindloadfilesilent @/Global.txt$$bindloadfilesilent @/Snuks/General.txt$$bindloadfilesilent @/Snuks/RelevantPathStuff/binds.txt"&> Option "Jack the Snake" <¯oimage TalonsOfVengeance_MorbidCut "Jake the Snake" "bindloadfilesilent @/Global.txt$$bindloadfilesilent @/Snakie/General.txt$$bindloadfilesilent @/Snakie/RelevantPathStuff/binds.txt"&> Option "Iron Shiek" <¯oimage TalonsOfVengeance_MorbidCut "Iron Shiek" "bindloadfilesilent @/Global.txt$$bindloadfilesilent @/Shiknessest/General.txt$$bindloadfilesilent @/Shiknessest/RelevantPathStuff/binds.txt"&> Divider } In all cases, access to a popmenu, is going to need a non-bind solution to make it pop (Read, Macro). With the potential of hotkeys though, once it's open, it's got a bunch of potential to help keep you alive until binds are back up. Either way, not a bad option to keep in your back pocket. 3.3 custom.window By far, the best choice, in this particular circumstance, in my opinion. No need to look for it, no confusing it with something else and depending on a couple of other factors, a character limit, well above anything we'd want here. Window . 0 0 100 150 Button "" "" Button Apps "macro_image GenericPower_AutoOverlay APPS popmenu APPS" Button "" "" Button ToonLaunch3000 "" Button Relative "unbindall$$bindloadfilesilent XXXX/global.txt$$chatloadfile XXXX/chat.txt$$optionloadfile XXXX/options.txt$$wdwloadfile XXXX/wdw.txt$$bindloadfilesilent Binds/AT/XXXX.txt$$bindloadfilesilent XXXX/General.txt$$bindloadfilesilent XXXX/build1binds.txt" Button "" "" Button "" "" Button Absolute "unbindall$$bindloadfilesilent c./CoX/XXXX/global.txt$$chatloadfile c./CoX/XXXX/chat.txt$$optionloadfile c./CoX/XXXX/options.txt$$wdwloadfile c./CoX/XXXX/wdw.txt$$bindloadfilesilent c./CoX/Binds/AT/XXXX.txt$$bindloadfilesilent c./CoX/XXXX/General.txt$$bindloadfilesilent c./CoX/XXXX/build1binds.txt" Button --- "" Button Macros "" Button "Super Fly Snuka" <¯oimage TalonsOfVengeance_MorbidCut "Super fly" "bindloadfilesilent @/Global.txt$$bindloadfilesilent @/Snuks/General.txt$$bindloadfilesilent @/Snuks/RelevantPathStuff/binds.txt"&> Button --- "" Button "" "" Open 0 End Example: Snipped from custom.window. Yea, I named it, ".". 4. Adding the ability to use Custom and Pop menus The stickied guides for adding these menus are great! Easy to understand and the options themselves, won't require as many steps as I've got here. I've got a lot to learn. I'm more inclined to experiment. Blowing up stuff is more fun than documenting an explosion. I've really got a lot to learn... Check out those guides, if you haven't. Then, set yourself up with a couple of options to restore. 5. Generating the backups to load So, the commands that save are the same as the ones to load, the only difference, is the actual word, "save" and "load". Once you've decided which option you'd like to use, edit the paths, "XXXX" as the character name and make a copy of it. From there, change the, "loads" to, "save" or the, "saves" to, "load", leaving you with a matched set. Don't forget to save after big changes, high holidays and on leap years. Get a real text editor, if you don't have one and lookout for future guides, exploring the potential of file managed, global profiles. 6. Anti-climatic conclusion and... unbindall, the reason it hasn't stomped out my spirit? Combined with a following bindload, or series of bindloads, in a single command, they all happen around the same time. You always want to write them in the order you want to execute. Consider the last string in section 2, there would have been no need to go to the install folder at all, it generates an archive folder and saves the active bind file, unbinds everything and saves a copy of it in the new folder, and uploads the original keybind.txt and saves a copy to the new folder and than loads the original active bind file like nothing even happened. As I was writing this out, I decided to test what would happen if I shuffled the order, some of the results were unexpected so, it never hurts to test things under controlled environments. Ultimately, the first pass was the plan I was trying to execute and in that order, it did exactly that. Disclaimer If any additions, corrections, errors or elaboration stand out, let me know. If anyone recognizes work that should be contributed to another author, I'm more than happy to remove, extend credit or take whatever steps are appropriate to remedy the situation. Hope this is helpful.
-
I have a lvl50 Stone Tank, lvl50 Warshade, lvl50 Peacebringer and other characters with teleport or, mystic flight. Along the way, I've come to know what I like and don't like. I also have a lot of binds and a lot of alts, leading me, like a lot of people I'd guess, to start putting energy in to one global profile to cover as much as makes sense and smaller profiles for toons that develop out of it. I'm up to 11 level 50s in all so, that global has matured a lot along the way. There's great guides on this topic already. They've definitely helped steer me along the way. if this is something you're interested in, I highly recommend checking the previous posts for more information. This guide will be focused on what I haven't come across yet. Couple quick things, 1. I haven't tried Jaunt yet. I suspect this works but it hasn't been tested. With P2W flight and Ninja/Beast Run, I don't tend to lean towards travel powers like back in live. My stone tank's run speed at almost 70mph. KInd of an extreme example although, at an average of 60mph on others... anyway. 2. I've messed around with powexeclocation but ultimately, my preference for teleport is excename. I use powexeclocation for other things and I'm fairly confident it can be used here, interchangeably. 3. I only like LeftDoubleClick, sometimes. I use the client to grab a, "fresh off the press" copy of keybind.txt as the base for my global file. I splurged on some extra characters and named it Global.txt. This first bit goes in there. @/Global.txt SHIFT+LBUTTON "powexecname Translocation$$powexecname Jaunt$$powexecname Teleport$$powexecname White Dwarf Step$$powexecname Shadow Step" LeftDoubleClick nop CTRL+LeftDoubleClick "bindloadfilesilent @/!/LDCTP1.txt" My active binds are kept in the Install/data folder. My subfolder is, "@", where all the binds go. CTRL+LeftDoubleClick loads a file to mimic SHIFT+LBUTTON. It's in another subfolder named, "!". It's for anything global, Global.txt couldn't manage alone. Edit to taste. @/!/LDCTP1.txt LeftDoubleClick "powexecname Translocation$$powexecname Jaunt$$powexecname Teleport$$powexecname White Dwarf Step$$powexecname Shadow Step" CTRL+LeftDoubleClick "bindloadfilesilent @/!/LDCTP0.txt" CTRL+: Flips LeftDoubleClick back to my preferred default, off. @/!/LDCTP0.txt LeftDoubleClick nop CTRL+LeftDoubleClick "bindloadfilesilent @/!/LDCTP1.txt" This manages itself until the next reset. Warshade Minimum So, on to warshades. We have Shadow Step covered, so Dwarf is all we're missing. I'm using, a minimalist global folder structure here. Everyone has their own methods, so I wanted to present a, "just the facts" version to illustrate my thinking and conforms to other methods with less to cut. Afterwards, a puffed-up opinion piece, closer to what I use. That being said, Essentially, I'm mimicing the above. 1. @/WSToonName/NotDwarfBinds.txt - Minimum <KEY1> "powexectoggleon Black Dwarf$$bindloadfilesilent @/Global.txt$$bindloadfilesilent @/WSToonName/IsDwarfBinds.txt" This is a bare minimum option. <KEY1> loads the Dwarf binds. 2. @/WSToonName/IsDwarfBinds.txt - Minimum SHIFT+LBUTTON powexecname Black Dwarf Step LeftDoubleClick powexecname Black Dwarf Step CTRL+LeftDoubleClick "bindloadfilesilent @/!/WS-LDCTP0.txt" <KEY2> "powexectoggleoff Black Dwarf$$bindloadfilesilent @/Global.txt$$bindloadfilesilent @/WSToonName/NotDwarfBinds.txt" Unlike the multi power option, I prefer LeftDoubleClick's default is functional if I go Dwarf. <KEY2>, pops back to human form and Shadow Step is restored. 3. @/!/WS-LDCTP0.txt - Minimum LeftDoubleClick nop CTRL+LeftDoubleClick "bindloadfilesilent @/!/WS-LDCTP1.txt" This keeps the activity, back and forth, in the global folder . 4. @/!/WS-LDCTP1.txt - Minimum LeftDoubleClick powexecname Black Dwarf Step CTRL+LeftDoubleClick "bindloadfilesilent @/!/WS-LDCTP0.txt" And, like the first bit, this manages itself until <KEY2> gets pressed. Then, were back to square one. WIth that, the teleport part is finished. It's nothing fancy but, hopefully useful. Warshade Options So, here's a little more QOL and global flexibility. The teleport part is essentially the same. For anyone just getting familiar with this, we're rolling binds. Anyone who's spent any time with them will testify, interrupts, too-much-too-fast keyboard action or occasional glitches can knock them out of sync. With easy access to reset them, it's hardly worth mentioning. WIthout, possible disaster. Likely frustration. There's a lot of ways to do this and, here's a couple I use a variation of. 1. @/Nictus/BuildWithDwarf/NotDwarfBinds.txt SHIFT+1 "powexectoggleon Dark Nova$$windowhide Tray7$$gototray 4$$unbindall$$bindloadfilesilent @/Global.txt$$bindloadfilesilent @/Nictus/General.txt$$bindloadfilesilent @/!/Kheld.txt$$bindloadfilesilent @/Nictus/BuildWithNova/IsNovaBinds.txt" SHIFT+3 "powexectoggleon Black Dwarf$$windowhide tray7$$gototray 4$$unbindall$$bindloadfilesilent @/Global.txt$$bindloadfilesilent @/Nictus/General.txt$$bindloadfilesilent @/!/Kheld.txt$$bindloadfilesilent @/Nictus/BuildWithDwarf/IsDwarfBinds.txt" SHIFT+C "+$$powexectoggleon Penumbral Shield$$powexectoggleon Twilight Shield$$powexectoggleon Gravity Shield" CTRL+C "powexectoggleoff Black Dwarf$$powexectoggleoff Dark Nova$$windowshow tray7$$gototray 9$$unbindall$$bindloadfilesilent @/Global.txt$$bindloadfilesilent @/Nictus/General.txt$$bindloadfilesilent @/Nictus/BuildWithDwarf/NotDwarfBinds" CTRL+R "up 0$$down 0$$forward 0$$backward 0$$left 0$$right 0$$camreset$$unbindall$$bindloadfilesilent @/Global.txt$$bindloadfilesilent @/Nictus/General.txt$$bindloadfilesilent @/Nictus/BuildWithDwarf/NotDwarfBinds.txt" I've added spaces, for legibility, that will need to be deleted before using. The rest of these can be edited for your pleasure. The Keys are relevant accept to illustrate one of the QOL pieces. SHIFT+1: Only added to illustrate where toggling on Nova fits in. SHIFT+3: Toggles Dwarf on, handles some window & tray stuff and then the binds load as follows. unbindall: I use this like it's part of an attack chain. Personally, I've found using it often means not really needing it. *(READ FOOTNOTE BEFORE USE!!) Global.tx: Now, it's my personal clean slate. Nictus/AllBuildBInds.txt: The Character's general binds load to catch Global overrides or, anything unique. Kheld.txt: I have global file for both forms, shared by PBs & WS so, Kheld.txt... This would be where it goes, if you do to otherwise, it's dead to us. BuildWithDwarf/NotDwarfBinds.txt: I spend more time on the human form so, a division. SHIFT+C: Notice the +$$ in the front, that's why I added the key names, it serves two functions In human, it kicks on two shields at once. More importantly, it picks up a cue from SHIFT+C in the next file and kicks on gravity shield, coming out of the other forms. If there's a bind issue, it buys a little time. CTRL+C: Emergency protocol if anything interrupted SHIFT+C. In most cases, rolling SHIFT+C works so, another key is the only choice for insurance. (Unbindall is in here too.) CTRL+R: Restores default NotDwarf state. I use this command for reset on everything. (Unbindall is in here too.) 2. @/Nictus/BuildWithDwarf/IsDwarfBinds.txt SHIFT+LBUTTON powexecname Black Dwarf Step LeftDoubleClick powexecname Black Dwarf Step CTRL+LeftDoubleClick "bindloadfilesilent @/!/Kheld/WS-LDCTP0.txt" SHIFT+3 "windowhide tray7$$gototray 4" SHIFT+C "-$$powexectoggleoff Black Dwarf$$powexectoggleoff Dark Nova$$windowshow Tray7$$gototray 9$$unbindall$$bindloadfilesilent @/Global.txt$$bindloadfilesilent @/Nictus/AllBuildBinds.txt$$bindloadfilesilent @/Nictus/BuildWithDwarf/NotDwarfBinds.txt" CTRL+C nop CTRL+R "up 0$$down 0$$forward 0$$backward 0$$left 0$$right 0$$camreset$$unbindall$$bindloadfilesilent @/Global.txt$$bindloadfilesilent @/Nictus/General.txt$$bindloadfilesilent @/!/Kheld.txt$$bindloadfilesilent @/Nictus/BuildWithDwarf/IsDwarfBinds.txt" The teleport binds show up again. The path added a subfolder named /Kheld/ which isn't necessary. It's only there to further illustrate the global purpose. SHIFT+1: Is gone, carried over from the last file and still toggles Nova on. SHIFT+3: We're in Dwarf so, this just maintains the window and tray stuff. SHIFT+C: Starts with -$$ to carry over to the last SHIFT+C command and auto toggle a primary shield. Both forms are toggled off, window & tray stuff then load the previous state. (Unbindall is in here too.) CTRL+C: With the rolling bind on SHIFT+C having more to offer, I only wanted CTRL+C if, SHIFT+C fails. Deleting it here, preserves its original command if, preferred. CTRL+R: Restores default NotDwarf state. I use this command for reset on everything. (Unbindall is in here too.) The last two steps from the Minimum version are nearly identical. Only the paths have changed to protect the innocent. We went from, @/!/WS-LDCTP0.txt to. @/!/Kheld/WS-LDCTP0.txt. *UNBINDALL/KEYBINDRESET: These two commands are identical. They will wipe your active (Client managed) bind file clean. You won't be able to recover what was lost. Bindsavefile, managing files locally and knowing what you need to load and when, is imperative to successfully implementing either of these. If you're not sure what these do, don't use them without doing some homework. I apologize for endlessly nagging about this. I'd just hate to find out, I was the guy that walked you through vaporizing your data, like it didn't matter. If this tutorial was helpful, I posted a recovery guide right here. Thanks for checking out the guide! Let me know If there's any corrections, improvements or elaboration in order.
-
I was messing around in the editor, and suddenly realized, the commands for angle and grid snap accept values... Why isn't anybody talking about this?! Help a builder out! Is this one of those things, so obvious, it's hardly worth mentioning. Now that I know, it seems kind of obvious. Is this cognitive bias? Before I slip any deeper, I figured I'd post what I found. At least then, I'll only be dense. Which is better than dense and a hypocrite, In all seriousness, the guides and tips, I've come across here, have been really helpful. So for anyone who hasn't come across this, yet, here's to giving back! Example Menu "Gri&d Size (F1)" { Divider Title "- Placement -" Title "Grid Snap" Divider Divider Title "Custom Small" Option "1/1&6 Grid" "gridsnap .125" Option "&3/16 Grid" "gridsnap .375" Option "&5/16 Grid" "gridsnap .625" Option "&7/16 Grid" "gridsnap .875" Divider Divider Title "Default" Option "1/4 x 1/4 &Grid" "gridsnap .25" Option "1/2 x 1/2 G&rid" "gridsnap .5" Option "1 x De&fault" "gridsnap 1" Option "2 x 2 Gr&id" "gridsnap 2" Option "4 x 4 Gri&d" "gridsnap 4" Divider Divider Title "Custom Large" Option "&8 x 8 Grid" "gridsnap 8" Option "16 &x 16 Grid" "gridsnap 16" Option "3&2 x 32 Grid" "gridsnap 32" Option "50 x 50 M&ax" "gridsnap 50" Option "0.00000&1-50" "gridsnap$$show chat$$beginchat /gridsnap " Divider Option "Dis&play" "gridsnap" Option "Disa&bled" "gridsnap 0" Divider } Menu "An&gle Snap (F2)" { Divider Title "- Rotation -" Divider Divider Title "Default" Option "1° &Snap" "anglesnap 1" Option "3° S&nap" "anglesnap 3" Option "5° &Default" "anglesnap 5" Option "&10° Snap" "anglesnap 10" Option "15° Sn&ap" "anglesnap 15" Option "30° Sna&p" "anglesnap 30" Option "&45° Snap" "anglesnap 45" Divider Divider Title "Custom" Option "&90° Snap" "anglesnap 90" Option "1&80° Snap" "anglesnap 180" Option "359° ma&x" "anglesnap 359" Option "0-&359°" "anglesnap$$show chat$$beginchat /anglesnap " Divider Option "Dis&play" "anglesnap" Option "0 Disa&bled" "anglesnap 0" Divider } The example was cut out of a popmenu I keep stuff in. It has an sg menu, with sg stuff. If you're into that kind of thing, look for, "popmenu SGStuff" on this forum.
- 1 reply
-
- 2
-
-
Thanks, @Hopestar!
-
I'm a little late to base building, and finding the editor very frustrating. I came here hoping to find some sort of nudge tool but, no luck. The preformatted list of music was pretty cool, though. A little cut and paste and, I was able to add it to my ever-expanding popmenu. Unfortunately, the paragonwiki list was a little more involved so I didn't I didn't bother, this round. If anyone's interested, SGMusic.mnu plays everything from the OP list and SGStuff.mnu includes the music, an updated cheat sheet and, a few other sg commands I've come across, along the way. I rushed through the sorting and tweaked some of the file nicknames, for formatting reasons, hopefully that doesn't pose a problem. Enjoy! SGMusic.mnu SGStuff2-5.mnu