oedipus_tex
-
Posts
2652 -
Joined
-
Last visited
-
Days Won
4
Content Type
Profiles
Forums
Events
Store
Articles
Patch Notes
Everything posted by oedipus_tex
-
This build is hot. Great work. Is there a reason you skipped Blazing Bolt? I'm not totally in tune with everything Defender so may be out of touch. Coming from playing Dominators, I assumed the Snipe would be great, but would love to learn.
-
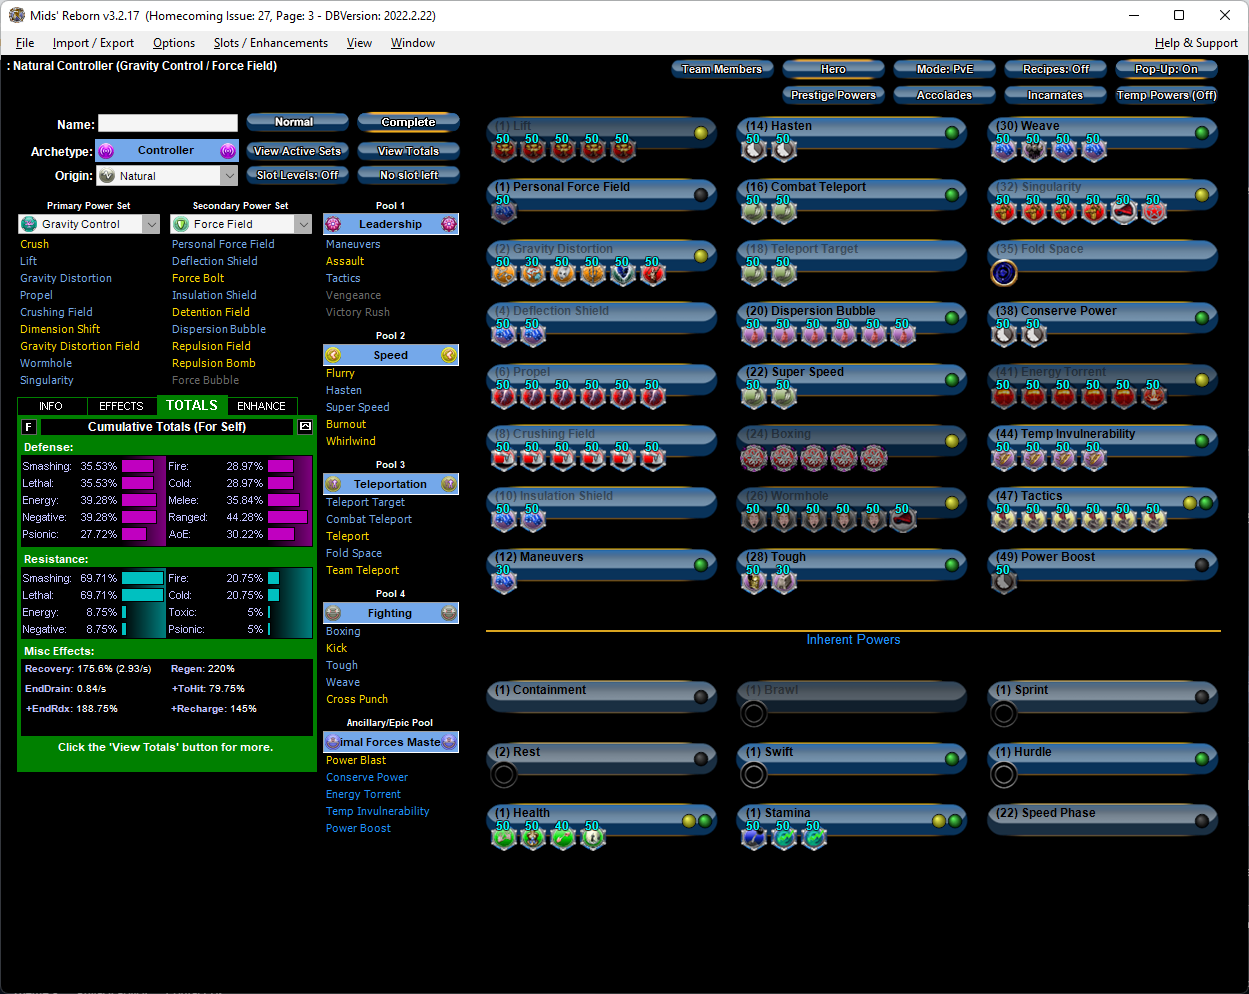
That's good information to have, Here's an alternate take on the build that drops Hover, Gravity Distortion Field, and Repulsion Bomb for the Teleport pool. I took Combat Teleport instead of regular Teleport because I consider it generally superior, but you can go with either. Distortion Field was the hardest for me to drop, but I do think it was the weakest link in the previous build based on your criteria. Since it sounds like you're new to Power Boost it might be worth explaining how it works. Your shields last 4 minutes. If you recast them before 4 minutes are up, you replace the shields. So, the way it works is if you hit Power Boost > shields, your teammates have Power Boosted version of the shields for the 4 minutes. If for some reason you cast the shields again without Power Boost up, it replaces the shields with a weaker version. So the habit you'll want to be in is only hitting the shields when Power Boost is up. Power Boost also multiples the duration of your control powers: the Hold, Wormhole, and your immobilize. Wormhole's usually the main one you want to time it with, if you can. The Stun from Power Boosted Wormhole lasts about twice as long as unboosted. RE: Lift, Gravity Distortion, Crushing Field and Propel: I still recommend slotting them out. Propel and Crushing Field are adding to your Ranged defense, Lift is adding to global Recharge. There's really no reason to not slot them, even if you don't use them often. IMO the mistake you were making previously was trying to overslot Defense sets; that doesn't really work, you want to grab some of your Defenses from properly slotted attacks. Gravity Distortion you could swap to Hold set like Basilisk's Gaze if you preferred. But you have Tactics, which makes proccing Gravity Distortion juicy. I recommend at least trying it out. If you are used to sluggish attacks, you might be surprised to find your little Gravity troller packs a punch. I did note in your original build you didn't slot knockback to knockdown in Wormhole. I recommend trying it. Will allow you to have more control over where teleported mobs land. I slotted Purple sets in Wormhole; you could replace with the much much cheaper Stupefy set and only lose a little Recharge if you need to save money. Boxing is purely a mule. You can move those slots elsewhere if you don't care about losing the Slash/Lethal/Melee defense. This Hero build was built using Mids Reborn 3.2.17 https://github.com/LoadedCamel/MidsReborn Click this DataLink to open the build! Level 50 Natural Controller Primary Power Set: Gravity Control Secondary Power Set: Force Field Power Pool: Leadership Power Pool: Speed Power Pool: Teleportation Power Pool: Fighting Ancillary Pool: Primal Forces Mastery Hero Profile: Level 1: Lift -- Apc-Dam%(A), Apc-Dmg/EndRdx(3), Apc-Acc/Rchg(3), Apc-Acc/Dmg/Rchg(5), Apc-Dmg/Rchg(5) Level 1: Personal Force Field -- LucoftheG-Def/Rchg+(A) Level 2: Gravity Distortion -- UnbCns-Dam%(A), NrnSht-Dam%(11), GhsWdwEmb-Dam%(11), GldNet-Dam%(13), IceMisTrmt-+ColdDmg(13), GldJvl-Dam%(15) Level 4: Deflection Shield -- LucoftheG-Def/Rchg+(A), LucoftheG-Def(15) Level 6: Propel -- Thn-Dmg/EndRdx/Rchg(A), Thn-Acc/Dmg/EndRdx(17), Thn-Acc/Dmg(17), Thn-Dmg/EndRdx(19), Thn-Dmg/Rchg(19), Thn-Acc/Dmg/Rchg(21) Level 8: Crushing Field -- Artl-End/Rech/Rng(A), Artl-Acc/Rech/Rng(21), Artl-Acc/Dam(23), Artl-Dam/End(23), Artl-Dam/Rech(25), Artl-Acc/Dam/Rech(25) Level 10: Insulation Shield -- LucoftheG-Def/Rchg+(A), LucoftheG-Def(27) Level 12: Maneuvers -- LucoftheG-Def/Rchg+(A) Level 14: Hasten -- RechRdx-I(A), RechRdx-I(29) Level 16: Combat Teleport -- BlsoftheZ-ResKB(A), BlsoftheZ-Travel/EndRdx(29) Level 18: Teleport Target -- BlsoftheZ-ResKB(A), BlsoftheZ-Travel/EndRdx(31) Level 20: Dispersion Bubble -- RedFrt-EndRdx(A), RedFrt-Def(27), RedFrt-Def/EndRdx(33), RedFrt-Def/Rchg(33), RedFrt-EndRdx/Rchg(39), RedFrt-Def/EndRdx/Rchg(50) Level 22: Super Speed -- BlsoftheZ-ResKB(A), BlsoftheZ-Travel/EndRdx(31) Level 24: Boxing -- SprBlsCol-Rchg/HoldProc(A), SprBlsCol-Dmg/EndRdx/Acc/Rchg(34), SprBlsCol-Acc/Dmg/Rchg(34), SprBlsCol-Acc/Dmg/EndRdx(34), SprBlsCol-Dmg/EndRdx(36) Level 26: Wormhole -- AbsAmz-ToHitDeb%(A), AbsAmz-EndRdx/Stun(36), AbsAmz-Acc/Rchg(36), AbsAmz-Acc/Stun/Rchg(37), AbsAmz-Stun/Rchg(37), SuddAcc--KB/+KD(37) Level 28: Tough -- GldArm-3defTpProc(A), StdPrt-ResDam/Def+(39) Level 30: Weave -- LucoftheG-Def/Rchg+(A), ShlWal-ResDam/Re TP(31), LucoftheG-Def(39), LucoftheG-Def/EndRdx(42) Level 32: Singularity -- ExpRnf-+Res(Pets)(A), ExpRnf-Acc/Dmg/Rchg(33), ExpRnf-Acc/Dmg(40), ExpRnf-Dmg/EndRdx(40), SuddAcc--KB/+KD(40), SlbAll-Build%(42) Level 35: Fold Space -- DS:DSyncThreatAccRech(A) Level 38: Conserve Power -- RechRdx-I(A), RechRdx-I(43) Level 41: Energy Torrent -- PstBls-Dam%(A), PstBls-Acc/Dmg/EndRdx(43), PstBls-Dmg/Rng(43), PstBls-Dmg/EndRdx(45), PstBls-Acc/Dmg(45), Bmbdmt-+FireDmg(45) Level 44: Temp Invulnerability -- UnbGrd-Max HP%(A), UnbGrd-ResDam(46), UnbGrd-ResDam/EndRdx(46), UnbGrd-Rchg/ResDam(46) Level 47: Tactics -- GssSynFr--Build%(A), GssSynFr--ToHit/EndRdx(48), GssSynFr--ToHit(48), GssSynFr--ToHit/Rchg(48), GssSynFr--ToHit/Rchg/EndRdx(50), GssSynFr--Rchg/EndRdx(50) Level 49: Power Boost -- RechRdx-I(A) Level 1: Brawl -- Empty(A) Level 1: Containment Level 1: Sprint -- Empty(A) Level 2: Rest -- Empty(A) Level 1: Swift -- Empty(A) Level 1: Health -- NmnCnv-Regen/Rcvry+(A), Pnc-Heal/+End(7), Mrc-Rcvry+(7), Prv-Absorb%(42) Level 1: Hurdle -- Empty(A) Level 1: Stamina -- PrfShf-End%(A), PwrTrns-+Heal(9), PwrTrns-EndMod(9) Level 22: Speed Phase ------------ | Copy & Paste this data into Mids Reborn : Hero Designer to view the build | |-------------------------------------------------------------------| |MxDz;1406;655;1310;HEX;| |78DA65934B6F125114C7EF3033407953A0B4A5B414843E682974ADF181C568A1926| |8DC924919DA49A64086A9B15F42ADB671E5333ED71A75EF56FD02BA735DC5A66A5C| |E1E99C7395D84926BFB9E77FCFB9E771A772EDACA7D1289D6242A0A82B9D4EADD86| |A9A464BD755C3B1A2989B86A2B3C3C7016FF29FC6B7E5CE19CA55CDDCE2EB58DF96| |339B8D46AED43256D55A4953F53AF3575BE0515695BA6A74D6B5B6CB5A5F6AAB6A7| |DD0FABCACEA6ABB65988AA9B59A5ECB54D2D6D64DADB936BAD4D656735543DB50F4| |9A15B453AB281D5335B68621B504BCD705C69F9EC40A36C60A12B3E5890B4829479| |C471EEF73622C2258C61B0001859E2C9CC79D2E052C71E0066EF22C89489F6CD137| |87EB13208BE42C8814D11746DE04C83CB2FC8859C6C043E25DE4E03DE27D64F8017| |21B1C1DDCD9E1C463C30EE490489490C332D18E3C098E033CAD014A6B94D20AC278| |DD243277040B4D82D1CB3DBC59CC618C9801D1CF45FF676CD1D827641AC42017832| |48E93781A8410AF22E4A7447CC8848BE846663CC882179972E090ACC891FF220B20| |46F90588EE4A96717287789B780B99DA46EE40B4117292472E62A4D40AB1823C562| |62E13BFA0B30827C6783AB145BC009928F64F02314EA218A78E8F2FD326EAFC4C00| |B90B98E05D9938C06312FBC8A92EF13B918E9F29E25A1C829F938F2FB908039744F| |61E0E4AF3DCD234B659E2BE87B1695EF5F45B12DF105F23E75E115F126D78953E40| |E42C2F2CFB1B0B9A3F20FE20FE4286A00B395E58EE0526BCF09CF898F80459784A7| |C86FC0831F2FCEFCCF32B28F5FFB23D780EBBFDD7D42B1FD5AB6012B849B04C7B2E| |C66D7CD7B73E93C8AEE060EC935887FD02ACA7A0E77BB8FE7AD4BFDB67B2B13B588| |2F327CECAD945BE9B851BCC53FD036DADD13F| |-------------------------------------------------------------------|

-

SOLO Master of LR SF, 54 x8, NO inspirations, NO deaths, no temp powers
oedipus_tex replied to Voltak's topic in Dominator
Confused enemies who aren't aware of the caster will happily kill each other without aggroing the player. It's not often that useful, since you don't get XP from Confused mobs you don't injure. But, it's a staple of an old technique Mind and Dark Dominators used on Live to solo some Task Forces, Confuse the end bosses and let them defeat each other. It's occasionally useful to discretely Confuse enemies in iTrials as well... Electric and Mind Control specifically are good at it, since neither of their AoE Confuses notify enemies. -
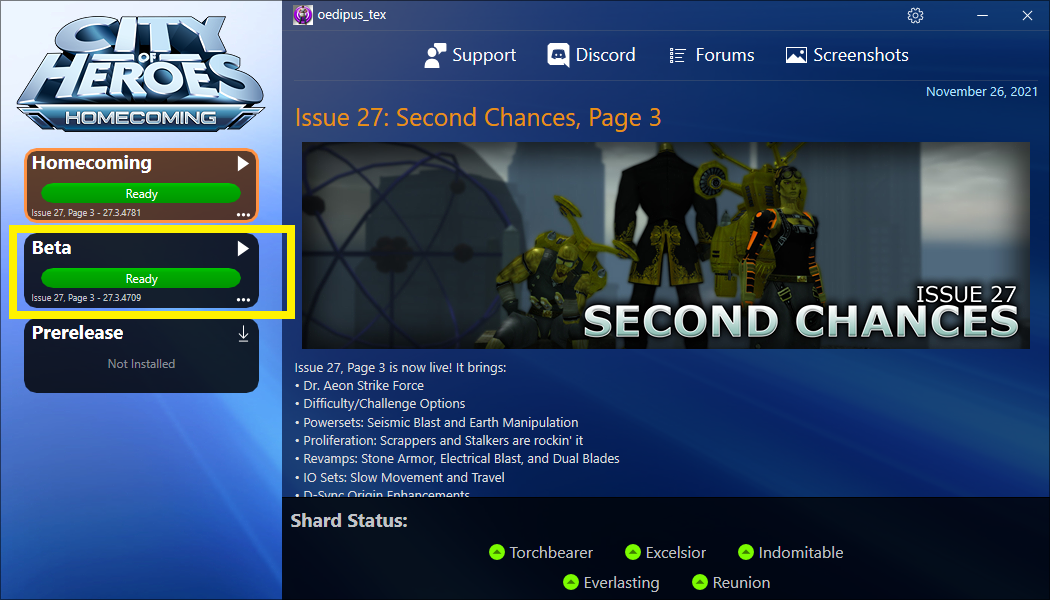
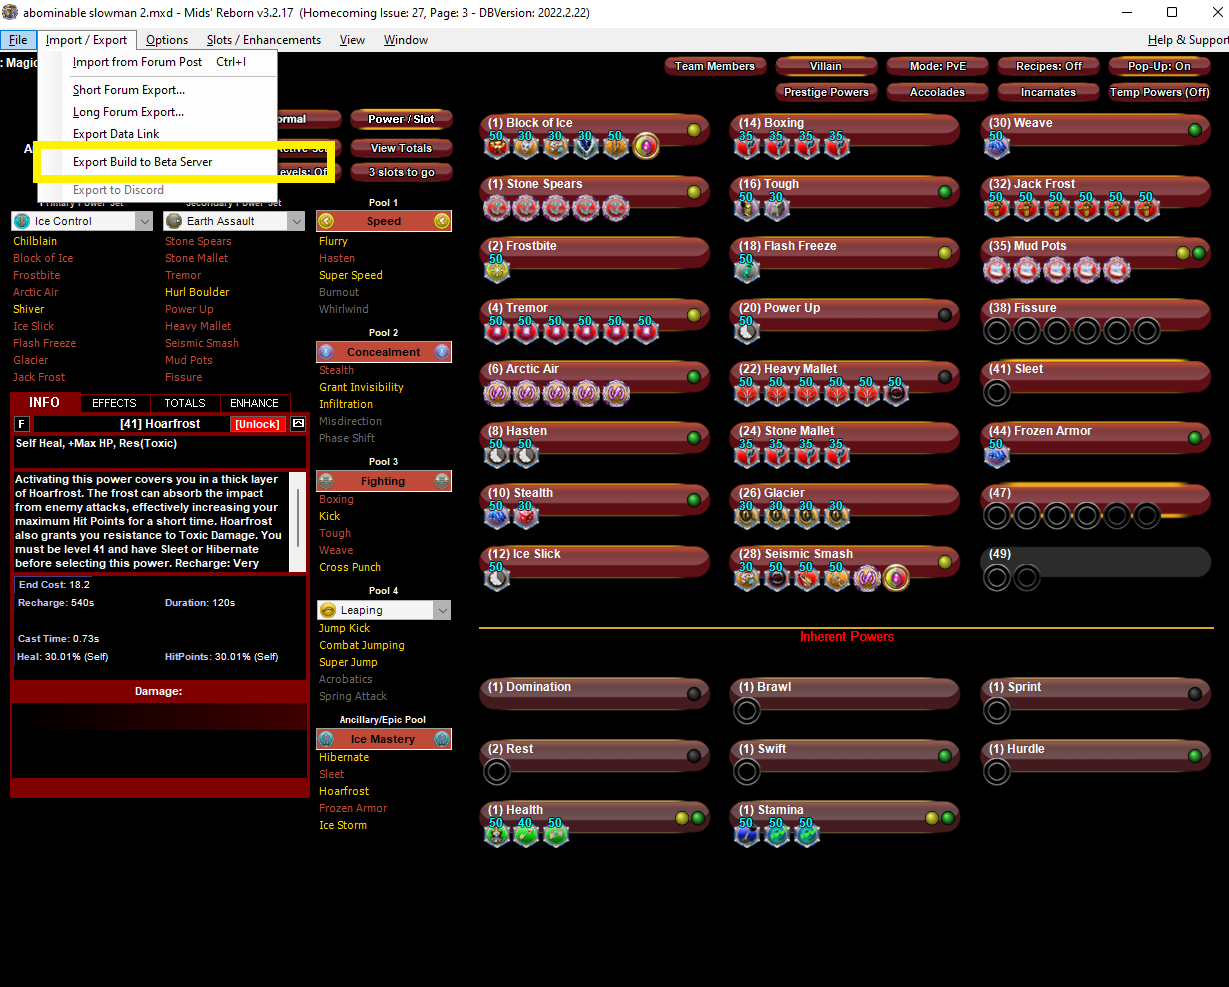
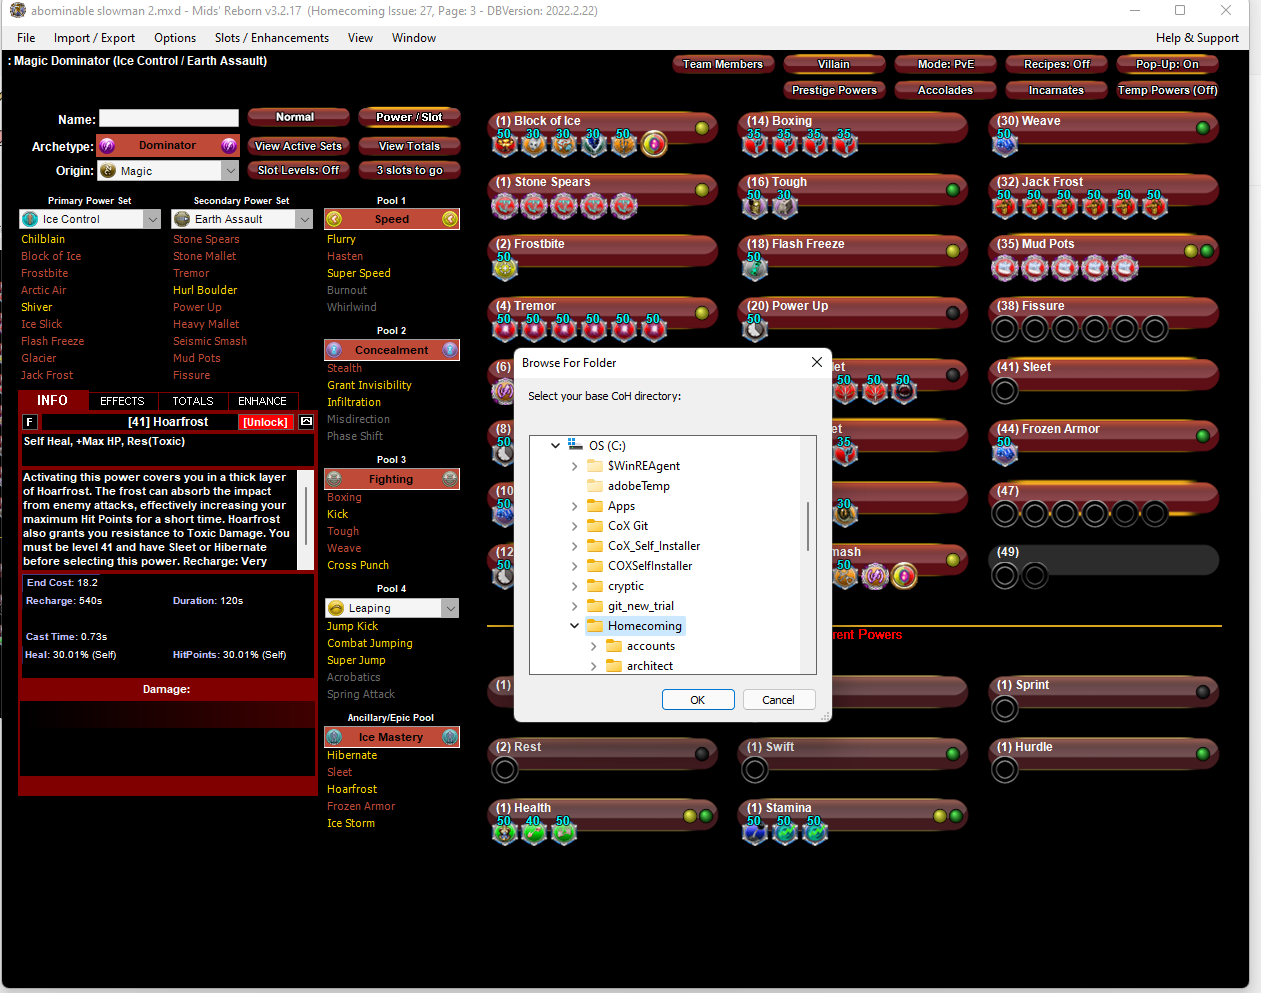
What you will do is this: 1. In Mids, open the build you want to test out 2. Select Import/Export > Export build to Beta Server 3. Find the folder where your COX Homecoming is located, for me it is C:Homecoming 5. Give the build a name and hit Save. You'll get a pop up explaining how you will play the build in test 6. Open the Beta version of COX Homecoming (you may need to install first) 7. Create the toon with the necessary sets and enter the game 8. Type /levelupxp 50 to immediately hit level 50 9. Type /popmenu nameofbuildyouused. You'll get a pop up menu. Clicking each option fills your tray with the IOs from the build 10. Manually go through and place each IO. They should be in the exact order as they are in your original build, so this usually goes fast, but it can be a small time commitment.
-
In fairness to the person being quoted, the version of TA that existed in 2019 I would also rank as inferior to most other sets. The newer, updated version is fantastic. My 2022 ranking of Defender Primary sets for general content would look something like the list below. Each Primary could rise or fall a few ranks depending on whether it's being used for general content versus hand picked content, though. S TIER: Time Manipulation, Cold Domination, Trick Arrow, Dark Miasma, Storm Summoning A TIER: Thermal Radiation, Traps, Kinetics B TIER: Nature Affinity, Electric Affinity, Radiation Emission, Poison C TIER: Sonic Resonance, Empathy, Pain Domination, Force Field w/ Power Boost D TIER: Force Field w/o Power Boost Yeah I have a lot of S-Tier rankings for Defender sets. 🙂
-
Yeah, eating Purples as they come up is a part of the plan. 🙂 Always good advice. The Power Boost method is more about boosting the ally shields than the personal defense. The personal defense is mainly an extra... but the nice thing about it is that if you hit PB before each opening attack, you're wading into each fresh encounter with shields at their high crest even when you don't have a Purple to down. It's also not bad form to hit PB when you get an idle moment in the middle of a busy fray where aggro is still being worked out, especially during iTrials. I'm a little biased, because I consider the Force Field set itself somewhat lacking. The shields on their own are about as strong as Cold Domination shields, the only real extra the OP is getting is some extra Defense (keeping in mind Cold Dom also has an aura power with some Defense and Resist, so this is close to a tie) and mezz protection (granted, mezz protection is great). What FF does have is the ability to Power Boost the shields tho, roughly doubling their Defense rating. That's the advantage I'd press if there's any way to justify it RP'ly.
-
I had a few minutes and was able to do a test run of my proposed Ice/Earth/Psi prototype above. It had been a long time since I played Earth Assault so I wanted to see what I thought of it on an end game build firsthand. After playing it I'd give the /Psi build a "not bad, but a Sleet build is probably better" review. Earth plays so differently from other Assault sets, although its hard to explain what is so different about it. It's also possible that my Ranged defense, which is only around 30, just wasn't high enough to carry the combo. I definitely felt a lot more pressured in this build than the Ice/Dark, who had padding from a heal and some -ToHit. Even with its controls, Ice Control eats so much aggro. I had also remembered that Earth Assault is endurance heavy, but the volume of it was still pretty shocking in actual play. Ageless by itself mostly kept me in the blue zone, but not entirely. I hate to drop an Alpha slot with +Damage but it may be necessary... which is a huge shame, because damage is what Earth is all about. Not being able to press that advantage sets me back a bit. There may be other ways to solve it, like with an occasional Hibernate. I'd try a Sleet build too, but all that respeccing takes a long time. I'd recommend trying it yourself on the test server before you spend a ton of cash though.
-
It can probably work with just Ageless. You can see a proof of concept video for Ice/Dark with similar-ish slotting here (altho I did badly screw up the slotting for the self heal in this video). Earth does have heavier endurance usage than Dark, so I'd want to test run it on the test server first just to check.
-
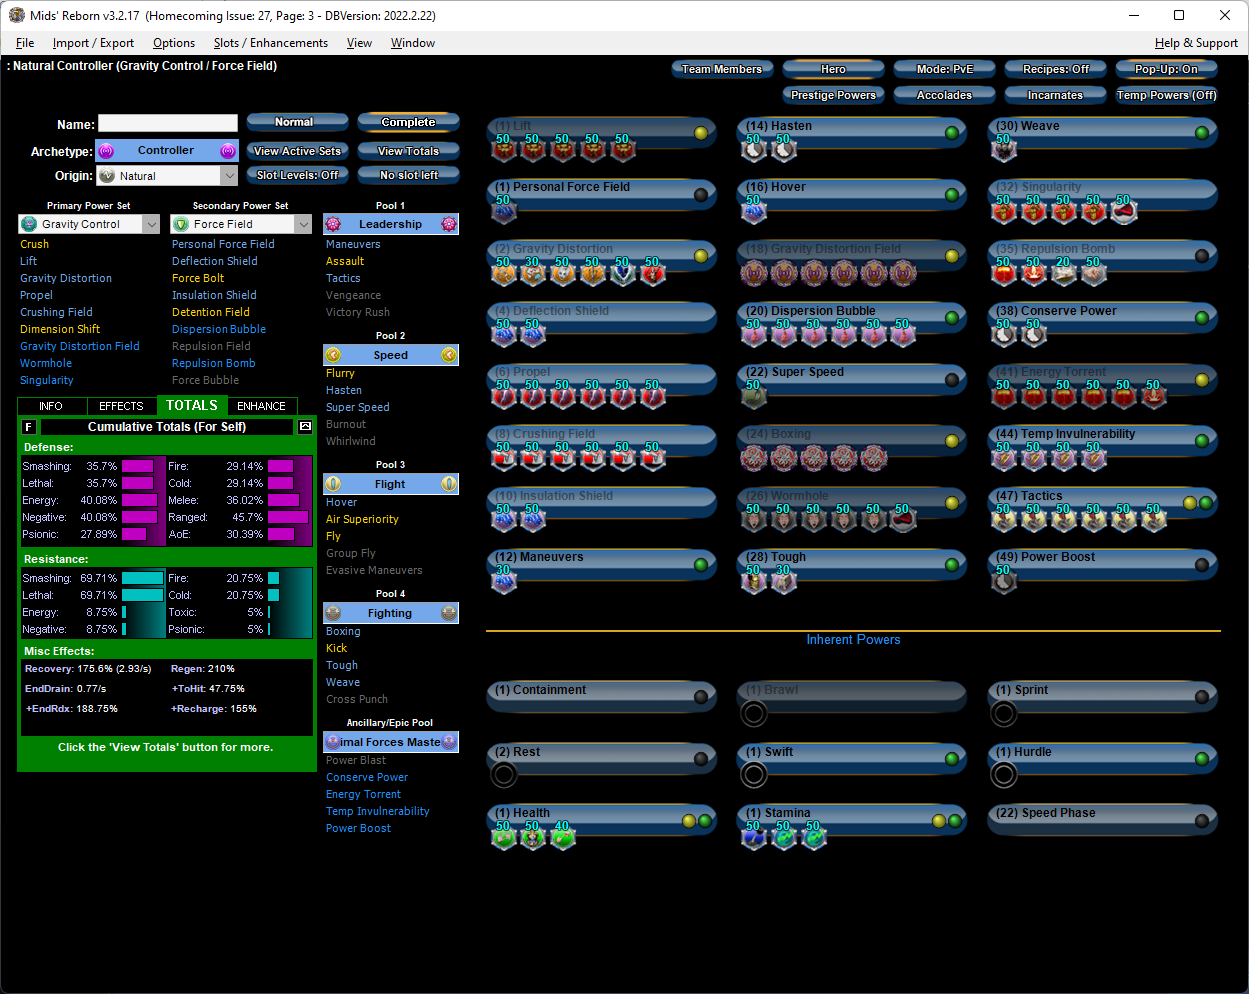
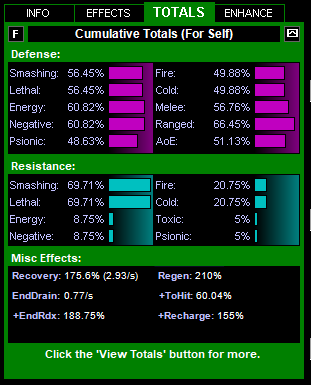
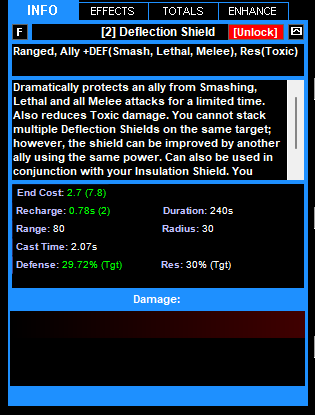
I realize you're heavy into role play, so if you want to dismiss this comment out of hand feel free to do so. But IMO you're underserving your build by a lot by taking the Psi APP and not the Primal APP for Power Boost. The ability to Power Boost Force Field is one of the main draws of the set. Your shields are currently operating at about half their potential capacity. On a good end game build, you should also be entering into a lot of combats with Power Boost up, shielding you well even during difficult iTrial encounters. I realize how important concept is to some people, but if there's any way for you to justify it, its a huge step up in power. I made a quick reinterpretation of your build and pasted it below. You may not like all of the powers I picked; I tried to stay close to your original power picks, but there were a few I couldn't squeeze in, mainly in the Teleport pool. IMO I think taking that pool isn't that useful for you any way--Fold Space even stops Wormhole from working for a while--but you know your playstyle better than I do. I tried to maintain as much Ranged defense as possible. I also did take Hover, which you may not like. With this load out there really isn't much reason for you to be on the ground, though. You could carry your very high Defense a lot further by being above ground. Like others mentioned, you were leaving a lot of potential for decent attacks on the table. Gravity actually has excellent ST damage for a Controller, and you want to get on that. Despite appearances, Lift and Gravity Distortion actually do more DPA than Propel so you don't want to pass over those. Repulsion Bomb is also semi-decent when procced out; I don't always recommend it, but since you already are taking Tactics it's not a bad idea. Someone craftier than me may be able to find a better use for the Controller ATO proc. It does feel like a bit of a waste to have it in Gravity Distortion Field, but at least you have a 90% chance to proc it with every Field you cast. But it's not the worst thing in the world. Too bad Repulsion Bomb for some reason doesn't take the proc or I'd put it there instead. For the 15 seconds after hitting Power Boost, your Defenses are: And here is how strong your shields are if you cast them while Power Boosted (be careful not to cast them again until the next time Power Boost is up): This Hero build was built using Mids Reborn 3.2.17 https://github.com/LoadedCamel/MidsReborn Click this DataLink to open the build! Level 50 Natural Controller Primary Power Set: Gravity Control Secondary Power Set: Force Field Power Pool: Leadership Power Pool: Speed Power Pool: Flight Power Pool: Fighting Ancillary Pool: Primal Forces Mastery Hero Profile: Level 1: Lift -- Apc-Dam%(A), Apc-Dmg/EndRdx(3), Apc-Acc/Rchg(3), Apc-Acc/Dmg/Rchg(5), Apc-Dmg/Rchg(5) Level 1: Personal Force Field -- LucoftheG-Def/Rchg+(A) Level 2: Gravity Distortion -- UnbCns-Dam%(A), NrnSht-Dam%(11), GhsWdwEmb-Dam%(11), GldNet-Dam%(13), IceMisTrmt-+ColdDmg(13), GldJvl-Dam%(15) Level 4: Deflection Shield -- LucoftheG-Def/Rchg+(A), LucoftheG-Def(15) Level 6: Propel -- Thn-Dmg/EndRdx/Rchg(A), Thn-Acc/Dmg/EndRdx(17), Thn-Acc/Dmg(17), Thn-Dmg/EndRdx(19), Thn-Dmg/Rchg(19), Thn-Acc/Dmg/Rchg(21) Level 8: Crushing Field -- Artl-End/Rech/Rng(A), Artl-Acc/Rech/Rng(21), Artl-Acc/Dam(23), Artl-Dam/End(23), Artl-Dam/Rech(25), Artl-Acc/Dam/Rech(25) Level 10: Insulation Shield -- LucoftheG-Def/Rchg+(A), LucoftheG-Def(27) Level 12: Maneuvers -- LucoftheG-Def/Rchg+(A) Level 14: Hasten -- RechRdx-I(A), RechRdx-I(29) Level 16: Hover -- LucoftheG-Def/Rchg+(A) Level 18: Gravity Distortion Field -- SprWiloft-Rchg/Dmg%(A), SprWiloft-Acc/Conf/Hold/Immob/Sleep/Stun/Fear/EndRdx/Rchg(29), SprWiloft-Acc/Conf/Hold/Immob/Sleep/Stun/Fear(31), SprWiloft-Conf/Hold/Immob/Sleep/Stun/Fear/Rchg(31), SprWiloft-EndRdx/Rchg(31), SprWiloft-Acc/Conf/Hold/Immob/Sleep/Stun/Fear/EndRdx(33) Level 20: Dispersion Bubble -- RedFrt-EndRdx(A), RedFrt-Def(27), RedFrt-Def/EndRdx(33), RedFrt-Def/Rchg(33), RedFrt-EndRdx/Rchg(39), RedFrt-Def/EndRdx/Rchg(50) Level 22: Super Speed -- BlsoftheZ-ResKB(A) Level 24: Boxing -- SprBlsCol-Rchg/HoldProc(A), SprBlsCol-Dmg/EndRdx/Acc/Rchg(34), SprBlsCol-Acc/Dmg/Rchg(34), SprBlsCol-Acc/Dmg/EndRdx(34), SprBlsCol-Dmg/EndRdx(36) Level 26: Wormhole -- AbsAmz-ToHitDeb%(A), AbsAmz-EndRdx/Stun(36), AbsAmz-Acc/Rchg(36), AbsAmz-Acc/Stun/Rchg(37), AbsAmz-Stun/Rchg(37), SuddAcc--KB/+KD(37) Level 28: Tough -- GldArm-3defTpProc(A), StdPrt-ResDam/Def+(39) Level 30: Weave -- ShlWal-ResDam/Re TP(A) Level 32: Singularity -- ExpRnf-+Res(Pets)(A), ExpRnf-Acc/Dmg/Rchg(39), ExpRnf-Acc/Dmg(40), ExpRnf-Dmg/EndRdx(40), SuddAcc--KB/+KD(40) Level 35: Repulsion Bomb -- PstBls-Dam%(A), Bmbdmt-+FireDmg(42), ExpStr-Dam%(42), FrcFdb-Rechg%(42) Level 38: Conserve Power -- RechRdx-I(A), RechRdx-I(43) Level 41: Energy Torrent -- PstBls-Dam%(A), PstBls-Acc/Dmg/EndRdx(43), PstBls-Dmg/Rng(43), PstBls-Dmg/EndRdx(45), PstBls-Acc/Dmg(45), Bmbdmt-+FireDmg(45) Level 44: Temp Invulnerability -- UnbGrd-Max HP%(A), UnbGrd-ResDam(46), UnbGrd-ResDam/EndRdx(46), UnbGrd-Rchg/ResDam(46) Level 47: Tactics -- GssSynFr--Build%(A), GssSynFr--ToHit/EndRdx(48), GssSynFr--ToHit(48), GssSynFr--ToHit/Rchg(48), GssSynFr--ToHit/Rchg/EndRdx(50), GssSynFr--Rchg/EndRdx(50) Level 49: Power Boost -- RechRdx-I(A) Level 1: Brawl -- Empty(A) Level 1: Containment Level 1: Sprint -- Empty(A) Level 2: Rest -- Empty(A) Level 1: Swift -- Empty(A) Level 1: Health -- NmnCnv-Regen/Rcvry+(A), Pnc-Heal/+End(7), Mrc-Rcvry+(7) Level 1: Hurdle -- Empty(A) Level 1: Stamina -- PrfShf-End%(A), PwrTrns-+Heal(9), PwrTrns-EndMod(9) Level 22: Speed Phase ------------ | Copy & Paste this data into Mids Reborn : Hero Designer to view the build | |-------------------------------------------------------------------| |MxDz;1399;651;1302;HEX;| |78DA6593CB4F135114C6EF74A614FA044B2D509052E4D542A1AE353E901AA560131| |3B7CD04A630C9409B6931F207B85511882B9F511EBAD4A87BB7EA5FE0CEB58A0435| |AEEAE97CE74A0D9334BF99EFDCEFDC73EEB99DB979D15F2C66CF09A575D2D22B95C| |26469B96A972CCBB03DB37A75C5D62D517F3CF44B1CC6E4B2F4255BBF615657E577| |AC61C9859562319D2DD97346216B1AD6BC08E54BE4C819FABC615716CDB2D7F9BE5| |6368C799FF39AB5CC85C56A00EFF5577379A16BAA6CCEA5F3B6B9A45B05275BA530| |A357AA86BDDA4135C5E9775B11F2A96922E31222A309D704731CD4D2CC31F074834| |98888E28877080A0235B772192BBD3A293DC4252CF24FA960D0ED30388AEF331456| |D9ACA89C31D80EDE25B86566F753E188AD4F980FC0630F998FC0F6C7E01A193DD2E| |C69C6B6ED1EF0B8CAD4C00E37B3093C4BC61659560B97D5C565B5D15C7D1C14BE08| |1A4D9018908E400A3574335B2818928E10A75B27B4F161BADB5EE23CBA5F8027B69| |8DBCC1D30BE0B9E27735876170E71814130EE65FAC0413F980980FD544E448E31F2| |191353488CCA0B11DDD41CB16F83B9CEBC07F6AF811B94B053F6D0791599FA67993| |3E0C91C739AF9056695768CC9238B9D426383519CA746C11E79643DD3086E92D0CB| |A2D67B807483FBE0D01EF30793B79924430217B4A626DE6122232E0C7A649516878| |9B760FA401B0DC89A06787C49E6BE5F8861D9ED30674ABE65BE01475F335F3179A7| |8F9439C599D5D41F343476C0FCC9FC0D86A9FBB41C6F7A17B58DEF309F319F83992| |DE636F889724CC8F14EC8ABA835FE756BF4D44FF99F54CB1D8DE74952A4A438D257| |AF909A5CF5BD417289EBB8614D7DE8A3E90A7D0F69E2DB51DFDE7FBEFB28BDF9176| |6D6BC07BE4F1EDED4DA5F2CF7CE92| |-------------------------------------------------------------------|
-
Hopefully this won't make things more confusing, but likely anything you can think of that affects stats is technically a "power." The short version: Most Set Bonuses, including +Damage, are global Most (not quite all) enhanceable powers benefit from these globals ...and almost nothing else does ----------------------------------------- The longer version: If you're familiar with simplistic object-oriented programming,* Power is the base class that most other things derive from. I'm lying about the specifics to make the analogy work, but you can imagine Power is the parent class of all the various things you think of in game: Power Base Class >>> >>> Archetype Inherent - varies wildly in implementation >>> Boost/Enhancement - are usually marked to only affect the power they are slotted in (but don't have to be--a global enhancement is theoretically possible) >>> Set Bonus - are usually marked as global (but again don't have to be) >>> Inspiration - are just powers that cause the button to disappear after you use it instead of recharge etc [*The object oriented programming example shouldn't be taken literally. There are no actual subclasses of Power as far as I know. Instead literally everything is a Power, and differences between Enhancements, Set Bonuses, Inspirations, Temporary powers etc all comes down to design patterns used on those objects. When you go into the code and look at the game's files there isn't even a separate folder for Powers, Set Bonuses, Inspirations, or Archetype Inherents. They're all in one giant folder called Powers, which houses everything. Because of this, you could theoretically turn an Enhancement into a normal Power with a couple of small line changes. In fact, with just a couple of edits you could turn something an enhancement into a power that accepts its own enhancements, altho it may cause the UI to freak out.] To blow things completely out of proportion relative to OP's question, it's even probably possible to create Enhancements for Inspirations. With manipulation to the Inspiration code to allow them to accept specific external boosts, you could theoretically have a Set Bonus that "makes Inspirations 10% more effective" or whatever. Probably a lot of work to implement, but at least theoretically possible, because of how intertwined all of these systems are when you dive into them.
-
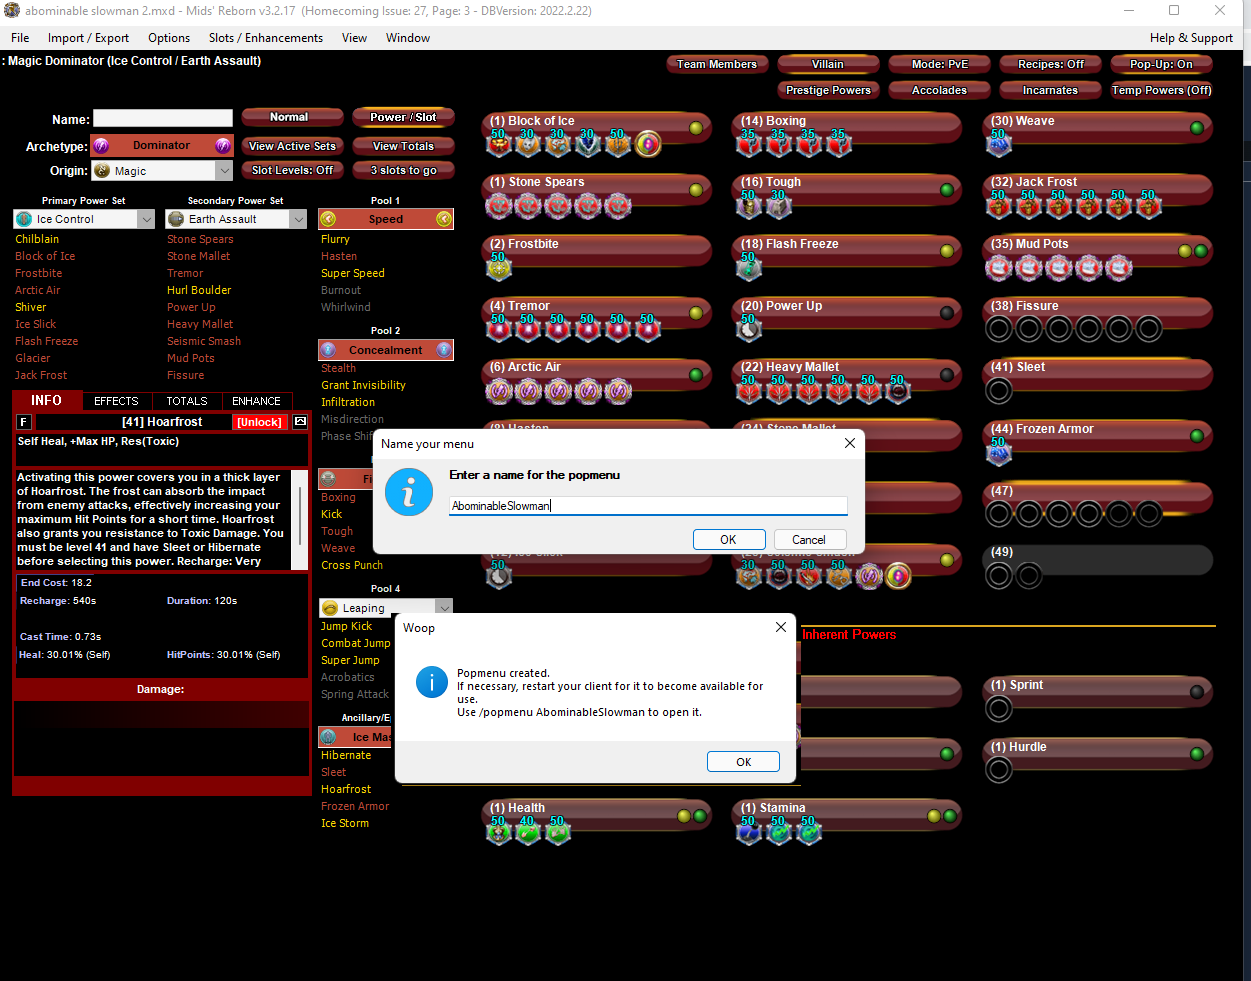
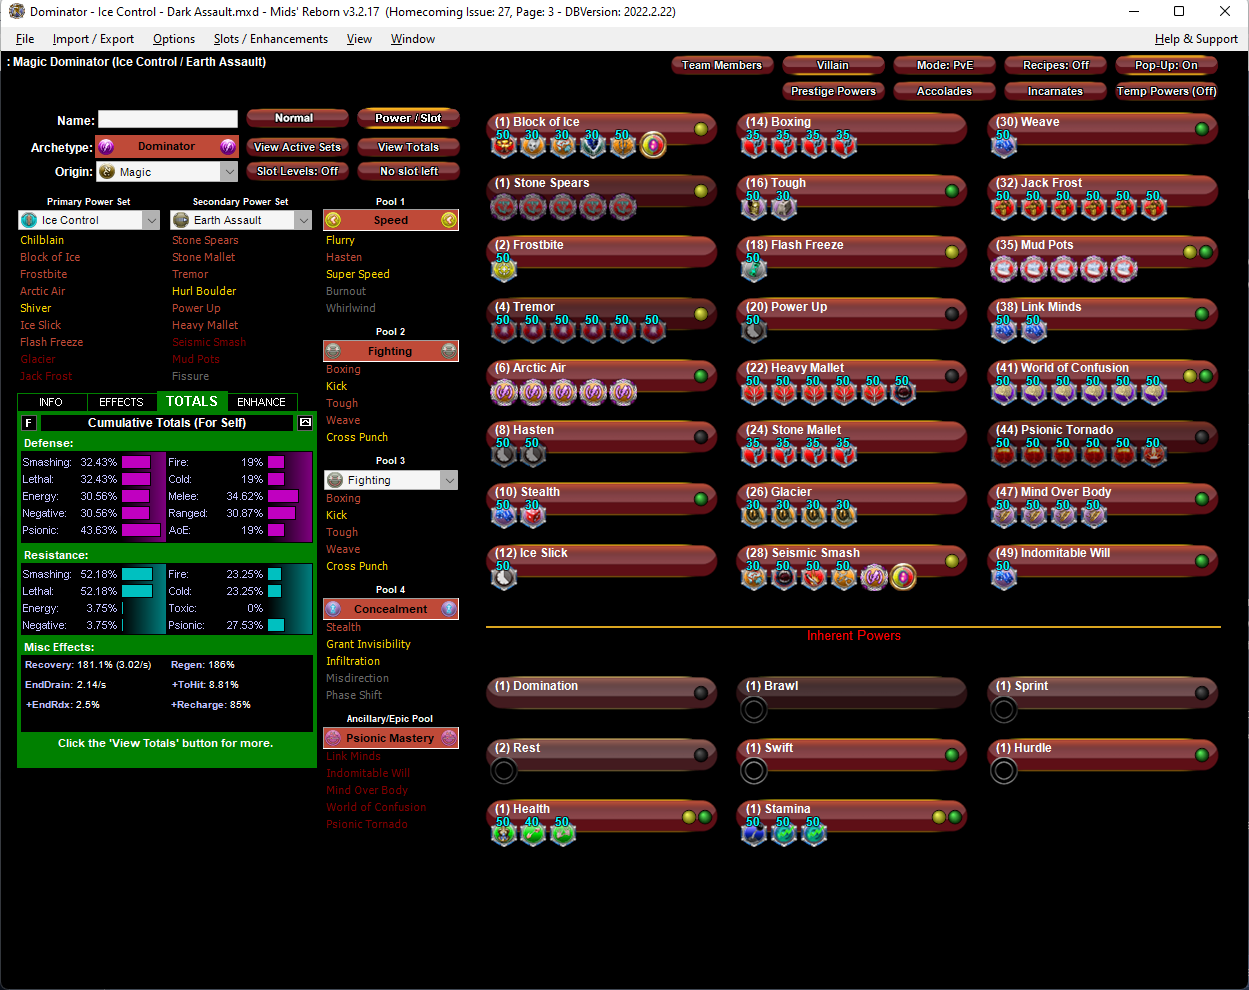
I have an alternate take on this combo which might be somewhat controversial. IMO the new World of Confusion, which now benefits from Domination, is hand tailored for Ice Control--especially Ice Controllers who have a Power Boost like power in their secondary. In Domination mode, World of Confusion is an 8ft radius 100% chance for Mag 3 Confuse. In effect what the creates is a sphere near the center of the power minions and lieutenants have a very difficult time overcoming, and any bosses within that range have a decent chance to be hit too. Since the WoC Confuse is autohit, all it takes to Confuse a nearby boss is for Arctic Air to roll a successful Confuse. The reason this build will be controversial is that in order to take all 5 powers in the Psi APP, you're forced to skip either your level 35 or 38 power. In this case, I think the power to skip is Fissure. I like Fissure, a lot. But it's a choice between Fissure and Mud Pots, and IMO Mud Pots probably contributes more over its lifetime than adding another clickable. The way I look at is this: if a single Confused boss throws a punch, it probably does more damage actually spending animation time to cast Fissure. I'm sure plenty will disagree, but I'd be very tempted to at least try a build with the tradeoff. FYI if you want to give the build a trial run, try running into a pack while in Domination mode with Arctic Air and World of Confusion running. WoC has the "Domination!" pop up text and you can track exactly how often it's popping. I've done it and it felt really wonderful. BTW don't sleep (LOL?) on the new Flash Freeze. It has some issues, mainly that Interface DOT procs break the sleep. But it's now autohit. Put a single Heal proc in it for a guaranteed 15% HP bar refill with each cast. Flash Freezing stuff before leaping in with Arctic Air and Ice Slick can really help you out solo. RE: Slotting Arctic Air versus World of Confusion, I re-used old slotting from an Ice/Dark Dom I test rolled recently where WoC got 6 slots of the Coercive Persuasion purple. These can be moved to AA if you want. I had them this way because I was testing AA with the full Dom ATO to see how reliably it procced the +damage ATO proc. It worked out okay, Earth Assault has better places to put that proc tho. For Incarnate slots, I'd go with: Intuition Radial: gives damage, slow movement, range (useful for Ice Slick and Flash Freeze), and hold duration Destiny: Ageless, required because this build is going to drain endurance faster than... idk something that drains fast. The +recharge will help close remaining gaps in a few powers I didn't bother to perma. Judgement, any, but Void is always useful for its -Damage, and you're in PBAoE range a lot anyway. That said, there's sometimes an advantage to adding a ranged nuke, so really up to you Interface: Cognitive for even more Confusion chances. Be aware this proc annoyingling breaks the sleep in Flash Freeze. This Villain build was built using Mids Reborn 3.2.17 https://github.com/LoadedCamel/MidsReborn Click this DataLink to open the build! Level 50 Magic Dominator Primary Power Set: Ice Control Secondary Power Set: Earth Assault Power Pool: Speed Power Pool: Fighting Power Pool: Concealment Ancillary Pool: Psionic Mastery Villain Profile: Level 1: Block of Ice -- Apc-Dam%(A), GhsWdwEmb-Dam%(3), NrnSht-Dam%(3), IceMisTrmt-+ColdDmg(5), GldNet-Dam%(50), HO:Nucle(50) Level 1: Stone Spears -- SprWntBit-Rchg/SlowProc(A), SprWntBit-Dmg/EndRdx/Acc/Rchg(5), SprWntBit-Acc/Dmg/Rchg(7), SprWntBit-Acc/Dmg/EndRdx(7), SprWntBit-Dmg/Rchg(9) Level 2: Frostbite -- Acc-I(A) Level 4: Tremor -- Obl-%Dam(A), Obl-Acc/Dmg/EndRdx/Rchg(13), Obl-Dmg(15), Obl-Acc/Rchg(15), Obl-Dmg/Rchg(17), Obl-Acc/Dmg/Rchg(17) Level 6: Arctic Air -- SprAscoft-Acc/Conf/Hold/Immob/Sleep/Stun/Fear/EndRdx(A), SprAscoft-Acc/Conf/Hold/Immob/Sleep/Stun/Fear/EndRdx/Rchg(19), SprAscoft-Acc/Conf/Hold/Immob/Sleep/Stun/Fear(19), SprAscoft-EndRdx/Rchg(21), SprAscoft-Conf/Hold/Immob/Sleep/Stun/Fear/Rchg(21) Level 8: Hasten -- RechRdx-I(A), RechRdx-I(23) Level 10: Stealth -- LucoftheG-Def/Rchg+(A), Ksm-ToHit+(50) Level 12: Ice Slick -- RechRdx-I(A) Level 14: Boxing -- KntCmb-Acc/Dmg(A), KntCmb-Dmg/EndRdx(23), KntCmb-Dmg/Rchg(25), KntCmb-Dmg/EndRdx/Rchg(25) Level 16: Tough -- GldArm-3defTpProc(A), StdPrt-ResDam/Def+(27) Level 18: Flash Freeze -- CaloftheS-Heal%(A) Level 20: Power Up -- RechRdx-I(A) Level 22: Heavy Mallet -- Hct-Dam%(A), Hct-Dmg/EndRdx(27), Hct-Acc/Rchg(29), Hct-Acc/Dmg/Rchg(29), Hct-Dmg/Rchg(31), Mk'Bit-Dam%(31) Level 24: Stone Mallet -- KntCmb-Acc/Dmg(A), KntCmb-Dmg/EndRdx(31), KntCmb-Dmg/Rchg(33), KntCmb-Dmg/EndRdx/Rchg(33) Level 26: Glacier -- BslGaz-Acc/Hold(A), BslGaz-Acc/Rchg(33), BslGaz-Rchg/Hold(34), BslGaz-EndRdx/Rchg/Hold(34) Level 28: Seismic Smash -- NrnSht-Dam%(A), Mk'Bit-Dam%(34), GldStr-%Dam(36), UnbCns-Dam%(36), SprAscoft-Rchg/+Dmg%(36), HO:Nucle(37) Level 30: Weave -- LucoftheG-Def/Rchg+(A) Level 32: Jack Frost -- ExpRnf-+Res(Pets)(A), ExpRnf-EndRdx/Dmg/Rchg(37), ExpRnf-Acc/Rchg(37), ExpRnf-Acc/Dmg(39), ExpRnf-Dmg/EndRdx(39), ExpRnf-Acc/Dmg/Rchg(39) Level 35: Mud Pots -- SprAvl-Acc/Dmg/EndRdx/Rchg(A), SprAvl-Rchg/KDProc(40), SprAvl-Acc/Dmg/Rchg(40), SprAvl-Acc/Dmg/EndRdx(40), SprAvl-Dmg/EndRdx(42) Level 38: Link Minds -- LucoftheG-Def/Rchg+(A), LucoftheG-Def/Rchg(42) Level 41: World of Confusion -- CrcPrs-Conf%(A), CrcPrs-Conf/EndRdx(42), CrcPrs-Conf(43), CrcPrs-Conf/Rchg(43), CrcPrs-Acc/Conf/Rchg(43), CrcPrs-Acc/Rchg(45) Level 44: Psionic Tornado -- PstBls-Dam%(A), PstBls-Acc/Dmg/EndRdx(45), PstBls-Dmg/Rchg(45), PstBls-Dmg/EndRdx(46), PstBls-Acc/Dmg(46), Bmbdmt-+FireDmg(46) Level 47: Mind Over Body -- UnbGrd-Max HP%(A), UnbGrd-ResDam(48), UnbGrd-ResDam/EndRdx(48), UnbGrd-ResDam/EndRdx/Rchg(48) Level 49: Indomitable Will -- LucoftheG-Def/Rchg+(A) Level 1: Domination Level 1: Brawl -- Empty(A) Level 1: Sprint -- Empty(A) Level 2: Rest -- Empty(A) Level 1: Swift -- Empty(A) Level 1: Hurdle -- Empty(A) Level 1: Health -- Pnc-Heal/+End(A), Mrc-Rcvry+(9), NmnCnv-Regen/Rcvry+(11) Level 1: Stamina -- PrfShf-End%(A), PwrTrns-EndMod(11), PwrTrns-+Heal(13) ------------ | Copy & Paste this data into Mids Reborn : Hero Designer to view the build | |-------------------------------------------------------------------| |MxDz;1396;671;1342;HEX;| |78DA6594594F135114C7EF7466040A052B56D6D252C0B6142B3551A3F2A06149309| |254497C52EB584B99585AD2198D7C129708E8A3DB931A71FB00BE2B7E0A05158D46| |713C33FF7359C22493DF9C73CFF2BFE7CECCC4CD9186A9A9B19342691A2E1996951| |BA9CC9865C3AE54F509A368E65541570DDDE18D85DC70A56C572BA5F478BE209F23| |9BABA72CCBB85EB2D3A346D59E9696F0672B9431395B285C0D788F636671DA36CBC| |5ED56D0B3C6CB374CCBBC62964C7B2E323A6BE6D359CBAC94CD7C6EC2B0EC42750E| |2A8B6EBF56D216A5FBB0AB5471D50A4717199F10194DF866C813261AA0D6A87BCC8| |CAADE7A6688C23555DC0E0879399A78AA798BDA1370D763E623B0F62178846A28DC| |5128EDC273DEA54A2A57D25581360D0EE434FE61FE0577AF33FF8147295C474947D| |3DF2079CF5BE612B8F735F31518ABC101B9494A4D0A32F63103B452C71A95BA9082| |5DAF0B6F0AC7A840BDDC403D6728941160A71AC8126254EE2CD87A8E3909AA14DC2| |4CB371D82A0F6160CFB389941593EF81EBDEFD17C9A59AD68E69EF3E40CF1BEF550| |0AC368EF073B93CC04D815675E43F21D4A6E91825B5870170B8EB2E0280B3E419AD| |A6470DB079F2734FA11EC5E667E0217A872877CA53AF815EAE6B63D09ECB6671C72| |7ADEC1EEE5574AA3D184E5EEC33CF9218A89C88A913564F67E67AE80FB57995F99D| |FC0459213E3642D761F2F61FC017391B90026E7C15850883E79427D2C231904FB68| |3121E5240CB4495E06FB2F302F322F8103399645C929C187965AC254065E325F800| |79E339F317D3AF64AC969790EE9DF18DDC135E60FE62F1E31050FCA510EF21EE830| |373E59A7738BE1DA8E23CEEC746535F987703F58CFF5D9BFF9D7E0A82F3B5D2B5B5| |C3ED10D55B5A7C913D784FF3C04AD6E0BBA8521F957710C0D3F41B79CF31FD3D4D7| |9C| |-------------------------------------------------------------------|
-
Gravity/Fire is an interesting case of a B-tier or C-tier (to me) primary combined with an S-tier secondary. It can work, but before you spend a lot of money on this build I want to express the nature of these two sets and the challenges this you will encounter. Dominators are meant to use Controls for survival, and Assault sets for attacks. Gravity subverts this design however; it's a set that provides extra attacks at the expense of Controls. On a Controller, that's great, since you don't get an Assault set. On a Dominator you often end up duplicating what the Assault set offers, and losing out on control. On top of this, despite powers like Propel seeming like do a lot of damage, the actual damage advantage of Gravity is disputable. Moreover, an issue with this specific combo is two attack systems at odds with each other: Fire attacks benefit from Fiery Embrace, a +80% Fire damage ability, but it doesn't benefit the Gravity attacks Gravity attacks benefit from the Impact mechanic, but the Fire attacks don't Now the good news. Fire Assault has fantastic DPA, and is one of the only (maybe the only?) Assault sets that works well from range. Some of the risks normally associated with Gravity Control may be subverted, because this character can be played as a hover-Dominator, which is actually rare for Dominator builds. That's the direction I'd encourage you to go to capitalize on the synergies that do exist between the sets. Other than Mind/Fire, there really isn't another Dominator build that can be built to Hover-dom without major tradeoffs in either control capability or damage, so take advantage of that. Note, you will still need to occasionally need to enter range to use Consume, your endurance bar refill, but you don't need to hang around there afterward. On the Gravity side, you'll be leaning hard on Wormhole, the AOE stun you get at level 26, and Singularity, the pet which unlocks at 32. Neither of these powers unlock until late. At low levels or when you exemp, you'll be playing like a low level Blaster. Things get better for you and worse at later levels. The Singularity pet is pretty strong but not super reliable, especially in team settings. I didn't have a Grav/Fire build handy, but I did have a Grav/Radiation and Fire/Fire build you can reference to try to paste something together. Note, neither build is 100% vetted, and the Grav one still has a bunch of slots that still need placement. This Villain build was built using Mids Reborn 3.2.17 https://github.com/LoadedCamel/MidsReborn Click this DataLink to open the build! Bad Situation: Level 50 Magic Dominator Primary Power Set: Gravity Control Secondary Power Set: Radioactive Assault Power Pool: Speed Power Pool: Fighting Power Pool: Concealment Power Pool: Leaping Ancillary Pool: Ice Mastery Villain Profile: Level 1: Lift -- SprWntBit-Rchg/SlowProc(A), SprWntBit-Dmg/EndRdx/Acc/Rchg(3), SprWntBit-Acc/Dmg/Rchg(3), SprWntBit-Acc/Dmg/EndRdx(5), SprWntBit-Dmg/Rchg(5) Level 1: Neutrino Bolt -- Empty(A) Level 2: Gravity Distortion -- UnbCns-Dam%(A), GldNet-Dam%(11), NrnSht-Dam%(13), GhsWdwEmb-Dam%(13), SprAscoft-Rchg/+Dmg%(15), GldJvl-Dam%(15) Level 4: Contaminated Strike -- SprBlsCol-Rchg/HoldProc(A), SprBlsCol-Dmg/EndRdx/Acc/Rchg(17), SprBlsCol-Acc/Dmg/Rchg(17), SprBlsCol-Acc/Dmg/EndRdx(19), SprBlsCol-Dmg/EndRdx(19), TchofLadG-%Dam(21) Level 6: Hasten -- RechRdx-I(A), RechRdx-I(21) Level 8: Crushing Field -- Acc-I(A) Level 10: Boxing -- Empty(A) Level 12: Stealth -- LucoftheG-Def/Rchg+(A) Level 14: Tough -- StdPrt-ResDam/Def+(A), GldArm-3defTpProc(43) Level 16: Fusion -- GssSynFr--Build%(A) Level 18: Gravity Distortion Field -- BslGaz-Acc/Hold(A), BslGaz-Acc/Rchg(23), BslGaz-Rchg/Hold(23), BslGaz-EndRdx/Rchg/Hold(25) Level 20: Radiation Siphon -- TchoftheN-Heal/HP/Regen/Rchg(A), TchoftheN-Heal(25), KntCmb-Dmg/EndRdx/Rchg(27), KntCmb-Acc/Dmg(27), KntCmb-Dmg/EndRdx(29), KntCmb-Dmg/Rchg(29) Level 22: Weave -- LucoftheG-Def/Rchg+(A) Level 24: Combat Jumping -- LucoftheG-Def/Rchg+(A) Level 26: Wormhole -- SuddAcc--KB/+KD(A), SprAscoft-Acc/Conf/Hold/Immob/Sleep/Stun/Fear(31), SprAscoft-Conf/Hold/Immob/Sleep/Stun/Fear/Rchg(31), SprAscoft-EndRdx/Rchg(31), SprAscoft-Acc/Conf/Hold/Immob/Sleep/Stun/Fear/EndRdx(33), SprAscoft-Acc/Conf/Hold/Immob/Sleep/Stun/Fear/EndRdx/Rchg(33) Level 28: Atom Smasher -- Obl-%Dam(A), Obl-Dmg(33), Obl-Acc/Dmg/EndRdx/Rchg(34), Obl-Acc/Rchg(34), Obl-Dmg/Rchg(34), Obl-Acc/Dmg/Rchg(36) Level 30: Super Speed -- BlsoftheZ-ResKB(A) Level 32: Singularity -- SuddAcc--KB/+KD(A), ExpRnf-Acc/Dmg/Rchg(36), ExpRnf-Acc/Dmg(36), ExpRnf-Dmg/EndRdx(37), ExpRnf-EndRdx/Dmg/Rchg(37) Level 35: Proton Volley -- StnoftheM-Dam%(A), StnoftheM-Dmg/EndRdx/Rchg(37), StnoftheM-Dmg/ActRdx/Rchg(39), StnoftheM-Dmg/EndRdx(39), StnoftheM-Acc/Dmg(39), TchofLadG-%Dam(40) Level 38: Devastating Blow -- Hct-Dam%(A), Hct-Dmg/EndRdx(40), Hct-Acc/Rchg(40), Hct-Acc/Dmg/Rchg(42), Hct-Dmg/Rchg(42), Mk'Bit-Dam%(42) Level 41: Sleet -- RechRdx-I(A) Level 44: Frozen Armor -- LucoftheG-Def/Rchg+(A), LucoftheG-Def(45), LucoftheG-Def/EndRdx(45) Level 47: Ice Storm -- Artl-End/Rech/Rng(A), Artl-Acc/Rech/Rng(48), Artl-Acc/Dam/Rech(48), Artl-Dam/Rech(48), Artl-Dam/End(50), Artl-Acc/Dam(50) Level 49: Hibernate -- RechRdx-I(A) Level 1: Domination Level 1: Brawl -- Empty(A) Level 1: Sprint -- Empty(A) Level 2: Rest -- Empty(A) Level 1: Swift -- Empty(A) Level 1: Hurdle -- Empty(A) Level 1: Health -- NmnCnv-Regen/Rcvry+(A), Pnc-Heal/+End(7), Mrc-Rcvry+(9) Level 1: Stamina -- PwrTrns-+Heal(A), PrfShf-End%(9), PwrTrns-EndMod(11) Level 49: Quick Form Level 30: Speed Phase ------------ | Copy & Paste this data into Mids Reborn : Hero Designer to view the build | |-------------------------------------------------------------------| |MxDz;1366;654;1308;HEX;| |78DA6593596F125114C7EF3033A5A5508A40D9DB428B50402CFA05D42E062D0996C| |4573202AD375286C094D88FE1163F435DDE5D9F7C361AADFAE28B1AB7071535F1C5| |050F73CE6D354CDAFCB8FF7B96FF99B9B7707ED1BEB6B67C8449CE85BAD66E9717F| |50DDED00CBDA516B4755E9119638E635A75BAC48D4DCDE07AC30A4A7437AABCA037| |8C965ECF1E6F691D6E6C89757C2FE268BBAD6DD68DECAA56E5BA563178A72634662| |BEA905B6AD66A5587F97399AF9F357863DD65AEF28D0E6FF333BC0E95EDA6B252D3| |9AB01D5C6AF24A365FA9950B5ADBA8B5B6F67CFBFBFEE03FD3B72EB1FED353D84D8| |5B19CC22C3788D791CA35E236F2559289A7077FF0B0035047A23AAA94B79871B625| |D9A45D839D08704332D763F7511FCB205F433D5924CB57B0C9F865E225E4BE8BC40| |B48CF436C128357AD52B2A4A6196E120F42032B6D326B104509324684FD11D3BE03| |A4511137EA459B32880E51D9E1C3195287D0F35BF0EC14459CDBE825077B2ECA905| |D3B163363E219F139D2FF02F90E2AB8C5D46E0F96F5BB91C112C8316011193E455C| |452AE0CD2B0C7BC9F004883E21FA48ECFB0D88368137F8F2266F619BC9DBC43BC8E| |9BBC47BC8F7E0314453AA21469B3F71DA688FF88BF81B39F387087622C24EE4258A| |87A1C6943870536467E61B657491B35F89DF911FC1464CCC10DBC1CF38FB14B9FF0| |9F131F111324107E40324C745723C8D6222459C43CE258909E2392CE27731961433| |24E95485404C936849D37BCE7888E3C830046545DBECB08AE7D14A1C22AAC89C429| |49101489E176DE7A92D7CF6DD6BD70B2B03777065502A2AE276832499D227DBDE8D| |A7A8CF83D2977F240B3B8D230D45F1000C9F80754261DDFF827EE0B71CBE4A97BF8| |BEB93291845B87E008B8858FC0598CDDFD2| |-------------------------------------------------------------------| This Villain build was built using Mids Reborn 3.2.17 https://github.com/LoadedCamel/MidsReborn Click this DataLink to open the build! Level 50 Magic Dominator Primary Power Set: Fire Control Secondary Power Set: Fiery Assault Power Pool: Speed Power Pool: Concealment Power Pool: Fighting Power Pool: Leadership Ancillary Pool: Ice Mastery Villain Profile: Level 1: Char -- UnbCns-Dam%(A), GldNet-Dam%(3), GhsWdwEmb-Dam%(5), NrnSht-Dam%(5), SprAscoft-Rchg/+Dmg%(7), GldJvl-Dam%(7) Level 1: Flares -- Empty(A) Level 2: Fire Cages -- PstBls-Dam%(A), PstBls-Acc/Dmg/EndRdx(23), PstBls-Dmg/Rchg(23), PstBls-Acc/Dmg(25), PstBls-Dmg/EndRdx(25) Level 4: Hasten -- RechRdx-I(A), RechRdx-I(9) Level 6: Stealth -- LucoftheG-Def/Rchg+(A), ShlWal-ResDam/Re TP(43), Rct-ResDam%(46), Empty(46) Level 8: Hot Feet -- SprAvl-Rchg/KDProc(A), SprAvl-Acc/Dmg/EndRdx/Rchg(9), SprAvl-Acc/Dmg/Rchg(11), SprAvl-Acc/Dmg/EndRdx(11), SprAvl-Dmg/EndRdx(17) Level 10: Fire Blast -- SprWntBit-Acc/Dmg(A), SprWntBit-Dmg/Rchg(27), SprWntBit-Acc/Dmg/EndRdx(34), SprWntBit-Acc/Dmg/Rchg(37), SprWntBit-Dmg/EndRdx/Acc/Rchg(39) Level 12: Flashfire -- Stp-Acc/Rchg(A), Stp-EndRdx/Stun(13), Stp-Acc/EndRdx(13), Stp-Stun/Rng(15), Stp-Acc/Stun/Rchg(15), PstBls-Dam%(17) Level 14: Boxing -- SprBlsCol-Rchg/HoldProc(A), SprBlsCol-Dmg/EndRdx/Acc/Rchg(42), SprBlsCol-Acc/Dmg/Rchg(42), SprBlsCol-Acc/Dmg/EndRdx(43), SprBlsCol-Dmg/EndRdx(43) Level 16: Embrace of Fire -- RechRdx-I(A) Level 18: Cinders -- BslGaz-Acc/Hold(A), BslGaz-Acc/Rchg(19), BslGaz-Rchg/Hold(19), BslGaz-EndRdx/Rchg/Hold(21) Level 20: Tough -- StdPrt-ResDam/Def+(A), GldArm-3defTpProc(21) Level 22: Maneuvers -- LucoftheG-Def/Rchg+(A) Level 24: Tactics -- EndRdx-I(A) Level 26: Bonfire -- FrcFdb-Rechg%(A), OvrFrc-Dam/KB(27) Level 28: Consume -- Obl-Dmg(A), Obl-%Dam(29), Obl-Acc/Dmg/EndRdx/Rchg(29), Obl-Acc/Dmg/Rchg(31), Obl-Dmg/Rchg(31), Obl-Acc/Rchg(31) Level 30: Weave -- LucoftheG-Def/Rchg+(A), Ksm-ToHit+(42) Level 32: Fire Imps -- ExpRnf-+Res(Pets)(A), ExpRnf-EndRdx/Dmg/Rchg(33), ExpRnf-Acc/Rchg(33), ExpRnf-Acc/Dmg(33), ExpRnf-Dmg/EndRdx(34), ExpRnf-Acc/Dmg/Rchg(34) Level 35: Blazing Bolt -- GldJvl-Dam%(A), StnoftheM-Dam%(36), StnoftheM-Dmg/EndRdx/Rchg(36), StnoftheM-Acc/Dmg(36), StnoftheM-Dmg/EndRdx(37), StnoftheM-Dmg/ActRdx/Rchg(37) Level 38: Blaze -- Apc-Dam%(A), Apc-Dmg/EndRdx(39), Apc-Acc/Rchg(39), Apc-Acc/Dmg/Rchg(40), Apc-Dmg/Rchg(40), GldJvl-Dam%(40) Level 41: Sleet -- AchHee-ResDeb%(A) Level 44: Frozen Armor -- LucoftheG-Def/Rchg+(A), LucoftheG-Def(45), LucoftheG-Def/EndRdx(45) Level 47: Ice Storm -- Artl-End/Rech/Rng(A), Artl-Acc/Rech/Rng(48), Artl-Acc/Dam/Rech(48), Artl-Dam/Rech(48), Artl-Dam/End(50), Artl-Acc/Dam(50) Level 49: Hibernate -- RechRdx-I(A) Level 1: Domination Level 1: Brawl -- Empty(A) Level 1: Sprint -- Empty(A) Level 2: Rest -- Empty(A) Level 1: Swift -- Empty(A) Level 1: Hurdle -- Empty(A) Level 1: Health -- Pnc-Heal/+End(A), NmnCnv-Regen/Rcvry+(45), Mrc-Rcvry+(46), Prv-Absorb%(50) Level 1: Stamina -- PrfShf-End%(A), PwrTrns-+Heal(3) Level 49: Quick Form Level 50: Musculature Core Paragon ------------ | Copy & Paste this data into Mids Reborn : Hero Designer to view the build | |-------------------------------------------------------------------| |MxDz;1411;679;1358;HEX;| |78DA65945B4F135110C7CF76775B6EB5D482B4B4802DA52D050AF51368B82408242| |426BE921516D8A4B44DB71A79F2163F80B7F8E4EDCDDB9B1A7DF1C14FA051D4673F| |0082A24683B84EF73F879274D3CDAF67E69C99FFCC3967E7CE4FB42D2F4F1D174A6| |0BC60D8F6C24469CD2A1AD552459F3356AC4555D0E3A3B777DFB1305E2A562BA542| |6ECAAA9872D057779FB06DE36CA14A6EB3B22E47A265BE444B4E954D7329E8FE9D2| |E9EB36CEB8C55B0AAEB7ED73265ADAC56ADE24AC01DCD9AC69259B157AD72F764D9| |5ACC4D2F9A0B73865DAD05DD4F162665717AFB6B3A959A56E1E862DA23445E139E4| |9D5A5B6A68006B14713DED7B07B87C19F1E211F877EF488A42AC30947535E0977DE| |9197CC1760F819F33998A03EA92C425187606C62FAC9A9B353D53BA1283B0305233| |B4C37798A063E9EAAF91E6888731F6CB9C7BC0BB6DF017F5311CD5271F34318BB1F| |81F1C760F209987A0AA62953AB6C5BEB05886ABBC8BC041EBACCBC02B6733B14AAC| |82F33FA6F21E2E04DE60D307B9D790DFC4332039C5104B837199211E4486A70C3E3| |EED2E18FCC4F60C76750A5B421D9E55017B6B4E3181A182467A70CDFC95D0E91B14| |B1ABBE2C839480B22324CE42A4E4CF71784D9A56154714F80A34777E18C0938630E| |C6BDFF987BCCBFA046E97A64E41ED630B8275CA1598AD1C7A5EA7D3FB0E2E80E738| |BB90DC6BF31BF83B50409B95D093EBDFD1B28A8FF03F32D987CC77C0FD6540EC8C5| |0379444C8D3147C1748E39C2E42461DA9E0C6E8423326FC819D244948C431CD133C| |4850E7730DBC1184DCAC982734DBA6B1CF531BD4C1DCC6B4C158CD0E2317933C7F8| |B424B4FA7575625AC3DD9D6D34CD6BF5EB2C14D7B4D952FF62F0ACAF8DA6AD03265| |5C4D18CE1D3286DE424314D6A3761DF3E305911B7F923F40B077F265B2FC5990991| |8D673AFF018852DF77| |-------------------------------------------------------------------|
-
Bad Build Decisions You're Willing to Admit To
oedipus_tex replied to oedipus_tex's topic in General Discussion
I do take Frostbite on Ice Doms, but yeah I don't cast it much. Usually it gets one Accuracy enhancement and that's all. It casts too slowly to be useful as an attack, and you're right that most of the time it's more effective to let enemies run around aimlessly in Arctic Air. -
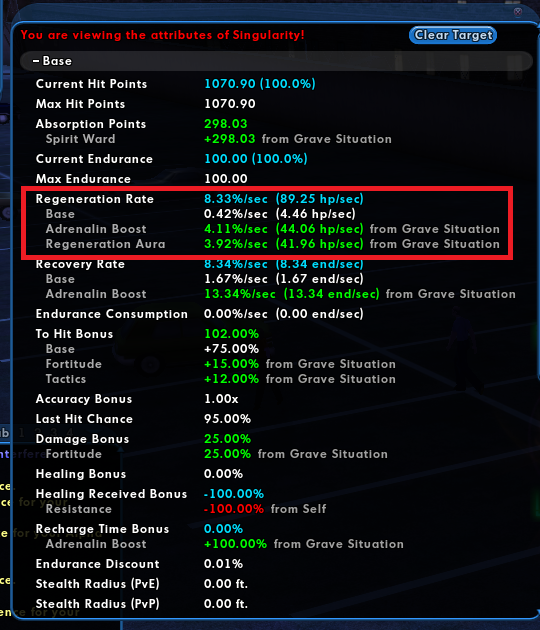
I'm going to subtly disagree about Spirit Ward and pets. Spirit Ward is really good at limiting "nick damage" taken by some of the stronger pets like Singularity or the Earth Control pet. It's true that it tends to work best on pets that are already pretty resilient, but it makes a real difference. That's useful on Singularity in particular, because you can't directly heal it. Here's how much of the pet's bar gets padded with a single end/heal slot devoted to Spirit Ward. I probably wouldn't take the power just by itself, but the fact that it unlocks the Sorcery pool makes it pretty attractive when I can squeeze it in. I especially recommend trying it on certain popular Gravity builds like Gravity/Storm.
-
The new Stealth is a must-take on any squishy build I create, replacing my old pragma of Super Speed + Stealth proc. New Stealth provides invisibility against most mobs, some Defense (about as much as Combat Jumping in combat), and a LoTG slot.
-
The lvl 41 Clockwork King AV challenge for Controllers
oedipus_tex replied to LynxNordique's topic in Controller
I did a quick test of Gravity/Empathy to see if Regen powers worked on Singularity. The results are promising. From the looks of it between Adrenalin Boost and Regen Aura I was able to cap his regen at 89.25/sec. Note Regen Aura can't be perma'ed, on the build I created I had it at around 147 recharge. It has a duration of 90, so around 60% up time. Adrenalin Boost meanwhile was about 4 seconds shy of perma, probably not enough to matter, I'll call that basically perma. With Power Boosted Fortitude, Maneuvers, and the pet Defense IOs I was able to soft cap Singy to all except Toxic: My Resists were slightly less impressive, mostly around 60%, which isn't terrible, but also I wish I had some way to make it better. Throwing Spirit Ward on the pet helps a bit with nick damage tho. The build I threw together isn't perfect. True Empaths will probably not like that I skipped powers teams tend to expect. Also, Empathy entirely lacks -Damage, which I tend to think of as critical for difficult AV fights. This Hero build was built using Mids Reborn 3.2.17 https://github.com/LoadedCamel/MidsReborn Click this DataLink to open the build! Level 50 Magic Controller Primary Power Set: Gravity Control Secondary Power Set: Empathy Power Pool: Speed Power Pool: Leadership Power Pool: Sorcery Power Pool: Concealment Ancillary Pool: Primal Forces Mastery Hero Profile: Level 1: Lift -- Apc-Dam%(A), Apc-Dmg/EndRdx(9), Apc-Acc/Rchg(9), Apc-Acc/Dmg/Rchg(11), Apc-Dmg/Rchg(13), FrcFdb-Rechg%(46) Level 1: Healing Aura -- DctWnd-Rchg(A), DctWnd-Heal(17), DctWnd-Heal/EndRdx/Rchg(19), DctWnd-Heal/Rchg(19), DctWnd-EndRdx/Rchg(23) Level 2: Gravity Distortion -- UnbCns-Dam%(A), GhsWdwEmb-Dam%(3), GldNet-Dam%(3), NrnSht-Dam%(5), GldJvl-Dam%(7), SprWiloft-Rchg/Dmg%(7) Level 4: Hasten -- RechRdx-I(A), RechRdx-I(5) Level 6: Propel -- SprWntBit-Rchg/SlowProc(A), SprWntBit-Dmg/EndRdx/Acc/Rchg(13), SprWntBit-Acc/Dmg/Rchg(15), SprWntBit-Acc/Dmg/EndRdx(15), SprWntBit-Dmg/Rchg(17), FrcFdb-Rechg%(46) Level 8: Crushing Field -- Artl-End/Rech/Rng(A), Artl-Acc/Rech/Rng(37), Artl-Acc/Dam(40), Artl-Dam/End(42), Artl-Dam/Rech(42), Artl-Acc/Dam/Rech(42) Level 10: Maneuvers -- LucoftheG-Def/Rchg+(A), LucoftheG-Def(11), Ksm-ToHit+(25) Level 12: Spirit Ward -- DctWnd-Heal/EndRdx(A) Level 14: Stealth -- LucoftheG-Def/Rchg+(A) Level 16: Tactics -- DS:DSyncEndToHitDef(A) Level 18: Gravity Distortion Field -- BslGaz-Acc/Hold(A), BslGaz-Acc/Rchg(43), BslGaz-Rchg/Hold(43), BslGaz-EndRdx/Rchg/Hold(46) Level 20: Fortitude -- LucoftheG-Def/Rchg+(A), LucoftheG-Def(21), LucoftheG-Def/Rchg(21), GssSynFr--Build%(23) Level 22: Mystic Flight -- BlsoftheZ-ResKB(A), BlsoftheZ-Travel/EndRdx(48) Level 24: Enflame -- Artl-End/Rech/Rng(A), Artl-Acc/Rech/Rng(25), Artl-Acc/Dam(31), Artl-Dam/End(31), Artl-Dam/Rech(34), Artl-Acc/Dam/Rech(37) Level 26: Wormhole -- SuddAcc--KB/+KD(A), AbsAmz-ToHitDeb%(27), AbsAmz-EndRdx/Stun(27), AbsAmz-Acc/Rchg(29), AbsAmz-Acc/Stun/Rchg(29), AbsAmz-Stun/Rchg(31) Level 28: Recovery Aura -- DS:DSyncEndModRech(A), DS:DSyncEndModRech(43) Level 30: Rune of Protection -- GldArm-3defTpProc(A) Level 32: Singularity -- ExpRnf-+Res(Pets)(A), ExpRnf-EndRdx/Dmg/Rchg(33), ExpRnf-Acc/Dmg/Rchg(33), ExpRnf-Acc/Dmg(33), CaltoArm-+Def(Pets)(34), EdcoftheM-PetDef(34) Level 35: Regeneration Aura -- DctWnd-Rchg(A), DctWnd-Heal(36), DctWnd-Heal/EndRdx/Rchg(36), DctWnd-Heal/Rchg(36), DctWnd-EndRdx/Rchg(37) Level 38: Adrenalin Boost -- NmnCnv-Regen/Rcvry+(A), NmnCnv-Heal(39), NmnCnv-Heal/EndRdx(39), NmnCnv-EndRdx/Rchg(39), NmnCnv-Heal/Rchg(40), NmnCnv-Heal/EndRdx/Rchg(40) Level 41: Conserve Power -- RechRdx-I(A) Level 44: Temp Invulnerability -- UnbGrd-Max HP%(A), UnbGrd-ResDam(45), StdPrt-ResDam/Def+(45) Level 47: Energy Torrent -- PstBls-Dam%(A), PstBls-Acc/Dmg/EndRdx(48), PstBls-Acc/Dmg(48), PstBls-Dmg/Rchg(50), PstBls-Dmg/Rng(50), Bmbdmt-+FireDmg(50) Level 49: Power Boost -- RechRdx-I(A) Level 1: Brawl -- Empty(A) Level 1: Containment Level 1: Sprint -- Empty(A) Level 2: Rest -- Empty(A) Level 1: Swift -- Empty(A) Level 1: Health -- Pnc-Heal/+End(A) Level 1: Hurdle -- Empty(A) Level 1: Stamina -- PrfShf-End%(A), PwrTrns-+Heal(45) ------------ | Copy & Paste this data into Mids Reborn : Hero Designer to view the build | |-------------------------------------------------------------------| |MxDz;1385;671;1342;HEX;| |78DA65944B6F125114C7EFC00CB414040484D202E525B5BC75E36363ACD4348516A| |DBA25231DEC2450C80C36F201DCAA4DAD7E865A5D191F1F425DF958E84A572ED4A6| |36262E0C1EE69C6BDB7402F363FEF79C73CF39F70C95DB17ED8DC6CC7926B8A69BB| |2AED7A6DB2B5DADDD6C2A9A54916FAA7536B8ACF08DEDAD70A3DC254D5E55BB3DFE| |ECDF6772E156A3912BB53A7277B9C76CD536582F761465C969FC2C2BF292A2E9CB6| |AC78E4B6DADAE683DB7F130BBB2AAEAEA0DB509A183A58E5ACF5535B525376B3303| |2BBD5691F52E180720A9087CEF0A70130637D69758D1C45851644305621E69CB21E| |D5964F60EF294E16C14D91759553044D702F2E83CB1823C5646DE13F886B0A3308B| |914C2D5C3495CC0645199E4322B364F0D9B2858C4133CDE42C98D30C8D89F76141E| |2B5484F45CCF909F2C816F131D2B5291EA8650DFCAC3C2DEB906488092B3265469E| |108912D18274435AC3E46C1AF6612D362F32F09719B5AC25191B21233632878B0EF| |07470D1419E1E109D5C744EC01EA299AD83E026D1EC7E6732624EBD277E40663F22| |4F83A1871B7B28AC9712F2BAE94436B1F47548CCC79BEAFB8C62FE13720316FDBC2| |F7EEA4B80FA12A6BE84A92F51EA4B82FAF2001C4719398F7EC58E07173072701E39| |5E219691E139E419701EE3698DE5B10B53C48790568822B3D0499C8E0DB08EF05C2| |3BB1866E2177187B88D8C7EC15645BF81794A6467C131C6873946C31CA7618ED330| |C769981334CCE70049BE63F23A8AC7AF112F13AF20538BC4ABC8D790F5243FE6491| |AE23720A6F928A5FF6061995DA21F5F8B1D3B6339DED7DC2BF4CCBF243E43169F13| |5F104D78286F215681B7AE40DB8E8B8C5F7DF8C035D8E7BFD42F1F5EAF8AFCE5074| |930A4EFB6BD3F04B2FA79408A621D3F0EDB6DEF9304F608CF28F31B47E61F8DCACA| |7E| |-------------------------------------------------------------------|
-
The lvl 41 Clockwork King AV challenge for Controllers
oedipus_tex replied to LynxNordique's topic in Controller
Oh for sure. I did that recently on a Dominator and was very pleasantly surprised by how effective Spirit Ward is on pets, especially that particular pet. I think I'm gonna need to roll a Grav/Emp on the test server just to see how extreme I things can get. 🙂 I'm thinking going with the Primal pool for Power Boosted Fortitudes too. -
The lvl 41 Clockwork King AV challenge for Controllers
oedipus_tex replied to LynxNordique's topic in Controller
This is making me curious about TA combos. Trick Arrow lacks a heal and a good source of -Regen, but has a realllllly good -Special power that puts Thermal or Cold to bed even on an SO build because a missed roll on Ice Arrow doesn't mean the AV is running around undebuffed for 30 seconds. The -ToHit it has is also partially unresisted by AVs. The only real disadvantage is cycling all those powers can be a lot to manage. One funny and interesting fact about Trick Arrow is that the field summoned by the T9 power, EMP Arrow, does not vanish if you die. It also lasts a really long time, 4 min IIRC. In difficult content I've used it to create a field where I can resurrect with an inspiration without experiencing a Stun. Illusion/Trick Arrow would seem to be an obvious front runner, for all the reasons Cold pairs well with Illusion. Dark/Trick Arrow has a lot of synergy. Gravity/Trick Arrow would play on the combo of +Resist for the pet (from EMP Arrow) and the huge amount of -Damage in TA. Not sure if it's possible to make the Gravity pet survive an AV fight directly, Elite Bosses should be cake though. You can't heal this pet anyway, so seems legit. FWIW one unlikely soloist I'm curious about is Gravity/Empathy. Did you notice above how I said the Gravity pet can't be healed directly? That's true, but IIRC you can boost Singy's Regeneration with Adrenalin Boost/Regen Aura. I have never actually tried this, and Empathy still would lack debuffs, so the fight would be a slog. I'm curious whether AB'ed, Fortitude'd Singularity is as difficult to kill as I imagine. -
I think all of these characters are going to be very good, so better is subjective. For a newish player determined not to repeat sets I'd probably recommend: Water/Cold Ice/Dark Not that the opposite pairings are weak in any way. I do think Ice/Cold is a particular type of amazing end game character in the hands of a very experienced player. Like, that's a combo you see a lot on hand-picked, heavily IOed teams built for speed running the ITF. It's excellent, just very specific and probably needs more kitting out than certain other combos to break out of its initial okay-ness.
-
I'm not an expert on AV solo times by any means. One thing about Water though is that a big part of its power comes from having a heal built into the set, which for me tends to mean two things: On sets that dont get their own heal (like Cold) it's obviously a big help to get one On sets that do get their own heal (like Dark) it's a power you can probably skip, earning you a power "back" in some sense I do have a Dark/Water Defender and he's very good. Never really focused on his ST damage though. Water is more of an AoE set. One thing Ice has that Water does not is a very, very, very good Hold power that is easily worked into attack chains. I do happen to think Water's nuke is among the best in the game, for its combo of range and burst damage, so there's that. Ice doesn't really have any burst AoE other than its cone. That another thing that leans me toward Dark/Ice, Dark has more to keep you standing upright while you wait for AoE damage to accumulate. Rightly or wrongly, I think of Ice/Cold as more of an AV slayer, albiet one that needs to find a way to stay alive in the fight.
-
Dark is much friendlier set for the newer player in my opinion. It's a great kit of abilities, and mostly easy to understand. Whenever I have a friend who is new to the game and they want to play support, its a set I push them toward. In comparison Cold is a fantastic, but very specialized set. To me it's one of the most complex kits in the game. It's complicated enough that it's hard to even explain the reasons it is good. Most players on a standard playthrough probably wouldn't pick up on it being an S-Tier set valued by players at the top end of play.
-
Two big questions I'd have is 1) How patient are you for key power unlocks and 2) Do you plan to IO? IMO if the answer to the questions above are "Not very patient" and "No plans to IO" Dark is the clear winner. Dark Miasma gets a very strong heal as its T1, and has most of its bread and butter powers by level 20. It has its -Resist power by level 2, compared to 35/38 for Cold. Most of the powers function reasonably well with an SO or basic enhancement build. Cold is the dead opposite of that. It gets its shields early, but its two most key power unlocks have to wait til levels 35 and 38 respectively. You get a strong AV debuff at level 28, probably before you really need it. On top of that, powers like Benumb and Heat Loss aren't that great out of the box. Only with excellent Recharge do they reach their potential and do some of the things you hear are great about Cold. Cold also has no self heal, so you probably need some Defense on top of that. I don't want to make Cold sound terrible, just paint a realistic picture. It's not a great set at low levels, and is only so-so at high levels until you kit it out. All of that said, with commitment either of these characters once kitted out is an A Tier or even S Tier performer, depending on the content you bring them to. You won't go wrong with either selection, so I'd pick the one that appeals to your style most.
-
Thank you for the testing of VG procs! I think Volcanic Gasses is a YMMV power. On a top end build it should be up a little faster than 70 seconds. On a Dominator, that probably tracks with about how long it will take you to solo a x8+4 pack, assuming you're willing to start moving to the next pack with a couple of survivors left over. The patch lasts 60 seconds, which is an eternity in CoX time. On a very very fast moving team or if only fighting small groups of enemies you might only be able to drop it every other pack or so, but in my experience it's not a power that "feels" limited the way some other powers do. For sure when I'm soloing on a end game build, it feels like there's a VG patch underfoot more often than not. Part of the wonderfulness of VG is how it picks its targets. It's not a completely random die roll like Arctic Air, Choking Cloud, Entangling Aura or even the Dark Control AoE hold. Instead it's a guaranteed pet-of-my-pet summon that will always pick a target from among the critters left alive in the cloud. That means that once you are down to only a couple of enemies, the cloud will begin to focus fire those couple of folks, spamming its holds on them over and over. The hold stacks with itself, so this will hold bosses. In the past I've tried the Chance for Mag 2 Hold proc in VG and found it just "okay." It does fire every so often, but not enough to make it worthwhile to me. Loading the power up with damage procs might work better, but I'd make sure to get the power's recharge under control first. The real beauty of it is unlocked once you reach perma-Hasten/perma Dom levels of recharge and can have it up reliably. A night and day difference IMO and part of why Earth Dominators in particular are so scary (not because the power can Dominate, it can't but in combo with the rest of the Dominator kit it delivers).
-
I think the fascinating answer here is that there is no easy correct answer, but a lot of answers that will still work very well. I think that is part of the reason City of Heroes maintains such a loyal following over almost 20 years. I am still constantly looking at builds I've had for a while and discovering ways I could do it better or different. Even the most experienced players are probably doing that as well, and once you understand that is part of the appeal of the IO system, it's possible to relax and run with it. There are very few players who stick to a single build over multiple years, so don't be afraid to try different thing. The one major exception I'd say is that if you have a clickable power that has +ToHit in it, like Aim or Build Up or one of their various clones, you should (almost) always slot Gaussian's Chance for Build Up in it. That's a case where the recharge on those powers is pretty much guaranteed to trigger a proc and there are few justifications for skipping it. If you can understand the essence of that statement--that there are some powers where the value of the proc is really high and you feel like you couldn't live without it--then you're beginning to understand the core of the proc system and can build up from there.
-
Earth/Thermal - giving Thermal the respect it deserves
oedipus_tex replied to Onlyasandwich's topic in Controller
Thanks for sharing your build! First glance reaction: You've picked the same powers I would have and overall slotting is good. Most of the overall build Looks solid. You have done a really good job balancing the needs of each individual power while laying the bricks needed to achieve overall goals. There's some really clever use of Hami Os in a few powers I haven't thought to do in the past and will now probably copy--particularly the Taunt Hami in Heat Exhaustion. I've never thought to slot it that way, and your way is superior to how I would probably approached it. The rest of comments are just suggestions and things to pique your interest. Knockback Protection I didn't see any. It's possible I missed it. If not though, be sure to slot it somewhere in the mix. -Recharge Resist I notice you've slotted for a lot of it using the Frozen sets, which is fine, and potentially useful. I do think it's less critical on a Controller versus a Dominator build though, and you might be able to use those slots in ways that would be more beneficial for a Controller. The Frozen sets are really expensive, so it might also save you a couple million influence. Thaw Choosing to take or skip Thaw will always be one of those controversial decisions, but I think skipping it is fine if it just won't fit. It's the sort of power that falls into the "sometimes useful, always annoying to maintain" category. If you do take it, the good news is its an easy mule for a free +3% Defense IO. Stalagmites You've done a good job turning this into a proc bomb, so that aspect is fine. I worry that you're not getting enough Stun duration here though. I'd consider swapping out the Frozen set for Absolute Amazement, a Acc/Mezz Hami O, or similar set, depending on what makes the most sense. It's also fine to slot this with x5 Will of the Controller x1 damage proc. That will get you 2 damage procs in the power (instead of 4) and an additional +10 global recharge and a much longer stun duration. In the end this one is really up to you and how you view your role. Salt Crystals Is now autohit in PVE, so there's no need to heavily slot it. I'd remove the 5 slots here and replace with 1 slot of Call of the Sandman: Chance for Self Heal or the purple Placate proc. Even as an autohit power, I suspect this will be one of your "weaker link" powers, and it would be on my list of potential chopping block powers. Earthquake I usually 5 slot this. One Chance for 100% recharge proc, and then 4 Dark Watcher's Despair, focusing on Recharge/End Cost/-To Hit. If you can't make the -ToHit fit I'd just do the 100% recharge proc. Stone Cages Earth has one of the faster casting AoE immobilizes so I'd probably try to put damage here and ignore mezz duration. I think a lot of folks just slot x5 Positron's Blast, for the +6.25% recharge. Sometimes people also just single slot with one accuracy or Hami O. I don't think the slots you're putting in this right now are serving you as well as they could. Power of the Phoenix If you're teaming a lot and after your next build review you find yourself with an open slot e.g. because of dropping Salt Crystals, I'd consider taking Power of the Phoenix, to tie in nicely with your Vengeance power. RoTP is a really fun rezz, even unslotted it does 343 base damage. If you put a Overwhelming Force: KB to KD, you convert its knockback to KD and the damage rises to 432. What's funny is you probably don't need any Accuracy in it, because you'll be casting Vengeance moments before, which will give you +28 ToHit. It's a nice 1, 2 combo enemies won't even see coming.- 2 replies
-
- 2
-

-
- builds
- earth control
- (and 1 more)