oedipus_tex
-
Posts
2652 -
Joined
-
Last visited
-
Days Won
4
Content Type
Profiles
Forums
Events
Store
Articles
Patch Notes
Everything posted by oedipus_tex
-
Before I say anything about procs, I want to first say that there's a lot about the system that I think is charming. It's fun to explore ways to make powers useful or perform in unexpected ways. I'd much rather CoX wth its current system than what's available in other RPGs and MMOs, so anything I have to say about it stems from a place of respect for the design. When it comes to valid criticism, I do think critiques have two valid points of concern: 1) Some attribute mods have lots of access to procs, and others have very few. Not everything has to be fair. But when people ask why things are they are, I think what they mean is why is Infrigidate a blast power when we would not put a real blast in a support set? And why is, say, Sonic Siphon not proccable in the same way? Is the fix to make it so that Sonic Siphon is proccable? I don't know to tell you the truth. Mind you, I have no beef with procced up Infrigidate specifically, but I see why questions are asked about it and future sets. 2) The second item is the "spirit" of procs. Powers with very long recharges virtually guarantee procs to fire, turning what was originally intended to be a "chance for" something to happen" to a "near guarantee." Often, we think of procs as average chances. But there is no such thing in real life as an "average moment." Either the proc fires or it does not. 30% Chance to Hold over a period of six casts is not the same as a 90% chance to Hold in one cast. In the second scenario, I know with a great deal of certainty what will happen when a power is held on the hot bar for a period of time and only fired when needed. That level of certainty wasn't present in the pre-PPM proc design. I do think it's worth discussing the possibility that certain procs, especially of the Chance to Mezz variety, might be more fair using their old formulas versus the PPM model. And at risk of being dragged into the town square and set afire: the stand out proc from item #2 I'd like to see reviewed is Gaussian's Chance for Build Up. All of the above said, I totally understand the concerns of people who don't want to see drastic changes happen either. A lot of folks rolled characters because of how procs work in them. I think its valid for players to play the game that is provided to them, and perhaps a bit unfair to snatch the rug out from under them after they've demonstrated how adroit they are at building cool stuff.
-
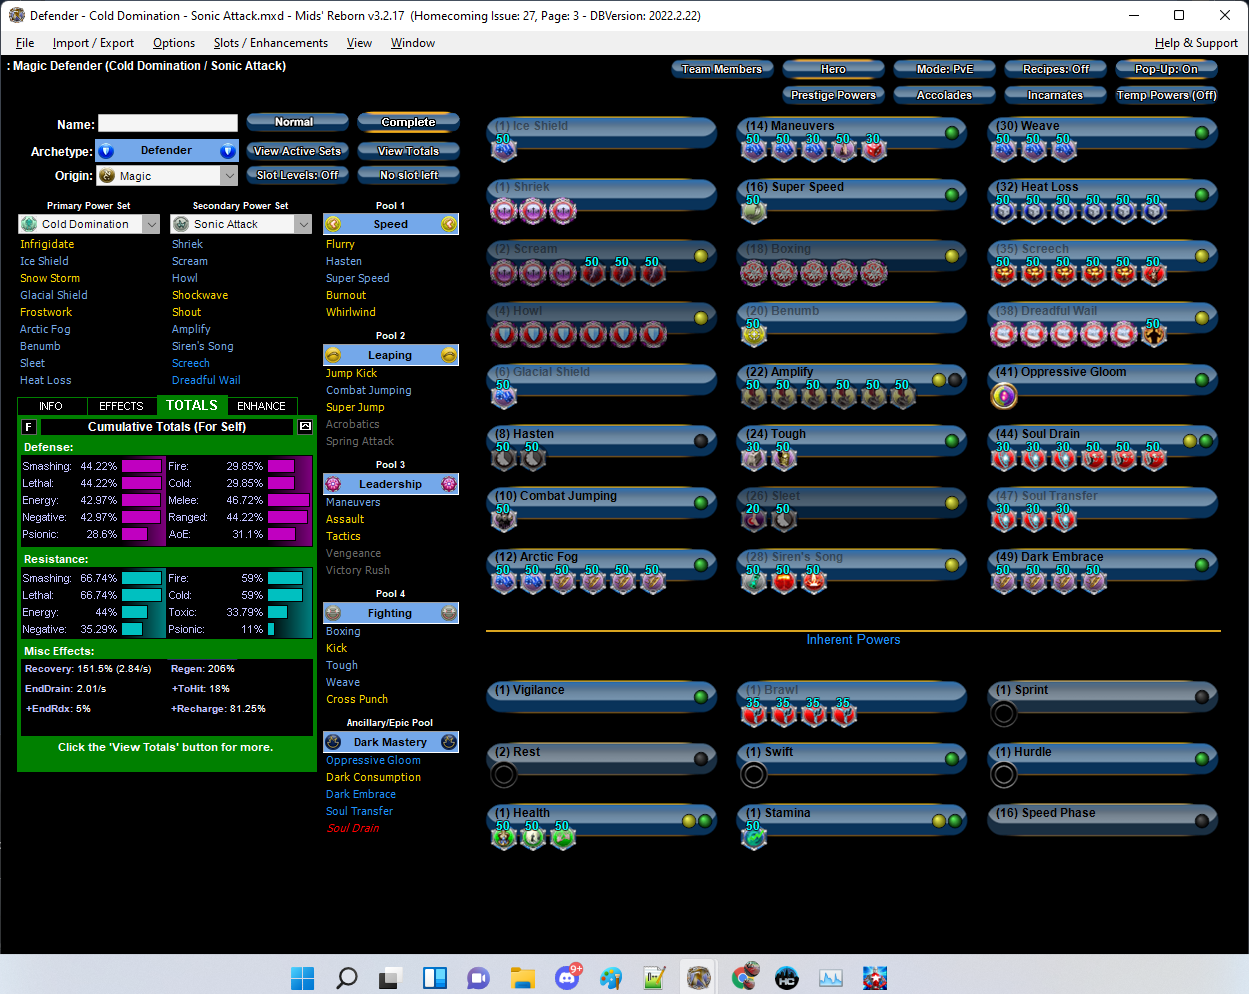
Thanks, you given me a lot of good ideas. I appreciate the feedback RE: Screech. It's a power that's controversial for a number of reasons, but you're right that proccing it out can make some sense. I can also 5 slot Screech for some bonus Recharge, bringing the new total to 81 (up from 71 in the previous build). Here's draft 2. I decided that Fold Space wasn't that critical to the build, allowing to drop the Teleport pool and slot in a slightly more traditional fashion. I picked up Super Speed, Combat Jumping, and Screech and realigned the rest of the build. I also shortchanged the ally shields, since that extra 5 defense or so in them from slotting them only goes so far. Here's draft 2: This Hero build was built using Mids Reborn 3.2.17 https://github.com/LoadedCamel/MidsReborn Click this DataLink to open the build! Level 50 Magic Defender Primary Power Set: Cold Domination Secondary Power Set: Sonic Attack Power Pool: Speed Power Pool: Leaping Power Pool: Leadership Power Pool: Fighting Ancillary Pool: Dark Mastery Hero Profile: Level 1: Ice Shield -- LucoftheG-Def/Rchg+(A) Level 1: Shriek -- SprVglAss-Acc/Dmg/EndRdx/Rchg(A), SprVglAss-Dmg/EndRdx/Rchg(3), SprVglAss-Acc/Dmg/EndRdx(3) Level 2: Scream -- SprVglAss-Rchg/+Absorb(A), SprVglAss-Acc/Dmg(9), SprVglAss-Dmg/Rchg(11), Thn-Acc/Dmg(11), Thn-Acc/Dmg/EndRdx(13), Thn-Dmg/EndRdx/Rchg(13) Level 4: Howl -- SprDfnBst-Rchg/Heal%(A), SprDfnBst-Acc/Dmg/EndRdx/Rchg(15), SprDfnBst-Acc/Dmg/EndRdx(15), SprDfnBst-Dmg/EndRdx/Rchg(17), SprDfnBst-Dmg/Rchg(17), SprDfnBst-Acc/Dmg(19) Level 6: Glacial Shield -- LucoftheG-Def/Rchg+(A) Level 8: Hasten -- RechRdx-I(A), RechRdx-I(19) Level 10: Combat Jumping -- ShlWal-ResDam/Re TP(A) Level 12: Arctic Fog -- LucoftheG-Def/Rchg+(A), LucoftheG-Def(21), UnbGrd-ResDam(21), UnbGrd-ResDam/EndRdx(23), UnbGrd-ResDam/EndRdx/Rchg(23), UnbGrd-Rchg/ResDam(25) Level 14: Maneuvers -- LucoftheG-Def/Rchg+(A), LucoftheG-Def(25), LucoftheG-Def/EndRdx(27), Rct-ResDam%(27), Ksm-ToHit+(29) Level 16: Super Speed -- BlsoftheZ-ResKB(A) Level 18: Boxing -- SprBlsCol-Rchg/HoldProc(A), SprBlsCol-Dmg/EndRdx/Acc/Rchg(29), SprBlsCol-Acc/Dmg/Rchg(31), SprBlsCol-Acc/Dmg/EndRdx(31), SprBlsCol-Dmg/EndRdx(31) Level 20: Benumb -- Acc-I(A) Level 22: Amplify -- GssSynFr--Build%(A), GssSynFr--ToHit/EndRdx(33), GssSynFr--Rchg/EndRdx(33), GssSynFr--ToHit/Rchg/EndRdx(33), GssSynFr--ToHit/Rchg(34), GssSynFr--ToHit(34) Level 24: Tough -- StdPrt-ResDam/Def+(A), GldArm-3defTpProc(34) Level 26: Sleet -- AchHee-ResDeb%(A), RechRdx-I(36) Level 28: Siren's Song -- CaloftheS-Heal%(A), PstBls-Dam%(36), Bmbdmt-+FireDmg(36) Level 30: Weave -- LucoftheG-Def/Rchg+(A), LucoftheG-Def(37), LucoftheG-Def/EndRdx(37) Level 32: Heat Loss -- PreOptmz-EndMod/End/Rech(A), PreOptmz-EndMod/Acc/Rech(37), PreOptmz-EndMod/Acc/End(39), PreOptmz-EndMod/Rech(39), PreOptmz-EndMod/End(39), PreOptmz-Acc/Rech(40) Level 35: Screech -- Apc-Dam%(A), Apc-Dmg/EndRdx(43), Apc-Acc/Rchg(43), Apc-Acc/Dmg/Rchg(43), Apc-Dmg/Rchg(46), GldJvl-Dam%(48) Level 38: Dreadful Wail -- SprAvl-Rchg/KDProc(A), SprAvl-Acc/Dmg/EndRdx/Rchg(40), SprAvl-Acc/Dmg/Rchg(40), SprAvl-Acc/Dmg/EndRdx(42), SprAvl-Dmg/EndRdx(42), FuroftheG-ResDeb%(42) Level 41: Oppressive Gloom -- HO:Endo(A) Level 44: Soul Drain -- Erd-%Dam(A), Erd-Dmg/Rchg(45), Erd-Acc/Dmg/Rchg(45), Arm-Dam%(45), Arm-Acc/Rchg(46), Arm-Dmg/EndRdx(46) Level 47: Soul Transfer -- Erd-Dmg/Rchg(A), Erd-Acc/Rchg(48), Erd-Acc/Dmg/Rchg(48) Level 49: Dark Embrace -- UnbGrd-Max HP%(A), UnbGrd-ResDam/EndRdx/Rchg(50), UnbGrd-ResDam(50), UnbGrd-ResDam/EndRdx(50) Level 1: Vigilance Level 1: Brawl -- KntCmb-Acc/Dmg(A), KntCmb-Dmg/EndRdx(5), KntCmb-Dmg/Rchg(5), KntCmb-Dmg/EndRdx/Rchg(7) Level 1: Sprint -- Empty(A) Level 2: Rest -- Empty(A) Level 1: Swift -- Empty(A) Level 1: Hurdle -- Empty(A) Level 1: Health -- Pnc-Heal/+End(A), Prv-Absorb%(7), NmnCnv-Regen/Rcvry+(9) Level 1: Stamina -- PwrTrns-+Heal(A) Level 16: Speed Phase ------------ | Copy & Paste this data into Mids Reborn : Hero Designer to view the build | |-------------------------------------------------------------------| |MxDz;1385;680;1360;HEX;| |78DA6594596F125114C7EF3033A5A5A5405B0A6DC196A55A4B3B405D5ED4B814FBD| |2A214125FC904063A2902014CF4C9E837707BAC5AE3525FDD5F8D4F7E0535717954| |5B4D5CDABA643CCC39D76224197E73FFF7FECF3DE7CC9D499E4E74150A338798D03| |D5D52EBF56C422B68E5BC5693936A51CFB1E6CF0A979FEBD923A70A0565BA52CA67| |1395937A596DE895B2EFEF6C5A2D17B5BC92A994F55CF670A3A1E616992D55A9949| |44C55D3F25DE6ED9CA656F572D1C10760AC2FE855BB399ED18B0B0D98751DADEA39| |25A1D616B349B5DED06A67BC90C7085CB316F813CCD40CC6DC701797D88B16D1C27| |64BA6689922EE42BEB4F035CC90853D28B6C790B638718999EC5A26DE40BE02B3C8| |CDE263D114BB1F111F229D0F88F7913DF7904930CB3C6799720E5AB1B94D51B0467| |09B1E623FCC747047C72C86390E613A49943B294C5F1FF12B2EEAFF46DC407AD791| |2E886827B36427B397CC834EA01FF80517FB7E33731C029383A7E168F6002605105| |D94B8E4BA827DF35D466EBB44BC48BC804C81B79747EA1DC42A5F83E8E64D75DFC5| |F0232BC43BC4DBC8C02DE24DA408697828A2E0F1600181292C601ED60CF0E60E3C6| |D6E0ED55073DFC070889F96A1E7D882D0139C0C5964931284F7F3457EEA5798FA15| |7622D3106958304F95210FFFC252C33F91DB7F1037891BC81DEBC8B7600EF2C7198| |C6355E3316294A820272791D1092CF01D0C47B9797499225F275E43EEBC4A5C221E| |44F359C0187F18637B0192C8CE8318E1B544D62C663F273E103F120F503AFB88FB9| |12B76C614DE2D854CD1F744329F831D62B4488C6D622E713AA7713ABF713ABFC7A4| |AD57DAF0B50C44960204E109CD13D3C8B60C724E62FC6734CD86C152D2D6ABCF045| |35AB5B57E474C69ED7FE993ADF5C312C0D4DA5691ED27F0147CFEC7F71D7BFD6C1C| |5E1DDAD2F8030C47CD9F| |-------------------------------------------------------------------|

-
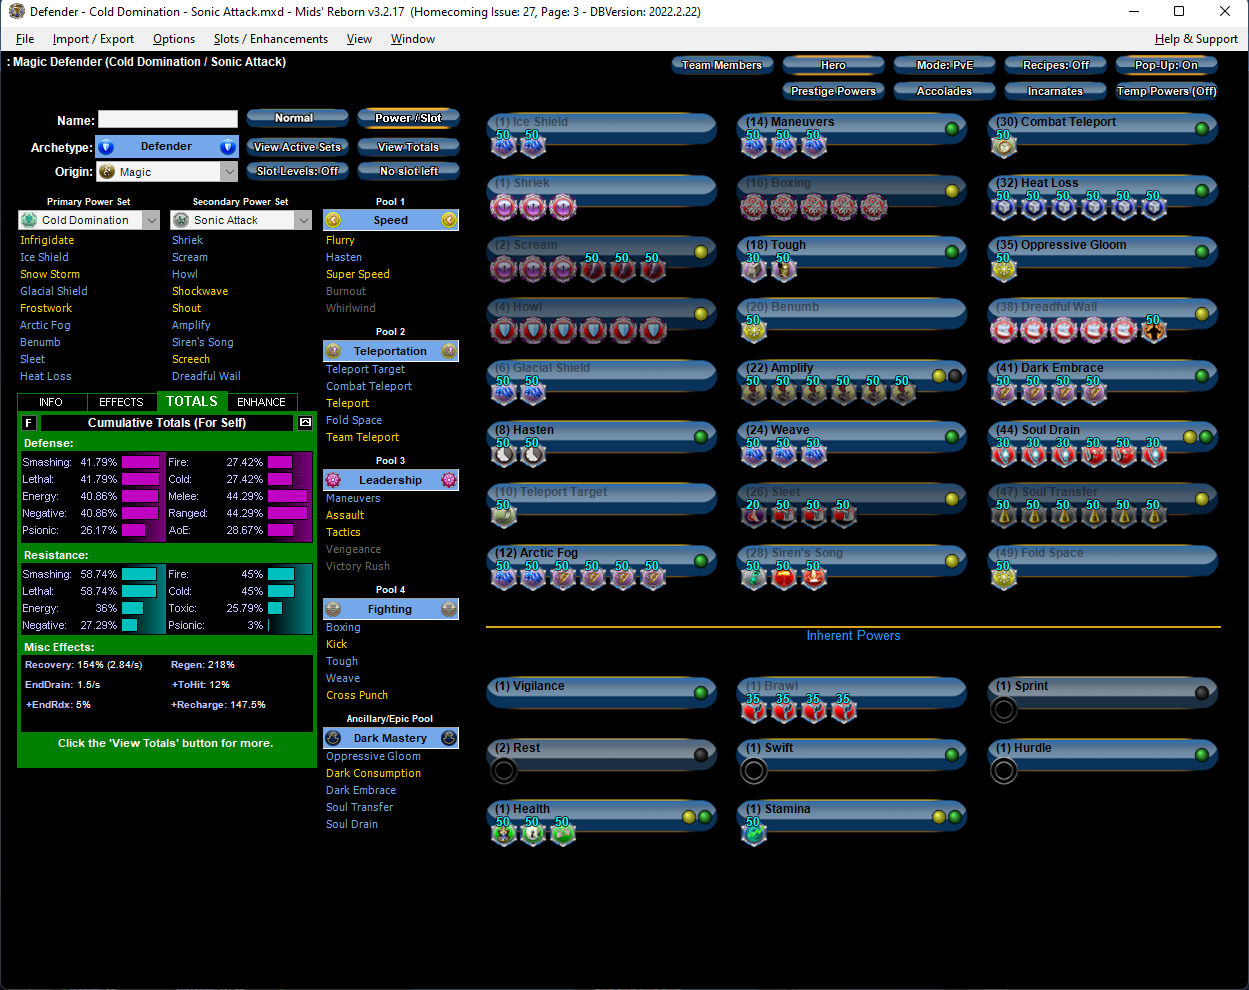
Hey all, Been a while since I built a Defender. I wanted to take advantage of the new Sleep rules which seem to have made Siren's Song into a pretty decent proc cannon. I haven't played with Defender ATOs or support builds in general in a long time. Had this guy sitting at 50 for ages, now time to IO him. Goal is mostly team support, with the ability at least get through basic missions solo. I went for all around Defense and Recharge, with some healing sources. On the test server, procs in Siren's Song seemed to fire a lot. The combo of Oppressive Gloom with the nuke and Fold Space seemed pretty potent. I originally tried the build with slots in Oppressive Gloom and Soul Transfer flipped around, except the annoying knockback proc in that set would occasionally hurl enemies out of the aura. Open to your suggestions. This Hero build was built using Mids Reborn 3.2.17 https://github.com/LoadedCamel/MidsReborn Click this DataLink to open the build! Level 50 Magic Defender Primary Power Set: Cold Domination Secondary Power Set: Sonic Attack Power Pool: Speed Power Pool: Teleportation Power Pool: Leadership Power Pool: Fighting Ancillary Pool: Dark Mastery Hero Profile: Level 1: Ice Shield -- LucoftheG-Def/Rchg+(A), LucoftheG-Def(3) Level 1: Shriek -- SprVglAss-Acc/Dmg/EndRdx/Rchg(A), SprVglAss-Dmg/EndRdx/Rchg(3), SprVglAss-Acc/Dmg/EndRdx(5) Level 2: Scream -- SprVglAss-Rchg/+Absorb(A), SprVglAss-Acc/Dmg(11), SprVglAss-Dmg/Rchg(11), Thn-Acc/Dmg(13), Thn-Acc/Dmg/EndRdx(13), Thn-Dmg/EndRdx/Rchg(15) Level 4: Howl -- SprDfnBst-Rchg/Heal%(A), SprDfnBst-Acc/Dmg/EndRdx/Rchg(15), SprDfnBst-Acc/Dmg/EndRdx(17), SprDfnBst-Dmg/EndRdx/Rchg(17), SprDfnBst-Dmg/Rchg(19), SprDfnBst-Acc/Dmg(19) Level 6: Glacial Shield -- LucoftheG-Def/Rchg+(A), LucoftheG-Def(39) Level 8: Hasten -- RechRdx-I(A), RechRdx-I(21) Level 10: Teleport Target -- BlsoftheZ-ResKB(A) Level 12: Arctic Fog -- LucoftheG-Def/Rchg+(A), LucoftheG-Def(21), UnbGrd-ResDam(23), UnbGrd-ResDam/EndRdx(23), UnbGrd-ResDam/EndRdx/Rchg(25), UnbGrd-Rchg/ResDam(25) Level 14: Maneuvers -- LucoftheG-Def/Rchg+(A), LucoftheG-Def(27), LucoftheG-Def/EndRdx(27) Level 16: Boxing -- SprBlsCol-Rchg/HoldProc(A), SprBlsCol-Dmg/EndRdx/Acc/Rchg(29), SprBlsCol-Acc/Dmg/Rchg(29), SprBlsCol-Acc/Dmg/EndRdx(31), SprBlsCol-Dmg/EndRdx(31) Level 18: Tough -- StdPrt-ResDam/Def+(A), GldArm-3defTpProc(31) Level 20: Benumb -- Acc-I(A) Level 22: Amplify -- GssSynFr--Build%(A), GssSynFr--ToHit/EndRdx(33), GssSynFr--Rchg/EndRdx(33), GssSynFr--ToHit/Rchg/EndRdx(33), GssSynFr--ToHit/Rchg(34), GssSynFr--ToHit(34) Level 24: Weave -- LucoftheG-Def/Rchg+(A), LucoftheG-Def(34), LucoftheG-Def/EndRdx(36) Level 26: Sleet -- AchHee-ResDeb%(A), Artl-Dam/Rech(36), Artl-End/Rech/Rng(36), Artl-Acc/Rech/Rng(37) Level 28: Siren's Song -- CaloftheS-Heal%(A), PstBls-Dam%(37), Bmbdmt-+FireDmg(37) Level 30: Combat Teleport -- Tim&SpcMn-Stlth(A) Level 32: Heat Loss -- PreOptmz-EndMod/End/Rech(A), PreOptmz-EndMod/Acc/Rech(39), PreOptmz-EndMod/Acc/End(39), PreOptmz-EndMod/Rech(40), PreOptmz-EndMod/End(40), PreOptmz-Acc/Rech(40) Level 35: Oppressive Gloom -- Acc-I(A) Level 38: Dreadful Wail -- SprAvl-Rchg/KDProc(A), SprAvl-Acc/Dmg/EndRdx/Rchg(42), SprAvl-Acc/Dmg/Rchg(42), SprAvl-Acc/Dmg/EndRdx(42), SprAvl-Dmg/EndRdx(43), FuroftheG-ResDeb%(43) Level 41: Dark Embrace -- UnbGrd-Max HP%(A), UnbGrd-ResDam/EndRdx/Rchg(43), UnbGrd-ResDam(45), UnbGrd-ResDam/EndRdx(45) Level 44: Soul Drain -- Erd-%Dam(A), Erd-Dmg/Rchg(45), Erd-Acc/Dmg/Rchg(46), Arm-Dam%(46), Arm-Acc/Rchg(46), Erd-Acc/Dmg/EndRdx/Rchg(48) Level 47: Soul Transfer -- Stp-KB%(A), Stp-Acc/Stun/Rchg(48), Stp-Stun/Rng(48), Stp-Acc/EndRdx(50), Stp-EndRdx/Stun(50), Stp-Acc/Rchg(50) Level 49: Fold Space -- Acc-I(A) Level 1: Vigilance Level 1: Brawl -- KntCmb-Acc/Dmg(A), KntCmb-Dmg/EndRdx(5), KntCmb-Dmg/Rchg(7), KntCmb-Dmg/EndRdx/Rchg(7) Level 1: Sprint -- Empty(A) Level 2: Rest -- Empty(A) Level 1: Swift -- Empty(A) Level 1: Hurdle -- Empty(A) Level 1: Health -- Pnc-Heal/+End(A), Prv-Absorb%(9), NmnCnv-Regen/Rcvry+(9) Level 1: Stamina -- PwrTrns-+Heal(A) ------------ | Copy & Paste this data into Mids Reborn : Hero Designer to view the build | |-------------------------------------------------------------------| |MxDz;1378;669;1338;HEX;| |78DA65944B4F135114C7EF74662C144A29EF57452A20F2280F75658C0F2A1BA9163| |06E9B493B2D136AA7696BA22B04FD02BE96A8181FB8F5BD75C95750138D5B055DA8| |809A8CA7F33F57304E32FDCD9CD73DFF73EF3476315A9D4E4F1C134ACD78D628161| |351336DE65266418F19192B29CA9797EE90B4274E5C48A723E376369588DAE7AD9C| |51B2EC5CC75FEFB491CB98A9C88C9DB39289E3A592919C13BEB86D67233379D34CD| |5B98F67CDAC99B70B253737E09A264D83D28BB356DEEFBE4F5899D99295CB044FE6| |AD64246A14E61231A358320B975AA89B4EBA4F79E847711B7414D1484FA39AF0348| |06F76383DE2A006E718A81D00DF7A648C7074E5108CBE11E62858BD24C065B0E61E| |F88E925599ACBE54E17C01D63E673E03EB9E329F80314AD665EF3AF7DECBBD8769D| |E5EE9F40E60B906660F392BD9292ACB4D90F10CA18A8D7A15976BE0724DDFB066D3| |77B06593B90106A9A25F8ECACFC96D9CDC560B2A141460B55AE01646D371937903D| |C7D9D790D5429292885049BE92944CE312C1BA79EEBA590FA36A87B4FC64639D4C6| |C750B76785F988F910EC7AC0BC0F6AB45CB314D2CC42BA58C85E163245B1ADBC82D| |AFABADC0439751D411560B717FC40EE7659B17D1515BA5FA1D76E0F827A69D99014| |120AA0976942A7E29E2E47EFFC8D79F4FE62FE04F76D3137991BE03C4D282C2B867| |9341FA9628FDCE39E6544EEBFCBBCC3BC0DF62F318F62D80B843E4E56FBB660ECE7| |8330C80764900FC8226140F63EB0EE71B76DF01338F499790442870E83C36BB0AFF| |88588C81D8C5CC5C886AF3017C1D105E665E63CA836093122858FB0F0D3DAF6A7EC| |74EC7851459C10A68D9F02774D3367C0494DC8CB29273B8E886BDB9FBC505CD39A6| |FBB2447ADFF6FFAE2DBF987D2854955AC31CFA1FFAFFFE4FDC01EFC011EA5CADF| |-------------------------------------------------------------------|
-
To come to the limited defense of Mind/Psi, there's something to be said for combining Mass Hypnosis and Drain Psyche on a Fold Space build. That's a very specific playstyle (unique to Homecoming, in fact) but works surprisingly well. Mass Hypnosis now has no chance of missing, making it very safe. Also, Psi Assault tends to work well with sets that have a fast animating Hold, to help cover for Psi Assault's relatively weak single target game. Procced out Dominate is a better attack than the actual ranged attacks in Psi, so that's something.
-
You might want to try Dark/Psi. Dark Control plays similarly to Mind Control in a lot of ways, but IMO is a lot more forgiving. You'll lose an AoE Confuse but gain a much faster Rechargiing AoE Stun. You'll also gain -ToHit in your attacks. Psi Assault is an interesting set. It has excellent survivability if you plan to IO, but is probably only mediocre if you do not. The key power in it is Drain Psyche, a "vampiric" style power that you will need to center a lot of your gameplay strategy around as a /Psi Assault player. Drain Psyche provides a massive Regen and Recovery boost for thirty seconds after hitting enough enemies at close range. It tends to inspire a go go go go go approach to gameplay. The good news is that if you achieve permadom Recharge levels, Drain Psyche will be close to perma as well. Keep in mind, though, that that survivability comes at a price, since Psi Assault otherwise has lackluster damage (somewhat but not entirely offset by the unusual ability to be a Dominator who can debuff AV regen). The ranged blasts and cone in particular are slow animating and I tend to skip them.
-
I think this is pretty accurate. I'm not sure I'd call most legacy Dominators overpowered, though a few specific builds were. Plant/Fire/Ice is surely up there, along with a few other handpicked builds. Back then, just being a squishy who wasn't a Force Field, Sonic res or Traps character with mezz protection was pretty valuable and stood out, of course. On the other hand, Dominators on live and still on some other fan servers didn't have any consistency between power animation times and damage, leading to situations where ranged attacks sometimes outdamaged melee attacks, cones and spheres did inconsistent damage with smaller radii, some powers like Chilling Embrace did almost nothing, and numerous other issues existed. You could do very well with a Fire or perhaps a Psi Dominator, where most other secondaries were either average or in some cases very poor. Homecoming Dominators are somewhat better than on live. You can still see the animation time disparities at play with the low level immobilize and hold powers. Weirdly, its a problem that continued even with sets releases later in the game's cycle. Electric Control's hold takes 2.37 Arcanaseconds to animate, versus 1.32 for Fire Control. A balance pass to normalize the animation times is welcome. It would benefit Controllers more than Dominators, but both classes are likely to benefit from more consistency.
-
Part of the answer to Dominator effectiveness I think can be seen in iTrials. You might suppose that given all of the trash mobs in iTrials that Dominators would be a key class for shutting enemies down while the team concentrates on the boss. In practice, what you probably need is a lot of damage to burn the boss down fast + buff characters to help the team shrug off the attacks. Most Dominators probably should fall back second or third rate single target blasters. Encounters tend to come in two varieties: 1) Dogpiles, where control doesn't matter much, and the mob quickly evaporates 2) Dangerous ambushes and adds, where you probably don't want to hit them with anything. When they wake from the mezz they'll maintain perma aggro. If you had just left them alone you might be okay. The out-of-iTrial analogue which every new Dominator is likely to experience at least a few times is an enemy pack ambushing the team, thinking you can save the day with a carefully timed Control, only to have half the enemies ward it off and destroy you. Bonus points if the Control was a psuedopet wiped out on death. 😄 We've all been there. Mind Control and to an extent Illusion and Dark Control have a slightly easier time of of it in iTrials because they can mezz trash mobs without alerting them. I suppose Gravity would too, if its teleport worked on boss level enemies in that content. Anyway, I'm in total agreement on the need for Defenses for Dominators. You don't have much else, your damage is usually close range, and in the most difficult content many of your controls create more problems than they solve. As with all things, there are exceptions. OTOH I do still find the class fun to play, and they can excel in some unusual ways where other builds might not.
-
I think it depends. You'll notice none of my runs are versus a very difficult enemy. I don't have any Dominator who can clear a +4x8 Carnival of Shadows mission solo, and that goes for a lot of other enemy groups. They can be built to destroy very specific content that meets specific criteria. Even the best Dominators tho probably eat dirt regularly. That's a hazard of being an unarmored archetype expected to enter melee range with (usually) very little buff, debuff, healing, or really anything but Controls. And also, outside of Domination mode, most Dominators actually have weak controls, since they have very few powers they can stack together. There's a strange dichotomy at work with Dominators. A few of them can clear ridiculous obstacles just because shutting down an enemy's responses can open up possibilities. OTOH most probably don't reach that threshold. On the other other other other hand, in 2022 it's a fact that Blasters produce WAY more damage than they ever did on live, Their nukes are crashless, do huge damage with terrific Accuracy, recharge 100 seconds faster than a Dominator's AoE Hold, and many of them have stuns, holds or other dramatic effects of their own. Dominators are a lot of fun and still my favorite class. But you'll note I cherry pick them. It's not that some of the sets are bad, strictly speaking. A few of them are just unfortunately bland and same-y. For example, I'd put Ice, Electric, and Thorny all into the "why bother" category just for being unflavorful. I can combine virtually any two Blaster sets and still end up with a high damage character with a stable blue bar, multiple sources of self Heal procs, Bonfire if I want it, and other advantages. That just doesn't happen with Dominators. TLDR on paragraph above: I believe this is an archetype where primary and secondary set matter a lot. I don't think any amount of bad slotting can make Plant/Fire bad, or any amount of slotting can make Grav/Electric a competitive character for heavy investment (just because I wrote that someone will prove me wrong; I'd love to see a build that makes it work). If I was charting out Dominator performance, I'd say most start strong, dive in usefulness through the midlevels (especially in terms of endurance usage), and only after significant investment break even with other classes at high levels, depending on what you want out of them. They can master certain very specific content, and are one of if not the worst classes for certain other kinds of content. But they are fun to play, and if kept within their niche, can be exciting.
-
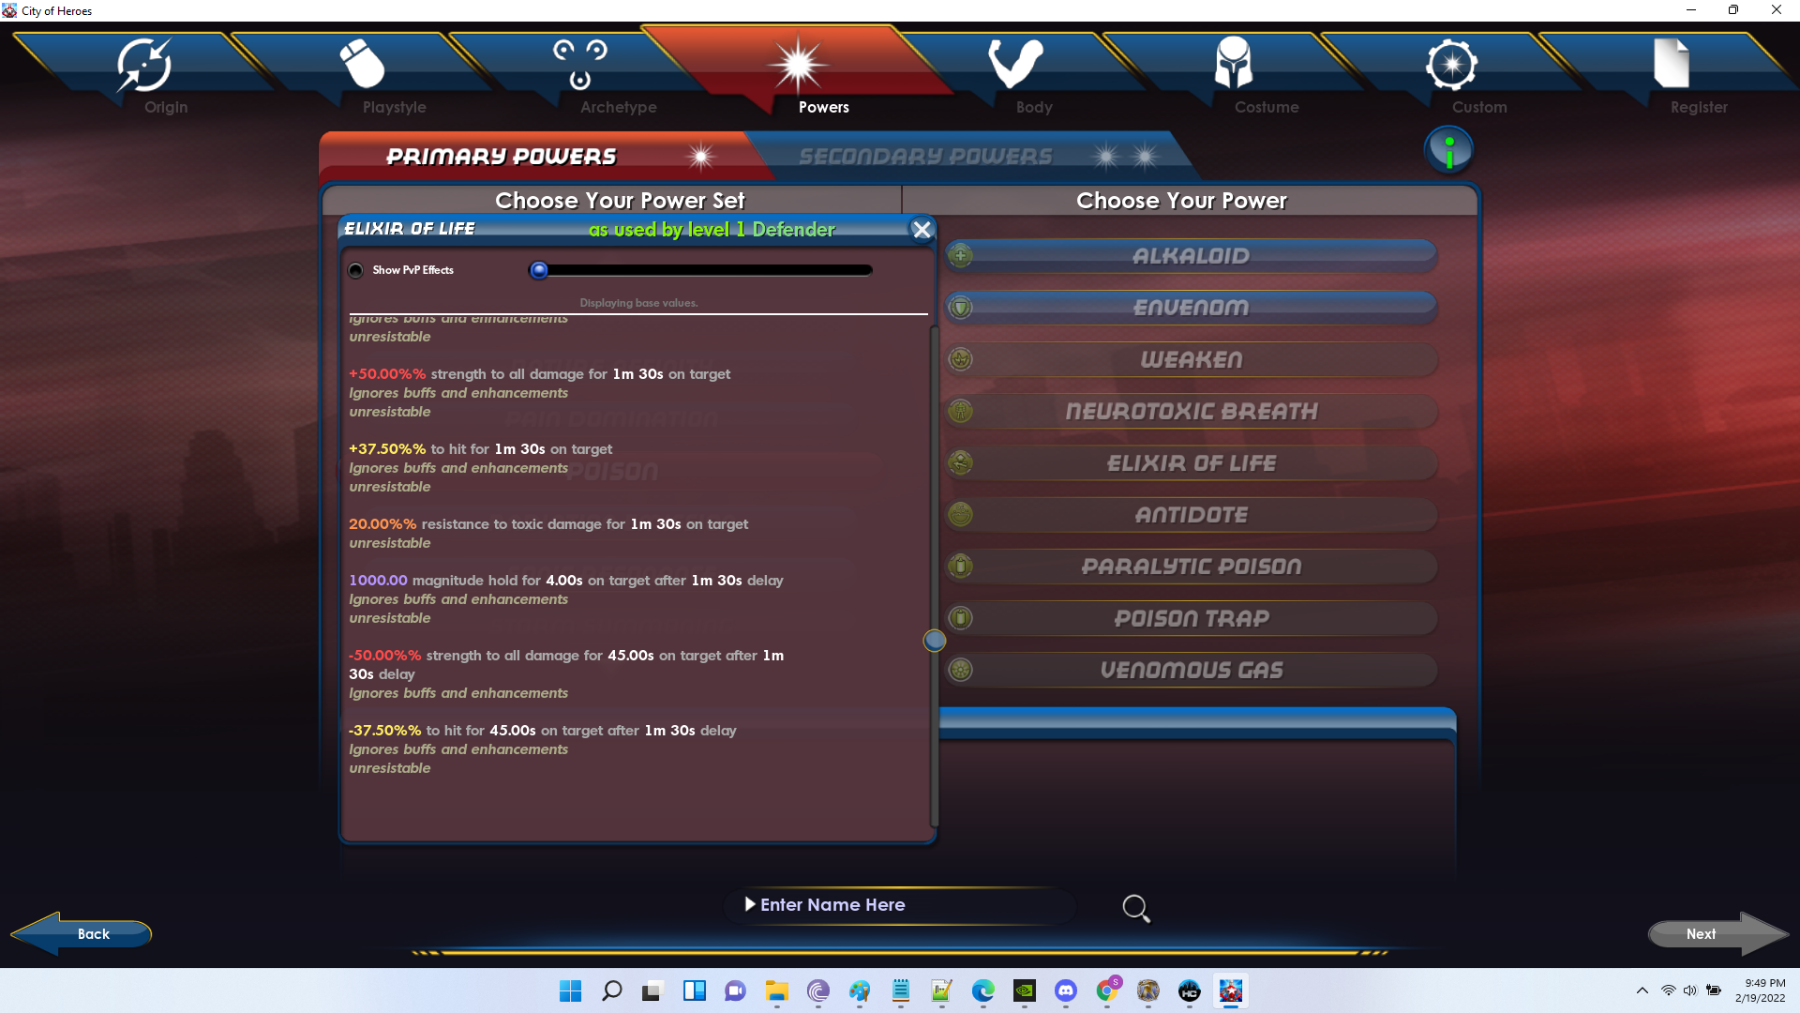
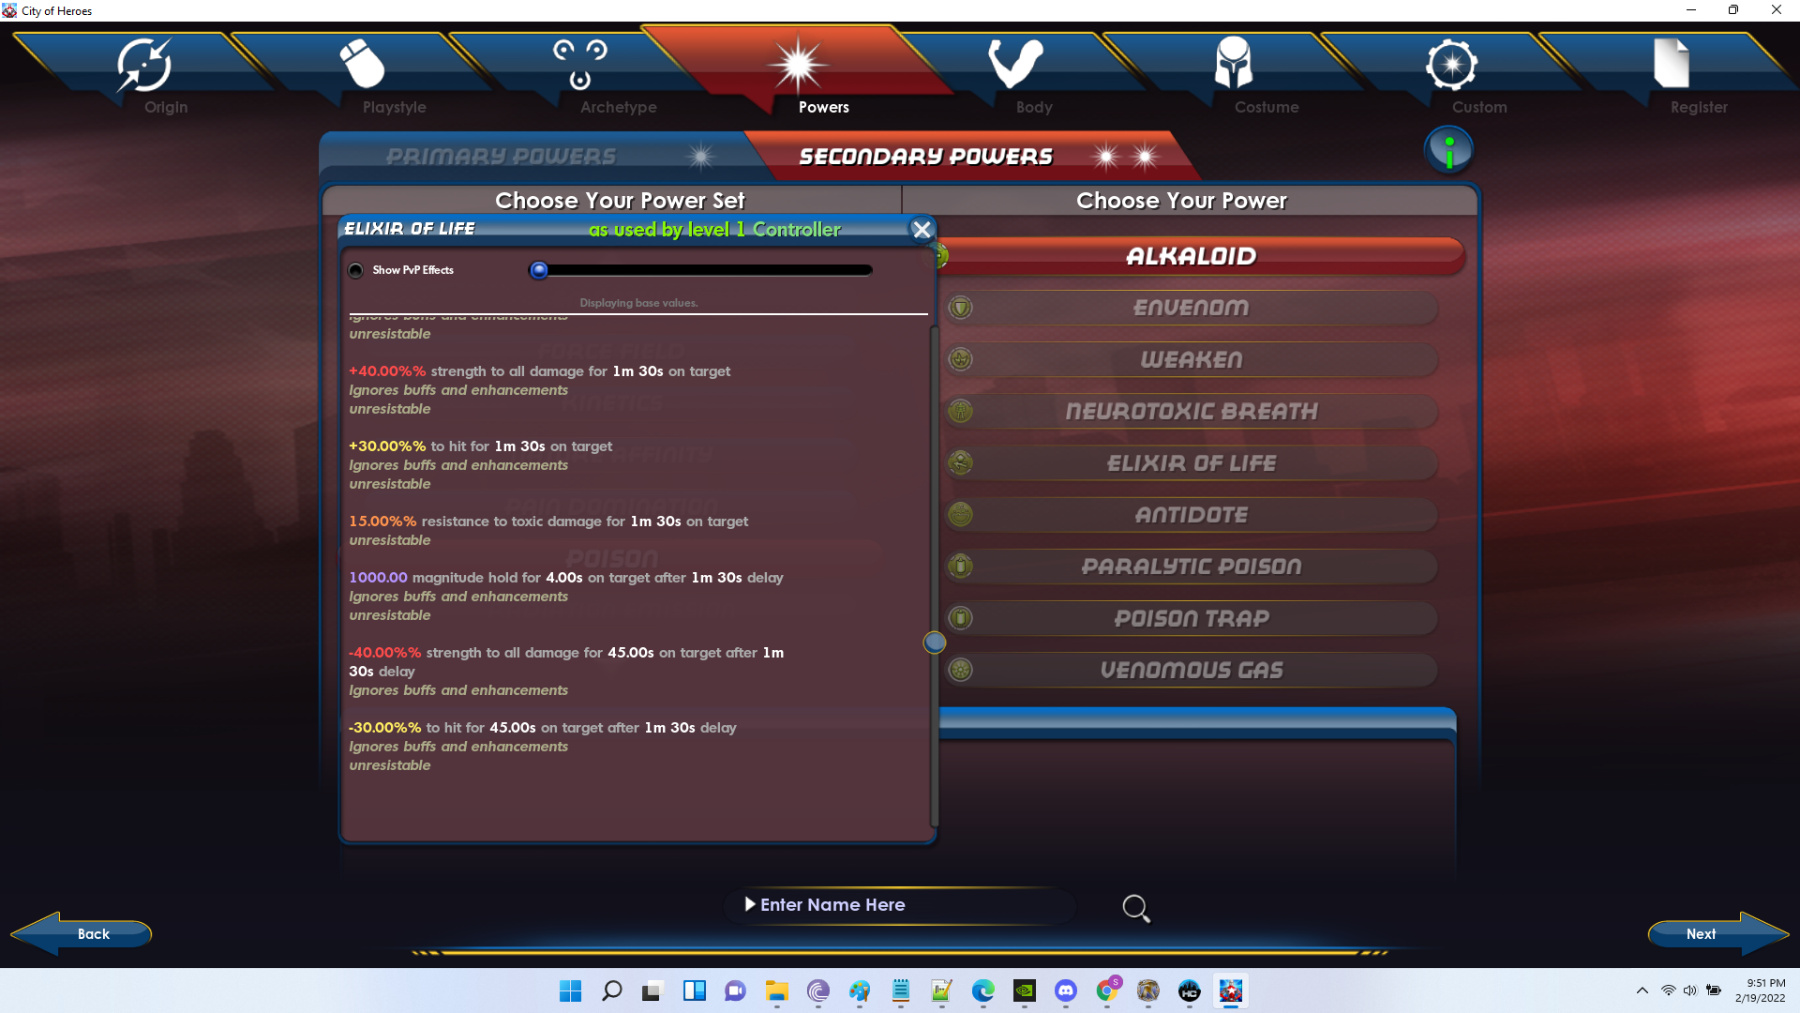
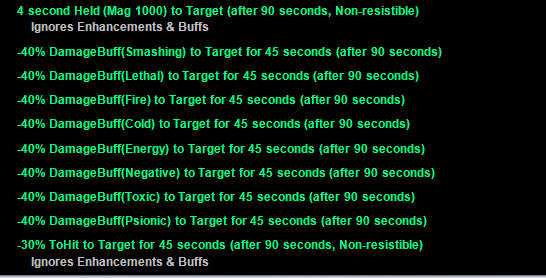
Looks like it's still around. EDIT: I also just realized the Strength and ToHit debuff flexes with archetype modifiers. Defenders debuff your Damage and ToHit more than other ATs. Not technically a bug, but not what I expected. Here's Controllers: And Masterminds:
-
I just realized the OG is brand new (congrats on your first post) so wanted to expand a bit on stuff that us old school folks know. To start with your questions: Does the Fear or Stun in these powers stack with other sources of Stun and Fear? Yes, it does stack with other powers. These powers can be your powers, your teammates powers, powers from pets, or any other source. In City of Heroes, Stun and Terrify (along with Hold, Immobilize, Confuse, and a few others) are measured in Magnitudes. Magnitude is always a positive number. Mezz protection is the force you need to overcome to mezz the enemy. Enemies naturally have mezz protection based on their rank. Mezz protection is literally just inverse mezz, written as a negative number (tho in game displays will show it as a positive number, its a negative number under the hood). Minions have -1.0 mezz Lieutenants have -2,0 mezz Bosses have -3.0 mezz If the total amount of Mezz on a creature is greater than 0 after all sources of mezz and mezz protection are added together, it is mezzed. EXAMPLE 1: In the case of both Stun and Terrify for Dark Armor, both auras are Mag 2. Minions have 1.0 mezz protection. The aura provides +2 mezz. That results in a total mezz of 1 (2 -2 = 1). That result is greater than 0, so they are mezzed without needing any outside help. Lieutenants have -2.0 mezz protection, and the aura provides +2 mezz. That results in a total mezz of 0 (2 -2 = 0). The creature is not mezzed, because the total mezz is not greater than 0 (it is exactly 0). But any amount of additional Stun from any source, no matter how weak. will exceed the protection and Stun the mob. (NOTE: In practice, Magnitude is almost always a whole number. However there are a few powers that are exceptions, like the Sleep in Mind Control, which is Mag 3.5. In general, you can expect most single target powers from most other casters to be Mag 3, and most AoEs to be either Mag 2 or Mag 3. This means if you are paired with any other player who has an AoE Stun or Fear that your auras will stack and mezz bosses and lieutenants.) EXAMPLE 2: As a Dark Armor character you can select powers that stun, such as powers in Martial Arts or Energy Melee. If a Boss level enemy (native -3.0 Stun) stands within your Oppressive Gloom, initially it will have 2 - 3 = -1 Stun status. -1 is not more than 0, so it is not Stunned. Imagine you then hit the boss with Cobra Strike (which has a chance for Mag 3 Stun). If the Stun triggers, the new total is 2 + 3 - 3 = 2 Stun. The total Stun is greater than 0, so the enemy is stunned. Read this only if you feel like you understand the explanation above: Keep in mind that each individual source of mezz has its own, independent duration. If you hit a boss with a Magnitude 2 Stun from your aura, then roll a Mag 3 Stun with an attack, it will be Stunned, but only for the duration that both Stuns are active and total mezz protection is exceeded. Once either of those Stuns wears off, the enemy will break free and attack. You can avoid this by continuing to stack Stun sources of Stun on the enemy. For melee characters, this means continuing to use powers that keep the enemy in the Stunned state. Takeaway: One of the benefits of a Stun or Fear aura is the duration is more or less "until you walk or run away from the enemy." Most AoE control powers on the other hand have long cooldowns and players tend not to want to "waste" them. Since there's no opportunity cost for these auras they can help you avoid a lot of incidents that can occur when fights are winding down--often one of the most risky parts of the fights for unarmored characters trying to save their payloads for the next spawn. How concerning is the self damage from Oppressive Gloom? On an armored character, the self damage is negligent and can be pretty much ignored. You get a huge self heal anyway. It tends to function more like a small hit to your overall Regen. It certainly won't kill you on its own.
-
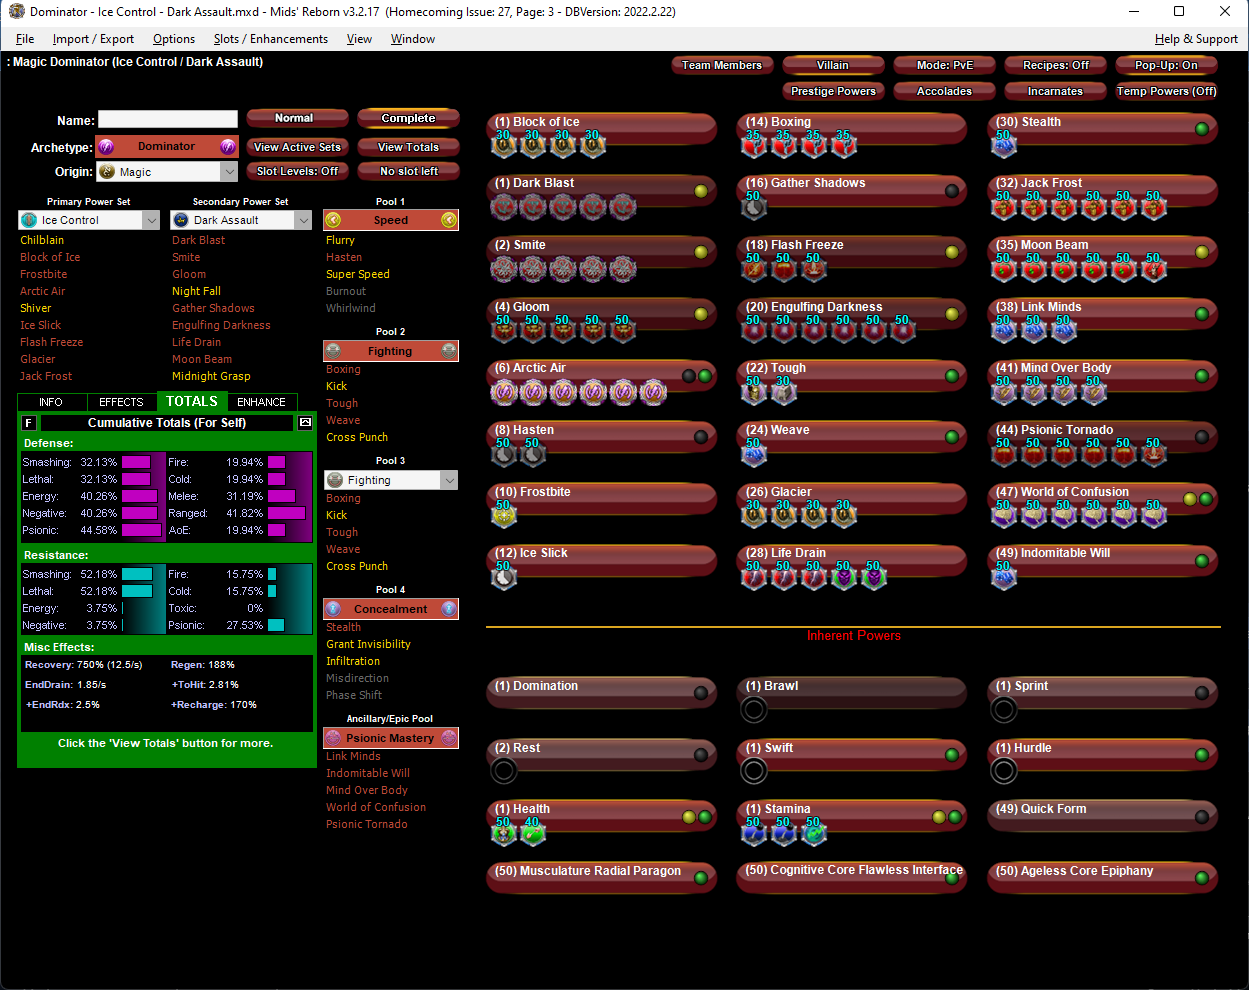
Sure thing The build is a little strange, because I was also testing to see how well the Dom ATO would proc in Arctic Air against big groups. It actually tended to stay at at least 2 stacks a lot of the time. I also didn't run the full gamut of Incarnate abilities I could have. I didn't run Interface, Judgment or Hybrid at all. Adding those in would probably make a big difference. \\\\ This Villain build was built using Mids Reborn 3.2.17 https://github.com/LoadedCamel/MidsReborn Click this DataLink to open the build! Level 50 Magic Dominator Primary Power Set: Ice Control Secondary Power Set: Dark Assault Power Pool: Speed Power Pool: Fighting Power Pool: Concealment Ancillary Pool: Psionic Mastery Villain Profile: Level 1: Block of Ice -- BslGaz-Acc/Hold(A), BslGaz-Acc/Rchg(3), BslGaz-Rchg/Hold(3), BslGaz-EndRdx/Rchg/Hold(5) Level 1: Dark Blast -- SprWntBit-Rchg/SlowProc(A), SprWntBit-Dmg/EndRdx/Acc/Rchg(5), SprWntBit-Acc/Dmg/Rchg(7), SprWntBit-Acc/Dmg/EndRdx(7), SprWntBit-Dmg/Rchg(9) Level 2: Smite -- SprBlsCol-Rchg/HoldProc(A), SprBlsCol-Dmg/EndRdx/Acc/Rchg(13), SprBlsCol-Acc/Dmg/Rchg(13), SprBlsCol-Acc/Dmg/EndRdx(15), SprBlsCol-Dmg/EndRdx(15) Level 4: Gloom -- Apc-Dam%(A), Apc-Dmg/EndRdx(17), Apc-Acc/Rchg(17), Apc-Acc/Dmg/Rchg(19), Apc-Dmg/Rchg(19) Level 6: Arctic Air -- SprAscoft-Rchg/+Dmg%(A), SprAscoft-Acc/Conf/Hold/Immob/Sleep/Stun/Fear/EndRdx/Rchg(21), SprAscoft-Acc/Conf/Hold/Immob/Sleep/Stun/Fear(21), SprAscoft-EndRdx/Rchg(23), SprAscoft-Conf/Hold/Immob/Sleep/Stun/Fear/Rchg(23), SprAscoft-Acc/Conf/Hold/Immob/Sleep/Stun/Fear/EndRdx(25) Level 8: Hasten -- RechRdx-I(A), RechRdx-I(25) Level 10: Frostbite -- Acc-I(A) Level 12: Ice Slick -- RechRdx-I(A) Level 14: Boxing -- KntCmb-Acc/Dmg(A), KntCmb-Dmg/EndRdx(27), KntCmb-Dmg/Rchg(27), KntCmb-Dmg/EndRdx/Rchg(29) Level 16: Gather Shadows -- RechRdx-I(A) Level 18: Flash Freeze -- Ann-ResDeb%(A), PstBls-Dam%(29), Bmbdmt-+FireDmg(31) Level 20: Engulfing Darkness -- Obl-%Dam(A), Obl-Acc/Dmg/EndRdx/Rchg(31), Obl-Dmg(31), Obl-Acc/Rchg(33), Obl-Dmg/Rchg(33), Obl-Acc/Dmg/Rchg(33) Level 22: Tough -- GldArm-3defTpProc(A), StdPrt-ResDam/Def+(34) Level 24: Weave -- LucoftheG-Def/Rchg+(A) Level 26: Glacier -- BslGaz-Acc/Hold(A), BslGaz-Acc/Rchg(34), BslGaz-Rchg/Hold(34), BslGaz-EndRdx/Rchg/Hold(36) Level 28: Life Drain -- Thn-Acc/Dmg(A), Thn-Dmg/Rchg(36), Thn-Acc/Dmg/EndRdx(36), TchoftheN-Heal(37), TchoftheN-Acc/Heal(37) Level 30: Stealth -- LucoftheG-Def/Rchg+(A) Level 32: Jack Frost -- ExpRnf-+Res(Pets)(A), ExpRnf-EndRdx/Dmg/Rchg(37), ExpRnf-Acc/Rchg(39), ExpRnf-Acc/Dmg(39), ExpRnf-Dmg/EndRdx(39), ExpRnf-Acc/Dmg/Rchg(40) Level 35: Moon Beam -- StnoftheM-Dam%(A), StnoftheM-Dmg/EndRdx/Rchg(40), StnoftheM-Dmg/ActRdx/Rchg(40), StnoftheM-Acc/Dmg(42), StnoftheM-Dmg/EndRdx(42), GldJvl-Dam%(42) Level 38: Link Minds -- LucoftheG-Def/Rchg+(A), LucoftheG-Def/Rchg(43), LucoftheG-Def(50) Level 41: Mind Over Body -- UnbGrd-Max HP%(A), UnbGrd-ResDam/EndRdx/Rchg(43), UnbGrd-ResDam(43), UnbGrd-ResDam/EndRdx(45) Level 44: Psionic Tornado -- PstBls-Dam%(A), PstBls-Acc/Dmg/EndRdx(45), PstBls-Dmg/Rchg(45), PstBls-Dmg/EndRdx(46), PstBls-Acc/Dmg(46), Bmbdmt-+FireDmg(46) Level 47: World of Confusion -- CrcPrs-Conf%(A), CrcPrs-Conf/EndRdx(48), CrcPrs-Conf(48), CrcPrs-Conf/Rchg(48), CrcPrs-Acc/Conf/Rchg(50), CrcPrs-Acc/Rchg(50) Level 49: Indomitable Will -- LucoftheG-Def/Rchg+(A) Level 1: Domination Level 1: Brawl -- Empty(A) Level 1: Sprint -- Empty(A) Level 2: Rest -- Empty(A) Level 1: Swift -- Empty(A) Level 1: Hurdle -- Empty(A) Level 1: Health -- Pnc-Heal/+End(A), Mrc-Rcvry+(9) Level 1: Stamina -- PrfShf-End%(A), PrfShf-EndMod(11), PwrTrns-+Heal(11) Level 49: Quick Form Level 50: Musculature Radial Paragon Level 50: Cognitive Core Flawless Interface Level 50: Ageless Core Epiphany ------------ | Copy & Paste this data into Mids Reborn : Hero Designer to view the build | |-------------------------------------------------------------------| |MxDz;1442;677;1354;HEX;| |78DA6594594F135114C7EF4C67040A152B60D95AECC2224BA1266ADC120D9504A54| |99557B58EB5D489B5259D6AE463881A9E8CF1D1ED498DB87D060DA27E049F140444| |88CB783AFF73A1864926BFB96799F33FF79E99C48D78DDC4C4C831A1D40FE70CCB4| |AC50B57CDBC512A14F5849135D32E415715DDFE0D476AB8902F150BB9E8683A239F| |039BDEE396655CCB95A271A378452E843B59A084F1C94CE692C7791C31B3974B663| |EFBFFCAEBAC46F3D74DCBBC68E6CCD254C78949331D4D5A66216FA65309C32A658A| |5310992D976B266961BAF795852A65B1C276897995046B42FDC8FC046A9FC1259F9| |097AD89279A1031723E06B73D623E04AB1F80CB3E598092943B30D6DD66DE02B74F| |336F822B94E49249AE98EA18770C3107C19D51E60078803274C5A965EBFA5B97636| |C7CC39C0577BD62BE049B5F83A12A9C573959A9EA137032F7534C0DEF92A86985F1| |20196BA5B19623157A8747EEA727490869A2F534F30CD83E0EAE5297F55C53D4F31| |B0ED16BBD6C54BD5FA0AE7D16CE80AA3BFC49990D1CA4370804056CEC43E017B8FB| |37F30FF32FE8228D4DAC5169DA8BE4A04FC15993D327BBF295C3C87998625A64572| |D3C25419E92204F4998A7648DB4B571B0D67617C2C3F798F7C14803CA469A400F95| |F5CBB27E2E7B847C1D6CD43B56A03EB20C762D301799DFC1EE25709D64846472681| |E65BB3F30E7C03DEF98EF99FD3C0D74029D9CAC76B29C5E2F186B042314D42377A5| |671D99BD6BCC15B0FF07D845C17D8287B38F8FB3FF05F33938F08CF994C9C7DD49C| |951D94BD440838317986799E7C0D879660A0C53F290DCDA21EE85A66FE353B6DB2B| |16E5B56D8BB1ADA6A4B6F9210BC5317D756FFE3D38EADB56D34285491141EC47F54| |9B2746B62B1C2A98A1948764F3357F13B38D54B2D48B56334F831CEB08FFA2A1633| |959E7FD36DE42D| |-------------------------------------------------------------------|
-
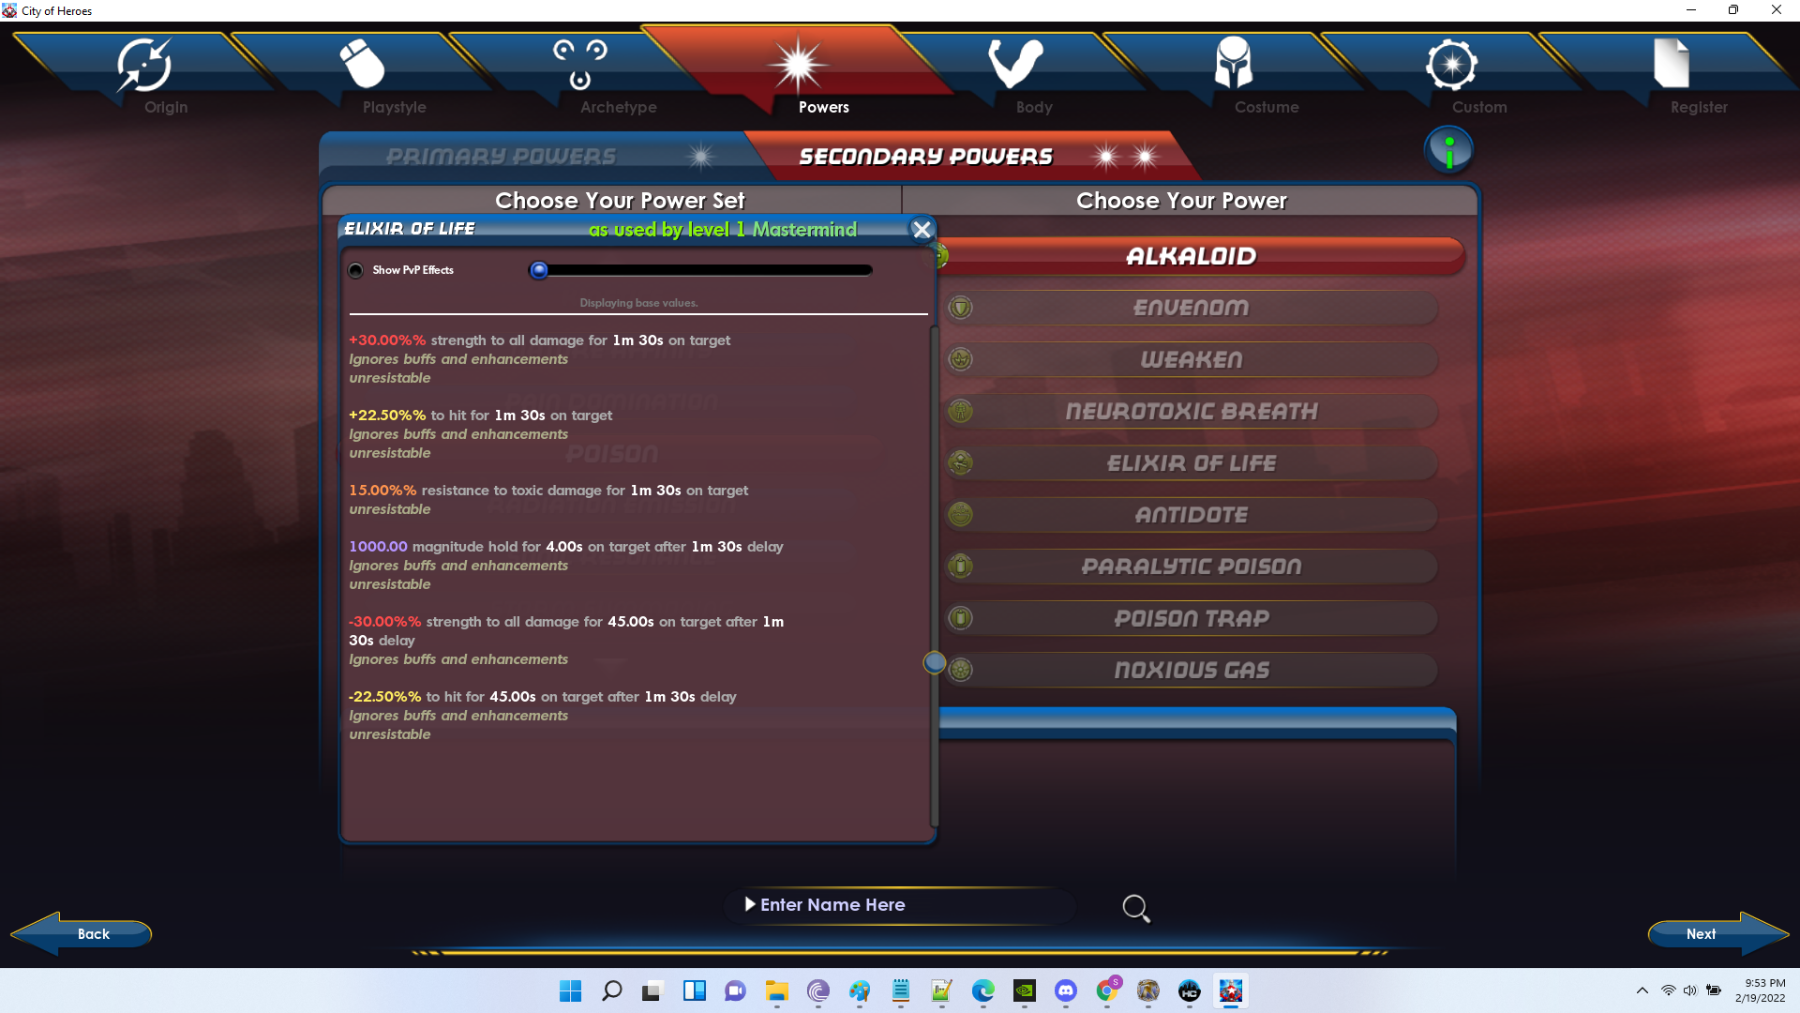
Since of Elixir of Life already has a debuff built into it, it might be on-theme to allow players to use it against enemies. These debuff effects are very debilitating. I don't cast the Poison rezz on allies. An inspiration is probably better. Is there an enemy in game that can hit you with a -30% unresistable -ToHit debuff that lasts 45 seconds? Thanks, "teammate." 😄
-
 I know you are committed by theme to Fire, and we just chatted in the other thread about a comparison to Plant/Fire Dominators. If your theme is open to interpreting Kinetics as "fire energy" or something similar, I can tell you for sure Plant/Kinetics is designed to do exactly what you're hoping to do here, which is build a proc-based Plant monstrosity. I do like Plant/Thermal for a few reasons, mainly as a strong support character. Plant/Kin though may be the proc monster you're looking for, if a meat grinder made of thorns and vines is your speed.
 -
Something to keep in mind is that powers like OG and Cloak of Fear do more than just protect you, they fall into the realm of control powers similar to what a Controller or Dominator would bring. Whether that's valuable to you probably depends on how you view your role. As a player who primarily plays squishies, I will always appreciate Dark Armor tanks who take Oppressive Gloom and Cloak of Fear, because they protect me. -ToHit applies to the mobs AoE attacks, and Stun/Fear disable attacks that might otherwise come my way. Even a Mag 2 stun will shut down a Malta Sapper, and by stacking stuns you can even take care of annoying bosses like Fake Nemesis before they can jump into their PFF super bubbles.
-
Hi there, thanks for sharing your build. So that this post isn't a million lines of text I'm going to concentrate just on the suggestions and not places where the slotting is done well. Hope this is helpful. 🙂 In general You're off to a good start. Two things stick out: The build is expensive, but you don't actually have permadom. You'll need to grab about +12 extra recharge somewhere to be comfortably there. Alternatively, you can just rely on the +20% bonus from the base bonus menu, which will get you there. Fire/Earth is very heavy on endurance consumption. You're going to want end redux everywhere you can get it or plan to rely on alternative means of recovery. Char This power has an unusually short animation time, much faster than the Holds most other Control sets get. For this reason, it is popular to load up this power with damage procs. A sufficiently loaded Char does significant damage, on par with or better than your Assault set powers. The second most popular slotting option for Holds is x4 Basilisk's Gaze, for the combo of +Recharge and +Ranged defense. I probably wouldn't do that with Fire Control, because the proc option is so delicious, but it's an option if you happen to have the sets or have a specialist role in mind. Fire Cages This power also has a very fast animation time. It's less open to proccing, but they aren't bad to have. I recommend putting x5 Positron's Blast here, so that you get damage and a damage proc in the set. This will also provide +6.25% recharge. Seismic Smash This is another proccable power. I am not an expert on slotting it. If you look around the forums you may find some examples. When tricked out it hits incredibly hard. Bonfire I usually just use 2 slots here. x1 Force Feedback Chance for +100% recharge, and x1 Overwhelming Force KB to KD. The power is autohit, so any Accuracy in it is wasted. If you do enhance it, increase End Redux, Damage, or Recharge, ignore Accuracy. Hot Feet This is a damage aura, and one of your key powers. It should be enhanced for Damage, End Redux and Accuracy. Procs don't help much in auras. If you can afford it, I tend to go with x5 Superior Avalanche. Warning: This power will drain a ton of endurance on a build that is already very endurance heavy. You're going to want to offset the end redux as much as possible. Mud Pots See comments above about Hot Feet, Mud Pots is a damage aura. If you take it (and you probably should given its overlap with Hot Feet) make sure you enhance it for Damage, End Redux, and Accuracy. Procs don't help very much in auras. Sleet and the Ice Pool in General As strong as Sleet is, unless you are already at end game Incarnate strength where you have Destiny Ageless refilling your blue bar, I think you're going to be happier starting out with an APP that provides some endurance relief. IMO the best option is the Mu pool, for the power Power Sink. Power Sink will refill your bar on demand. It also will crash an enemy's endurance bar, and altho that won't help you out too much solo, you do have Power Up, and the combo of Power Up and Power Sink will drop a same level enemy's bar by 90%, s your Electric Blast friends will appreciate your contribution. Later on, once you've reached incarnate level strength you can reevaluate and see if the Mu Pool still makes sense for you. AoE Blast I noticed you skipped Ice Storm. I would recommend whichever APP you pick, you take the AoE blast. Unlike a lot of other classes, Dominators derive much of their AoE potential from their APP powers. The only AoE I generally skip is the one in Leviathan (because its slow and Water Spout is good on its own).
-
That's a noble goal. I think grabbing damage is important, and to an extent your plan will work. I think what you'll also find is that Controls that aren't backed by Defense can hem you in and actually lower your kill rate. Most Dominators reach a point during battle when it makes sense to abandon the current pack of enemies and head toward the next one while a few are still alive. Melee characters do this all the time without thinking about it. That's the moment you probably want Defenses for, so you don't get stuck having to finish off every member of a pack or expend a valuable control power before proceeding. Dominators don't have a lot of healing, regen, or debuff to fall back on. They have control powers, and decent modifiers. Other than that they are one of the most vulnerable classes in the game. Even the best permadoms with lots of Defense tend to die with frequency just because of lucky rolls from enemies. Even if you decide not to go for full cap, I think at least reaching a threshold around 32.5 defense to Ranged is helpful. If you happen to take an APP that has a Slash/Lethal armor, hitting at least those values for that armor is helpful too. Remember, dying on a Dominator sucks. You can't just get back up and start blasting again. You have to rebuild the Dom bar to try to achieve momentum again. In some difficult content you can even find yourself locked out of Domination for long periods while you try to regain your footing. I do think your character will be fun to play either way. Best of luck on your journey.
-
Time manipulation plus Radiation Blast or Water Blast
oedipus_tex replied to Nihil's topic in Archetypes
From a strict powergaming perspective, I'd go with Water, mainly for the ranged nuke. I can't prove it with any actual statistics, but I would bet money the effective damage of that nuke outstrips most others just because of how accessible it is. Water is a top tier set on every archetype that has it. Radiation is fine if you enjoy that play experience or it fits your theme. There are ways that play to its strengths too. -
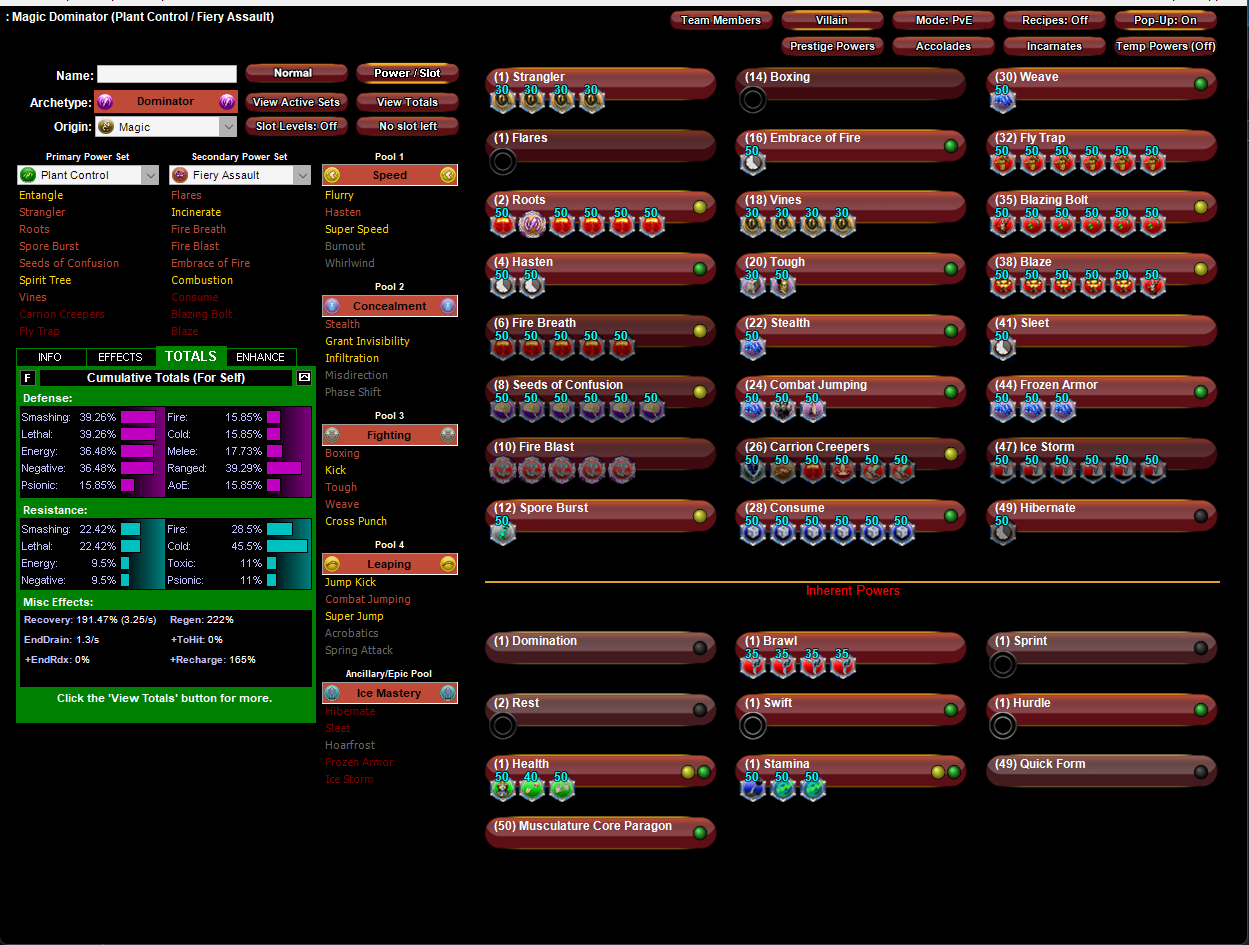
Plant/Fire is one of the most classic high damage Dominator combos. The comparable Controller set, Thermal, is a support set that provides healing and buffs/debuffs, but not a lot of damage. Based on what you're looking for, you'll probably be happiest with Plant/Fire Dominator. I didnt have a chance to look through your build closely, but I notice there's a lot of opportunity for improved Defense. Here's a generic Plant/Fire Dom build you can reference for comparison that would give you capped Slash Lethal and Ranged defense when comboed with low ebbs of Destiny Barrier. I don't think its perfect, but may help you with ideas. I'm unsure this is the current optimal slotting for Carrion Creepers and a few other powers, but I think this is close. The Dominator +damage ato proc here is in Roots, which assumes an AoE focused approach. Roots is an excellent AoE blast in its own right and worth spamming. This Villain build was built using Mids Reborn 3.2.17 https://github.com/LoadedCamel/MidsReborn Click this DataLink to open the build! Level 50 Magic Dominator Primary Power Set: Plant Control Secondary Power Set: Fiery Assault Power Pool: Speed Power Pool: Concealment Power Pool: Fighting Power Pool: Leaping Ancillary Pool: Ice Mastery Villain Profile: Level 1: Strangler -- BslGaz-Acc/Hold(A), BslGaz-Acc/Rchg(3), BslGaz-Rchg/Hold(5), BslGaz-EndRdx/Rchg/Hold(5) Level 1: Flares -- Empty(A) Level 2: Roots -- PstBls-Dam%(A), SprAscoft-Rchg/+Dmg%(7), PstBls-Acc/Dmg/EndRdx(23), PstBls-Acc/Dmg(23), PstBls-Dmg/Rchg(25), PstBls-Dmg/EndRdx(25) Level 4: Hasten -- RechRdx-I(A), RechRdx-I(9) Level 6: Fire Breath -- PstBls-Dam%(A), PstBls-Acc/Dmg/EndRdx(13), PstBls-Acc/Dmg(15), PstBls-Dmg/EndRdx(15), PstBls-Dmg/Rng(17) Level 8: Seeds of Confusion -- CrcPrs-Conf%(A), CrcPrs-Conf/EndRdx(9), CrcPrs-Acc/Rchg(11), CrcPrs-Acc/Conf/Rchg(11), CrcPrs-Conf/Rchg(17), CrcPrs-Conf(46) Level 10: Fire Blast -- SprWntBit-Acc/Dmg(A), SprWntBit-Dmg/Rchg(27), SprWntBit-Acc/Dmg/EndRdx(34), SprWntBit-Acc/Dmg/Rchg(37), SprWntBit-Dmg/EndRdx/Acc/Rchg(39) Level 12: Spore Burst -- CaloftheS-Heal%(A) Level 14: Boxing -- Empty(A) Level 16: Embrace of Fire -- RechRdx-I(A) Level 18: Vines -- BslGaz-Acc/Hold(A), BslGaz-Acc/Rchg(19), BslGaz-Rchg/Hold(19), BslGaz-EndRdx/Rchg/Hold(21) Level 20: Tough -- StdPrt-ResDam/Def+(A), GldArm-3defTpProc(21) Level 22: Stealth -- LucoftheG-Def/Rchg+(A) Level 24: Combat Jumping -- LucoftheG-Def/Rchg+(A), ShlWal-ResDam/Re TP(42), Rct-ResDam%(42) Level 26: Carrion Creepers -- IceMisTrmt-+ColdDmg(A), TraoftheH-Dam%(27), PstBls-Dam%(43), Bmbdmt-+FireDmg(46), Rgn-Acc/Rchg(46), Rgn-Acc/Dmg/Rchg(50) Level 28: Consume -- PreOptmz-Acc/Rech(A), PreOptmz-EndMod/End(29), PreOptmz-EndMod/Rech(29), PreOptmz-EndMod/Acc/End(31), PreOptmz-EndMod/Acc/Rech(31), PreOptmz-EndMod/End/Rech(31) Level 30: Weave -- LucoftheG-Def/Rchg+(A) Level 32: Fly Trap -- ExpRnf-+Res(Pets)(A), ExpRnf-EndRdx/Dmg/Rchg(33), ExpRnf-Acc/Dmg/Rchg(33), ExpRnf-Dmg/EndRdx(33), ExpRnf-Acc/Dmg(34), ExpRnf-Acc/Rchg(34) Level 35: Blazing Bolt -- GldJvl-Dam%(A), StnoftheM-Dam%(36), StnoftheM-Dmg/EndRdx/Rchg(36), StnoftheM-Acc/Dmg(36), StnoftheM-Dmg/EndRdx(37), StnoftheM-Dmg/ActRdx/Rchg(37) Level 38: Blaze -- Apc-Dam%(A), Apc-Dmg/EndRdx(39), Apc-Acc/Rchg(39), Apc-Acc/Dmg/Rchg(40), Apc-Dmg/Rchg(40), GldJvl-Dam%(40) Level 41: Sleet -- RechRdx-I(A) Level 44: Frozen Armor -- LucoftheG-Def/Rchg+(A), LucoftheG-Def(45), LucoftheG-Def/EndRdx(45) Level 47: Ice Storm -- Artl-End/Rech/Rng(A), Artl-Acc/Rech/Rng(48), Artl-Acc/Dam/Rech(48), Artl-Dam/Rech(48), Artl-Dam/End(50), Artl-Acc/Dam(50) Level 49: Hibernate -- RechRdx-I(A) Level 1: Domination Level 1: Brawl -- KntCmb-Acc/Dmg(A), KntCmb-Dmg/EndRdx/Rchg(42), KntCmb-Dmg/EndRdx(43), KntCmb-Dmg/Rchg(43) Level 1: Sprint -- Empty(A) Level 2: Rest -- Empty(A) Level 1: Swift -- Empty(A) Level 1: Hurdle -- Empty(A) Level 1: Health -- Pnc-Heal/+End(A), Mrc-Rcvry+(7), NmnCnv-Regen/Rcvry+(45) Level 1: Stamina -- PrfShf-End%(A), PwrTrns-+Heal(3), PwrTrns-EndMod(13) Level 49: Quick Form Level 50: Musculature Core Paragon ------------ | Copy & Paste this data into Mids Reborn : Hero Designer to view the build | |-------------------------------------------------------------------| |MxDz;1411;656;1312;HEX;| |78DA65935B5352511886D73E79E4202AA2021978164168EABE46A354682867BAAA6| |867687B8680815D93BFA48BFE40A7BB8E37FD80AE6ACAEA579494959A36F4B9DF6F| |898D7B601ED6BBD6777A593B7B6FCEB5B2923E2D14EF6CD1ACD5F273E5DB56C9B4C| |B55236BAE5ACB9AA0A795BE43071BF9D972C9AE968B895CD12CD9727568FF4CAD66| |DE29DA89B455A8AEC995E8C8952966A95228DCF4393FE74B77AD9A75C32A5AF69AD| |B51D2D6EA2DDB2AADBA9C55A66056683178B6622D27E6970BF9AC59B3F7331E54EA| |A7BE22F43DB7DFA5B2DFA96868625D1522AC0BF513A87F667E017FA9423E0DFAD02| |3CE53BCC2F186F29A90D245CB1BCD61DF2BACFB9E81FD2F98CFC128B9A371B0A2C5| |20B631B7A898C1C5748333BB38A387337A3853D74B704183E54E3BADA68A8CD7C18| |E3CF31AD875158C5F01B709EDB262FB43DD11071F8191C7E0C81370EC29384F153B| |7906D1F9567144857A704BA3DC8E513B94DC2BCF7979C60C05FBA4FB3E76BF9BDDE| |F66F77BD97D8D92F648B77A020A364FC06A376DFA657ABF1F6DF4911860510DB038| |B98888C94D304B1890960D780C4CFD0087A7D8F7B80A3D7E0A56A54E82BB84A0E25| |CA08611DC8225A16DE60E78EC0F7397B907EAD45E58F61CE6F62E503B43F2420DFD| |4499E39BCC1FCCEF60A4CEDC00F70851191C9DC680C3EB9861F823F31D38F29EF90| |1FC4BC1A3327834858C6349E60C389E60C6995CA4DF27C4849C6582FFDE208931E9| |7F8C079CEE657681213A9490FE27DAE0F34C2BB3856980299DA98103149C94172DC| |965A37AF3356D84F4C32F788E40DB934BE0D445E62530A31F79C173BA0C274971A4| |AF1DCD947CEADB5169E390A48A086C6A5920659C86BF8CE1EBFF1DBA0F4FD5DFB81| |FAE3AB838D51CB2B1D8431A4734FE0107E1DC77| |-------------------------------------------------------------------|
-
That's a holdover from playing sapper builds. I actually had to go reread one of my old posts to remember how I did it. The commands aren't in the Options windows, instead type: /optionset ShowVillainName 1 /optionset ShowVillainBars 1 Turning those bars on is especially useful for Electric builds because it lets you visualize how much endurance enemies have remaining. You can read the rest of that old post (a bit outdated now, but still mostly relevant I hope) here:
-
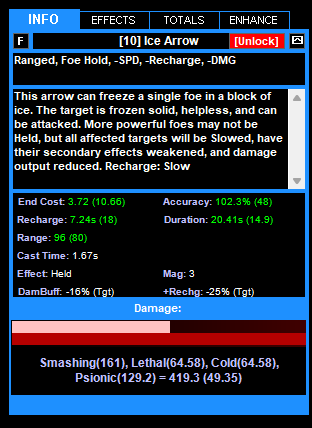
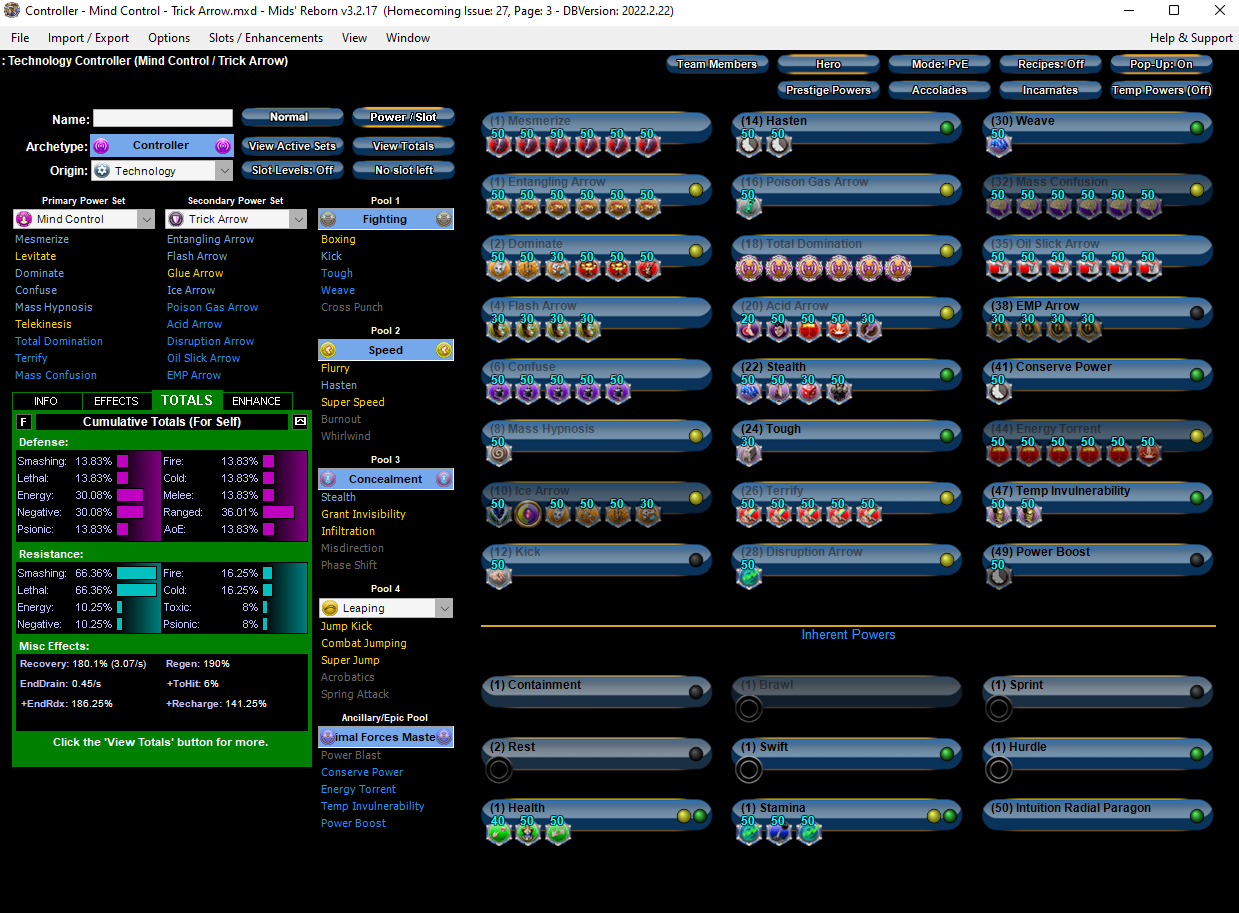
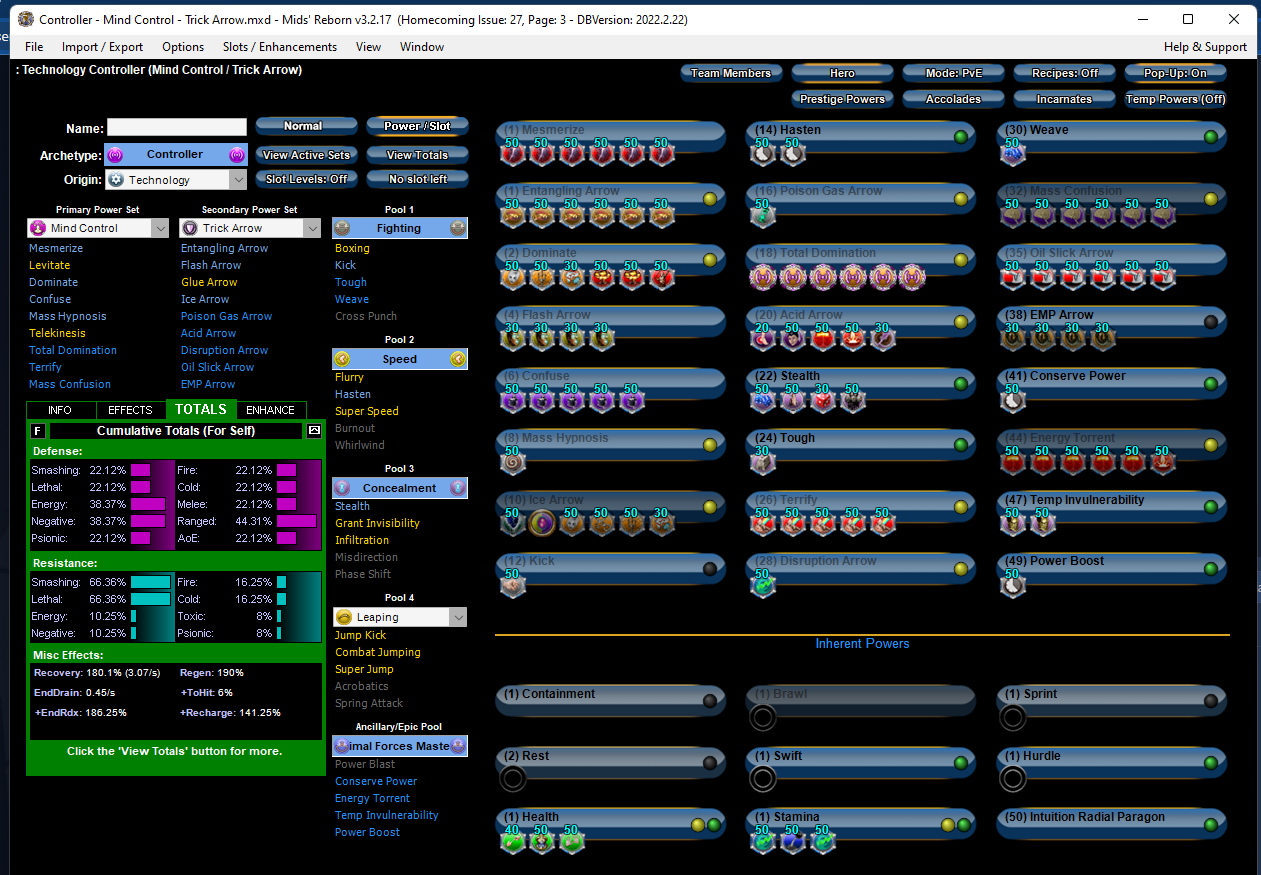
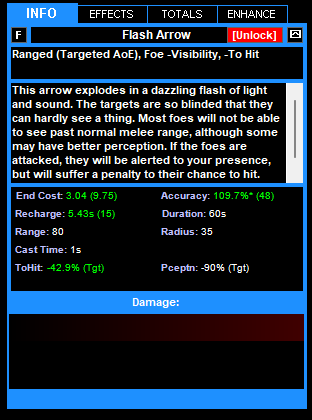
Trick Arrow is super tight. The one power I tend to sacrifice is Glue Arrow. Though It's a fine power leveling up, Oil Slick Arrow also has -Run Speed so on most Controllers I find it losing value over time in the competition for all the clicks Trick Arrow has. I hope you don't mind that I wanted to offer you some alternatives to consider. TA and Mind Control are both sets that benefit a lot from Power Boost, so I wanted to see how that could factor in. This is what I posited to show some comparisons. The screenshots below show values in and out of the Power Boost window. EDIT: Just looked at this build again and realized I accidentally dropped kb protection when editing it. So that would probably need to be fixed in the final build. Also, here is Flash Arrow with Power Boost. Against same level enemies, your team and all pets are capped to everything. Against +3s its a 27 point defense bonus. Against +3 AVs, who resist about half, its a about a 13.5% Defense boost. If you should get ambushed and aren't fast enough to fire a Flash Arrow into the group, you can hit Power Boost and be soft capped to Ranged defense for 15 seconds while you plan your next move. Also, since you are hitting Power Boost with every alpha breaker, you're further protected against mob retaliation, allowing you fire powers indiscriminately into enemy packs. If all that fails you still have 66% Slash/Lethal resist. During AV fights where you are within an EMP arrow field, you add 11.5% resist to that, which brings you to 77.5% resist, a bit over the resistance cap of 75% for trollers. That will probably keep you alive longer than just capped S/L defense. Anyway just some options for you to consider. Thanks for sharing your build and your design process. It sounds like your character will be a lot of fun. This Hero build was built using Mids Reborn 3.2.17 https://github.com/LoadedCamel/MidsReborn Click this DataLink to open the build! Level 50 Technology Controller Primary Power Set: Mind Control Secondary Power Set: Trick Arrow Power Pool: Fighting Power Pool: Speed Power Pool: Concealment Ancillary Pool: Primal Forces Mastery Hero Profile: Level 1: Mesmerize -- Thn-Acc/Dmg(A), Thn-Dmg/EndRdx/Rchg(3), Thn-Dmg/EndRdx(3), Thn-Acc/Dmg/EndRdx(5), Thn-Dmg/Rchg(5), Thn-Acc/Dmg/Rchg(7) Level 1: Entangling Arrow -- TraoftheH-Acc/Rchg(A), TraoftheH-EndRdx/Immob(7), TraoftheH-Acc/EndRdx(9), TraoftheH-Acc/Immob/Rchg(9), TraoftheH-Dam%(11), TraoftheH-Immob/Acc(11) Level 2: Dominate -- GhsWdwEmb-Dam%(A), GldNet-Dam%(17), NrnSht-Dam%(17), Apc-Dam%(19), Apc-Dmg(19), GldJvl-Dam%(21) Level 4: Flash Arrow -- CldSns-ToHitDeb(A), CldSns-ToHitDeb/EndRdx/Rchg(21), CldSns-Acc/ToHitDeb(23), CldSns-Acc/EndRdx/Rchg(23) Level 6: Confuse -- MlsIll-Acc/Rchg(A), MlsIll-EndRdx/Conf(25), MlsIll-Acc/EndRdx(25), MlsIll-Conf/Rng(27), MlsIll-Acc/Conf/Rchg(27) Level 8: Mass Hypnosis -- FrtHyp-Plct%(A) Level 10: Ice Arrow -- IceMisTrmt-+ColdDmg(A), HO:Endo(29), GhsWdwEmb-Dam%(29), UnbCns-Dam%(31), GldNet-Dam%(31), NrnSht-Dam%(31) Level 12: Kick -- FrcFdb-Rechg%(A) Level 14: Hasten -- RechRdx-I(A), RechRdx-I(33) Level 16: Poison Gas Arrow -- CaloftheS-Heal%(A) Level 18: Total Domination -- SprWiloft-Rchg/Dmg%(A), SprWiloft-Acc/Conf/Hold/Immob/Sleep/Stun/Fear/EndRdx/Rchg(33), SprWiloft-Acc/Conf/Hold/Immob/Sleep/Stun/Fear(33), SprWiloft-Conf/Hold/Immob/Sleep/Stun/Fear/Rchg(34), SprWiloft-EndRdx/Rchg(34), SprWiloft-Acc/Conf/Hold/Immob/Sleep/Stun/Fear/EndRdx(34) Level 20: Acid Arrow -- AchHee-ResDeb%(A), TchofLadG-%Dam(36), PstBls-Dam%(36), Bmbdmt-+FireDmg(36), ShlBrk-%Dam(37) Level 22: Stealth -- LucoftheG-Def/Rchg+(A), Rct-ResDam%(37), Ksm-ToHit+(37), ShlWal-ResDam/Re TP(39) Level 24: Tough -- StdPrt-ResDam/Def+(A) Level 26: Terrify -- Rgn-Knock%(A), Rgn-Dmg/EndRdx(39), Rgn-Acc/Rchg(39), Rgn-Acc/Dmg/Rchg(40), Rgn-Dmg/Rchg(40) Level 28: Disruption Arrow -- PwrTrns-+Heal(A) Level 30: Weave -- LucoftheG-Def/Rchg+(A) Level 32: Mass Confusion -- CrcPrs-Conf%(A), CrcPrs-Conf/EndRdx(40), CrcPrs-Conf(42), CrcPrs-Conf/Rchg(42), CrcPrs-Acc/Conf/Rchg(42), CrcPrs-Acc/Rchg(43) Level 35: Oil Slick Arrow -- Artl-End/Rech/Rng(A), Artl-Acc/Rech/Rng(43), Artl-Acc/Dam(43), Artl-Dam/End(45), Artl-Dam/Rech(45), Artl-Acc/Dam/Rech(45) Level 38: EMP Arrow -- BslGaz-Acc/Hold(A), BslGaz-Acc/Rchg(46), BslGaz-Rchg/Hold(46), BslGaz-EndRdx/Rchg/Hold(46) Level 41: Conserve Power -- RechRdx-I(A) Level 44: Energy Torrent -- PstBls-Dam%(A), PstBls-Acc/Dmg/EndRdx(48), PstBls-Dmg/Rng(48), PstBls-Dmg/EndRdx(48), PstBls-Acc/Dmg(50), Bmbdmt-+FireDmg(50) Level 47: Temp Invulnerability -- GldArm-3defTpProc(A), GldArm-ResDam(50) Level 49: Power Boost -- RechRdx-I(A) Level 1: Brawl -- Empty(A) Level 1: Containment Level 1: Sprint -- Empty(A) Level 2: Rest -- Empty(A) Level 1: Swift -- Empty(A) Level 1: Health -- Mrc-Rcvry+(A), Pnc-Heal/+End(13), NmnCnv-Regen/Rcvry+(13) Level 1: Hurdle -- Empty(A) Level 1: Stamina -- PwrTrns-+Heal(A), PrfShf-End%(15), PwrTrns-EndMod(15) Level 50: Intuition Radial Paragon ------------ | Copy & Paste this data into Mids Reborn : Hero Designer to view the build | |-------------------------------------------------------------------| |MxDz;1412;683;1366;HEX;| |78DA6593594F135114C7EF74A6144ACB56B0EC4B5B16010B75C157152141212191F| |8E2526B99C2C4D269A665A9EF7E057189EB83221835D1A0AF3E9A884F2E1F40A34F| |2A01E5CDD4C3FCCF6509379DFEE69E7BCE3DFF73CF9D91B9939E4462F09850CAFA9| |3B14C26DA6FA6B296994CEA967B4C8F4FA6CCA43991139BC3454FD3F6B2F40C8F18| |A97139A9DBB17E623A91088F5946FC4AF4B86599B3C23B6A92FBA03131993552136| |E7B7626ADEBE3E5F6EB506AC6C818978DA491CD796CCBB01E4B9367ED40DA888747| |2D632A968C0E9A565CCF44476299AC6EE5AA4953809E0585FE145B66DE29EE10229| |A703C64DE05B507CC7B60C17DD0DA157C5DC1E23C587883790B74DF66DE0417098A| |0C56A6602C1B50C118CD1B34511171D8F38A6EB0B21BEB195A56395855BF3A6CE7C| |AEFE0BE6FCC1FE012393AD95973AE2153F53AF30F58FB97B9013E25B83848B8CE21| |FD34198A046B2E2A71DAC6FA3E9A6AAAA8E71A1A87E0DCC8B534722D0EBA07C5A83| |82F8AAFC12940462FA751BC5D38D766E60C2D944A0DA5EFB0FD3342B93CB7F225E4| |685E643E025B1E3317984FC0590AF4C9A3F0BD250D3E4D0457A025F80669830E141| |62A506DE15ED258250FBBAA0A3242EBD831F44FD84E6DA73157C9D92F35FBFD28FD| |39A146A6AD398A746D7DCC2360FB61E621708E02EAE44E751B1AAE206DDF208D0DA| |CE505A149B6A529C6DB5C02F79F675E605E043BA3608E8203F23C038528BDD3C554| |C16E8DE96416805729B09533ABAD1F71DF0E7C627E667E01DFD3097548ED1DDCE33| |58F105D527B1777A0E7357399F90A8CBC6472875668C7B0BC3DE183E840A407FC40| |E895E97A395DBD26E4C8D38FC6A6B22D537E78EFFAA8263F723229B6E9A77BFBC36| |7AFDF3B4C0E718ADEDA35E1698114CF5934EAD7DEB8D55D71DCE59279F4A66415F3| |FCD6D0FC6460F7FC7F5F0AE059| |-------------------------------------------------------------------|
-
Who's good at estimating DPS? Or, the curious case of Fire/Fire
oedipus_tex replied to oedipus_tex's topic in Dominator
FWIW I find Ice Assault on the okay but bland side. Power Up is probably the best feature of the set IMO. Note that Power Up on other servers is Power Boost, the damage was added for Homecoming, and the +special durations cut by 5 seconds. TBH I prefer the original Power Boost, but Power Up is nice too. Chilling Embrace is at least better on Homecoming than on live or other servers, where it is legendary for being hands down one of the worst powers in the game's history. (The Jack Frost pet still has this version of Chilling Embrace, a 8ft or so -RunSpeed and -Recharge aura). I like what Homecoming did with it, even if overall I still find it drains a lot of endurance, and endurance is something few Dominators can spare. It's basically Hot Feet-lite, which isn't bad to have. Unfortunately, prior to incarnate levels, few builds can sustain that level of endurance drain while still running enough armor toggles to make a 15ft damage aura toggle worthwhile. I do wish Ice Assault had either at least one hold or some version of Ice Patch in its set. It doesn't feel particularly "icy" to me. In the past I've suggested that Power Up drop an Ice Patch under the caster. Wouldn't do much for the sets atrocious endurance usage, but would make it more fun. -
Nice build. Big picture, I'd start by swapping out Scorpion Shield for something with a Resist armor. Flash Arrow is already going to make you capped to enemy attacks most of the time. Extra Defense beyond that point can be helpful against -Defense attacks, but overall you'll probably be happier with a Resist armor. You also didn't take any of the APP AoE blasts, which leaves some of your potential on the table. Doesn't really matter which one you take, most of them are pretty solid. I'd take Total Domination over Telekinesis. It's your only hard AoE control besides Mass Confusion, which has a very long recharge. Plus, its your only source of AoE Containment. Note that pairing Total Domination with Power Boost from the APPs can help you extend how long enemies are Contained and increase damage potential. Power Boost will also multiply the -ToHit in Flash Arrow, plus Energy Torrent will light an oil slick. While its not critical, I tend to like knockdown powers like Energy Torrent or Psionic Tornado for Mind Control because enemies who are Knocked lose their chance to fire back at you if they are currently Terrified. They'll fall over and when they stand back up go back into the "cower" animation without being able to shoot back. For this same reason, putting the purple Knockdown damage proc in Terrify can help you mitigate some of the return fire you get. The latest build of the game turned Mass Hypnosis into an autohit power. I'd one slot it with a Recharge IO, or else put procs in it. You probably want to max out the -ToHit in Flash Arrow, It's autohit in PVE, but there are still good set bonuses you can get with 4 slots for -ToHit powers. Keep in mind unlike most other ToHit debuffs in games, AVs only resist half of the debuff, so be sure to hit them with it for some extra Defense padding. Concept permitting, you may also want to explore whether dropping Punch/Tough/Weave in favor of the Sorcery pool for Arcane Bolt/Mystic Flight/Rune of Protection would better serve you. Between Rune of Protection and EMP Arrow you'd have a lot of resilience against getting mezzed, and by cycling between EMP Arrow and RoP actually have better overall Resistance a lot of the time. If you can afford to do it, I'd put a purple damage proc in Ice Arrow. I'd continue playing with damage procs in that power to ensure you're getting as much bang as you can. Adding a Kismet elsewhere in the build or else more sources of +ToHit/Accuracy can make it more likely to hit. Fully procced out it hits so hard you can work into your regular attack chain.
-
After I uploaded the last Ice video I decided it may not have been entirely fair, since it was one of the first test runs of a build. I've since refactored it, plus played a little better in the next video I captured. Switching to Destiny Ageless made a huge difference with the blue bar, plus allowed some key powers to recharge faster. I also got smarter about actually using the new Sleep. Overall, I was actually quite impressed. I think Ice/Dark is a particularly synergistic combo of course. The -ToHit and multipliers in Gather Shadows definitely helped carry me. Still this performed better than I imagined it would. Note, every tiime you see the word Domination appear when I'm not casting anything, its probably the new World of Confusion. It's actually really impressive, just hard to fit in a build. There's a really fun moment that comes around 2:40 that is exactly the kind of chaos I love so much in City of Heroes. So I may end up playing this guy more often.
-
I finally have a video of an end game Ice Dominator. This is actually from the test server. The build is Ice/Dark/Psi, partially built as a test to see if the new World of Confusion works well for Ice Control. I would still call Ice Control a step below other sets, but I did manage to complete a Council run at +4x8. You'll see the blue bar was a constant struggle, Arctic Air is just incredibly expensive. You'll also see me get mezzed early on and nearly die, always a hazard for Ice Control. I was kinda hoping all the -ToHit and the Defense from Barrier and Link Minds would help Jack Frost stick around for a while, but that didn't really happen. Still pretty fun though.
-
I think sometimes people think Neutron Bomb is slow because it looks so similar to Repulsion Bomb. Somehow Neutron Bomb has a 1.67 anim time and Repulsion Bomb has 3.07. Always wished Repulsion Bomb could get upgraded to the faster cast time.